
Dropdown lists in Excel usually are built from a range or from a variable list.

Dropdown list from Excel Range
Thus, building a dynamic dropdown list may include building a dynamic range, with undeclared end. Thus, let’s imagine that the end of the range is unknown and it should be used for the dropdown list.
Thus, once we know the start, the end could be found with the
LastRow function:
|
Function LastRow(wsName As String, Optional columnToCheck As Long = 1) As Long Dim ws As Worksheet Set ws = ThisWorkbook.Worksheets(wsName) LastRow = ws.Cells(ws.Rows.Count, columnToCheck).End(xlUp).Row End Function |
The rest is easy – we should know which range to consider for the validation. Passing the range looks like this
=C1:C5 and converted to a VBA formula, this looks like the following:
|
.Add Type:=xlValidateList, AlertStyle:=xlValidAlertStop, _ Operator:=xlBetween, Formula1:=«=» & ValidationRange.Address |
The whole code looks like this:
|
Sub ValidationRangeAddress() Dim wks As Worksheet: Set wks = Worksheets(1) Dim endRow As Long: endRow = LastRow(wks.Name, 3) Dim ValidationRange As Range Set ValidationRange = wks.Range(wks.Cells(1, 3), wks.Cells(endRow, 3)) With Worksheets(1).Cells(1, «A»).Validation .Delete .Add Type:=xlValidateList, AlertStyle:=xlValidAlertStop, _ Operator:=xlBetween, _ Formula1:=«=» & ValidationRange.Address End With End Sub |

Dropdown list from Named Range
Using named range for a source of a dropdown gives one huge advantage over using a normal range – if a new value is added to the range, the validation is automatically edited. Thus, we get quite dynamic range.

|
1 2 3 4 5 6 7 8 9 10 11 12 13 14 15 16 17 18 |
Sub ValidationNameRange() Dim wks As Worksheet: Set wks = Worksheets(1) Dim nameString As String Dim nameRange As Range nameString = «validator» Set nameRange = wks.Range(«C1:C5») ThisWorkbook.Names.Add Name:=nameString, RefersTo:=nameRange With Worksheets(1).Cells(1, «A»).validation .Delete .Add Type:=xlValidateList, AlertStyle:=xlValidAlertStop, _ Operator:=xlBetween, _ Formula1:=«=» & nameRange.Address End With End Sub |
Dropdown list from variable list
Using a range for a source for the dropdown in general has 1 drawback – we should write the range somewhere in Excel. And sometimes, when the Excel file becomes too large, it is not always handy to look for the “Settings” tab and try to edit it back. Thus, it is possible to write the range from a list, which is simply inserted through VBA. In the example below, there is a folder “QA” in the desktop, accessed through
Environ(«UserProfile») & «DesktopQA». In this folder, there are a few
*.xlsx files, which are converted through a dropdown. Without writing them to the Excel file.
|
1 2 3 4 5 6 7 8 9 10 11 12 13 14 15 16 17 18 19 20 21 22 23 24 25 |
Sub DropdownList() Dim filePath As String filePath = Environ(«UserProfile») & «DesktopQA» Dim fsoLibrary As Object: Set fsoLibrary = CreateObject(«Scripting.FileSystemObject») Dim fsoFolder As Object: Set fsoFolder = fsoLibrary.GetFolder(filePath) Dim fsoFile As Object Dim validationString As String For Each fsoFile In fsoFolder.Files If fsoFile Like «*.xlsx» Then validationString = validationString & fsoFile.Name & «, « End If Next fsoFile If validationString <> «» Then validationString = Left(validationString, Len(validationString) — 2) With Worksheets(1).Range(«A1»).Validation .Delete .Add Type:=xlValidateList, AlertStyle:=xlValidAlertStop, _ Operator:=xlBetween, Formula1:=validationString End With End If End Sub |
Thank you for reading! 🙂
Содержание
- VBA Drop Down List (Data Validation)
- Creating a Drop Down List Using VBA
- Populate a Drop Down List From a Named Range in VBA
- Removing the Drop Down List
- VBA Coding Made Easy
- VBA Code Examples Add-in
- Dynamic dropdown list in Excel VBA with variables
- Dropdown list from Excel Range
- Dropdown list from Named Range
- Dropdown list from variable list
- Creating a drop-down list in Excel using tools or macros
- Creating a drop-down list
- Drop-down list with data lookup in Excel
- Excel drop-down list with data from another sheet / file
- How to create dependent drop-down lists
- Selecting multiple values from a drop-down list in Excel
- Searchable drop-down list in Excel
VBA Drop Down List (Data Validation)
In this Article
This tutorial will demonstrate how to use Data Validation to work with drop-down lists in Excel using VBA.
Excel Data Validation allows you to limit what value(s) may be entered in a cell or range. You can limit entries to positive integers, text, dates, and much more. In this tutorial, we are going to look at how to create a Data Validation Drop-Down List in a cell using VBA. 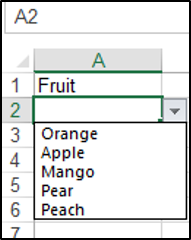
Note: An alternative to a Data Validation Drop-Down list is a ListBox object. ListBoxes can be added to Excel worksheets. ListBoxes can trigger macros that run every time a ListBox value is changed. ListBoxes are also used in VBA Userforms.
Creating a Drop Down List Using VBA
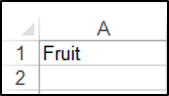
We have the text Fruit in cell A1, and we are going to create a drop-down list in cell A2, with five entries.
We will use the Validation.Add method and specify that the Type parameter is xlValidateList. You can add the specific items you would like in your list using the Formula1 parameter.
The following code will create a data validation drop-down list in cell A2:
Populate a Drop Down List From a Named Range in VBA
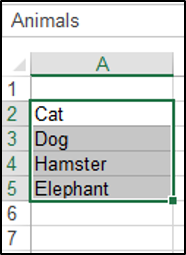
You can use a named range containing the items, to populate a drop-down list in VBA. We have the named range Animals shown below:
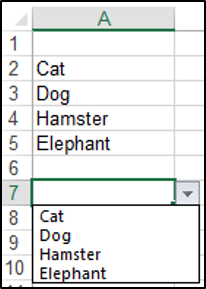
We have to set the Formula1 parameter equal to the named range. The following code will create a data validation drop-down list in cell A7 based on the items in the named range:
Removing the Drop Down List
You can use the Validation.Delete method to remove the drop-down list from the cell. The following code would remove the drop-down list from cell A7 in the example above:
VBA Coding Made Easy
Stop searching for VBA code online. Learn more about AutoMacro – A VBA Code Builder that allows beginners to code procedures from scratch with minimal coding knowledge and with many time-saving features for all users!


VBA Code Examples Add-in
Easily access all of the code examples found on our site.
Simply navigate to the menu, click, and the code will be inserted directly into your module. .xlam add-in.
Источник
Dynamic dropdown list in Excel VBA with variables
Dropdown lists in Excel usually are built from a range or from a variable list.
Dropdown list from Excel Range
Thus, building a dynamic dropdown list may include building a dynamic range, with undeclared end. Thus, let’s imagine that the end of the range is unknown and it should be used for the dropdown list.
Thus, once we know the start, the end could be found with the LastRow function:
The rest is easy – we should know which range to consider for the validation. Passing the range looks like this = C1 : C5 and converted to a VBA formula, this looks like the following:
The whole code looks like this:
Dropdown list from Named Range
Using named range for a source of a dropdown gives one huge advantage over using a normal range – if a new value is added to the range, the validation is automatically edited. Thus, we get quite dynamic range.
Dropdown list from variable list
Using a range for a source for the dropdown in general has 1 drawback – we should write the range somewhere in Excel. And sometimes, when the Excel file becomes too large, it is not always handy to look for the “Settings” tab and try to edit it back. Thus, it is possible to write the range from a list, which is simply inserted through VBA. In the example below, there is a folder “QA” in the desktop, accessed through Environ ( «UserProfile» ) & «DesktopQA» . In this folder, there are a few * . xlsx files, which are converted through a dropdown. Without writing them to the Excel file.
Источник
Creating a drop-down list in Excel using tools or macros
A drop-down list means that one cell includes several values. When the user clicks the arrow on the right, a certain scroll appears. He can choose a specific one.
A drop-down list is a very handy Excel tool for checking the entered data. The following features of drop-down lists allow you to increase the convenience of data handling: data substitution, displaying data from another sheet or file, the presence of the search and dependency function.
Creating a drop-down list
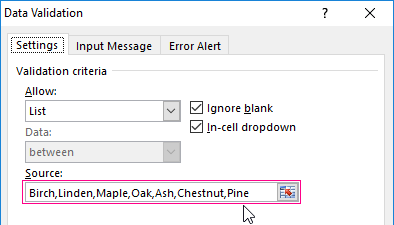
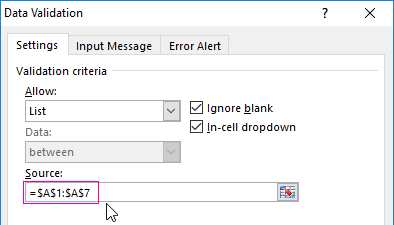
Path: the «DATA» menu – the «Data Validation» tool – the «Settings» tab. The data type – «List».
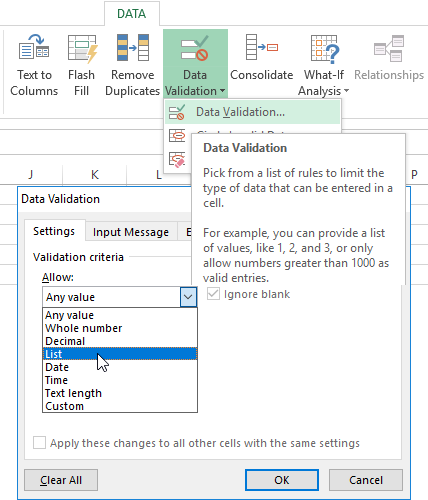
You can enter the values from which the drop-down list will consist, in different ways:
- Manually through the «Comma» in the «Source:» field.

- Enter the values in advance. Specify a range of cells with a list as a source.
- Assign a name for a range of values and enter the name in the «Source:» field.
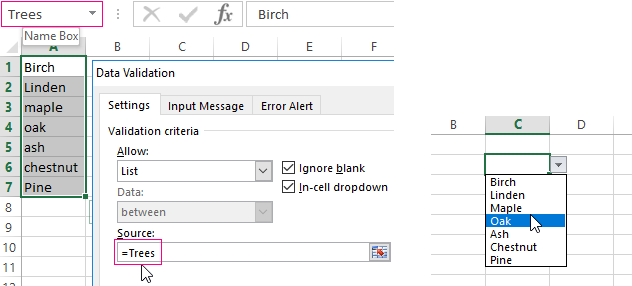
Any of the mentioned options will give the same result.
Drop-down list with data lookup in Excel
It is necessary to make a drop-down list with values from the dynamic range. If changes are made to the available range (data are added or deleted), they are automatically reflected in the drop-down list.
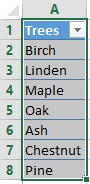
- Highlight the range for the drop-down list. Find the «Format As Table» tool in the main menu.
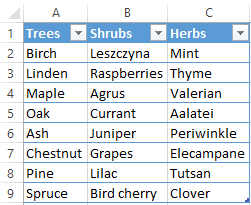
- The styles will open. Choose any of them. For solving our task, design does not matter. The presence of the header is important. In our example, the header is cell A1 with the word «Trees». That is, you need to select a table style with a header row. You’ll get the following range:
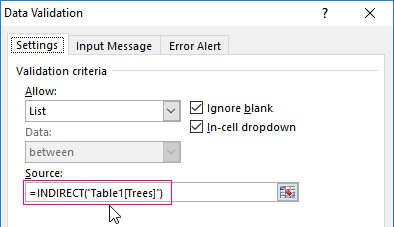
- Put the cursor on the cell where the drop-down list will be located. Open the parameters of the «Data Validation» tool (the path is described above). In the «Source:» field, write the following function:

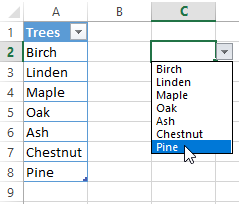
Let’s test it. Here is our table with a list on one sheet:
Add the new value «Spruce» to the table.
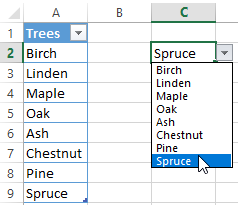
Now delete the «Birch» value.
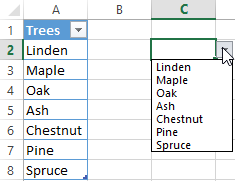
The «smart table», which easily «expands» and changes, has helped us to perform our task.
Now let’s make it possible to enter new values directly into the cell with this list and have data automatically added to the range.
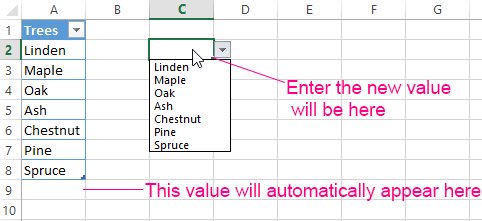
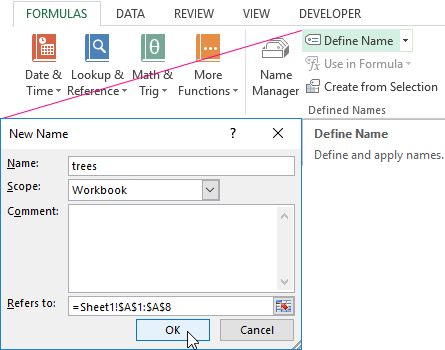
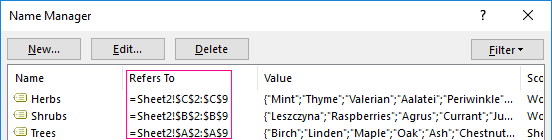
- Form a named range. Path: «FORMULAS» — «Define Name» — «New Name». Enter a unique name for the range and press OK.
- Create a drop-down list in any cell. You already know how to do this. Source – name range: =trees.
- Clear the following check boxes: «Error Alert», «Show error alert invalid data entered». If you do not do this, Excel will not allow you to enter new values.
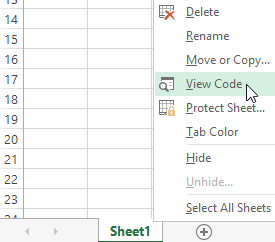
- Launch the Visual Basic Editor. To do this, right-click on the name of the sheet and go to the «View Code» tab. Alternatively, press Alt + F11 simultaneously. Copy the code (just insert your parameters).

Private Sub Worksheet_Change( ByVal Target As Range)
Dim lReply As Long
If Target.Cells.Count > 1 Then Exit Sub
If Target.Address = «$C$2» Then
If IsEmpty(Target) Then Exit Sub
If WorksheetFunction.CountIf(Range( «trees» ), Target) = 0 Then
lReply = MsgBox( «Add entered name » & _
Target & » in the drop-down list?» , vbYesNo + vbQuestion)
If lReply = vbYes Then
Range( «trees» ).Cells(Range( «trees» ).Rows.Count + 1, 1) = Target
End If
End If
End If
End Sub
When you enter a new name in the empty cell of the drop-down list, the following message will appear: «Add entered name Baobab?».
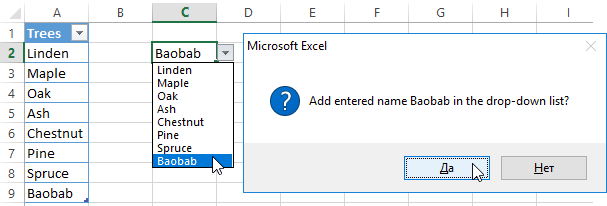
Click «OK» and one more row with the «Baobab» value will be added.
Excel drop-down list with data from another sheet / file
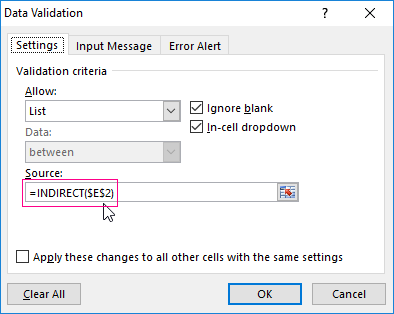
When the values for the drop-down list are located on another sheet or in another workbook, the standard method does not work. You can solve the problem with the help of the =INDIRECT() function: it will form the correct link to an external source of information.
- Activate the cell where we want to put the drop-down menu.
- Open the Data Validation options. In the «Source:» field, enter the following formula:
The name of the file from which the information for the list is taken is enclosed in square brackets. This file must be opened. If the book with the desired values is stored in a different folder, you need to specify the path completely.
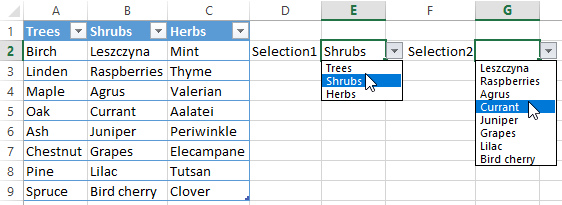
How to create dependent drop-down lists
Take three named ranges:
It is an indispensable prerequisite. Above you can see how to turn a normal scroll in a named range (using the «Name Manager»). Remember that the name cannot contain spaces or punctuation.
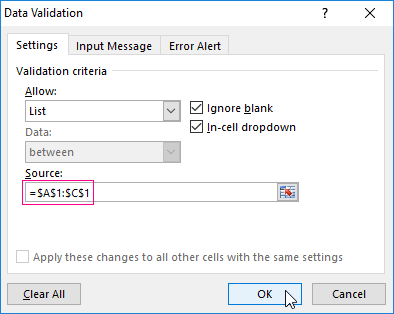
- Create the first drop-down list, which will include the names of the ranges.
- Having placed the cursor on the «Source:» field, go to the sheet and select the required cells alternately.
- Now create the second drop-down menu. It should reflect those words that correspond to the name chosen in the first scroll. If the «Trees», then «Linden», «Maple», etc. should correspond to it. Enter the following function: =INDIRECT(А1) in the «Source:» field. A1 is a cell with the first range.
Selecting multiple values from a drop-down list in Excel
Sometimes, you need to select several items from the drop-down list. Let’s consider the ways of performing this task.
- Create a standard ComboBox using the «Data Validation» tool. Add a ready-made macro to the sheet module. The way how to do this is described above. With its help, the selected values will be added to the right of the drop-down menu.
Private Sub Worksheet_Change( ByVal Target As Range)
On Error Resume Next
If Not Intersect(Target, Range( «E2:E9» )) Is Nothing And Target.Cells.Count = 1 Then
Application.EnableEvents = False
If Len(Target.Offset(0, 1)) = 0 Then
Target.Offset(0, 1) = Target
Else
Target. End (xlToRight).Offset(0, 1) = Target
End If
Target.ClearContents
Application.EnableEvents = True
End If
End Sub
Private Sub Worksheet_Change( ByVal Target As Range)
On Error Resume Next
If Not Intersect(Target, Range( «H2:K2» )) Is Nothing And Target.Cells.Count = 1 Then
Application.EnableEvents = False
If Len(Target.Offset(1, 0)) = 0 Then
Target.Offset(1, 0) = Target
Else
Target. End (xlDown).Offset(1, 0) = Target
End If
Target.ClearContents
Application.EnableEvents = True
End If
End Sub
Private Sub Worksheet_Change( ByVal Target As Range)
On Error Resume Next
If Not Intersect(Target, Range( «C2:C5» )) Is Nothing And Target.Cells.Count = 1 Then
Application.EnableEvents = False
newVal = Target
Application.Undo
oldval = Target
If Len(oldval) <> 0 And oldval <> newVal Then
Target = Target & «,» & newVal
Else
Target = newVal
End If
If Len(newVal) = 0 Then Target.ClearContents
Application.EnableEvents = True
End If
End Sub
Do not forget to change the ranges to «your own» ones. Create scroll in the classical way. The rest of the work will be done by macros.
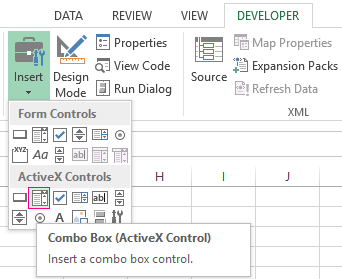
Searchable drop-down list in Excel
- On the «DEVELOPER» tab find the «Insert» tool – «ActiveX». Here you need the button «Combo Box (ActiveX Control)» (focus your attention on the tooltips).
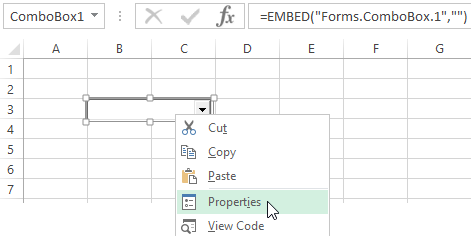
- Click on the icon – «Design Mode» becomes active. Draw a small rectangle (the place of the future scroll) with a cursor that transforms to a «cross».
- Click «Properties» to open a Combobox1 of settings.
- Enter the range in the ListFillRange row (manually). The cell where the selected value will be displayed can be changed in the LinkedCell row. Changing of the font and size can be done in Font row.
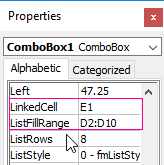

When you enter the first letters from the keyboard, the appropriate items are displayed. These are not all the pleasant moments of this instrument. Here you can customize the visual representation of information, specify two columns at once as a source.
Источник
based on examples above and examples found on other sites, I created a generic procedure and some examples.
'Simple helper procedure to create a dropdown in a cell based on a list of values in a range
'ValueSheetName : the name of the sheet containing the value range
'ValueRangeString : the range on the sheet with name ValueSheetName containing the values for the dropdown
'CreateOnSheetName : the name of the sheet where the dropdown needs to be created
'CreateInRangeString : the range where the dropdown needs to be created
'FieldName As String : a name of the dropdown, will be used in the inputMessage and ErrorMessage
'See example below ExampleCreateDropDown
Public Sub CreateDropDown(ValueSheetName As String, ValueRangeString As String, CreateOnSheetName As String, CreateInRangeString As String, FieldName As String)
    Dim ValueSheet As Worksheet
    Set ValueSheet = Worksheets(ValueSheetName) 'The sheet containing the values
    Dim ValueRange As Range: Set ValueRange = ValueSheet.Range(ValueRangeString) 'The range containing the values
    Dim CreateOnSheet As Worksheet
    Set CreateOnSheet = Worksheets(CreateOnSheetName) 'The sheet containing the values
    Dim CreateInRange As Range: Set CreateInRange = CreateOnSheet.Range(CreateInRangeString)
    Dim InputTitle As String:  InputTitle = "Please Select a Value"
    Dim InputMessage As String:  InputMessage = "for " & FieldName
    Dim ErrorTitle As String:  ErrorTitle = "Please Select a Value"
    Dim ErrorMessage As String:  ErrorMessage = "for " & FieldName
    Dim ShowInput As Boolean:  ShowInput = True 'Show input message on hover
    Dim ShowError As Boolean:  ShowError = True 'Show error message on error
    Dim ValidationType As XlDVType:  ValidationType = xlValidateList
    Dim ValidationAlertStyle As XlDVAlertStyle:  ValidationAlertStyle = xlValidAlertStop 'Stop on invalid value
    Dim ValidationOperator As XlFormatConditionOperator:  ValidationOperator = xlEqual 'Value must be equal to one of the Values from the ValidationFormula1
    Dim ValidationFormula1 As Variant:  ValidationFormula1 = "=" & ValueSheetName & "!" & ValueRange.Address 'Formula referencing the values from the ValueRange
    Dim ValidationFormula2 As Variant:  ValidationFormula2 = ""

    Call CreateDropDownWithValidationInCell(CreateInRange, InputTitle, InputMessage, ErrorTitle, ErrorMessage, ShowInput, ShowError, ValidationType, ValidationAlertStyle, ValidationOperator, ValidationFormula1, ValidationFormula2)
End Sub


'An example using the ExampleCreateDropDown
Private Sub ExampleCreateDropDown()
    Call CreateDropDown(ValueSheetName:="Test", ValueRangeString:="C1:C5", CreateOnSheetName:="Test", CreateInRangeString:="B1", FieldName:="test2")
End Sub


'The full option function if you need more configurable options
'To create a dropdown in a cell based on a list of values in a range
'Validation: https://msdn.microsoft.com/en-us/library/office/ff840078.aspx
'ValidationTypes: XlDVType  https://msdn.microsoft.com/en-us/library/office/ff840715.aspx
'ValidationAlertStyle:  XlDVAlertStyle  https://msdn.microsoft.com/en-us/library/office/ff841223.aspx
'XlFormatConditionOperator  https://msdn.microsoft.com/en-us/library/office/ff840923.aspx
'See example below ExampleCreateDropDownWithValidationInCell
Public Sub CreateDropDownWithValidationInCell(CreateInRange As Range, _
                                        Optional InputTitle As String = "", _
                                        Optional InputMessage As String = "", _
                                        Optional ErrorTitle As String = "", _
                                        Optional ErrorMessage As String = "", _
                                        Optional ShowInput As Boolean = True, _
                                        Optional ShowError As Boolean = True, _
                                        Optional ValidationType As XlDVType = xlValidateList, _
                                        Optional ValidationAlertStyle As XlDVAlertStyle = xlValidAlertStop, _
                                        Optional ValidationOperator As XlFormatConditionOperator = xlEqual, _
                                        Optional ValidationFormula1 As Variant = "", _
                                        Optional ValidationFormula2 As Variant = "")

    With CreateInRange.Validation
        .Delete
        .Add Type:=ValidationType, AlertStyle:=ValidationAlertStyle, Operator:=ValidationOperator, Formula1:=ValidationFormula1, Formula2:=ValidationFormula2
        .IgnoreBlank = True
        .InCellDropdown = True
        .InputTitle = InputTitle
        .ErrorTitle = ErrorTitle
        .InputMessage = InputMessage
        .ErrorMessage = ErrorMessage
        .ShowInput = ShowInput
        .ShowError = ShowError
    End With
End Sub


'An example using the CreateDropDownWithValidationInCell
Private Sub ExampleCreateDropDownWithValidationInCell()
    Dim ValueSheetName As String: ValueSheetName = "Hidden" 'The sheet containing the values
    Dim ValueRangeString As String: ValueRangeString = "C7:C9" 'The range containing the values
    Dim CreateOnSheetName As String: CreateOnSheetName = "Test"  'The sheet containing the dropdown
    Dim CreateInRangeString As String: CreateInRangeString = "A1" 'The range containing the dropdown

    Dim ValueSheet As Worksheet
    Set ValueSheet = Worksheets(ValueSheetName)
    Dim ValueRange As Range: Set ValueRange = ValueSheet.Range(ValueRangeString)
    Dim CreateOnSheet As Worksheet
    Set CreateOnSheet = Worksheets(CreateOnSheetName)
    Dim CreateInRange As Range: Set CreateInRange = CreateOnSheet.Range(CreateInRangeString)
    Dim FieldName As String: FieldName = "Testing Dropdown"
    Dim InputTitle As String:  InputTitle = "Please Select a value"
    Dim InputMessage As String:  InputMessage = "for " & FieldName
    Dim ErrorTitle As String:  ErrorTitle = "Please Select a value"
    Dim ErrorMessage As String:  ErrorMessage = "for " & FieldName
    Dim ShowInput As Boolean:  ShowInput = True
    Dim ShowError As Boolean:  ShowError = True
    Dim ValidationType As XlDVType:  ValidationType = xlValidateList
    Dim ValidationAlertStyle As XlDVAlertStyle:  ValidationAlertStyle = xlValidAlertStop
    Dim ValidationOperator As XlFormatConditionOperator:  ValidationOperator = xlEqual
    Dim ValidationFormula1 As Variant:  ValidationFormula1 = "=" & ValueSheetName & "!" & ValueRange.Address
    Dim ValidationFormula2 As Variant:  ValidationFormula2 = ""

    Call CreateDropDownWithValidationInCell(CreateInRange, InputTitle, InputMessage, ErrorTitle, ErrorMessage, ShowInput, ShowError, ValidationType, ValidationAlertStyle, ValidationOperator, ValidationFormula1, ValidationFormula2)

End Sub
Welcome to Excel Jet Consult blog post. In this tutorial, we will learn different ways of creating a drop-down list in Excel VBA. Let’s get started
The first thing we need to do is to have the Developer tab available: To activate the Developer tab:
- Execute ALT + FT
- In the Excel Options dialogue box, click on Customize Ribbon

- Check Developer tab box
- Click OK
First Method
In the caption below, we want to create drop-down list for the Customer Name

The first thing we will do is apply named range to Customer Name in Column A: To do that:
- Select A1:A7 and execute CTRL + SHIFT + F3
- In the Create Names from Selection dialogue box, the automatically checked Top row is fine. Therefore, click OK
Now, we have a named range Customer_Name

- In the Insert drop-down of the Control group of the Developer tab, locate and click on Combo Box (ActiveX Control) and make a combo box on the spreadsheet
- Right-click on the Combo Box and select Properties
- In the ListFillRange, type in the Customer_Name (which is the named range created earlier).

- Click Enter.
Caveat, ensure the named range is correctly typed inside the ListFillRange box. See the caption above
- Close the Properties dialogue box
- In the Control group of the Developer tab, click on the Design Mode to turn off design mode
When we click on the Combo Box drop-down, we can see the List of the Customer Name; and make selection

Second Method
- In the Insert drop-down of the Control group of the Developer tab, locate and click on Combo Box (ActiveX Control) and make a combo box on the spreadsheet
- Double-click on the Combo Box
- In the VBA Editor code window, from the Change drop-down on the top right of the screen, select DropButtonClick
- Execute the lines of codes as seen in the caption below

- Close the VBA Editor
- In the Control group of the Developer tab, click on the Design Mode to turn off design mode
When we click on the Combo Box drop-down, we can see the List of the Customer Name

Posted in Blog and tagged Excel VBA.