
Содержание
- Continue Statement (Visual Basic)
- Syntax
- Remarks
- Example
- Оператор Continue (Visual Basic)
- Синтаксис
- Remarks
- Пример
- Using Do. Loop statements
- Repeating statements while a condition is True
- Repeating statements until a condition becomes True
- Exiting a Do. Loop statement from inside the loop
- See also
- Support and feedback
- Оператор Do. Loop (Visual Basic)
- Синтаксис
- Компоненты
- Комментарии
- Выход из Do
- Пример 1
- Пример 2
- Пример 3
- Пример 4
- Do. Loop Statement (Visual Basic)
- Syntax
- Parts
- Remarks
- Exit Do
- Example 1
- Example 2
- Example 3
- Example 4
Continue Statement (Visual Basic)
Transfers control immediately to the next iteration of a loop.
Syntax
You can transfer from inside a Do , For , or While loop to the next iteration of that loop. Control passes immediately to the loop condition test, which is equivalent to transferring to the For or While statement, or to the Do or Loop statement that contains the Until or While clause.
You can use Continue at any location in the loop that allows transfers. The rules allowing transfer of control are the same as with the GoTo Statement.
For example, if a loop is totally contained within a Try block, a Catch block, or a Finally block, you can use Continue to transfer out of the loop. If, on the other hand, the Try . End Try structure is contained within the loop, you cannot use Continue to transfer control out of the Finally block, and you can use it to transfer out of a Try or Catch block only if you transfer completely out of the Try . End Try structure.
If you have nested loops of the same type, for example a Do loop within another Do loop, a Continue Do statement skips to the next iteration of the innermost Do loop that contains it. You cannot use Continue to skip to the next iteration of a containing loop of the same type.
If you have nested loops of different types, for example a Do loop within a For loop, you can skip to the next iteration of either loop by using either Continue Do or Continue For .
Example
The following code example uses the Continue While statement to skip to the next column of an array if a divisor is zero. The Continue While is inside a For loop. It transfers to the While col statement, which is the next iteration of the innermost While loop that contains the For loop.
Источник
Оператор Continue (Visual Basic)
Немедленно передает управление в следующую итерацию цикла.
Синтаксис
Можно перенести из Do цикла , For или While в следующую итерацию этого цикла. Элемент управления немедленно передается тесту условий цикла, что эквивалентно передаче For в оператор или While или Do оператор или Loop , содержащий Until предложение или While .
Вы можете использовать Continue в любом расположении цикла, которое разрешает передачу данных. Правила, разрешающие передачу управления, те же, что и в операторе GoTo.
Например, если цикл полностью содержится в блоке Try , блоке Catch или блоке Finally , можно использовать для Continue передачи из цикла. Если, с другой стороны, структура . End Try содержится в цикле, вы не можете использовать Continue для передачи управления из Finally блока, и вы можете использовать ее для передачи Try из блока или Catch только при полной Try передаче из структуры . End Try . Try
Если у вас есть вложенные циклы одного типа, например Do цикл в другом Do цикле, Continue Do оператор переходит к следующей итерации самого внутреннего Do цикла, содержащего его. Нельзя использовать для Continue перехода к следующей итерации содержащего цикла того же типа.
Если у вас есть вложенные циклы разных типов, например Do цикл внутри For цикла, можно перейти к следующей итерации любого цикла с помощью Continue Do или Continue For .
Пример
В следующем примере кода оператор используется Continue While для перехода к следующему столбцу массива, если делитель равен нулю. Находится Continue While внутри For цикла. Он передается в While col оператор , который является следующей итерацией самого внутреннего While цикла, содержащего For цикл.
Источник
Using Do. Loop statements
Use Do. Loop statements to run a block of statements an indefinite number of times. The statements are repeated either while a condition is True or until a condition becomes True.
Repeating statements while a condition is True
There are two ways to use the While keyword to check a condition in a Do. Loop statement. You can check the condition before you enter the loop, or you can check it after the loop has run at least once.
In the following ChkFirstWhile procedure, you check the condition before you enter the loop. If myNum is set to 9 instead of 20, the statements inside the loop will never run. In the ChkLastWhile procedure, the statements inside the loop run only once before the condition becomes False.
Repeating statements until a condition becomes True
There are two ways to use the Until keyword to check a condition in a Do. Loop statement. You can check the condition before you enter the loop (as shown in the ChkFirstUntil procedure), or you can check it after the loop has run at least once (as shown in the ChkLastUntil procedure). Looping continues while the condition remains False.
Exiting a Do. Loop statement from inside the loop
You can exit a Do. Loop by using the Exit Do statement. For example, to exit an endless loop, use the Exit Do statement in the True statement block of either an If. Then. Else statement or a Select Case statement. If the condition is False, the loop will run as usual.
In the following example myNum is assigned a value that creates an endless loop. The If. Then. Else statement checks for this condition, and then exits, preventing endless looping.
To stop an endless loop, press ESC or CTRL+BREAK.
See also
Support and feedback
Have questions or feedback about Office VBA or this documentation? Please see Office VBA support and feedback for guidance about the ways you can receive support and provide feedback.
Источник
Оператор Do. Loop (Visual Basic)
Повторяет блок инструкций, пока Boolean условие не станет True или не станет True .
Синтаксис
Компоненты
| Термин | Определение |
|---|---|
| Do | Обязательный. Запускает определение Do цикла. |
| While | Невозможно при Until использовании. Повторяйте цикл до тех пор, пока condition не будет False . |
| Until | Невозможно при While использовании. Повторяйте цикл до тех пор, пока condition не будет True . |
| condition | Необязательный элемент. Выражение Boolean . Если condition это так Nothing , Visual Basic обрабатывает его как False . |
| statements | Необязательный элемент. Один или несколько операторов, повторяющихся в то время или до тех пор, condition является True . |
| Continue Do | Необязательный элемент. Передает управление в следующую итерацию Do цикла. |
| Exit Do | Необязательный элемент. Передает элемент управления из Do цикла. |
| Loop | Обязательный. Завершает определение Do цикла. |
Комментарии
Используйте структуру Do. Loop , если требуется повторять набор инструкций неограниченное количество раз, пока условие не будет выполнено. Если вы хотите повторить инструкции в заданное количество раз, параметр For. Следующий оператор обычно является лучшим выбором.
Можно использовать While один или несколько Until вариантов condition , но не оба. Если вы не предоставите ни разу, цикл продолжается до тех пор, пока Exit не будет передан элемент управления из цикла.
Вы можете проверить condition только один раз в начале или в конце цикла. Если тестироваться condition в начале цикла (в инструкции Do ), цикл может не выполняться даже один раз. При тестировании в конце цикла (в инструкции Loop ) цикл всегда выполняется по крайней мере один раз.
Условие обычно приводит к сравнению двух значений, но это может быть любое выражение, результатом которого является логическое значение типа данных ( True или False ). Сюда входят значения других типов данных, таких как числовые типы, преобразованные в Boolean .
Вы можете вложить Do циклы, поместив один цикл в другой. Вы также можете вложить различные типы структур управления друг в друга. Дополнительные сведения см. в разделе «Вложенные структуры управления».
Структура Do. Loop обеспечивает большую гибкость, чем while. Оператор End While , так как он позволяет решить, следует ли завершать цикл, когда condition он перестает быть True или когда он сначала становится True . Он также позволяет тестировать condition в начале или в конце цикла.
Выход из Do
Оператор Exit Do может предоставить альтернативный способ выхода Do…Loop из . Exit Do передает управление непосредственно оператору, следующему за оператором Loop .
Exit Do часто используется после оценки некоторых условий If. Then. Else , например в структуре. Может потребоваться выйти из цикла, если обнаруживается условие, которое делает его ненужным или невозможным продолжать итерацию, например ошибочное значение или запрос на завершение. Одним из способов Exit Do является проверка на условие, которое может вызвать бесконечный цикл, который является циклом, который может выполняться большое или даже бесконечное количество раз. Можно использовать для Exit Do экранирования цикла.
Вы можете включить любое количество Exit Do операторов в любом месте. Do…Loop
При использовании в вложенных Do циклах Exit Do передает управление из самого внутреннего цикла и на следующий более высокий уровень вложения.
Пример 1
В следующем примере операторы в цикле продолжают выполняться до тех пор, пока index переменная не будет больше 10. Предложение Until находится в конце цикла.
Пример 2
В следующем примере вместо предложения используется While предложение Until и condition тестируется в начале цикла, а не в конце.
Пример 3
В следующем примере цикл останавливается, condition если index переменная больше 100. Однако оператор If в цикле приводит Exit Do к остановке цикла, если переменная индекса больше 10.
Пример 4
В следующем примере считываются все строки в текстовом файле. Метод OpenText открывает файл и возвращает StreamReader объект, который считывает символы. В условии Do. Loop метод StreamReader определяет наличие Peek дополнительных символов.
Источник
Do. Loop Statement (Visual Basic)
Repeats a block of statements while a Boolean condition is True or until the condition becomes True .
Syntax
Parts
| Term | Definition |
|---|---|
| Do | Required. Starts the definition of the Do loop. |
| While | Cannot be given if Until is used. Repeat the loop until condition is False . |
| Until | Cannot be given if While is used. Repeat the loop until condition is True . |
| condition | Optional. Boolean expression. If condition is Nothing , Visual Basic treats it as False . |
| statements | Optional. One or more statements that are repeated while, or until, condition is True . |
| Continue Do | Optional. Transfers control to the next iteration of the Do loop. |
| Exit Do | Optional. Transfers control out of the Do loop. |
| Loop | Required. Terminates the definition of the Do loop. |
Use a Do. Loop structure when you want to repeat a set of statements an indefinite number of times, until a condition is satisfied. If you want to repeat the statements a set number of times, the For. Next Statement is usually a better choice.
You can use either While or Until to specify condition , but not both. If you give neither, the loop continues until an Exit transfer control out of the loop.
You can test condition only one time, at either the start or the end of the loop. If you test condition at the start of the loop (in the Do statement), the loop might not run even one time. If you test at the end of the loop (in the Loop statement), the loop always runs at least one time.
The condition usually results from a comparison of two values, but it can be any expression that evaluates to a Boolean Data Type value ( True or False ). This includes values of other data types, such as numeric types, that have been converted to Boolean .
You can nest Do loops by putting one loop within another. You can also nest different kinds of control structures within each other. For more information, see Nested Control Structures.
The Do. Loop structure gives you more flexibility than the While. End While Statement because it enables you to decide whether to end the loop when condition stops being True or when it first becomes True . It also enables you to test condition at either the start or the end of the loop.
Exit Do
The Exit Do statement can provide an alternative way to exit a Do…Loop . Exit Do transfers control immediately to the statement that follows the Loop statement.
Exit Do is often used after some condition is evaluated, for example in an If. Then. Else structure. You might want to exit a loop if you detect a condition that makes it unnecessary or impossible to continue iterating, such as an erroneous value or a termination request. One use of Exit Do is to test for a condition that could cause an endless loop, which is a loop that could run a large or even infinite number of times. You can use Exit Do to escape the loop.
You can include any number of Exit Do statements anywhere in a Do…Loop .
When used within nested Do loops, Exit Do transfers control out of the innermost loop and into the next higher level of nesting.
Example 1
In the following example, the statements in the loop continue to run until the index variable is greater than 10. The Until clause is at the end of the loop.
Example 2
The following example uses a While clause instead of an Until clause, and condition is tested at the start of the loop instead of at the end.
Example 3
In the following example, condition stops the loop when the index variable is greater than 100. The If statement in the loop, however, causes the Exit Do statement to stop the loop when the index variable is greater than 10.
Example 4
The following example reads all lines in a text file. The OpenText method opens the file and returns a StreamReader that reads the characters. In the Do. Loop condition, the Peek method of the StreamReader determines whether there are any additional characters.
Источник
In this Article
- VBA Loop Quick Examples
- For Each Loops
- For Next Loops
- Do While Loops
- Do Until Loops
- VBA Loop Builder
- VBA For Next Loop
- For Loop Syntax
- For Loop Step
- For Loop Step – Inverse
- Nested For Loop
- Exit For
- Continue For
- VBA For Each Loop
- For Each Cell in Range
- For Each Worksheet in Workbook
- For Each Open Workbook
- For Each Shape in Worksheet
- For Each Shape in Each Worksheet in Workbook
- For Each – IF Loop
- VBA Do While Loop
- Do While
- Loop While
- VBA Do Until Loop
- Do Until
- Loop Until
- Exit Do Loop
- End or Break Loop
- More Loop Examples
- Loop Through Rows
- Loop Through Columns
- Loop Through Files in a Folder
- Loop Through Array
- Loops in Access VBA
To work effectively in VBA, you must understand Loops.
Loops allow you to repeat a code block a set number of times or repeat a code block on a each object in a set of objects.
First we will show you a few examples to show you what loops are capable of. Then we will teach you everything about loops.
VBA Loop Quick Examples
For Each Loops
For Each Loops loop through every object in a collection, such as every worksheet in workbook or every cell in a range.
Loop Through all Worksheets in Workbook
This code will loop through all worksheets in the workbook, unhiding each sheet:
Sub LoopThroughSheets()
Dim ws As Worksheet

    For Each ws In Worksheets
        ws.Visible = True
    Next

End Sub
Loop Through All Cells in Range
This code will loop through a range of cells, testing if the cell value is negative, positive, or zero:
Sub If_Loop()
Dim Cell as Range

  For Each Cell In Range("A2:A6")
    If Cell.Value > 0 Then
      Cell.Offset(0, 1).Value = "Positive"
    ElseIf Cell.Value < 0 Then
      Cell.Offset(0, 1).Value = "Negative"
    Else
      Cell.Offset(0, 1).Value = "Zero"
     End If
  Next Cell

End Sub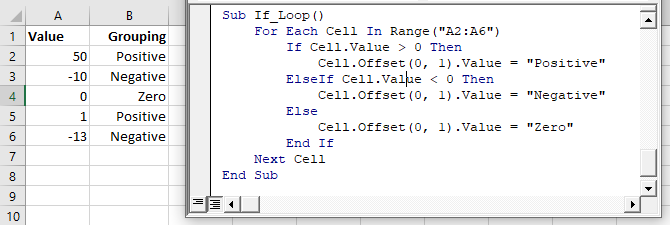
For Next Loops
Another type of “For” Loop is the For Next Loop. The For Next Loop allows you to loop through integers.
This code will loop through integers 1 through 10, displaying each with a message box:
Sub ForLoop()
    Dim i As Integer
    For i = 1 To 10
        MsgBox i
    Next i
End Sub
Do While Loops
Do While Loops will loop while a condition is met. This code will also loop through integers 1 through 10, displaying each with a message box.
Sub DoWhileLoop()
    Dim n As Integer
    n = 1
    Do While n < 11
        MsgBox n
        n = n + 1
    Loop
End Sub
Do Until Loops
Conversely, Do Until Loops will loop until a condition is met. This code does the same thing as the previous two examples.
Sub DoUntilLoop()
    Dim n As Integer
    n = 1
    Do Until n >= 10
        MsgBox n
        n = n + 1
    Loop
End Sub
We will discuss this below, but you need to be extremely careful when creating Do While or Do Until loops so that you don’t create a never ending loop.
VBA Loop Builder
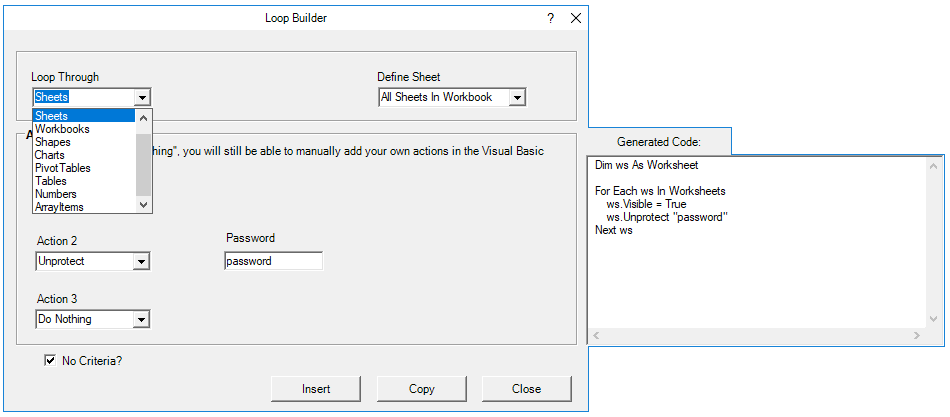
This is a screenshot of the “Loop Builder” from our Premium VBA Add-in: AutoMacro. The Loop Builder allows you to quickly and easily build loops to loop through different objects, or numbers. You can perform actions on each object and/or select only objects that meet certain criteria.
The add-in also contains many other code builders, an extensive VBA code library, and an assortment of coding tools. It’s a must have for any VBA developer.
Now we will cover the different types of loops in depth.
VBA Coding Made Easy
Stop searching for VBA code online. Learn more about AutoMacro — A VBA Code Builder that allows beginners to code procedures from scratch with minimal coding knowledge and with many time-saving features for all users!

Learn More
VBA For Next Loop
For Loop Syntax
The For Next Loop allows you to repeat a block of code a specified number of times. The syntax is:
[Dim Counter as Integer]

For Counter = Start to End [Step Value]
    [Do Something]
Next [Counter]
Where the items in brackets are optional.
- [Dim Counter as Long] – Declares the counter variable. Required if Option Explicit is declared at the top of your module.
- Counter – An integer variable used to count
- Start – The start value (Ex. 1)
- End – The end value (Ex. 10)
- [Step Value] – Allows you to count every n integers instead of every 1 integer. You can also go in reverse with a negative value (ex. Step -1)
- [Do Something] – The code that will repeat
- Next [Counter] – Closing statement to the For Next Loop. You can include the Counter or not. However, I strongly recommend including the counter as it makes your code easier to read.
If that’s confusing, don’t worry. We will review some examples:
Count to 10
This code will count to 10 using a For-Next Loop:
Sub ForEach_CountTo10()

Dim n As Integer
For n = 1 To 10
    MsgBox n
Next n

End Sub
For Loop Step
Count to 10 – Only Even Numbers
This code will count to 10 only counting even numbers:
Sub ForEach_CountTo10_Even()

Dim n As Integer
For n = 2 To 10 Step 2
    MsgBox n
Next n

End Sub
Notice we added “Step 2”. This tells the For Loop to “step” through the counter by 2. We can also use a negative step value to step in reverse:
VBA Programming | Code Generator does work for you!
For Loop Step – Inverse
Countdown from 10
This code will countdown from 10:
Sub ForEach_Countdown_Inverse()

Dim n As Integer
For n = 10 To 1 Step -1
    MsgBox n
Next n
MsgBox "Lift Off"

End Sub
Delete Rows if Cell is Blank
I’ve most frequently used a negative step For-Loop to loop through ranges of cells, deleting rows that meet certain criteria. If you loop from the top rows to the bottom rows, as you delete rows you will mess up your counter.
This example will delete rows with blank cells (starting from the bottom row):
Sub ForEach_DeleteRows_BlankCells()

Dim n As Integer
For n = 10 To 1 Step -1
    If Range("a" & n).Value = "" Then
        Range("a" & n).EntireRow.Delete
    End If
Next n

End Sub
Nested For Loop
You can “nest” one For Loop inside another For Loop. We will use Nested For Loops to create a multiplication table:
Sub Nested_ForEach_MultiplicationTable()

Dim row As Integer, col As Integer

For row = 1 To 9
    For col = 1 To 9
        Cells(row + 1, col + 1).Value = row * col
    Next col
Next row

End Sub
Exit For
The Exit For statement allows you to exit a For Next loop immediately.
You would usually use Exit For along with an If Statement, exiting the For Next Loop if a certain condition is met.
For example, you might use a For Loop to find a cell. Once that cell is found, you can exit the loop to speed up your code.
This code will loop through rows 1 to 1000, looking for “error” in column A. If it’s found, the code will select the cell, alert you to the found error, and exit the loop:
Sub ExitFor_Loop()

Dim i As Integer

For i = 1 To 1000
    If Range("A" & i).Value = "error" Then
        Range("A" & i).Select
        MsgBox "Error Found"
        Exit For
    End If
Next i

End Sub
Important: In the case of Nested For Loops, Exit For only exits the current For Loop, not all active Loops.
Continue For
VBA does not have the “Continue” command that’s found in Visual Basic. Instead, you will need to use “Exit”.
AutoMacro | Ultimate VBA Add-in | Click for Free Trial!
VBA For Each Loop
The VBA For Each Loop will loop through all objects in a collection:
- All cells in a range
- All worksheets in a workbook
- All shapes in a worksheet
- All open workbooks
You can also use Nested For Each Loops to:
- All cells in a range on all worksheets
- All shapes on all worksheets
- All sheets in all open workbooks
- and so on…
The syntax is:
For Each Object in Collection
[Do Something]
Next [Object]
Where:
- Object – Variable representing a Range, Worksheet, Workbook, Shape, etc. (ex. rng)
- Collection – Collection of objects (ex. Range(“a1:a10”)
- [Do Something] – Code block to run on each object
- Next [Object] – Closing statement. [Object] is optional, however strongly recommended.
For Each Cell in Range
This code will loop through each cell in a range:
Sub ForEachCell_inRange()

Dim cell As Range

For Each cell In Range("a1:a10")
    cell.Value = cell.Offset(0,1).Value
Next cell

End Sub
For Each Worksheet in Workbook
This code will loop through all worksheets in a workbook, unprotecting each sheet:
Sub ForEachSheet_inWorkbook()

Dim ws As Worksheet

For Each ws In Worksheets
    ws.Unprotect "password"
Next ws

End Sub
For Each Open Workbook
This code will save and close all open workbooks:
Sub ForEachWB_inWorkbooks()

Dim wb As Workbook

For Each wb In Workbooks
    wb.Close SaveChanges:=True
Next wb

End Sub
AutoMacro | Ultimate VBA Add-in | Click for Free Trial!
For Each Shape in Worksheet
This code will delete all shapes in the active sheet.
Sub ForEachShape()

Dim shp As Shape

For Each shp In ActiveSheet.Shapes
    shp.Delete
Next shp

End Sub
For Each Shape in Each Worksheet in Workbook
You can also nest For Each Loops. Here we will loop through all shapes in all worksheets in the active workbook:
Sub ForEachShape_inAllWorksheets()

Dim shp As Shape, ws As Worksheet

For Each ws In Worksheets
    For Each shp In ws.Shapes
        shp.Delete
    Next shp
Next ws

End Sub
For Each – IF Loop
As we’ve mentioned before, you can use an If statement within a loop, performing actions only if certain criteria is met.
This code will hide all blank rows in a range:
Sub ForEachCell_inRange()

Dim cell As Range

For Each cell In Range("a1:a10")
    If cell.Value = "" Then _
       cell.EntireRow.Hidden = True
Next cell

End Sub
VBA Do While Loop
The VBA Do While and Do Until (see next section) are very similar. They will repeat a loop while (or until) a condition is met.
The Do While Loop will repeat a loop while a condition is met.
Here is the Do While Syntax:
Do While Condition
[Do Something]
Loop
Where:
- Condition – The condition to test
- [Do Something] – The code block to repeat
You can also set up a Do While loop with the Condition at the end of the loop:
Do
[Do Something]
Loop While Condition
We will demo each one and show how they differ:
AutoMacro | Ultimate VBA Add-in | Click for Free Trial!
Do While
Here is the Do While loop example we demonstrated previously:
Sub DoWhileLoop()
    Dim n As Integer
    n = 1
    Do While n < 11
        MsgBox n
        n = n + 1
    Loop
End Sub
Loop While
Now let’s run the same procedure, except we will move the condition to the end of the loop:
Sub DoLoopWhile()
    Dim n As Integer
    n = 1
    Do
        MsgBox n
        n = n + 1
    Loop While n < 11
End Sub
VBA Do Until Loop
Do Until Loops will repeat a loop until a certain condition is met. The syntax is essentially the same as the Do While loops:
Do Until Condition
[Do Something]
Loop
and similarly the condition can go at the start or the end of the loop:
Do
[Do Something]
Loop Until Condition
Do Until
This do Until loop will count to 10, like our previous examples
Sub DoUntilLoop()
    Dim n As Integer
    n = 1
    Do Until n > 10
        MsgBox n
        n = n + 1
    Loop
End Sub
AutoMacro | Ultimate VBA Add-in | Click for Free Trial!
Loop Until
This Loop Until loop will count to 10:
Sub DoLoopUntil()
    Dim n As Integer
    n = 1
    Do
        MsgBox n
        n = n + 1
    Loop Until n > 10
End Sub
Exit Do Loop
Similar to using Exit For to exit a For Loop, you use the Exit Do command to exit a Do Loop immediately
Exit DoHere is an example of Exit Do:
Sub ExitDo_Loop()

Dim i As Integer
i = 1

Do Until i > 1000
    If Range("A" & i).Value = "error" Then
        Range("A" & i).Select
        MsgBox "Error Found"
        Exit Do
    End If
    i = i + 1
Loop

End Sub
End or Break Loop
As we mentioned above, you can use the Exit For or Exit Do to exit loops:
Exit ForExit DoHowever, these commands must be added to your code before you run your loop.
If you are trying to “break” a loop that’s currently running, you can try pressing ESC or CTRL + Pause Break on the keyboard. However, this may not work. If it doesn’t work, you’ll need to wait for your loop to end or, in the case of an endless loop, use CTRL + ALT + Delete to force close Excel.
This is why I try to avoid Do loops, it’s easier to accidentally create an endless loop forcing you to restart Excel, potentially losing your work.
More Loop Examples
AutoMacro | Ultimate VBA Add-in | Click for Free Trial!
Loop Through Rows
This will loop through all the rows in a column:
Public Sub LoopThroughRows()

Dim cell As Range

For Each cell In Range("A:A")
    If cell.value <> "" Then MsgBox cell.address & ": " & cell.Value
Next cell

End Sub
Loop Through Columns
This will loop through all columns in a row:
Public Sub LoopThroughColumns()

Dim cell As Range

For Each cell In Range("1:1")
    If cell.Value <> "" Then MsgBox cell.Address & ": " & cell.Value
Next cell

End Sub
Loop Through Files in a Folder
This code will loop through all files in a folder, creating a list:
Sub LoopThroughFiles ()

Dim oFSO As Object
Dim oFolder As Object
Dim oFile As Object
Dim i As Integer

Set oFSO = CreateObject("Scripting.FileSystemObject")

Set oFolder = oFSO.GetFolder("C:Demo)

i = 2

For Each oFile In oFolder.Files
    Range("A" & i).value = oFile.Name
    i = i + 1
Next oFile

End Sub
Loop Through Array
This code will loop through the array ‘arrList’:
For i = LBound(arrList) To UBound(arrList)
    MsgBox arrList(i)
Next i
The LBound function gets the “lower bound” of the array and UBound gets the “upper bound”.
Loops in Access VBA
Most of the examples above will also work in Access VBA. However, in Access, we loop through the Recordset Object rather than the Range Object.
Sub LoopThroughRecords()
   On Error Resume Next
   Dim dbs As Database
   Dim rst As Recordset
   Set dbs = CurrentDb
   Set rst = dbs.OpenRecordset("tblClients", dbOpenDynaset)
   With rst
      .MoveLast
      .MoveFirst
      Do Until .EOF = True
         MsgBox (rst.Fields("ClientName"))
        .MoveNext
     Loop
   End With
   rst.Close
   Set rst = Nothing
   Set dbs = Nothing
End SubThis can also be solved using a boolean.
For Each rngCol In rngAll.Columns
    doCol = False '<==== Resets to False at top of each column
    For Each cell In Selection
        If cell.row = 1 Then
            If thisColumnShouldBeProcessed Then doCol = True
        End If
        If doCol Then
            'Do what you want to do to each cell in this column
        End If
    Next cell
Next rngCol
For example, here is the full example that:
(1) Identifies range of used cells on worksheet
(2) Loops through each column
(3) IF column title is an accepted title, Loops through all cells in the column
Sub HowToSkipForLoopIfConditionNotMet()
    Dim rngCol, rngAll, cell As Range, cnt As Long, doCol, cellValType As Boolean
    Set rngAll = Range("A1").CurrentRegion
    'MsgBox R.Address(0, 0), , "All data"
    cnt = 0
    For Each rngCol In rngAll.Columns
        rngCol.Select
        doCol = False
        For Each cell In Selection
            If cell.row = 1 Then
                If cell.Value = "AnAllowedColumnTitle" Then doCol = True
            End If
            If doCol Then '<============== THIS LINE ==========
                cnt = cnt + 1
                Debug.Print ("[" & cell.Value & "]" & " / " & cell.Address & " / " & cell.Column & " / " & cell.row)
                If cnt > 5 Then End '<=== NOT NEEDED. Just prevents too much demo output.
            End If
        Next cell
    Next rngCol
End Sub
Note: If you didn’t immediately catch it, the line If docol Then is your inverted CONTINUE. That is, if doCol remains False, the script CONTINUES to the next cell and doesn’t do anything.
Certainly not as fast/efficient as a proper continue or next for statement, but the end result is as close as I’ve been able to get.
Loops in VBA
Loops are an essential part of any programming language because they help with the repeated running of any code snippet. Just like any other language, VBA offers the following loops to enable efficient programming:
- Do until
- Do while
- For
- Foreach
In this article we will dive dep into the “for” loop which iterates only for “x” number of times where “x” is a known value before the loop’s runtime.
“X” can also be a predictable number at runtime, for example when you determine the Lbound and Ubound values of arrays.
The For Loop in VBA
In VBA, “for loop” is easy to use. It follows a simple and understandable syntax.
Syntax:
For <counter> = <start> to <end> [ <step value> ]
[ <code block to execute> ]
Next [ <counter> ]
where
<counter> is the iterator variable which keeps incrementing by the <step value> after every iteration.
<step value> is optional. If this value is not provided, the default incremental value is “1.”
<Code block to execute> is also optional. It is the snippet of code to be executed during every iteration.
The “Next” statement marks the end of the “for” loop. It indicates to move to the next iteration of this loop with the incremented counter value.
Simple Examples of a For Loop
Print a Mathematical Table for a Number
Sub forloop_demo()
' declare all the required variables
Dim counter, input_number As Integer
' Receive input from user
input_number = InputBox(" Which tables do you want to print ? ")
' Print the mathematical table of the input number upto 12 count
For counter = 1 To 12
Debug.Print (counter &amp;amp; " X " &amp;amp; input_number &amp;amp; " = " &amp;amp; counter * input_number)
Next
End Sub
This program receives a number as an input from the user. Then, using a “for” loop, it is multiplied with each number from 1 to 12 to print a “times table” table of that input number.
A sample output of this program if “3” is input by the user is seen in the image below.

Program to Print Contents of an Array
This program defines an array with its size. All elements of the array are assigned values one by one. Next they are printed as we iterate through a loop. It is noteworthy to say that the iterator variable (i) of the “for” loop is also used as the array index inside the loop (this is not mandatory but makes it easy to read/understand/maintain).
Sub array_cars()

'declaring variable while defining its size
Dim arr_my_cars1(5) As Variant

'initialize array elements for one array
 arr_my_cars1(0) = "Benz"
 arr_my_cars1(1) = "Maruthi"
 arr_my_cars1(2) = "Hyundai"
 arr_my_cars1(3) = "Ford"
 arr_my_cars1(4) = "Nissan"

'print all elements of the array
For i = LBound(arr_my_cars1) To UBound(arr_my_cars1)
    Debug.Print arr_my_cars1(i)
Next

End Sub
Output of the Program:
Benz
Maruthi
Hyundai
Ford
Nissan
Program to Write and Read Array Contents
This program slightly varies from the one above. Here you will create an array and iterate through it using its indices.
Values are given to each array item using a “for” loop initially. (This was not the case in the previous program.)
Then, all the data stored in each element of the same array are read/printed back using another “for” loop.
Two loops are used here one below the other:
- One to write data to array
- Another one to read data from the same array.
Sub array_check_demo1()

' Declaration of array variable
Dim arr1(11)

' Assign values to array elements
For i = LBound(arr1) To UBound(arr1)
    'Allocate data for each array item through a loop
    arr1(i) = Cells(i + 2, 1).Value
Next

' Print values of the array
For i = LBound(arr1) To UBound(arr1)
    'Read data of each array item through a loop
    Debug.Print arr1(i)
Next
End Sub
Input is taken from the table below:
| Principal amount | No of yrs | Age of customer |
| 10000 | 5 | 67 |
| 340600 | 6 | 45 |
| 457800 | 8 | 34 |
| 23400 | 3 | 54 |
| 12000 | 4 | 23 |
| 23545 | 4 | 56 |
| 345243 | 2 | 55 |
| 34543 | 3 | 24 |
| 23223 | 2 | 19 |
| 3656 | 1 | 65 |
Output of the Program

Program That Uses the [step] Value
Check out this program and try to find out why the numbers are not continuous in the output:
Sub step_demo()
' declare a counter
Dim p As Integer

'loop through 10 numbers and print them
For p = 1 To 10 step 3
	Debug.Print p
Next
End Sub
Output of the Program
1
4
7
10
Yes, you might have found that the iterator variable increments by “3” instead of “1” in every iteration. Hence, the numbers printed are skip counted by “3.”
Try the same with different values in the place of [step] to understand it better if you are still confused.
The Nested “For” Loop
A loop within a loop is called a nested loop.
Structure
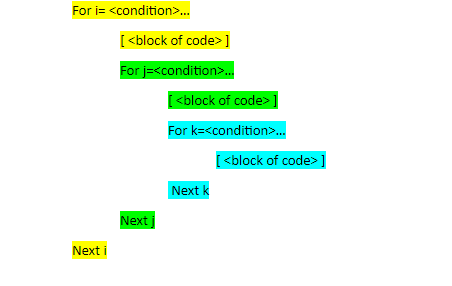
Let me explain this structure with colors:
- The for loop structure in yellow color is the outermost loop.
- The for loop structure/block in green color is the inner loop for the outermost (yellow color) loop. But it also acts as the outer loop for the “for loop” structure in turquoise color.
- The for loop structure in turquoise color is the innermost loop.
In this way , we can have any number of nested loops.
But there are ample chances for you to get confused when you see your own code after several days. You will wonder inside which loop is a specific line and what role it plays in the whole code.
To avoid this, follow the tips below while you code your logic:
- Maintain the alignment in your code with proper tab spaces as shown in the structure above. This can help you find the block of code/loop in which your statement is.
If possible, use the iterator variable next to the “next” keyword. It can help you indicate which “next” statement marks the closure of which loop. This is also marked in the colored structure for reference.
A Few Examples of Nested For Loops
Program to Format Cells with a Specific Word
This program iterates through all the cells (every column of every row in this case). If the cell content has a word “India,” then the specified formatting is applied to it.
Sub format_cell_with()
For i = 1 To 15
For j = 1 To 5
cellcontent = Cells(i, j).Value
If InStr(cellcontent, "India") &amp;gt; 0 Then
With Cells(i, j).Interior
.Pattern = xlSolid
.PatternColorIndex = xlAutomatic
.ThemeColor = xlThemeColorAccent2
.TintAndShade = 0.399975585192419
.PatternTintAndShade = 0
End With
End If
Next
Next
Input sheet:
| ICC Men’s Cricket World Cup Winners – 50 Overs | ||||
| Year | World Cup Winner | Runners Up | Host | Finals Venue |
| 1975 | West Indies | Australia | England | Lord’s Cricket Ground, London |
| 1979 | West Indies | England | England | Lord’s Cricket Ground, London |
| 1983 | India | West Indies | England | Lord’s Cricket Ground, London |
| 1987 | Australia | England | India & Pakistan | Eden Gardens, Kolkata |
| 1992 | Pakistan | England | Australia & New Zealand | Melbourne Cricket Ground, Melbourne |
| 1996 | Sri Lanka | Australia | India, Pakistan & Sri Lanka | Gaddafi Stadium, Lahore |
| 1999 | Australia | Pakistan | England | Lord’s Cricket Ground, London |
| 2003 | Australia | India | Australia | Wanderers, Johannesburg |
| 2007 | Australia | Sri Lanka | West Indies | Kensington Oval, Bridgetown |
| 2011 | India | Sri Lanka | India | Wankhede Stadium, Mumbai |
| 2015 | Australia | New Zealand | Australia | Melbourne Cricket Ground |
| 2019 | England | New Zealand | England | Lord’s, London |
| 2023 | — | — | India | — |
Output sheet – after the program is run:

Program with 2D Array and “NESTED FOR” Loop
This program declares a two dimensional array and initializes data in all its elements.
The first dimension holds the students’ names, and the second dimension holds the “exam results” of the students in the first dimension. These are written back to an Excel sheet.
Warning: As the code does not select any sheet in specific, please ensure that you keep a blank Excel sheet selected. This can prevent any damage to your existing data.
In case you wish to learn more about multidimensional arrays, please check out this article.
Sub Nested_for_demo2()

'declaring and defining size of an array
'3 means 4 rows starting from 0 to 3 and 1 means 2 columns starting from 0 to 1
Dim arr_stu(1 To 5, 1 To 2) As Variant

'initialize array elements

 arr_stu(1, 1) = "Dave"
 arr_stu(1, 2) = "Fail"
 arr_stu(2, 1) = "Trumpo"
 arr_stu(2, 2) = "Pass"
 arr_stu(3, 1) = "Vincent"
 arr_stu(3, 2) = "Pass"
 arr_stu(4, 1) = "Rose Mary"
 arr_stu(4, 2) = "Pass"
 arr_stu(5, 1) = "Eliza"
 arr_stu(5, 2) = "Fail"

' print all elements to the open excel sheet.
For i = 1 To 5
    For j = 1 To 2
        Cells(i, j) = arr_stu(i, j)
    Next j
Next

End Sub
Output of the Program on the Active Excel Sheet: Here
- The rows indicate the “i” value of the array (first dimension) and the iterator variable of the outer “for” loop.
- The columns indicate the “j” value of the array (Col A – first dimension , Col B – second dimension) and the iterator variable of the inner “for” loop.

The “Continue” Statement in Visual Basic: Skip a Part of an Iteration
When you encounter a situation where you wish to skip running the rest of the code inside the loop for a specific iteration based on a condition, the “continue” statement will come to your rescue in Visual Basic Programming.
Continue
Syntax:
Continue { Do | For | While }
Where { Do | For | While } are the respective loops in which it has to be used.
A Simple Example
Sub continue_demo()
' declare a counter
Dim i As Integer

'loop through 10 numbers and print them
For i = 1 To 10
    ' we will skip printing "4"
    If i = 4 Then
        Continue For
    End
    Debug.Print i
Next
End Sub
Your output will not have “4” in this case. As the condition is met in the 4th iteration, the continue statement is hit and the rest of the code is skipped for that iteration. The control then moves to the “next” statement of the loop (inner loop in case of nested loops).
Note: The Next statement is the closure of a loop, as you may be aware.
Output of the above program
1
2
3
5
6
7
8
9
10
Continue Statement is Not Available in VBA
VBA does not offer the “continue statement” because well-built logic in a loop can help us avoid using a “continue” statement. For example, rearranging statement blocks like nested loops and if conditions can help avoid the use of “continue” statements.
An Alternative to the Continue Statement
In unavoidable situations, the Goto statement can be used.
This article can provide you with more insights on how to properly use the “Goto” statement in VBA.
Conclusion
In my experience, I would say that the “for” loop is my favorite compared to the “do while “/“Do until”/“ For each” loops. The reason is the comfort of defining it completely in one line. Even during run-time, you can find how many iterations are completed and how many are yet to come.
I have also been able to use this loop in situations where I do not know the number of iterations. I manage it using conditions inside the loop. It also comes handy when I want to wait for a page load during automation. Once you start using this loop, you will even start playing around nested “for loops” with much more confidence and fewer of mistakes.
So, what are you waiting for ? Why not give it a try? 😊
На чтение 13 мин. Просмотров 26.3k.

Рамакришна, Источники индийской мудрости
Сейчас … мы идем по кругу
Эта статья содержит полное руководство по VBA Do While и VBA While Loops. (Если вы ищете информацию о циклах VBA For и For Each, перейдите сюда)
Цикл VBA While существует, чтобы сделать его совместимым со старым кодом. Однако Microsoft рекомендует использовать цикл Do Loop, поскольку он более «структурирован и гибок». Оба этих цикла рассматриваются в этом посте.
Для быстрого ознакомления с этими циклами перейдите к таблице быстрого руководства ниже.
Если вы ищете что-то конкретное, вы можете посмотреть содержание ниже.
Содержание
- Краткое руководство по VBA While Loops
- Введение
- Цикл For против цикла Do While
- Условия
- Формат цикла Do
- Цикл Exit Do
- While Wend
- Бесконечный цикл
- Использование функций Worksheet вместо циклов
- Резюме
Краткое руководство по VBA While Loops
| Формат цикла | Описание | Пример |
| Do While … Loop | Запускается 0 или более раз, пока условие выполняется | Do While result = «Верно» Loop |
| Do … Loop While | Запускается 1 или более раз, пока условие выполняется | Do Loop While result = «Верно» |
| Do Until … Loop | Запускается 0 или более раз, пока условие не будет выполнено | Do Until result <> «Верно» Loop |
| Do … Until Loop | Запускается 1 или более раз, пока условие не будет выполнено | Do Loop Until result <> «Верно» |
| While … Wend R |
Запускается 0 или более раз, пока условие истинно. Примечание: этот цикл считается устаревшим. |
While result = «Верно» Wend |
| Exit the Do Loop | Завершает Do | Do While i < 10 i = GetTotal If i < 0 Then Exit Do End If Loop |
Введение
Если вы никогда ранее не использовали циклы, тогда вы можете прочитать «Что такое циклы и зачем они вам нужны» из моего поста в журнале For Loop.
Я собираюсь сосредоточиться в основном на Do Loop в этой статье. Как я упоминал выше, мы видели, что цикл While Wend считается устаревшим. Для полноты информации я все равно его включил в эту статью.
Итак, во-первых, зачем нам нужны циклы Do While, когда у нас уже есть циклы For?
Цикл For против цикла Do While
Когда мы используем цикл For Loop, мы заранее знаем, сколько раз мы хотим его запустить. Например, мы можем захотеть запустить цикл один раз для каждого элемента в коллекции, массиве или словаре.
В следующем примере кода мы видим в начале каждого цикла, сколько раз он будет выполняться.
' запускается 5 раз
For i = 1 To 5

' запускается один раз для каждого элемента коллекции
For i = 1 To coll.Count

' запускается один раз для каждого элемента в arr
For i = LBound(arr) To coll.lbound(arr)

' запускается один раз для каждого значения от 1 до значения в lastRow
For i = 1 To lastRow

' запускается один раз для каждого элемента в коллекции
For Each s In coll
Цикл Do другой. Он работает:
- В то время как условие верно
- Пока условие не будет выполнено
Другими словами, количество циклов в большинстве случаев не имеет значения.
Итак, что такое условие и как мы их используем?
Условия
Условие — это утверждение, которое оценивается как истинное или ложное. Они в основном используются с операторами Loops и If. При создании условия вы используете такие знаки, как >, <, <>,> =, =.
Ниже приведены примеры условий
| Условие | Истина, когда… |
| x < 5 | x меньше 5 |
| x <= 5 | x меньше либо равен 5 |
| x > 5 | x больше 5 |
| x >= 5 | x больше либо равен 5 |
| x = 5 | x равен 5 |
| x <> 5 | x не равен 5 |
| x > 5 And x < 10 | x больше 5 И меньше 10 |
| x = 2 Or x >10 | x равен 2 ИЛИ больше 10 |
| Range(«A1») = «Иван» | Ячейка A1 содержит текст «Иван» |
| Range(«A1») <> «Иван» | Ячейка A1 не содержит текст «Иван» |
Вы могли заметить x = 5 как условие. Его следует путать с х = 5, при использовании в качестве назначения.
Например
' означает: значение 6 будет храниться в х
x = 6

' означает: х равен 6?
If x = 6

' означает: х равен 6?
Do While x = 6
В следующей таблице показано, как «=» используется в условиях и назначениях.
| Использование «=» | Тип | Имеется в виду |
| Loop Until x = 5 | Условие | x равен 5? |
| Do While x = 5 | Условие | x равен 5? |
| If x = 5 Then | Условие | x равен 5? |
| For x = 1 To 5 | Присваивание | Установите значение x = 1, затем = 2 и т.д. |
| x = 5 | Присваивание | Установите значение x=5 |
| b = 6 = 5 | Присваивание и условие |
Присвойте b результату условия 6 = 5 |
| x = MyFunc(5,6) | Присваивание | Присвойте х значение, возвращаемое функцией |
Формат цикла Do
Цикл Do можно использовать четырьмя способами, и это часто вызывает путаницу. Однако в каждом из этих четырех способов есть только небольшая разница.
Do всегда в начале первой строки, а Loop всегда в конце последней строки.
Мы можем добавить условие после любой строки.
Do [условие]
Loop

Do
Loop [условие]
Условию предшествует While или Until, которое дает нам эти четыре возможности
Do While [условие]
Loop

Do Until [условие]
Loop

Do
Loop While [условие]

Do
Loop Until [условие]
Давайте посмотрим на некоторые примеры, чтобы прояснить это.
Примеры цикла Do
Представьте, что вы хотите, чтобы пользователь ввел список элементов. Каждый раз, когда пользователь вводит элемент, вы печатаете его в «Immediate Window». Когда пользователь вводит пустую строку, вы хотите, чтобы приложение закрывалось.
В этом случае цикл For не подойдет, поскольку вы не знаете, сколько элементов будет вводить пользователь. Пользователь может ввести пустую строку первым или с сотой попытки. Для этого типа сценария вы бы использовали цикл Do.
Следующий код показывает это
 Dim sCommand As String

    Do
        ' Получить пользовательский ввод
        sCommand = InputBox("Пожалуйста, введите элемент")

        ' Печать в Immediate Window (Ctrl + G для просмотра)
        Debug.Print sCommand

    Loop While sCommand <> ""
Код входит в цикл и продолжается до тех пор, пока не достигнет строки «Loop While». На этом этапе он проверяет, оценивается ли условие как истинное или ложное.
Если условие оценивается как ложное, то код выходит из цикла и продолжается.
Если условие оценивается как истинное, то код возвращается к строке Do и снова проходит через цикл.
Разница между наличием условия на линии Do и на линии Loop очень проста.
Когда условие находится в строке Do, цикл может вообще не работать. Так что он будет работать ноль или более раз.
Когда условие находится на линии Loop, цикл всегда будет запущен хотя бы один раз. Так что он будет запущен один или несколько раз.
В нашем последнем примере условие находится в строке Loop, потому что мы всегда хотим получить хотя бы одно значение от пользователя. В следующем примере мы используем обе версии цикла. Цикл будет выполняться, пока пользователь не введет букву «н».
Sub GetInput()

    Dim sCommand As String

    ' Условие в начале
    Do While sCommand <> "н"
        sCommand = InputBox("Пожалуйста, введите элемент для цикла 1")
    Loop

    ' Условие в конце
    Do
        sCommand = InputBox("Пожалуйста, введите элемент для цикла 2")
    Loop While sCommand <> "н"

End Sub
В приведенном выше примере оба цикла будут вести себя одинаково.
Однако, если мы установим для sCommand значение «н» до запуска цикла «Do While», код не войдет в цикл.
Sub GetInput2()

    Dim sCommand As String
    sCommand = "н"

    ' Цикл не будет работать, поскольку команда "н"
    Do Whilel sCommand <> "н"
        sCommand = InputBox("Пожалуйста, введите элемент для цикла 1")
    Loop

    ' Цикл все равно будет запущен хотя бы один раз
    Do
        sCommand = InputBox("Пожалуйста, введите элемент для цикла 2")
    Loop While sCommand <> "н"

End Sub
Второй цикл в вышеприведенном примере (то есть Loop While) всегда будет запускаться хотя бы один раз.
While против Until
При использовании Do Loop условию должно предшествовать Until или While.
Until и While, по сути, противоположны друг другу. Они используются в VBA аналогично тому, как они используются в английском языке.
Например:
- Оставьте одежду, пока не пойдет дождь
- Оставь одежду, пока не идет дождь
Другой пример:
- Оставайся в постели, пока не станет светло
- Оставайся в постели, пока темно
Еще один пример:
- повторять, пока число не станет больше или равно десяти
- повторить пока счет меньше десяти
Как видите, использование Until и While — это просто противоположный способ написания одного и того же условия.
Примеры Until и While
Следующий код показывает циклы «While» и «Until» рядом. Как видите, единственная разница в том, что условие полностью изменено.
Примечание: знаки <> означают «не равно».
Sub GetInput()

    Dim sCommand As String

    ' Условие в начале
    Do Until sCommand = "н"
        sCommand = InputBox("Пожалуйста, введите элемент для цикла 1")
    Loop

    Do While sCommand <> "н"
        sCommand = InputBox("Пожалуйста, введите элемент для цикла 1")
    Loop

    ' Условие в конце
    Do
        sCommand = InputBox("Пожалуйста, введите элемент для цикла 2")
    Loop Until sCommand = "н"

    Do
        sCommand = InputBox("Пожалуйста, введите элемент для цикла 2")
    Loop While sCommand <> "н"

End Sub
- Первый цикл: запускается только в том случае, если sCommand не равен ‘н’.
- Второй цикл: запускается только в том случае, если sCommand не равен ‘н’.
- Третий цикл: будет запущен хотя бы один раз перед проверкой sCommand.
- Четвертый цикл: будет запущен хотя бы один раз перед проверкой sCommand.
Пример: проверка объектов
Примером использования Until и While является проверка объектов. Когда объект не был назначен, он имеет значение Nothing.
Поэтому, когда мы объявляем переменную книги в следующем примере, она имеет значение Nothing, пока мы не назначим ее Workbook.
Противоположностью Nothing не является Nothing, что может сбить с толку.
Представьте, что у нас есть две функции: GetFirstWorkbook и GetNextWorkbook, которые возвращают некоторые объекты книги. Код будет печатать имя рабочей книги до тех пор, пока функции больше не вернут действительную рабочую книгу.
Вы можете увидеть пример кода здесь:
Dim wrk As Workbook
    Set wrk = GetFirstWorkbook()

    Do Until wrk Is Nothing
        Debug.Print wrk.Name
        Set wrk = GetNextWorkbook()
    Loop
Написание этого кода с использованием Do While было бы более запутанным, так как условие Not Is Nothing
Dim wrk As Workbook
    Set wrk = GetFirstWorkbook()

    Do While Not wrk Is Nothing
        Debug.Print wrk.Name
        Set wrk = GetNextWorkbook()
    Loop
Это делает код более понятным, и наличие четких условий — всегда хорошо. Честно говоря, разница маленькая, и выбор между «While» и «Until» действительно сводится к личному выбору.
Цикл Exit Do
Мы можем выйти из любого цикла Do с помощью оператора Exit Do.
Следующий код показывает пример использования Exit Do
Do While i < 1000
     If Cells(i,1) = "Найдено" Then
         Exit Do
     End If
     i = i + 1
Loop
В этом случае мы выходим из цикла Do Loop, если ячейка содержит текст «Найдено».
While Wend
Этот цикл в VBA, чтобы сделать его совместимым со старым кодом. Microsoft рекомендует использовать циклы Do, поскольку они более структурированы.
Из MSDN: «Оператор Do… Loop обеспечивает более структурированный и гибкий способ выполнения циклов».
Формат цикла VBA While Wend
Цикл VBA While имеет следующий формат:
While <Условие>
Wend
While Wend против Do
Разница между циклами VBA While и VBA Do заключается в следующем:
- While может иметь условие только в начале цикла.
- While не имеет версии Until.
- Не существует оператора для выхода из цикла While, как Exit For или Exit Do.
Условие для цикла VBA While такое же, как и для цикла VBA Do While. Два цикла в приведенном ниже коде работают точно так же.
Sub GetInput()

    Dim sCommand As String

    Do While sCommand <> "н"
        sCommand = InputBox("Пожалуйста, введите элемент для цикла 1")
    Loop

    While sCommand <> "н"
        sCommand = InputBox("Пожалуйста, введите элемент для цикла 2")
    Wend

End Sub
Бесконечный цикл
Даже если вы никогда не писали код в своей жизни, я уверен, что вы слышали фразу «Бесконечный цикл». Это цикл, в котором условие никогда не будет выполнено. Обычно это происходит, когда вы забыли обновить счетчик.
Следующий код показывает бесконечный цикл
Dim cnt As Long
    cnt = 1

    'это бесконечный цикл
    Do While cnt <> 5

    Loop
В этом примере cnt установлен в 1, но он никогда не обновляется. Поэтому условие никогда не будет выполнено — cnt всегда будет меньше 5.
В следующем коде cnt обновляется каждый раз, поэтому условие будет выполнено.
Dim cnt As Long
    cnt = 1

    Do While cnt <> 5
        cnt = cnt + 1
    Loop
Как вы можете видеть, использование For Loop безопаснее для подсчета, поскольку оно автоматически обновляет счет в цикле. Ниже приведен тот же цикл с использованием For.
Dim i As Long
    For i = 1 To 4

    Next i
Это явно лучший способ сделать это. Цикл For устанавливает начальное значение, условие и счет в одну строку.
Конечно, можно использовать бесконечный цикл, используя For — это потребует немного больше усилий 🙂
 Dim i As Long
    ' Бесконечный цикл
    For i = 1 To 4
        ' i никогда не достигнет 4
        i = 1
    Next i
Работа с бесконечным циклом
Когда у вас бесконечный цикл — VBA не выдаст ошибку. Ваш код будет продолжать работать, а редактор Visual Basic не будет отвечать.
Раньше вы могли выйти из цикла, просто нажав Ctrl и Break. В настоящее время разные ноутбуки используют разные комбинации клавиш. Полезно знать, как это настроено в вашем ноутбуке, чтобы в случае возникновения бесконечного цикла вы могли легко остановить код.
Вы также можете выйти из цикла, убив процесс. Нажмите Ctrl + Shift + Esc. На вкладке Процессы найдите Excel / Microsoft Excel. Щелкните правой кнопкой мыши по этому и выберите «Завершить процесс». Это закроет Excel, и вы можете потерять часть работы — так что гораздо лучше использовать Ctrl + Break или его эквивалент.
Использование функций Worksheet вместо циклов
Иногда вы можете использовать функцию листа вместо цикла.
Например, представьте, что вы хотите добавить значения в список ячеек. Вы можете сделать это с помощью цикла, но было бы более эффективно использовать функцию таблицы Sum. Это быстрее и экономит много кода.
Использовать функции рабочего листа очень просто. Ниже приведен пример использования Sum и Count.
Sub WorksheetFunctions()

    Debug.Print WorksheetFunction.Sum(Range("A1:A10"))

    Debug.Print WorksheetFunction.Count(Range("A1:A10"))

End Sub
В следующем примере используется цикл для выполнения того же действия. Как видите, это гораздо более длинный способ достижения той же цели.
Sub SumWithLoop()

    Dim total As Long, count As Long
    Dim rg As Range
    For Each rg In Range("A1:A10")
        ' Total
        total = total + rg
        ' Count
        If rg <> "" Then
            count = count + 1
        End If
    Next rg

    Debug.Print total
    Debug.Print count

End Sub
Резюме
Цикл Do While
- Цикл Do можно использовать 4 способами.
- Его можно использовать в начале или в конце, Do While .. Loop, Do … Loop While
- Может использоваться с Until в начале или в конце, Do Until .. Loop, Do … Loop Until
- While и Until используют противоположные условия друг к другу.
- Бесконечный цикл происходит, если ваше условие выхода никогда не будет выполнено.
- Иногда использование функции рабочего листа более эффективно, чем использование цикла.
Цикл While Wend
- Цикл Wend Wend устарел, и вы можете вместо этого использовать цикл Do.
- 07/20/2015
- Чтение занимает 3 мин
В этой статье
Повторяет блок инструкций Boolean , пока условие находится True в состоянии или до тех пор, пока условие не станет True .Repeats a block of statements while a Boolean condition is True or until the condition becomes True.
СинтаксисSyntax
Do { While | Until } condition
[ statements ]
[ Continue Do ]
[ statements ]
[ Exit Do ]
[ statements ]
Loop
‘ -or-
Do
[ statements ]
[ Continue Do ]
[ statements ]
[ Exit Do ]
[ statements ]
Loop { While | Until } condition
КомпонентыParts
| ТерминTerm | ОпределениеDefinition |
|---|---|
| Do | Обязательный.Required. Запускает определение Do цикла.Starts the definition of the Do loop. |
| While | Является обязательным, если используется параметр Until.Required unless Until is used. Повторите цикл, пока condition не будет False .Repeat the loop until condition is False. |
| Until | Является обязательным, если используется параметр While.Required unless While is used. Повторите цикл, пока condition не будет True .Repeat the loop until condition is True. |
| condition | Необязательный элемент.Optional. Выражение Boolean.Boolean expression. Если condition имеет значение Nothing , Visual Basic обрабатывает его как False .If condition is Nothing, Visual Basic treats it as False. |
| statements | Необязательный элемент.Optional. Одна или несколько инструкций, повторяемых в, или до, condition имеют True .One or more statements that are repeated while, or until, condition is True. |
| Continue Do | Необязательный элемент.Optional. Передает управление следующей итерации Do цикла.Transfers control to the next iteration of the Do loop. |
| Exit Do | Необязательный элемент.Optional. Передает управление за пределы Do цикла.Transfers control out of the Do loop. |
| Loop | Обязательный элемент.Required. Завершает определение Do цикла.Terminates the definition of the Do loop. |
Используйте Do…Loop структуру, если нужно повторить набор инструкций неопределенное число раз, пока не будет удовлетворено условие.Use a Do…Loop structure when you want to repeat a set of statements an indefinite number of times, until a condition is satisfied. Если нужно повторить инструкции заданное число раз, то для… Обычно лучше подходит следующий оператор.If you want to repeat the statements a set number of times, the For…Next Statement is usually a better choice.
Можно использовать либо While , либо Until , чтобы указать condition , но не оба.You can use either While or Until to specify condition, but not both.
Тест можно выполнять condition только один раз, в начале или в конце цикла.You can test condition only one time, at either the start or the end of the loop. Если проверка выполняется в condition начале цикла (в Do операторе), цикл может не выполняться даже один раз.If you test condition at the start of the loop (in the Do statement), the loop might not run even one time. Если протестировать в конце цикла (в Loop операторе), цикл всегда выполняется по крайней мере один раз.If you test at the end of the loop (in the Loop statement), the loop always runs at least one time.
Условие обычно является результатом сравнения двух значений, но может быть любым выражением, результатом вычисления которого является логическое значение типа данных ( True или False ).The condition usually results from a comparison of two values, but it can be any expression that evaluates to a Boolean Data Type value (True or False). Сюда относятся значения других типов данных, например числовые типы, которые были преобразованы в Boolean .This includes values of other data types, such as numeric types, that have been converted to Boolean.
Можно вложить Do циклы, поместив один цикл в другой.You can nest Do loops by putting one loop within another. Можно также вкладывать различные виды управляющих структур друг в друга.You can also nest different kinds of control structures within each other. Дополнительные сведения см. в разделе вложенные структуры управления.For more information, see Nested Control Structures.
Примечание
Эта Do…Loop структура обеспечивает большую гибкость, чем while… Оператор End While , так как он позволяет решить, следует ли завершать цикл при condition остановке True или при первом преобразовании True .The Do…Loop structure gives you more flexibility than the While…End While Statement because it enables you to decide whether to end the loop when condition stops being True or when it first becomes True. Он также позволяет тестироваться condition как в начале, так и в конце цикла.It also enables you to test condition at either the start or the end of the loop.
ВыйтиExit Do
Оператор Exit Do может предоставить альтернативный способ выхода из Do…Loop .The Exit Do statement can provide an alternative way to exit a Do…Loop. Exit Do немедленно передает управление оператору, следующему за Loop оператором.Exit Do transfers control immediately to the statement that follows the Loop statement.
Exit Do часто используется после вычисления некоторого условия, например в If…Then…Else структуре.Exit Do is often used after some condition is evaluated, for example in an If…Then…Else structure. Может потребоваться выйти из цикла, если обнаруживается условие, которое делает ненужным или невозможным продолжение итераций, например ошибочное значение или запрос на завершение.You might want to exit a loop if you detect a condition that makes it unnecessary or impossible to continue iterating, such as an erroneous value or a termination request. Одно из них Exit Do — Проверка на наличие условия, которое может вызвать бесконечный цикл, то есть цикл, который может выполнять большое или даже бесконечное число раз.One use of Exit Do is to test for a condition that could cause an endless loop, which is a loop that could run a large or even infinite number of times. Exit DoДля экранирования цикла можно использовать.You can use Exit Do to escape the loop.
В можно включить любое количество Exit Do операторов в любом месте Do…Loop .You can include any number of Exit Do statements anywhere in a Do…Loop.
При использовании внутри вложенных Do циклов Exit Do передает управление за пределы самого внутреннего цикла и в следующий более высокий уровень вложенности.When used within nested Do loops, Exit Do transfers control out of the innermost loop and into the next higher level of nesting.
ПримерExample
В следующем примере операторы в цикле продолжают выполняться до тех пор, пока index переменная не будет больше 10.In the following example, the statements in the loop continue to run until the index variable is greater than 10. UntilПредложение находится в конце цикла.The Until clause is at the end of the loop.
Dim index As Integer = 0
Do
Debug.Write(index.ToString & ” “)
index += 1
Loop Until index > 10
Debug.WriteLine(“”)
‘ Output: 0 1 2 3 4 5 6 7 8 9 10
ПримерExample
В следующем примере While вместо предложения используется предложение, которое Until condition проверяется в начале цикла, а не в конце.The following example uses a While clause instead of an Until clause, and condition is tested at the start of the loop instead of at the end.
Dim index As Integer = 0
Do While index <= 10
Debug.Write(index.ToString & ” “)
index += 1
Loop
Debug.WriteLine(“”)
‘ Output: 0 1 2 3 4 5 6 7 8 9 10
ПримерExample
В следующем примере condition останавливается цикл, если index переменная больше 100.In the following example, condition stops the loop when the index variable is greater than 100. IfОднако инструкция в цикле приводит к Exit Do остановке цикла, если переменная индекса больше 10.The If statement in the loop, however, causes the Exit Do statement to stop the loop when the index variable is greater than 10.
Dim index As Integer = 0
Do While index <= 100
If index > 10 Then
Exit Do
End If
Debug.Write(index.ToString & ” “)
index += 1
Loop
Debug.WriteLine(“”)
‘ Output: 0 1 2 3 4 5 6 7 8 9 10
ПримерExample
В следующем примере считываются все строки в текстовом файле.The following example reads all lines in a text file. OpenTextМетод открывает файл и возвращает объект StreamReader , считывающий символы.The OpenText method opens the file and returns a StreamReader that reads the characters. В Do…Loop условии Peek метод StreamReader определяет наличие дополнительных символов.In the Do…Loop condition, the Peek method of the StreamReader determines whether there are any additional characters.
Private Sub ShowText(ByVal textFilePath As String)
If System.IO.File.Exists(textFilePath) = False Then
Debug.WriteLine(“File Not Found: ” & textFilePath)
Else
Dim sr As System.IO.StreamReader = System.IO.File.OpenText(textFilePath)
Do While sr.Peek() >= 0
Debug.WriteLine(sr.ReadLine())
Loop
sr.Close()
End If
End Sub
См. такжеSee also
- Циклические структурыLoop Structures
- Оператор For…NextFor…Next Statement
- Логический тип данныхBoolean Data Type
- Вложенные структуры управленияNested Control Structures
- Оператор ExitExit Statement
- Оператор While…End WhileWhile…End While Statement
If you’ve been working enough time with Visual Basic for Applications, you’re probably aware that 2 of its most powerful structures are:
- Decision-making structures, such as the If… Then… Else statement.
- Loops.
 These 2 structures allow you to create powerful, flexible, sophisticated macros.
Excel VBA loops are, however, not an easy concept to understand.
My main purpose with this Excel tutorial is to help you get the hang of Excel VBA loops. Therefore, in this blog post, I cover the main aspects you need to understand for purposes of using VBA loops to improve your macros. The topics I cover go from basic aspects, such as what is a loop, to details about the syntax and process followed by the main types of looping structures supported by Excel. The following table of contents lists (in more detail) all of the topics I cover:
Before we go into the details of the different type of loops that Excel supports, let’s start by understanding…
What Is An Excel VBA Loop
Defined very broadly, looping is repeating the execution of certain statements more than one time. Therefore, when you want or need to repeat a particular action (or course of actions) while using Visual Basic for Applications, you can use loops.
In very broad terms, an Excel VBA loop does 2 things:
- #1: Executes certain statements.
- #2: Once all the statements have been executed, it goes (loops) back to the beginning of the structure.
Each of these cycles is known as an iteration. The number of iterations can (but doesn’t have to) be fixed. Based on whether this number of repetitions is fixed or not, you can distinguish between 2 loop categories:
- Category #1: Fixed-iteration loops, which repeat the relevant statements a set number of times.
- Category #2: Indefinite loops, in which the number of iterations is more flexible.
In either case, the factor that determines the number of iterations is sometimes referred to as the loop invariant or determinant. You can generally classify loop determinants in 2 categories:
- Numeric expressions, which can be evaluated as numbers.
- Logical expressions, which evaluate to True or False.
You can write VBA loops in several different ways. The looping structures supported by Excel and covered in this VBA tutorial are the following:
- For… Next.
- For Each… Next.
- Do….
- Do While and Do Until.
- While… Wend.
In practice, you’re most likely to work with only some of these looping structures: For… Next, For Each… Next, Do While and Do Until.
Out of these looping structures, only For… Next and For Each… Next loops are (usually) classified as fixed iteration loops. The other structures are (usually) classified as indefinite loops.
I explain the main aspects you need to know to start working with any of these looping structures in the sections below. However, before we start taking a look at each of them, let’s dive deeper into the question of…
Why Learn About Excel VBA Loops
Loops are an essential part of Visual Basic for Applications and (more generally) any programming language.
From a general perspective, the main beauty of Excel VBA loops is the fact that, as explained above, they allow you to repeatedly execute certain statements. In other words: Loops allow you to repeat a task several times.
The (main) reason you need loops for these purposes is that Visual Basic for Applications is a sequential programming language. As a consequence of this, statements are generally executed in order, line-by-line, from top to bottom. VBA includes some structures that allow you to control the flow of the program (such as If… Then… Else statements). However, as a general matter, the construct that you should usually use to repeat statements is an Excel VBA loop.
Among other things, Excel VBA loops allow you to loop through all the elements within a particular group, and work with each of those elements. Some of the groups you may want to work with in such a manner include: (i) ranges of cells, (ii) open workbooks, (iii) worksheets within a workbook or within all currently open workbooks, (iv) elements of an array, (v) characters within a cell, or (vi) charts on a worksheet or workbook.
From a theoretical standpoint, you could repeat an action by repeating the relevant VBA code as many times as necessary. In most cases, it’s better to use a loop to repeatedly execute the statements (as required).
The following are some advantages of using loops instead of simply repeating blocks of code:
- Advantage #1: Loops allow you to create shorter VBA procedures.
- Advantage #2: Macros that use VBA loops are, generally, more readable and easier to test, debug, maintain or modify than macros that repeat the same block of code several times.
- Advantage #3: Looping structures are significantly more flexible, particularly when it comes to determining the number of times the execution of the statements is repeated.
The main reason why Excel VBA loops are extremely useful is their speed. Loops are significantly faster than manually repeating a task several times.
This isn’t to say that you should never repeat blocks of code in your VBA procedures. I’m aware that learning about loops requires time, although you’re already reading this Excel tutorial which provides all the information you need to start working with loops.
Furthermore, in certain (very basic) situations, the amount of up-front work required to craft a good loop may not be justified by the time you’ll save later. In other words, there may be some (very basic) situations, in which limited repeating of blocks of code may be more efficient than using loops. This may the case with procedures that meet some or (preferably) all of the following conditions:
- Condition #1: Are very short.
- Condition #2: Repeat a small number of actions.
- Condition #3: Have a low and fixed number of repetitions.
In such cases, the VBA code will be longer and (slightly) more difficult to maintain. These issues are (usually) not a big problem when working with short/simple VBA procedures.
In the end, it comes down to a cost-benefit analysis. You must determine whether the amount of up-front work required by a loop is (or isn’t) worth it in the long run.
Despite these exceptional cases where looping may not be as efficient, the fact is that using Excel VBA loops can help you improve your speed when working with Excel.
As you’ll see in this Excel tutorial, they’re not exaggerating.
In addition to the usefulness of Excel VBA loops, there’s another reason why learning about the programming aspects behind these constructs is important:
The macro recorder doesn’t record loops. Therefore, if you want to use loops in your VBA code, you must know the code behind them.
All of this doesn’t mean that you should start using loops whenever you can. Using loops inappropriately can slow down your code. Therefore, you shouldn’t always use loops while working with Visual Basic for Applications. There are (for example) several cases where you can avoid loops by using worksheet functions in VBA.
However, if you’re serious about Visual Basic for Applications, you’ll eventually need to learn about (and work with) loops. Furthermore, in order to be able to determine whether a loop is the appropriate structure to use in a particular situation, you must understand what a loop is and what are the different types of loops you can use.
Therefore, let’s take a look at the main types of loops that you can use while working with Visual Basic for Applications:
For… Next Excel VBA Loops
For… Next Excel VBA loops are perhaps the most basic type of VBA loop. They’re generally considered to be the most commonly used Excel VBA loop. Their purpose is to repeat a particular group of statements a certain number of times.
Let’s take a look at the basic syntax of the For… Next Excel VBA loop. Items within square brackets ([ ]) are generally optional.
For counter = start To end [Step step]
    [statements]
    [Exit For]
    [statements]
Next [counter]
The following are some situations (along with samples of the appropriate VBA code) where you may find For… Next Excel VBA loops helpful:
- Looping through worksheets for purposes of, for example, saving each worksheet as a separate PDF file as explained in the linked blog post from Power Spreadsheets.
- Looping through array items.
- Looping through an entire column.
- Looping through rows for purposes of deleting those that are empty, using the fourth sample macro in this Power Spreadsheets VBA tutorial.
Now, let’s take a look at the main items within this looping structure:
Item #1: Counter
This is, perhaps, the key item of any For… Next loop. The reason is quite straightforward:
For… Next Excel VBA loops repeat statements a certain number of times. Therefore, you need to keep track of the number of times the statements have been executed. You use a loop counter for these purposes.
In other words, the counter controls the looping carried out by a For… Next loop.
The loop counter is simply a normal numeric variable. The loop counter can’t be a Boolean or an array element.
A consequence of the fact that the loop counter is a normal variable is that you can change its value within the For… Next block of code.
However, even though you can change the value of the counter while you’re inside the For… Next loop itself, this isn’t generally advisable (and it’s usually considered to be a poor coding practice). Changing the value of the loop counter in such a way makes your VBA code less readable, more difficult to debug, and may have difficult to predict consequences.
So, to put it simply:
Make sure that your VBA code doesn’t change the value of the counter variable within the For… Next loop itself. Be extra careful about this.
Notice that, within the basic syntax of the For… Next loop, [counter] appears in 2 different positions:
- On the opening statement, after the For keyword.
- This instance of the counter is required.
- At the end of the For… Next loop, after the Next keyword.
- This instance of the counter is optional. If you omit the loop counter in this position, the VBA code is executed as if counter is anyway included.
- In some cases (such as when nesting loops, a topic I cover below), it may be advisable to include this second counter.
When working with Visual Basic for Applications, you’ll often see that the loop counter variable is given a very short name, such as “i”, “j”, “k” and so on. This convention has its origins in the fact that (in the past) using longer names was more inconvenient. This (however) is no longer the case.
As a consequence of the above, you don’t have to continue using the traditional counter variable naming convention when working with Excel VBA loops. In this blog post, I explain the rules that apply to variable naming within VBA and provide some suggestions and ideas about how you can name your variables.
Item #2 And Item #3: Start and End
The loop counter (item #1 above) allows your VBA code to keep track of the number of times the relevant statements have been executed.
Items #2 (start) and #3 (end) allow your VBA code to determine the initial and final values that the counter must take. In other words, these items determine the values at which the counter variable starts and stops.
The value for start doesn’t necessarily need to be smaller than the value for end. In other words, you can structure your loops using either of the following:
- A start value that is smaller than the end value (start < end).
- A start value that is larger than the end value (start > end).
- As I show below, this is very helpful in cases where you need the loop to run backwards.
When determining the starting and ending values of the looping counter, you’re not limited to just using hard-coded values. You can also use variables for these purposes. Additionally, these items can be:
- Hard-coded;
- Passed from either an input or a dialog box; or
- Passed from a value generated by a VBA procedure, including both the same procedure where the loop is or a different procedure.
When using variables, however, you should probably exercise additional caution.
The last main item your For… Next VBA loop needs in order to be able to accurately execute the relevant statements the number of times you want is…
Item #4: Step
By now, you know that a For… Next Excel VBA loop needs a loop counter (item #1 above). You also know that you need to determine the initial and final values that this particular counter takes (items #2 and #3 above).
The optional Item #4, step, allows you to determine the way in which the loop counter changes every time the statements within the For… Next loop are executed. In other words: Step is the amount by which the counter changes each time/iteration.
By appropriate use of the step you can, among other things, skip some of the values of the loop counter.
To make the concept of step clearer, imagine that you must start counting at 1 and stop when you reach 100. In VBA terms, 1 is the start counter value (item #2 of a For… Next loop) and 100 is the end counter value (item #3 of the For… Next loop).

If you’re like me, you’d probably start counting in order: 1, 2, 3, 4, 5, … and so on until you reach 100.
This way of counting may be correct. However…
There are other ways in which you can start counting at 1 and stop when you reach 100. Just to give you some examples:
- You can count by twos (2, 4, 6, 8, …, 100). You could make a further distinction between counting by even and counting by odd (1, 3, 5, 7, 9, …, 99) numbers.
- You can count by fives (5, 10, 15, 20, 25, …, 100).
- You can count by tens (10, 20, 30, 40, …, 100).
- And so on… You probably get the idea.
The For… Next Excel VBA loop works roughly like this. In other words:
- The step item determines how the loop counter changes every time an iteration is completed.
- Despite the above, you don’t need to explicitly determine a step value. If you don’t specify the step, the default value is 1.
- You can, however, set different values for step. In fact, step can be both a positive or a negative number.
- As I explain below, using a negative value for step can be very useful in certain circumstances where you need the loop to run backwards.
The step of a For… Next VBA loop plays a very important role for purposes of loop processing. I explain its specific impact further below.
Item #5: Statements
These are simply the statements that are executed the relevant number of times. Even though statements are an optional item, it’s likely that the For… Next VBA loops you create will include them.
As a general rule, there’s no restriction on the number of statements that you can have within a loop (including a For… Next loop).
Additionally, as I explain below, you can nest For… Next loops within other For… Next loops.
Item #6: Exit For Statement
Exit For statements are generally optional. The Exit For statement is a specific type of Exit statement.
Exit statements allow you to exit a block of code. In the case we’re analyzing the block of code you’re exiting is that of the For… Next loop.
In broad terms, you can use the Exit For statement for purposes of exiting (or terminating) a For… Next loop. If the relevant For…Next VBA loop isn’t nested, an Exit For statement transfers control to the statement that follows the Next keyword of the For… Next loop.
How Does The For… Next Excel VBA Loop Work
Let’s start by taking a broad look at the process followed by the For… Next Excel VBA loop:

And let’s take a more specific look at the 5 basic steps that the For… Next loop goes through before exiting the loop:
Step #1: Determine Whether Statements Must Be Executed
When working with a For… Next loop, Visual Basic for Applications must always determine whether the statements within the For… Next loop must be executed. This is done by comparing (i) the current value of the loop counter with (ii) the end value of the counter.
The rules for determining whether the statements should be executed or not depend on whether the value of step is positive or negative:
- If step is a negative value, the statements in the loop are executed as long as the loop counter is larger than or equal to the end value of the counter. Mathematically, the loop is executed if “counter >= end”.
- If step is non-negative (positive or 0), the statements within the loop are executed as long as the loop counter is smaller than or equal to the end value. In this case, the loop is executed if “counter <= end”.
As you can see, the value of step plays a key role in the process followed by a For… Next loop.
The first time the logical tests described above are carried out (when Visual Basic for Applications enters the loop for the first time), the starting value is assigned to the loop counter. For the subsequent iterations, the relevant counter value is determined in accordance with step #3 below and, therefore, depends on the value of the step.
If the conclusion reached after applying the logical tests explained above is that the statements shouldn’t be executed, the macro exits the For… Next loop. Upon exiting the For… Next loop, execution control generally goes to the statement after the Next keyword.
However, if the conditions for executing the statements again are met, the For… Next loop moves onto…
Step #2: Execute Statements
The statements within a For… Next Excel VBA loop are executed a certain number of times.
Therefore, if VBA determines that the statements within the loop must be executed according to the criteria explained in step #1 above, the macro executes the statements.
Step #3: Add Step To Counter
You already know that the main items that Visual Basic for Applications uses to determine whether the statements within a For… Next VBA loop must be executed are (i) the loop counter and (ii) the end value of the counter.
The first time the statements are executed, the value of the loop counter is its initial value. You determine this value through the start item I explain above.
Every time the statements are executed, the step is added to the counter. As I explain above, the default value of step is 1. However, as you’ve seen, you can specify other values regardless of whether they’re positive or negative.
Step #4: Repeat Step #1
Once step has been added to the loop counter in step #3, the VBA application must determine (once again) whether the loop must be executed. This means that step #1 above is executed again.
For Each… Next Excel VBA Loop
You can use the For Each… Next Excel VBA loop for purposes of repeating the execution of certain statements for each element within a particular array or collection. In broad terms:
- Arrays are sets of values that have a logical relationship between them.
- Collections are groups of related objects.
The For Each… Next Excel VBA loop is a very helpful construct for purposes of manipulating arrays and collections. The For Each… Next loop (and similar constructs such as the With… End With statement) can help you simplify your VBA code when working with objects and collections.
You’ll probably notice that, in some respects, the For Each… Next Excel VBA loop is materially similar to the For… Next loop that I explain above. One of the main advantages of the For Each… Next loop, when compared with the For… Next loop, is that the For Each… Next loop allows you to work with an array or collection without knowing the number of elements within the relevant array or collection. In other words: You don’t have to know the number of loop iterations in advance because VBA will know the number of loop iterations at execution time.
The basic syntax of the For Each… Next loop is as follows. Items within square brackets are optional.
For Each element In group
    [statements]
    [Exit For]
    [statements]
Next [element]
If you’re interested in some practical applications of the For Each… Next VBA loop, the following list may interest you:
- To delete blank rows, you can use macro #5 here, which I explain in another blog post within Power Spreadsheets.
- To loop through a Range, refer to the very simple example I include in this VBA tutorial.
- To modify all open workbooks, and using a loop to go through them.
- To go through every worksheet within every open Excel workbook.
- To loop through (and make changes to) all the graphs within the active Excel workbook.
- To change all tables within an Excel workbook or worksheet, and use loops to go through them.
- To loop through (among others) PivotTables, Shapes, Combo Boxes, Checkboxes, Option Buttons, Buttons (Form Control), Textboxes (ActiveX), Command Buttons (ActiveX) or Toggle Buttons (ActiveX).
Let’s take a closer look at each of the elements within the syntax of a For Each… Next loop:
Item #1: Element
Element makes reference to the variable that the loop uses to iterate through all of the elements within the relevant group. In order for VBA to enter a For Each… Next Excel VBA loop, there must be at least one element within the group that is being used.
There are some restrictions that apply when determining which data types you can use for the element variable. More precisely, which data types can you use is mainly determined by the characteristics of the group you’re looping through. The main restrictions you should remember for these purposes are the following:
- If the group is a collection: You can only use (i) Variant variables, (ii) generic object variables, or (iii) specific object variables.
- If the group is an array: You can only use Variant variables.
In practice, you’re more likely to encounter object variables when working with For Each… Next loops.
In certain respects, the element item within a For Each… Next loop serves a similar purpose as the loop counter in a For… Next loop. More precisely, and as I explain below, element (item #1) and group (item #2) are used by Visual Basic for Applications to determine whether the statements within the For Each… Next loop should be executed.
If you omit the last element (which appears after the Next keyword), macro execution continues as if the element is included. In other words:
- The first instance of element (on the opening statement) is required.
- The last instance of element (at the end of the loop) is optional.
- However, in some cases (such as when nesting loops), you may want to get used to including this instance of element.
Item #2: Group
As anticipated above, group represents the group of elements that you’re looping through.
As a general rule, groups can be either (i) object collections or (ii) arrays. As an exception to this rule, you can’t use arrays of user-defined types. The reason for this is that a Variant variable can’t contain a user-defined type.
Item #3: Statements
Statements are the actual statements that Excel executes for each of the items within the group that you’re working with.
Theoretically, statements are optional. In practice, most of the For Each… Next Excel VBA loops you create will include at least one statement.
Generally, you can include as many statements as you want. Furthermore, you can nest For Each… Next loops within other loops.
Item #4: Exit For Statement
The Exit For statement is optional. This statement is a specific form of the more general Exit statement.
The Exit statement by itself allows you to exit a block of, among others, For Each… Next, Function or Sub code.
You can use the Exit For statement to exit a For Each… Next loop. This is particularly useful, for example, in cases where you don’t need the loop to go through all the elements in the group.
If you use the Exit For statement within a For Each… Next Excel VBA loop, the way in which the code determines to which other statement it transfers control depends on whether the For Each… Next loop is nested or not. More precisely:
- If the For Each… Next loop is nested within other loop(s), the Exit For statement transfers control to the loop that is immediately one level above.
- If the loop isn’t nested, control is transferred to the statement that follows the Next keyword.
How Does The For Each… Next Excel VBA Loop Work
The previous sections give you a good idea of what is the basic structure and elements of the For Each… Next Excel VBA loop. Let’s take a closer look at how this structure and elements work together to achieve the purpose of repeating the execution of the statements for each element within the group.
From a broad perspective, a For Each… Next Excel VBA loop proceeds as follows:

Let’s take a look at the 5 broad steps that a For Each… Next Excel VBA loop goes through before exiting the For Each… Next loop:
Step #1: Enter The For Each Block
The first part of a For Each… Next Excel VBA loop is the For Each block.
A macro only enters this For Each block if there is at least one element in the applicable group.
Therefore, if the group that you’re working with has at least one element, the application enters the For Each block. Once this occurs, the code continues to…
Step #2: Execute Statements For First Element In Group
After the code has entered the For Each block, the macro starts executing all of the statements for the first element within the group.
However, since the main purpose of this loop is to repeat the execution of the statements for each of the elements within the relevant array or collection, this step #2 by itself isn’t enough to achieve that goal. The following steps are the ones that actually carry out the looping.
Step #3: Determine Whether There Are More Elements In Group
Once all of the statements have been executed for a particular element within the group, the For Each… Next loop looks to determine whether there are more elements in the group.
If there are no other elements within the group, the macro exits the For Each… Next loop. Once the macro exits the loop, it generally continues with the statement that follows the Next statement of the For Each… Next loop.
However, if the group contains more elements, the macro goes on to…
Step #4: Execute Statements For Next Element In Group
Notice how this step is pretty much a repetition of step #2 above. The key difference is that the element for which all of the statements are applied changes as the loop progresses.
Step #5: Repeat Step #3
From a general perspective, a For Each… Next Excel VBA loop simply (i) goes through all of the elements within the group and (ii) executes the statements for each of those elements. Therefore, step #3 above is the key in determining whether the loop continues or stops.
In other words, every single time the statements are executed for a certain element within the group, the macro checks whether there are elements left within the group (step #3). If there are still elements, the statements are executed for the next element and the loop continues.
Eventually (assuming your For Each… Next VBA loop is properly structured), the macro will get to the last element in the group. As explained above, once the applicable VBA statements are executed for the last group element, and there aren’t any other elements left, the macro:
- Exits the For Each… Next loop; and
- Generally, continues execution with the statement that follows the Next statement (that is at the end of the For Each… Next loop).
Do While And Do Until Excel VBA Loops
Do While and Do Until Excel VBA loops are 2 versions of the same VBA construct: the Do… Loop statement. Their purpose is to repeat a certain statement (or block of statements) subject to a condition being met. More precisely:
- The Do While Excel VBA loop repeats the relevant statements while a condition is met (True). Once the condition isn’t met (becomes False), Visual Basic for Applications exits the loop.
- The Do Until Excel VBA loop repeats the statements until the condition is met (becomes True). In other words, the statements are repeated as long as the condition isn’t met (False).
As you can see, Do While and Do Until VBA loops are substantially similar. Their main difference is that (i) Do While loops run while the condition is True, while (ii) Do Until loops do the opposite and run while the condition is False.
In other words: The main difference (between Do While and Do Until loops) is in how they handle the tested condition. In fact, both approaches are functionally similar (or even the same). In this context, the choice between one loop or the other (usually) boils down to how you want to manage/structure the applicable condition.
To understand the above, consider the 2 following structures, which generally lead to the same result:
- Set a condition that evaluates to True and use a Do While loop. Once the condition evaluates to False, your code exits the loop.
- For a real life example, imagine that on any particular day you sit down to work and say: “I will work while it’s daytime”. In such a case, you work while it’s daytime (the condition is True) and, once the condition evaluates to False (it’s no longer daytime), you stop working.
- Set the opposite condition and use a Do Until loop. Once the condition evaluates to True, Visual Basic for Applications exits the loop.
- Going back to the real life example above, in this case you’d say “I will work until it’s night-time”. In this situation, you work while the condition is False (it’s not night-time) and, once the condition evaluate to True (it’s night-time), you stop working.
Do Until and Do While are, to a certain extent, simply opposite ways of stating the same condition.
Let’s begin the exploration of these loops by taking a look at the basic syntax of the Do… Loop statement:
Unlike other loops that I explain in this Excel tutorial, you have 2 alternatives for structuring Do While and Do Until loops. In both cases, the items within square brackets ([ ]) are optional.
Do While And Do Until Excel VBA Loops: Syntax #1
Do [{While | Until} condition]
    [statements]
    [Exit Do]
    [statements]
    Loop
Do While And Do Until Excel VBA Loops: Syntax #2
Do
    [statements]
    [Exit Do]
    [statements]
Loop [{While | Until} condition]
Why Are There 2 Syntax Options For Do While And Do Until Excel VBA Loops
Notice that both syntax options are substantially similar. The only real difference lies in the position of “[{While | Until} condition]”.
- In syntax option #1: “[{While | Until} condition]” appears on the opening statement.
- In syntax option #2: “[{While | Until} condition]” appears at the end of the loop.
- Some authors refer to these loops as Do… Loop While or Do… Loop Until.
The position of “[{While | Until} condition]” is relevant because this is the point at which the condition that determines whether the statements within the loop must be executed 1 more time or not is evaluated. In particular:
- In syntax option #1, the statements inside the loop may never be executed.
- In syntax option #12, the statements inside the loop are always executed (at least 1 time).
These differences allow you to determine whether (i) the statements within the loop shouldn’t be executed in certain circumstances (using syntax #1), or (ii) the loop should always be executed the first time around (using syntax #2). These options provide you even greater flexibility for structuring your Excel VBA loops.
The usefulness of the second syntax may not be evident at first. You may wonder in which situations you’d want to execute the statements before checking whether the relevant condition is met…
The second syntax of Do While and Do Until VBA loops is useful when you have to:
- Carry out a particular action at least once; and
- Repeat the action, subject to some condition.
So don’t dismiss the second syntax of Do While and Do Until loops. You’re likely to eventually run into situations where they may help you.
In fact, the situations where you take an action first, and check whether the condition is met later (to determine whether you need to repeat the action) aren’t uncommon in programming.
As you can see, the syntax choice you make when working with for Do While and Do Until loops have a material impact in the way your loops work. They’re not simply cosmetic differences.
Understanding these differences is important to ensure that you know which version of a Do While or a Do Until loop is more appropriate for any particular situation you may face. However, if the difference between the syntax options for Do While and Do Until loops isn’t yet perfectly clear, don’t worry. I show you how these loops proceed (step-by-step) below.
But first, let’s take a look at the basic items that go in a Do While and a Do Until VBA loop. Notice how, despite the different syntax alternatives, these basic items remain the same.
Item #1: {While | Until}
The structure of the Do Until and Do While Excel VBA loops is substantially similar.
However, notice that, in both of the syntax options I describe above, there are curly brackets surrounding the words While and Until ({While | Until}). Here, you must state whether you’re creating a Do While or a Do Until loop by choosing the appropriate word from within the curly brackets ({ }) or, what is the same, delete the word that corresponds to the type of Do… loop that you aren’t creating.
In other words, if you’re using the first syntax option, the actual first statement (Do [{While | Until} condition]) you should use is determined as follows:
- Do While loop: Do [While condition].
- Do Until loop: Do [Until condition].
Similarly, if you’re using the second syntax option, the actual last statement (Loop [{While | Until} condition]) you should use is as follows:
- Do While loop: Loop [While condition].
- Do Until loop: Loop [Until condition].
Item #2: Condition
A condition can be structured as either of the following:
- A numeric expression, which is an expression that can be evaluated as numbers.
- A string expression, which is an expression that evaluates to a sequence of contiguous characters.
The condition must return one of the Boolean values: True or False. Null is treated as False.
From a theoretical standpoint, both items #1 and #2 are optional. However, omitting them can have undesirable consequences, as I explain below.
Item #3: Statements
As in the other types of loops that I explain in this Excel tutorial, these are simply the statements that are repeatedly executed. In the case of Do While and Do Until VBA loops, these are the statements that are executed while (in the Do While loop) or until (in the Do Until loop) the condition is met (True).
Item #4: Exit Do Statement
The Exit Do statement holds some similarities with the Exit For statement that you can use within the For Each… Next and For… Next loops. For example:
- The Exit Do statement is one of the forms of the more general Exit statement.
- You can use an Exit Do statement to create an alternate way to exit the relevant loop.
- You can generally place Exit Do statements anywhere within a Do While or Do Until loop. However, the Exit Do statement is often used after evaluating a condition (with, for example, an If… Then… Else statement).
As a general rule, the Exit Do statement exits a Do While or Do Until loop by transferring control to the statement that follows the Loop. However, if you have a nested Do While or Do Until loop, control is transferred to the loop nested one level above the current loop (the one where the executed Exit Do statement is).
How Do The Do While And Do Until Excel VBA Loops Work
By now, you probably have a good idea of how the different types of Do While and Do Until loops work. However, just as with the For… Next and For Each… Next loops, let’s take a look at the actual process carried out by each of the different Do While and Do Until loops:
Do While Excel VBA Loop: Syntax #1
The Do While loop (syntax #1, where the opening statement is “Do While condition”) proceeds as follows:

The 3 steps that the Do While loop follows (before exiting the loop) are the following:
Step #1: Test Whether Condition Is True.
I explain how you can use 2 different syntaxes for purposes of creating Do While loops above. The main difference between both syntax options is the point at which the condition that determines whether the loop must be executed one more time or not appears.
If you use the first syntax that I explain above, the opening statement of the Do While loop is “Do While condition”. In this case, the condition that determines whether the statements within the loop is executed is tested at the beginning.
In a Do While loop, the relevant statements are executed as long as the condition is True. Therefore:
- If the condition evaluates to False, the loop ends and control passes (usually) to the VBA code that appears immediately below the loop.
- If the condition evaluates to True, Visual Basic for Applications proceeds to…
Step #2: Execute The Statements.
The statements within the Do While loop are executed if the condition (evaluated in step #1 above) continues to be True.
Execution of the statements continues until Visual Basic for Applications encounters the Loop keyword at the end of the Do While VBA loop. At this point, it goes onto…
Step #3: Loop.
Once all the statements within the Do While loop have been executed, Visual Basic for Applications loops. In other words, VBA goes back to step #1 above and tests whether the condition continues to be True.
Now, compare this process with that followed by the second syntax option for the Do While Excel VBA loop. This should clear up any doubts you have regarding the procedural differences between the 2 types (syntaxes) of the Do While loop.
Do While Excel VBA Loop: Syntax #2
In the second syntax option of a Do While VBA loop, the closing statement (“Loop While condition”) is the one checking whether the required condition is met. As I explain above, these loops are sometimes referred to as Do… Loop While loops.
The following image illustrates the process followed by this type of Do While Loops:

The 3 steps followed by this type of Do While loop are substantially the same as those I describe above. The main difference is the order in which the steps are carried out.
Let’s go through each of the steps followed by a Do While when the second syntax is used:
Step #1: Execute The Statements.
When you use the second syntax for a Do While loop, the relevant condition is only tested at the end of the loop.
Therefore, regardless of whether the condition is True or False, the statements within the loop are executed. In other words, as explained above, the statements within a Do While loop that uses the second syntax (also known as a Do… Loop While loop) are always executed at least 1 time.
Once the statements are executed, Visual Basic for Applications proceeds to…
Step #2: Test The Condition.
Within this type of Do While loop, all of the statements are executed until Visual Basic for Applications encounters the statement “Loop While condition”.
At this point, the relevant condition is tested. The way in which execution continues depends on whether the condition is True or False. More precisely:
- If the condition is False, Visual Basic for Applications exits the loop. In such a case, execution usually continues with the statement following “Loop While Condition”.
- If the condition is True, VBA goes on to…
Step #3: Loop.
If the relevant condition is True, Visual Basic for Applications loops. In other words, as long as the condition being evaluated continues to be True, Visual Basic for Applications returns to step #1 above and repeats the loop.
Do Until Excel VBA Loop: Syntax #1
The difference between the 2 syntax options for a Do Until loop roughly mirrors the difference between the 2 alternatives for a Do While loop.
Let’s start by taking a look at the process followed by the first version of a Do Until VBA loop:

Notice that, this process, is substantially the same as that followed by the Do While loop (using syntax #1) that I explain above. The main difference, as explained above, is in the handling of the tested condition which is done in…
Step #1: Test Whether Condition Is False.
A Do While loop runs as long as the tested condition is True. Therefore, the question asked in step #1 of a Do While loop is whether the condition is True.
A Do Until loop asks the opposite question:
Is the condition False?
In other words, a Do Until loop tests the condition (just as a Do While loop does). However, once the condition is tested, a Do Until loop proceeds in the opposite way in which a Do While loop does. More precisely:
- If the condition is True, it exits the loop. Execution then, generally, continues with the statement following the Loop keyword.
- If the condition is False, it carries on with…
Step #2: Execute Statements.
In step #2, a Do Until loop simply executes the statements within its body. In other words, all of the statements before the Loop keyword are executed.
Once Visual Basic for Applications encounters the Loop keyword, it goes on to…
Step #3: Loop.
Once all of the statements within a Do Until loop have been executed, a Do Until loop returns to step #1.
Let’s finish the section about Do While and Do Until Excel VBA loops by taking a look at the second possible syntax of Do Until loops. Just as you did with Do While loops, compare the 2 syntax options you can use when working with Do Until loops.
Do Until Excel VBA Loop: Syntax #2
When working with a Do Until VBA loop using syntax #2 (also known as a Do… Loop Until loop), the statement that checks the relevant condition (Loop Until condition) is at the end of the loop. Therefore, the process followed by this type of loop is as follows:

Let’s go through the 3 main steps that this version of Do Until loop goes through before exit:
Step #1: Execute Statements.
When using the second syntax option of a Do Until loop, the statements within the loop are always executed at least 1 time. Therefore, upon entering the loop, Visual Basic for Applications executes all the statements prior to the closing loop statement (Loop Until condition).
Once the statements are executed, VBA goes on to…
Step #2: Test The Condition.
Do Until loops execute a series of statements as long as the relevant condition is False. Therefore, once VBA encounters the “Loop Until condition” statement, it tests the relevant condition and:
- If the condition evaluates to True, exits the loop. Upon exiting this type of loop, execution usually continues with the statement that follows “Loop Until condition”.
- If the condition evaluates to False, it goes onto to…
Step #3: Loop.
When looping, Visual Basic for Applications goes back to step #1 above.
In other words, as long as the condition evaluated in step #2 is False, VBA continues to go back to step #1 for purposes of executing the statements within the Do Until loop.
While working with Visual Basic for Applications, you’re likely to work most of the time with the loops that I describe above, namely:
- For… Next loops.
- For Each… Next loops.
- Do While and Do Until loops (each having 2 versions).
These, however, aren’t the only ways to create loops in Visual Basic for Applications, although they’re generally the most appropriate. Since you may eventually encounter other type of looping constructs, let’s take a look at 2 alternative looping structures, starting with…
Do… Excel VBA Loops and Avoiding Infinite Loops
In the section above, I introduce Do While and Do Until VBA loops.
As I explain in that section, the keywords While or Until and the condition items are optional.
This means that, strictly speaking, Do… loops don’t have to be Do While or Do Until loops. In other words, you can theoretically use the 2 syntaxes below to create looping structures.
However, as I explain further down this Excel tutorial, neither of these structures is really recommended nor necessary.
Do… Excel VBA Loops: Syntax #1
Do
    [statements]
    [Exit Do]
    [statements]
Loop
Do… Excel VBA Loops: Syntax #2
Do
    [statements]
    [Exit Do]
    [statements]
Loop
Notice that both of these structures are exactly the same as those I explain above when introducing the Do While or Do Until loops with a big exception:
Neither of them includes the optional (i) While or Until keywords or (ii) condition ([{While | Until} condition]).
These absences have big consequences.
As I explain above, in Do While or Do Until loops a certain group of statements is executed repeatedly while or until a particular condition is met. In the absence of these items ({While | Until} condition), there’s no mechanism to stop the looping procedure. In other words: The Do… Loop runs forever because nothing stops it from doing so.
This is sometimes called an infinite loop.
You can actually stop the execution of a such a macro by, for example:
- Pressing the keyboard shortcuts “Ctrl + Break”, although some computer may require different key combinations.
- Use Windows’ Task-Manager (keyboard shortcut “Ctrl + Alt + Del”) to shut down Excel.
- Restart your computer.
However, as I explain in the previous sections of this Excel tutorial, there are better ways to stop the looping.
One option, is to use (i) If… Then… Else statement to carry out conditional tests and determine whether certain conditions are met and, based on the result of the logical test, (ii) continue looping or use the Exit Do statement (which I explain below) to exit the Do… Excel VBA loop.
In most cases, however, the simplest option is likely to stick to Do While and Do Until loops. These constructs allow you to easily determine when Visual Basic for Applications should exit the relevant loop. Therefore, the appropriate use of the Do While and Do Until loops should allow you to achieve the same objectives as an unrestricted Do… VBA loop without the added complexity.
And finally, always ensure the applicable condition (that terminates at loop) will eventually be satisfied. This comment is applicable to other types of Excel VBA loops (not only the Do… loop), particularly Do While loops.
While… Wend Excel VBA Loops
You’ve already seen several different types of Excel VBA loops in the previous sections:
- For… Next loops.
- For Each… Next loops.
- Do While and Do Until loops.
- Do… loops.
There is, however, an additional looping structure that doesn’t appear in this list: The While… Wend loop.
The term “Wend” is a contraction of While… End.
The While… Wend loop exists mainly for compatibility purposes with earlier languages. Therefore, this type of Excel VBA loop is relatively rare and you’re unlikely to work (or find it) too frequently while working with Visual Basic for Applications.
In fact, instead of using While… Wend loops, you’re probably better off using the Do While and Do Until loops that I introduce above. In particular, the general Do… Loop structure is more robust and flexible (than the While… Wend loop). In particular, as you’ll notice below:
- When using the While… Wend Excel VBA loop, you don’t have the possibility of specifying whether the condition should be tested at the beginning or at the end of the loop. As I explain above, Do While and Do Until loops allow you to do this.
- When using Do While and Do Until loops, you can use the Exit Do statement to create alternate exits to the loop. The While… Wend looping structure isn’t as flexible in this regard.
However, the While… Wend looping structure exists and works (if you choose to use it). Therefore, to the extent that you may still encounter it, I might as well introduce it in this Excel tutorial about VBA loops.
The main purpose of the While… Wend VBA loop is to execute certain statements as long as a particular condition is True. Once the condition isn’t met (becomes False), VBA exits the loop.
The basic syntax of the While… Wend loop is as follows:
While condition
    [statements]
Wend
The items within this type of statement may look familiar. After all, they’re substantially similar to some of the elements in the other type of VBA loops that I describe further above. In any case, let’s take a look at those items:
Item #1: Condition
The condition within a While… Wend loop is a numeric or string expression evaluating to either True or False. Similar to what happens with the Do While and Do Until loops, if condition is Null, Visual Basic for Applications treats it as False.
Item #2: Statements
These are the actual statements that Visual Basic for Applications executes repeatedly while the condition is True.
After understanding the basic elements and purpose of the While… Wend statement, we can dive into the actual process followed by this type of Excel VBA loop:
How Does The While… Wend Excel VBA Loop Work
The following diagram illustrates the basics of how the While… Wend loop proceeds:

Notice how this process is materially similar to that followed by the Do While VBA loop I explain above.
The following are the 3 main steps within this process:
Step #1: Check Whether Condition Is True
The main purpose of the While… Wend VBA loop is to execute certain statements as long as the applicable condition is True. Therefore, the process begins by checking whether the condition is actually True.
If the condition isn’t True, Visual Basic for Applications exits the loop. In such cases, execution generally continues with the statement that appears after “Wend”.
If the condition is indeed True, the VBA code proceeds to…
Step #2: Execute All Statements
If the condition within the While… Wend loop is True, all of the statements within the loop are executed.
Execution goes on until the VBA code encounters the Wend statement. At that point, the code goes on to…
Step #3: Repeat Step #1
Once the Wend statement is encountered, control goes back to the While statement that opens the While… Wend loop (step #1 above). This allows the code to check (again) whether the condition continues to be True.
Excel VBA Loops: The Exit Statement And Nesting
As with most VBA constructs, once you understand the basic steps of Excel VBA loops, you can start creating more complex and sophisticated loops. Let’s take a look at 2 common ways you can start doing this:
Excel VBA Loops And The Exit Statement
As explained above, the Exit For statement allows you to exit a For Each… Next or For… Next loop while the Exit Do statement allows you to exit a Do While or Do Until loop. In other words, once Visual Basic for Applications encounters the statement, the relevant loop is immediately terminated.
Note that you can’t use the Exit statement to exit a While… Wend Excel VBA loop.
The usual way of exiting loops is the one I explain in the relevant sections above. More precisely:
- Visual Basic for Applications exits a For… Next loop when the current value of the loop counter variable is (i) larger than the end value of the counter (if the step is positive), or (ii) smaller than the end value of the counter if the loop counter runs backwards (the step is negative) (see step #1 of a For… Next loop above).
- A For Each… Next loop is exited once the relevant VBA statements are executed for the last group element (see steps #3 and #5 of a For Each… Next loop above).
- VBA code exits a Do While VBA loop when the relevant condition isn’t met any longer.
- Visual Basic for Applications exits a Do Until loop when the applicable condition is met.
By using Exit For or Exit Do statements you can create alternate exits when working with loops.
You may wonder why would you want to create an alternate exit to a loop…
One of the main reasons why you may want to use the Exit For or Exit Do statements to create an alternate exit to a loop is that it can greatly speed your code.
The truth is that, in some macros, you simply don’t need to go through the whole looping structure.
This is the case, for example, when you create VBA applications whose objective may be achieved without having to (i) wait until a condition becomes False (or True) in the case of Do While or Do Until loops, or (ii) loop through each element within a group in the case of For Each… Next loops. Consider, for example, a situation where you must find a single record meeting certain criteria. In such a case, once you find the specific record you’re looking for, you can exit/stop the loop.
Other situations where you may want to use the Exit statement include cases where your procedure is responding to an error or to the user cancelling the procedure.
This, however, doesn’t mean that you should use the Exit statement profusely.
To a certain extent, there’s debate regarding the use of the Exit statement and, more precisely, whether this is a good coding practice. Some advanced Excel VBA users argue that the optional Exit statement is rarely necessary. In fact, from this perspective, using the Exit For statement too often may be a sign that your approach to building/structuring loops could be improved.
In any case, the Exit statement exists. Some practitioners agree that there are cases (such as the 3 I mention above) where using the Exit statement is generally acceptable. This is the case with some advanced Excel VBA users who cannot justify continuing a loop after the loop’s objective has been met (for example, you’ve found what you need).
The use of the Exit statement is probably one of those topics where you’ll build your own opinion and practices as you go along. While doing so, you may want to keep in mind that this debate exists.
Personally, whenever working with VBA loops, I do the following:
- Use the Exit statement sparingly; and
- Ask whether I could structure a loop in such a way that allows me to avoid an unnecessary Exit statement.
As a general rule, there aren’t restrictions as to where you should place the Exit For or Exit Do statements. However, they’re usually included after carrying out a conditional test. One way in which you do this is by (i) using the If… Then… Else statement for purposes of checking whether a condition is met and, (ii) depending on whether the condition is met or not, using the Exit For or Exit Do statement to exit the Excel VBA loop.
Nesting Excel VBA Loops
For purposes of this VBA tutorial, nesting a loop means placing a loop within another loop.
You can generally nest loops within other loops. In these cases, a loop (the nested loop) runs within another loop (the outer loop).
As a general rule, you have a good amount of freedom when combining loops by nesting them. You can (for example):
- Nest For… Next or For Each… Next loops within other For… Next or For Each… Next loops.
- Nest For… Next or For Each… Next loops within Do While or Do Until loops.
- Nest Do While or Do Until loops within other Do While or Do Until loops.
- Next Do While or Do Until loops within For… Next or For Each… Next loops.
Even though you can nest loops within loops of a different type, you can’t overlap control structures. This means that each nested VBA loop must close/end with its outer nested level.
More generally, when nesting Excel VBA loops, you’ll probably want to be very organized and ensure that the structure of each loop is clearly differentiated. This allows you to, among others, guarantee that:
- The opening and closing statements of each loop match appropriately.
- For example, as explained in Microsoft’s Official Documentation for the case of While… Wend loops, each “Wend” matches the most recent “While”. Therefore, you want to ensure that the individual statements within your code are where they should be.
- Each element within a For Each… Next loop is unique.
- Each loop counter variable in a For… Next loop has a unique name (as it should be).
Some of the habits that may help you adequately organize the code of your nested Excel VBA loops and make it more readable are the following:
- Habit #1: Make adequate use of indentations. In the case of loops, the lines of code inside a loop have additional indentation.
- The settings of the Visual Basic Editor allow you to determine certain settings regarding code indentation. You can, for example, enable or disable the Auto Indent setting, which makes the indentation of each line of code equal to that of the previous line. You can also use these settings to determine the indentation width. The default tab width is 4 characters.
- Habit #2: When working with For… Next and For Each… Next VBA loops, include the second (and last) instance of the counter or element item.
- As I explain above, the last statement of For… Next loops is “Next [counter]” and the last statement of For Each… Next loops is “Next [element]”. In both cases, the item within square brackets ([ ]) is optional. However, including the counter or element helps improve readability and prevent bugs.
Further to the above, you may want to avoid generating too much complexity when nesting loops. If your VBA code includes too many levels of nested loops (according to some VBA authorities you can theoretically have up to 16 levels), it will likely be difficult to read, modify and maintain.
If you find yourself in the situation where a particular VBA application has too many nested loops, consider whether you can restructure that part of your VBA code for purposes of achieving the same goal using a less complex process.
Conclusion
After reading this Excel tutorial, you know all the basic concepts and information you need to start creating and implementing loops in your VBA applications and macros.
In addition to knowing what a loop is and what are its uses and advantages, you know what are the main looping structures that Excel supports and (out of those structures), which are the types of loops that you’re most likely to encounter and use in practice:
- For… Next loops.
- For Each… Next loops.
- Do While and Do Until loops.
In case you ever need it, you’re now also familiar with While… Wend loops, and understand what is a Do… loop and why you should take extra precautions to avoid infinite loops. Finally, you’ve seen 2 ways in which you can modify the way your loops proceed and add some complexity (as well as the reasons why you shouldn’t overdo this):
- The Exit statement.
- Nesting.
With all these knowledge, you’re ready to start creating amazing Excel VBA loops. You’ll probably start developing your own style and preferences about how to work with loops.
VBA Do while is a loop in which you need to specify a condition and that condition must remain true for the loop to run. In simple words, first, it checks that the condition you have specified is true or not and if that condition is true it runs the loop, otherwise nothing.
In each iteration, it tests for the condition and only then executes the statement. Imagine, you want to add worksheets in Excel while the full account of the worksheets is 12 or below. In this case, you can use the do-while loop to write that code.
Syntax
Following is the syntax for the VBA For Each Next Loop.
Do While Condition
    [statements]
Loop
- Condition: It is the condition that you specify, and this condition must be true to run the loop.
- Statement: The line(s) of code are you want Do While Loop to execute condition is true.
- Loop: It’s the end statement for one iteration of the loop and tells VBA to move back to test the condition again.
Example to Understand the DO While Loop
To understand Do While Loop, let’s write a code to add worksheets in a workbook hey while the total count of the worksheets is below twelve. You do not need to tell VBA how many sheets to add and you will always have a total of 12 sheets every time when you run this code.
Use the following steps:
- First, you need to type the keyboard “Do While”.

- Next you need to write a condition that can check if the total number of worksheets in the workbook are lower than twelve.
- For this, you need to use the below code, that count the total count of the worksheets then compare it with the number twelve.

- Next you need to write the code to add a worksheet. This code will run when the condition that you have specified is true.

- And, in the end, type the keyword “Loop” to end the code.


Here is the full code that you have just written:
Sub vba_do_while_loop()

    Do While ActiveWorkbook.Worksheets.Count < 12
        Sheets.Add
    Loop

End Sub
Now let me tell you how this code works: The condition you have specified checks for the total number of worksheets in the workbook and then you have a lower than operator that checks for the count of the worksheets against twelve.
When the count of the worksheet is below twelve the loop will continue to run and keep on adding new worksheets but once the count of the worksheets will reach twelve it will stop the loop.
It’s in simple words the loop will continue to run while the count of the worksheets is below twelve.
Here’s the thing, with the code that you have just written, you don’t need to specify the count of the worksheets that you want to add, but if you go with the next loop you need to specify the count of the worksheets that you want to add.
Do Loop While is an extended version of Do While Loop as it works in the same way but there is a slight difference while testing the condition.
In Do Loop While, it runs one iteration of the loop before testing the condition that you have specified and if the condition is true it will continue to loop.
Let’s say, you want to write a code to verify a password to run a code and continue to loop while the password is incorrect (we see it in the example).
Syntax
Following is the syntax for the VBA Do Loop While.

- Do: It is the starting keyword for the Do Loop While.
- Statement: It is the line(s) of the code that you want to run in the loop.
- Loop While: It’s the keyword to continue the loop and test the condition that you have specified.
- Condition: it is the condition that you want to test before the loop starts its second iteration and carries on the loop.
As you can see in the syntax of Do Loop While, it will first run the statement once and after that, it will go to the condition and test it, and if that condition is true, it will start the loop and continue it while the condition is true.
Example to Understand the DO Loop While
To understand the do loop while, let’s write a code to show an input box and ask the user to enter the password.
That input box will continue to show well the password entered by the user is incorrect up to the five attempts and after that, the input box will disappear without running the procedure.
- First, declare two variables that you need for storing the password and the counter for the attempts.

- After that, type the “Do” keyword. Here you don’t need to define the condition first as you have seen in the syntax.

- Next, you need to write a line of code to show the input box that asks the user to enter the password.

- From here, you need to define a counter that can count upto five (adds up with each interation of loop).

- Now, type the keyword “Loop While” and define two conditions that can verify the value entered by the user and into the input box and can test the value of the counter if it’s lower then than 5.

- In the end, write the code that you want to run. Here I’m using the IF statement that will show a message box if the password entered by the user is correct.


Sub vba_do_loop_while()

Dim varPassword As Variant, i As Double
Do
    varPassword = InputBox _
    ("Enter the password to start the procedure:", _
    "Check Password 1.0")
    i = i + 1
Loop While varPassword <> "CorrectPassword" And i < 5
If varPassword = "CorrectPassword" Then
    MsgBox "Your Password is Correct"
End If

End Sub
Let me explain this code.
- In the first part of this code, you have the do loop while which will show an input box to the user and ask for a password.
- And if the password is incorrect it will continue to run the loop until the user enters the correct password.
- But as you are using a counter to count the iterations of the loop and once that counter reach the 5, the loop will stop.
A loop is an essential concept for any programming language, and VBA follows the same approach. You can use loops to repeat an action until a specified condition is reached, or move through objects in a group, e.g. all worksheets in a workbook. A loop is an essential concept for programming. In this guide, we’re going to show you how to create a VBA loop in Excel.
Download Workbook
VBA loops can be useful to automate tasks. For example, you may need to protect or unprotect every worksheet at once, iterate a calculation for a specific number of times, or loop cells and store their values into an array until you find an empty cell. The rest is up to your needs and imagination.
VBA has two main loop categories:
- For…Next Loops
- Do Loops
In generally, while For…Next loops are designed for specific amount of iterations, Do loops are good for iterating based on a condition. However, you can modify and configure both loop types by their individual keywords. Let’s see the loop types with examples.
For…Next VBA Loop
For…Next (also known as For) loops are where you start to create VBA loops in Excel. A For loop is a basic concept of a loop structure in all programming languages. A For…Next loop is good for if you want to iterate you code certain amount of times, and for when you need to use the counter. For example, if you want to check cells from A1 to A10, a counter clicks from 1 to 10 can work in that case. Let’s see its syntax and an example.
Syntax
For counter = start To end [ Step step ]
[ statements ]
[ Exit For ]
[ statements ]
Next [ counter ]
| Part | Description |
| counter | Required. Numeric variable used as a loop counter. The variable can’t be a Boolean or an array element. |
| start | Required. Initial value of counter. |
| end | Required. Final value of counter. |
| step | Optional. Amount counter is changed each time through the loop. If not specified, step defaults to one. |
| statements | Optional. One or more statements between For and Next that are executed a specific number of times. |
Example 1 – Basic Form
In the first example of For…Next loop, we attempt to write serial numbers into the cells in A1:A10. In this code, For…Next loop sets values from 1 to 10 into the variable i. After the variable gets its value, you can use it in the code. We used the variable to specify the row numbers and cell values. Finally, the Next row increases the variable’s row by 1, and cycle goes on until the variable is equal to 11.
Sub FillSerialNumbers()
    Dim i As Integer
    For i = 1 To 10
        ActiveSheet.Cells(i, 1) = i
    Next i
End Sub
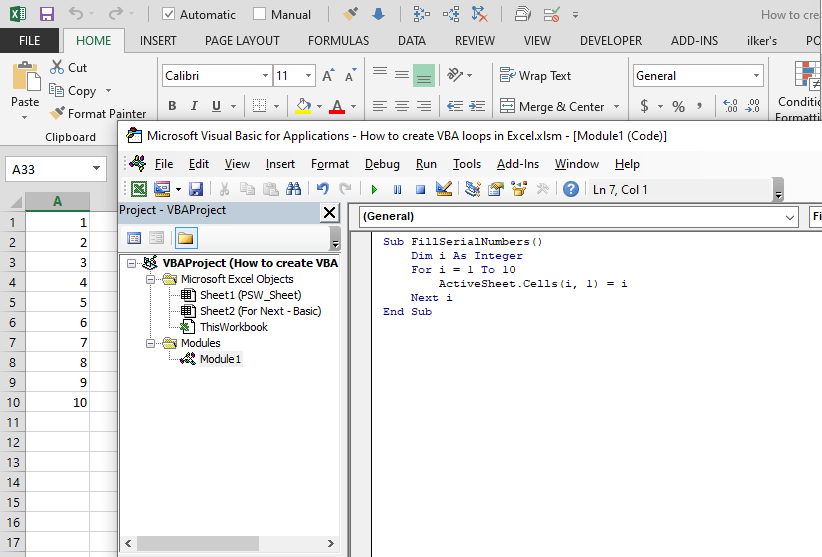
Example 2 – Step
By default, For…Next loop increases its counter variable by 1 for each loop. You can change this property by using the step argument. To specify a step argument, use the Step keyword after the end argument and enter a number. Step can be either a positive or negative.
The following code is a modified version of the first example. Step 2 argument is added to loop. In this loop, the variable i can only take «1, 3, 5, 7, 9» values.
Sub FillSerialNumbers_Step2()
    Dim i As Integer
    For i = 1 To 10 Step 2
        ActiveSheet.Cells(i, 1) = i
    Next i
End Sub

Remember to choose appropriate start and end arguments when you need to use a negative step value. For example, For I = 10 To 1 Step -1
Example 3 – Nested Loops
You can create loops within other loops. VBA executes all iterations in an inner loop, for each iteration of the outer loop. This type of structure can be helpful if you want add additional dimensions into your code. For example, while one loop is counting rows, other can count the columns. You need three loops to fill a three-dimensional data array.
The important point is using different counter variables for each loop. Otherwise, there will be leaps for the counter values. Let’s see an example for nested For…Next loops.
The following code contains 2 For…Next loops which is using variables named i and j. In the statement panel, i and j are used as row and column numbers respectively.
In the first run, i becomes 1 and j becomes 2. After code is executed in the j-loop, while i keeps its value (1), j becomes 3. This cycle goes on until j becomes 7. After this, i becomes 2 and j returns back to 2.
Sub FillSerialNumbers_Nested()
    Dim i As Integer, j As Integer
    For i = 1 To 10
        For j = 2 To 6
            ActiveSheet.Cells(i, j) = i * j
        Next j
    Next i
End Sub
Since j gets numbers between 2 and 6, only columns from B to F are filled.

Example 4 – Exit For
You may want to exit a loop when a certain condition is met. Let’s say we do not want to fill cells if i * j is more than 18. To achieve this, we can use Exit For statement.
The following code uses Exit For in the inner loop. Please note that, Exit For works for only the loop it’s in. Thus, when i * j > 18 condition is met, VBA continues to run the outer loop (i-loop).
Sub FillSerialNumbers_ExitFor()
    Dim i As Integer, j As Integer
    For i = 1 To 10
        For j = 2 To 6
            If i * j > 18 Then Exit For
            ActiveSheet.Cells(i, j) = i * j
        Next j
    Next i
End Sub

Example 5 — For Each
A For Each loop is a more specialized version of the For…Next loops. For Each loops can iterate for elements in a list. These elements can be values in an array, cells in a range, or worksheets in workbook. For Each loops doesn’t need a counter, each element is stored in a variable to be used in the code.
Let’s take another example. This time there isn’t a counter variable, but a range object c. For Each loop assigns each cell in the range «A1:C8» to element c, at each iteration. Also, since there is no counter value, we need to increase an integer by 1 in the code.
Sub FillSerialNumbers_ForEach()
    Dim c As Range, i As Integer
    i = 0
    For Each c In ActiveSheet.Range("A1:C8")
        i = i + 1
        c = i
    Next c
End Sub
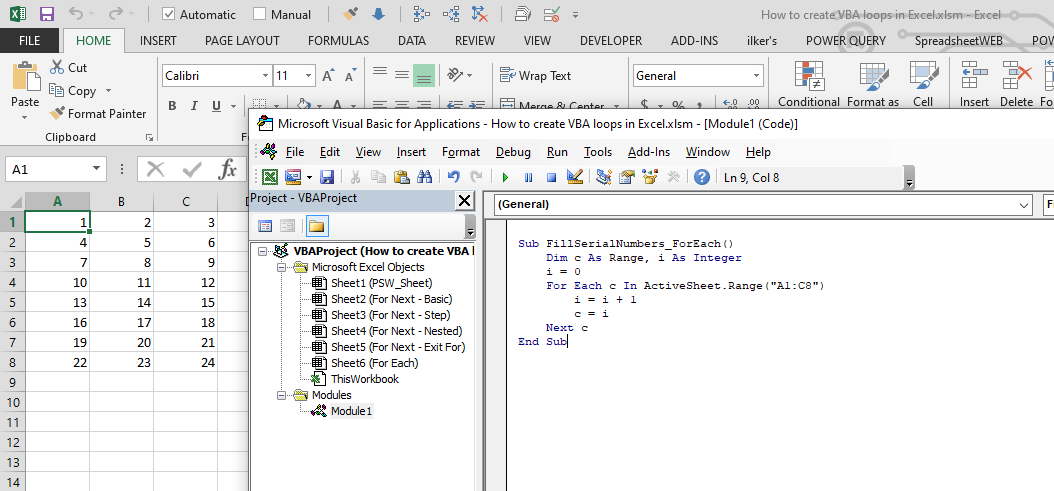
This is the last example for the For…Next loops of our how to create a VBA loop in Excel guide. Let’s now move on to the Do loops.
Do VBA Loop
A Do loop looks at whether a condition is met to continue cycling through, or stop a loop. Do loops are more flexible than For…Next loops. On the other hand, this flexibility comes with some complexities.
A Do loop starts with Do and finishes with Loop keywords. You can define a condition for one of these statements. If you specify a condition with Do, VBA looks at the condition first; otherwise, the code block in the loop is executed and the condition is evaluated at the end. This flexibility presents 2 syntaxes.
Also, Do loops can use While and Until keywords to specify the action when a condition is met. If you use the While keyword, the loop continues to work if condition is met. On the other hand, the Until keyword stops the loop.
Syntax
Do [{ While | Until } condition ]
[ statements ]
[ Exit Do ]
[ statements ]
Loop
Or, you can use this syntax:
Do
[ statements ]
[ Exit Do ]
[ statements ]
Loop [{ While | Until } condition ]
| Part | Description |
| condition | Optional. Numeric expression or string expression that is True or False. If condition is Null, condition is treated as False. |
| statements | One or more statements that are repeated while, or until, condition is True. |
Example 1 – Do While
Do While loop iterates its statements as long as the specified conditions are valid. We can modify our first example to work with a Do loop.
In the following example, the Do loop works as many iterations as the variable i is equal or less than 10.
Sub FillSerialNumbers_DoWhile()
    Dim i As Integer
    i = 1
    Do While i <= 10
        ActiveSheet.Cells(i, 1) = i
        i = i + 1
    Loop
End Sub
Caution: If you use a loop like this, remember to add a code to change the value of the variable. Otherwise, the code will be stuck in an infinite loop because the variable i will always remain less than 10.
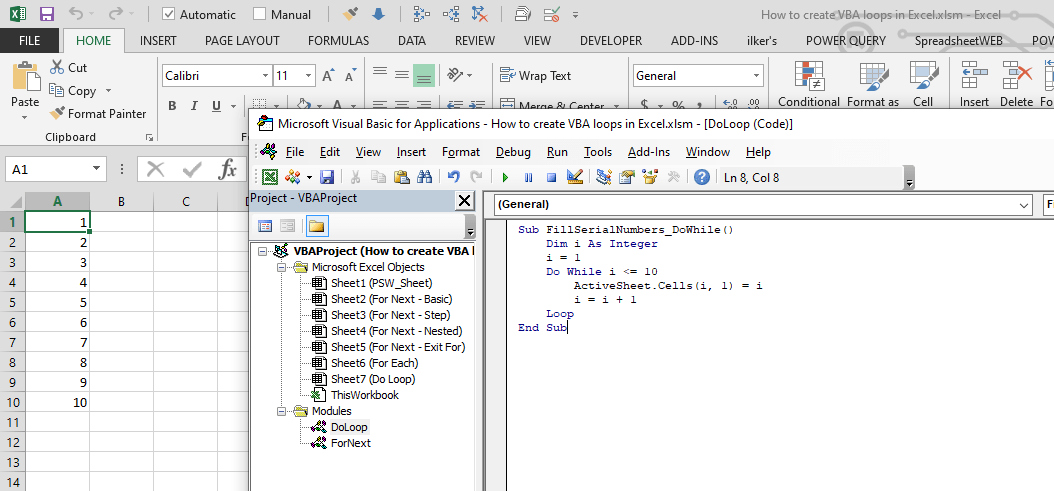
Example 2 — Do Until
This time the loop continues «until» the condition is met. Once it does, the loop ends.
Sub FillSerialNumbers_DoUntil()
    Dim i As Integer
    i = 1
    Do Until i > 10
        ActiveSheet.Cells(i, 1) = i
        i = i + 1
    Loop
End Sub
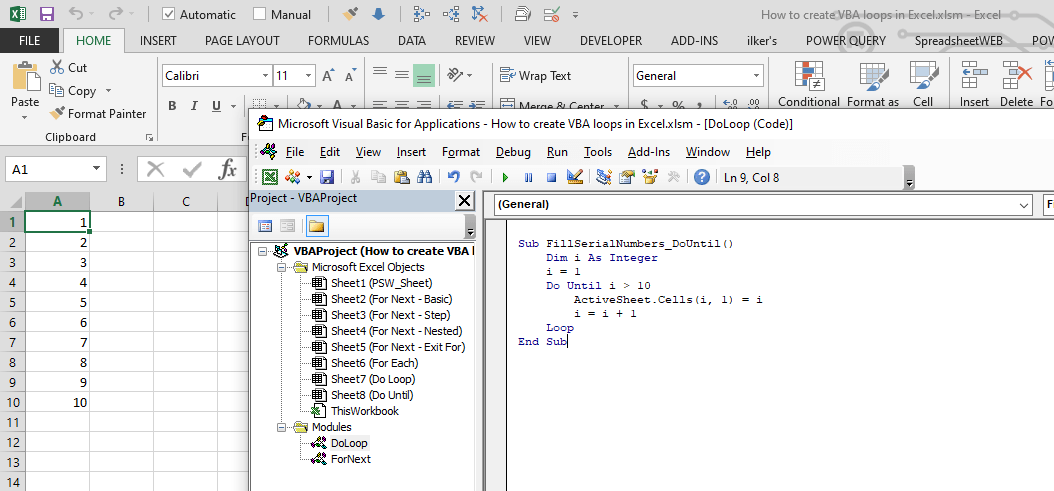
Example 3 – Loop While
You can use conditions after Loop as well. In this scenario, you ensure that the statements are executed at least once before condition validation.
Loop While iterates the loop if the supplied condition is met.
Sub FillSerialNumbers_DoLoopWhile()
    Dim i As Integer
    i = 1
    Do
        ActiveSheet.Cells(i, 1) = i
        i = i + 1
    Loop While i <= 10
End Sub
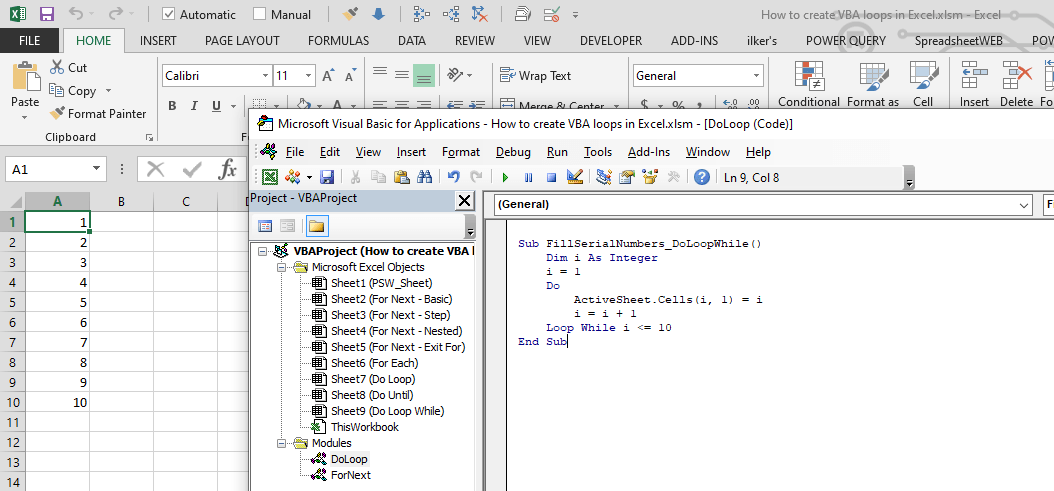
Example 4 – Loop Until
Use Loop Until statement when you need to check the condition after the statements, and want to continue the loop «until» the condition is met.
Sub FillSerialNumbers_DoLoopUntil()
    Dim i As Integer
    i = 1
    Do
        ActiveSheet.Cells(i, 1) = i
        i = i + 1
    Loop Until i > 10
End Sub

That’s all! You can now create your own VBA loop to automate your Excel tasks in no time.