
Excel for Microsoft 365 Excel for Microsoft 365 for Mac Excel 2021 Excel 2021 for Mac Excel 2019 Excel 2019 for Mac Excel 2016 Excel 2016 for Mac Excel 2013 Excel 2010 Excel 2007 More…Less
Add-ins provide optional commands and features for Microsoft Excel. By default, add-ins are not immediately available in Excel, so you must first install and (in some cases) activate these add-ins so that you can use them.
Are you looking for information about Office Add-ins based on HTML, CSS, and JS? If you are, see Get an Office Add-in for Excel.
Some add-ins are built in to Excel, such as Solver and the Analysis ToolPak. Other add-ins are available from the Download Center and must first be downloaded and installed. Finally, there are add-ins that are created by third parties, such as a programmer in your organization or a software solution provider. These can be Component Object Model (COM) add-ins, Visual Basic for Applications (VBA) add-ins, and DLL add-ins. These add-ins must also be installed to use them.
Most add-ins can be categorized into three different types:
-
Excel add-ins These typically include Excel add-in (.xlam), Excel 97-2003 add-in (.xla), or DLL add-in (.xll) files or they are automation add-ins. Some Excel add-ins, such as Solver and the Analysis ToolPak, may be available after you install Excel or Microsoft Office. Typically, you only need to activate these add-ins to use them.
-
Downloadable add-ins Additional add-ins for Excel can be downloaded and installed from Downloads at Office.com.
-
Custom add-ins Developers and solution providers usually design custom Component Object Model (COM) add-ins, automation add-ins, VBA add-ins, and XLL add-ins. These must be installed for you to use them.
After you have installed or activated an add-in, the add-in and its commands may be available in one of the following locations:
-
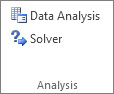
Data tab. After you install and activate the Analysis ToolPak and Solver add-ins, the Data Analysis and Solver commands are available in the Analysis group.

-
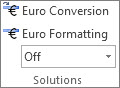
Formulas tab. After you install and activate the Euro Currency Tools, the Euro Conversion and Euro Formatting commands are displayed in the Solutions group.
-
Add-Ins tab. Other add-ins may be added to the Add-Ins tab. This tab is added to the ribbon when you install and activate the first add-in that is shown in the Add-Ins tab. If you don’t see the Add-Ins tab, you should exit and then restart Excel.
Other add-ins, such as the Get Started tab, are available in other places in Excel, such as a tab on the ribbon, or through macros or customized menus.
Important: If you are a software developer, you can use this procedure to install or remove an automation program before you design installation and removal programs for your add-in.
To activate an Excel add-in
-
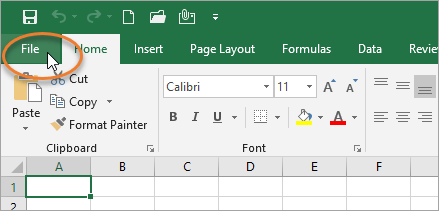
Click the File tab, click Options, and then click the Add-Ins category.
-
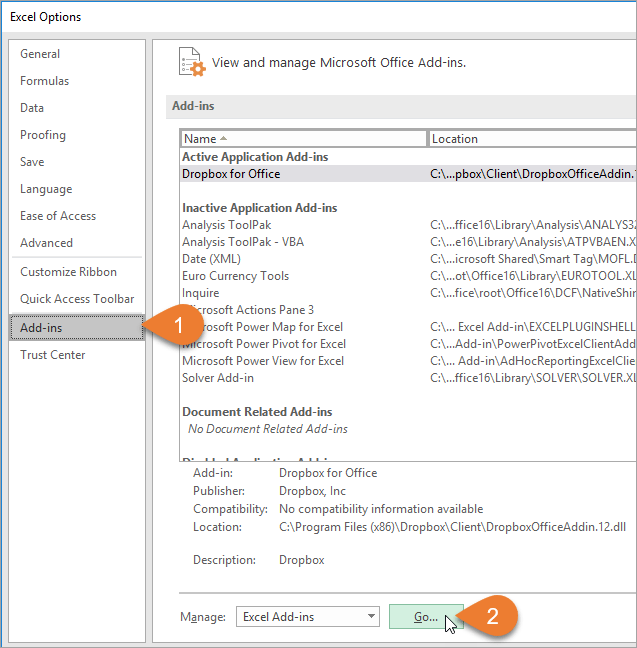
In the Manage box, click Excel Add-ins, and then click Go.
The Add-Ins dialog box appears.
-
In the Add-Ins available box, select the check box next to the add-in that you want to activate, and then click OK.
If you cannot find the add-in that you want to activate in the Add-Ins available box, you may need to install it.
To install an Excel add-in
-
To install an add-in that is typically installed with Excel, such as Solver or the Analysis ToolPak, run the setup program for Excel or Microsoft Office and choose the Change option to install the add-in. After you restart Excel, the add-in should appear in the Add-Ins available box.
-
Some Excel add-ins are located on your computer and can be installed or activated by clicking Browse (in the Add-Ins dialog box) to locate the add-in, and then clicking OK.
-
Some Excel add-ins require running an installation package. You may need to download or copy the installation package to your computer (an installation package is typically a file with an .msi file name extension), and then run it.
-
Other add-ins that are not available on your computer can be downloaded and installed through a Web browser from Downloads or from other sites on the Internet or a server in your organization. Follow the setup instructions for the download as needed.
To inactivate an Excel add-in
-
Click the File tab, click Options, and then click the Add-Ins category.
-
In the Manage box, click Excel Add-ins, and then click Go.
-
In the Add-Ins available box, clear the check box next to the add-in that you want to inactivate, and then click OK.
In many cases, when you inactivate an add-in, it is removed from its group on the ribbon. In other cases, to remove the add-in from the ribbon, you may need to restart Excel.
Note Inactivating an add-in does not remove the add-in from your computer. To remove the add-in from your computer, you must uninstall it.
To remove an Excel add-in
Important: If you originally installed the Excel add-in from a network file server or from a shared folder, you might need to remove the add-in from that location. If you installed the Excel add-in from a CD and you mapped your CD drive to a new drive letter after installing the add-in, you need to reinstall the add-in from the CD. If you are running any Excel add-ins from the CD, you must uninstall the Excel add-ins, and then reinstall them from the CD.
-
Click the File tab, and then click Exit.
-
In Control Panel, click Programs and Features (Windows 7 and Windows Vista) or Add/Remove Programs (Windows XP).
-
Do one of the following:
-
If you installed Excel as part of Microsoft Office, click Microsoft Office in the list of installed programs, and then click the Change button.
-
If you installed Excel individually, click the name of your program in the list of installed programs, and then click the Change button.
-
If you installed the add-in from the Download Center, click the name of your program in the list of installed programs, and then click the Uninstall button.
-
-
Follow the instructions in the installation program.
Important: If you are a software developer, you can use this procedure to install or remove an automation program before you design installation and removal programs for your add-in. If you are not a developer, you should not need to use this procedure. Contact the system administrator who provided the add-in if you want installation and removal instructions.
Add a COM add-in
-
Click the File tab, click Options, and then click the Add-Ins category.
-
In the Manage box, click COM Add-ins, and then click Go.
The COM Add-Ins dialog box appears.
-
In the Add-Ins available box, select the check box next to the add-in that you want to install, and then click OK.
Tip If the add-in that you want to use is not listed in the Add-Ins available box, click Add, and then locate the add-in.
Remove a COM add-in
-
Click the File tab, click Options, and then click the Add-Ins category.
-
In the Manage box, click COM Add-ins, and then click Go.
The COM Add-Ins dialog box appears.
-
In the Add-Ins available box, clear the check box next to the add-in that you want to remove, and then click OK.
Note This removes the add-in from memory but keeps its name in the list of available add-ins. It does not delete the add-in from your computer.
-
To remove a COM add-in from the list of available add-ins and to delete the add-in from your computer, click its name in the Add-ins available box, and then click Remove.
Note: If you are a software developer, you can use this procedure to install or remove an automation program before you design installation and removal programs for your add-in. If you are not a developer, you should not need to use this procedure. Contact the system administrator who provided the add-in if you want installation and removal instructions.
-
Click the File tab, click Options, and then click the Add-Ins category.
-
In the Manage box, click Excel Add-ins, and then click Go.
The Add-Ins dialog box appears.
-
To install an automation add-in, in the Automation servers available box, click Automation, and then click the add-in that you want.
Tip If the add-in that you want isn’t in the list, click Browse, locate the add-in, and then click OK.
-
To remove an automation add-in, you must remove it from the registry. See your system administrator for details.
Some add-ins are built in to Excel, such as Solver and the Analysis ToolPak. Other add-ins are available from the Download Center and must first be downloaded and installed. Finally, there are add-ins that are created by third parties, such as a programmer in your organization or a software solution provider. These can be Component Object Model (COM) add-ins, Visual Basic for Applications (VBA) add-ins, and DLL add-ins. These add-ins must also be installed to use them.
Most add-ins can be categorized into three different types:
-
Excel add-ins These typically include Excel add-in (.xlam), Excel 97-2003 add-in (.xla), or DLL add-in (.xll) files or they are automation add-ins. Some Excel add-ins, such as Solver and the Analysis ToolPak, may be available after you install Excel or Microsoft Office. Typically, you only need to activate these add-ins to use them.
-
Downloadable add-ins Additional add-ins for Excel can be downloaded and installed from Downloads at Office.com.
-
Custom add-ins Developers and solution providers usually design custom Component Object Model (COM) add-ins, automation add-ins, VBA add-ins, and XLL add-ins. These must be installed for you to use them.
After you have installed or activated an add-in, the add-in and its commands may be available in one of the following locations:
-
Data tab. After you install and activate the Analysis ToolPak and Solver add-ins, the Data Analysis and Solver commands are available in the Data tab on the ribbon.
-
Home tab. Other add-ins may be added to the Home tab.
Other add-ins, such as the Get Started tab, are available in other places in Excel, such as a tab on the ribbon, or through macros or customized menus.
Important: If you are a software developer, you can use this procedure to install or remove an automation program before you design installation and removal programs for your add-in.
To activate a pre-installed Excel add-in
-
On the Tools menu, select Add-ins.
-
In the Add-Ins available box, select the check box for the Add-in you want to activate, and then click OK.
To install an Excel add-in
-
Some Excel add-ins are located on your computer and can be installed or activated by clicking Browse (in the Add-Ins dialog box above) to locate the add-in, and then clicking OK.
-
Some Excel add-ins require running an installation package. You may need to download or copy the installation package to your computer (an installation package is typically a file with an .msi file name extension), and then run it.
-
Other add-ins that are not available on your computer can be downloaded and installed through a Web browser from Downloads or from other sites on the Internet, a server in your organization, , or using the built-in Store option in Excel. Follow the setup instructions for the download as needed.
To install Add-ins from the Store
-
Click the Insert tab in the ribbon.
-
Click the Store button.
-
Use the Categories or Search field to find Add-ins.
-
Click Add to install the Add-in.
Note: Some Add-ins need to be purchased.
-
To remove an Excel add-in
-
Click the Insert tab, and then click My Add-ins.
-
In Office Add-ins, click the 3 dots menu next to the Add-in.
-
Click Remove.
-
Read the notice that appears regarding other devices and click Remove.
Need more help?
Microsoft Excel already has some amazing features and functionalities that come in-built with it.
To add to it, you can also add some add-ins that can further enhance the functionality and can do things that are otherwise not possible with the existing features in Excel.
However, as you add more and more add-ins, it can slow down your Excel performance and make it difficult to navigate.
Removing or disabling add-ins that are no longer needed can help to improve Excel performance, and in some cases, may be needed as it might be causing issues.
If you have some add-ins in Excel that you would like to remove/disable, this article will show you a few different methods you can use.
Some add-ins can be removed directly from Excel’s Add-ins menu, while others may need to be uninstalled from your computer entirely.
In this article, we’ll look at some of the ways you can use to disable or remove add-ins from Excel. I also cover some common issues you may face when removing add-ins from Excel and the possible solutions for them.
Why Remove/Disable Add-ins from Excel?
Before I show you how to remove add-ins, let me quickly give you some reasons why people sometimes want to remove add-ins.
- Add-ins can lead to Performance issues: Some Excel add-ins can slow the processing of Excel files or cause them to crash, especially if they are poorly designed or incompatible with your version of Excel.
- Security concerns: Add-ins can potentially contain malicious code that can harm your computer or compromise your data. Removing suspicious or untrusted add-ins can help protect your system.
- Compatibility problems: Certain add-ins may not play nicely with other add-ins or software programs in your system. Removing (or disabling) incompatible add-ins can help prevent errors and compatibility issues.
- No longer need the add-in: If you no longer need certain add-ins or their features, removing them can help simplify your Excel environment and reduce clutter (and also improve the performance of Excel and make it fast).
It’s important to note that removing add-ins from Excel is not the same as disabling them.
Disabling an add-in simply turns off its functionality, but it remains installed in Excel and can be re-enabled later.
Removing an add-in, on the other hand, completely uninstalls it from Excel and removes all associated files and settings.
Method 1: Disable Add-ins Using the Option in the Ribbon
This is a straightforward method of removing Add-ins in Excel.
The method uses the Excel Add-ins option available in the Developer tab of the ribbon.
For demonstration, I will disable the Solver Add-in that is already enabled on my system. If you don’t know how to enable the Solver Add-in, steps are provided at the end of the tutorial. The steps I show here can be used to remove any add-in that is already installed in your Excel.
Note: Before using this method, make sure the Developer tab is enabled in your Excel file. If you do not see the Developer tab in the ribbon, you can either enable it or skip this method and go to method 2, which is described in the next section.
If the Developer mode is enabled on your Excel, follow the below steps:
- Click on the Developer option in the ribbon

- Click on the Excel Add-ins option

- Uncheck the Solver Add-in option. If you have any other add-in that is installed and enabled, it will show in this Add-ins dialog box.

- Click on OK

This will remove the solver Add-in from Excel.
This is the most simple method of disabling Add-ins in Excel, provided that the developer mode is enabled in your Excel Sheet.
Method 2: Disable Add-ins Using Options in the File Menu
In this method, I will show you how you can disable an Excel Add-in using Options in the File menu.
For demonstration, I will disable the Solver Add-in that is already enabled on my PC.
Follow the below-mentioned steps to get the complete process.
- From the ribbon, click on the File option

- From the menu that appears, click on Options

- This will open the Excel Options dialog box from where you need to select the Add-ins option.

- Click on the Manage drop-down option

- From the drop-down, choose the Excel Add-ins option

Note: You can select any option from the dropdown depending on which Add-ins you are looking for. I choose this option because I am looking for Solver Add-in that is available in the Excel Add-ins option.
- Click on the Go option appearing next to the Manage dropdown

- Uncheck the Solver Add-in option.

- Click on OK

This will disable the solver Add-in, and you will not find the Solver option in the Data tab anymore.
You can follow the same steps to disable any add-in from your Excel files.
In this method, I showed you how you could disable any Add-ins from Excel. However, the next method will guide you about removing Add-in permanently.
Method 3: Remove Add-in Permanently from Excel
In this Method, I will show you how you can get rid of an Add-in by completely removing it from Excel.
The process involves locating the path of the Add-in and removing the Add-in from the specified location.
For demonstration, I will show how you can remove Sover Add-in from Excel, like in Methods 1 and 2.
So follow the below-mentioned steps.
- Click on the File option in the ribbon

- From the File menu, click on Options

- Select the Add-in option from the Excel options dialog box.

- Click on the Manage drop-down option

- From the drop-down, choose the Excel Add-ins option.

- This will show all the installed Add-ins. Now locate the path of the Add-in that you want to remove permanently, which is Solver in my case.

- Go to the located location on your PC

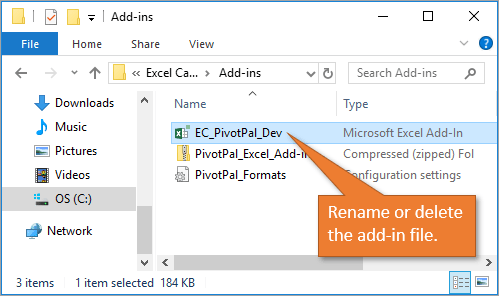
- Rename or delete all the above files.
- Restart the Excel application.
Doing so, the Add-in will be permanently removed from Excel.
So in this section, I showed how you could remove Add-in permanently from your Excel. The next section will guide you about the addition of an Add-in in the Excel application.
How to Enable an Add-in in Excel
In this section, I will demonstrate how you can install Add-in in Excel. Here, I am going to show the process by installing Solver Add-in.
To do so, follow the steps.
- From the menu bar, click on the File option.

- From the menu that appears, click on Options.

- In the Excel Options dialog box, click on Add-ins

- From the Manage drop-down, choose the Excel Add-Ins option

- Click on the Go option

- From the Add-ins dialog box, check the Solver Add-in option.

- Click on OK

This will install Solver Add-in in your Excel. You can view the Solver Add-in in the Data tab of the ribbon.
Common Problems When Removing Add-ins in Excel
When removing add-ins from Excel, you may encounter some common problems.
Here are a few solutions to help you resolve these issues:
- Problem: You cannot remove the add-in because it is currently in use.
- Solution: Close Excel and all other applications that may be using the add-in. Then try to remove the add-in again.
It is important to note that some add-ins may be loaded by other applications, so make sure to close all relevant applications before attempting to remove the add-in.
- Problem: The add-in is not listed in the Manage Add-ins dialog box.
- Solution: Check the registry to see if the add-in is listed there. To do this, go to Start > Run > regedit and navigate to HKEY_CURRENT_USERSoftwareMicrosoftOfficeExcelAddins. If the add-in is listed, delete the corresponding key to remove the add-in.
It is important to be cautious when editing the registry, as making incorrect changes can cause serious problems with your system.
- Problem: The add-in is listed, but the Remove button is grayed out.
- Solution: Try disabling the add-in first, then restart Excel and try to remove the add-in again. If this does not work, try uninstalling the add-in from your system and then removing it from Excel.
Remember to always save a backup of your Excel files and settings before making any changes to your add-ins or registry.
In this tutorial, I showed you three approaches for removing Add-ins from Excel. In the first two methods, I showed how you could disable the Add-in, while in method 3, I explained the complete process of permanently removing Add-ins from Excel.
Apart from that, I also explained the complete procedure of enabling Add-ins in Excel. So if you don’t know how to enable an Add-in, the stepwise procedure is depicted in the last section of the tutorial.
Other Excel articles you may also like:
- How to Remove Macros from Excel?
- Not Enough Memory to Complete This Action in Excel – How to Fix?
- Why does Excel Open on Startup (and How to Stop it)
- How to Remove Password From Excel?
Bottom Line: Learn how to disable or completely uninstall and remove an Excel Add-in from the Add-ins menu.
Skill Level: Beginner
What is an Excel Add-in?
An add-in (or VBA add-in) is a file that contains macros. It has the extension “.xlam”. When opened, the worksheets in the file are hidden and the macros are typically accessed through buttons that are added to the toolbar or ribbon. Once installed, the .xlam file will automatically open every time Excel is opened. Check out are guide for installing an Excel Add-in to learn more.
If you don’t want an add-in to run, it can simply be disabled (switched off) or completely removed.
How to Disable an Add-in
- Open Excel and click on the File tab.

- Then choose the Options menu.

- Next, click the “Add-Ins” option on the left-side menu, and then click the “Go…” button.

You may have to wait a few seconds for the window to appear.
Another way to access your add-ins is by clicking on the Excel Add-ins button on the Developer tab.

You can also add the Excel Add-ins button to the Quick Access Toolbar if you use it frequently.
- Uncheck the box next to the name of the add-in you want to disable. Then click OK.
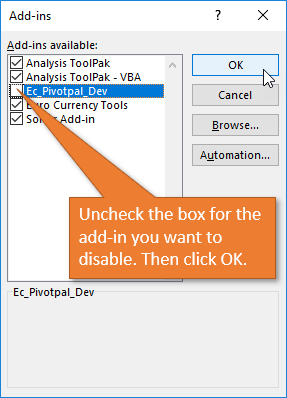
The add-in will be disabled and closed in the background. It will not open next time you open Excel.
To Completely Remove an Add-in
- Open Excel, go to the File tab, and choose the Options Menu, just as in steps 1 and 2 above.
- Next, determine where the add-in file is saved on your computer.
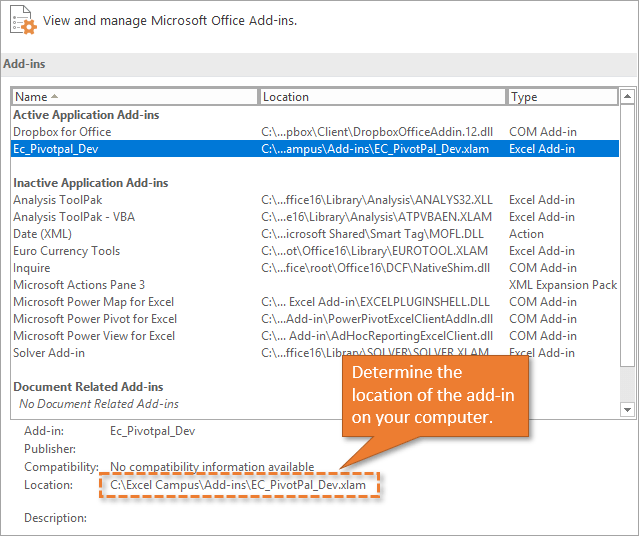
- Close Excel.
- Then go to the location of the add-in and delete or rename it.

- Open Excel and navigate back to the Add-ins menu in the Options window.
- Press the “Go…” button to open the Add-ins window.
- Click the add-in you just deleted.

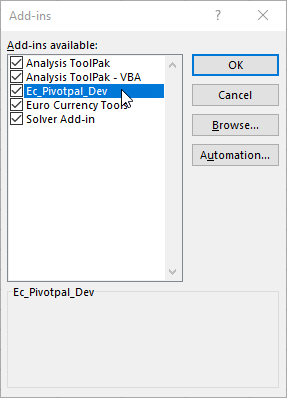
- A message box will appear asking you if you want to permanently delete the add-in. Click Yes.

You’ve now permanently deleted the add-in from the Add-ins Window menu.
You can also use this process for Microsoft Word, PowerPoint, and Outlook.
Install an Excel Add-In
Now that you know how to disable and remove Excel add-ins, check out my video blog post on how to install an add-in.
And for a complete list of all of the useful Excel Campus add-ins available for purchase, you can go here.
In this post you will find instructions on how you can disable Word, Excel & Outlook add-ins in Office 2016, 2013, 2010, 2007 & 2003. Disabling an add-in, is the first step to troubleshoot problems in all Office applications, especially if you face one of the following problems.
- You receive a runtime error when you try to open Outlook.
- When you try to launch Word, Excel or Outlook you get a runtime error.
- When your close Word, Excel or Outlook you get a runtime error.
- When you double-click to open a Word document, Word opens but the document doesn’t.
- You cannot print a Word or Excel document.
Add-ins can commonly causes problems, after updating them, or after updating Windows, or Office, or because they have installed incorrectly on the system. In all that cases, you have to disable them, or to completely uninstall the third party program that installs the add-in in your Office application. After turning off the problematic add-in and if your Office program functionality returns to normal, then you can try to reinstall the Add-in, by downloading its latest version from the plugin developer.
If an add-on prevents the normal startup of the Microsoft Office application (e.g. the application crashes upon boot), then you can start the Office application in the special diagnostic mode (also known as «Safe Mode») in order to be able to locate and deactivate the add-in that is causing the problem.
To start an Office application in Safe Mode, just hold down the CTRL key on your keyboard before opening the application shortcut, or simultaneously press the Windows + R keys to open the «Run» command box and:
- Type excel /safe and click OK to open Excel in Safe Mode.
- Type outlook /safe and click OK to open Excel in Safe Mode.
- Type powerpnt /safe and click OK to open PowerPoint in Safe Mode.
- Type winword /safe and click OK to open Word in Safe Mode.
How to Enable or Disable Add ins in Word, Outlook & Excel in All Office Versions.
- Outlook 2016, 2013 & 2010 – Outlook 2007 – Outlook 2003
- Word 2016, 2013 & 2010 – Word 2007 – Word 2003
- Excel 2016, 2013 & 2010 – Excel 2007 – Excel 2003
Outlook
How to Manage Outlook 2016, Outlook 2013 & Outlook 2010 Add-ins:
1. Click the File menu and select Options.
2. Select Add-ins at the left pane.
3. At the right pane, select COM Add-ins and click Go…
4. Uncheck the checkbox next to the Add-in that you want to disable and click OK.
5. Restart Outlook
How to Disable or Enable Outlook 2007 Add-ins:
1. On the Tools menu, click Trust Center.
2. Select Add-ins on the left pane.
3. At the right pane, select COM Add-ins and click Go…
4. Uncheck the checkbox next to the Add-in that you want to disable and click OK.
5. Restart Outlook.
How to Disable Add-ins in Outlook 2003:
1. On the Tools menu, click Options.
2. At the Other tab, click Advanced Options.

3. Press the COM Add-Ins button.
4. Uncheck the checkbox next to the Add-in that you want to disable and click OK.
5. Restart Outlook.
Word
How to Manage Word 2016, Word 2013 or Word 2010 Add ins:
1. Click the File menu and select Options.
2. Select Add-ins at the left pane.
3. At the right pane, select COM Add-ins and click Go…
4. Uncheck the checkbox next to the Add-in that you want to disable and click OK.
5. Restart Microsoft Word.
How to Disable Add-ins in Word 2007
1. From the Microsoft Office Button  menu, click Word Options.

2. Select Add-ins at the left pane..
3. At the right pane, select COM Add-ins and click Go…
4. Uncheck the checkbox next to the Add-in that you want to disable and click OK.
5. Restart Microsoft Word.
To Disable Add ins in Word 2003.
1. On the Tools menu select Customize.
2. In the Customize window, select the Commands tab.
3. At the left pane, select Tools.
4. Drag the COM Add-Ins from the right pane the the Word toolbar and then click Close.
5. Click the COM Add-Ins button on the toolbar to open the COM Add-Ins dialog.
6. Uncheck any unwanted plugin and click OK.
Excel
How to Enable or Disable Add-ins in Excel 2016, Excel 2013 or Excel 2010:
1. Click the File menu and select Options.
2. Select Add-ins at the left pane.
3. At the right pane, select COM Add-ins and click Go…
4. Uncheck the checkbox next to the Add-in that you want to disable and click OK.
5. Restart Microsoft Excel.
How to Disable Add ins in Excel 2007:
1. From the Microsoft Office Button menu, click Excel Options.
2. Choose Add-ins on the left pane.
3. At the right pane, select COM Add-ins and click Go…
4. Uncheck any unwanted plugin and click OK.
How to Disable Excel 2003 Add-ins:
1. From the Tools menu, select Add-ins.
2. Uncheck the checkbox next to the Add-in that you want to disable and click OK.
That’s all folks! Did it work for you?
Please leave a comment in the comment section below or even better: like and share this blog post in the social networks to help spread the word about this solution.
If this article was useful for you, please consider supporting us by making a donation. Even $1 can a make a huge difference for us.

An «Add-in» (also known as: plugin, addin, add-on, addon, or extension) is a software component that adds a specific feature to a specific application. For example an «Antivirus» add-in, for Outlook Email program, can offer antivirus protection for all received e-mails. Although add ins are generally useful, in some cases they can cause the malfunction of a program and you have to disable them in order to regain the program’s functionality.
In this tutorial you can find instructions to manage and disable the unnecessary plugins in Word, Excel, Outlook and PowerPoint programs to improve their performance. (Office 2003, 2007, 2010, 2013 & 2016)
How to Manage – Enable or Disable – Addins in Office Applications.
Tip: If you cannot start the malfunctioning Office application normally, then start it in safe mode and then disable add-ins. To do that:
1. Press simultaneously the Windows ![]() + R keys to open the «RUN» command box and then give one of the following command according your case:
+ R keys to open the «RUN» command box and then give one of the following command according your case:
- To start Outlook in Safe Mode, type: outlook.exe /safe
- To start Word in Safe Mode mode, type: winword.exe /safe
- To start Excel in Safe Mode, type: excel.exe /safe
- To start PowerPoint in Safe Mode, type: powerpnt.exe /safe
- To start Access in Safe Mode, type: msaccess.exe /safe

2. According to the installed Office version, select the corresponding link below, to view the instructions to disable add-ins.
Office 2010, 2013 & 2016.
Office 2007
Office 2003
Office 2010, 2013 & 2016.
– To disable add-ins in all Office 2016, 2013 or 2010 applications (Word, Excel, Outlook, etc.):
1. From the File menu, select Options.
2. Choose Add-ins on the left pane.
3. At the right pane, select COM Add-ins and click Go…

4. Uncheck any unwanted plugin and click OK.
5. Restart the Office application.
Office 2007
Word, Excel, Access or PowerPoint 2007 * Outlook 2007
– To view and manage add-ins in Word 2007, Excel 2007, PowerPoint 2007 or Access 2007:
1. From the File menu (Microsoft Office Button), select Word Options (or «Excel Options» for Excel, etc.)

2. Choose Add-ins on the left pane.
3. At the right pane, select COM Add-ins and click Go…

4. Uncheck any unwanted plugin and click OK.
5. Restart the Office application.
Outlook 2007
– To disable add-ins in Outlook 2007:
1. From the Tools menu, select Trust Center.

2. Choose Add-ins on the left pane.
3. At the right pane, select COM Add-ins and click Go…

4. Uncheck any unwanted plugin and click OK.
5. Restart the Outlook application.
Office 2003
Word 2003 * Excel 2003 * Outlook 2003.
– To disable add-ins in Word 2003:
1. From Tools menu select Customize.

2. In the Customize window, select the Commands tab.
3. At the left pane, select Tools.
4. Select the COM Add-Ins at the right pane and drag the command at toolbar.

5. Close the Customize window.
6. Click the COM Add-Ins button on the toolbar to open the COM Add-Ins dialog.
7. Uncheck any unwanted plugin and click OK.
8. Restart Word application.
Excel 2003.
– To manage and disable add-ins in Excel 2003:
1. From Tools menu, select Add-ins.

2. Uncheck any unwanted plugin and click OK.
3. Restart Excel application.
Outlook 2003.
– To disable Add-ins in Outlook 2003:
1. From Tools menu, click Options.

2. Select the Other tab and then click Advanced Options.

3. Click the COM Add-Ins button.

4. Uncheck any unwanted plugin and click OK.
5. Restart Outlook application.
That’s it! Let me know if this guide has helped you by leaving your comment about your experience. Please like and share this guide to help others.
If this article was useful for you, please consider supporting us by making a donation. Even $1 can a make a huge difference for us in our effort to continue to help others while keeping this site free:
If you want to stay constantly protected from malware threats, existing and future ones, we recommend that you install Malwarebytes Anti-Malware PRO by clicking below (we
do earn a commision from sales generated from this link, but at no additional cost to you. We have experience with this software and we recommend it because it is helpful and useful):
Full household PC Protection — Protect up to 3 PCs with NEW Malwarebytes Anti-Malware Premium!
- Click the File tab, click Options, and then click the Add-Ins category.
- In the Manage box, click Excel Add-ins, and then click Go.
- In the Add-Ins available box, clear the check box next to the add-in that you want to inactivate, and then click OK.
Contents
- 1 How do I disable add ons?
- 2 What are Excel add-ins?
- 3 How do you fully remove a browser add on or extension?
- 4 How do I disable 3rd party add ons?
- 5 How do I get rid of slow and disabled COM add-ins?
- 6 Why do we use Microsoft add-ins?
- 7 How do I enable inactive add-ins in Excel 365?
- 8 How do I disable add ons in Chrome?
- 9 How do I disable add ons in Internet Explorer?
- 10 How do I stop extensions from being added to Chrome?
- 11 Should I disable add ons?
- 12 What does disable extensions mean?
- 13 What means blocked plugin?
- 14 How do I disable Outlook Add-Ins from registry?
- 15 What causes Outlook add-ins to disable?
- 16 How do I stop Outlook from disabling add-ins?
- 17 How do I disable Outlook Add-Ins without opening Outlook?
- 18 Are add-ins safe?
- 19 Are Excel Add-Ins free?
- 20 How do I change inactive active Add-Ins?
How do I disable add ons?
Permanently disable or remove an add-in
- Click File > Options > Add-ins.
- Towards the bottom of the window, where it says Manage, click the Go button.
- In the dialog box, select the add-ins you want to disable or remove.
- To disable the add-in, just uncheck the box in front of its name.
What are Excel add-ins?
An Excel add-in allows you to extend Excel application functionality across multiple platforms including Windows, Mac, iPad, and in a browser. Use Excel add-ins within a workbook to: Interact with Excel objects, read and write Excel data.
How do you fully remove a browser add on or extension?
Google Chrome:
- On your computer, open Chrome.
- At the top right, click More > More tools > Extensions.
- On to the extension you want to remove, click Remove.
- Confirm by clicking Remove.
How do I disable 3rd party add ons?
To disable third-party browser extensions:
- From the Tools menu, select Internet Options….
- Click the Advanced tab.
- Under Browsing, uncheck Enable third-party browser extensions (requires restart).
- Restart your computer.
How do I get rid of slow and disabled COM add-ins?
On the File tab, select Slow and Disabled COM Add-ins in Outlook 2016 or select Slow and Disabled Add-ins in Outlook 2013. Select Disable this add-in below the add-in you want to disable. Select Close. Exit and restart Outlook.
Why do we use Microsoft add-ins?
You can use the Office Add-ins platform to build solutions that extend Office applications and interact with content in Office documents. With Office Add-ins, you can use familiar web technologies such as HTML, CSS, and JavaScript to extend and interact with Word, Excel, PowerPoint, OneNote, Project, and Outlook.
How do I enable inactive add-ins in Excel 365?
How do I activate an inactive add-in?
- On the Tools menu, click Trust Center, and then click Add-ins.
- In the Add-ins box, identify the add-in that you want to enable or disable and note the Add-in type located in the Type column.
- Select the Add-in type in the Manage box and then click Go.
How do I disable add ons in Chrome?
Chrome. Click the menu icon ≡ at the top right of the browser. Click Tools, then select Extensions to open a new Options tab. Uncheck Enabled to disable an extension or click Remove to delete it completely.
How do I disable add ons in Internet Explorer?
To turn off add-ons
- Open Internet Explorer, select the Tools button , and then select Manage add-ons.
- Under Show, select All add-ons and then select the add-on you want to turn off.
- Select Disable, and then Close.
How do I stop extensions from being added to Chrome?
There is no mechanism in Chrome to prevent someone from uninstalling an extension.
Should I disable add ons?
Unless your business has a program installed that requires an add-on in order to function correctly, it is OK to disable any or all add-ons. Add-ons are not vital to your browser’s performance. Add-ons are optional even though you may have a few that you can’t live without.
What does disable extensions mean?
If you see a message saying “Extensions Disabled,” it’s because Chrome has turned off one or more of your extensions to keep your data safe while you’re browsing the Internet. The extensions that Chrome turned off either didn’t come from the Chrome Web Store or were determined unsafe.
What means blocked plugin?
An error on Mac saying “Blocked Plug-in” typically means that the system has prevented a specific plug-in from running. Most reports regarding this issue are associated with Adobe software, including Flash Player and Acrobat Reader.
How do I disable Outlook Add-Ins from registry?
To do this, open your Windows Start menu and type “regedit”. Go to HKEY_CURRENT_USERSoftwareMicrosoftOfficeOutlookAddinsBoyum IT. CRM for Outlook.
If the LoadBehavior key is anything other than “3” then follow these steps:
- Close Outlook (and all other Office programs to be sure).
- Open the registry editor again.
What causes Outlook add-ins to disable?
Outlook sometimes disables add-ins if it believes that an add-in is interfering with Outlook’s functionality.
How do I stop Outlook from disabling add-ins?
If you wish to keep the Encyro Outlook Addin enabled, you can tell Outlook to stop disabling it, as follows: In Microsoft Outlook, Click the File menu (top left). Then click the button near “Slow and Disabled COM Add-ins”
How do I disable Outlook Add-Ins without opening Outlook?
If you don’t want to use an add-in in Outlook 2013 or Outlook 2016 for Windows, you can disable it so it won’t show up in your messages. In Outlook, click File > Manage Add-ins. Tip: This opens Outlook on the web. Under Manage add-ins, in the Turned on column, uncheck the box for the add-in you want to turn off.
Are add-ins safe?
Microsoft Office add-ins themselves have limited capabilities to cause harm to the operating systems and applications running on a device due to the add-in runtime environment. However, the permissions granted to an add-in could allow unwanted access to resources and documents.
Are Excel Add-Ins free?
Excel has free add-ins that easily install and use that can improve your reporting, data analysis, and make your life a lot easier.
How do I change inactive active Add-Ins?
Re-enable a disabled/inactive Outlook Add-in
- Go to File >Info.
- Select Manage COM Add-ins.
- In the windows, select Enable EasiShare Outlook Add-in, click on Always enable this add-in.
- Close Outlook and launch again. Note: If this does not work, try the last method below.
Home > Data Recovery > How to Add and Disable Add-Ins for Your Excel Files
You can use add-ins in Excel to fulfill some complex task. And in this article, we will introduce how to add and disable add-ins in Excel.
If you need to use add-ins in Excel, you need to add and activate it into Excel. On the other hand, if you don’t need to use add-ins, you can also disable it. Here we will demonstrate the steps to add and disable add-ins in Excel.
Add Add-Ins
- Click “File” in the ribbon.
- And then click the button “Options”.

- In the “Excel Options” window, choose the option “Add-ins”.
- Next choose the type of add-ins in the “Manage” textbox. Here we choose the “Excel Add-ins” as an example”.

- Next click the button “Go” next to the “Manage”.
- And then the window of “Add-Ins” will pop up. In this window, check the option that you need. Here we check the “Analysis ToolPak” in the window. If you need to install other add-ins, you can click the button “Browse” to add it. Besides, some add-ins require running installation packages. You need to run it in your computer.


- After that, click the button “OK”.
- Now you can come back and check the result. The “Analysis ToolPak” will be added in the tab of “Data”. Thus, here click the tab “Data” in the ribbon. You can see that the add-in has already appeared in the toolbar.


Therefore, whenever you need to use this tool, you can click the tab “Data” and select it.
Disable Add-Ins
Now if you don’t need to use the add-ins, you can also remove it from the toolbar.
- Click “File” in the ribbon.
- And then click the button “Options” to activate the “Excel Options” window.
- Here still choose the “Add-ins”.
- In the manage text box, choose the type of the add-in that you need to disable. Here we need to disable the “Analysis ToolPak”, therefore we choose the “Excel Add-Ins”.
- And then click the button “Go”.

- In the “Add-Ins” window, uncheck the add-in that you don’t need.
- Next click the button “OK”.

- Thus, this “Analysis ToolPak” will not appear in the toolbar.


Actually, this method only removes the Excel add-in from the ribbon. The add-in is still in your computer. If you need to delete the add-in from your computer, you need to uninstall the add-ins. Therefore, don’t mix these two different concepts.
In addition, as for removing the “Com Add-Ins”, things are different. You can select the add-in and then click the button “Remove”. And then you can remove it from your computer.

Be Careful When Using Add-ins in Excel
Even if you can acquire a lot of convenience from add-ins, you still need to be careful. Some malicious hacker will develop add-ins that can steal your data and information. And even worse, your file will be damaged due to the abnormal add-ins. When such accident happens, you can use our repair tool to repair xls corruption and other errors in Excel. This tool is exactly the insurance for your file.
Author Introduction:
Anna Ma is a data recovery expert in DataNumen, Inc., which is the world leader in data recovery technologies, including repair doc damage and outlook repair software products. For more information visit www.datanumen.com
You may have installed some add-ins in your Microsoft Excel, but now you need to disable a specified add-in at Excel startup. How to solve this problem? Method in this article can help you.
Disable add-ins at Excel startup by modifying Window’s Registry
Disable add-ins at Excel startup by modifying Window’s Registry
You can modify Window’s Registry to disable specified add-in in Microsoft Excel when starting up. Please do as follows.
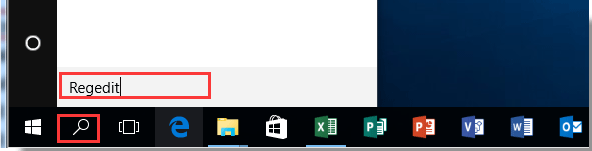
1. Enter the word Regedit into the window’s search box, and press the Enter key.
2. In the Popping up User Account Control dialog box, click the Yes button. See screenshot:

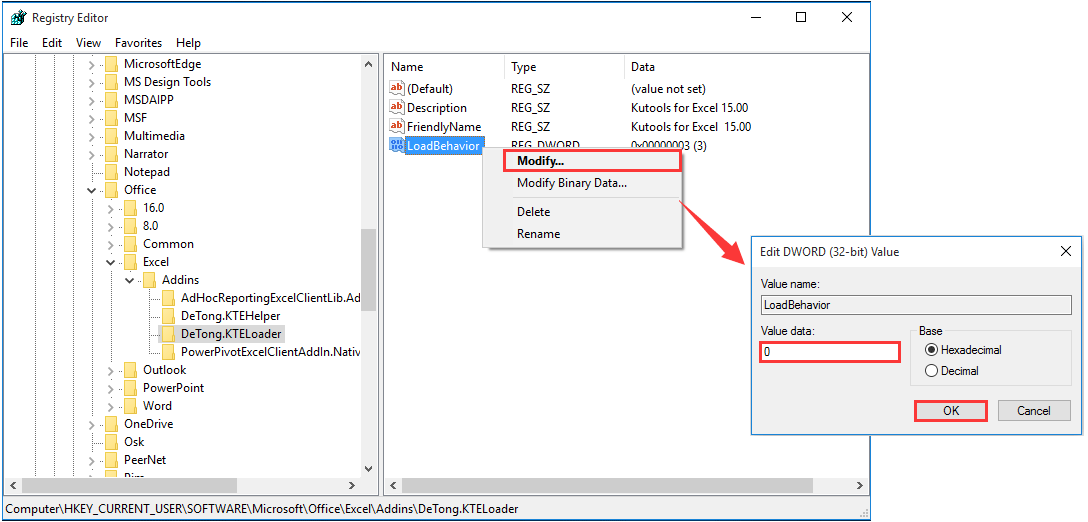
3. In the Registry Editor dialog box, you need to open the Excel Addins folder as below path shown:
HKEY_CURRENT_USERSoftwareMicrosoftOfficeExcelAddins
4. Then expand the Addins folder, and select the loader folder with the name of the add-in you need to disable at Excel startup. See screenshot:

5. Go to the right pane of the Registry Editor dialog box, you can see there is a REG_DWORD file named LoadBehavior, please right click on it and select Modify from the context menu.
6. Then the Edit DWOED dialog box pops up, please replace the number in the Value data box with 0, and then click the OK button. See screenshot:
7. Close the Registry Editor dialog box.
When starting up your Microsoft Excel, the specified add-in is disabled without displaying on the ribbon.
Related articles:
- How to disable or do not allow Save & Save As options in Excel?
- How to disable button after clicking once in Excel?
- How to disable cut, copy and paste functions in Excel?
- How to disable right click on sheet tab in Excel?
- How to disable the right click menu in specified worksheet or whole workbook in Excel?
The Best Office Productivity Tools
Kutools for Excel Solves Most of Your Problems, and Increases Your Productivity by 80%
- Reuse: Quickly insert complex formulas, charts and anything that you have used before; Encrypt Cells with password; Create Mailing List and send emails…
- Super Formula Bar (easily edit multiple lines of text and formula); Reading Layout (easily read and edit large numbers of cells); Paste to Filtered Range…
- Merge Cells/Rows/Columns without losing Data; Split Cells Content; Combine Duplicate Rows/Columns… Prevent Duplicate Cells; Compare Ranges…
- Select Duplicate or Unique Rows; Select Blank Rows (all cells are empty); Super Find and Fuzzy Find in Many Workbooks; Random Select…
- Exact Copy Multiple Cells without changing formula reference; Auto Create References to Multiple Sheets; Insert Bullets, Check Boxes and more…
- Extract Text, Add Text, Remove by Position, Remove Space; Create and Print Paging Subtotals; Convert Between Cells Content and Comments…
- Super Filter (save and apply filter schemes to other sheets); Advanced Sort by month/week/day, frequency and more; Special Filter by bold, italic…
- Combine Workbooks and WorkSheets; Merge Tables based on key columns; Split Data into Multiple Sheets; Batch Convert xls, xlsx and PDF…
- More than 300 powerful features. Supports Office / Excel 2007-2021 and 365. Supports all languages. Easy deploying in your enterprise or organization. Full features 30-day free trial. 60-day money back guarantee.
")
Office Tab Brings Tabbed interface to Office, and Make Your Work Much Easier
- Enable tabbed editing and reading in Word, Excel, PowerPoint, Publisher, Access, Visio and Project.
- Open and create multiple documents in new tabs of the same window, rather than in new windows.
- Increases your productivity by 50%, and reduces hundreds of mouse clicks for you every day!
")
Comments (1)
No ratings yet. Be the first to rate!
Содержание
- Удаление надстройки VBA-Excel
- Будем рады Вашей обратной связи
- Инструкция по отключению надстройки
- Полное удаление программы
- Как удалить надстройку xla/xlam из Excel? Удаление надстроек из списка доступных надстроек
- Отключение активной надстройки
- Удаление файла надстройки
- Изменение состояния надстройки с последующим удалением ее из списка
- Подключение/отключение надстроек
- Как отключить надстройки при запуске Excel?
- Отключить надстройки при запуске Excel, изменив реестр Windows
- Как установить надстройку Excel
- Установка надстройки Excel
- Шаг 1
- Шаг 2
- Шаг 3
- Шаг 4
- Шаг 5
- Шаг 6
- Если надстройка Excel не запускается (пропадает вкладка при запуске)
- Наша надстройка полностью безопасна, однако в некоторых случаях система безопасности MS Excel может препятствовать автоматическому запуску сторонних программ и вкладка PowerQuick может исчезать при перезапуске Excel. Для решения этой проблемы есть несколько способов:
- Способ 1. Добавление папки с надстройкой в «надежные расположения»
- Основной способ – сообщить системе, что файл безопасен. Для этого откройте “Параметры Excel” –> “Центр управления безопасностью” –> внизу кнопка “Параметры центра управления безопасностью”:
- Способ 2. Изменение свойств файла
- Способ 3. Через запаковку в архив
- Включение программного доступа к объектной модели VBA в Excel
- (для опытных пользователей)
- Некоторые функции надстройки направлены на изменение VBA-проекта файла, например, создание пользовательской формы, получение списка модулей проекта, задание особых настроек автозапуска файла и т.д.. Если Вы столкнетесь с необходимостью использования таких команд, необходимо разрешить программе доступ к объектной модели VBA .
- Как отключить надстройку Excel
Удаление надстройки VBA-Excel
Будем рады Вашей обратной связи
Мы сожалеем, что наша программа не подошла для Вас. Мы стараемся усовершенствовать ее внедряя новый функционал и исправляя выявленные ошибки. Будем рады если Вы дадите нам обратную связь, на основе которой мы поймем в каком направлении нам двигаться.
Оставьте Ваше предложение на этой странице.
Инструкция по отключению надстройки
- Откройте любой файл Excel, либо «чистую» книгу
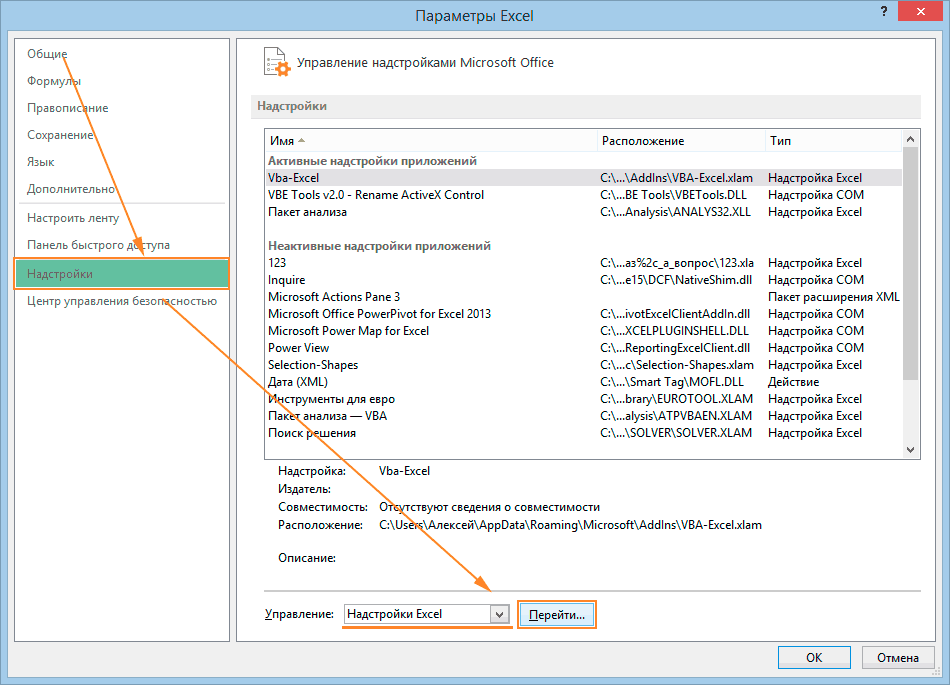
- Откройте параметры Excel
- Перейдите в список надстроек
- Отключите надстройку VBA-Excel сняв с нее выбор и нажав ОК.

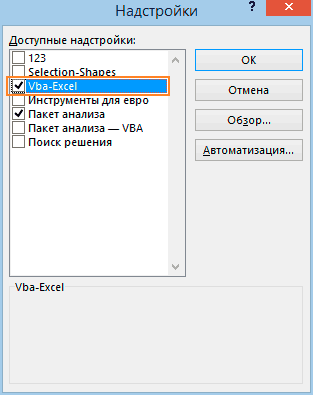
В результате вкладка с надстройкой исчезнет с компьютера и больше не будет загружаться вместе с Excel.
Вы сможете подключить надстройку тогда, когда она понадобиться.
Полное удаление программы
Если Вы больше не планируете пользоваться программой, то помимо отключения надстройки необходимо удалить сам файл с программой. Для этого:
- Откройте диалоговое окно Надстройки повторив действия указанные выше.
- Выделите надстройку VBA-Excel и нажмите Обзор.
- Откроется местоположение файла. Удалите его и программа удалится полностью.
Источник
Как удалить надстройку xla/xlam из Excel? Удаление надстроек из списка доступных надстроек
Наверное, у каждого пользователя, активно использующего надстройки, рано или поздно наступает такой момент, когда возникает желание почистить список доступных надстроек, то есть убрать из него все лишнее и неиспользуемое, удалить ставшие ненужными те или иные надстройки или их предыдущие версии, ставшие неактуальными.
Удаление надстроек Excel xla/xlam условно можно разбить на три этапа:
1) Отключение надстройки;
2) удаление файла надстройки;
3) изменение состояния надстройки с последующим удалением ее из списка.
Рассмотрим каждый этап подробнее на примере Excel 2007, в других версиях Excel надстройки удаляются аналогично.
Отключение активной надстройки
Перед тем как удалить надстройку Excel xla/xlam, необходимо сделать ее неактивной, то есть отключить. Чтобы узнать состояние надстройки (активная она или нет) необходимо нажать кнопку «Office»  и перейти в «Параметры Excel». Появляется окно «Параметры Excel», где в разделе «Надстройки» виден список всех установленных надстроек, сгруппированных на активные и неактивные. Активные – это те надстройки, которые на данный момент подключены, соответственно неактивные – это те, которые в данный момент отключены. Здесь также можно узнать место расположения файла удаляемой надстройки (оно нам вскоре понадобится). Обратите внимание на скриншот ниже, на нем видны активные надстройки, одну из них с названием test.xla мы и будем удалять.

Удаление файла надстройки
Итак, из приведенного выше окна мы узнали текущее состояние надстройки, которую собираемся удалить. Надстройка test.xla активная, поэтому переходим в поле «Управление», выбираем из списка «Надстройки Excel» и нажимаем кнопку «Перейти». Снимаем флажок перед названием надстройки.

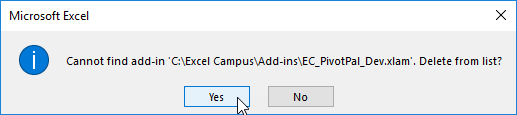
Все, надстройка стала неактивной, мы ее отключили. Теперь можно удалять файл. Место расположения файла мы уже предварительно выяснили чуть раньше, так что осталось зайти в указанную папку и удалить этот файл (можно переместить файл в другую папку или переименовать, если надстройка будет использоваться в будущем). Вот собственно и все, фактически надстройка уже удалена, но она продолжает оставаться в списке доступных надстроек, а в некоторых случаях может и доставлять определенные неудобства, вынуждая Excel при каждом запуске выдавать сообщение с текстом «Не удалось найти файл. Проверьте правильность ввода имени и расположения файла. При попытке открытия файла из списка недавно использованных файлов убедитесь, что файл не был переименован, перемещен или удален».

Изменение состояния надстройки с последующим удалением ее из списка
Для окончательного удаления надстройки из списка доступных надстроек, опять зайдем в окно «Надстройки» и попытаемся изменить состояние надстройки, то есть поставить флажок, если поле пустое, либо снять флажок, если он установлен. При попытке изменения состояния уже удаленной надстройки появится сообщение «Надстройка не найдена. Удалить из списка?».
Источник
Подключение/отключение надстроек

В основном, данный файл предназначен для подключения/удаления надстроек, выложенных на данном сайте на странице Мои надстройки.
Добавить надстройку — надстройка, выбранная в соответствующем поле, будет добавлена в список доступных надстроек Microsoft Excel и автоматически подключена.
Только для выложенных на сайте надстроек — Если установлен флажок Подключить файл помощи, то так же автоматически файл помощи будет подключен и его можно будет вызвать из надстройки нажатием значка соответствующей команды.
Удалить надстройку -надстройка, выбранная в соответствующем поле, будет удалена и отключена. Так же будет удален файл помощи для данной надстройки.
Только для выложенных на сайте надстроек — Если файл помощи не указан — то будет удален файл, относящейся программно к выбранной для удаления надстройке.
При помощи данного файла можно подключать и удалять абсолютно любые надстройки, а не только выложенные на данном сайте. Просто необходимо будет снять флажок с пункта — Подключить файл помощи.
 MyProgramms_Install_Addins.zip (305,8 KiB, 7 921 скачиваний)
Внимание: программа распространяется бесплатно. Распространение данной программы в коммерческих целях запрещено.
- в папку надстроек Excel, как правило она расположена по адресу:
C:Documents and SettingsДмитрийApplication DataMicrosoftAddIns ;
для Windows 7: C:UsersДмитрийAppDataRoamingMicrosoftAddIns - в любое место на локальном диске;
Вместо «Дмитрий» — Ваша учетная запись на компьютере.
Запускаем Excel и выбираем:
- 2010-2016 Excel — Файл—Параметры—Надстройки—Перейти
- 2007 Excel — Меню—Параметры Excel—Надстройки—Перейти

- 2003 Excel — Сервис—Надстройки

Если надстройка была помещена в папку C:Documents and SettingsДмитрийApplication DataMicrosoftAddIns , то она будет отображена в списке и Вам надо будет только выбрать её, поставив галочку. 
Если же Вы поместили надстройку в другую папку, то в окне выбора надстроек нажмите кнопку «Обзор» и выберите файл надстройки. После нажатия «ОК» надстройка будет подключена.
После подключения и установки надстройки для версий Excel 2007 и старше на панели появится новая вкладка(если она еще не отображена) — «Надстройки» (Add-Ins) и на ней будут показаны элементы, относящиеся к данной надстройке. Для версий Excel 2003 и ниже — команды новой надстройки будут созданы вместе с новой панелью, которая должна отобразиться сразу после установки надстройки.
Вкладка «Надстрйоки» и меню появляются только в том случае, если это предусмотрено надстройкой. Если в надстройке не реализован визуальный интерфейс, а присутствуют лишь функции пользователя или процедуры, запускаемые не с панели — то панель не появится.
Источник
Как отключить надстройки при запуске Excel?
Возможно, вы установили некоторые надстройки в Microsoft Excel, но теперь вам нужно отключить указанную надстройку при запуске Excel. Как решить эту проблему? Метод, описанный в этой статье, может вам помочь.
Отключите надстройки при запуске Excel, изменив реестр Windows
Отключить надстройки при запуске Excel, изменив реестр Windows

Потрясающе! Использование эффективных вкладок в Excel, таких как Chrome, Firefox и Safari!
Сэкономьте 50% своего времени и уменьшите тысячи щелчков мышью каждый день!
Вы можете изменить реестр Windows, чтобы отключить указанную надстройку в Microsoft Excel при запуске. Пожалуйста, сделайте следующее.
1. Введите слово Regedit в поле поиска окна и нажмите клавишу Enter .
2. В появившемся диалоговом окне Контроль учетных записей нажмите кнопку Да . См. Снимок экрана:
3. В диалоговом окне Редактор реестра вам нужно открыть папку надстроек Excel, как показано ниже:
HKEY_CURRENT_USER Software Microsoft Office Excel Addins
4. Затем разверните папку Addins и выберите папку загрузчика с именем надстройки, которую необходимо отключить при запуске Excel. См. Снимок экрана:
5. Перейдите в правую панель диалогового окна редактора реестра, вы увидите файл REG_DWORD с именем LoadBehavior , щелкните его правой кнопкой мыши и выберите Изменить из контекстного меню.
6. Затем появится диалоговое окно Изменить DWOED , замените число в поле данных Value на 0, а затем нажмите кнопку ОК . См. Снимок экрана:
7. Закройте диалоговое окно Редактор реестра .
При запуске Microsoft Excel указанная надстройка отключается и не отображается на ленте.
Источник
Как установить надстройку Excel
Установка надстройки Excel
Любая надстройка VBA для MS Excel представляет собой книгу специального формата .xlam (не путать со словом “хлам” ☺ ), которая запускается автоматически при запуске Excel. Именно такой файл (PowerQuick.xlam) в архиве вы скачаете на сайте.
Шаг 1
Надстройку необходимо распаковать из архива и расположить в надежном месте, т.е. в папке, которая не может быть удалена, перемещена или переименована. Название надстройки также не менять. В дальнейшем надстройка будет запускаться из этого места каждый раз при запуске MS Excel.
Шаг 2
Открыть Файл-Параметры Excel.
Активировать меню «Надстройки» и нажать кнопку внизу «Перейти».

Шаг 3

Шаг 4
Найти папку, в которой Вы расположили надстройку, выбрать файл надстройки PowerQuick.xlam

Нажать «Открыть»
В диалоговом окне нажимаем «Нет» (сохранение надстройки в системной папке Excel затруднит в дальнейшем её поиск и обновление).

Шаг 5
Проставляем галочку на появившейся надстройке PowerQuick в меню надстроек, нажимаем «Ок»

Шаг 6
Проверяем подключение надстройки – в окне программы должна появиться новая вкладка на ленте с именем “PowerQuick” примерно такого вида (в зависимости от версии):

Если надстройка Excel не запускается (пропадает вкладка при запуске)
Наша надстройка полностью безопасна, однако в некоторых случаях система безопасности MS Excel может препятствовать автоматическому запуску сторонних программ и вкладка PowerQuick может исчезать при перезапуске Excel. Для решения этой проблемы есть несколько способов:
Способ 1. Добавление папки с надстройкой в «надежные расположения»
Основной способ – сообщить системе, что файл безопасен. Для этого откройте “Параметры Excel” –> “Центр управления безопасностью” –> внизу кнопка “Параметры центра управления безопасностью”:

Выберите второе сверху меню – «Надежные расположения», далее кнопка внизу «Добавить новое расположение» и там задайте папку, в которой Вы расположили надстройку.
Также поставьте вторую снизу галочку «Разрешить надежные расположения в моей сети»

Нажимаем кнопку «Ок», проверяем подключение надстройки
Способ 2. Изменение свойств файла
Закройте все окна Excel. Щелкните правой кнопкой мыши по файлу надстройки PowerQuick.xlam и выберите Свойства, на вкладке “Общие” внизу нажимаем “Разблокировать” и кнопку “Ок”. Проверяем подключение надстройки.
Способ 3. Через запаковку в архив
Говорят, что данный метод тоже работает. Запаковываем файл надстройки в архив, удаляем исходный файл и распаковываем затем из архива файл обратно. Проверяем подключение надстройки. Такие действия в некоторых случаях позволяют обмануть Windows и заставить ее относиться к файлам более лояльно.
Включение программного доступа к объектной модели VBA в Excel
(для опытных пользователей)
Некоторые функции надстройки направлены на изменение VBA-проекта файла, например, создание пользовательской формы, получение списка модулей проекта, задание особых настроек автозапуска файла и т.д.. Если Вы столкнетесь с необходимостью использования таких команд, необходимо разрешить программе доступ к объектной модели VBA .
Для этого нужно открыть “Параметры центра управления безопасностью” (см. предыдущий пункт) –> “Параметры макросов” – > далее поставить галочку напротив “Представлять доступ к объектной модели проектов VBA”

Как отключить надстройку Excel
Если вам потребовалось отключить надстройку, снимите галочку напротив имени надстройки в меню Надстроек (Файл-Параметры Excel – «Надстройки» – кнопка внизу «Перейти»), а затем просто удалите файл надстройки с компьютера.
Источник
На чтение 2 мин. Просмотров 45 Опубликовано 23.05.2021
Возможно, вы установили некоторые надстройки в Microsoft Excel, но теперь вам нужно отключить указанную надстройку при запуске Excel. Как решить эту проблему? Метод, описанный в этой статье, может вам помочь.
Отключите надстройки при запуске Excel, изменив реестр Windows
Отключить надстройки при запуске Excel, изменив реестр Windows


Потрясающе! Использование эффективных вкладок в Excel, таких как Chrome, Firefox и Safari!
Сэкономьте 50% своего времени и уменьшите тысячи щелчков мышью каждый день!
Вы можете изменить реестр Windows, чтобы отключить указанную надстройку в Microsoft Excel при запуске. Пожалуйста, сделайте следующее.
1. Введите слово Regedit в поле поиска окна и нажмите клавишу Enter .

2. В появившемся диалоговом окне Контроль учетных записей нажмите кнопку Да . См. Снимок экрана:

3. В диалоговом окне Редактор реестра вам нужно открыть папку надстроек Excel, как показано ниже:
HKEY_CURRENT_USER Software Microsoft Office Excel Addins
4. Затем разверните папку Addins и выберите папку загрузчика с именем надстройки, которую необходимо отключить при запуске Excel. См. Снимок экрана:

5. Перейдите в правую панель диалогового окна редактора реестра, вы увидите файл REG_DWORD с именем LoadBehavior , щелкните его правой кнопкой мыши и выберите Изменить из контекстного меню.
6. Затем появится диалоговое окно Изменить DWOED , замените число в поле данных Value на 0, а затем нажмите кнопку ОК . См. Снимок экрана:

7. Закройте диалоговое окно Редактор реестра .
При запуске Microsoft Excel указанная надстройка отключается и не отображается на ленте.
Статьи по теме :
- Как отключить или нет разрешить параметры «Сохранить и сохранить как» в Excel?
- Как отключить кнопку после однократного нажатия в Excel?
- Как отключить функции вырезания, копирования и вставки в Excel?
- Как отключить щелчок правой кнопкой мыши на вкладке листа в Excel?
- Как отключить контекстное меню на указанном листе или всей книге в Excel?