-
— By
Sumit Bansal
A timestamp is something you use when you want to track activities.
For example, you may want to track activities such as when was a particular expense incurred, what time did the sale invoice was created, when was the data entry done in a cell, when was the report last updated, etc.
Let’s get started.
Keyboard Shortcut to Insert Date and Timestamp in Excel
If you have to insert the date and timestamp in a few cells in Excel, doing it manually could be faster and more efficient.
Here is the keyboard shortcut to quickly enter the current Date in Excel:
Control + : (hold the control key and press the colon key).
Here is how to use it:
- Select the cell where you want to insert the timestamp.
- Use the keyboard shortcut Control + :
- This would instantly insert the current date in the cell.
A couple of important things to know:
- This shortcut would only insert the current date and not the time.
- It comes in handy when you want to selectively enter the current date.
- It picks the current date from your system’s clock.
- Once you have the date in the cell, you can apply any date format to it. Simply go to the ‘Number Format’ drop-down in the ribbon and select the date format you want.
Note that this is not dynamic, which means that it will not refresh and change the next time you open the workbook. Once inserted, it remains as a static value in the cell.
While this shortcut does not insert the timestamp, you can use the following shortcut to do this:
Control + Shift + :
This would instantly insert the current time in the cell.
So if you want to have both date and timestamp, you can use two different cells, one for date and one for the timestamp.
Using TODAY and NOW Functions to Insert Date and Timestamps in Excel
In the above method using shortcuts, the date and timestamp inserted are static values and don’t update with the change in date and time.
If you want to update the current date and time every time a change is done in the workbook, you need to use Excel functions.
This could be the case when you have a report and you want the printed copy to reflect the last update time.
Insert Current Date Using TODAY Function
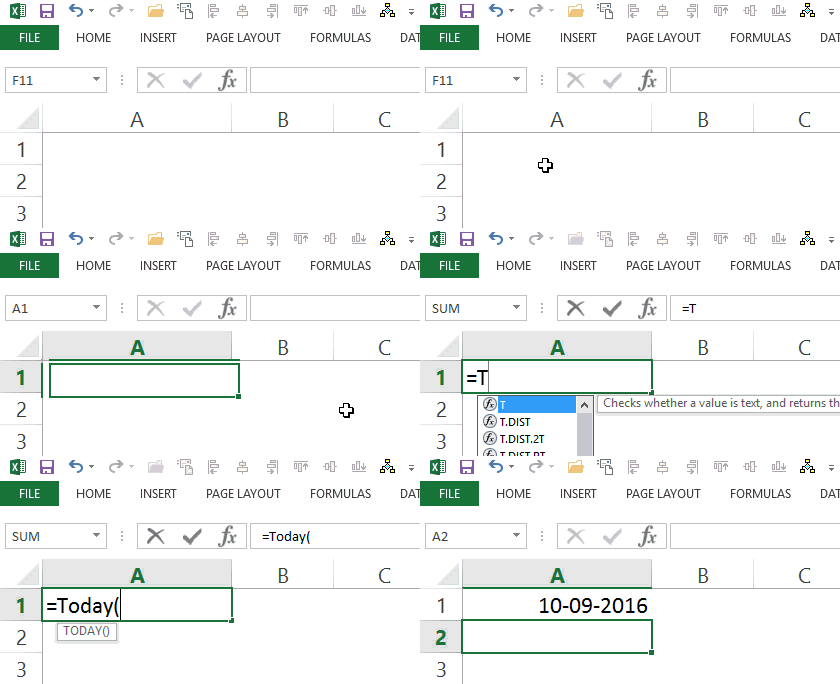
To insert the current date, simply enter =TODAY() in the cell where you want it.
Since all the dates and times are stored as numbers in Excel, make sure that the cell is formatted to display the result of the TODAY function in the date format.
To do this:
Note that this formula is volatile and would recalculate every time there is a change in the workbook.
Insert Date and Timestamp Using NOW Function
If you want the date and timestamp together in a cell, you can use the NOW function.
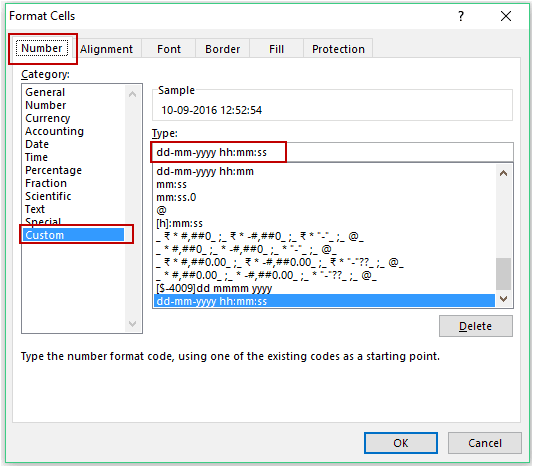
Again, since all the dates and times are stored as numbers in Excel, it is important to make sure that the cell is formatted to have the result of the NOW function displayed in the format that shows the date as well as time.
To do this:
- Right-click on the cell and select ‘Format cells’.
- In the Format Cells dialog box, select ‘Custom’ category in the Number tab.
- In the Type field, enter dd-mm-yyyy hh:mm:ss
- Click OK.
This would ensure that the result shows the date as well as the time.
Note that this formula is volatile and would recalculate every time there is a change in the workbook.
Circular References Trick to Automatically Insert Date and Timestamp in Excel
One of my readers Jim Meyer reached out to me with the below query.
“Is there a way we can automatically Insert Date and Time Stamp in Excel when a data entry is made, such that it does not change every time there is a change or the workbook is saved and opened?”This can be done using the keyboard shortcuts (as shown above in the tutorial). However, it is not automatic. With shortcuts, you’ll have to manually insert the date and timestamp in Excel.
To automatically insert the timestamp, there is a smart technique using circular references (thanks to Chandoo for this wonderful technique).
Let’s first understand what a circular reference means in Excel.
Suppose you have a value 1 in cell A1 and 2 in cell A2.
Now if you use the formula =A1+A2+A3 in cell A3, it will lead to a circular reference error. You may also see a prompt as shown below:
This happens as you are using the cell reference A3 in the calculation that is happening in A3.
Now, when a circular reference error happens, there is a non-ending loop that starts and would have led to a stalled Excel program. But the smart folks in the Excel development team made sure that when a circular reference is found, it is not calculated and the non-ending loop disaster is averted.
However, there is a mechanism where we can force Excel to at least try for a given number of times before giving up.
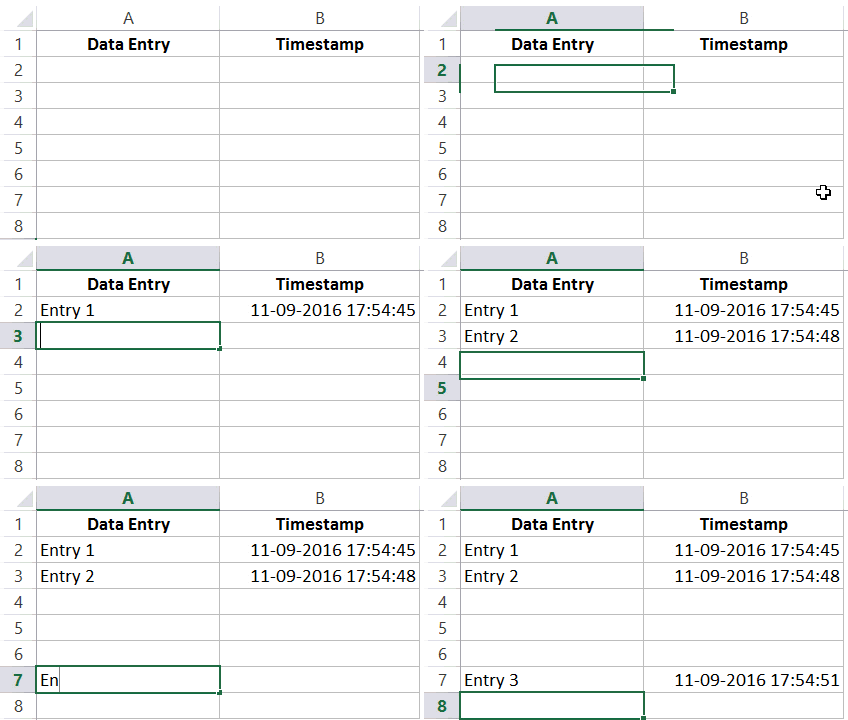
Now let’s see how we can use this to automatically get a date and timestamp in Excel (as shown below).
Note that as soon as I enter something in cells in column A, a timestamp appears in the adjacent cell in column B. However, if I change a value anywhere else, nothing happens.
Here are the steps to get this done:
That’s it!
Now when you enter anything in column A, a timestamp would automatically appear in column B in the cell adjacent to it.
With the above formula, once the timestamp is inserted, it doesn’t update when you change the contents of the adjacent cell.
If you want the timestamp to update every time the adjacent cell in Column A is updated, use the below formula (use Control + Shift + Enter instead of the Enter key):
=IF(A2<>"",IF(AND(B2<>"",CELL("address")=ADDRESS(ROW(A2),COLUMN(A2))),NOW(),IF(CELL("address")<>ADDRESS(ROW(A2),COLUMN(A2)),B2,NOW())),"")
This formula uses the CELL function to get the reference of the last edited cell, and if it’s the same as the one to the left of it, it updates the timestamp.
Note: When you enable iterative calculations in the workbook once, it will be active until you turn it off. To turn it off, you need to go to Excel Options and uncheck the ‘Enable iterative calculation’ option.
Using VBA to Automatically Insert Timestamp in Excel
If VBA is your weapon of choice, you’ll find it to be a handy way to insert a timestamp in Excel.
VBA gives you a lot of flexibility in assigning conditions in which you want the timestamp to appear.
Below is a code that will insert a timestamp in column B whenever there is any entry/change in the cells in Column A.
'Code by Sumit Bansal from https://trumpexcel.com
Private Sub Worksheet_Change(ByVal Target As Range)
On Error GoTo Handler
If Target.Column = 1 And Target.Value <> "" Then
Application.EnableEvents = False
Target.Offset(0, 1) = Format(Now(), "dd-mm-yyyy hh:mm:ss")
Application.EnableEvents = True
End If
Handler:
End Sub
This code uses the IF Then construct to check whether the cell that is being edited is in column A. If this is the case, then it inserts the timestamp in the adjacent cell in column B.
Note that this code would overwrite any existing contents of the cells in column B. If you want. You can modify the code to add a message box to show a prompt in case there is any existing content.
Where to Put this Code?
This code needs to be entered as the worksheet change event so that it gets triggered whenever there is a change.
To do this:
Make sure you save the file with .XLS or .XLSM extension as it contains a macro.
Creating a Custom Function to Insert Timestamp
Creating a custom function is a really smart way of inserting a timestamp in Excel.
It combines the power of VBA with functions, and you can use it like any other worksheet function.
Here is the code that will create a custom “Timestamp” function in Excel:
'Code by Sumit Bansal from http://trumpexcel.com
Function Timestamp(Reference As Range)
If Reference.Value <> "" Then
Timestamp = Format(Now, "dd-mm-yyy hh:mm:ss")
Else
Timestamp = ""
End If
End Function
Where to Put this Code?
This code needs to be placed in a module in the VB Editor. Once you do that, the Timestamp function becomes available in the worksheet (just like any other regular function).
Here are the steps to place this code in a module:
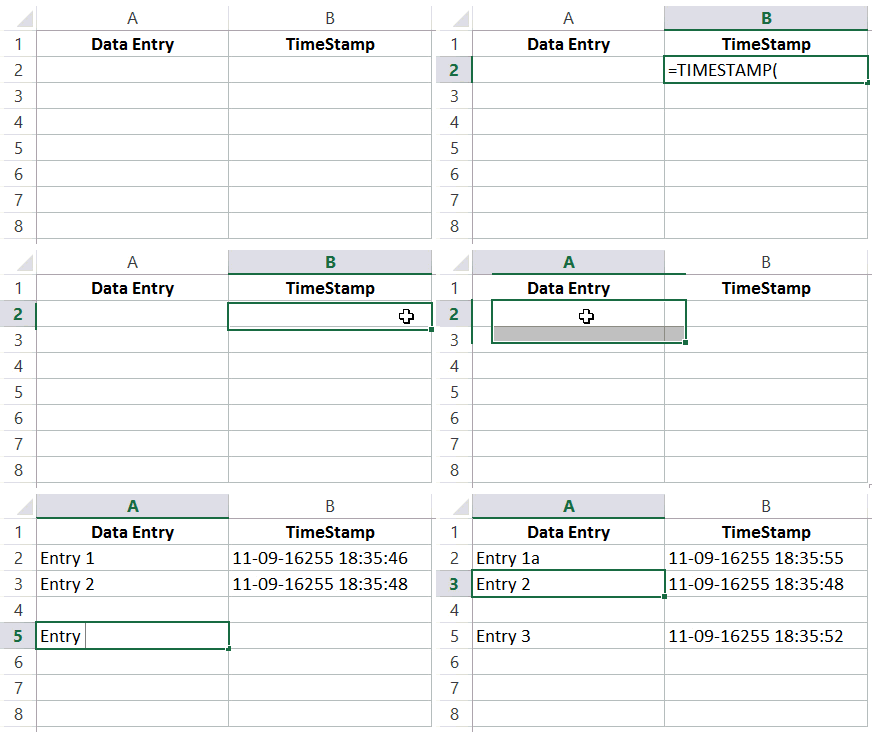
Now you can use the function in the worksheet. It will evaluate the cell to its left and insert the timestamp accordingly.
It also updates the timestamp whenever the entry is updated.
Make sure you save the file with .XLS or .XLSM extension as it contains VB code.
Hope you’ve found this tutorial useful.
Let me know your thoughts in the comments section.
You May Also Like the Following Excel Tutorials and Resources:
- How to Run a Macro in Excel.
- How to Create and Use an Excel Add-ins.
- Select Multiple Items from a Drop Down List in Excel.
- Inserting Date and Timestamp in Google Sheets.
- A Collection of FREE Excel Templates.
- Excel Timesheet Template.
- Excel Calendar Template.
- Convert Time to Decimal Number in Excel (Hours, Minutes, Seconds)
- How to Autofill Only Weekday Dates in Excel (Formula)
- Make VBA Code Pause or Delay (Using Sleep / Wait Commands)

Get 51 Excel Tips Ebook to skyrocket your productivity and get work done faster
61 thoughts on “How to Quickly Insert Date and Timestamp in Excel”
-
so amazing
-
All of this is very clever and I even got it all to work using VBA to insert a time in a column to the right of where I entered some data. Perfect but .. How can you protect your code, as you can see it and edit it by doing View Code, even if the sheet and/or workbook is protected? Also when I saved it and then re-opened the worksheet it stopped working – what have I done wrong? Wonderful stuff!! Thank you.
-
Thank you awesome work i know its hard to get these formulas running how you like and i just wanted to thank you for letting people like me steal them off the web 🙂
-
Doesn’t work in Online Excel ?
-
What if I want to check a range of cells B2 – G2 and if any are updated, update the date and timestamp?
-
Thank you for all the instructions, I used this option
=IF(A2″”,IF(AND(B2″”,CELL(“address”)=ADDRESS(ROW(A2),COLUMN(A2))),NOW(),IF(CELL(“address”)ADDRESS(ROW(A2),COLUMN(A2)),B2,NOW())),””)
Works fine, but after keeping the sheet open for a few hours, while updating it, the timestamp gives an #N/A error and can’t get it back.
I use the VBA timestamp function to get over this, seems to be working fine…
Any ideas?
Thank you
-
For Timestamp Update Formula:
=IF(B4″”,IF(AND(F4″”,CELL(“address”)=ADDRESS(ROW(B4),COLUMN(F4))),NOW(),IF(CELL(“address”)ADDRESS(ROW(B4),COLUMN(B4)),F4,NOW())),””)
Works fine when it is on the same sheet, but its not working for different sheet even after changing the reference all B4 into Sheet1!B4 and looking output in the Sheet 2 in F4 Cell
-
This has worked perfect for what I was trying to create. I now have the problem of the timestamp resetting each time I reopen the file. Is there a way for the timestamp to stay the same from when the data was put in?
-
Disregard…
-
-
Hi
I need a timestamp on “C” that updates the time when either “A” or “B” is updated. I can’t use a macro as I need my file in Sharepoint and to be accessible by many people at the same time.
How can I use the circular reference or the Custom Function for this purpose?
Thanks!
-
it working fine with me, however i have issue when using auto-filter or Auto-clear-filter function for designated table, it will keep updating the timestamp in all timestamp reference cells…
below sub :
——————————————————————–
Sub Access_Filter()Dim WeekS As String
Dim WeekE As StringWeekS = “>=” & Application.InputBox(Prompt:=”Enter Start Date”, Default:=Format(Date, “dd mmm yyyy”), Type:=2)
WeekE = “<=» & Application.InputBox(Prompt:=»Enter End Date», Default:=Format(Date, «dd mmm yyyy»), Type:=2)ActiveSheet.ListObjects(«ACCESS»).Range.AutoFilter Field:=3, Criteria1:=WeekS, Operator:=xlAnd, Criteria2:=WeekE
End Sub
———————————————————————————-
Sub Access_Clear_All_Filters_Range()‘To Clear All Fitlers use the ShowAllData method for
‘for the sheet. Add error handling to bypass error if
‘no filters are applied. Does not work for Tables.
On Error Resume Next
ActiveSheet.ListObjects(«ACCESS»).Range.AutoFilter Field:=3
On Error GoTo 0
ActiveSheet.ListObjects(«ACCESS»).Range.End(xlDown).SelectEnd Sub
-
I am having this issue too. I am using it in a table and every time i change filters, it updates to the current time.
-
-
Great job thanks!
-
How to put an start date and time with end date and time? Same as above with duration.
-
Hi guys, I tried to apply the formula below. It works and i saved my macro excel. But when I opened my file (1st time after the file created) the macro was put to disable. when i enable it then the timestamp reset. It also happened when the file was opened from other user which using the same network folder. any idea how to prevent the timestamp reset?
Function Timestamp(Reference As Range)
If Reference.Value “” Then
Timestamp = Format(Now, “dd-mm-yyy hh:mm:ss”)
Else
Timestamp = “”
End If
End Function-
Same issue not sure if anyone found a solution.
-
-
For the formula
=IF(A2″”,IF(AND(B2″”,CELL(“address”)=ADDRESS(ROW(A2),COLUMN(A2))),NOW(),IF(CELL(“address”)ADDRESS(ROW(A2),COLUMN(A2)),B2,NOW())),””)is it possible to change “A2” to a range of cells?
-
I agree is it possible to add a list of cells that are changed and record the dates the they were changed??
-
-
For the formula
=IF(A2″”,IF(AND(B2″”,CELL(“address”)=ADDRESS(ROW(A2),COLUMN(A2))),NOW(),IF(CELL(“address”)ADDRESS(ROW(A2),COLUMN(A2)),B2,NOW())),””)is it possible to change “A2” to a range of cells?
I would like to use “A2:M2” as the affected cells, so the timestamp updates when any one of that range of cells is modified. I tried to change it but it would not work.
I added another set of parentheses to each A2:M2 range, still no luck.-
H i Ron, I had the same problem and fixed it by adding an OR within the AND expression like:
In an example field C2 is also ‘monitored’ for change.
It is a formula mess but it works.=IF(A2″”,IF(AND(B2″”,OR(CELL(“address”)=ADDRESS(ROW(A2),COLUMN(A2)),CELL(“address”)=ADDRESS(ROW(C2),COLUMN(C2)))),NOW(),IF(CELL(“address”)ADDRESS(ROW(A2),COLUMN(A2)),B2,NOW())),””)
-
-
Hi Guys i’m looking for something similar the point of difference is as follows … eg There is a column A which is part of a table where it records a series of values based on a formula. values are “text 1″,”text2″ text3” etc . What i want is in column b, should the value in corresponding Acell reaches “text3” then it records the date when the cell reached “Text 3” else blank. Can anyone help…
-
excellent!
-
Hi, Sumit.Greetings!!
I’m preparing a worksheet to enter all the received purchase orders & associated details viz. customer name, item type, item drawing no., drawing revision no. in po, etc. Say BOOK1
When all the relevant data is entered then I get ” found-clear” in column O & now all the data related to that entry is to be extracted to another book, say BOOK-2.
Also extracted data should appear in BOOK-2 in a sequential manner, without blank rows & as any entry is cleared in BOOK-1(PO entry workbook), it should appear in BOOK-2 below all the previously extracted entries.To solve this, I thought of getting :
1) Fixed, non-volatile timestamps as soon as ” found-clear” appears in column O for any PO entry.
2) To give Rank to these timestamps, using Rank Function.
3) Then use Index, Match, Rows to extract data in a sequential sorted manner.To get fixed( non-volatile) timestamps I applied two approaches as shown by you:
1) Circular reference with NOW()
2) UDFI’ve attached an excel file with two sheets:
1) Examples
2) ApplicationProblem 1) with circular reference & NOW()
1A) Also if I change conditions so that “found-clear” is removed & then recreate the conditions to get “found-clear” back, timestamp disappears.
Problem 2) with UDF; refer sheet” examples”, SAMPLE-3
2A) It is showing the year as 1989 in place of 2019.
2B) If I make any changes to the worksheet, like add or remove cells anywhere in the worksheet, all the timestamps change to current time & date.
2C) Rank function not working. -
Guys,
I have a different requirement and this is for stock market.
Let us say I have Columns A to G in the excel sheet and the columns heading reading as below for stock market :
Symbol, Lot Size, Open, High, Low, LTP and the Signal Column (which gives Buy or Sell based on a strategy).
The last column which is the Signal Column (and which happens to be Column G) contains the “Buy”or “Sell” or Ëmpty when there is no signal. This column is dynamic, in the sense, as and when the data across A-F changes, I get new signals like Buy or Sell or Empty, depending upon the strategy.
My expectation is, as and when I get a Buy or a Sell or an empty in Column G (in the event of a Buy and Sell that has changed to an empty cell), I want to timestamp, let us say, Column H with the exact time the change happened (regardless of Buy or Sell or empty (post a buy or sell). And this timestamp should not change the time, unless any change happens in Column G. For e.g. a buy changing to a sell or a sell changing to a buy or a buy/sell changing to an empty cell.
Let me know if the above explanation helps.
-
The challenge I have with the available solution on the net is, my Excel sheet refreshes every 1 minute pulling data off the net, and as and when it does, the timestamp changes to the current time as against the time the signal came.
For e.g. a BUY or SELL that came at say 11:15 AM, should remain static unless the signal changes from a buy to sell or a sell to buy, but everytime my excel refreshes it updates with the current time in this column. What I am looking for is to understand what time a buy or sell came.
-
-
I used this formula yesterday on 5th March and it worked perfect =IF(A2″”,IF(B2″”,B2,NOW()),””) my dates registered as 5th March timestamp. However I’ve now come into the same spreadsheet the very next day on 6th March but when i enter data into column A new rows, the formula in column B remains blank no result. Is there another step I’ve missed so it recognises a new day?
-
Super easy directions – thankyou 🙂
-
This has been really helpful! thank you! I was wondering if we’re able to input in multiple cells (e.g. A2, B2, D2) and still get and updated timestamp in “F2” when ever the multiple cells (A2, B2, D2) are updated.
-
It worked on one Excel Spreadsheet but when I tried it again on another Spreadsheet (totally different workbook), it just shows a blank cell. I have it formatted for date.
-
In the example, “Using VBA to Automatically Insert Timestamp in Excel” I have a condition where a process is running and I want to ‘time stamp’ when it began in one column and ‘time stamp’ (date and time) when the process ended, a few columns to the right…meaning a start and stop time stamp. Can this formula accommodate this requirement?
-
Hi,
Thanks Sumit, very nice contribution 🙂
To add to your article for those, who like to have a static value for Date or Time Stamp and need a specific date / time format but without going through VBA, you may consider this option:
1. Choose one Reference Cell, e.g. [A1]. It can be on a separate worksheet.
Put in the formula
=today()
or
=now()2. Give that cell the name “Time” or “Date”
3. Now, if you want to enter current Date or Time in any cell in your workbook, just type
=Date
or
=TimeThe target cell can be formatted according to your preferences, e.g. “YYYY-MM-DD” or “hh:mm:ss”. The advantage is that you can also catch the seconds which is not possible with the keyboard shortcut [CTRL] + [SHIFT] + [:].
4. You can also incorporate this in any formulas you are using in your worksheet.
Example:
Every time you enter the word “ok” in Row [C], Row [B] will automatically register the current time. To do this format Row [B] as “hh:mm:ss”.
Now, in cell [B1] you enter the formulaif(C1=”ok”,Time,””)
Then you copy this formula to the range you will be using.
Now, every time you enter “ok” in a cell on Row [C], you will get an automatic (and static) time stamp in the adjacent cell in Row [B].
-
NICE great article style and super helpful
-
I’m trying to create a timestamp based on a dropdown value, however leveraging the macro is providing a validation error. Is there a workaround? If I use in a blank (no validation field) the vba/macro works correctly.
-
Function Timestamp(Reference As Range)
If Reference.Value “” Then
Timestamp = Format(Now, “dd-mm-yyy hh:mm:ss”)
Else
Timestamp = “”
End If
End Functionis not worjking ???
-
there is a typo in the formula,
replace -yyy by -yyyy (4 letters) and it will work.
-
-
Hi there – this is FABULOUS! Really saved me a lot of pain!
Can you assist with one thing?
I need to be able to create the timestamp, on a separate row, each time a (custom function) button is pressed?
We will be using this to create a basic “footfall counter” to count the time/date and number of people passing into our IT support area.
If you can assist, this would be amazing…
-
Thank you for your tips! I am an italian Excel Professionist and often i read your blog. Good work 😉 Marck
-
Is it possible to write a code that take effect of Cell A or Cell B for the timestamp?
using below code:
Function Timestamp(Reference As Range)
If Reference.Value <> “” Then
Timestamp = Format(Now, “dd-mm-yyy hh:mm:ss”)
Else
Timestamp = “”
End If
End FunctionIn cell C, should I use =timestamp(A1:B2)
-
This is just what I needed. You rock!
Thank you! -
=IF($A12<>“”,IF(AND($I12<>“”,CELL(“address”)=ADDRESS(ROW($A12),COLUMN($A12))),NOW(),IF(CELL(“address”)<>ADDRESS(ROW($A12),COLUMN($A12)),$I12,NOW())),””)
i CHECKED FOR ITERATION ALSO.. EVEN ITS NOT WORKING KINDLY HELP ON THIS
-
NOT WORKING SECOND FORMULA
-
I use the following formula (=IF(A2″”,IF(B2″”,B2,NOW()),””)
But whenever i type in other cells, the time updated.
or when i save and close, then reopen the date and time updated automatically. -
Superb Job.Thanks
-
Can the custom function be modified to display hh:mm then am or pm?
-
Wowww This is what I am looking for!!!
THANK YOU SO MUCHHH!!!!
-
One issue: keeping the formula options for iterations to prevent the cirucular reference error. The options are not saved with the sheet. They are saved on the computer and those saved options change with each workbook you open. For a timestamp with a circular reference you need to set the options as the workbook opens. Use this macro:
Private Sub Workbook_Open()
Application.Calculation = xlCalculationAutomatic
Application.Iteration = True
Application.MaxIterations = 1
End SubThat solves the problem and the formula works fine every time.
-
Why =IF($A$1″”,NOW()) does not work here.
-
grate! just you should say that it works mailny or totaly only on ENG versions.
I have Excel in italian and many of this stuff does not work like that -
I have checked ‘enable iterative calculation’ option and I have put the formula =IF(A2””,IF(B2””,B2,NOW()),””) in cell B2 but I am getting error #Name? when I enter any text in A2.
-
Hello Sajid.. Your double quotes are not in the right format (it happens sometimes when copied directly from the webpage). Just delete the double quotes and enter it manually. It would work then.
-
Yes, Now it’s working. Thank you so much Sumit.
-
-
-
I like the automated timestamp, I have users who have asked for similar things, it gives ideas on how to implement.
-
Thanks Sumit……..I was searching this for more over decade.
-
Glad you found this useful Anand!
-
-
When I tried to use the formulas to insert the timestamp, it returned 1/0/1900. It sounds like some setting that needs to changed but I couldn’t figure out where or what to change.
-
Hello Terry.. You need to check the ‘enable iterative calculation’ option for this to work
-
How to make it work for an online excel sheet shared with multiple people?
-
-
-
Good one! thanks
-
Thanks Ashesh!
-
-
Excellent tip! Thank you!
-
Thanks for commenting.. Glad you liked it 🙂
-
Comments are closed.
Временная метка Unix также называется временем эпохи или временем POSIX, которое широко используется во многих операционных системах или форматах файлов. В этом руководстве рассказывается о преобразовании между датой и меткой времени Unix в Excel.
Преобразовать дату в метку времени
Преобразование даты и времени в метку времени
Преобразовать метку времени на дату
Дополнительные руководства по преобразованию даты и времени …
 Преобразовать дату в метку времени
Чтобы преобразовать дату в метку времени, формула может вычислить это.
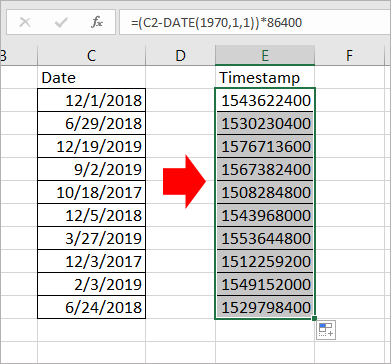
Выберите пустую ячейку, предположим, ячейку C2, и введите эту формулу = (C2-ДАТА (1970,1,1)) * 86400 в это и нажмите Enter key, при необходимости вы можете применить диапазон с этой формулой, перетащив маркер автозаполнения. Теперь диапазон ячеек даты преобразован в метки времени Unix.
 Преобразование даты и времени в метку времени
Существует формула, которая может помочь вам преобразовать дату и время в метку времени Unix.
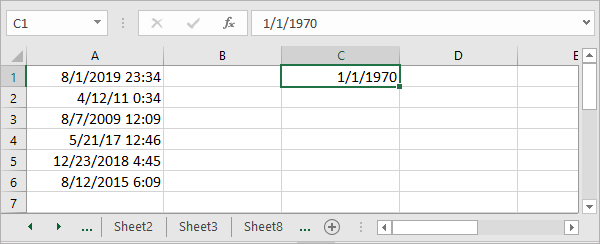
1. Во-первых, вам нужно ввести всемирное координированное время в ячейку, 1. Смотрите скриншот:
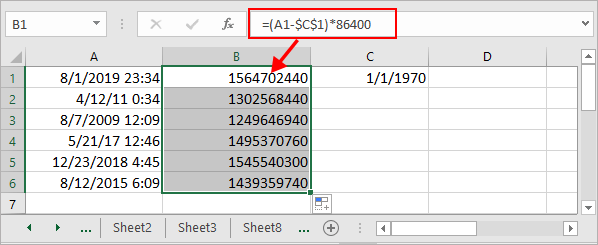
2. Затем введите эту формулу = (A1- $ C $ 1) * 86400 в ячейку, нажмите Enter , а затем при необходимости перетащите дескриптор автозаполнения в диапазон с этой формулой. Смотрите скриншот:
Tips: В формуле A1 — это ячейка даты и времени, C1 — введенная вами координата всемирного времени.
 Преобразовать метку времени на дату
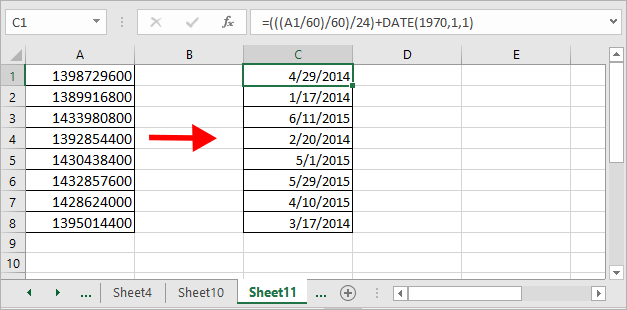
Если у вас есть список временных меток, необходимых для преобразования на сегодняшний день, вы можете сделать следующие шаги:
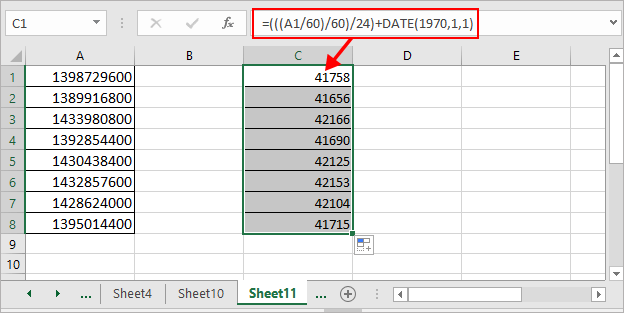
1. В пустой ячейке рядом со списком временных меток введите эту формулу. =(((A1/60)/60)/24)+DATE(1970,1,1), нажмите Enter и перетащите маркер автозаполнения в нужный диапазон.
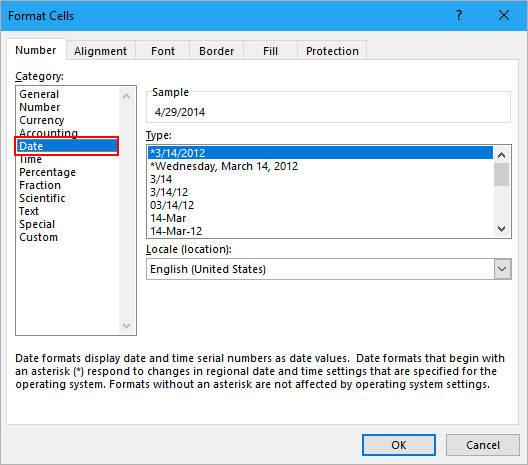
2. Затем щелкните правой кнопкой мыши ячейки, в которых используется формула, и выберите Формат ячеек из контекстного меню, затем во всплывающем Формат ячеек диалог под Nвокруг вкладку нажмите Время в Категория список, затем выберите тип даты в правом разделе.
3. Нажмите OK, теперь вы можете видеть, что метки времени Unix преобразованы в даты.
Ноты:
1. A1 указывает нужную ячейку с отметкой времени.
2. Эту формулу также можно использовать для преобразования ряда временных меток в дату и время, просто отформатируйте результат в формате даты и времени.
3. Приведенная выше формула преобразует 10-значное число в стандартную дату и время. Если вы хотите преобразовать 11-значное число, 13-значное число или 16-значное число в стандартную дату и время в Excel, используйте формулу, как показано ниже:
Преобразование 11-значного числа в дату: =A1/864000+ДАТА(1970,1,1)
Преобразование 13-значного числа в дату: =A1/86400000+ДАТА(1970,1,1)
Преобразование 16-значного числа в дату: =A1/86400000000+ДАТА(1970,1,1)
Для разной длины числа, которое необходимо преобразовать в дату и время, просто измените количество нулей делителя в формуле, чтобы правильно получить результат.
Относительные статьи:
-
Как преобразовать дату и время из одного часового пояса в другой в Excel?
Эта статья покажет вам, как преобразовать дату и время из одного часового пояса в другой в Excel.
-
Как разделить дату и время из ячейки на две отдельные ячейки в Excel?
Например, у вас есть список данных, смешанных с датой и временем, и вы хотите разделить каждую из них на две ячейки, одна — это дата, а другая — время, как показано ниже. В этой статье представлены два быстрых метода решения этой проблемы в Excel.
-
Как преобразовать ячейку формата даты / времени в дату только в Excel?
Если вы хотите преобразовать ячейку формата даты и времени только в значение даты, такое как 2016/4/7 1:01 AM до 2016/4/7, эта статья может вам помочь.
-
Как убрать время с даты в Excel?
Если есть столбец даты с отметкой времени, например, 2 17:2012, и вы не хотите сохранять отметку времени и хотите удалить время 12:23 из даты и оставить только дату 12. Как можно быстро удалить время из даты в нескольких ячейках Excel?
-
Как объединить дату и время в одну ячейку в Excel?
На листе есть два столбца, один — это дата, другой — время. Есть ли способ быстро объединить эти два столбца в один и сохранить формат времени? Теперь в этой статье представлены два способа в Excel объединить столбец даты и столбца времени в один и сохранить формат времени.
Лучшие инструменты для работы в офисе
Kutools for Excel Решит большинство ваших проблем и повысит вашу производительность на 80%
- Снова использовать: Быстро вставить сложные формулы, диаграммы и все, что вы использовали раньше; Зашифровать ячейки с паролем; Создать список рассылки и отправлять электронные письма …
- Бар Супер Формулы (легко редактировать несколько строк текста и формул); Макет для чтения (легко читать и редактировать большое количество ячеек); Вставить в отфильтрованный диапазон…
- Объединить ячейки / строки / столбцы без потери данных; Разделить содержимое ячеек; Объединить повторяющиеся строки / столбцы… Предотвращение дублирования ячеек; Сравнить диапазоны…
- Выберите Дубликат или Уникальный Ряды; Выбрать пустые строки (все ячейки пустые); Супер находка и нечеткая находка во многих рабочих тетрадях; Случайный выбор …
- Точная копия Несколько ячеек без изменения ссылки на формулу; Автоматическое создание ссылок на несколько листов; Вставить пули, Флажки и многое другое …
- Извлечь текст, Добавить текст, Удалить по позиции, Удалить пробел; Создание и печать промежуточных итогов по страницам; Преобразование содержимого ячеек в комментарии…
- Суперфильтр (сохранять и применять схемы фильтров к другим листам); Расширенная сортировка по месяцам / неделям / дням, периодичности и др .; Специальный фильтр жирным, курсивом …
- Комбинируйте книги и рабочие листы; Объединить таблицы на основе ключевых столбцов; Разделить данные на несколько листов; Пакетное преобразование xls, xlsx и PDF…
- Более 300 мощных функций. Поддерживает Office/Excel 2007-2021 и 365. Поддерживает все языки. Простое развертывание на вашем предприятии или в организации. Полнофункциональная 30-дневная бесплатная пробная версия. 60-дневная гарантия возврата денег.
Вкладка Office: интерфейс с вкладками в Office и упрощение работы
- Включение редактирования и чтения с вкладками в Word, Excel, PowerPoint, Издатель, доступ, Visio и проект.
- Открывайте и создавайте несколько документов на новых вкладках одного окна, а не в новых окнах.
- Повышает вашу продуктивность на 50% и сокращает количество щелчков мышью на сотни каждый день!
Home / Excel Basics / How to Insert a Timestamp in Excel [Formula + VBA + Shortcut]
A few years back when I was working for a tech company I was one of those people who were an Excel help point for all. And that’s the real reason I’m fascinated to learn more. One day the lady who was working as a reception coordinator came to me and asked:
Puneet, I’m managing a list of tasks and I want to add date and time in the corresponding cell on completion of each task. Which is the best way?
And quickly I realized that she was talking about a timestamp. I’m sure you also use it while working in Excel. In general, it contains the current date and time, and we use it to capture the completion time of a task. Now the thing is: Which is the best way to insert a timestamp in Excel?
In this post, you’ll learn how to create a timestamp in Excel using 5 different ways and we will try to figure out which is the best out of all. So let’s get started.
1. Using a Keyboard Shortcut to Insert a Timestamp
There are two different shortcuts to insert a date and a time. And, here we need to use both of them subsequently. Here are the steps:
- First of all, select the cell where you need to insert a timestamp.
- After that, use the shortcut key Control + : (Press and hold control and then press colon). Once you press this, it will insert the current date (according to your system) in the cell.
- At this time, your cell is in edit mode.
- Now, press Control + Shift + : (Press and hold the control and shift key and then press the colon).
- Your cell is still in edit mode, now press the enter key to complete the entry.
In short, you need to press two shortcuts in sequence to insert this. And, if you want to add only one thing of date and time, just skip the shortcut key.
| PROs | Cons |
|---|---|
| If you want to save time and have fewer cells, this method is perfect. | This is not a dynamic method, you have a static timestamp. And if you want to update the time stamp you need to enter it again. |
| When you enter both the date and time, Excel automatically picks the right format to display it. | You need to press two different shortcut keys to enter it. |
2. Insert a Timestamp with NOW Function
A simple dynamic method. If you want to use a formula to insert a timestamp, the perfect way is to use the NOW function. When you enter this function in a cell it returns the current date and time according to your system’s settings.
The default format of date and time return by NOW is mm/dd/yyyy hh:mm. But for some reason, if you want a custom format, you change its format using the custom format option. Select the cell ➜ Press shortcut key control + 1 ➜ Select “Custom” ➜ Enter “mm/dd/yyyy hh:mm” in the input box ➜ Click OK.

And if you want to enter the only date then you can use TODAY instead of NOW, it only returns the current date according to the system’s settings.

Pros
- It’s a dynamic method.
- You can use both of the functions with an IF function to create a condition to enter a timestamp if another cell has a value.
Cons
- Even though it’s a dynamic method but as both of the functions are volatile they will get updated whenever you make changes to your worksheet.
- And if you just want values instead of formulas you need to convert them into values manually.
3. Using Circular Reference for Creating a Timestamp
If you want to get into an advanced method and don’t want to use methods #1 and #2 then you can use a circular reference to insert a timestamp.
But before you learn this method let’s understand what circular reference is all about. Let’s say you have a value of 5 in cell A1 and a value of 10 in cell B1. Now if you enter a formula =A1+B1+C1 in cell C1, it will return a message circular reference error.

This is because you are using cell C1 as a reference in cell C1. When a circular reference error happens, there is a non-ending loop in the cell. Reference the cell A3 is dependent on the value of cell A3 and the value of A3 is dependent on reference to cell A3.

But when a circular reference is entered, Excel doesn’t calculate it and the non-ending loop never starts.
Here’s the deal:
You can enable the “iterative calculation option” to force Excel to perform the calculation at least one time and use the now function in the calculation. This way Excel will update the cell formula only one time instead of every time. Steps to enable iterative calculation option:
- Go to File ➜ Options.
- In the Excel options, select Formulas.
- In the Calculated options, check the Enable iterative calculation option.
- Click OK.

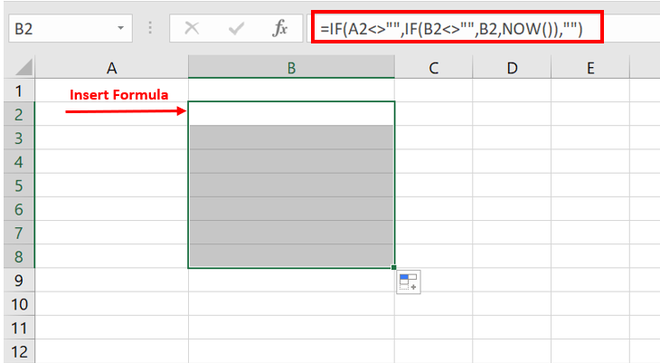
After that in cell B2, enter the below formula in the formula bar.
=IF(A2<>"",IF(B2<>"",B2,NOW()),"")
Now when you enter any value in cell A2 the formula in cell B2 will return a timestamp.

If you are a VBA freak then I’m sure you’ll find this VBA code useful. With this, you don’t need to enter a formula or even not use any shortcut key. Just select the cell where you need to enter a timestamp and run the macro.
Sub timeStamp()

Dim ts As Date

With Selection

.Value = Now
.NumberFormat = "m/d/yyyy h:mm:ss AM/PM"

End With

End Sub
How to use this code
To use this code you can add it on QAT (quick access toolbar) and run it every time whenever you need to add a timestamp.
Here are the steps:
Now you have an icon on QAT and whenever you need a timestamp you can select the cell and click this button to insert it.
4.1 Using UDF for Timestamp
Yes, you can also create a custom Excel function for inserting a timestamp in Excel. Below is the code for this UDF.
Function Timestamp(Reference As Range)
If Reference.Value <> "" Then
Timestamp = Format(Now, "dd-mm-yyyy hh:mm:ss")
Else
Timestamp = ""
End If
End Function
By using this user-defined function you can get a timestamp in a cell if another has a value in it. Please follow the below steps:
- Go to Developer tab and open VBA editor.
- In VBA editor, insert a new module and paste this code into it.
- Now, close VBA editor and come back to your worksheet.
- In the cell B2, enter below formula.
- Now, when you enter any value in cell A1, cell B1 will get a timestamp.
Conclusion
Adding a timestamp is something we often do while working in Excel. And, you have 5 different methods to insert it. If you ask me I love to use the VBA button on QAT for this. The best way is to add this code in a personal.xlsb so that you can use it in all the workbooks. This is the whole story about timestamps and I’m sure you found it useful but now tell me one thing.
Do you know any other method for this?
Please share with me in the comment section, I’d love to hear from you, and please don’t forget to share this tip with your friends.
If you want to sharpen your existing Excel Skills, check out these Excel Tips and Tricks.
The Date and Timestamp is a type of data type that determines the date and time of a particular region. It contains some characters along with some encoded data. This format may vary from language to language. Keeping track of date and time helps in managing records of our work as well as segregate the information day-wise. In this article, we will be going to learn how we can automatically insert Date and Timestamp in Excel.
There are multiple ways to insert Date and Timestamp in Excel. These methods include both static and dynamic methods.
1. Inserting Date And Timestamp using keyboard shortcuts (Static method)
The static method is helpful when there are only a few cells where you need to insert the Date and Timestamp. You can quickly use the keyboard shortcut to manually insert the Date and Timestamp.
Follow the below steps to implement the same:
- Select the cell into which the current date or time needs to be inserted.
- Use this shortcut – Ctrl + ; (Control + semicolon) to insert the current date.
- Use this shortcut – Ctrl + Shift + ; (Control + Shift + semicolon) to insert the current time.
- Use this shortcut – Press the combination (Ctrl + ;) and (Ctrl + Shift + ;) to insert the current time and time.
2. Inserting Date And Timestamp using Formulas:
The NOW() and TODAY() functions can be used to insert the current date and time that will update automatically. This method dynamically updates the date-time whenever a change is made in the worksheet.
- NOW(): To insert current date and time.
- TODAY(): To insert the current date.
Follow the below steps to implement the same:
- Select the cell into which the current date or time needs to be inserted.
- Enter the function NOW() or TODAY().
- Press the Enter key.
- The current date-time or date will be inserted into the selected cell.
3. Insert Timestamp Automatically While Entering Data In Different Column
This method will enable the insertion of the timestamp in a column while entering data into another column. For example, consider two columns A and B in your worksheet. While you enter data in a cell of column A, the current date and time in the corresponding cell in Column B will get updated automatically.
Follow the below steps to implement the same:
- Click File -> Options and the Excel Options dialogue box will appear. Now from the left pane, select the Formulas option. You will see Enable interactive calculation in the right pane below Calculation options. Check this option and select OK.
- In this next adjoining column (say column B), enter this formula:
=IF(A1<>"",IF(B1<>"",B1,NOW()),"")
- Drag and select cells to auto-fill the formula.
- You can also customize the format of the date and time. To do this, right-click on the selected formula cells, go to the context menu, and select Format Cells. You will see the Format cells dialogue box. Go to the bottom and select Custom. In the right pane select the suitable format for your cells.
- Now when you enter the data in a column, you will get the date and time in your chosen format in the adjoining cell.
4. Using VBA To Insert Timestamp Automatically While Entering Data In a Different Column
If you are familiar with working on VBA, then there is another method for you to automatically insert the timestamp in your excel sheet using VBA.
Follow the below steps to implement the same:
- To open Microsoft Visual Basic for Applications, press Alt + F11. The VBA window will open. Now go to Insert and select the Module to open a blank module.
- Now, add the code given below to your blank module and save the code.
Function MyTimestamp(Reference As Range)

If Reference.Value <> "" Then

MyTimestamp = Format(Now, "dd-mm-yyyy hh:mm:ss")

Else

MyTimestamp = ""

End If

End Function
- Go back to your worksheet and type the below formula in your cell in which you want to insert timestamp.
A is the column for inserting entries of data.
B is corresponding column, into which the date and timestamp will be updated.

Type the below formula into B1 cell:
=MyTimestamp(A1)
- Now, if you insert the entry in a column, you will get the date and time in the adjoining cell automatically.
Here is a mapping for reference, assuming UTC for spreadsheet systems like Microsoft Excel:
                         Unix  Excel Mac    Excel    Human Date  Human Time
Excel Epoch       -2209075200      -1462        0    1900/01/00* 00:00:00 (local)
Excel ≤ 2011 Mac† -2082758400          0     1462    1904/12/31  00:00:00 (local)
Unix Epoch                  0      24107    25569    1970/01/01  00:00:00 UTC
Example Below      1234567890      38395.6  39857.6  2009/02/13  23:31:30 UTC
Signed Int Max     2147483648      51886    50424    2038/01/19  03:14:08 UTC

One Second                  1       0.0000115740…             —  00:00:01
One Hour                 3600       0.0416666666…             ―  01:00:00
One Day                 86400          1        1             ―  24:00:00
* “Jan Zero, 1900” is 1899/12/31; see the Bug section below. † Excel 2011 for Mac (and older) use the 1904 date system.
As I often use awk to process CSV and space-delimited content, I developed a way to convert UNIX epoch to timezone/DST-appropriate Excel date format:
echo 1234567890 |awk '{
  # tries GNU date, tries BSD date on failure
  cmd = sprintf("date -d@%d +%%z 2>/dev/null || date -jf %%s %d +%%z", $1, $1)
  cmd |getline tz                                # read in time-specific offset
  hours = substr(tz, 2, 2) + substr(tz, 4) / 60  # hours + minutes (hi, India)
  if (tz ~ /^-/) hours *= -1                     # offset direction (east/west)
  excel = $1/86400 + hours/24 + 25569            # as days, plus offset
  printf "%.9fn", excel
}'
I used echo for this example, but you can pipe a file where the first column (for the first cell in .csv format, call it as awk -F,) is a UNIX epoch. Alter $1 to represent your desired column/cell number or use a variable instead.
This makes a system call to date. If you will reliably have the GNU version, you can remove the 2>/dev/null || date … +%%z and the second , $1. Given how common GNU is, I wouldn’t recommend assuming BSD’s version.
The getline reads the time zone offset outputted by date +%z into tz, which is then translated into hours. The format will be like -0700 (PDT) or +0530 (IST), so the first substring extracted is 07 or 05, the second is 00 or 30 (then divided by 60 to be expressed in hours), and the third use of tz sees whether our offset is negative and alters hours if needed.
The formula given in all of the other answers on this page is used to set excel, with the addition of the daylight-savings-aware time zone adjustment as hours/24.
If you’re on an older version of Excel for Mac, you’ll need to use 24107 in place of 25569 (see the mapping above).
To convert any arbitrary non-epoch time to Excel-friendly times with GNU date:
echo "last thursday" |awk '{
  cmd = sprintf("date -d "%s" +"%%s %%z"", $0)
  cmd |getline
  hours = substr($2, 2, 2) + substr($2, 4) / 60
  if ($2 ~ /^-/) hours *= -1
  excel = $1/86400 + hours/24 + 25569
  printf "%.9fn", excel
}'
This is basically the same code, but the date -d no longer has an @ to represent unix epoch (given how capable the string parser is, I’m actually surprised the @ is mandatory; what other date format has 9-10 digits?) and it’s now asked for two outputs: the epoch and the time zone offset. You could therefore use e.g. @1234567890 as an input.
Bug
Lotus 1-2-3 (the original spreadsheet software) intentionally treated 1900 as a leap year despite the fact that it was not (this reduced the codebase at a time when every byte counted). Microsoft Excel retained this bug for compatibility, skipping day 60 (the fictitious 1900/02/29), retaining Lotus 1-2-3’s mapping of day 59 to 1900/02/28. LibreOffice instead assigned day 60 to 1900/02/28 and pushed all previous days back one.
Any date before 1900/03/01 could be as much as a day off:
Day        Excel   LibreOffice
-1            -1    1899/12/29
 0    1900/01/00*   1899/12/30
 1    1900/01/01    1899/12/31
 2    1900/01/02    1900/01/01
 …
59    1900/02/28    1900/02/27
60    1900/02/29(!) 1900/02/28
61    1900/03/01    1900/03/01
Excel doesn’t acknowledge negative dates and has a special definition of the Zeroth of January (1899/12/31) for day zero. Internally, Excel does indeed handle negative dates (they’re just numbers after all), but it displays them as numbers since it doesn’t know how to display them as dates (nor can it convert older dates into negative numbers). Feb 29 1900, a day that never happened, is recognized by Excel but not LibreOffice.


