
Working with dates in Excel might not be as simple as working with plain numbers and text, and the reason is that Excel’s way of storing and displaying dates is very different.
Moreover, Excel can display the same date in multiple ways (or formats).
The good news though is that it is possible to convert between date formats quite easily.
In this tutorial we will show you three ways to apply the Short Date format to any date in Excel:
- Using the Number Format menu
- Using the Format Cells dialog box
- Using the TEXT function
What are Long Date and Short Date Formats?
One of the formats in which Excel displays dates is the Long date Format.
This format displays the day of the week along with the full month name as shown below:

Notice the actual date in the formula bar is just 1/1/2021.
However, since the cell is formatted to display the date in Long format, it shows the date in the cell as Friday, January 1, 2021.
The Long Date format might not be the most convenient form to display your date.
It’s too long, so it ends up taking a lot of space and you would need to increase the column width to accommodate the full format.
Moreover, if you see pound symbols “###” in a cell that contains a date, it is usually because the width of the cell is too narrow to display the full date.
This often happens when your cell contains the date in Long format.
A good way to reduce the column size or to handle “###” errors would be to apply the Short Date format to the cells.
Also read: How to Insert Date in Excel?
Let us look at three ways in which we can apply the Short Date format to a given cell or range of cells in Excel.
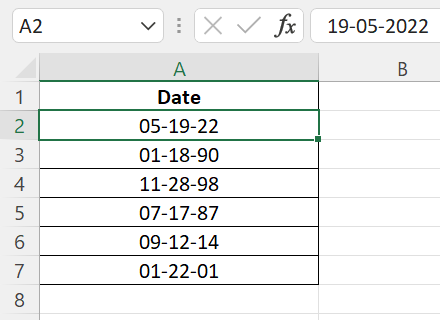
We will apply each method to the set of dates shown below:

Notice that each date is displayed in a different format.
For example, the date in the first row is in Long Date format, while the one in the second row is displayed in the form of the serial number that represents the date.
We are going to apply the Short Date format to all the above dates by the following three methods.
Method 1: Using the Number Format Menu to Apply Short Date Format in Excel
The first method is actually the quickest way to apply the Short Date format to a cell or range of cells.
All you need to do is:
- Select the cell or range of cells to which you want to apply the Short Date format.
- Click the Home tab from the main menu.
- Click on the dropdown arrow in the “Number” group (shown in the image below):

- In the dropdown menu that appears, you should see a number of number formatting options. Click on the ‘Short Date’ option.

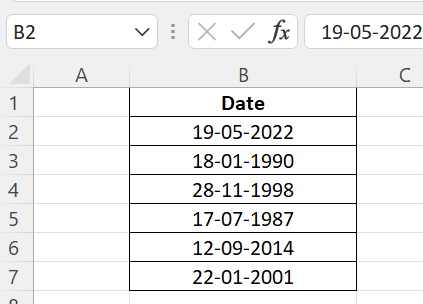
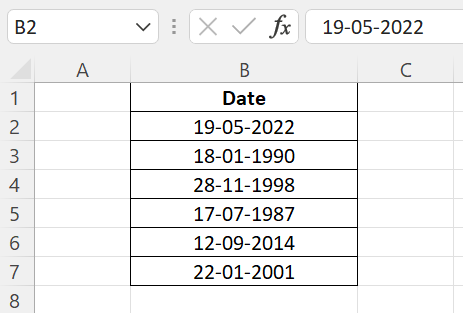
You should now have the Short Date format applied to all the selected cells as shown below:

In case you don’t see the cell content convert into the short date format, a possible reason could be that the cell has text content (which is not something that Excel considers a date)
Also read: How to Remove Year from Date in Excel?
Method 2: Using the Format Cells Dialog Box to Apply Short Date Format in Excel
This method is a little more versatile as it also lets you customize your Short date according to your requirement.
For example, you can set the components of the date to be separated by hyphens (-), slashes (/) or dots (.).
Here are the steps that you need to follow to apply Short Date format using this method:
- Select the cell or range of cells to which you want to apply the Short Date format
- Right-click on your selection and select ‘Format Cells’ from the context menu that appears. Alternatively, you can use the CTRL+1 shortcut from your keyboard.

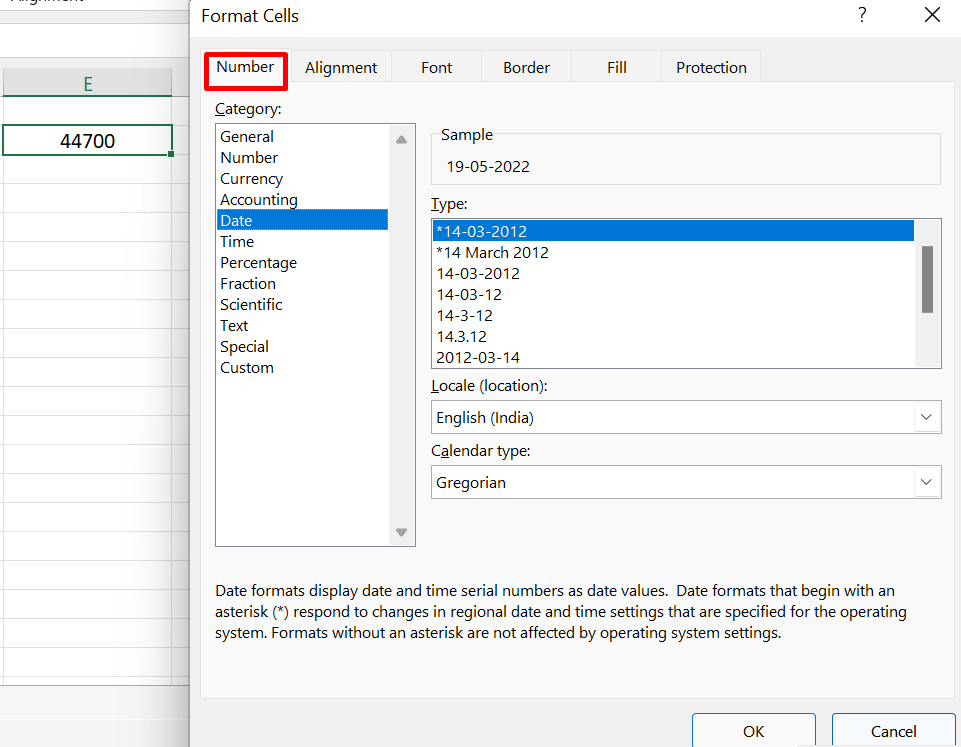
- This will open the Format Cells dialog box. Select the Number tab.

- Make sure that the ‘Date’ option is selected from the list under ‘Category’.

- This will display a number of date formatting options on the right side of the dialog box.
- Select the short date format that you want to apply to your dates. For a general Short Date format, you can simply select the option shown below:

- Click OK to close the Format Cells dialog box.
You should now have the Short Date format applied to your selected cells as shown below:

If you need a more customized date format, then you can type in the format that you want in the input box under ‘Type’, after selecting the ‘Custom’ option from the ‘Category’ list (instead of step 4).

For example, if you type the format “mm-dd-yy” then your date will be formatted to display two-digit month, day, and year numbers separated by hyphens, as shown below:

Your customized format needs to follow certain rules. For example, to represent the month number without a leading zero, you can use the “m” code.
To display the month number with a leading zero, on the other hand, you can use the “mm” code. Here are some of the codes that you can use:
| Code | Description | Example |
| m | Month number without leading zero | 1 |
| mm | Month number with leading zero | 01 |
| d | Day number without leading zero | 5 |
| dd | Day number with leading zero | 05 |
| yy | Year with last 2 digits only | 21 |
| yyyy | Full-year with 4 digits | 2021 |
You can combine the above codes to create your required short-date format.
Here are a few example date formats that are commonly used:
| Format | Example |
| dd-mm-yy | 13-01-21 |
| mm/dd/yyyy | 01/13/2021 |
| mm-dd-yy | 01-13-21 |
| m.d.yy | 1.13.21 |
| m/dd/yy | 1/13/21 |
Also read: How to Apply Long Date Format in Excel?
Method 3: Using the TEXT Function to Apply Short Date Format in Excel
The first two methods apply the Short Date format to the original cell(s).
If, however, you want to keep the original date(s) in the Long format as is and display the Short format in a separate cell, then you can use the TEXT function.
The TEXT function lets you convert dates to different text formats.
It takes a DATE value and lets you format it according to a given format code.
The syntax for the TEXT function is:
= TEXT (date_input, date_format_code)
In the above formula syntax:
- date_input is the date value or a reference to a cell containing a date that you want to apply the Short Date format to.
- date_format_code is the format code that specifies how you want the resulting date to look.
These format codes are the same as the codes discussed in Method 2.
The TEXT function applies this format code to the specified date_input and it returns a text string in the given format.
For example, the following formula takes the date provided in cell A2 and returns the date “1/1/21”:
=TEXT(A2,”m/d/yy”)
Note: Always remember to enclose the format_code in quotes.
Insert this formula in cell B2 (of our sample dataset) and copy it down to the rest of the cells in column B.
Here’s how the result that you should get:

The only issue with the TEXT function is that the date that is returned is actually a string and not a DATE value.
That is why you see the results aligned to the left side of the cells instead of the right. So you cannot perform subsequent operations with the result (i.e., you can’t use it in calculations that use date as the input).
The benefit of using the TEXT function to get the date in the short format is that you can add any text string before or after the date.
For example, if you want to show the result as Date: 01/01/2021, you can use the below formula:
="Date: "&TEXT(A2,”mm/dd/yy”)
In the above formula, I have appended “Date: ” before the TEXT function, which will make sure that the result I get would have the desired text before the date followed by the date in the specified format.
In this tutorial, we showed you three ways in which you can apply the Short Date format in Excel.
The first method is the quickest and the most commonly used. The second method is more versatile as it lets you customize the short date to your required format.
The third method is not used all that often, but you can use this method if you don’t want to make changes directly to the original cells.
We tried to make this tutorial simple and easy to follow.
We hope it was helpful.
Other Excel tutorials you may also like:
- How to Apply Accounting Number Format in Excel
- How to Apply Comma Style in Excel (3 Easy Ways)
- Why are Dates Shown as Hashtags in Excel? Easy Fix!
- How to Convert Date to Day of Week in Excel (3 Easy Ways)
- How to Convert Date to Month and Year in Excel (3 Easy Ways)
- How to Sort by Date in Excel (Single Column & Multiple Columns)
- How to Change Date and Time to Date in Excel
- How to Calculate the Number of Months Between Two Dates in Excel?
- How To Combine Date and Time in Excel
- Apply Currency Format in Excel (Shortcut)
This probably never dragged too much attention because it was always there but all of a sudden you’re finding that taken-for-granted Short Date because you’ve been handed down Long Dates that contain too much information on the whole. With your worksheet bustling and your columns many in number, a Short Date format can be a needed input.
In this tutorial, you’ll find the difference between Short and Long Date formats, how to change the default Short Date format, and 3 easy ways to apply a Short Date format with Number Format on the Ribbon, Format Cells, and the TEXT function.
And first, what is the Short Date format?
 1")
What is Short Date Format in Excel
Enter the date 1-31-25 on the worksheet. The cell will snap to a date format and the entered date will snap to 1/31/2025. This Excel folk is a Short Date format and will include the shorter sides of the day, month, and year combination.
The above-mentioned format is the default, depends on the Regional format set in your computer’s Time and Language settings, English (United States) in our case. Therefore, the default format can be changed using the same settings.
With English (United States), the date components can be slightly different in other Short Date formats. The day in the Short Date format will be displayed in a single digit (1 to 31) or double digits (01 to 31). The month can be single or double digits or a 3-letter abbreviation of the month name. The year can be in double digits or in full. Any combination of these makes up a Short Date.
Short Date formats steers clear of the full month name, day name, and time which can be part of a Long Date. Other Short Date formats, with English (United States) as your computer’s Regional format setting, are listed below. All the dates are Short Date formats of the date 1st of February 2025:
Computer’s Regional format: English (United States)
| Short Date | Format | Comments |
|---|---|---|
| 1/31/2025 | m/d/yyyy | Default format |
| 2/1/25 | m/d/yy | Other formats |
| 02/01/25 | mm/dd/yy | |
| 02/01/2025 | mm/dd/yyyy | |
| 25/02/01 | yy/mm/dd | |
| 2025-02-01 | yyyy-mm-dd | |
| 01-Feb-25 | dd-mmm-yy |
Do you want know how to apply any of them?
Let’s get formatting!
How to Apply Short Date Format
If you’re at the point of data entry, all you have to do is enter the date in one of the acceptable formats and you will get a Short Date in return.
The format that the date is returned in depends on the system settings of the Regional format; English (United States) in our case. See what type of date you need to enter and the type of Short Date Excel will return:
| Date entered | Date returned |
|---|---|
| 1/31/25 | 1/31/2025 |
| 1-31-25 | 1/31/2025 |
| 2025-1-31 | 1/31/2025 |
| 31 jan 25 | 31-Jan-25 |
The returned Short Date formats are:
m/d/yyyy (the default Short Date format)
dd-mmm-yy
Depending on how the date is entered, one of two formats will be returned. When the month is entered numerically, the default Short Date format is returned i.e. m/d/yyyy. Since the default format has the month mentioned first, enter the dates month-first for them to be accepted by Excel.
When the month is entered alphabetically, the date is returned in this d/mmm/yy format with the month name abbreviated.
That’s how to deal with Short Dates when you’re creating your dataset. There’s equally the possibility that you’re dealing with ready data that has dates a mile long. There are a few quick ways you can tackle changing Long Dates to Short Dates or even if you want to change the Short Date from one format to another.
Let’s dive into the methods of applying the Short Date format to dates in Excel.
Using Number Format in Ribbon
This method applies the default Short Date format to the selected dates. Since dates are entered in the default Short Date format, the Ribbon option only concerns dates that are in a different format; whether Long or Custom.
Let’s see to this with an example we have set up with the order and delivery dates regarding the product deliveries scheduled for a slot of 6 days. For the dispatch department, the Long Date format makes more sense with the day and time mentioned. But for other departments, where reports may be drafted with many columns, we’ll try to condense the date as much as possible and that calls for the Short Date format.
To bring your dates back to the default Short Date format, use the Number Format Bar in the Ribbon with these steps:
- Select the dates that you want in the default Short Date
- Click on the Number Format Bar‘s arrow to view the Number Format menu in the Home tab’s Number
 2")
- Select the Short Date option from the menu.
 3")
And that click will switch the format of the selected dates to the default Short Date format:
 4")
Notes:
Select any date from the Short Dates and note in the Formula Bar that the actual value of the cell doesn’t change with a change in format, only the display.
The Number Format Bar will display Date as the format when the selected cell is formatted to the default Short or Long Date format.
For the formatting to work, the cell must carry a date value (which can be deduced also from the alignment to the right). If the date is copied or entered as text, Number Formats will make no changes to them.
Using Format Cells Option
You’re likely to resort to this option when you want a Short Date format but not Excel’s default one. Format Cells gives you various options for Short Date formats and also room for custom formats. This way, you can modify the placement of the date components and even add your choice of separators.
Let’s cut some dates short. Use the Format Cells option to apply a Short Date format in Excel with the following steps:
- Select the cells containing the dates you want to reformat.
- From the Ribbon, select the dialog launcher of the Home tab’s Number group to access the Format Cells dialog box.
- Using the Number group’s launcher opens the Format Cells dialog box in the Number tab directly.
 5")
- In the dialog box, go through the format types in the Date category to choose a Short Date format of preference.
 6")
If you’ve found what you want, use the OK button to apply it but would this even be a neat tutorial without giving you more ideas?
At this point, you can use the Locale (location) to get a location-specific format which may include the locale’s native language in the date.
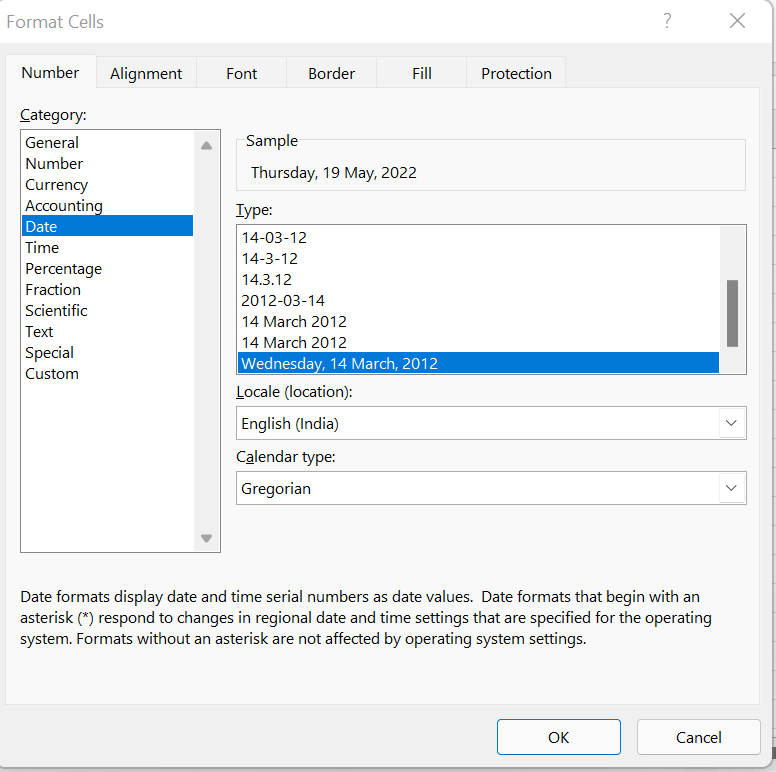
We talked about custom formats earlier and now would be the best time to collate one by heading to the Custom category. Before that, picking a format from the Date category first will allow you to edit that format in the Custom category.
- Go to the Custom category and it will carry the formatting code of the format selected in the Date
 7")
- Use the code as a base to edit it into a custom code for a Custom Short Date
- We will change the separator from a hyphen to a period and change the day component from «d» to «dd» so that the day will be displayed in double digits instead of a single digit. 1 will be displayed as 01; look at the Sample box before and after editing the code to see a preview of this change.
 8")
- Hit the OK command in the dialog box.
The dates will now have a custom Short Date format, also confirmed by the Number Format Bar:
 9")
That’s the good thing about formatting; the dates will be usable in calculations and date formulas. When it won’t be a good thing is the case of wanting to use the date as text. This is Excel so a lot of these notions should be possible, right? This innocent notion can come true thanks to the TEXT function so read up ahead!
Using TEXT Function
The TEXT function can return the date as a Short Date in text format. The date needs to be the only value present in the cell so that the function knows what to pick on. The TEXT function converts the cell value to text in the supplied format. We will feed the TEXT function with our choice of Short Date format so it can return the Long Dates as Short Dates in text form.
Dates won’t always need to be used in calculations and you may need the date to be a part of a text to go on a receipt, footnote, or email message for example. There was also something we said about rearranging the components of the date so let’s see what the TEXT function can do for us. Enter the formula below to use the TEXT function to apply a Short Date format:
=TEXT(C3,"m/d/yyyy")
Columns C and D in our case example have the original Long Dates. Taking the first date in C3, we’ve applied the format «m/d/yyyy» with the year component placed first, enclosed in double quotes. All the rest of the Long Dates in the dataset also follow:
 10")
The Number Format Bar also shows that the resulting value is not in a date format anymore. Now you can pick the text from here and place it as text wherever needed.
Formulas for other short date formats
It’s not just the default Short Date format that the TEXT function will be able to work with. You can go with any other Short Date format of preference or the format that conforms to the default Short Date format as per your computer’s Regional format settings. Enter the relevant Short Date format in the formula such as:
=TEXT(B3,"dd-mmm-yy")
See how this would apply to a Long Date:
 11")
If you’re going totally unconventional, the TEXT function can accept that too like this formula below:
=TEXT(B3,"yyyy| mmm dd")
This Short Date format has the date components regrouped and separated with the vertical bar. Here’s how it worked out in Excel:
 12")
How to Change Default Short Date Format
By now, we’re well familiar that the default Short Date format is m/d/yyyy. This format being the default is resultant of the Regional format set as English (United States). The format may change by changing this setting but you can also change the default Short Date format leaving the Regional format untouched. Either way, these are the steps to go about if you want to change the default Short Date format:
- Visit the Start Menu of your computer and select the Settings
- Select Time & Language on the Settings
 13")
- Now select the Region tab from the pane on the left.
This is the part you’re interested in when it comes to some default settings of your computer such as the Short and Long Date and time formats, the region, the first day of the week, etc.
If you change the region in the Regional format setting, this may also automatically change the default Short Date format e.g. the default format for a Short Date with English (United Kingdom) as the Regional format is dd/mm/yyyy.
But keeping the Regional format constant, you can still change the default Short Date format and for that, proceed with these steps:
- At the bottom of the Region settings click on the last option reading Change data formats.
 14")
- Click on the arrow of the Short Date bar and select a different format for the default Short Date.
 15")
Regional format data will instantly be updated.
 16")
Now when a date is entered in Excel, the new default format for the Short Date will be applied and you can confirm this change from the Number Format Bar which shows the updated default Short Date format:
 17")
Short Date Format vs Long Date Format
The Short Date format does not include the full month name, only the 3-letter abbreviation at most. By default, the representation of the month component is numerical. The Long Date format displays the complete month name and may show the day name and time.
The Short Date format is applied by default to dates whereas the Long Date format is applied by the user. A Short Date entered that takes on the default format will be a date value that can be used in calculations and date functions.
The Short Date format has the date components divided by a separator (forward slash or hyphen mostly) after the first and second components in the date. The Long Date format includes commas as the separator by default.
Use the Short Date format to quickly enter the date and also where you would prefer to have compact dates and narrow columns. Use the Long Date format to feature the day, full month, or time for quick analysis.
To sum it up shortly, the Short Date format is applied by default to a date entered in Excel. It can be customized to be displayed differently and can be converted to text and is space efficient. While you’re chipping at your Excel Long Dates to shorten them, we’ll come up with more Excel chiseling, hacking away at another problem!
(Note: This guide on how to apply a short date in Excel is suitable for all Excel versions including Office 365)
Excel supports short dates, long dates, and customized dates besides numbers. Date and time are the most common data types used in Excel. The default format to display the date is normally dd-mm-yyyy and the same date can be displayed in a variety of ways based on the requirement.
You’ll Learn:
- Different Formats of Displaying Dates
- Short Date Format in Excel
- Long and Short Date
- Different Methods to Apply Short Date in Excel
- Method 1: From Home Tab
- Method 2: Using the Format Cell
- Method 3: Custom Cells
- Other Formatting
The different formats of dates supported in Excel are shown in the image below.

There are different ways to format the dates and it is important to know all the available formats. Internally, Excel stores the date in the same format regardless of the format you have used to display the date.
The date usually contains the month and the year. Apart from these details, the day of the week and the time can also be included. An example of a long date format is dd-mm-yyyy hh: mm.
And, an example of a short date format is dd-mm-yyyy which is commonly used in date formatting.
Related Reads:
- How to use EDATE in Excel? 11 Easy Examples
- How to Enable Excel Dark Mode? 2 Easy Methods
- How to Graph a Function in Excel? 2 Easy Ways
Different Formats of Displaying Dates
A date can be displayed in a variety of ways as you can see in the example below.

Generally, a date has three components, the date, month, and year. Apart from this, it can include the day of the week and also the current time. In the above example, the date 19-May-2022 is displayed in various formats. But, cell B6 displays the same date as 44700 as the cell has not been formatted to contain the date values.
You should change the format of the cell to accept a date value as shown in the above screenshot.
Excel uses the default date system where the date argument must represent a date between January 1, 1900, and December 31, 9999. Excel stores date as sequential serial numbers so that they can be used in calculations. By default, January 1, 1900, is stored as serial number 1 and May 19, 2022, is serial number 44700 because it is 44700 days after January 1, 1900.
Short Date Format in Excel
As mentioned earlier, Excel stores the date in the dd-mm-yyyy format by default no matter what formatting you choose.

In the example above, cell A5 displays the date in a long format as Friday, 17 July 1987. In the formula bar, the date is displayed in the default date format as 17-07-1987.
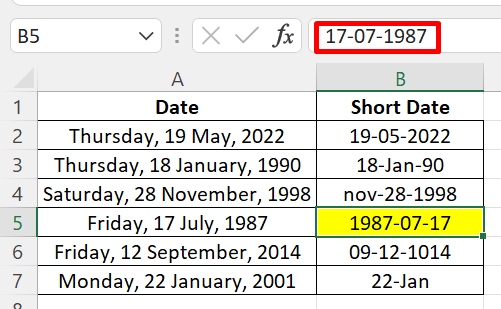
Similarly, another example of a short date format is displayed in cell B5 as yyyy-mm-dd. Excel displays the same date as 17-07-1987, which is the default format.
Long and Short Date
The Long Date format contains the day of the week along with the date, month, and year details. It might not be the most convenient format as a long date format would require a longer column width to accommodate its length.
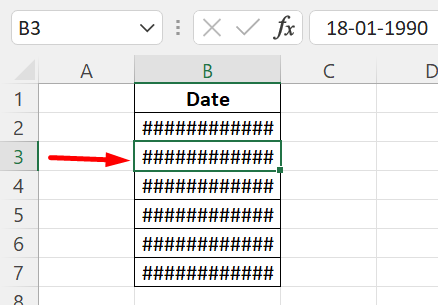
In the example above, the long date format is selected for displaying the date. Instead of displaying the date in the desired format, you see a series of ### (hash) symbols in the cell that contains it. The reason is that the width of the column is too narrow to display the full date.
When the date is in a long format, the column size has to be increased to accommodate the long date. Instead of increasing the column width, the date can be shortened using a short date format.
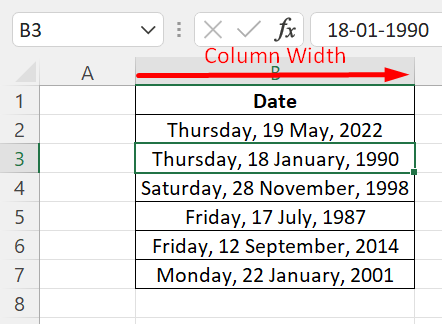
In the example above, the column width is increased to accommodate the long date format that contains the week of the date along with the date information.
Also Read:
- How to Add Leading Zeros in Excel? 4 Easy Methods
- How to Use Nested VLOOKUP in Excel? A Step-by-Step Guide
- Excel String Compare – 5 Easy Methods
Different Methods to Apply Short Date in Excel
There are different methods to apply a short date format in Excel. Let’s see each of these with examples.
Method 1: From Home Tab

Follow these steps to apply the short date format to the given date. In the Excel spreadsheet, select the list that contains the dates to format. Click on the Home tab, and then click the Number category.
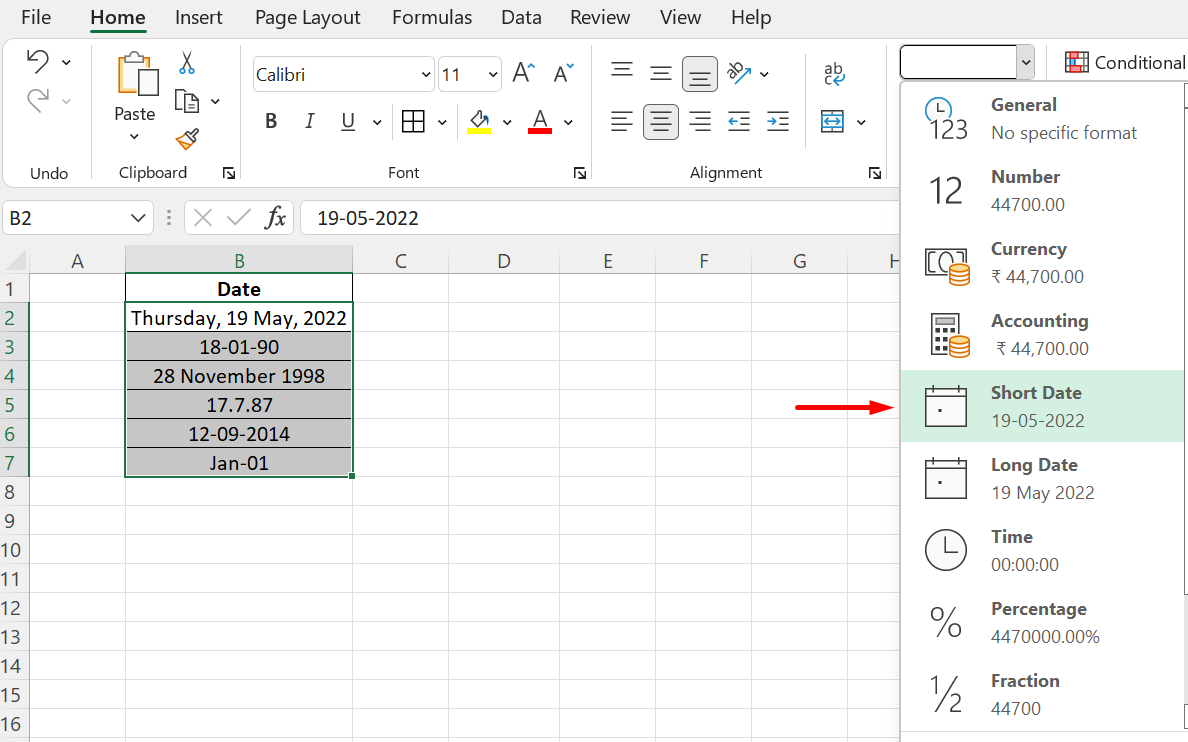
You can see various formats available in the drop-down menu to choose from, such as :
- General
- Number
- Currency
- Short date
- Long date
- Time
- Percentage
- Fraction
- Scientific
- Text
Choose Short Date from the menu and you can see the table containing the dates change to short date in the format dd-mm-yyyy. The below table shows all the dates in Short Date format in Excel.
Method 2: Using the Format Cell
You can apply the Short Date format using the Format Cells by selecting the date that you want to format and right-clicking on it. This is a much more versatile method as you can customize the date components by separating the date, month, and year with hyphens (-), slashes (/), or dots (.).
To apply the Short Date format, select the range of cells that contains the dates to format, then right-click on it. The keyboard shortcut to get this menu is to press CTRL+1 on the keyboard. You will get the drop-down menu as seen below.
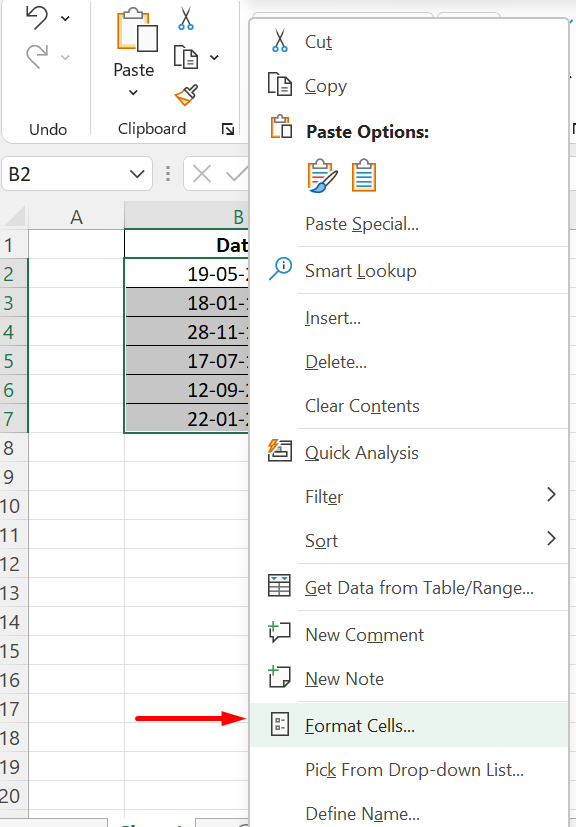
Click on the Format Cell and choose Date from the various categories. By default, the category General is set for all the cells.
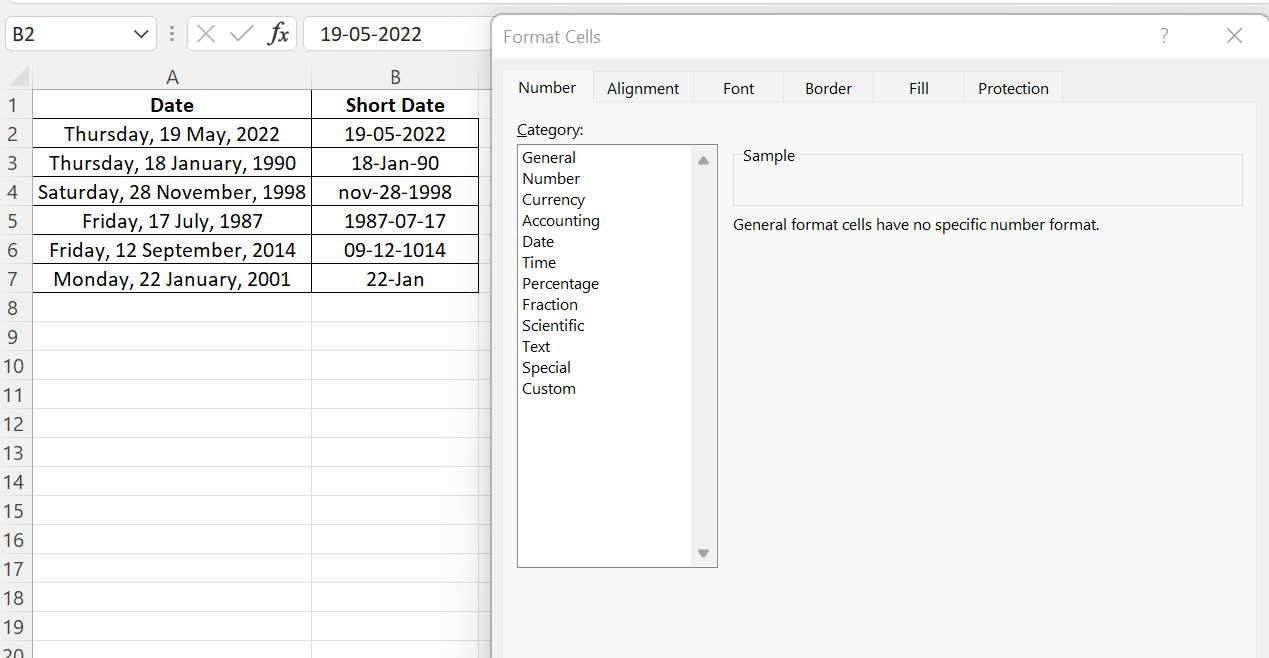
When you click on Date, there are many types of date formats and you can choose one for your date.

Method 3: Custom Cells
You can change the date format through the Custom option in the drop-down menu. There are a variety of options to choose from, but choose the format that you want the date to be displayed. In the example below, a short date displaying only the date and month is displayed.
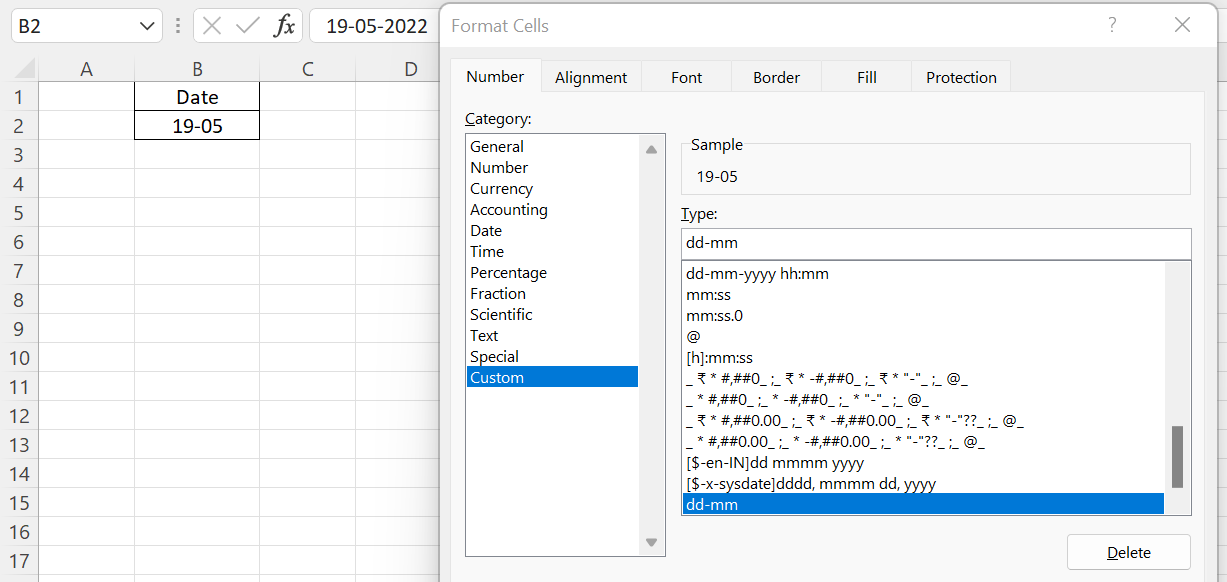
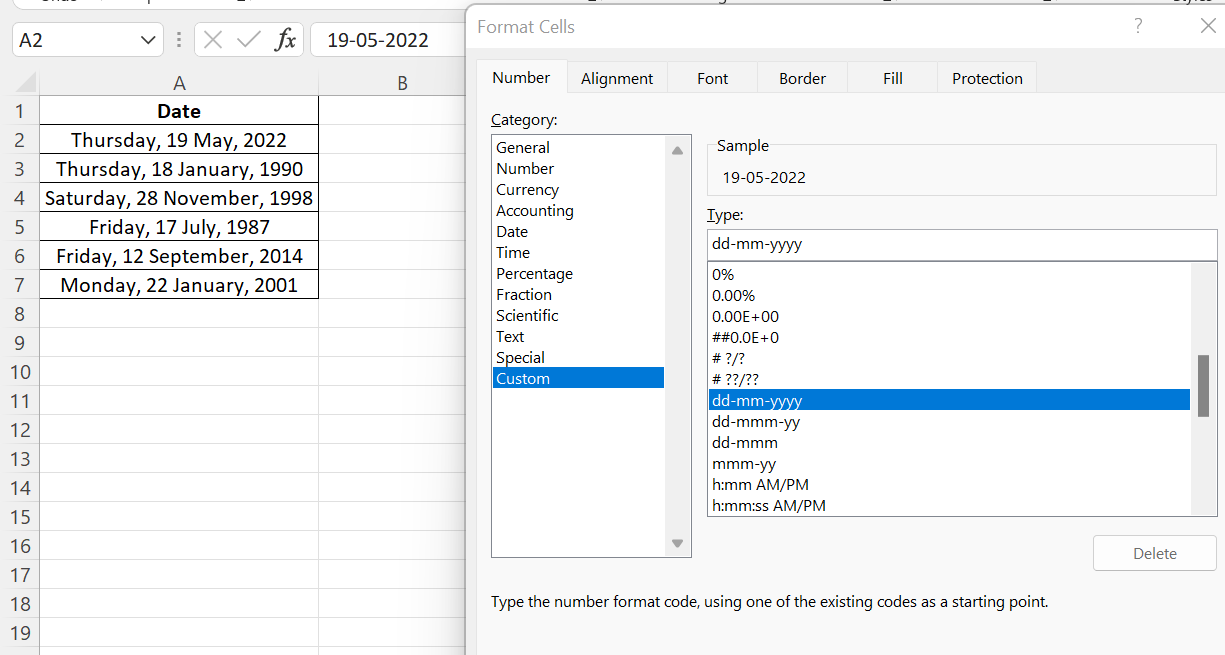
Select the list of cells that contains the date and then select the format dd-mm-yyyy. The sample box will provide a preview of the date based on the type selected.
If you select the format as mm-dd-yy, then the date will be formatted to display two-digit month, day, and year separated by hyphens as shown below.
Using a custom format, you can display a month number without a leading zero by using a single month (m) in the format list.
Other Formatting
Dates can be customized to set the regional settings depending on the location you reside. Dates are represented differently in each location and you can convert the date format to another locale by choosing Locale (location) and selecting a country from the drop-down menu.
In the example below, the language under the Locale (location) drop-down menu is chosen as English (U.S.)

Suggested Reads:
- How to Hide and Unhide Columns in Excel? (3 Easy Steps)
- How to Stop Excel From Rounding? 4 Easy Ways
- How to Make a Pie Chart in Excel? A Step by Step Guide
Final Thoughts
In this guide, we explained how to apply the short date format in Excel. Besides numbers, dates are used extensively in Excel, and practicing them would benefit you when you use financial data in spreadsheets.
Please visit our free resources center to know more about the date and time functions.
We have high-quality Excel guides and you will be really excited to know how handy and useful these functions are.
Simon Sez IT has been teaching Excel for over ten years. For a low monthly fee, you can access 130+ IT training courses. Click here for advanced Excel courses with in-depth training modules.
Simon Calder

Chris “Simon” Calder was working as a Project Manager in IT for one of Los Angeles’ most prestigious cultural institutions, LACMA.He taught himself to use Microsoft Project from a giant textbook and hated every moment of it. Online learning was in its infancy then, but he spotted an opportunity and made an online MS Project course — the rest, as they say, is history!
Format a date the way you want
Excel for Microsoft 365 Excel for Microsoft 365 for Mac Excel for the web Excel 2021 Excel 2021 for Mac Excel 2019 Excel 2019 for Mac Excel 2016 Excel 2016 for Mac Excel 2013 Excel 2010 Excel 2007 Excel for Mac 2011 More…Less
When you enter some text into a cell such as «2/2″, Excel assumes that this is a date and formats it according to the default date setting in Control Panel. Excel might format it as «2-Feb». If you change your date setting in Control Panel, the default date format in Excel will change accordingly. If you don’t like the default date format, you can choose another date format in Excel, such as «February 2, 2012″ or «2/2/12″. You can also create your own custom format in Excel desktop.
Follow these steps:
-
Select the cells you want to format.
-
Press CTRL+1.
-
In the Format Cells box, click the Number tab.
-
In the Category list, click Date.

-
Under Type, pick a date format. Your format will preview in the Sample box with the first date in your data.
Note: Date formats that begin with an asterisk (*) will change if you change the regional date and time settings in Control Panel. Formats without an asterisk won’t change.
-
If you want to use a date format according to how another language displays dates, choose the language in Locale (location).

Tip: Do you have numbers showing up in your cells as #####? It’s likely that your cell isn’t wide enough to show the whole number. Try double-clicking the right border of the column that contains the cells with #####. This will resize the column to fit the number. You can also drag the right border of the column to make it any size you want.
If you want to use a format that isn’t in the Type box, you can create your own. The easiest way to do this is to start from a format this is close to what you want.
-
Select the cells you want to format.
-
Press CTRL+1.
-
In the Format Cells box, click the Number tab.
-
In the Category list, click Date, and then choose a date format you want in Type. You can adjust this format in the last step below.
-
Go back to the Category list, and choose Custom. Under Type, you’ll see the format code for the date format you chose in the previous step. The built-in date format can’t be changed, so don’t worry about messing it up. The changes you make will only apply to the custom format you’re creating.
-
In the Type box, make the changes you want using code from the table below.
|
To display |
Use this code |
|---|---|
|
Months as 1–12 |
m |
|
Months as 01–12 |
mm |
|
Months as Jan–Dec |
mmm |
|
Months as January–December |
mmmm |
|
Months as the first letter of the month |
mmmmm |
|
Days as 1–31 |
d |
|
Days as 01–31 |
dd |
|
Days as Sun–Sat |
ddd |
|
Days as Sunday–Saturday |
dddd |
|
Years as 00–99 |
yy |
|
Years as 1900–9999 |
yyyy |
If you’re modifying a format that includes time values, and you use «m» immediately after the «h» or «hh» code or immediately before the «ss» code, Excel displays minutes instead of the month.
-
To quickly use the default date format, click the cell with the date, and then press CTRL+SHIFT+#.
-
If a cell displays ##### after you apply date formatting to it, the cell probably isn’t wide enough to show the whole number. Try double-clicking the right border of the column that contains the cells with #####. This will resize the column to fit the number. You can also drag the right border of the column to make it any size you want.
-
To quickly enter the current date in your worksheet, select any empty cell, press CTRL+; (semicolon), and then press ENTER, if necessary.
-
To enter a date that will update to the current date each time you reopen a worksheet or recalculate a formula, type =TODAY() in an empty cell, and then press ENTER.
When you enter some text into a cell such as «2/2″, Excel assumes that this is a date and formats it according to the default date setting in Control Panel. Excel might format it as «2-Feb». If you change your date setting in Control Panel, the default date format in Excel will change accordingly. If you don’t like the default date format, you can choose another date format in Excel, such as «February 2, 2012″ or «2/2/12″. You can also create your own custom format in Excel desktop.
Follow these steps:
-
Select the cells you want to format.
-
Press Control+1 or Command+1.
-
In the Format Cells box, click the Number tab.
-
In the Category list, click Date.
-
Under Type, pick a date format. Your format will preview in the Sample box with the first date in your data.
Note: Date formats that begin with an asterisk (*) will change if you change the regional date and time settings in Control Panel. Formats without an asterisk won’t change.
-
If you want to use a date format according to how another language displays dates, choose the language in Locale (location).
Tip: Do you have numbers showing up in your cells as #####? It’s likely that your cell isn’t wide enough to show the whole number. Try double-clicking the right border of the column that contains the cells with #####. This will resize the column to fit the number. You can also drag the right border of the column to make it any size you want.
If you want to use a format that isn’t in the Type box, you can create your own. The easiest way to do this is to start from a format this is close to what you want.
-
Select the cells you want to format.
-
Press Control+1 or Command+1.
-
In the Format Cells box, click the Number tab.
-
In the Category list, click Date, and then choose a date format you want in Type. You can adjust this format in the last step below.
-
Go back to the Category list, and choose Custom. Under Type, you’ll see the format code for the date format you chose in the previous step. The built-in date format can’t be changed, so don’t worry about messing it up. The changes you make will only apply to the custom format you’re creating.
-
In the Type box, make the changes you want using code from the table below.
|
To display |
Use this code |
|---|---|
|
Months as 1–12 |
m |
|
Months as 01–12 |
mm |
|
Months as Jan–Dec |
mmm |
|
Months as January–December |
mmmm |
|
Months as the first letter of the month |
mmmmm |
|
Days as 1–31 |
d |
|
Days as 01–31 |
dd |
|
Days as Sun–Sat |
ddd |
|
Days as Sunday–Saturday |
dddd |
|
Years as 00–99 |
yy |
|
Years as 1900–9999 |
yyyy |
If you’re modifying a format that includes time values, and you use «m» immediately after the «h» or «hh» code or immediately before the «ss» code, Excel displays minutes instead of the month.
-
To quickly use the default date format, click the cell with the date, and then press CTRL+SHIFT+#.
-
If a cell displays ##### after you apply date formatting to it, the cell probably isn’t wide enough to show the whole number. Try double-clicking the right border of the column that contains the cells with #####. This will resize the column to fit the number. You can also drag the right border of the column to make it any size you want.
-
To quickly enter the current date in your worksheet, select any empty cell, press CTRL+; (semicolon), and then press ENTER, if necessary.
-
To enter a date that will update to the current date each time you reopen a worksheet or recalculate a formula, type =TODAY() in an empty cell, and then press ENTER.
When you type something like 2/2 in a cell, Excel for the web thinks you’re typing a date and shows it as 2-Feb. But you can change the date to be shorter or longer.
To see a short date like 2/2/2013, select the cell, and then click Home > Number Format > Short Date. For a longer date like Saturday, February 02, 2013, pick Long Date instead.
-
If a cell displays ##### after you apply date formatting to it, the cell probably isn’t wide enough to show the whole number. Try dragging the column that contains the cells with #####. This will resize the column to fit the number.
-
To enter a date that will update to the current date each time you reopen a worksheet or recalculate a formula, type =TODAY() in an empty cell, and then press ENTER.
Need more help?
You can always ask an expert in the Excel Tech Community or get support in the Answers community.
Need more help?
Want more options?
Explore subscription benefits, browse training courses, learn how to secure your device, and more.
Communities help you ask and answer questions, give feedback, and hear from experts with rich knowledge.
Преобразование чисел, дат и строк в настраиваемый текстовый формат из кода VBA Excel с помощью функции Format. Синтаксис, параметры, символы, примеры.
Format – это функция, которая преобразует число, дату или строку в текст, отформатированный в соответствии с именованным выражением формата или инструкциями, составленными из специальных символов.
Синтаксис и параметры
Format(Expression, [FormatExpression], [FirstDayOfWeek], [FirstWeekOfYear])
- Expression – любое допустимое выражение (переменная), возвращающее числовое значение или строку (обязательный параметр).
- FormatExpression – выражение формата, именованное или содержащее инструкции из специальных символов (необязательный параметр).
- FirstDayOfWeek – константа, задающая первый день недели (необязательный параметр).
- FirstWeekOfYear – константа, задающая первую неделю года (необязательный параметр).
Именованные выражения форматов
Именные форматы даты и времени
| Имя формата | Описание |
|---|---|
| General Date | Стандартное отображение даты и времени в соответствии с параметрами системы. |
| Long Date | Длинный формат даты. |
| Medium Date | Средний формат даты. |
| Short Date | Краткий формат даты. |
| Long Time | Длинный формат времени. |
| Medium Time | Средний формат времени. |
| Short Time | Краткий формат времени. |
Проверьте отображение даты и времени с использованием именованных форматов на вашем компьютере при помощи следующего кода VBA Excel:
|
Sub FormatDateTime() MsgBox «General Date: « & Format(Now, «General Date») & vbNewLine _ & vbNewLine & «Long Date: « & Format(Now, «Long Date») & vbNewLine _ & vbNewLine & «Medium Date: « & Format(Now, «Medium Date») & vbNewLine _ & vbNewLine & «Short Date: « & Format(Now, «Short Date») & vbNewLine _ & vbNewLine & «Long Time: « & Format(Now, «Long Time») & vbNewLine _ & vbNewLine & «Medium Time: « & Format(Now, «Medium Time») & vbNewLine _ & vbNewLine & «Short Time: « & Format(Now, «Short Time») End Sub |
Скорее всего, результат будет таким:

Именованные форматы чисел
| Имя формата | Описание |
|---|---|
| General Number | Стандартное отображение числа без знака разделителя групп разрядов. |
| Currency | Денежный формат. |
| Fixed | Отображение числа без знака разделителя групп разрядов с двумя цифрами после разделителя целой и дробной части. |
| Standard | Отображение числа со знаком разделителя групп разрядов и с двумя цифрами после разделителя целой и дробной части. |
| Percent | Процентный формат: отображение числа, умноженного на 100, со знаком процента (%), добавленного справа. |
| Scientific | Отображение числа в экспоненциальном виде. |
| Yes/No | Возвращается «Нет», если число равно 0, иначе отображается «Да». |
| True/False | Возвращается «Ложь», если число равно 0, иначе отображается «Истина». |
| On/Off | Возвращается «Выкл», если число равно 0, иначе отображается «Вкл». |
Проверяем работу именованных форматов на числах 2641387.7381962 и 0 с помощью кода VBA Excel:
|
Sub FormatNumber() Dim n As Double n = 2641387.7381962 ‘n = 0 MsgBox «Форматируемое число = « & n & vbNewLine _ & vbNewLine & «General Number: « & Format(n, «General Number») & vbNewLine _ & vbNewLine & «Currency: « & Format(n, «Currency») & vbNewLine _ & vbNewLine & «Fixed: « & Format(n, «Fixed») & vbNewLine _ & vbNewLine & «Standard: « & Format(n, «Standard») & vbNewLine _ & vbNewLine & «Percent: « & Format(n, «Percent») & vbNewLine _ & vbNewLine & «Scientific: « & Format(n, «Scientific») & vbNewLine _ & vbNewLine & «Yes/No: « & Format(n, «Yes/No») & vbNewLine _ & vbNewLine & «True/False: « & Format(n, «True/False») & vbNewLine _ & vbNewLine & «On/Off: « & Format(n, «On/Off») End Sub |
Получаем следующий результат:


Вместо вопросительного знака в отображении числа в формате Currency, по идее, должен быть знак валюты (₽ или руб.).
Специальные символы для выражений форматов
Символы для форматов даты и времени
| Символ | Описание |
|---|---|
| Точка (.) | Разделитель компонентов даты (день, месяц, год). Используется при отображении месяца в виде числа. |
| Пробел | Разделитель компонентов даты (день, месяц, год). Используется при отображении месяца прописью. |
| Двоеточие (:) | Разделитель компонентов времени (часы, минуты, секунды). |
| d | День в виде числа без нуля в начале (1–31). |
| dd | День в виде числа с нулем в начале (01–31). |
| m | Месяц в виде числа без нуля в начале (1–12). Если (m) следует после (h) или (hh), отображаются минуты (0–59). |
| mm | Месяц в виде числа с нулем в начале (01–12). Если (mm) следует после (h) или (hh), отображаются минуты (00–59). |
| mmm | Месяц прописью в сокращенном виде (янв–дек). |
| mmmm | Полное название месяца (январь–декабрь). |
| y | День года в виде числа (1–366). |
| yy | Год в виде 2-значного числа (00–99). |
| yyyy | Год в виде 4-значного числа (1900–9999). |
| h | Часы в виде числа без нуля в начале (0–23). |
| hh | Часы в виде числа с нулем в начале (00–23). |
| n (m) | Минуты в виде числа без нуля в начале (0–59). |
| nn (mm) | Минуты в виде числа с нулем в начале (00–59). |
| s | Секунды в виде числа без нуля в начале (0–59). |
| ss | Секунды в виде числа с нулем в начале (00–59). |
В этой таблице перечислены далеко не все символы для выражений форматов даты и времени. Вы можете ознакомиться со всеми символами, в том числе и для форматирования чисел, на сайте разработчика.
Примеры отображения даты с помощью разных по количеству наборов символа d:
|
Sub DataIsD() MsgBox «d: « & Format(Now, «d») & vbNewLine _ & vbNewLine & «dd: « & Format(Now, «dd») & vbNewLine _ & vbNewLine & «ddd: « & Format(Now, «ddd») & vbNewLine _ & vbNewLine & «dddd: « & Format(Now, «dddd») & vbNewLine _ & vbNewLine & «ddddd: « & Format(Now, «ddddd») & vbNewLine _ & vbNewLine & «dddddd: « & Format(Now, «dddddd») End Sub |

Символы для числовых форматов
| Символ | Описание |
|---|---|
| Точка (.) | Десятичный разделитель. |
| Запятая (,) | Разделитель групп разрядов. В отображаемых числах заполняется пробелом. |
| (0) | Заполнитель, который отображает цифру или ноль. Используется, когда нужны ведущие нули или нули в конце числа. |
| (#) | Заполнитель, который отображает цифру или ничего не отображает. Используется, когда не нужны ведущие нули или нули в конце числа. |
| (%) | Заполнитель процента. Выражение умножается на 100, а знак процента (%) вставляется на той позиции, где он указан в строке формата. |
| (E- E+ e- e+) | Экспоненциальный формат. |
Примеры использования символов в выражениях числовых форматов VBA Excel:
|
Sub FormatNumber2() Dim n As Double n = 2641387.7381962 ‘n = 0.2397842 MsgBox «Форматируемое число = « & n & vbNewLine _ & vbNewLine & «0.##: « & Format(n, «0.##») & vbNewLine _ & vbNewLine & «000.###: « & Format(n, «000.###») & vbNewLine _ & vbNewLine & «#,###.###: « & Format(n, «#,###.###») & vbNewLine _ & vbNewLine & «0 %: « & Format(n, «0 %») & vbNewLine _ & vbNewLine & «0.### E-: « & Format(n, «0.### E-«) & vbNewLine _ & vbNewLine & «0.### E+: « & Format(n, «0.### E+») End Sub |


Символы для текстовых форматов
| Символ | Описание |
|---|---|
| At-символ (@) | Заполнитель для символов, отображающий знак или пробел. |
| Амперсанд (&) | Заполнитель для символов, отображающий знак или ничего (пустая строка). |
| Меньше (<) | Принудительный перевод всех буквенных символов в нижний регистр. |
| Больше (>) | Принудительный перевод всех буквенных символов в верхний регистр. |
Примеры использования символов в выражениях строковых форматов VBA Excel:
|
Sub FormatString() MsgBox «Номер телефона: « & Format(«1234567890», «+7 (@@@) @@@-@@-@@») & vbNewLine _ & vbNewLine & «Серия и номер паспорта: « & Format(«1234567890», «&& && &&&&») & vbNewLine _ & vbNewLine & «Нижний регистр: « & Format(«Нижний регистр», «<«) & vbNewLine _ & vbNewLine & «Верхний регистр: « & Format(«Верхний регистр», «>») End Sub |

Форматы для различных значений одного выражения
Различные форматы для разных числовых значений
В выражении формата для чисел предусмотрено от одного до четырех разделов, отделяемых друг от друга точкой с запятой. Отображаемая строка зависит от значения, возвращенного параметром Expression функции Format.
| Количество разделов | Результат форматирования |
|---|---|
| Один раздел | Выражение формата применяется ко всем значениям. |
| Два раздела | Первый раздел применяется к положительным значениям и нулям, второй – к отрицательным значениям. |
| Три раздела | Первый раздел применяется к положительным значениям, второй – к отрицательным значениям, третий – к нулям. |
| Четыре раздела | Первый раздел применяется к положительным значениям, второй – к отрицательным значениям, третий – к нулям, четвертый – к значениям Null. |
Пример использования четырех разделов в выражении формата числовых значений:
|
Sub FormatDifferentValues() MsgBox «Число 1234,5678: « & _ Format(1234.5678, «#,##0.00 руб.;Отрицательное число;Ноль рублей;Значение Null») _ & vbNewLine & vbNewLine & «Число -25: « & _ Format(—25, «#,##0.00 руб.;Отрицательное число;Ноль рублей;Значение Null») _ & vbNewLine & vbNewLine & «Число 0: « & _ Format(0, «#,##0.00 руб.;Отрицательное число;Ноль рублей;Значение Null») _ & vbNewLine & vbNewLine & «Null: « & _ Format(Null, «#,##0.00 руб.;Отрицательное число;Ноль рублей;Значение Null») End Sub |

Различные форматы для разных строковых значений
В выражении формата для строк предусмотрено до двух разделов, отделяемых друг от друга точкой с запятой. Отображаемая строка зависит от текста, возвращенного параметром Expression функции Format.
| Количество разделов | Результат форматирования |
|---|---|
| Один раздел | Выражение формата применяется ко всем строковым данным. |
| Два раздела | Первый раздел применяется к строковым данным, второй – к значениям Null и пустым строкам («»). |
Пример использования двух разделов в выражении формата строк:
|
Sub FormatString2() MsgBox «Строка «Белка»: « & _ Format(«Белка», «@;Пустая строка или Null») _ & vbNewLine & vbNewLine & «Пустая строка: « & _ Format(«», «@;Пустая строка или Null») _ & vbNewLine & vbNewLine & «Строка «Null»: « & _ Format(«Null», «@;Пустая строка или Null») _ & vbNewLine & vbNewLine & «Значение Null: « & _ Format(Null, «@;Пустая строка или Null») End Sub |
