
Format numbers as dates or times
Excel for Microsoft 365 Excel for Microsoft 365 for Mac Excel for the web Excel 2021 Excel 2021 for Mac Excel 2019 Excel 2019 for Mac Excel 2016 Excel 2016 for Mac Excel 2013 Excel 2010 Excel 2007 Excel for Mac 2011 More…Less
When you type a date or time in a cell, it appears in a default date and time format. This default format is based on the regional date and time settings that are specified in Control Panel, and changes when you adjust those settings in Control Panel. You can display numbers in several other date and time formats, most of which are not affected by Control Panel settings.
In this article
-
Display numbers as dates or times
-
Create a custom date or time format
-
Tips for displaying dates or times
Display numbers as dates or times
You can format dates and times as you type. For example, if you type 2/2 in a cell, Excel automatically interprets this as a date and displays 2-Feb in the cell. If this isn’t what you want—for example, if you would rather show February 2, 2009 or 2/2/09 in the cell—you can choose a different date format in the Format Cells dialog box, as explained in the following procedure. Similarly, if you type 9:30 a or 9:30 p in a cell, Excel will interpret this as a time and display 9:30 AM or 9:30 PM. Again, you can customize the way the time appears in the Format Cells dialog box.
-
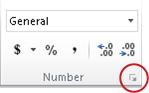
On the Home tab, in the Number group, click the Dialog Box Launcher next to Number.

You can also press CTRL+1 to open the Format Cells dialog box.
-
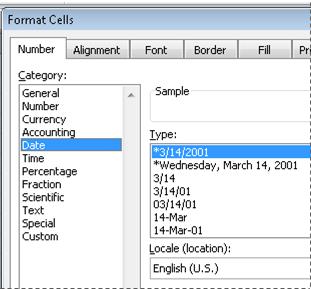
In the Category list, click Date or Time.
-
In the Type list, click the date or time format that you want to use.
Note: Date and time formats that begin with an asterisk (*) respond to changes in regional date and time settings that are specified in Control Panel. Formats without an asterisk are not affected by Control Panel settings.
-
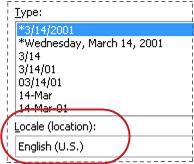
To display dates and times in the format of other languages, click the language setting that you want in the Locale (location) box.
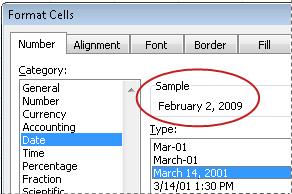
The number in the active cell of the selection on the worksheet appears in the Sample box so that you can preview the number formatting options that you selected.
Top of Page
Create a custom date or time format
-
On the Home tab, click the Dialog Box Launcher next to Number.
You can also press CTRL+1 to open the Format Cells dialog box.
-
In the Category box, click Date or Time, and then choose the number format that is closest in style to the one you want to create. (When creating custom number formats, it’s easier to start from an existing format than it is to start from scratch.)
-
In the Category box, click Custom. In the Type box, you should see the format code matching the date or time format you selected in the step 3. The built-in date or time format can’t be changed or deleted, so don’t worry about overwriting it.
-
In the Type box, make the necessary changes to the format. You can use any of the codes in the following tables:
Days, months, and years
|
To display |
Use this code |
|---|---|
|
Months as 1–12 |
m |
|
Months as 01–12 |
mm |
|
Months as Jan–Dec |
mmm |
|
Months as January–December |
mmmm |
|
Months as the first letter of the month |
mmmmm |
|
Days as 1–31 |
d |
|
Days as 01–31 |
dd |
|
Days as Sun–Sat |
ddd |
|
Days as Sunday–Saturday |
dddd |
|
Years as 00–99 |
yy |
|
Years as 1900–9999 |
yyyy |
If you use «m» immediately after the «h» or «hh» code or immediately before the «ss» code, Excel displays minutes instead of the month.
Hours, minutes, and seconds
|
To display |
Use this code |
|---|---|
|
Hours as 0–23 |
h |
|
Hours as 00–23 |
hh |
|
Minutes as 0–59 |
m |
|
Minutes as 00–59 |
mm |
|
Seconds as 0–59 |
s |
|
Seconds as 00–59 |
ss |
|
Hours as 4 AM |
h AM/PM |
|
Time as 4:36 PM |
h:mm AM/PM |
|
Time as 4:36:03 P |
h:mm:ss A/P |
|
Elapsed time in hours; for example, 25.02 |
[h]:mm |
|
Elapsed time in minutes; for example, 63:46 |
[mm]:ss |
|
Elapsed time in seconds |
[ss] |
|
Fractions of a second |
h:mm:ss.00 |
AM and PM If the format contains an AM or PM, the hour is based on the 12-hour clock, where «AM» or «A» indicates times from midnight until noon and «PM» or «P» indicates times from noon until midnight. Otherwise, the hour is based on the 24-hour clock. The «m» or «mm» code must appear immediately after the «h» or «hh» code or immediately before the «ss» code; otherwise, Excel displays the month instead of minutes.
Creating custom number formats can be tricky if you haven’t done it before. For more information about how to create custom number formats, see Create or delete a custom number format.
Top of Page
Tips for displaying dates or times
-
To quickly use the default date or time format, click the cell that contains the date or time, and then press CTRL+SHIFT+# or CTRL+SHIFT+@.
-
If a cell displays ##### after you apply date or time formatting to it, the cell probably isn’t wide enough to display the data. To expand the column width, double-click the right boundary of the column containing the cells. This automatically resizes the column to fit the number. You can also drag the right boundary until the columns are the size you want.
-
When you try to undo a date or time format by selecting General in the Category list, Excel displays a number code. When you enter a date or time again, Excel displays the default date or time format. To enter a specific date or time format, such as January 2010, you can format it as text by selecting Text in the Category list.
-
To quickly enter the current date in your worksheet, select any empty cell, and then press CTRL+; (semicolon), and then press ENTER, if necessary. To insert a date that will update to the current date each time you reopen a worksheet or recalculate a formula, type =TODAY() in an empty cell, and then press ENTER.
Need more help?
You can always ask an expert in the Excel Tech Community or get support in the Answers community.
Need more help?
Want more options?
Explore subscription benefits, browse training courses, learn how to secure your device, and more.
Communities help you ask and answer questions, give feedback, and hear from experts with rich knowledge.
Even though dates and time are actually stored as a regular number known as the date serial number, we can make use of extensive Excel date and time formatting options to display them just the way we want.
We can access some quick date and time formats from the Home tab > in the Number group:
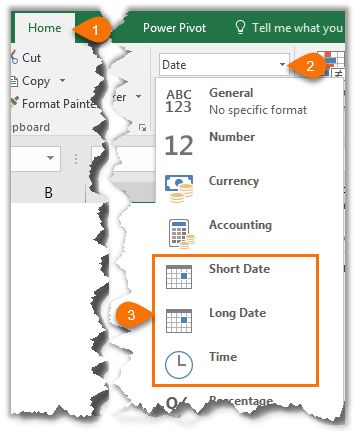
We can also create our own custom date and time formats to suit our needs. Let’s take a look.
- Select the cell(s) containing the dates you want to format.
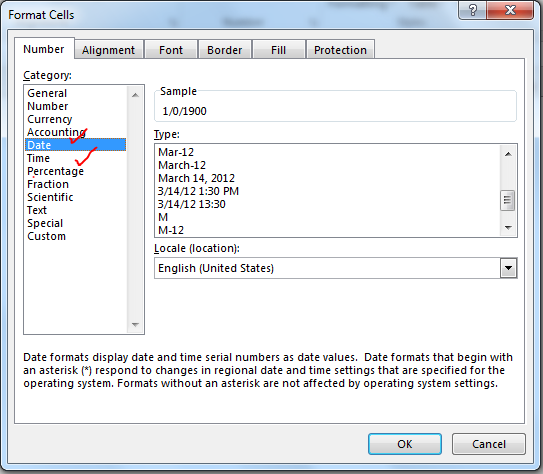
- Press CTRL+1, or right-click > Format Cells to open the Format Cells dialog box.
- On the Number tab select ‘Date’ in the Categories list. This brings up a list of default date formats you can select from in the ‘Type’ list. Likewise for the Time category.
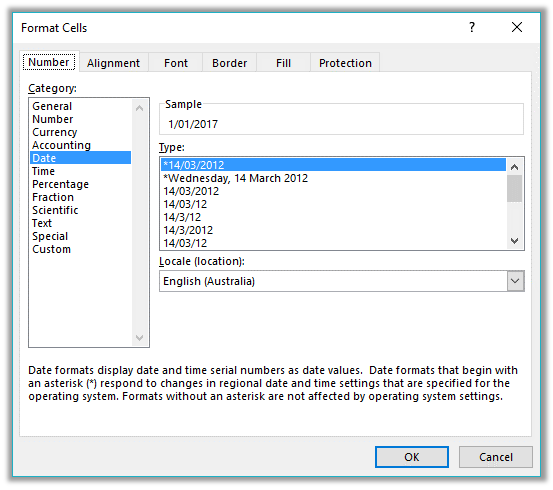
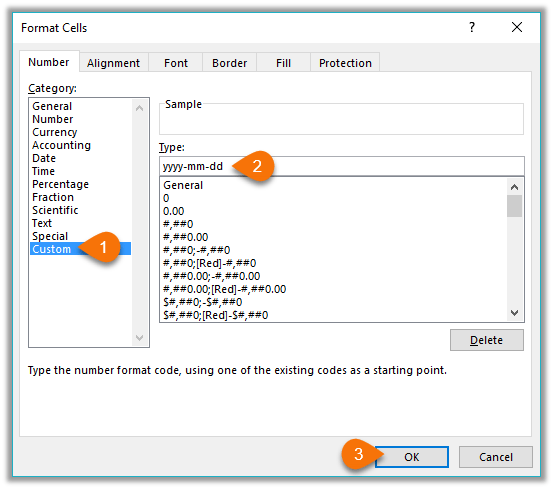
We aren’t limited to the defaults though. You can create your own Custom date or time formats in the ‘Custom’ category. These custom formats are saved for you to re-use in the current file.
Custom Date Formatting Characters
Excel recognises the following characters and sets of characters for date formatting.
| Character | Explanation | Date | Formatted | |
| d | Displays the day as a number without a leading zero. | 3/09/2016 | 3 | |
| dd | Displays the day as a number with a leading zero when appropriate. | 3/09/2016 | 03 | |
| ddd | Displays the day as an abbreviation (Sun to Sat). | 3/09/2016 | Sat | |
| dddd | Displays the day as a full name (Sunday to Saturday). | 3/09/2016 | Saturday | |
| m | Displays the month as a number without a leading zero. | 3/09/2016 | 9 | |
| mm | Displays the month as a number with a leading zero when appropriate. | 3/09/2016 | 09 | |
| mmm | Displays the month as an abbreviation (Jan to Dec). | 3/09/2016 | Sep | |
| mmmm | Displays the month as a full name (January to December). | 3/09/2016 | September | |
| mmmmm | Displays the month as a single letter (J to D). | 3/09/2016 | S | |
| yy | Displays the year as a two-digit number. | 3/09/2016 | 16 | |
| yyyy | Displays the year as a four-digit number. | 3/09/2016 | 2016 |
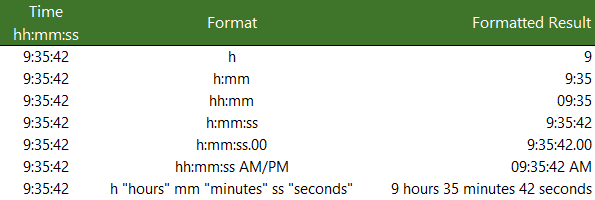
Custom Date Formatting Examples
We can bring the characters together to create our own custom formats. Some examples below:
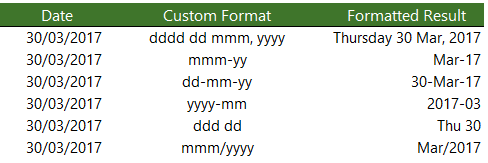
Remember; the custom format doesn’t alter the underlying date serial number, it is still the same.
Custom Time Formatting Characters
Like dates, time also has its own set of custom formatting characters, as listed below:
| Character | Explanation | ||
| h | Displays the hour as a number without a leading zero. | ||
| [h] | Displays elapsed time in hours. If you are working with a formula that returns a time in which the number of hours exceeds 24, use a number format that resembles [h]:mm:ss or [h]:mm | ||
| hh | Displays the hour as a number with a leading zero when appropriate. If the format contains AM or PM, the hour is based on the 12-hour clock. Otherwise, the hour is based on the 24-hour clock. | ||
| m | Displays the minute as a number without a leading zero.* | ||
| [m] | Displays elapsed time in minutes. If you are working with a formula that returns a time in which the number of minutes exceeds 60, use a number format that resembles [mm]:ss. | ||
| mm | Displays the minute as a number with a leading zero when appropriate.* | ||
| s | Displays the second as a number without a leading zero. | ||
| [s] | Displays elapsed time in seconds. If you are working with a formula that returns a time in which the number of seconds exceeds 60, use a number format that resembles [ss]. | ||
| ss | Displays the second as a number with a leading zero when appropriate. If you want to display fractions of a second, use a number format that resembles h:mm:ss.00. | ||
| AM/PM, am/pm, A/P, a/p | Displays the hour using a 12-hour clock. Excel displays AM, am, A, or a for times from midnight until noon and PM, pm, P, or p for times from noon until midnight. |
*Note: The m or mm code must appear immediately after the h or hh code or immediately before the ss code; otherwise, Excel displays the month instead of minutes.
Custom Time Formatting Examples
Note: if your PC region settings have the Date & Time formats set to show the Short Time as hh:mm tt or the Long Time as hh:mm:ss tt then this may override any single ‘h’ formats and display them as ‘hh’.
The screenshot above is what I see with my PC region settings for the Short Time as h:mm tt. If you see something different when using a single ‘h’ format, then it will be down to your PC region settings.
More Excel Formatting
Custom cell formatting isn’t limited to dates and times. There is a plethora of formatting options for all types of numbers that we can use to get our reports looking just the way we want. Click here for our comprehensive guide to Excel custom number formatting.
Free eBook — Working with Date & Time in Excel
Everything you need to know about Date and Time in Excel — Download the free eBook and Excel file with detailed instructions.
Enter your email address below to download the comprehensive Excel workbook and PDF.
By submitting your email address you agree that we can email you our Excel newsletter.
So I’ve been battling with this issue all day.
Basically I have it now sorted and part of the solution was a code that Excel itself generated which is:
[$-en-AU]yyyy-mm-dd hh:mm
So, in the first instance,
- in a new spreadsheet, type your entry in as per usual, eg:
2026-01-31 10:00 - set the format of the cell to «custom» and use the above formula, ie
[$-en-AU]yyyy-mm-dd hh:mm - Hit enter and Bob’s your uncle!
Then save it as a CSV file, then close it and re-open it to check Excel hasn’t changed the date format.
The weird thing is if it does work (and I’ve re-tried it a few times successfully), when you check the format of the cell you’ve created, it’s changed the format to «General».
But seriously who cares. As long as it works!!
You can then copy and paste the cell and use it wherever you want!!
I hope this solution works for you!!
Regards
Richard
Dates and times in Excel can be displayed in a variety of ways. To apply a Date or Time format, execute the following steps.
1. Select cell A1.

2. Right click, and then click Format Cells.
3. In the Category list, select Date, and select a Date format.

4. Click OK.

Note: to apply a Time format, in the Category list, select Time.
5. Dates are stored as numbers in Excel and count the number of days since January 0, 1900. Times are handled internally as numbers between 0 and 1. To clearly see this, change the number format of cell A1, B1 and C1 to General.

Note: apparently, 42544 days after January 0, 1900 is the same as June 23, 2016. 6:00 is represented as 0.25 (quarter through the day).
6. You can enter times as 6:00, but Excel displays this time as 6:00:00 AM in the formula bar. AM is used for times in the night and morning. PM is used for times in the afternoon and evening.

7. Change the number format of cell C1 to Date only.

Note: cell C1 still contains the number 42544.25. We only changed the appearance of the number, not the number itself.
Date and time in excel are treated a bit differently in excel than in other spreadsheets software. If you don’t know how Excel date and time work, you may face unnecessary errors.
So, in this article, we will learn everything about the date and time of Excel. We will learn, what are dates in excel, how to add time in excel, how to format date and time in excel, what are date and time functions in excel, how to do date and time calculations (adding, subtracting, multiplying etc. with dates and times).
What is Date and Time in Excel?
Many of you may already know that Excel dates and time are nothing but serial numbers. A date is a whole number and time is a fractional number. Dates in excel have different regional formatting. For example, in my system, it is mm/dd/YYYY (we will use this format throughout the article). You may be using the same date format or you could be using dd/mm/YYYY date format.
Date Formatting of Cell
There are multiple options available to format a date in Excel. Select a cell that may contain a date and press CTRL+1. This will open the Format Cells dialogue box. Here you can see two formatting options as Date and Time. In these categories, there are multiple date formattings available to suit your requirements.
 Dates:
Dates in Excel are mare serial numbers starting from 1-Jan-1900. A day in excel is equal to 1. Hence 1-Jan-1900 is 1, 2-Jan-1900 is 2, and 1-Jan-2000 is 36526.
Fun Fact: 1900 was not a leap year but excel accepts 29-Feb-1900 as a valid date. It was a desperate glitch to compete Lotus 1-2-3 back in those days.
Shortcut to enter static today’s date in excel is CTRL+; (Semicolon).
To add or subtract a day from a date you just need to subtract or add that number of days to that date.
Time:
Excel by default follows the hh:mm format for time (0 to 23 format). The hours and minutes are separated by a colon without any spaces in between. You can change it to hh:mm AM/PM format. The AM/PM must have 1 space from the time value. To include seconds, you can add :ss to hh:mm (hh:mm:ss). Any other time format is invalid.
Time is always associated with a date. The date comes before the time value separated with a space from time. If you don’t mention a date before time, by default it takes the first date of excel (which is 1/1/1900). Time in excel is a fractional number. It is shown on the right side of the decimal.
Hours:
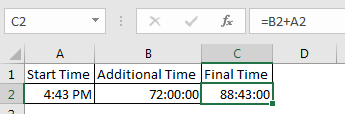
Since 1 day is equal to 1 in excel and 1 day consists of 24 hours, 1 hour is equal to 1/24 in excel. What does that mean? It means that if you want to add or subtract 1 hour to time, you need to add or subtract 1/24. See the image below.
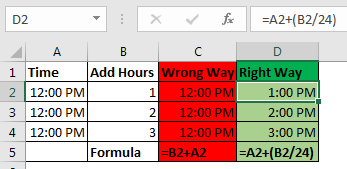 you can say that 1 hour is equal to 0.041666667 (1/24).
Calculate hours between time in Excel
Minutes:
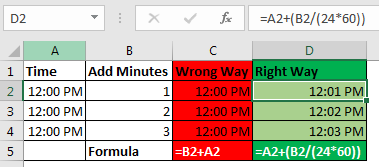
From the explanation of the hour in excel, you must have guessed that 1 Minute in excel is equal to 1/(24×60) (or 1/1440 or 0.000694444).
If you want to add a minute to an excel time, add 1/(24×60). See the image below. Sometimes you get the need to Calculate Minutes Between Dates & Time In Excel, you can read it here.
 Seconds:
Yes, a second in Excel is equal to 1/(24x60x60). To add or subtract seconds from a time, you just need to do the same things as we did in minutes and hours.
Date and Time in one cell
Dates and times are linked together. A date is always associated with a valid date and time is always associated with a valid excel date. Even if you are not able to see one of them.
If you only enter a time in a cell, the date of that cell will 1-Jan-1900, even if you are not able to see it. If you format that cell as a date-time format, you can see the associated date. Similarly, if you don’t mention time with the date, by default 12:00 AM is attached. See the image below.
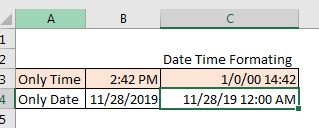
In the image above, we have time only in B3 and date only in B4. When we format these cells as mm/dd/yy hh:mm, we get both, time and date in both cells.
So, while doing date and time calculations in excel, keep this in check.
No Negative Time
As I told you the date and time in excel starts from 1-Jan-1900 12:00 AM. Any time before this is not a valid date in excel. If you subtract a value from a date that leads to before 1-Jan-1900 12:00, even one second, excel will produce ###### error. I have talked about it here and in Convert Date and Time from GMT to CST. It happens when we try to subtract something that leads to before 1 Jan-1900 12:00. Try it yourself. Write 12:00 PM and subtract 13 hours from it. see what you get.
Calculations with Dates and Time in Excel
Adding Days to a date:
Adding days to a date in excel is easy. To add a day to date just add 1 to it. See the image below.
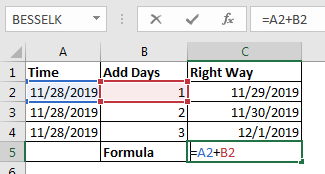
You should not add two dates to get the future date, as it will sum up the serial numbers of those days and you may get a date far in the future.
Subtracting Days from Date:
If you want to get a backdate from a date a few days before, then just subtract that number of days from the date and you will get backdate. For example, if I want to know what date was before 56 days since TODAY then I would write this formula in the cell.
This will return us the date of 56 before the current date.
Note: Remember that you can not have a date before 1/Jan/1900 in excel. If you get ###### error, this could be the reason.
Days between two dates:
To calculate days between two dates we just need to subtract the start date from the end date. I have already done an article on this topic. Go and check it out here. You can also use the Excel DAYS Function to calculate days between a start date and end date.
Adding Times:
There’s been a lot of queries on how to add time to excel as many people get confusing results when they do it. There are two types of addition in times. One is adding time to another time. In this case, both times are formatted as hh:mm time format. In this case, you can simply add these times.
The second case is when you don’t have additional time in time format. You just have numbers of hours, minutes and seconds to add. In that case, you need to convert those numbers to their time equivalents. Note these points to add hours, minutes and seconds to a date/time.
- To add N hours to an X time use formula =X+(N/24) (As 1=24 hours)
- To Add N minutes to X time use formula = X+(N/(24*60))
- To Add N Second to X time use formula = X+(N/(24*60*60))
Subtracting Times
It’s the same as adding time, just make sure that you don’t end up with a negative time value when subtracting, because there is no such thing as a negative number in excel.
Note: When you add or subtract time in excel that exceeds 24 hours of difference, excel will roll to the next or previous date. For example, if you subtract 2 hours from 29-Jan-2019 1:00 AM then it will roll back to 28-Jan-2019 11:00 PM. If you subtract 2 hours from 1:00 AM (does not have the date mentioned), Excel will return ###### error. I have told the reason at the beginning of the article.
Adding Months to a Date:
You can’t just add multiples of 30 to add months to date as different months have a different number of days. You need to be careful while adding months to Date. To add months to a date in excel, we use EDATE function of excel. Here I have a separate article on adding months to a date in different scenarios.
 Adding years to date:
Just like adding months to a date, it is not straightforward to add years to date. We need to use YEAR, MONTH, DAY function to add years to date. You can read about adding years to date here.
If you want to calculate years between dates then you can use this.
Excel Date and Time Handling Functions:
Since date and time are special in Excel, Excel provides special functions to handle them. Here I am mentioning a few of them.
- TODAY(): This function returns today’s date dynamically.
- DAY(): Returns Day of the month (returns number 1 to 31).
- DAYS(): Used to count the number of days between two dates.
- MONTH(): Used to get the month of the date (returns number 1 to 12).
- YEAR(): Returns year of the date.
- WEEKNUM(): Returns the weekly number of a date, in a year.
- WEEKDAY(): Returns the day number in a week (1 to 7) of the supplied date.
- WORKDAY(): Used to calculate working days.
- TIMEVALUE(): Used to extract Time value (serial number) from a text formatted date and time.
- DATEVALUE(): Used to extract date value (serial number) from a text formatted date and time.
These are some of the most useful data and time functions in excel. There are plenty more date and time functions. You can check them out here.
Date and Time Calculations
If I explain all of them here, this article will get too long. I have divided these time calculation techniques in excel into separate articles. Here I am mentioning them. You can click on them to read.
- Calculate days, months and years
- Calculate age from date of birth
- Multiplying time values and numbers.
- Get Month name from Date in Excel
- Get day name from Date in Excel
- How to get a quarter of the year from date
- How to Add Business Days in Excel
- Insert Date Time Stamp with VBA
So yeah guys, this is all about the date and time in excel you need to know about. I hope this article was useful to you. If you have any queries or suggestions, write them down in the comments section below.