
Add or subtract days from a date
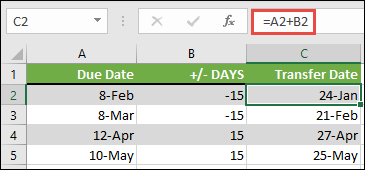
Suppose that a bill of yours is due on the second Friday of each month. You want to transfer funds to your checking account so that those funds arrive 15 calendar days before that date, so you’ll subtract 15 days from the due date. In the following example, you’ll see how to add and subtract dates by entering positive or negative numbers.
-
Enter your due dates in column A.
-
Enter the number of days to add or subtract in column B. You can enter a negative number to subtract days from your start date, and a positive number to add to your date.
-
In cell C2, enter =A2+B2, and copy down as needed.
Add or subtract months from a date with the EDATE function
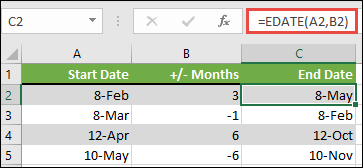
You can use the EDATE function to quickly add or subtract months from a date.
The EDATE function requires two arguments: the start date and the number of months that you want to add or subtract. To subtract months, enter a negative number as the second argument. For example, =EDATE(«9/15/19»,-5) returns 4/15/19.
-
For this example, you can enter your starting dates in column A.
-
Enter the number of months to add or subtract in column B. To indicate if a month should be subtracted, you can enter a minus sign (-) before the number (e.g. -1).
-
Enter =EDATE(A2,B2) in cell C2, and copy down as needed.
Notes:
-
Depending on the format of the cells that contain the formulas that you entered, Excel might display the results as serial numbers. For example, 8-Feb-2019 might be displayed as 43504.
-
Excel stores dates as sequential serial numbers so that they can be used in calculations. By default, January 1, 1900 is serial number 1, and January 1, 2010 is serial number 40179 because it is 40,178 days after January 1, 1900.
-
If your results appear as serial numbers, select the cells in question and continue with the following steps:
-
Press Ctrl+1 to launch the Format Cells dialog, and click the Number tab.
-
Under Category, click Date, select the date format you want, and then click OK. The value in each of the cells should appear as a date instead of a serial number.
-
-
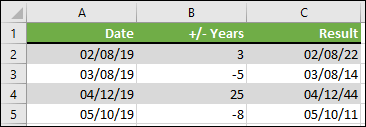
Add or subtract years from a date
In this example, we’re adding and subtracting years from a starting date with the following formula:
=DATE(YEAR(A2)+B2,MONTH(A2),DAY(A2))
How the formula works:
-
The YEAR function looks at the date in cell A2, and returns 2019. It then adds 3 years from cell B2, resulting in 2022.
-
The MONTH and DAY functions only return the original values from cell A2, but the DATE function requires them.
-
Finally, the DATE function then combines these three values into a date that’s 3 years in the future — 02/08/22.
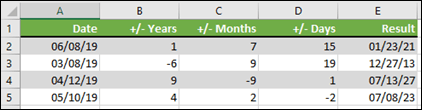
Add or subtract a combination of days, months, and years to/from a date
In this example, we’re adding and subtracting years, months and days from a starting date with the following formula:
=DATE(YEAR(A2)+B2,MONTH(A2)+C2,DAY(A2)+D2)
How the formula works:
-
The YEAR function looks at the date in cell A2, and returns 2019. It then adds 1 year from cell B2, resulting in 2020.
-
The MONTH function returns 6, then adds 7 to it from cell C2. This gets interesting, because 6 + 7 = 13, which is 1-year and 1-month. In this case, the formula will recognize that and automatically add another year to the result, bumping it from 2020 to 2021.
-
The DAY function returns 8, and adds 15 to it. This will work similarly to the MONTH portion of the formula if you go over the number of days in a given month.
-
The DATE function then combines these three values into a date that is 1 year, 7 months, and 15 days in the future — 01/23/21.
Here are some ways you could use a formula or worksheet functions that work with dates to do things like, finding the impact to a project’s schedule if you add two weeks, or time needed to complete a task.
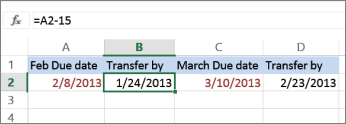
Let’s say your account has a 30-day billing cycle, and you want to have the funds in your account 15 days before the March 2013 billing date. Here’s how you would do that, using a formula or function to work with dates.
-
In cell A1, type 2/8/13.
-
In cell B1, type =A1-15.
-
In cell C1, type =A1+30.
-
In cell D1, type =C1-15.

Add months to a date
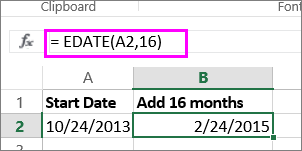
We’ll use the EDATE function and you’ll need the start date and the number of months you want to add. Here’s how to add 16 months to 10/24/13:
-
In cell A1, type 10/24/13.
-
In cell B1, type =EDATE(A1,16).
-
To format your results as dates, select cell B1. Click the arrow next to Number Format, > Short Date.
Subtract months from a date
We’ll use the same EDATE function to subtract months from a date.
Type a date in Cell A1 and in cell B1, type the formula =EDATE(4/15/2013,-5).
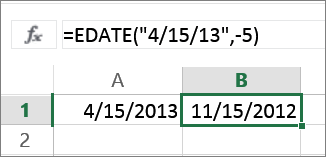
Here, we’re specifying the value of the start date entering a date enclosed in quotation marks.
You can also just refer to a cell that contains a date value or by using the formula =EDATE(A1,-5)for the same result.
More examples
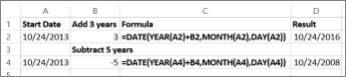
To add years to or subtract years from a date
|
Start Date |
Years added or subtracted |
Formula |
Result |
|---|---|---|---|
|
10/24/2013 |
3 (add 3 years) |
=DATE(YEAR(A2)+B2,MONTH(A2),DAY(A2)) |
10/24/2016 |
|
10/24/2013 |
-5 (subtract 5 years) |
=DATE(YEAR(A4)+B4,MONTH(A4),DAY(A4)) |
10/24/2008 |
Bottom line: Learn 3 different ways to add or subtract days to dates in Excel using formulas, copy & paste, and VBA macros. Includes video tutorial.
Skill level: Beginner
Video Tutorial
Download the File
Download the Excel file used in the video.
Michael asked a great question on how to add days to existing cells that contain dates. He has a data set with a column of dates, and wants to be able to easily add or subtract days to the dates.
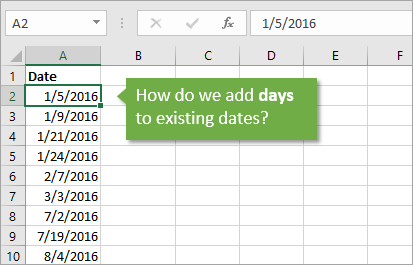
This is useful when your system has the wrong date or time setting, or if you are trying to create forecast data for a certain number of days in the future.
So let’s take a look at three methods to shift dates by a specific number of days.
Method #1: Use a Formula
The easiest option is to use a simple formula to add or subtract the number of days to the cell that contains the date.
In Excel, dates are actually numbers that are formatted as a date. If you change the number formatting of a cell that contains a date to General or Number, you will see number between 1 and 40,000+. This is the number of days that have elapsed since January 1, 1900, the day the calendar starts in Excel.
Checkout my article & video on how the date system works in Excel for more on this.
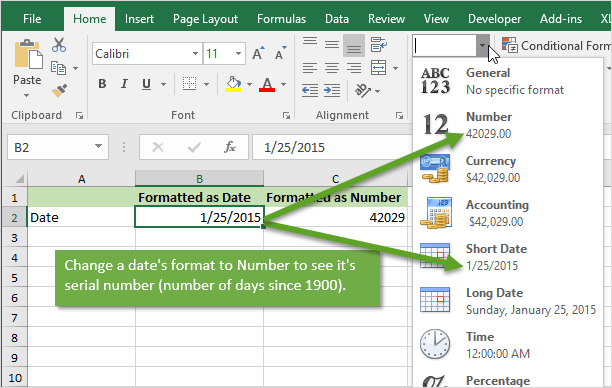
One day in Excel is represented by one whole number. Therefore, we can easily offset the date by adding or subtracting a whole number (the number of days).
In the example below we create a simple formula that references the cell that contains the date (A2) and add 1 to it. Copy the formula down to create a column of the new date that has one day added to it.
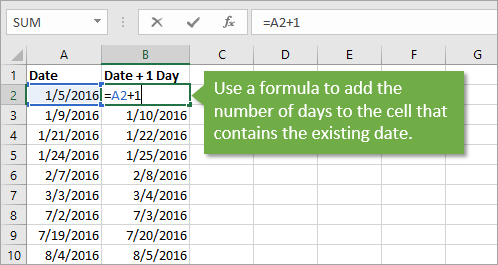
You can then copy and paste values over the existing date column to complete the update. This technique will work great if your data is the source of a pivot table and you want your reports to use the existing date field.
Method #2: Paste Special Operation
The Paste Special feature is another option when you don’t want to create a separate column of formulas.
Paste Special has Operations that allow us to add, subtract, multiply, or divide existing values by a number.
Here are instructions on how to use the Paste Special Operation to add or subtract dates:
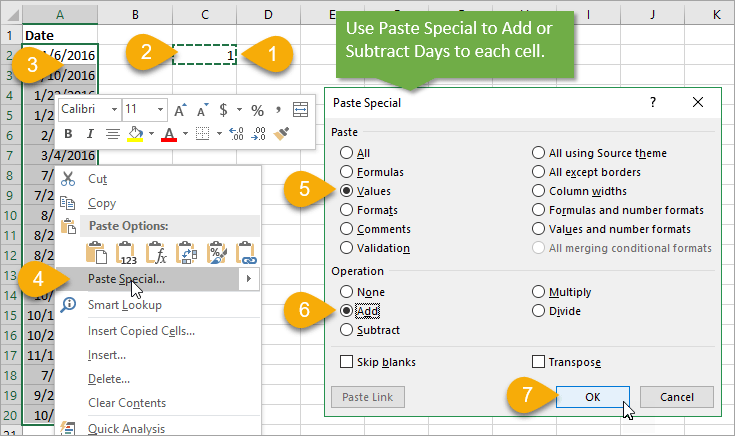
- Type the number of days you want to add or subtract in a blank cell. For this example I entered a 1 in cell C2.
- Copy the cell (Right-click > Copy or Ctrl +C).
- Select the cells that contain the dates.
- Right-click and choose Paste Special (keyboard shortcut: Alt, E, S).
- Select the Values radio button from the Paste section on the Paste Special menu (keyboard shortcut: V).
- Select the Add radio button from the Operation section (keyboard shortcut: D).
- Click OK or press Enter.
The copied number (1) will be added to the values in each cell.
The full keyboard shortcut to Paste Special > Add > Values is:
Alt, E, S, V, D, Enter (press & release each key in order)
How does Paste Special Work?
The Paste Special Operation will modify the value in the cell if the cell contains a values.
If the cell contains a formula then the formula will be modified and a +1 will be added to the end of each formula. I explain this in more detail in the video above.
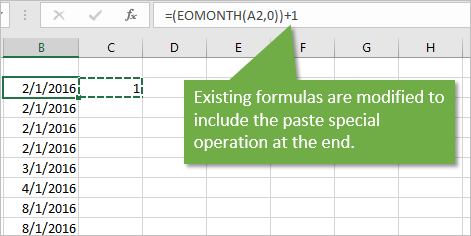
The Subtract operation can be used to subtract days from the existing dates. If you want to add or subtract a different number of days, then put a different number in the blank cell in step 1.
This is a quick way to add or subtract days without having to create a new column of formulas.
Method #3: VBA Macro
If this is a task you do frequently, or want the users of your spreadsheet to be able to add and subtract dates, then a macro is a great solution. A macro can be used to change the existing value in the cell(s) by any number of days you specify in the code.
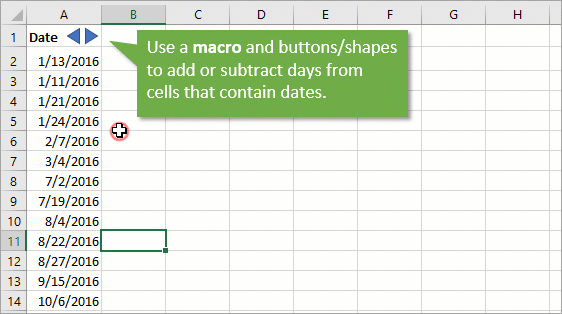
Here are some simple VBA macro code examples that add or subtract days to the active (selected) cell.
Sub Add_Day_To_Date()
'Adds 1 to the active cell

  ActiveCell.Value = ActiveCell.Value + 1

End Sub
Sub Subtract_Day_From_Date()
'Subtracts 1 from the activecell

  ActiveCell.Value = ActiveCell.Value - 1

End Sub
If you want to modify the dates in multiple cells then we can use a For Next Loop to loop through the range and modify each cell.
Sub Add_Day_To_Range()
'Adds 1 to each cell in the selected range
'For Next Loop explained: https://www.excelcampus.com/vba/for-each-next-loop/

Dim c As Range

    For Each c In Selection.Cells
      c.Value = c.Value + 1
    Next c

End Sub
The example file (download above) also contains a sheet with buttons in the header cell. These buttons are triangle shapes that are assigned to the Add and Subtract macros.
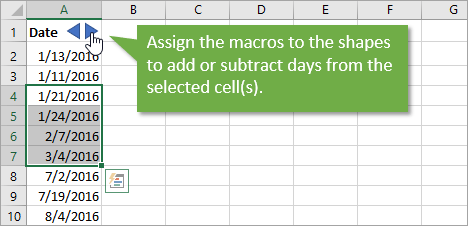
This makes it easy for your users to modify dates in the selected cell without having to type anything. There are a lot of possibilities with a macro based solution.
Free Training Webinar on the Power Tools
Right now I’m running a free training webinar on all of the Power Tools in Excel. This includes Power Query, Power Pivot, Power BI, pivot tables, macros & VBA, and more.
It’s called The Modern Excel Blueprint. During the webinar I explain what these tools are and how they can fit into your workflow.

You will also learn how to become the Excel Hero of your organization, that go-to gal or guy that everyone relies on for Excel help and fun projects.
The webinar is running at multiple days and times. Please click the link below to get registered and save your seat.
Click Here to Register for the Free Webinar
Other Techniques for Adding Days to Dates?
There are a lot of ways to accomplish this task in Excel. Please leave a comment below and share a technique that you use to add days to dates. I’m looking forward to learning something new.
Thank you! 🙂
Microsoft Excel stores dates and times as numbers, which allows the user to easily add and subtract days to a date in Excel.
It also makes it really easy when you want to find out the total number of days between two dates, as you can simply subtract one from the other.
In this tutorial, I’ll show you a couple of really easy ways to add or subtract days to dates in Excel.
So let’s get started!
Add or Subtract Days to Dates in Excel Using Paste Special
Recently, I was working with one of the content writers on one of my projects. I sent her a list of articles with the due dates to the writer (as shown below).

The writer came back to me and asked me to shift all these due dates by 10 days, as she had some urgent stuff to take care of and needed 10 days off.
This is a perfect example where I would need to add a fixed number of days to the due date so that I can get the new date for each task.
Excel has an in-built Paste Special functionality that allows you to quickly add or subtract a fixed number from a range of selected cells.
Below are the steps to add 10 days to the existing dates in our data set:
- In an empty cell, enter 10 (the number that we want to add to the dates)

- Copy this cell (the one in which we enter the value 10)
- Select the cells that have the dates

- Right-click on the selection
- Click on Paste Special. This will open the Paste Special dialog box

- In the Paste option, select ‘Values’

- In the Operation options, select ‘Add’
- Click Ok


That’s it!
The above steps would add 10 to all the dates in the selection.

In case you want to subtract from a date, select the Subtract option in Step 7.
Note: It’s important to select the Value option in Step 6 as this makes sure that the format of the dates remains unchanged. If you don’t do this, it would change the formatting of your dates (as it also copies the formatting from the copied cell).
This method is best used when you want to add a fixed number of days to dates. In case you want to add a variable number of days to a date, it’s best to use the formula method (covered next).
Also read: How to Add Week to Date in Excel?
Add or Subtract Days to Dates Using Formulas
With formulas, you get a lot of flexibility while adding or subtracting dates.
For example, you can add a different number of days to date by just having that number in an additional column.
You can also only add the weekdays (while ignoring the weekends).
Let’s see a couple of examples that will make these scenarios easy to understand.
Adding Fixed Number of Days to a Date
Suppose you have a data set as shown below and you want to add a fixed number of days to each of these dates.

Below is the formula to do this:
=B2+10

Since dates are stored as numbers in Excel, all you need to do is add the value by which you want to extend the date.
In this example, I have simply added 10 to the date in each cell to get the date after 10 days.
You can copy and paste the above formula to all the cells in the column to apply it for all the dates.
Adding Varying Number of Days to a Date
What if you don’t want to add the same number to each date? What if you want to have a variable date added two different existing dates.
For example, in some of these dates, I may want to add 10 days, and in some others, I may want to add 5 days or 15 days.
In such a scenario, it’s best to insert a helper column and have your variable dates in that helper column.
Below I have the example data set where I have a helper column (columns C) it has the days to add.

Below is the formula that I can use to add these days in the helper column to the existing dates:
=B2+C2

This is pretty straight forward, as we are simply adding two numbers.
And in case you want to subtract days from a date, use the minus sign instead of the plus sign in the above formula.
Note: In some cases, you may see a serial number instead of the date (or the date may be in a different format). If that happens, you simply need to change the format of the cell to show it in the expected date format.
But now, what if only want to add weekdays to the existing date (i.e., ignore the weekends – Saturday and Sunday)?
You can do that as well (as covered in the next section).
Adding Only Weekdays to a Date
Below I have the data set where the dates are in column B and the number of weekdays that I want to add are in column C.
Below is the formula that would give you the date after adding the given number of working days:
=WORKDAY(B2,C2)
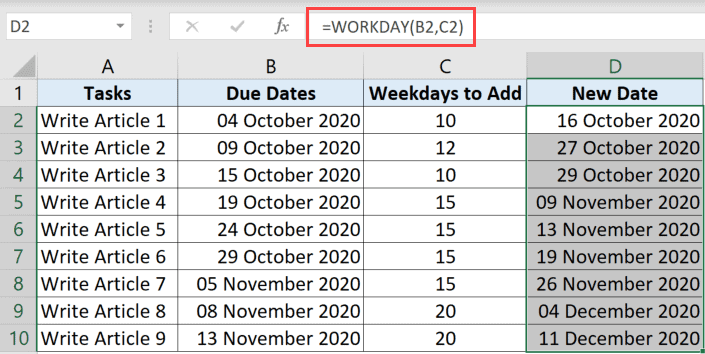
WORKDAY function in Excel takes three arguments:
- The date to which you want to add a specific number of workdays (B2 in our example)
- The total number of workdays that you want to add (C2 in our example)
- [Optional Argument] List of holidays that should not be counted
In our example, since we do not have the list of holidays, I am only using the first two arguments. This function only counts the weekdays (i.e., Monday to Friday), and ignore the weekends days (i.e., Saturday and Sunday).
In case you want to add weekend days that are different than Saturday and Sunday (say Friday and Saturday or only Sunday), you can do that by using a slightly different formula.
Below is the formula that would give me the final result considering Friday and Saturday as the weekend days
=WORKDAY.INTL(B2,C2,7)
The WORKDAY.INTL formula is a slight improvement over the WORKDAY function, as it allows you to choose the weekend days.

For example, in the above formula, I have specified the third argument as 7, which indicates that I want to consider Friday and Saturday as the weekend days.
Similarly, you can also choose to only have Sunday as the weekend day. In fact, you can choose to have any single day or combination of two consecutive days as the weekend days within this formula.
Note: In case you want to subtract days instead of adding days, use a negative number as the day value. For example, instead of 10 use -10 in Column c.
These are two simple ways you can use to add or subtract days from a date in Excel. If you want to quickly add a fixed number of days, you can use the paste special technique or a simple addition formula.
In case you want to only add the weekdays and ignore the weekends, you can also do that using the WORKDAY or the WORKDAY.INTL formulas.
I hope you found this tutorial useful.
Other Excel tutorials you may like:
- How to SUM values between two dates (using SUMIFS formula)
- Calculate the Number of Months Between Two Dates in Excel
- How to Stop Excel from Changing Numbers to Dates Automatically
- How to Calculate the Number of Days Between Two Dates in Excel
- How to Calculate Age in Excel using Formulas + FREE Calculator Template
- How to Add Months to Date in Excel
- How To Subtract In Excel (Subtract Cells, Column, Dates/Time)
- Get Day Name from Date in Excel
- How to Autofill Only Weekday Dates in Excel (Formula)
You may have come across situations where you needed to add a certain number of days to a date.
Say, you have a company policy that allows you to dispatch an ordered item for delivery only after a fixed number of days.
Or, you might have a payroll system that allows you to only dispatch a person’s salary after a certain security period. That means you will need to calculate the date for dispatch of the salary for each employee and put it in a separate column.
Under these circumstances, it is impractical to manually calculate the delivery date for every row of your data. Fortunately, MS Excel has provided an easy way for you to add a specific number of days to a date.
Here are three ways in which you can add days to a date in Excel.
Adding Days to Dates by Value
For this tutorial, we will be using the dataset shown below:
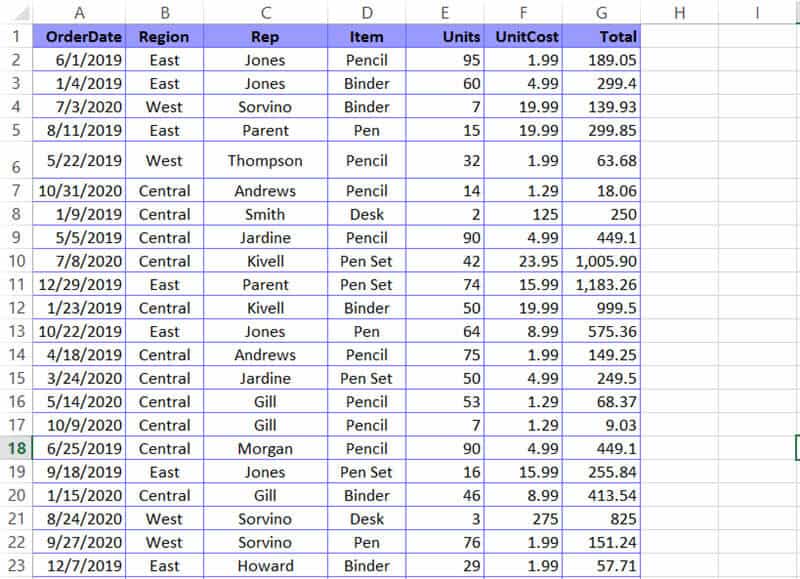
Let us assume you want to add a fixed number of days (say 15 days) to every date in column A and store the result of the addition in Column H.
- Select the first cell of the column you want to store the result in (in our example, cell H2).
- Type ‘=’ and select the first cell of the column containing the dates you want to add days to (cell A2).
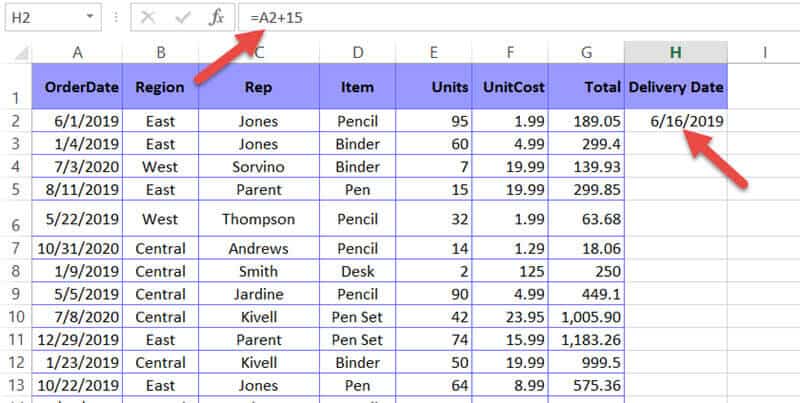
- Next, type ‘+’ followed by the number of days you want to add. So, if you want to add 15 days, type ‘+15’ in the same cell. This means, your cell H2 should have the formula =A2+15.
- Press the Return Key on your keyboard. You will get the result of adding 15 days to the date in cell A2.

- Since you want the same number of days added to all the dates in Column A, simply drag down the fill handle (at the bottom right of cell H2) to copy the formula to all the rows of Column H.
Also read: Calculate Days Left in the Year (Formula)
Adding Days from a Cell Location
If you need to add a different number of days to each date, you can type out the number of days you need to add to each row in a separate column (as shown below).
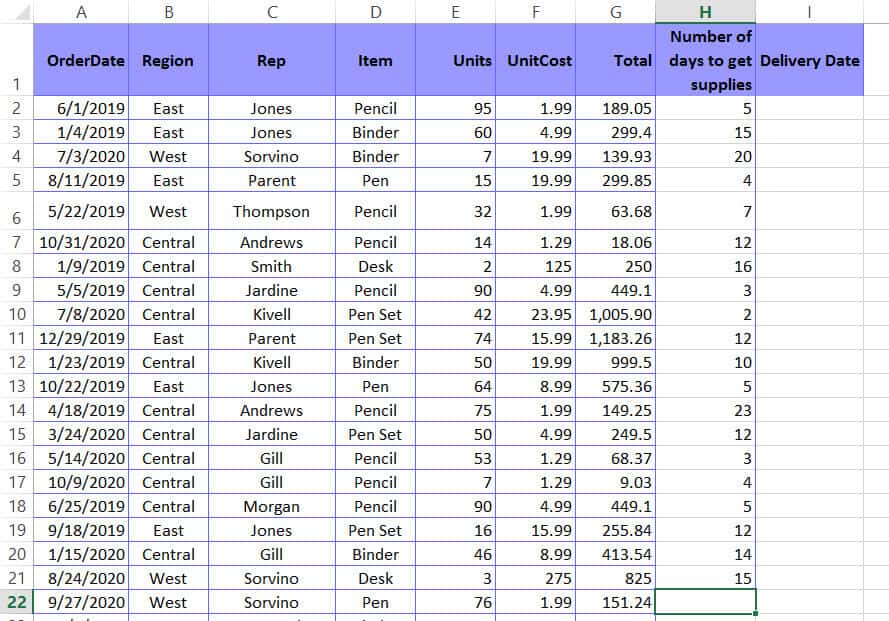
Next, follow the steps given below:
- Select the first cell of the column you want to store the result in (in our example, cell I2).
- Type ‘=’ and select the first cell of the column containing the dates you want to add days to (cell A2).
- Next, type ‘+’ .
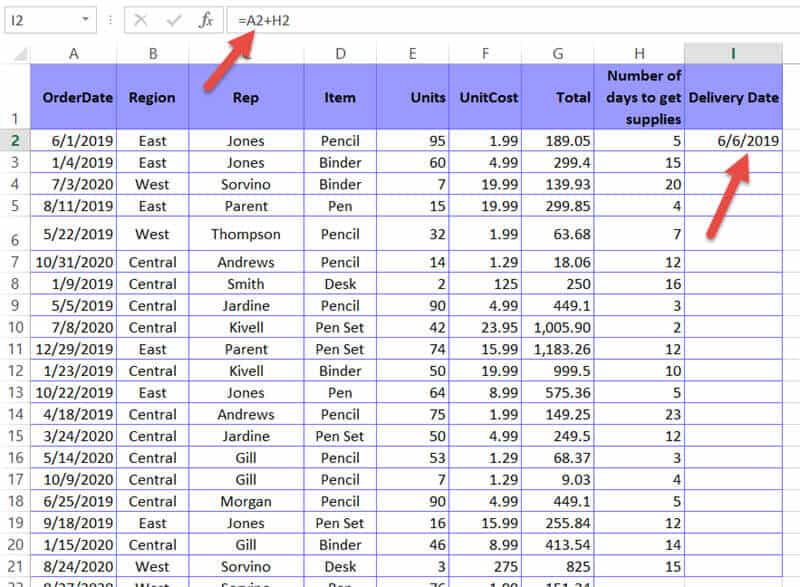
- After that, select the first cell of the column containing the number of days to add (in our example, cell H2. This means, your cell I2 should have the formula =A2+H2.
- Press the Return Key on your keyboard. You will get the result of adding the number of days in cell H2 to the date in cell A2.

- Drag down the fill handle (at the bottom right of cell I2) to copy the formula to all the rows of Column I. This will add the cell in column H to the cell in column A for every row.
Explanation of the above Formulas
Although we used a simple addition formula to add days to dates, intuitively we know that’s not how you add dates. In essence, dates are inherently represented as serial numbers in Excel, where serial 1 starts from January 1, 1900.
For each day since this date, the serial number keeps increasing by 1. That means, the date June 1, 2019, is actually serial 43617, because it is exactly 43,617 days after January 1, 1900.
When you are adding days to a date in Excel, it is actually adding the number of days to the serial number of that date. For example, in our example, here’s a breakdown of what’s actually happening:
= A2+H2
= 43617 + 15
= 43632
If you convert the serial number 43632 to date, you get June 16, 2019!
In rare cases, your result might appear as a serial number, instead of being in a Date format. This might happen if the format of your result cell is in a Number or Text format. In such cases, you can easily convert the serial to a Date format as follows:
- Right-click the cell or entire column.
- Select Format Cells from the popup menu. This will open the Format Cells dialog box.
- Under the Number tab, select Date from the options in the Category list.
- Select the format that you want your date to appear from the Type list on the right side of the dialog box.
- Click OK.
This should convert all your cells to the Date format.
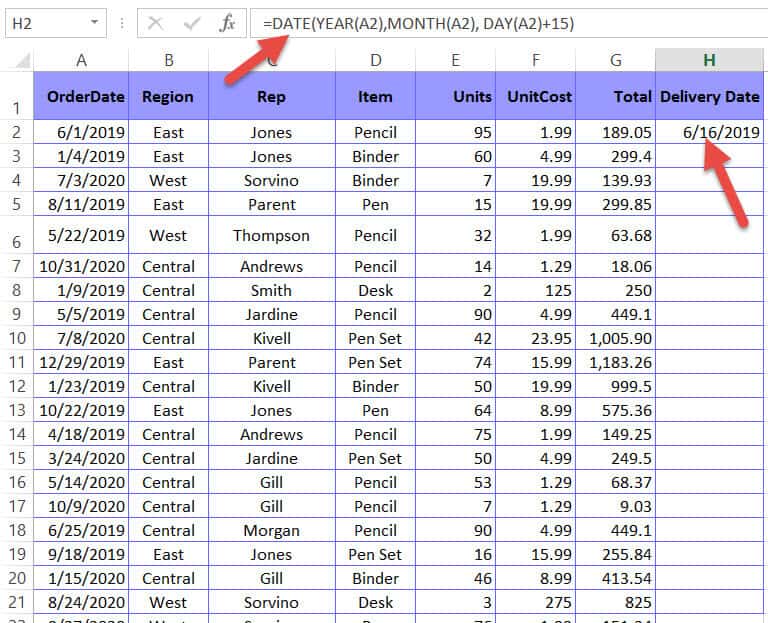
Adding Days using the DATE() Function
There is another way in which you can add days to a date in Excel. This is by using the DATE() function. Let us use the same dataset that we used earlier:
Here’s what you need to do:
- Select the first cell of the column you want to store the result in (in our example, cell H2).
- Type the following formula in the cell: =DATE(YEAR(A2),MONTH(A2), DAY(A2)+15). Let us break this formula down to understand it:
- The YEAR function extracts just the year of the date in cell A2. So YEAR(A2) in our case, will return 2019.
- The MONTH function extracts just the month of the date in cell A2. So MONTH(A2) in our case, will return 6.
- The DAY function extracts just the day part of the date in cell A2. So DAY(A2) returns 1. When you add 15 to this result, you get 1 + 15 = 16.
- Finally, the DATE() function combines the three values returned (2019, 6, and 16) into a Date. So, it returns the date 16/6/2019! You might ask why we need the Month and year functions when we just want to add 15 days to the original date. The reason is that the DATE functions format requires all three parameters to perform the calculation.
- Press the Return Key on your keyboard. You will get the result of adding 15 days to the date in cell A2.

- Drag down the fill handle (at the bottom right of cell H2) to copy the formula to all the rows of Column H.
With this method, you can even add months and years to your date. For example, say you want to add 1 year, 3 months, and 15 days to a date. You can easily accomplish this by the above method.
Just add 1 to the first parameter, 3 to the second and 15 to the third parameter, so that your formula becomes:
=DATE(YEAR(A2)+1,MONTH(A2)+3, DAY(A2)+15)
Adding Days to the Current Date
Finally, if you want to add a specific number of days (say 15 days) to the current date, depending on whenever you open the file, here’s what you need to do:
- Select the cell you want to store the result in.
- Type the formula: =TODAY() + 15. The TODAY() function returns the current date, formatted as Date. It takes no parameters.
- Press the Return key on your keyboard. You will get the result of adding 15 days to the current date.
Note that this value will change depending on the current date on which the Excel file is opened.
So, no matter when you open the Excel file, the cell will always display the date 15 days from that date.
Conclusion
In this tutorial, we demonstrated how you can add days to a date in Excel.
We hope you found it helpful. Do let us know in the comments if the above methods worked for you. If you face any issues applying the above, feel free to let us know.
Other Excel tutorials you may find useful:
- How to Sort by Date in Excel (Single Column & Multiple Columns)
- How to Remove Leading Zeros in Excel
- How to Get Total Days in Month in Excel?
- How to Unsort in Excel (Revert Back to Original Data)
- How to Convert Date to Month and Year in Excel
- How to Convert Serial Numbers to Date in Excel
- How to Convert Date to Day of Week in Excel
- How to Convert Days to Years in Excel
- Calculate Days Between Two Dates in Excel (Workdays/Weekends)
На чтение 10 мин. Просмотров 7.4k.
Содержание
- Добавить дни
- Добавить время
- Добавить месяцы до даты
- Добавить года
- Назначать баллы на основе позднего времени
Добавить дни
Добавить рабочие дни до даты
= РАБДЕНЬ (начало_даты; дни; праздники)
Если вам нужно добавить или вычесть рабочие дни (рабочие дни) для даты, чтобы можно было рассчитать дату в будущем или прошлом, которая пропускает выходные дни (и праздники), вы можете использовать функцию РАБДЕНЬ. Праздники не являются обязательными.

В этом примере формула в D5:
=РАБДЕНЬ(B5;C5;$B$8:$B$10)
Это добавляет 7 дней во вторник, 22 декабря и возвращает вторник, 5 января 2016 года. По умолчанию функция РАБДЕНЬ исключает выходные дни (суббота и воскресенье). В этом случае мы также предоставили список из трех праздничных дней, все из которых относятся к расчетному диапазону дат, что означает, что выходные и праздничные дни будут исключены.
Чтобы вычесть выходные из даты (вместо добавления рабочих дней), просто используйте отрицательное значение для дней. Например, чтобы получить дату 3 рабочих дня до даты в A1, вы можете использовать:
= РАБДЕНЬ (A1; -3)
Добавить рабочие дни без выходных
= РАБДЕНЬ.МЕЖД (дата начала; дни; «0000000»; праздничные дни)

Чтобы добавить или вычесть дни рабочих дней к дате, соблюдая праздники, но при условии 7-дневной рабочей недели, вы можете использовать функцию РАБДЕНЬ.МЕЖД. В этом примере формула в D6:
=РАБДЕНЬ.МЕЖД(B5;C5;»0000000″;B8:B10)
Эта формула добавляет 7 дней работы во вторник, 22 декабря. Три отпуска предоставляются с использованием названного диапазона «праздники» (B9: B11), а выходные устанавливаются с использованием специального синтаксиса «0000000», что означает, что все дни недели являются рабочими днями. Результат: Вт, 31 декабря 2015 года.
РАБДЕНЬ.МЕЖД может вычислять дату в будущем или прошлом, что касается праздников и выходных. Чтобы указать, какие дни считаются выходными, вы можете использовать специальный код (полный список кодов здесь) или использовать «маску» для обозначения выходных дней с единицами и нулями. Метод маски является более гибким, поскольку он позволяет назначать любой день недели в выходные (т. е. Нерабочий день). Например:
= РАБДЕНЬ.МЕЖД (A1;3; «0000000») // без выходных
= РАБДЕНЬ.МЕЖД (A1;3; «1000000») // выходной = Пн
= РАБДЕНЬ.МЕЖД (A1;3; «1100000») // выходные= понедельник + вторник
= РАБДЕНЬ.МЕЖД (A1;3; «1110000») // выходные = Пн + Вт + Ср
Аргумент выходных дней предоставляется в виде 7 символов, представляющих понедельник-воскресенье. Используйте один (1), чтобы указать выходные, и ноль (0), чтобы указать рабочий день.
Поскольку мы хотим, чтобы все дни недели считались рабочими днями, мы используем «0000000».
Добавить дни и исключить определенные дни недели
= РАБДЕНЬ.МЕЖД (дата; дни; «образец»)
Чтобы добавить дни в дату, исключая определенные дни (исключая вторники и четверги, только среду и т. д.), вы можете использовать функцию РАБДЕНЬ.МЕЖД со специальным кодом шаблона.

=РАБДЕНЬ.МЕЖД(B6;7;»0000011″)
Эта формула добавляет 7 дней к дате в B7, за исключением суббот и воскресений.
Функция РАБДЕНЬ.МЕЖД основана на функции РАБДЕНЬ, которая предназначена для добавления рабочих дней к дате. РАБДЕНЬ автоматически исключает субботу и воскресенье, а также может исключать список пользовательских праздников. РАБДЕНЬ.МЕЖД делает то же самое, но позволяет исключить любые дни недели, в дополнение к праздникам.
Чтобы исключить определенные дни недели, вы можете использовать предварительно сконфигурированный код или предоставить свой собственный код шаблона. Код шаблона должен состоять из 7 цифр, либо иметь ноль для каждого дня недели, начинающийся в понедельник и заканчивающийся в воскресенье. Значения, равные 1, исключаются, а дни с нулевыми значениями обрабатываются обычным образом.
Итак, если вы хотите добавить 7 дней к дате в ячейке A1, вы можете написать такие формулы:
= РАБДЕНЬ.МЕЖД (A1;7; «0000011») // исключить Сб; Вс
= РАБДЕНЬ.МЕЖД (A1;7; «0010011») // исключить Сб; Вс; Ср.
= РАБДЕНЬ.МЕЖД (A1;7; «0101011») // исключаем Сб; Вс; Вт; Чт
Добавить дни до даты
= Дата + дни
Чтобы добавить заданное количество лет к дате, вы можете использовать функцию ДАТАМЕС.

= B5 + C5
Даты в Excel — это только серийные номера. Число 1 представляет 1 января 1900 года, число 1000 — 26 сентября 1902 года и так далее.
Когда у вас есть действительная дата в Excel, вы просто добавляете дни непосредственно. Значения дня могут быть как положительными, так и отрицательными.
Например, с датой в A1 вы можете добавить 100 дней следующим образом:
= A1 + 100
В показанном примере формула решается следующим образом:
= B5 + C5
= 36861 + 7
= 36868
Когда отформатировано как дата, 36868 — 8 декабря 2000 года.
Добавить рабочие дни на персонализированные выходные дни
= РАБДЕНЬ.МЕЖД (начало_даты; дни; выходные; праздники)
Чтобы добавить или вычесть дни рабочих дней для даты, чтобы можно было рассчитать дату в будущем или прошлом, которая пропускает выходные дни (настраиваемые) и праздники, можно использовать функцию РАБДЕНЬ.МЕЖД. Праздники и выходные дни являются необязательными.

В этом примере формула в D5:
=РАБДЕНЬ.МЕЖД(B5;C5;11;B8:B10)
Эта формула добавляет 7 дней работы во вторник, 22 декабря. Три отпуска предоставляются, а выходные устанавливаются с использованием 11 аргументов в выходные, что означает «только воскресенье».
По умолчанию функция РАБДЕНЬ.МЕЖД исключает выходные дни (суббота и воскресенье). В этом случае, однако, мы поставили 11 для этого аргумента, что означает «только воскресенье».
Мы также предоставили список из 3 праздников, которые все выпадают в диапазоне дат, который рассчитывается, что означает, что праздники и воскресенья будут исключены.
Добавить время
= Время + (часы / 24)
Чтобы добавить определенное количество часов за раз, вы можете добавить часы, деленные на 24, или использовать функцию ВРЕМЯ.

В показанном примере формула в D5:
= B5 + (C5 / 24)
Примечание. Убедитесь, что результаты форматируются как время.
Время в Excel составляет 24 часа. Один час времени равен 1/24, а 1 минута времени равна 1 / (24 * 60) = 1/1440.
В результате, если у вас есть десятичное значение в течение 6 часов и время в A1, вы можете добавить 6 часов времени к значению в A1 следующим образом:
= A1 + (6/24)
Вы также можете добавить временные значения с помощью функции ВРЕМЯ. Чтобы добавить 15 часов к времени в A1, используйте:
= A1 + ВРЕМЯ (6;0;0)
Функция ВРЕМЯ избавляет вас от необходимости запоминать формулу для преобразования десятичных часов в Excel. Однако обратите внимание на то, что функция ВРЕМЯ будет возвращаться к нулю, когда значения превысят 24 часа.
Например, обратите внимание, как два подхода возвращают разные результаты в течение 25 часов:
= ВРЕМЯ(25;0;0) = 0;041667 = 1:00 в тот же день (1 час)
= 25/24 = 1.041667 = 1:00 на следующий день (25 часов)
Функция ВРЕМЯ возвращает эквивалент 1 часа, а 25/24 возвращает полное значение.
Вы можете получить ошибку, если попытаетесь вычесть часы из времени, когда результат будет отрицательным, поскольку Excel не допускает отрицательных значений времени.
Один из способов избежать этой проблемы — использовать формулу, подобную этой:
= ОСТАТ (время — (часы / 24); 1)
Здесь функция ОСТАТ заботится о негативной проблеме, используя функцию ОСТАТ для «переворачивания» отрицательных значений в требуемое положительное значение.
Другой способ избежать этой проблемы — начать с времени, которое включает значение даты. Это позволяет вам вычитать очень большое количество часов без какой-либо опасности получить отрицательный результат. Если вы не хотите видеть дату, отображаемую в результате, просто применяйте формат чисел только для времени.
Добавить минуты к часу
= Время + (минуты / 1440)
Чтобы добавить определенное количество минут за раз, вы можете добавить минуты, деленные на 1440, или использовать функцию ВРЕМЯ.

В показанном примере формула в D5:
= B5 + (C5 / 1440)
Примечание. Убедитесь, что результаты форматируются как время.
Время в Excel составляет 24 часа. Один час времени равен 1/24, а 1 минута времени равна 1 / (24 * 60) = 1/1440.
В результате, если у вас есть десятичное значение в течение 15 минут и время в A1, вы можете добавить 15 минут времени к значению в A1 следующим образом:
= A1 + (15/1440)
Вы также можете добавить временные значения с помощью функции ВРЕМЯ. Чтобы добавить 15 минут к времени в A1, используйте:
= A1 + ВРЕМЯ (0;15;0)
Функция ВРЕМЯ избавляет вас от необходимости запоминать формулу для преобразования десятичных минут в Excel. Однако обратите внимание на то, что функция ВРЕМЯ будет возвращаться к нулю, когда значения превысят 24 часа.
Например, 25 часов времени составляет 1500 минут. Обратите внимание на отличия:
= ВРЕМЯ (0;1500;0) = 0;041667 = 1:00 в тот же день
= 1500/1440 = 1.041667 = 1:00 на следующий день
Вы можете получить ошибку, если попытаетесь вычесть минуты из времени, когда результат будет отрицательным, поскольку Excel не допускает отрицательных значений времени.
Один из способов избежания данной проблемы — использовать формулу, подобную этой:
= ОСТАТ(время — (минуты / 1440); 1)
Здесь функция ОСТАТ заботится о негативной проблеме, используя функцию ОСТАТ для «переворачивания» отрицательных значений в требуемое положительное значение.
Другой способ избежания этой проблемы — начать со времени, которое включает значение даты. Это позволит вам вычитать очень большое количество минут без какой-либо опасности получить отрицательный результат. Если вы не хотите видеть дату, отображаемую в результате, просто применяйте формат чисел только для времени.
Добавить месяцы до даты
= ДАТАМЕС (дата; месяцы)
Чтобы добавить заданное количество лет к дате, вы можете использовать функцию ДАТАМЕС.

В показанном примере формула в D5:
= ДАТАМЕС(B5; C5)
Функция ДАТАМЕС полностью автоматическая. Просто введите действительную дату и количество месяцев, а ДАТАМЕС вернет новую дату. Чтобы вычесть месяцы из даты, поставьте отрицательное значение.
Чтобы двигаться вперед и назад в годах с определенной даты, вы можете умножить на 12 внутри ДАТАМЕС следующим образом:
= ДАТАМЕС (A1;12 * 10) // 10 лет
=ДАТАМЕС (A1;12 * 50) // 50 лет
Добавить года
= ДАТА(ГОД (дата) + годы; МЕСЯЦ(дата); ДЕНЬ(дата))
Чтобы добавить определенное количество лет к дате, вы можете использовать формулу, основанную на функции ДАТА, с помощью функций ГОД, МЕСЯЦ и ДЕНЬ.

В показанном примере формула в D5:
= ДАТА(ГОД (B5) + C5; МЕСЯЦ (B5); ДЕНЬ (B5))
Работая изнутри, функции ГОД, МЕСЯЦ и ДЕНЬ извлекают соответствующие компоненты даты:
= ГОД(B5) // 1960
= МЕСЯЦ (B5) // 3
= ДЕНЬ(B5) // 8
На внешнем уровне функция ДАТА просто пересобирает значения компонентов обратно в действительную дату Excel. Чтобы добавить годы к дате, нам просто нужно добавить значение в C5 к компоненту года до повторной сборки:
= ДАТА(ГОД (B5) + C5; МЕСЯЦ (B5); ДЕНЬ (B5))
Формула затем решается следующим образом:
= ДАТА(1960 + 10;3;8)
= ДАТА(1970;3;8)
= 8-мар-1970
Примечание. Если вам нужно добавить «четную» кратность 12 месяцев к дате (например, 12, 24, 36, 48 и т. д.), вы можете использовать гораздо более простую формулу, основанную на функции ДАТАМЕС.
Назначать баллы на основе позднего времени
= ЕСЛИ(время <ЗНАЧЕН («0:05»); 0; ЕСЛИ(время <ЗНАЧЕН(«0:15»); 1;
ЕСЛИ(время <ЗНАЧЕН(«0:30»); 2; ЕСЛИ(время <ЗНАЧЕН(«0:60»); 3;
ЕСЛИ(время <ЗНАЧЕН(«4:00»); 4; 5)))))

Чтобы назначить штрафные очки за опоздание, вы можете использовать вложенную формулу ЕСЛИ. В показанном примере формула в E5:
= ЕСЛИ (D5 <ЗНАЧЕН («0:05»); 0; ЕСЛИ (D5 < ЗНАЧЕН («0:15»); 1;
ЕСЛИ (D5 < ЗНАЧЕН («0:30»); 2; ЕСЛИ (D5 < ЗНАЧЕН («0:60»); 3;
ЕСЛИ (D5 < ЗНАЧЕН («4:00»); 4; 5)))))
Примечание. Разделители строк добавлены для удобства чтения.
Эта формула является классическим примером вложенной формулы ЕСЛИ, которая проверяет пороговые значения в порядке возрастания. Чтобы соответствовать графику, показанному в G4: G10, формула сначала проверяет по времени в D5, чтобы увидеть, не меньше ли она составляет 5 минут. Если это так, присваиваются нулевые точки:
ЕСЛИ(D5 <ЗНАЧЕН(«0:05»); 0;
Если результат логического теста выше ЛОЖЬ, формула проверяет, меньше ли D5, чем следующий порог, который составляет 15 минут:
ЕСЛИ(D5 < ЗНАЧЕН («0:15»); 1;
Такая же картина повторяется на каждом пороге. Поскольку тесты выполняются по порядку, от самого маленького до самого большого, нет необходимости в более сложных скобках.
Функция ЗНАЧЕН используется для того, чтобы значение времени обработки Excel обрабатывалось на каждом пороге как число вместо следующего.