
Время на прочтение
5 мин
Количество просмотров 47K
Здравствуй, %username%!
Недавно мне пришлось по долгу службы писать небольшой Excel add-in. К слову, до этого мой опыт работы с MS Office из-под .NET сводился к простеньким утилитам, генерировавшим отчеты в Excel при помощи Office Primary Interop Assemblies. А уж когда контора купила лицензии на Aspose.NET, взаимодействие с офисом через COM было забыто аки страшный сон. Так вот, начав разбираться в теме, я был неприятно удивлен отсутствием вменяемых русскоязычных туториалов для начинающих. Теперь хочу заполнить этот пробел. В качестве примера мы создадим add-in, который по нажатию кнопки генерирует на текущем листе список дней текущего месяца и выделяет выходные дни. Заинтересовавшихся прошу под кат!
Вместо предисловия
Заранее хочу оговориться, что сам я не профессионал в области разработки под MS Office, и здесь возможно найдутся люди, которые раскритикуют мое решение в пух и прах. Что ж, я буду рад любой конструктивной критике. Так же эта статья не является исчерпывающим руководством по написанию Excel Add-ins, не ставит цели подробно описать архитектуру Excel Add-ins или содержимое пространства имен Microsoft.Office.Core. Это вводная статья, которая, как я надеюсь, поможет новичку сориентироваться в новой для него теме и проведет через процесс создания add-in’а, который делает что-то осмысленное. Итак, приступим!
Готовим солюшен
Откроем студию и создадим новый проект типа Excel 2010 Add-in. Назовем его SampleAddIn:
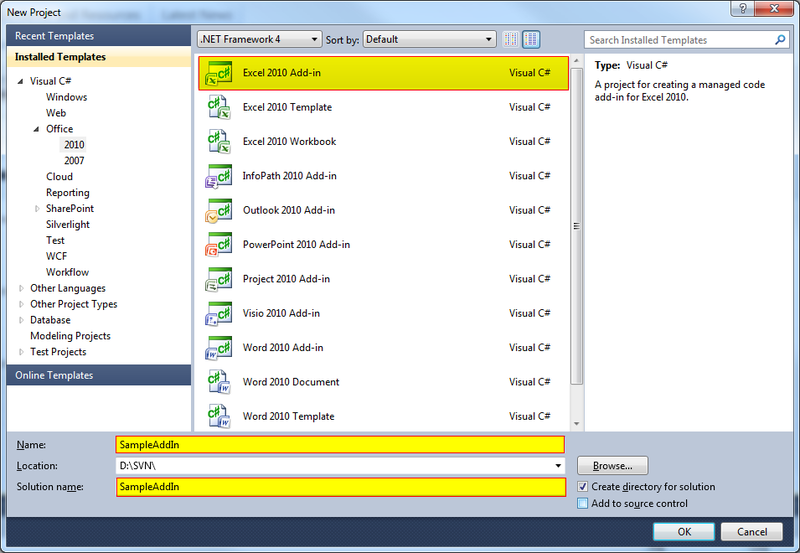
Если у вас все получилось правильно (а что собственно здесь могло получиться неправильно?..), вы увидите солюшен со следующей структурой:

Единственный файл, который сгененрировала для нас студия – это ThisAddIn.cs:
public partial class ThisAddIn
{
        private void ThisAddIn_Startup(object sender, System.EventArgs e)
        {
        }

        private void ThisAddIn_Shutdown(object sender, System.EventArgs e)
        {
        }

        #region VSTO generated code

        /// <summary>
        /// Required method for Designer support - do not modify
        /// the contents of this method with the code editor.
        /// </summary>
        private void InternalStartup()
        {
            this.Startup += new System.EventHandler(ThisAddIn_Startup);
            this.Shutdown += new System.EventHandler(ThisAddIn_Shutdown);
        }

        #endregion
}
Здесь все просто – мы всего лишь регистрируем обработчики событий запуска и завершения нашего add-in’а. Сейчас, естественно, наш Add-in ничего не делает, но вы уже можете его запустить как обычный проект, по нажатию F5. Что особенно приятно, на этом этапе можно не заморачиваться развертыванием, т.к. студия сама запускает Excel с нужными настройками безопасности и подсовывает ему наш Add-in. Если все получилось, то при запуске Excel вы увидите такую надпись:

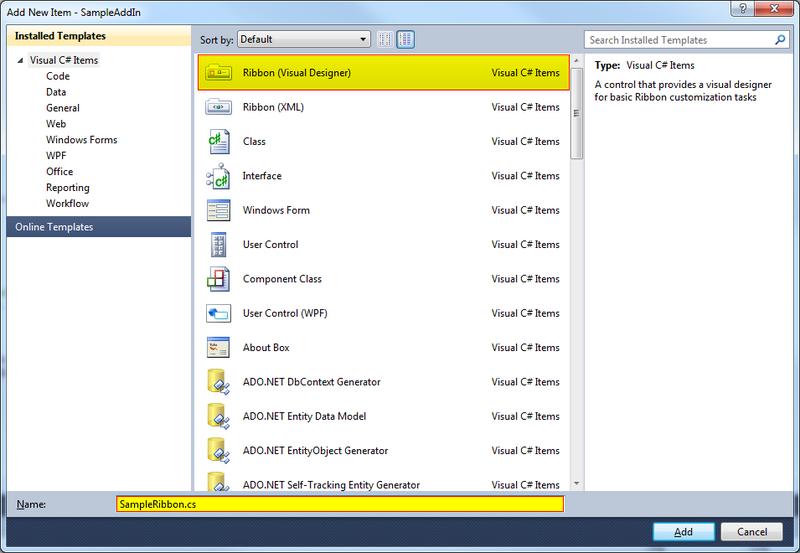
Рисуем интерфейс
Добавим в солюшен элемент типа Ribbon и назовем его SampleRibbon
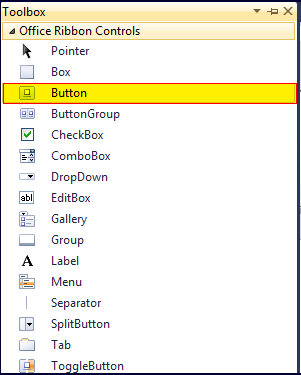
В дизайнере добавим туда кнопку:
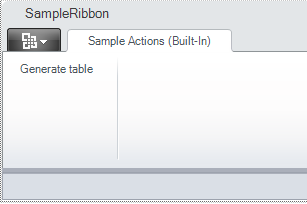
И зададим названия для вкладки, группы и кнопки:
А так же создадим обработчик нажатия кнопки:
public partial class SampleRibbon
{
        private void SampleRibbon_Load(object sender, RibbonUIEventArgs e)
        {

        }

        private void button1_Click(object sender, RibbonControlEventArgs e)
        {
            MessageBox.Show("Hello, world!");
        }
}
Попробуем запустить наш проект. Если вы все сделали правильно, то в Excel’е появилась новая вкладка с кнопкой, по нажатию на которую появляется окно с сообщением.
Ковыряем чуть глубже
На данный момент мы столкнулись с двумя проблемами: во-первых, если в классе ThisAddIn есть поле Application, дающее доступ к запущенному экземпляру Excel, то в классе Ribbon ничего подобного нет, а следовательно непонятно, как именно взаимодействовать с листами Excel’я. Во-вторых, как мы все знаем, смешение логики отображения и бизнес-логики является отличной заготовкой для хорошей порции спагетти в вашем коде. Поэтому изменим код, так чтобы избавиться от этих двух проблем, а заодно разберемся в «магии», которая встроила наш Ribbon в Excel без каких-либо действий с нашей стороны.
За создание пользовательских лент в Add-in’е отвечает метод CreateRibbonExtensibilityObject из класса AddInBase, от которого на самом деле унаследован наш класс ThisAddIn. Слава богу, этот метод был предусмотрительно сделан виртуальным, так что перегрузить его не составит проблем. Для начала добавим в класс ThisAddIn код:
protected override Microsoft.Office.Core.IRibbonExtensibility CreateRibbonExtensibilityObject()
{
        return null;
}
И запустим проект. Вуаля! Вкладка исчезла. Теперь изменим класс SampleRibbon:
public partial class SampleRibbon
{
        public event Action ButtonClicked;

        private void SampleRibbon_Load(object sender, RibbonUIEventArgs e)
        {

        }

        private void button1_Click(object sender, RibbonControlEventArgs e)
        {
            if (ButtonClicked != null)
                ButtonClicked();
        }
}
И класс ThisAddIn:
protected override Microsoft.Office.Core.IRibbonExtensibility CreateRibbonExtensibilityObject()
{
        var ribbon = new SampleRibbon();
        ribbon.ButtonClicked += ribbon_ButtonClicked;
        return Globals.Factory.GetRibbonFactory().CreateRibbonManager(new IRibbonExtension[] { ribbon });
}

private void ribbon_ButtonClicked()
{
         MessageBox.Show("Hello, world!");
}
Запустим проект. Если вы все сделали правильно, то вкладка снова появилась, а по нажатию кнопки, как и раньше выводится окно с сообщением.
Работаем с ячейками
Теперь пришло время для того, ради чего собственно и был затеян весь это сыр-бор – генерации таблицы. Для начала создадим пару вспомогательных методов для оформления ячеек:
public static void MarkBold(dynamic border)
{
        border.Weight = XlBorderWeight.xlMedium;
}
Этот метод выделяет границу ячейки жирным. Кстати, обратите внимание на тип аргумента border – dynamic – начиная с .NET 4.0 это очень удобный способ работы с COM-объектами! Если вдруг вы не в курсе, рекомендую ознакомиться, например, с этой статьей. Для нашего удобства создадим еще пару методов:
public enum Border
{
        Left = 1,
        Right = 2,
        Top = 3,
        Bottom = 4
 }

private void MarkCell(dynamic cell, DateTime day)
{
        if (day.DayOfWeek == DayOfWeek.Saturday)
        {
               MarkBold(cell.Borders[Border.Left]);
               MarkBold(cell.Borders[Border.Top]);
               MarkBold(cell.Borders[Border.Bottom]);
        }
        if (day.DayOfWeek == DayOfWeek.Sunday)
        {
               MarkBold(cell.Borders[Border.Right]);
               MarkBold(cell.Borders[Border.Top]);
               MarkBold(cell.Borders[Border.Bottom]);
        }
        cell.Columns[1].ColumnWidth = 4;
}
Теперь напишем код для получения списка дней месяца:
private static IEnumerable<DateTime> GetDaysOfCurrentMonth()
{
        var today = DateTime.Today;
        var dayIter = new DateTime(today.Year, today.Month, 1);
        while (dayIter.Month == today.Month)
        {
               yield return dayIter;
               dayIter = dayIter.AddDays(1);
         }
}
И сведем это все воедино:
private void ribbon_ButtonClicked()
{
        GenerateTable(Application.ActiveWorkbook.ActiveSheet, 1, 1);
}

private void GenerateTable(dynamic wSheet, int row, int column)
{
         var currentMonth = GetDaysOfCurrentMonth().ToArray();
         for (int i = 0; i < currentMonth.Length; i++)
         {
                wSheet.Cells[row, column + i] = currentMonth[i].Day;
                MarkCell(wSheet.Cells[row, column + i], currentMonth[i]);
         }
}
Если вы нигде не ошиблись, то запустив проект, и нажав на кнопку на нашей вкладке, вы увидите нечто подобное:

Вместо заключения
Вот и все, я надеюсь, после прочтения этой статьи вы получили базовые представления о создании Excel Add-ins под .NET. Для дальнейшего чтения могу порекомендовать, конечно же, MSDN и этот блог – он мне очень помог при изучении этой темы. Всем удачи и спасибо за внимание!
Даже если вы не умеете программировать, то существует множество мест (книги, сайты, форумы), где можно найти готовый код макросов на VBA для огромного количества типовых задач в Excel. По моему опыту, большинство пользователей рано или поздно собирают свою личную коллекцию макросов для автоматизации рутинных процессов, будь то перевод формул в значения, вывод суммы прописью или суммирования ячеек по цвету. И тут встает проблема — код макросов на Visual Basic нужно где-то хранить, чтобы потом использовать в работе.
Самый простой вариант — сохранять код макросов прямо в рабочем файле, зайдя в редактор Visual Basic с помощью сочетания клавиш Alt+F11 и добавив новый пустой модуль через меню Insert — Module:

При таком способе возникает, однако, несколько неудобств:
- Если рабочих файлов много, а макрос нужен везде, как например макрос преобразования формул в значения, то и копировать код придется в каждую книгу.
- Нужно не забыть сохранить файл в формате с поддержкой макросов (xlsm) или в формате двоичной книги (xlsb).
- При открытии такого файла защита от макросов будет каждый раз выдавать предупреждение, которое нужно подтвердить (ну, или отключить защиту полностью, что может быть не всегда желательно).
Более изящным решением будет создание своей собственной надстройки (Excel Add-in) — отдельного файла особого формата (xlam), содержащего все ваши «любимые» макросы. Плюсы такого подхода:
- Достаточно будет один раз подключить надстройку в Excel — и можно будет использовать её VBA процедуры и функции в любом файле на этом компьютере. Пересохранять ваши рабочие файлы в xlsm- и xlsb-форматы, таким образом, не потребуется, т.к. исходный код будет храниться не в них, а в файле надстройки.
- Защита от макросов вас тоже беспокоить уже не будет, т.к. надстройки по определению входят в доверенные источники.
- Можно сделать отдельную вкладку на ленте Excel с красивыми кнопками для запуска макросов надстройки.
- Надстройка — это отдельный файл. Его легко переносить с компьютера на компьютер, делиться им с коллегами или даже продавать


Давайте рассмотрим весь процесс создания своей собственной надстройки для Microsoft Excel по шагам.
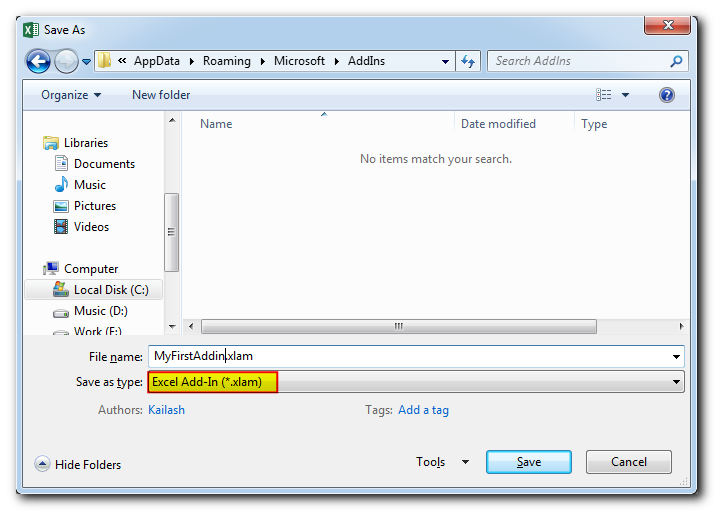
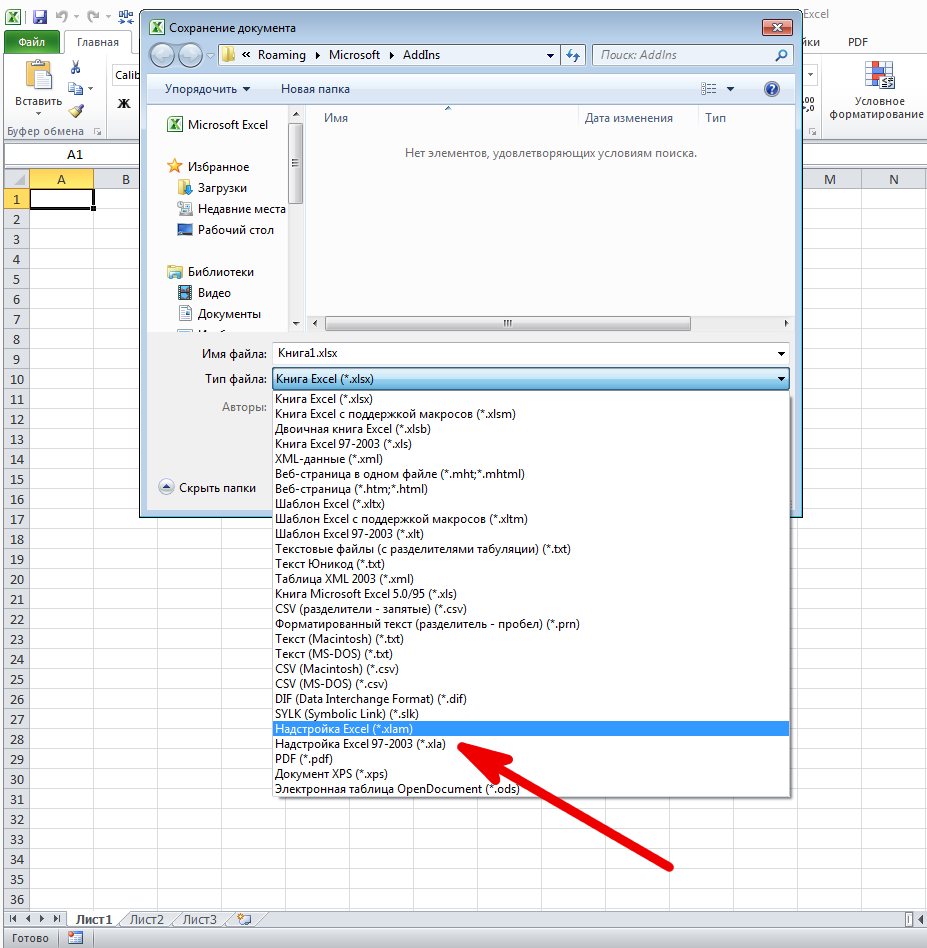
Шаг 1. Создаем файл надстройки
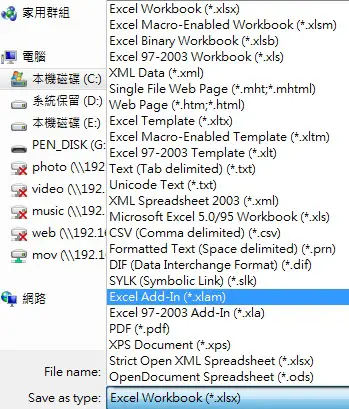
Открываем Microsoft Excel с пустой книгой и сохраняем ее под любым подходящим именем (например MyExcelAddin) в формате надстройки с помощью команды Файл — Сохранить как или клавиши F12, указав тип файла Надстройка Excel (Excel Add-in):

Обратите внимание, что стандартно Excel хранит надстройки в папке C:UsersВаше_имяAppDataRoamingMicrosoftAddIns, но, в приниципе, можно указать любую другую удобную вам папку.
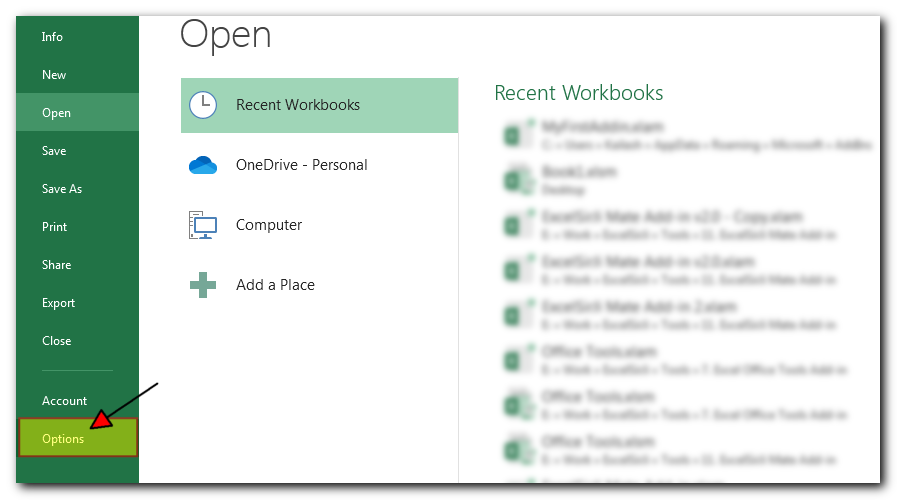
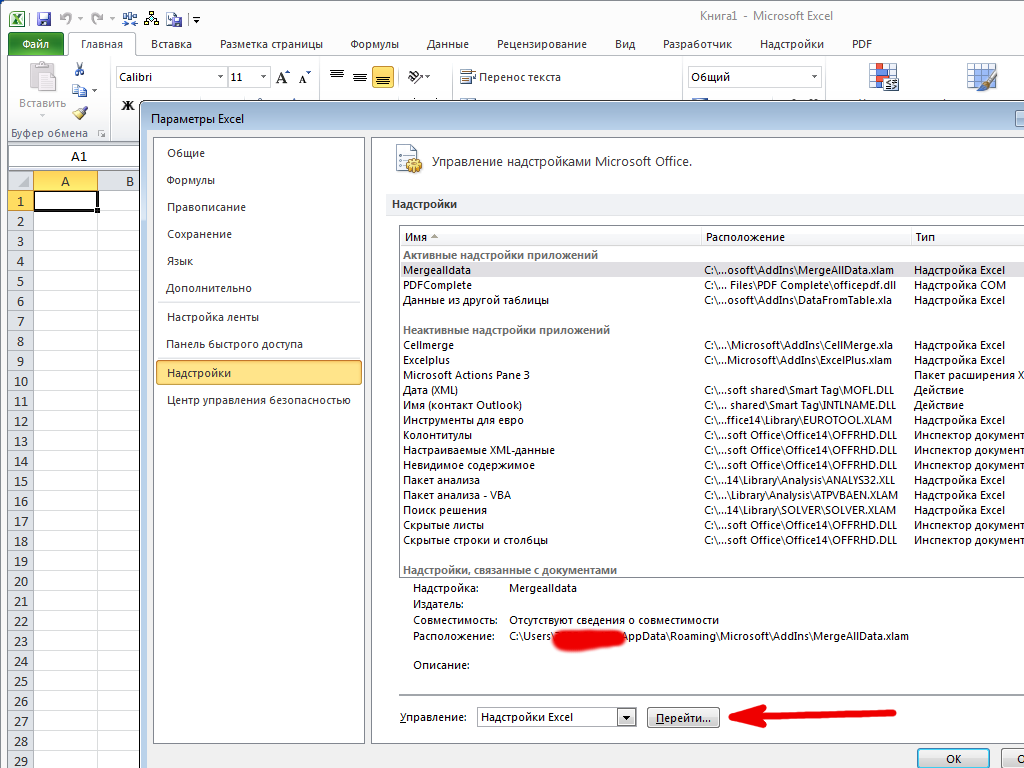
Шаг 2. Подключаем созданную надстройку
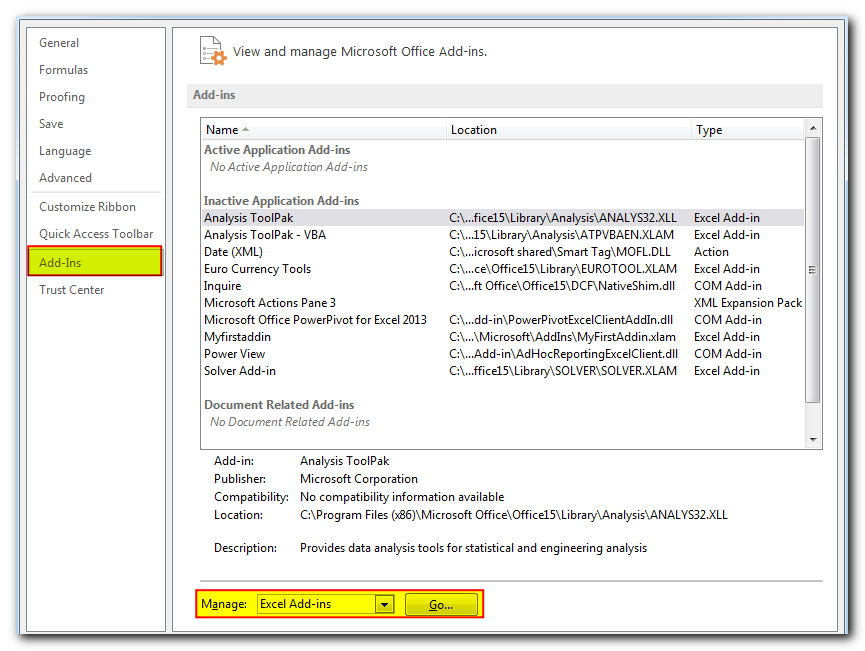
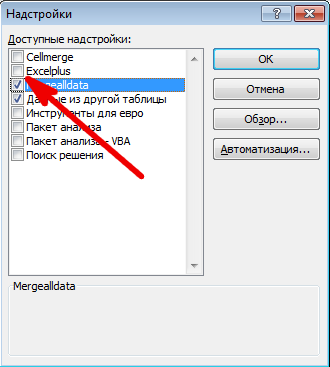
Теперь созданную нами на прошлом шаге надстройку MyExcelAddin надо подключить к Excel. Для этого идем в меню Файл — Параметры — Надстройки (File — Options — Add-Ins), жмем на кнопку Перейти (Go) в нижней части окна. В открывшемся окне жмем кнопку Обзор (Browse) и указываем положение нашего файла надстройки.
Если вы все сделали правильно, то наша MyExcelAddin должна появиться в списке доступных надстроек:

Шаг 3. Добавляем в надстройку макросы
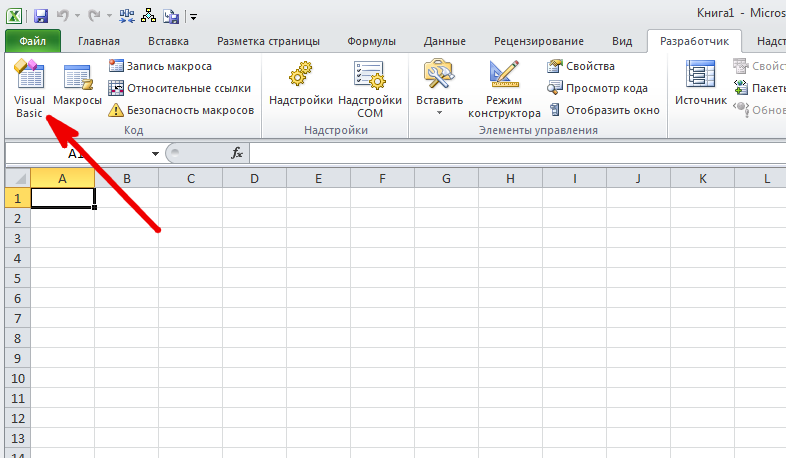
Наша надстройка подключена к Excel и успешно работает, но в ней нет пока ни одного макроса. Давайте её наполним. Для этого нужно открыть редактор Visual Basic сочетанием клавиш Alt+F11 или кнопкой Visual Basic на вкладке Разработчик (Developer). Если вкладки Разработчик не видно, то её можно отобразить через Файл — Параметры — Настройка ленты (File — Options — Customize Ribbon).
В левом верхнем углу редактора должно быть окно Project (если его не видно, то включите его через меню View — Project Explorer):

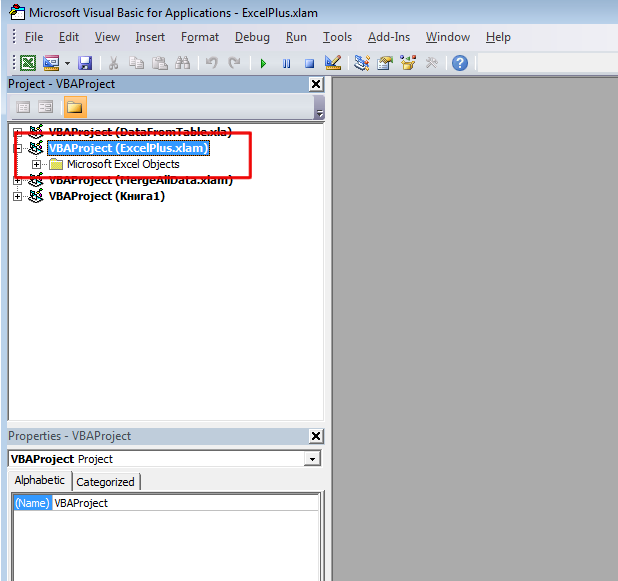
В этом окне отображаются все открытые книги и запущенные надстройки Microsoft Excel, в том числе и наша VBAProject (MyExcelAddin.xlam) Выделите её мышью и добавьте в неё новый модуль через меню Insert — Module. В этом модуле мы и будем хранить VBA-код наших макросов надстройки.
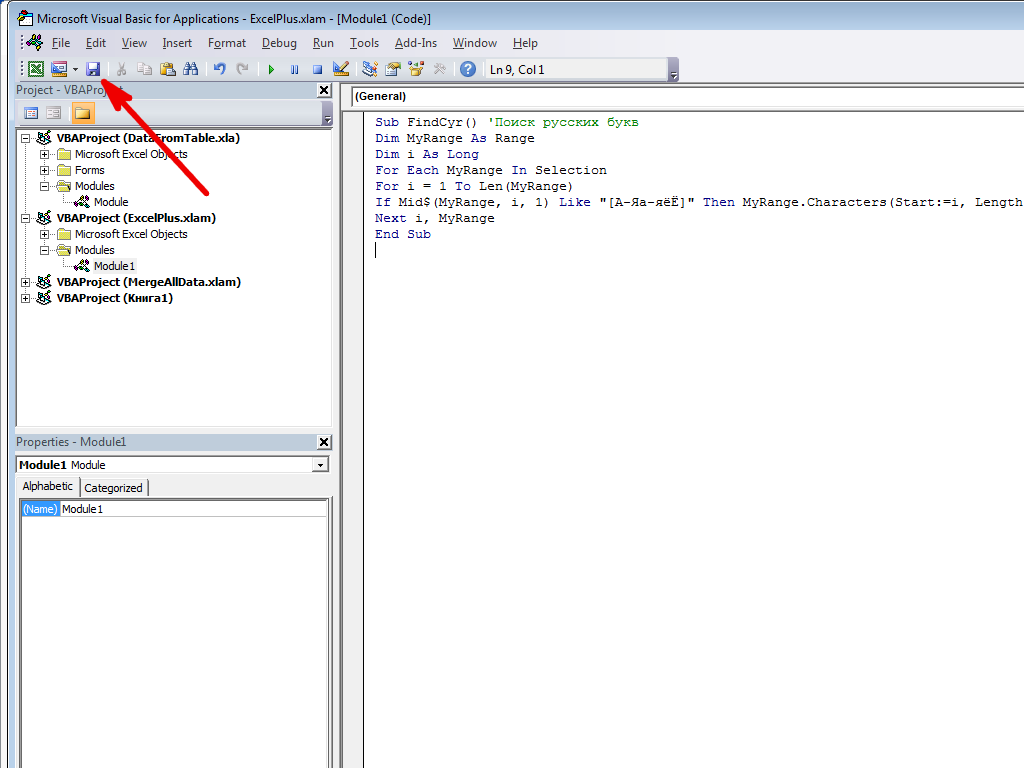
Код можно либо набрать «с нуля» (если вы умеете программировать), либо скопировать откуда-нибудь уже готовый (что гораздо проще). Давайте, для пробы, введем в добавленный пустой модуль код простого, но полезного макроса:

После набора кода не забудьте нажать на кнопку сохранения (дискетку) в левом верхнем углу.
Наш макрос FormulasToValues, как легко сообразить, преобразует формулы в значения в выделенном предварительно диапазоне. Иногда такие макросы называют еще процедурами. Чтобы его запустить, нужно выделить ячейки с формулами и открыть специальное диалоговое окно Макросы с вкладки Разработчик (Developer — Macros) или сочетанием клавиш Alt+F8. Обычно в этом окне отображаются доступные макросы из всех открытых книг, но макросы надстроек здесь не видны. Несмотря на это, мы можем ввести имя нашей процедуры в поле Имя макроса (Macro name), а затем нажать кнопку Выполнить (Run) — и наш макрос заработает:
Здесь же можно назначить сочетание клавиш для быстрого запуска макроса — за это отвечает кнопка Параметры (Options) в предыдущем окне Макрос:

При назначении клавиш имейте ввиду, что здесь учитывается регистр и раскладка клавиатуры. Поэтому, если вы назначите сочетание, например, Ctrl+Й, то, по факту, вам придется в будущем следить за тем, чтобы у вас была включена именно русская раскладка и жать дополнительно Shift, чтобы получить заглавную букву.
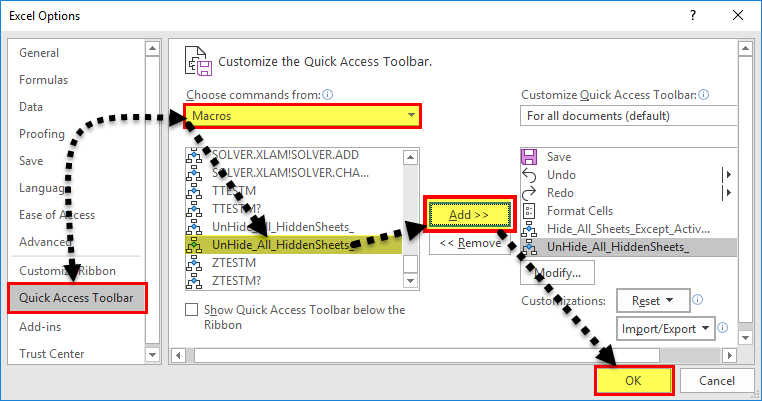
Для удобства можно добавить и кнопку для нашего макроса на панель быстрого доступа в левом верхнем углу окна. Для этого выберите Файл — Параметры — Панель быстрого доступа (File — Options — Customize Quick Access Toolbar), а затем в выпадающем списке в верхней части окна опцию Макросы. После этого наш макрос FormulasToValues можно поместить на панель кнопкой Добавить (Add) и выбрать для него значок кнопкой Изменить (Edit):

Шаг 4. Добавляем в надстройку функции
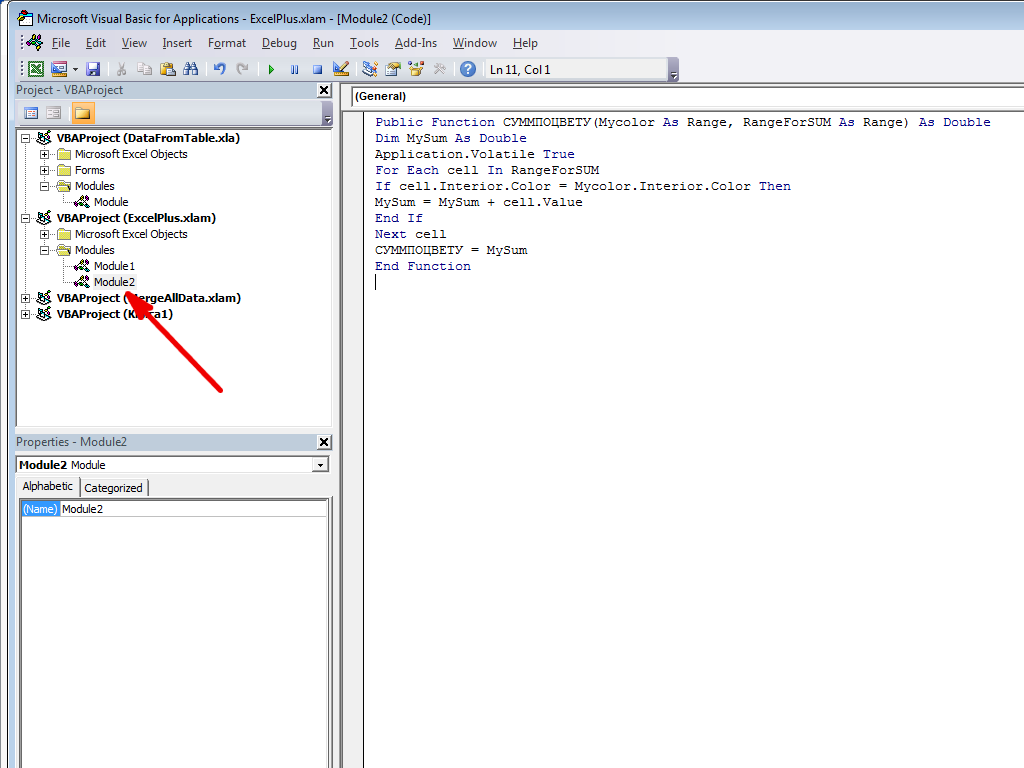
Кроме макросов-процедур, существуют еще и макросы-функции или как их еще называют UDF (User Defined Function = пользовательская функция). Давайте создадим в нашей надстройке отдельный модуль (команда меню Insert — Module) и вставим туда код такой функции:

Несложно сообразить, что эта функция нужна для извлечения НДС из суммы включающей НДС. Не бином Ньютона, конечно, но нам для примера сгодится, чтобы показать основные принципы.
Заметьте, что синтаксис функции отличается от процедуры:
- используется конструкция Function …. End Function вместо Sub … End Sub
- после названия функции в скобках указываются её аргументы
- в теле функции производятся необходимые вычисления и затем результат присваивается переменной с названием функции
Также обратите внимание, что эту функцию не нужно, да и невозможно запустить как предыдущий макрос-процедуру через диалоговое окно Макросы и кнопку Выполнить. Такую макрофункцию нужно использовать как стандартную функцию листа (СУММ, ЕСЛИ, ВПР…), т.е. просто ввести в любую ячейку, указав в качестве аргумента значение суммы с НДС:

… или ввести через стандартное диалоговое окно вставки функции (кнопка fx в строке формул), выбрав категорию Определенные пользователем (User Defined):

Единственный неприятный момент здесь — это отсутствие привычного описания функции в нижней части окна. Чтобы его добавить придется проделать следующие действия:
- Откройте редактор Visual Basic сочетанием клавиш Alt+F11
- Выделите надстройку в панели Project и нажмите клавишу F2, чтобы открыть окно Object Browser
- Выберите в верхней части окна в выпадающем списке свой проект надстройки
- Щелкните по появившейся функции правой кнопкой мыши и выберите команду Properties.
- Введите описание функции в окно Description
- Сохраните файл надстройки и перезапустите Excel.

После перезапуска у функции должно отобразиться описание, которое мы ввели:

Шаг 5. Создаем вкладку надстройки в интерфейсе
Финальным, хоть и не обязательным, но приятным штрихом будет создание отдельной вкладки с кнопкой запуска нашего макроса, которая будет появляться в интерфейсе Excel после подключения нашей надстройки.
Информация об отображаемых вкладках по умолчанию содержится внутри книги и должна быть оформлена в виде специального XML-кода. Проще всего писать и редактировать такой код с помощью специальных программ — XML-редакторов. Одна из самых удобных (и бесплатных) — это программа Максима Новикова Ribbon XML Editor.
Алгоритм работы с ней следующий:
- Закройте все окна Excel, чтобы не было конфликта файлов, когда мы будем редактировать XML-код надстройки.
- Запустите программу Ribbon XML Editor и откройте в ней наш файл MyExcelAddin.xlam
- При помощи кнопки tabs в левом верхнем углу добавьте заготовку кода для новой вкладки:

- В пустые кавычки нужно вписать id нашей вкладки и группы (любые уникальные идентификаторы), а в label — названия нашей вкладки и группы кнопок на ней:

- При помощи кнопки button на панели слева добавляем заготовку кода для кнопки и дописываем к ней теги:

— label — это текст на кнопке
— imageMso — это условное название изображения на кнопке. Я использовал иконку с красной кнопкой, которая имеет название AnimationCustomAddExitDialog. Названия всех доступных кнопок (а их несколько сотен!) можно найти на большом количестве сайтов в интернете, если искать по ключевым словам «imageMso». Для начала можно сходить сюда.
— onAction — это имя процедуры обратного вызова — специального короткого макроса, который будет запускать наш основной макрос FormulasToValues. Назвать эту процедуру можно как угодно. Мы добавим её чуть позже. - Проверить правильность всего сделанного можно с помощью кнопки с зеленой галочкой сверху на панели инструментов. Там же рядом нажмите на кнопку с дискетой для сохранения всех изменений.
- Закрываем Ribbon XML Editor
- Открываем Excel, заходим в редактор Visual Basic и добавляем к нашему макросу процедуру обратного вызова KillFormulas, чтобы она запускала наш основной макрос замены формул на значения.

- Сохраняем внесенные изменения и, вернувшись в Excel проверяем результат:


Вот и всё — надстройка готова к использованию. Наполните её своими процедурами и функциями, добавьте красивые кнопки — и использовать макросы в работе станет намного проще.
Ссылки по теме
- Что такое макросы, как их использовать в работе, где взять код макросов на Visual Basic.
- Как сделать заставку при открытии книги в Excel
- Что такое Личная Книга Макросов и как её использовать
An Excel add-in can be really useful when you have to run a macro often in different workbooks.
For example, suppose you want to highlight all the cells that have an error in it, you can easily create an Excel add-in that will highlight errors with a click of a button.
Something as shown below (the macro has been added to the Quick Access Toolbar to run it with a single click):

Similarly, you may want to create a custom Excel function and use it in all the Excel workbooks, instead of copy pasting the code again and again.
If you’re interested in learning VBA the easy way, check out my Online Excel VBA Training.
Creating an Excel Add-in
In this tutorial, you’ll learn how to create an Excel add-in. There are three steps to create an add-in and make it available in the QAT.
- Write/Record the code in a module.
- Save as an Excel Add-in.
- Add the macro to the Quick Access Toolbar.
Write/Record the Code in a Module
In this example, we will use a simple code to highlight all the cells that have error values:
Sub HighlightErrors()
 Selection.SpecialCells(xlCellTypeFormulas, xlErrors).Select
 Selection.Interior.Color = vbRed
End Sub
If you are writing code (or copy-pasting it from somewhere), here are steps:
Note: If you are recording a macro, Excel automatically takes care of inserting a module and putting the code in it.
Now let’s go ahead and create an add-in out of this code.
Save and Install the Add-in
Follow the below steps when you are in the workbook where you have inserted the code.
Now the add-in has been activated.
You may not see any tab or option appear in the ribbon, but the add-in gets activated at this stage and the code is available to be used now.
The next step is to add the macro to the Quick Access Toolbar so that you can run the macro with a single click.
Note: If you are creating an add-in that has a custom function, then you don’t need to go to step 3. By the end of step 2, you’ll have the function available in all the workbook. Step 3 is for such codes, where you want something to happen when you run the code (such as highlight cells with errors).
Save and Install the Add-in
To do this:
Now to run this code in any workbook, select the dataset and click on the macro icon in the QAT.
This will highlight all the cells with errors in red color. You can also use this macro in any workbook since you have enabled the add-in.
Caution: The changes done by the macro can’t be undone using Control + Z.
You can also create custom functions and then save it as an Excel add-in. Now, when you enable the add-in, the custom functions would be available in all your Excel workbooks.
You May Also Like the Following Excel Tutorials:
- Working with Cells and Ranges in Excel VBA.
- Working with Worksheets in VBA.
- Working with Workbooks in VBA.
- Using Loops in Excel VBA.
- Using IF Then Else Statement in Excel VBA.
- How to Create and Use Personal Macro Workbook in Excel.
- Useful Excel Macro Code Examples.
- Using For Next Loop in Excel VBA.
- Excel VBA Events – An Easy (and Complete) Guide.
- Excel VBA Error Handling
What are Add-ins in Excel?
An add-ins is an extension that adds more features and options to Microsoft Excel. Providing additional functions to the user increases the power of Excel. An add-in needs to be enabled for usage. Once enabled, it activates as Excel is started.
For example, Excel add-ins can perform tasks like creating, deleting, and updating the data of a workbook. Moreover, one can add buttons to the Excel ribbon and run custom functions with add-ins.
The Solver, Data Analysis (Analysis ToolPakExcel’s data analysis toolpak can be used by users to perform data analysis and other important calculations. It can be manually enabled from the addins section of the files tab by clicking on manage addins, and then checking analysis toolpak.read more), and Analysis ToolPak-VBA are some essential add-ins.
The purposes of activating add-ins are listed as follows: –
- To interact with the objects of Excel
- To avail an extended range of functions and buttons
- To facilitate the setting up of standard add-ins throughout an organization
- To serve the varied needs of a broad audience
In Excel, one can access several Add-ins from “Add-ins” under the “Options” button of the “File” tab. In addition, one can select from the drop-down “Manage” in the “Add-ins” window for more add-ins.
By default, it might hide some add-ins. One can view the unhidden add-ins in the “Data” tab on the Excel ribbonThe ribbon is an element of the UI (User Interface) which is seen as a strip that consists of buttons or tabs; it is available at the top of the excel sheet. This option was first introduced in the Microsoft Excel 2007.read more. For example, it is shown in the following image.

Table of contents
- What are Add-ins in Excel?
- How to Install Add-ins in Excel?
- Types of Add-ins in Excel
- The Data Analysis Add-in
- Create Custom Functions and Install as an Excel Add-in
- Example #1–Extract Comments from the Cells of Excel
- Example #2–Hide Worksheets in Excel
- Example #3–Unhide the Hidden Sheets of Excel
- The Cautions While Creating Add-ins
- Frequently Asked Questions
- Recommended Articles
How to Install Add-ins in Excel?
If Excel is not displaying the add-ins, they need to be installed. The steps to install Excel add-ins are listed as follows:
- First, click on the “File” tab located at the top left corner of Excel.

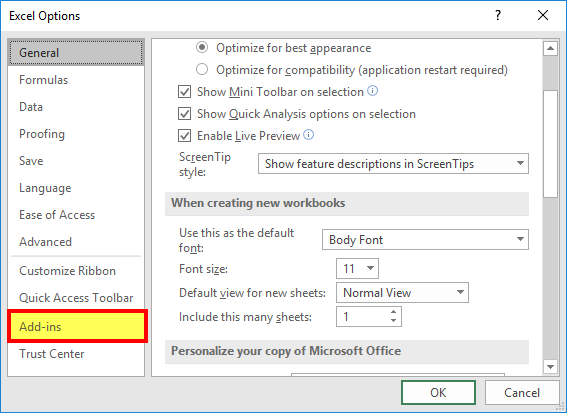
- Click “Options,” as shown in the following image.

- The “Excel Options” window opens. Select “Add-ins.”

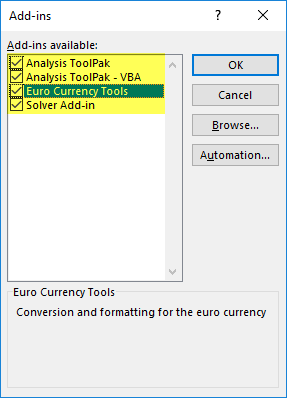
- There is a box to the right of “Manage” at the bottom. Click the arrow to view the drop-down menu. Select “Excel add-ins” and click “Go.”

- The “Add-ins” dialog box appears. Select the required checkboxes and click “OK.” We have selected all four add-ins.

- The “Data Analysis” and “Solver” options appear under the “Data tab” of the Excel ribbon.


Types of Add-ins in Excel
The types of add-ins are listed as follows:
- Inbuilt add-ins: These are built into the system. One can unhide them by performing the steps listed under the preceding heading (how to install add-ins in Excel?).
- Downloadable add-ins: These can be downloaded from the Microsoft website (www.office.com).
- Custom add-ins: These are designed to support the basic functionality of Excel. They may be free or chargeable.
The Data Analysis Add-in
The “Data Analysis Tools” pack analyzes statistics, finance, and engineering data.

The various tools available under the “Data Analysis” add-in are shown in the following image.

Create Custom Functions and Install them as an Excel Add-in
Generally, an add-in is created with the help of VBA macrosVBA Macros are the lines of code that instruct the excel to do specific tasks, i.e., once the code is written in Visual Basic Editor (VBE), the user can quickly execute the same task at any time in the workbook. It thus eliminates the repetitive, monotonous tasks and automates the process.read more. Let us learn to create an add-in (in all Excel files) for a custom functionCustom Functions, also known as UDF (User Defined Functions) in Excel, are personalized functions that the users create through VBA programming code to fulfill their particular requirements. read more. For this, first, we make a custom function.
Let us consider some examples.
You can download this Excel Add-Ins Excel Template here – Excel Add-Ins Excel Template
We want to extract comments from specific cells of Excel. Then, create an add-in for the same.
The steps for creating an add-in and extracting comments from cells are listed as follows:
Step 1: Open a new workbook.
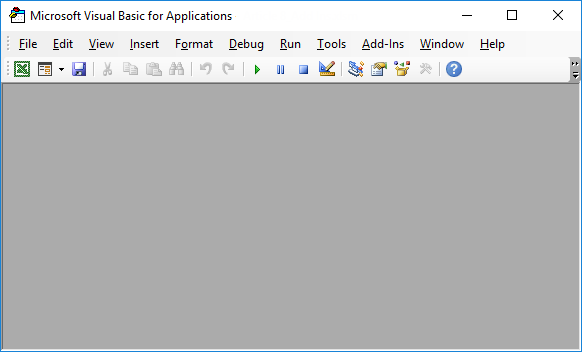
Step 2: Press the shortcutAn Excel shortcut is a technique of performing a manual task in a quicker way.read more “ALT+F11” to access the “Visual Basic Editor.” The following image shows the main screen of Microsoft Visual Basic for Applications.
Step 3: Click “Module” under the “Insert” tab, shown in the following image.

Step 4: Enter the following code in the “module” window.
Function TakeOutComment(CommentCell As Range) As String
TakeOutComment = CommentCell.Comment.Text
End Function

Step 5: Once the code is entered, save the file with the type “Excel add-in.”

Step 6: Open the file containing comments.
Step 7: Select ” Options ” in the “File” tab and select “Options.” Choose “Add-ins.” In the box to the right of “Manage,” select “Excel Add-ins.” Click “Go.”
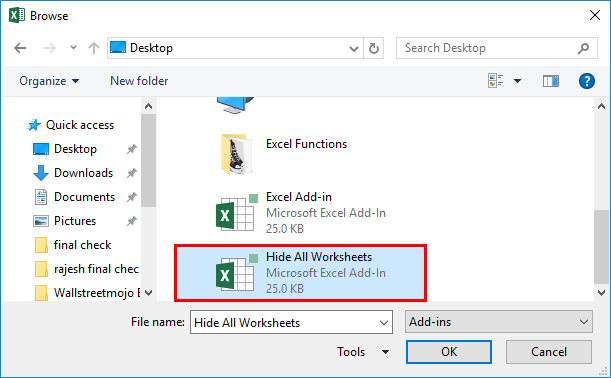
Click the “Browse” option in the “Add-ins” dialog box.

Step 8: Select the add-in file that had been saved. Click “Ok.”
We saved the file with the name “Excel Add-in.”

Step 9: The workbook’s name (Excel Add-in) that we had saved appears as an add-in, as shown in the following image.
This add-in can be applied as an Excel formula to extract comments.

Step 10: Go to the sheet containing comments. The names of three cities appear with comments, as shown in the following image.

Step 11: In cell B1, enter the symbol “equal to” followed by the function’s name. Type “TakeOutComment,” as shown in the following image.

Step 12: Select cell A1 as the reference. It extracts the comment from the mentioned cell.
Since there are no comments in cells A2 and A3, the formula returns “#VALUE!.”

Example #2–Hide Worksheets in Excel
We want to hide Excel worksheets except for the active sheet. Create an add-in and icon on the Excel toolbar for the same.
The steps to hide worksheets (except for the currently active sheet) and, after that, create an add-in and icon are listed as follows:
Step 1: Open a new workbook.
Step 2: In the “Visual Basic” window, insert a “Module” from the Insert tab. The same is shown in the following image.
Step 3: Copy and paste the following code into the module.
Sub Hide_All_Worksheets_()
Dim As Worksheet
For Each Ws In ActiveWorkbook.Worksheets
If Ws.Name <> ActiveSheet.Name Then
Ws.Visible = xlSheetVeryHidden
End If
Next Ws
End Sub

Step 4: Save this workbook with the type “Excel add-in.”
Step 5: Add this add-in to the new workbook. For this, click “Options” under the “File” tab. Select “Add-ins.” In the box to the right of “Manage,” select “Excel add-in” Click “Go.”
In the “Add-ins” window, choose “Browse.”

Step 6: Select the saved add-in file. Click “Ok.”
We have saved the file with the name “Hide All Worksheets.”
Step 7: The new add-in “Hide All Worksheets” appears in the “Add-ins” window.

Step 8: Right-click the Excel ribbon and select “Customize the Ribbon.”

Step 9: The “Excel Options” window appears. Click “Quick Access Toolbar.” Under the drop-down of “Choose commands from,” select “macrosA macro in excel is a series of instructions in the form of code that helps automate manual tasks, thereby saving time. Excel executes those instructions in a step-by-step manner on the given data. For example, it can be used to automate repetitive tasks such as summation, cell formatting, information copying, etc. thereby rapidly replacing repetitious operations with a few clicks.
read more.”
In the box following this drop-down, choose the name of the macro. Then, click “Add” followed by “OK.” The tasks of this step are shown with the help of black arrows in the following image.

Step 10: A small icon appears on the toolbar. Clicking this icon hides all worksheets except for the currently active sheet.

Example #3–Unhide the Hidden Sheets of Excel
If we want to unhide the sheetsThere are different methods to Unhide Sheets in Excel as per the need to unhide all, all except one, multiple, or a particular worksheet. You can use Right Click, Excel Shortcut Key, or write a VBA code in Excel. read more hidden in the preceding example (example #2). Create an add-in and toolbar icon for the same.
The steps to unhide the sheets and, after that, create an add-in and toolbar icon are listed as follows:
Step 1: Copy and paste the following code to the “Module” inserted in Microsoft Visual Basic for Applications.
Sub UnHide_All_HiddenSheets_()
Dim Ws As Worksheet
For Each Ws In ActiveWorkbook.Worksheets
Ws.Visible = xlSheetVisible
Next Ws
End Sub

Step 2: Save the file as “Excel add-in.” Add this add-in to the sheet.
Right-click the Excel ribbon and choose the option “Customize the ribbon.” Then, in the “Quick Access Toolbar,” select “Macros” under the drop-down of “Choose commands from.”
Choose the macro’s name, click “Add” and “OK.” The tasks of this step are shown with the help of black arrows in the following image.
Step 3: Another icon appears on the toolbar. Clicking this icon unhides the hidden worksheets.

The Cautions While Creating Add-ins
The points to be observed while working with add-ins are listed as follows:
- First, remember to save the file in Excel’s “Add-in” extensionExcel extensions represent the file format. It helps the user to save different types of excel files in various formats. For instance, .xlsx is used for simple data, and XLSM is used to store the VBA code.read more of Excel.
- Be careful while selecting the add-ins to be inserted by browsing in the “Add-ins” window.
Note: It is possible to uninstall the unnecessary add-ins at any time.
Frequently Asked Questions
1. What is an add-in? where is it in Excel?
An add-in extends the functions of Excel. It provides more features to the user. It is also possible to create custom functions and insert them as an add-in in Excel.
An add-in can be created, used, and shared with an audience. One can find the add-ins in the “Add-ins” window of Excel.
The steps to access the add-ins in Excel are listed as follows:
a. Click “Options” in the “File” tab of Excel. Select “Add-ins.”
b. In the box to the right of “Manage,” select “Excel add-ins.” Click “Go.”
c. The “Add-ins” window opens. Click “Browse.”
d. Select the required add-in file and click “OK.”
Note: The add-ins already present in the system can be accessed by browsing. Select the corresponding checkbox in the “Add-ins” window and click “OK” to activate an add-in.
2. How to remove an Add-in from Excel?
For removing an add-in from the Excel ribbon, it needs to be inactivated. The steps to inactivate an add-in of Excel are listed as follows:
a. In the File tab, click “Options” and choose “Add-ins”.
b. From the drop-down menu of the “Manage” box, select “Excel add-ins.” Click “Go.”c.
c. In the “Add-ins” window, deselect the checkboxes of the add-ins to be inactivated. Click “OK.”
The deselected add-ins are inactivated. Sometimes, one may need to restart Excel after inactivation. It helps remove the add-in from the ribbon.
Note: Inactivation does not remove an add-in from the computer. For removing an inactivated add-in from the computer, it needs to be uninstalled.
3. How to add an Add-in to the Excel toolbar?
The steps to add an Add-in to the Excel toolbar are listed as follows:
a. In an Excel workbook, press “Alt+F11” to open the Visual Basic Editor. Enter the code by inserting a “module.”
b. Press “Alt+F11” to return to Excel. Save the file as “Excel add-in” (.xlam).
c. In File, select “Options” followed by “Add-ins.” Select “Excel add-ins” in the “Manage” box and click “Go.”
d. Browse this file in the “Add-ins” window. Select the required checkbox and click “OK.”
e. Right-click the ribbon and choose “Customize the Ribbon.” Click “Quick Access Toolbar.”
f. Select “Macros” from the drop-down of “Choose commands from.”
g. Choose the required macro, click “Add” and” OK.”
The icon appears on the toolbar. This icon works in all Excel workbooks as the add-in has been enabled.
Recommended Articles
This article is a step-by-step guide to creating, installing, and using add-ins in Excel. Here, we also discuss the types of Excel add-ins and create a custom function. Take a look at these useful functions of Excel: –
- What is the Quick Access Toolbar in Excel?
- “Save As” Shortcut in Excel
- Remove Duplicates in Excel
- How to Show Formula in Excel?
This Excel tutorial explains how to add Excel Add-in in Ribbon.
You may also want to read:
Writing your first Excel Macro by recording Macro
Why use Excel Add-in
After you have created a Macro (Sub Procedure), you may want to distribute it for users to use. You can simply add the VBA code in the Module of a Workbook and then distribute the Workbook, but the problem is that the Macro cannot be used in other Workbook.
Depending on the situation, you may want to distribute a Macro is through Add-in. Add-in is a file with extension .xla (for Excel 2003 and older version) and .xlam (for Excel 2007 and newer version) where users can use the Macro in any Workbook in his workstation. The Add-in itself is stored in the local drive of the receiver, it is not stored in a Workbook. If you have used Functions from Analysis ToolPak before, you realize that if you send the Workbook that used the Function (such as MRound, Networkdays) to others who do not have the Add-in, the formula will fail once refreshed.
To summarize, if your Macro is only for use in particular Workbook, you don’t have to use Add-in. If not, create an Add-in.
After creating an Excel Add-in, send the Add-in to users, then install the add-in.
In order to facilitate users to locate and run the Macro, I highly recommend to add the Macro in Ribbon.
In the following demonstration, I will use a real example where I create several Macro for users to validate data, such as data formatting and conflicting values.
Assume that you have already created several Sub Procedure in the Module of a Workbook. You should check carefully that “ThisWorkbook” refers to the Add-in Workbook, not the ActiveWorkbook. Change from “ThisWorkbook” to “ActiveWorkbook” if needed.
The next step is to tell Excel to create a ribbon.
In VBE (Alt+F11), double click on ThisWorkBook under VBA Project of the Add-In, we need to add two Events here:
Workbook.AddinInstall Event – Triggered when users install the Add-in. We are going to tell Excel to add ribbon here.
Workbook.AddinUninstall Event – Triggered when users uninstall the Add-in. We are going to tell Excel to remove ribbon here.
Insert the following code in ThisWorkbook
Private Sub Workbook_AddinInstall()
    With Application.CommandBars("Formatting").Controls.Add
        .Caption = "Identify incorrect Date format"  'The button caption
        .Style = msoButtonCaption
        .OnAction = "checkDateText"  'The Macro name you want to trigger
    End With
End Sub

Private Sub Workbook_AddinUninstall()
    On Error Resume Next
        Application.CommandBars("Formatting").Controls("Identify incorrect Date format").Delete
    On Error GoTo 0
End Sub
The above code adds a button called Identify incorrect Date format. If you want to add more, copy the code and change the Caption and OnAction parameters.
Save Excel Add-In
Save the Workbook as you would normally save it, except that you save it as xlam file type for Add-In. Name the file as checking P2 template.
The xlam file icon looks like Excel, you can send this file for users to install.

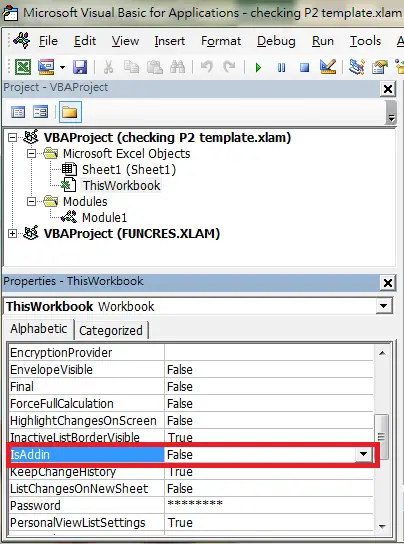
After you have saved the file as .xlam, all worksheets are hidden.
To change it back to a normal worksheet, change the IsAddin Property of ThisWorkbook to False.
Install Excel Add-in (User)
Navigate to Developer tab > Add-Ins, browse the Add-In location to add.

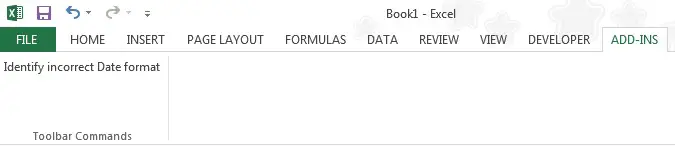
Now a tab called ADD-INS is added, under which is the button “Identify incorrect Date format”
If you have many items, you can group items by different CommandBars as below.

In the above example, I grouped them by Formatting / Worksheet Menu Bar
    With Application.CommandBars("Formatting").Controls.Add
        .Caption = "Remove Space in prefix/suffix"
        .Style = msoButtonCaption
        .OnAction = "checkSpace"
    End With

    With Application.CommandBars("Worksheet Menu Bar").Controls.Add
        .Caption = "Identify incorrect Original Hire Date"
        .Style = msoButtonCaption
        .OnAction = "chk_Original_Hire_Dt"
    End With
Remove Excel Add-in
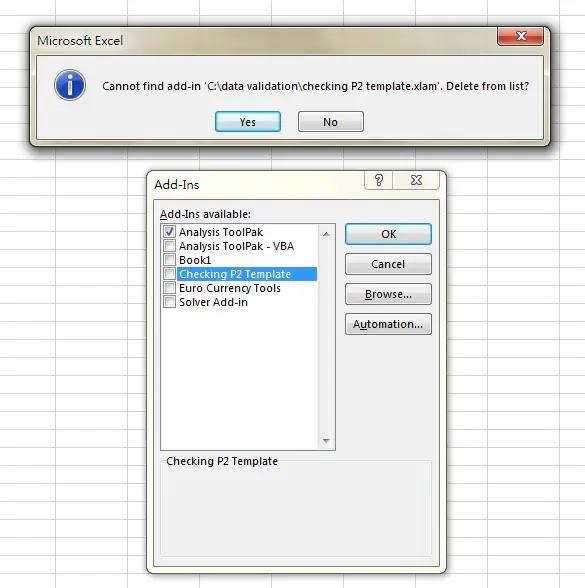
When you uncheck (uninstall) the box “Check P2 Template”, the option is still there.
If you want to completely remove the option from the Add-Ins box
1) Uncheck the Add-in
2) Close the workbook
3) Delete / Move the Add-Ins in your local drive
4) Open Excel, check the option of removed Add-in, then click on Yes to delete
http://sitestory.dk/excel_vba/my_menu.htm
Содержание
- Разработка Microsoft Excel add-in’а с использованием библиотеки Excel-DNA
- Введение
- Разработка add-in’а
- Сборка и Отладка
- Делаем установщик
- Заключение
- Build an Excel task pane add-in
- Create the add-in
- Prerequisites
- Create the add-in project
- Explore the project
- Try it out
- Next steps
- Prerequisites
- Create the add-in project
- Explore the Visual Studio solution
- Update the code
- Update the manifest
- Try it out
- Next steps
Разработка Microsoft Excel add-in’а с использованием библиотеки Excel-DNA
Введение
Представляю вашему вниманию пошаговое руководство по разработке add-in’а для Excel.
Excel-DNA это бесплатная открытая библиотека для создания Excel расширений. Сайт проекта excel-dna.net
На протяжении данного руководства мы разработаем add-in, который позволяет по нажатию кнопки загружать данные со стороннего сайта в текущую страницу. Итак, начнем.
Разработка add-in’а
Для начала создадим новый проект типа Class Library, назовем его cryptostar. Подключим библиотеку excel-dna:
Install-Package ExcelDna.AddIn
Install-Package ExcelDna.Integration
Install-Package ExcelDna.Interop
Теперь можем приступать к реализации. В качестве источника данных будем использовать API api.coinmarketcap.com/v1/ticker, запрос возвращает массив объектов содержащих информацию о различных цифровых валютах.
Первым делом напишем загрузчик данных:
Пояснять данный код я не буду, так как он довольно простой и к нашей теме отношение имеет довольно опосредованное.
Теперь мы умеем получать данные в виде массива объектов класса Ticker. Пришло время научиться отображать эти данные на текущей странице.
Что бы отобразить данные, нам понадобится экземпляр класса Microsoft.Office.Interop.Excel.Application. Он предоставляет доступ к объектной модели Excel, через него мы сможем получить объект-страницу(worksheet) и записать наши данные в нужные ячейки. Давайте напишем класс для записи данных на страницу.
При работе с объектной моделью надо помнить о том, что работаем со ссылками на COM объекты. В основном потоке Excel мы можем спокойно использовать эти объекты и не заботиться об освобождении ссылок (Marshal.ReleaseComObject), однако, если мы захотим использовать объектную модель из отдельного потока, у нас есть два варианта:
- Самостоятельно отслеживать все используемые объекты и очищать ссылки на них. Этот подход чреват ошибками и я не рекомендую его использовать.
- ExcelDna предоставляет возможность добавить задание на выполнение в основном потоке, для этого предназначен метод ExcelAsyncUtil.QueueAsMacro, пример использования:
Таким образом, мы научились отображать данные на странице. Приступим к работе с пользовательским интерфейсом. ExcelDna позволяет вносить изменения в стандартный Ribbon, добавлять в него новые вкладки и кнопки. Создадим собственную вкладку и разместим на ней кнопку. По нажатию на кнопку будет происходить загрузка данных на текущую страницу. Для этого мы должны отнаследоваться от класса ExcelRibbon и переопределить метод GetCustomUI, метод возвращает RibbonXML с описанием интерфейса нашего add-in’а.
Мы объявили кнопку, располагающуюся на закладке и группе с названием cryptostar. У кнопки задан обработчик onAction=’OnButtonPressed’, при нажатии на кнопку будет вызван метод OnButtonPressed в классе RibbonController.
Помимо обработчика мы указали изображение для кнопки: image=’bitcoin’. Имя изображения задается в конфигурационном файле — Cryptostar-AddIn.dna. Данный файл автоматически добавляется в проект при подключении nuget’a. Пример:
Сборка и Отладка
Наш плагин готов, давайте попробуем его собрать. Нажимаем F5. После чего получаем набор файлов *.xll:
Cryptostar-AddIn64-packed.xll, Cryptostar-AddIn-packed.xll, Cryptostar-AddIn.xll, Cryptostar-AddIn64.xll
Видим, что полученные файлы отличаются как по разрядности, так и по наличию слова packed. С разрядностью все понятно, выбирать нужно тот, который совпадает по разрядности с Excel. А чем же отличаются packed и не packed add-in’ы? ExcelDNA позволяет упаковывать зависимости плагина в .xll файл. Зависимостями могут являться любые файлы, используемые в проекте, например внешние библиотеки или картинки. Зависимости задаются в конфигурационном файле, выглядит это так:
Обратите внимание на атрибут Pack=”true”, он указывает, что данный файл должен быть упакован.
Если мы используем неупакованный add-in, то в одной директории с ним должны находиться и все его зависимости.
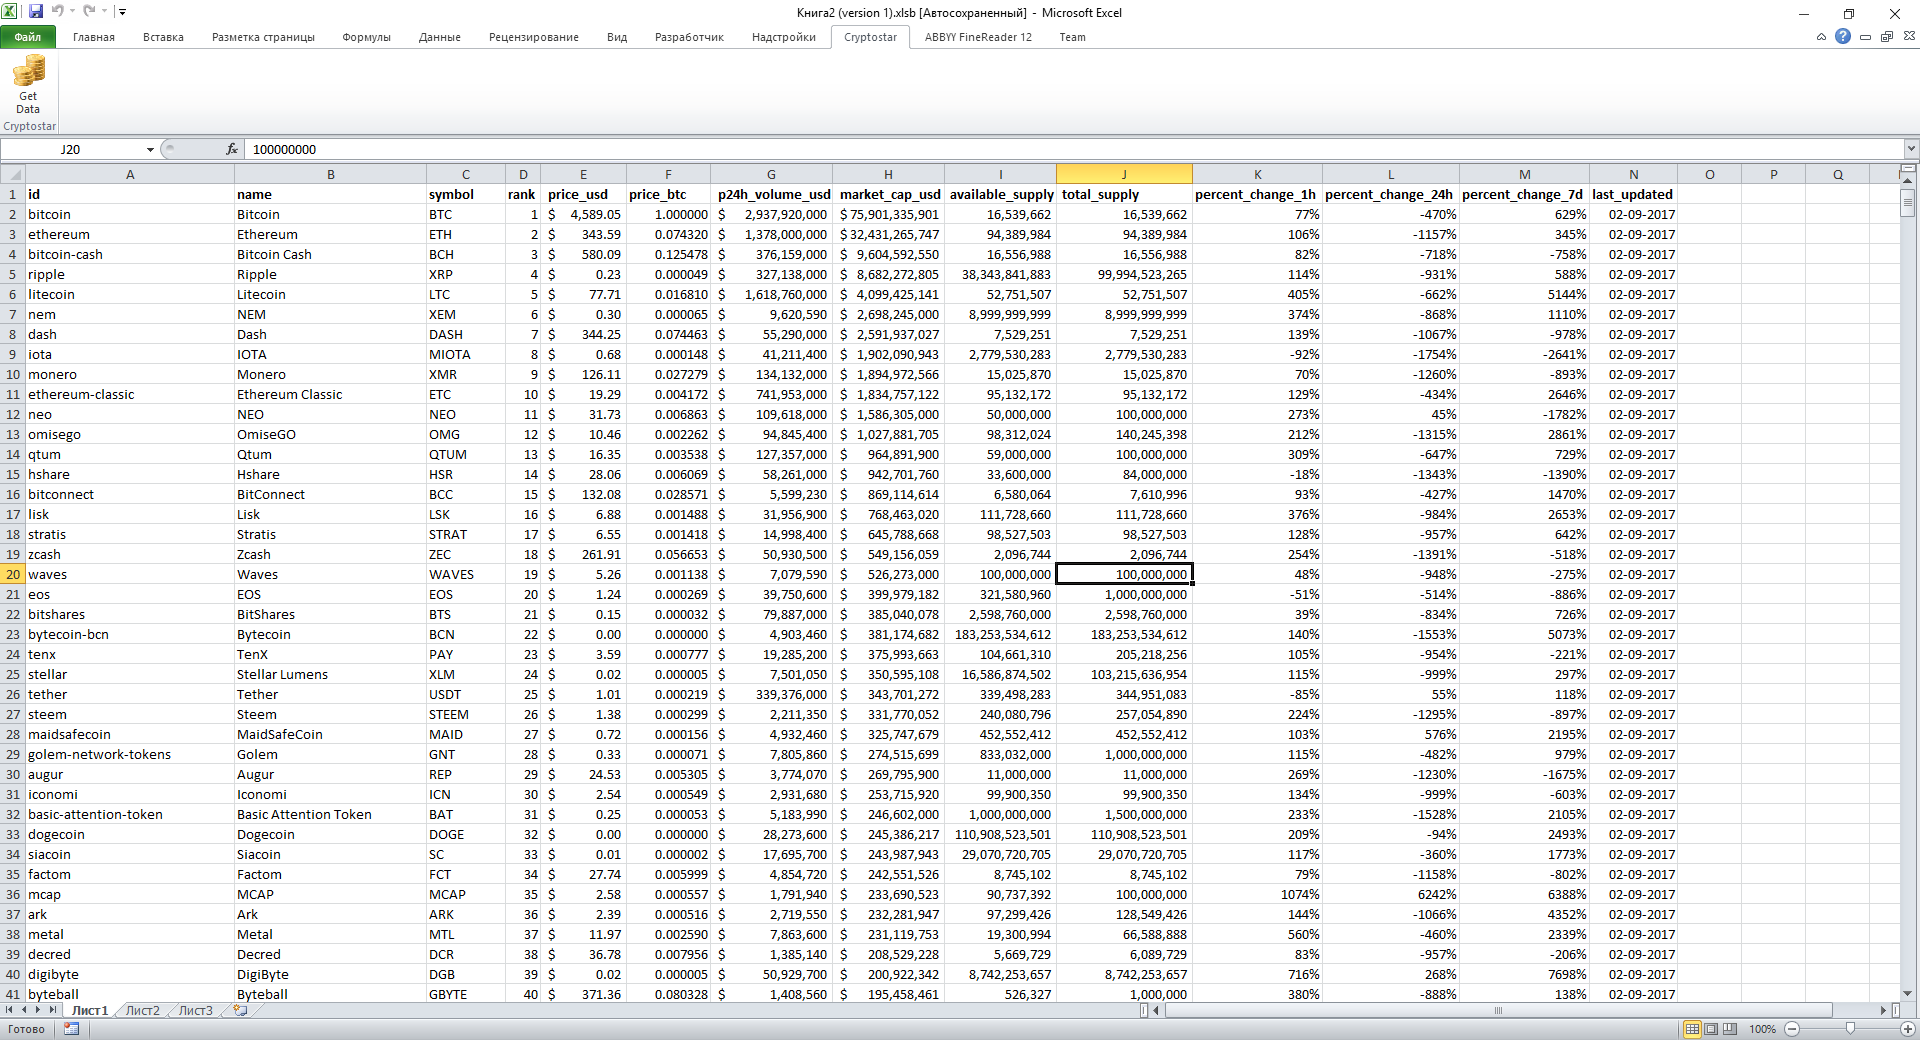
Теперь выбираем подходящий .xll файл и запускаем его. Если вы все сделали правильно, то после открытия Excel увидите новую вкладку Cryptostart и кнопку Get Data, а по нажатию на нее страница наполнится данными по валютам:
К сожалению, программы редко работают с первого раза, поэтому нам может потребоваться отладчик. Настроить отладку ExcelDna add-in’а просто. Для этого в свойствах проекта на закладке Debug выбираем Start External Program и прописываем путь к Excel.exe, в моем случае это G:Program FilesMicrosoft OfficeOffice14Excel.exe. В start options пишем название упакованного файла add-in’a с учетом разрядности Excel. Например, Cryptostar-AddIn64-packed.xll. Все, теперь мы можем нажать F5 и полноценно отлаживать add-in.
Делаем установщик
Итак, add-in сделан, отлажен, протестирован и готов к работе. Вопрос в том, в каком виде его распространять. Один из вариантов доверить установку add-in’a пользователю. Делается это через интерфейс Excel, на закладке developer tab->Add-ins->Browse указываем путь к .xll файлу. Данный способ будет работать, только если .xll файл подписан сертификатом и сертификат присутствует в trusted root certification authorities store. Как создать сертификат и подписать им файл хорошо описано здесь.
Альтернативный способ – написать свою программу для установки add-in’a, которая бы прописывала необходимые ключи в реестре и таким образом регистрировала наш add-in. Задача эта не из легких, т.к. необходимо учитывать различные версии Excel у которых пути и ключи в реестре различаются. Но к счастью эта задача уже решена и существует шаблон проекта — инсталлятора, выполняющего необходимые действия. Шаблон можно взять здесь.
Заключение
В результате мы познакомились с библиотекой Excel-DNA и прошли полный путь от разработки add-in’a до его отладки и создания установщика.
Источник
Build an Excel task pane add-in
In this article, you’ll walk through the process of building an Excel task pane add-in.
Create the add-in
You can create an Office Add-in by using the Yeoman generator for Office Add-ins or Visual Studio. The Yeoman generator creates a Node.js project that can be managed with Visual Studio Code or any other editor, whereas Visual Studio creates a Visual Studio solution. Select the tab for the one you’d like to use and then follow the instructions to create your add-in and test it locally.
Prerequisites
If you aren’t familiar with Node.js or npm, you should start by setting up your development environment.
Node.js (the latest LTS version).
The latest version of Yeoman and the Yeoman generator for Office Add-ins. To install these tools globally, run the following command via the command prompt.
Even if you’ve previously installed the Yeoman generator, we recommend you update your package to the latest version from npm.
Create the add-in project
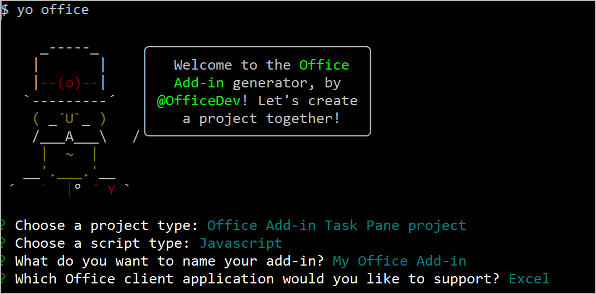
Run the following command to create an add-in project using the Yeoman generator.
When you run the yo office command, you may receive prompts about the data collection policies of Yeoman and the Office Add-in CLI tools. Use the information that’s provided to respond to the prompts as you see fit.
When prompted, provide the following information to create your add-in project.
- Choose a project type: Office Add-in Task Pane project
- Choose a script type: Javascript
- What do you want to name your add-in? My Office Add-in
- Which Office client application would you like to support? Excel
After you complete the wizard, the generator creates the project and installs supporting Node components.
You can ignore the next steps guidance that the Yeoman generator provides after the add-in project’s been created. The step-by-step instructions within this article provide all of the guidance you’ll need to complete this tutorial.
Explore the project
The add-in project that you’ve created with the Yeoman generator contains sample code for a basic task pane add-in. If you’d like to explore the components of your add-in project, open the project in your code editor and review the files listed below. When you’re ready to try out your add-in, proceed to the next section.
- The ./manifest.xml file in the root directory of the project defines the settings and capabilities of the add-in. To learn more about the manifest.xml file, see Office Add-ins XML manifest.
- The ./src/taskpane/taskpane.html file contains the HTML markup for the task pane.
- The ./src/taskpane/taskpane.css file contains the CSS that’s applied to content in the task pane.
- The ./src/taskpane/taskpane.js file contains the Office JavaScript API code that facilitates interaction between the task pane and the Office client application.
Try it out
Navigate to the root folder of the project.
Complete the following steps to start the local web server and sideload your add-in.
Office Add-ins should use HTTPS, not HTTP, even when you are developing. If you are prompted to install a certificate after you run one of the following commands, accept the prompt to install the certificate that the Yeoman generator provides. You may also have to run your command prompt or terminal as an administrator for the changes to be made.
If you’re testing your add-in on Mac, run the following command before proceeding. When you run this command, the local web server starts.
To test your add-in in Excel, run the following command in the root directory of your project. This starts the local web server and opens Excel with your add-in loaded.
To test your add-in in Excel on a browser, run the following command in the root directory of your project. When you run this command, the local web server starts. Replace «» with the URL of an Excel document on your OneDrive or a SharePoint library to which you have permissions.
The following are examples.
- npm run start:web — —document https://contoso.sharepoint.com/:t:/g/EZGxP7ksiE5DuxvY638G798BpuhwluxCMfF1WZQj3VYhYQ?e=F4QM1R
- npm run start:web — —document https://1drv.ms/x/s!jkcH7spkM4EGgcZUgqthk4IK3NOypVw?e=Z6G1qp
- npm run start:web — —document https://contoso-my.sharepoint-df.com/:t:/p/user/EQda453DNTpFnl1bFPhOVR0BwlrzetbXvnaRYii2lDr_oQ?e=RSccmNP
If you are developing on a Mac, enclose the in single quotation marks. Do not do this on Windows.
If your add-in doesn’t sideload in the document, manually sideload it by following the instructions in Manually sideload add-ins to Office on the web.
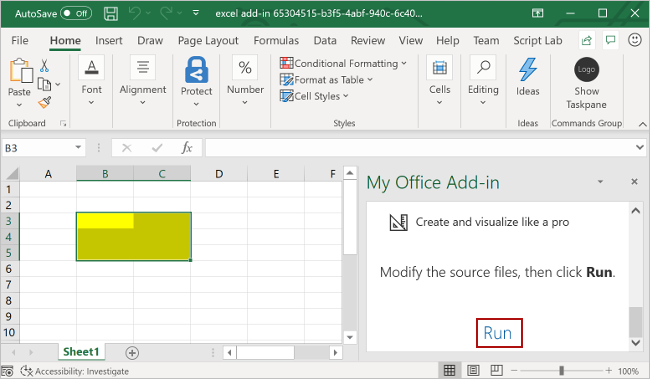
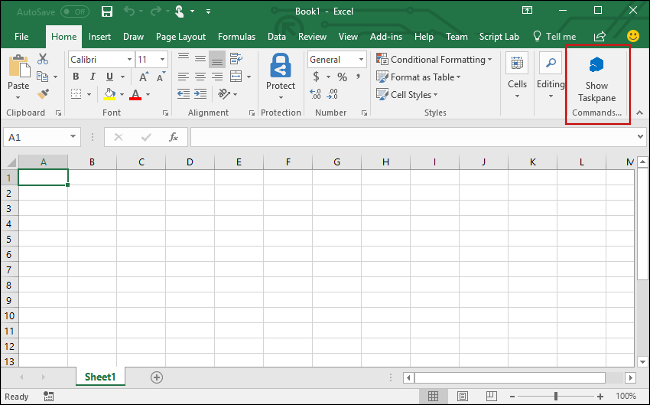
In Excel, choose the Home tab, and then choose the Show Taskpane button in the ribbon to open the add-in task pane.
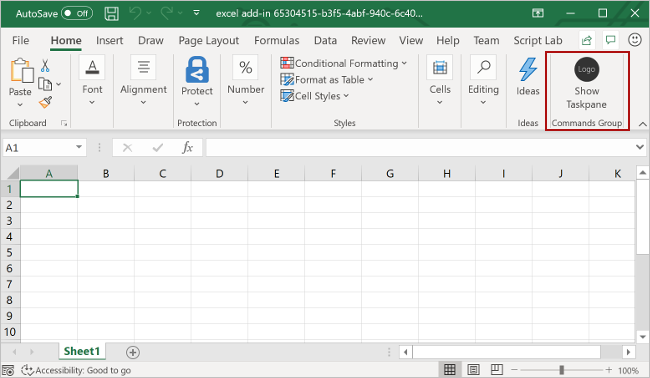
Select any range of cells in the worksheet.
At the bottom of the task pane, choose the Run link to set the color of the selected range to yellow.
Next steps
Congratulations, you’ve successfully created an Excel task pane add-in! Next, learn more about the capabilities of an Excel add-in and build a more complex add-in by following along with the Excel add-in tutorial.
Prerequisites
Visual Studio 2019 or later with the Office/SharePoint development workload installed.
If you’ve previously installed Visual Studio, use the Visual Studio Installer to ensure that the Office/SharePoint development workload is installed.
Office connected to a Microsoft 365 subscription (including Office on the web).
If you don’t already have Office, you can join the Microsoft 365 developer program to get a free, 90-day renewable Microsoft 365 subscription to use during development.
Create the add-in project
In Visual Studio, choose Create a new project.
Using the search box, enter add-in. Choose Excel Web Add-in, then select Next.
Name your project ExcelWebAddIn1 and select Create.
In the Create Office Add-in dialog window, choose Add new functionalities to Excel, and then choose Finish to create the project.
Visual Studio creates a solution and its two projects appear in Solution Explorer. The Home.html file opens in Visual Studio.
Explore the Visual Studio solution
When you’ve completed the wizard, Visual Studio creates a solution that contains two projects.
| Project | Description |
|---|---|
| Add-in project | Contains only an XML manifest file, which contains all the settings that describe your add-in. These settings help the Office application determine when your add-in should be activated and where the add-in should appear. Visual Studio generates the contents of this file for you so that you can run the project and use your add-in immediately. You change these settings any time by modifying the XML file. |
| Web application project | Contains the content pages of your add-in, including all the files and file references that you need to develop Office-aware HTML and JavaScript pages. While you develop your add-in, Visual Studio hosts the web application on your local IIS server. When you’re ready to publish the add-in, you’ll need to deploy this web application project to a web server. |
Update the code
Home.html specifies the HTML that will be rendered in the add-in’s task pane. In Home.html, replace the element with the following markup and save the file.
Open the file Home.js in the root of the web application project. This file specifies the script for the add-in. Replace the entire contents with the following code and save the file.
The following code uses ES6 JavaScript, which is not compatible with older versions of Office that use the Internet Explorer 11 browser engine. For information on how to support those platforms in production, see Support older Microsoft browsers and Office versions. Join the Microsoft 365 developer program to get a free, 90-day renewable Microsoft 365 subscription, with the latest Office applications, to use during development.
Open the file Home.css in the root of the web application project. This file specifies the custom styles for the add-in. Replace the entire contents with the following code and save the file.
Update the manifest
In Solution Explorer, go to the ExcelWebAddIn1 add-in project and open the ExcelWebAddIn1Manifest directory. This directory contains your manifest file, ExcelWebAddIn1.xml. The XML manifest file defines the add-in’s settings and capabilities. See the preceding section Explore the Visual Studio solution for more information about the two projects created by your Visual Studio solution.
The ProviderName element has a placeholder value. Replace it with your name.
The DefaultValue attribute of the DisplayName element has a placeholder. Replace it with My Office Add-in.
The DefaultValue attribute of the Description element has a placeholder. Replace it with A task pane add-in for Excel.
Try it out
Using Visual Studio, test the newly created Excel add-in by pressing F5 or choosing the Start button to launch Excel with the Show Taskpane add-in button displayed in the ribbon. The add-in will be hosted locally on IIS. If you are asked to trust a certificate, do so to allow the add-in to connect to its Office application.
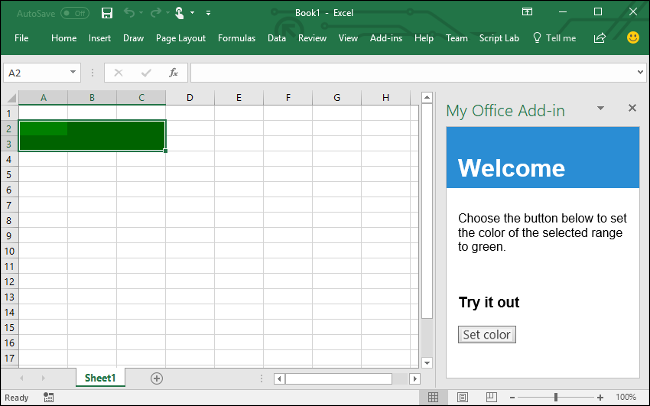
In Excel, choose the Home tab, and then choose the Show Taskpane button in the ribbon to open the add-in task pane.
Select any range of cells in the worksheet.
In the task pane, choose the Set color button to set the color of the selected range to green.
To see the console.log output, you’ll need a separate set of developer tools for a JavaScript console. To learn more about F12 tools and the Microsoft Edge DevTools, visit Debug add-ins using developer tools for Internet Explorer, Debug add-ins using developer tools for Edge Legacy, or Debug add-ins using developer tools in Microsoft Edge (Chromium-based).
Next steps
Congratulations, you’ve successfully created an Excel task pane add-in! Next, learn more about developing Office Add-ins with Visual Studio.
Источник
Simplest Way to Create Excel Add-in

In this article, we are going to talk about how you can create Excel Add-in by following few simple steps. Also we will talk about how you can link the Excel Add-in at your Excel Application open event and add it in Excel Ribbon.
Table of Content
-
What is an Excel Add-in -
How you can create your own Simple Excel Add-in -
Step 1: Write Your VBA Code -
Step 2: Save Your Excel Add-in File -
Step 3: Configure the Add-in on Excel Open Event -
Step 4: Add the Add-in in Excel Ribbon -
Step 5: Let’s Use the Add-in -
How you can create Advanced Excel Add-in with Ribbon -
Step 1: Write Your VBA Code -
Step 2: Save Your Excel Add-in File -
Step 3: Configure the Add-in on Excel Open Event -
Step 4: Let’s Use the Add-in -
Add Custom Image as Button Icon -
Sample XML Codes for Creating Controls in Ribbon -
ButtonGroup -
CheckBox -
ComboBox -
DropDown -
EditBox -
LabelControl -
Menu -
ToggleButton -
Practice file
What is an Excel Add-in
In simple words, Excel Add-in helps you to extend the features of Excel application. Using Excel Add-in, you can perform custom actions in Excel such as formatting the data, doing complex calculations which are not possible through Excel formulas, Reading or Writing data in other Excel files and so many more actions.
Not just Excel actions, you can also interact with other application’s object models right from your Excel file. Such as sending emails through Outlook, Generating customer letters in word file, Performing File and Folder operations etc.
How You Can Create Your Own Excel Add-in
Few developers thinks that creating an Excel Add-in is very difficult. However Excel Add-in is as simple as creating a normal VBA Macro. Let’s see how you can create an Excel Add-in.
Step 1: Open a new Excel file and start writing your VBA code for the functionalities which you want to be available in your Excel Add-in
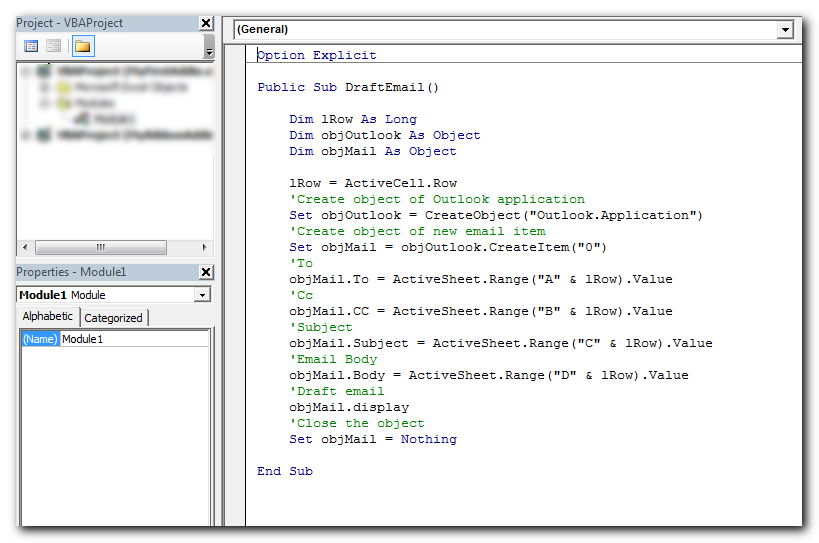
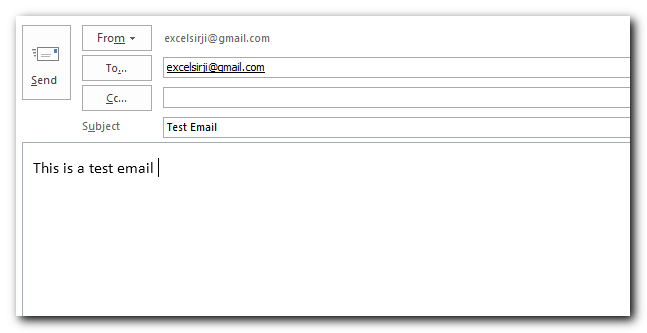
For the purpose of demo, here we have written a code which reads To, Cc, Subject and Email body from the active row of the sheet and displays the drafted Outlook email to user. Excel Add-ins are also compatible with userforms; hence you can also design userforms and allow users to navigate through the Add-in using the forms.
Step 2: This step defines how your Excel Add-in will appear on Excel Menu bar. There are two ways an Excel Add-in may appear on Excel as shown in below screenshots.
Here our target is to show the simplest way to create Excel Add-in; hence we will be using first way.
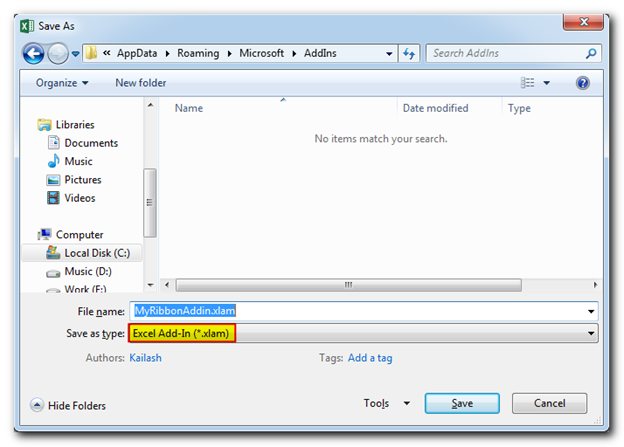
Now it’s time to save our file. To save any Excel file as Add-in, we need to save it in .xlam (Excel Add-In) format.
Note that by default Excel Add-ins are saved in AddIns folder under C:UsersXXXXAppDataRoamingMicrosoft. However you can save them at other places as well.
Once the file is saved, please close the same before proceeding with next step.
Step 3: Now as we have already saved our Excel Add-in, it’s time to use it. For this, we will open Excel application and go to Options under File menu.
In ‘Add-Ins’ tab, select ‘Excel Add-ins’ from Manage dropdown and click on ‘Go’ button
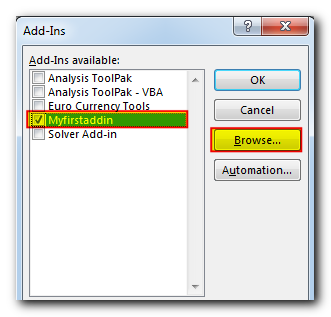
You should now be able to see the add-in we have just saved with ‘MyFirstAddin’ name in the list. If the add-in is not visible in the list, use the browse button to add the same.
Now the add-in is linked with Excel application open event; hence it will be automatically opened or activated as soon as you open any Excel file.
Step 4: The only step left now is to add the navigation button to run the macro. For this, right click on the menu bar and click on ‘Customize Quick Access Toolbar…’
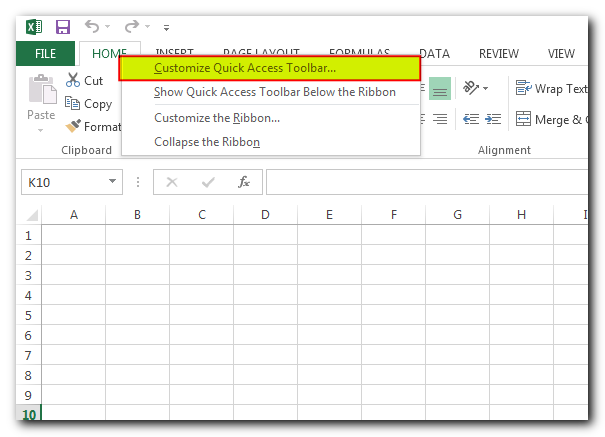
Select ‘Macros’ from commands dropdown
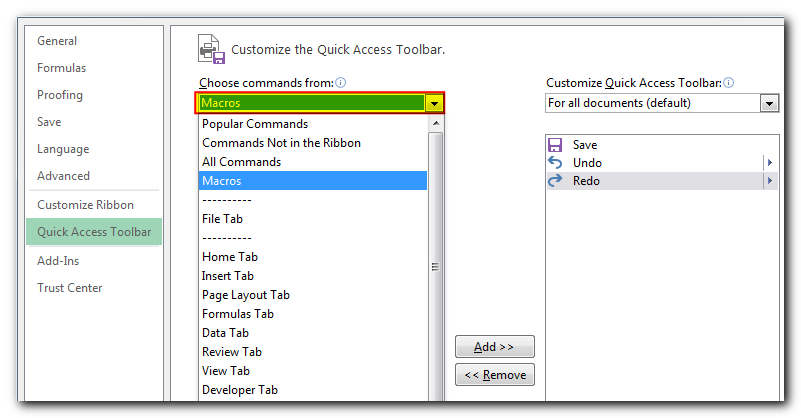
Select the macro named ‘DraftEmail’ and click on ‘Add >>’ button
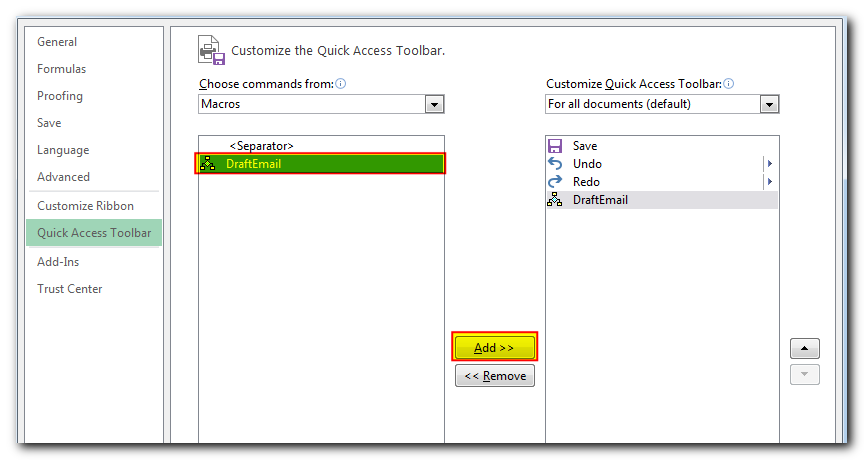
Click on ‘OK’ button and you are ready to use the Add-in
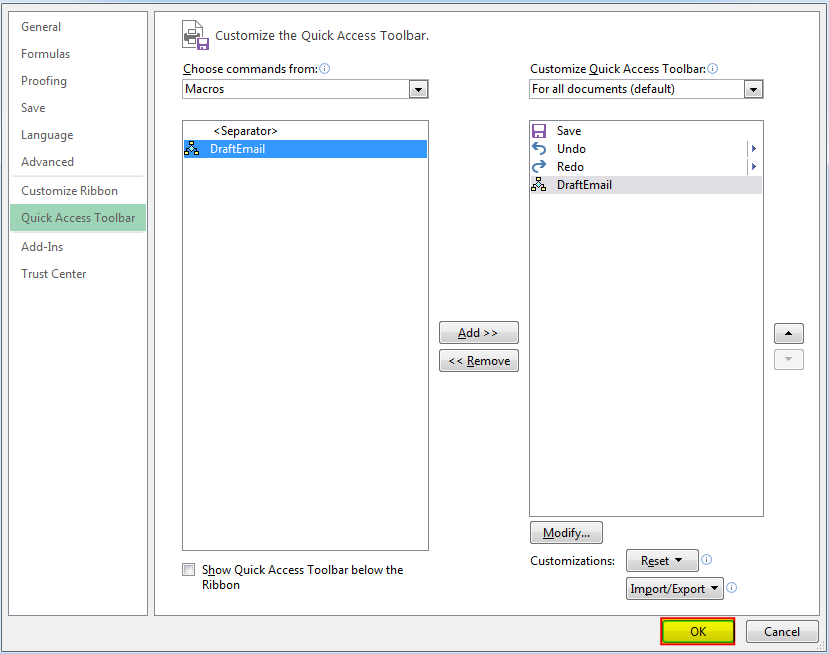
You will notice that a new icon is added in your Excel Quick Access Toolbar
Step 5: Let’s use the Add-in now. For this, we will add some dummy data in any opened Excel file
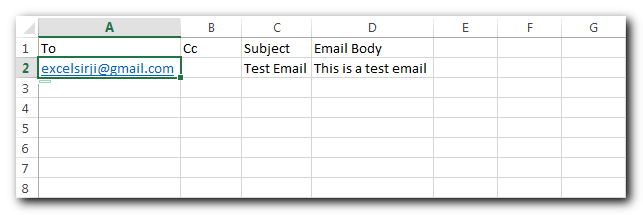
Select any cell in second row and click on the Add-in Macro
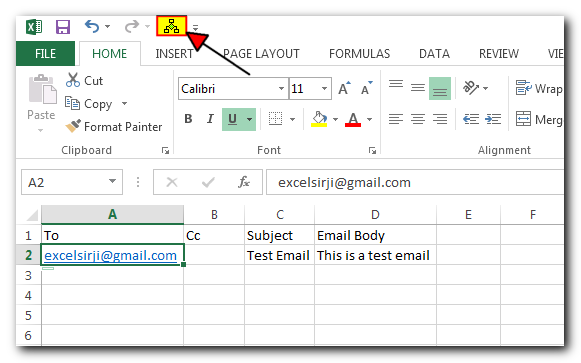
The Add-in macro will read the details from active row of the active Excel file and draft the email like below
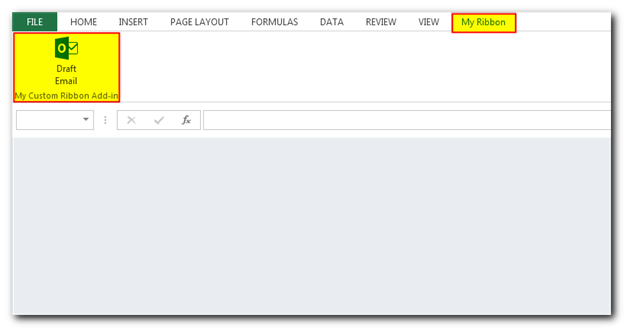
How you can create Advanced Excel Add-in with Ribbon?
Some developers have also requested us to share steps involved to create Add-in with ribbon menu. Let’s have a look at how you can create an Excel Add-in with custom defined menu ribbon.
Step 1: Open a new Excel file and start writing your VBA code for the functionalities which you want to be available in your Excel Add-in
For the purpose of demo, here we have written a code which reads To, Cc, Subject and Email body from the active row of the sheet and displays the drafted Outlook email to user. Excel Add-ins are also compatible with userforms; hence you can also design userforms and allow users to navigate through the Add-in using the forms.
We are expecting our Add-in with a ribbon named ‘My Ribbon’ and a button to execute the code just like below
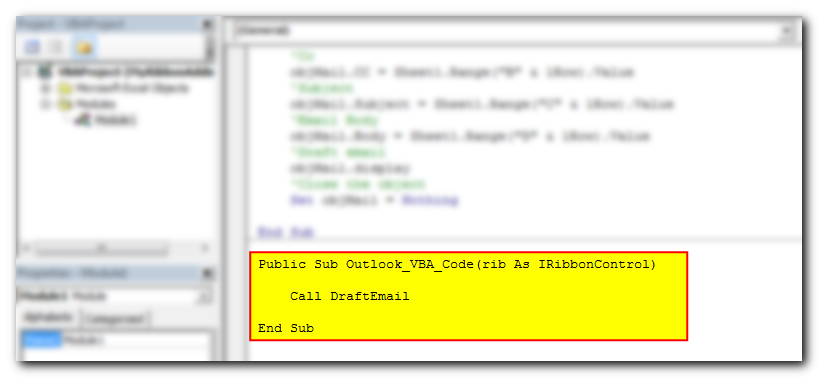
As you can see in the above screenshot, there is a button in the ribbon that is expected to draft the email. For the button to work, we need to add the event handler in our VBA code. For this, we need to add below VBA code in our Add-in
Public Sub Outlook_VBA_Code(rib As IRibbonControl)

    Call DraftEmail

End Sub
Now it’s time to save our file. To save any Excel file as Add-in, we need to save it in .xlam (Excel Add-In) format.
Note that by default Excel Add-ins are saved in AddIns folder under C:UsersXXXXAppDataRoamingMicrosoft. However you can save them at other places as well.
Once the file is saved, please close the same before proceeding with next step.
Step 2: Next step is to add customized menu in the Excel file. For this, we need to download and install OfficeCustomUIEditorSetup application. You can download it from below link or you can also find it on internet easily.
Once you have downloaded and installed the application, you need to open the Excel file in the application
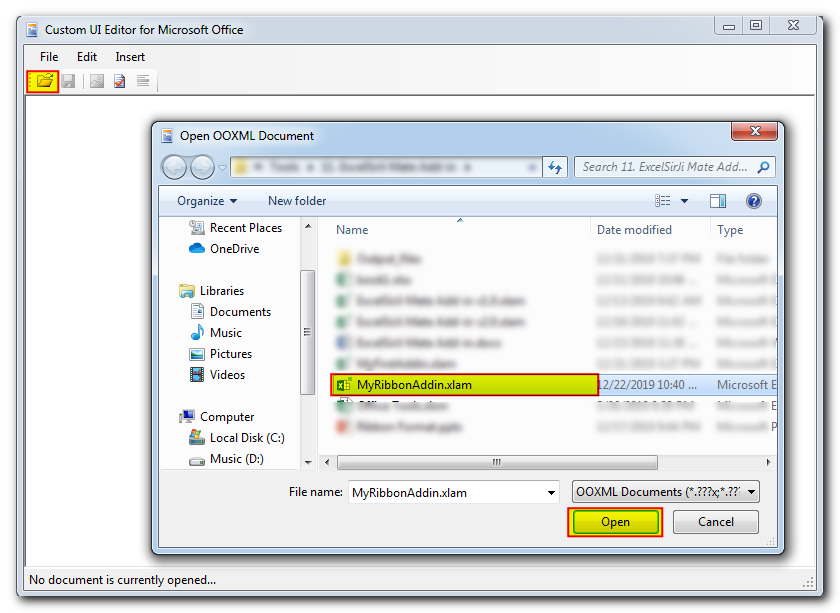
Right click on the file name and select ‘Office 2007 Custom UI Part’
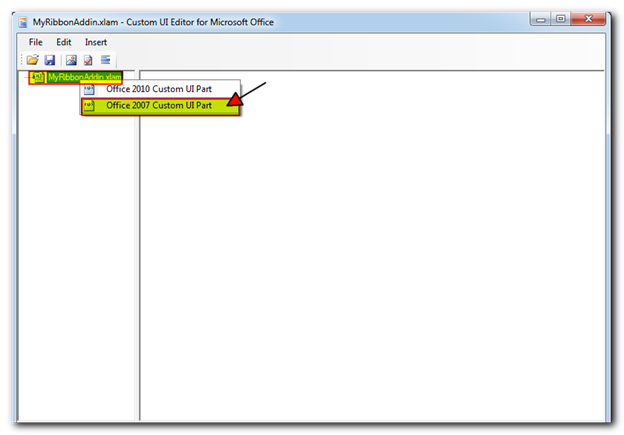
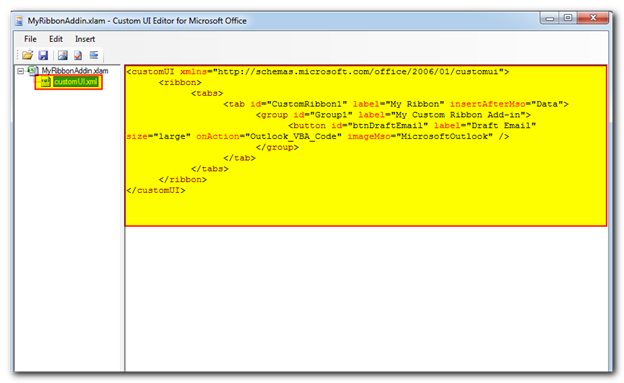
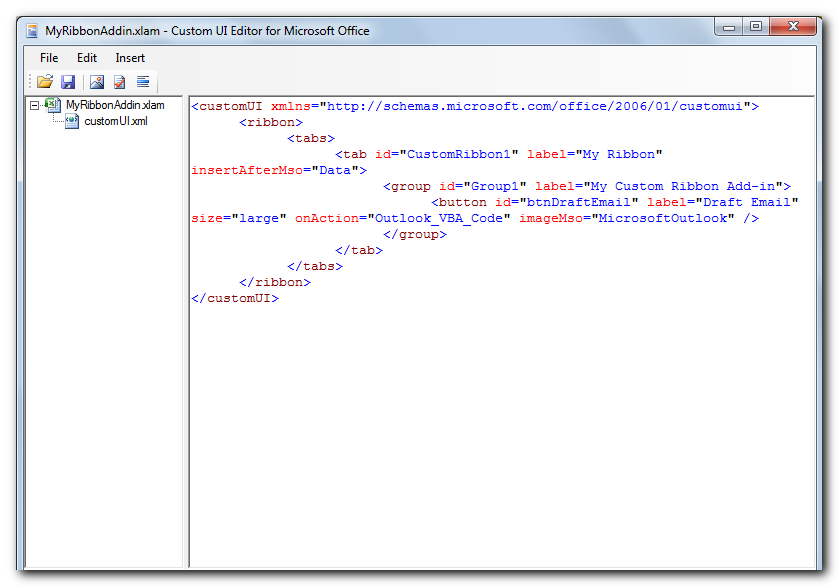
Paste the following XML code in the editor section
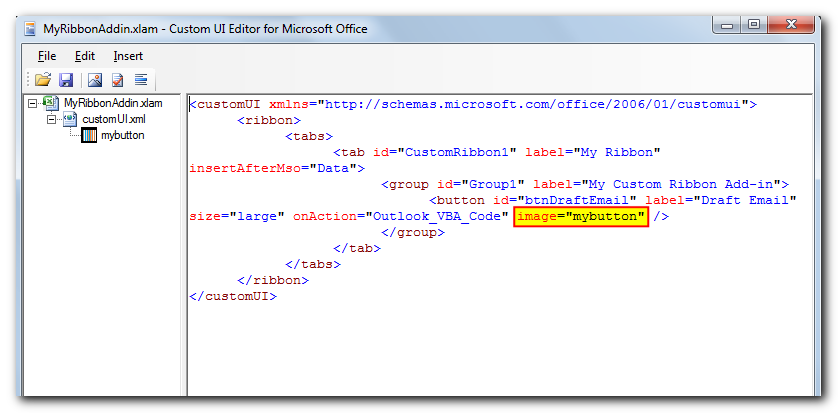
<customUI xmlns=”http://schemas.microsoft.com/office/2006/01/customui”>
<ribbon>
<tabs>
<tab id=”CustomRibbon1″ label=”My Ribbon” insertAfterMso=”Data”>
<group id=”Group1″ label=”My Custom Ribbon Add-in”>
<button id=”btnDraftEmail” label=”Draft Email” size=”large” onAction=”Outlook_VBA_Code” imageMso=”MicrosoftOutlook” />
</group>
</tab>
</tabs>
</ribbon>
</customUI>
-
In your tool, if you want to use a custom image as button icon then follow the steps mentioned in Add Custom Image as Button Icon section
Save the code and exit from the application

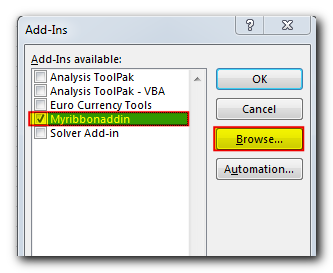
Step 3: Now as we have already saved our Excel Add-in, it’s time to use it. For this, we will open Excel application and go to Options under File menu
In ‘Add-Ins’ tab, select ‘Excel Add-ins’ from Manage dropdown and click on ‘Go’ button
You should now be able to see the add-in we have just saved with ‘MyRibbonAddin’ name in the list. If the add-in is not visible in the list, use the browse button to add the same.
Now the add-in is linked with Excel application open event; hence it will be automatically opened or activated as soon as you open any Excel file.
Step 4: Let’s use the Add-in now. For this, we will add some dummy data in any opened Excel file
Select any cell in second row and click on the ‘Draft Email’ button under ‘My Ribbon’
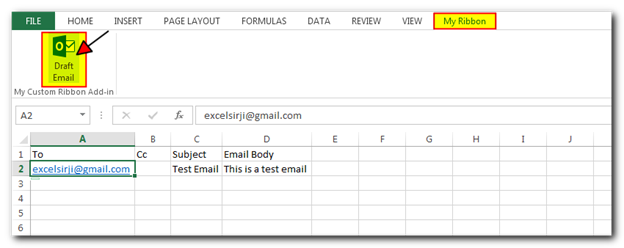
The Add-in macro will read the details from active row of the active Excel file and draft the email like below
Add Custom Image as Button Icon
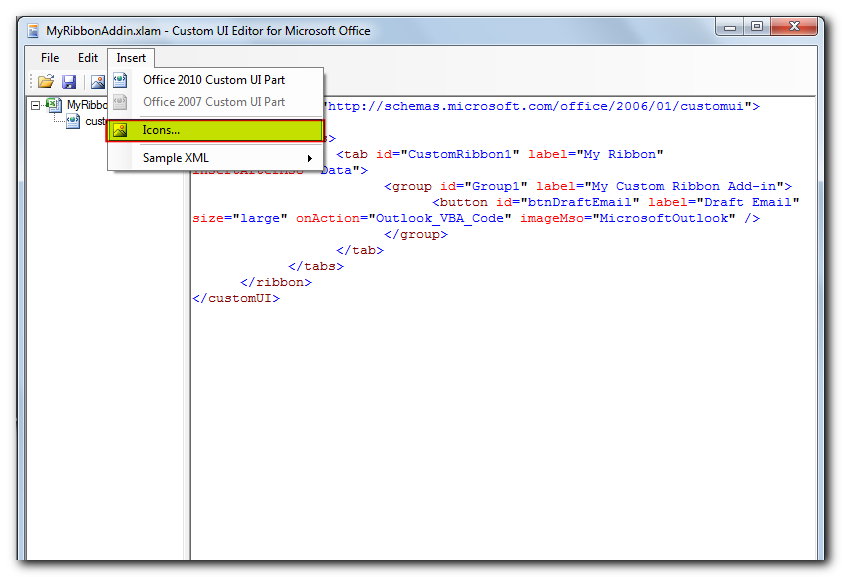
Step 1: Open the Excel file in Custom UI Editor Application
Step 2: Click on ‘Icons’ under Insert menu
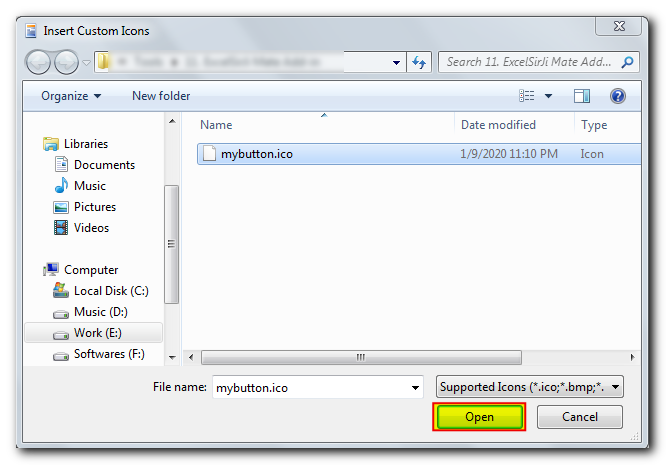
Step 3: Select your custom icon and click on ‘Open’ button
Step 4: You will notice that the icon is added under customUI.xml
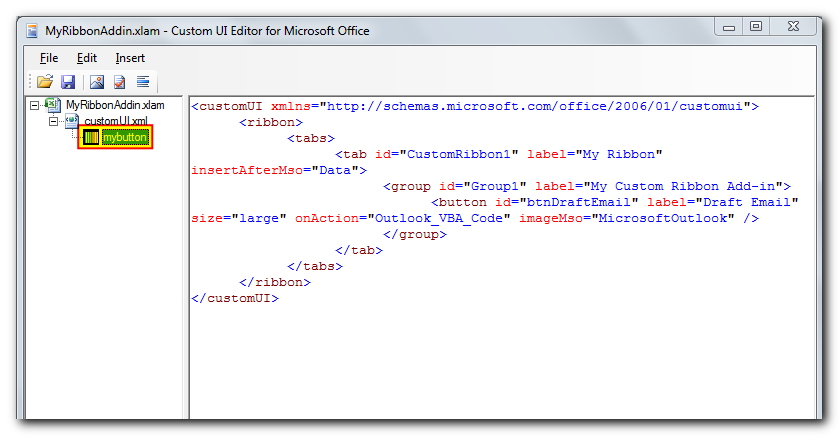
Step 5: Now it’s time to change the XML code to use the custom icon added by us as button icon. For this, remove the imageMso property of button and set image property to mybutton (icon name)
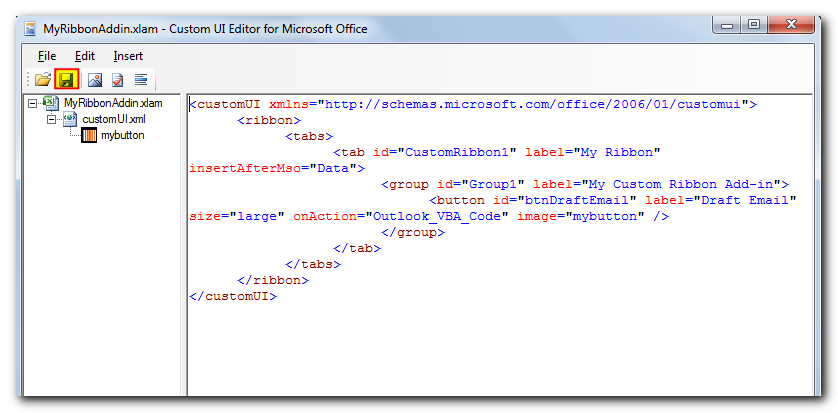
Step 6: Save the code and exit from the application
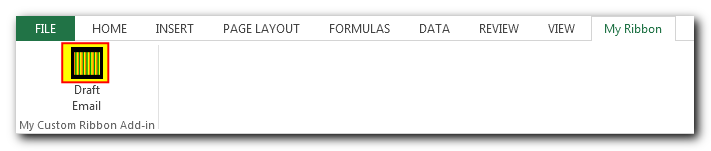
Step 7: Here is how our ribbon looks like with custom image as button icon
Sample XML Codes for Creating Checkbox, Dropdown and Other Controls in Ribbon
In the above article, we have used a button to create the ribbon. To help our subscribers, we are sharing few more XML codes for reference which can used to create different types of controls in a Ribbon such as ButtonGroup, CheckBox, ComboBox, DropDown, EditBox, Label, Menu and ToggleButton.
buttonGroup (Button Grouping Container)
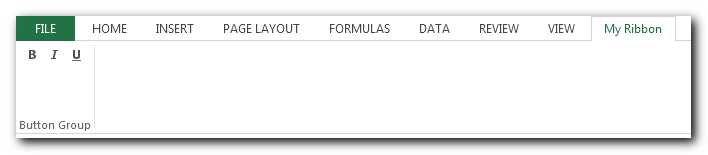
<customUI xmlns="http://schemas.microsoft.com/office/2006/01/customui">
<ribbon>
<tabs>
<tab id="CustomRibbon1" label="My Ribbon" insertAfterMso="Data">
<group id="Group1" label="Button Group">
<buttonGroup id="buttonGroup1">
<button id="button1" imageMso="Bold" onAction="Button1ClickEvent"/>
<button id="button2" imageMso="Italic" onAction="Button2ClickEvent"/>
<button id="button3" imageMso="Underline" onAction="Button3ClickEvent"/>
</buttonGroup>
</group>
</tab>
</tabs>
</ribbon>
</customUI>
checkbox (Check Box)

<customUI xmlns="http://schemas.microsoft.com/office/2006/01/customui">
<ribbon>
<tabs>
<tab id="CustomRibbon1" label="My Ribbon" insertAfterMso="Data">
<group id="Group1" label="Custom Group">
<checkBox id="checkBox" label="CheckBox" onAction="ClickEvent" />
</group>
</tab>
</tabs>
</ribbon>
</customUI>
comboBox (Combo Box)
<customUI xmlns="http://schemas.microsoft.com/office/2006/01/customui">
<ribbon>
<tabs>
<tab id="CustomRibbon1" label="My Ribbon" insertAfterMso="Data">
<group id="Group1" label="Custom Group">
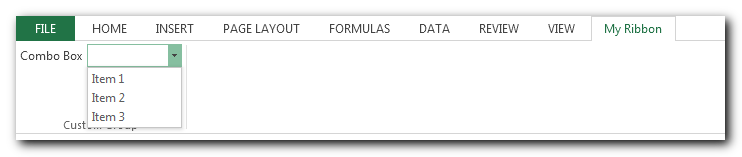
<comboBox id="comboBox" label="Combo Box" onChange="ClickMe">
<item id="item1" label="Item 1"/>
<item id="item2" label="Item 2"/>
<item id="item3" label="Item 3"/>
</comboBox>
</group>
</tab>
</tabs>
</ribbon>
</customUI>dropDown (Dropdown Control)
<customUI xmlns="http://schemas.microsoft.com/office/2006/01/customui">
<ribbon>
<tabs>
<tab id="CustomRibbon1" label="My Ribbon" insertAfterMso="Data">
<group id="Group1" label="Custom Group">
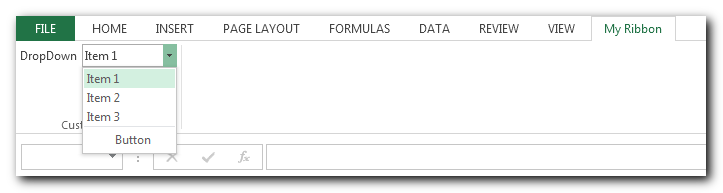
<dropDown id="dropDown" label="DropDown" onAction="ClickEvent">
<item id="item1" label="Item 1" />
<item id="item2" label="Item 2" />
<item id="item3" label="Item 3" />
<button id="button" label="Button" onAction="ClickEvent_2" />
</dropDown>
</group>
</tab>
</tabs>
</ribbon>
</customUI>editBox (Edit Box)

<customUI xmlns="http://schemas.microsoft.com/office/2006/01/customui">
<ribbon>
<tabs>
<tab id="CustomRibbon1" label="My Ribbon" insertAfterMso="Data">
<group id="Group1" label="Custom Group">
<editBox id="editBox" label="Edit Box" onChange="ClickEvent"/>
</group>
</tab>
</tabs>
</ribbon>
</customUI>
labelControl (Text Label)
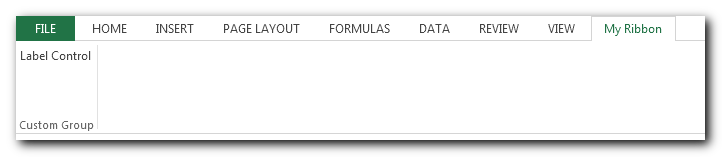
<customUI xmlns="http://schemas.microsoft.com/office/2006/01/customui">
<ribbon>
<tabs>
<tab id="CustomRibbon1" label="My Ribbon" insertAfterMso="Data">
<group id="Group1" label="Custom Group">
<labelControl id="label" label="Label Control" />
</group>
</tab>
</tabs>
</ribbon>
</customUI>
menu (Menu)
<customUI xmlns="http://schemas.microsoft.com/office/2006/01/customui">
<ribbon>
<tabs>
<tab id="CustomRibbon1" label="My Ribbon" insertAfterMso="Data">
<group id="Group1" label="Custom Group">
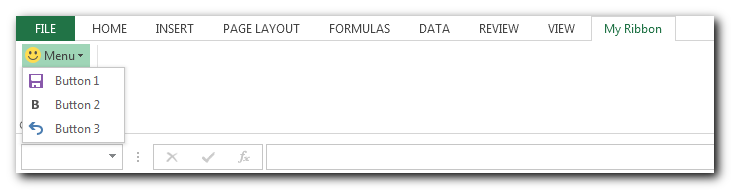
<menu id="menu" label="Menu" imageMso="HappyFace" >
<button id="button1" label="Button 1" imageMso="FileSave" onAction="Bultton1ClickEvent" />
<button id="button2" label="Button 2" imageMso="Bold" onAction="Bultton2ClickEvent" />
<button id="button3" label="Button 3" imageMso="Undo" onAction="Bultton3ClickEvent" />
</menu>
</group>
</tab>
</tabs>
</ribbon>
</customUI>toggleButton (Toggle Button)
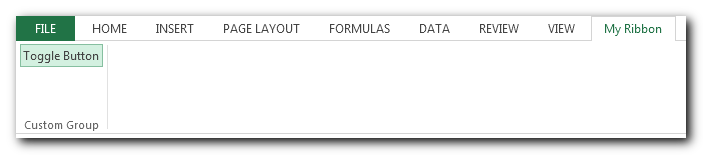
<customUI xmlns="http://schemas.microsoft.com/office/2006/01/customui">
<ribbon>
<tabs>
<tab id="CustomRibbon1" label="My Ribbon" insertAfterMso="Data">
<group id="Group1" label="Custom Group">
<toggleButton id="toggleButton" label="Toggle Button" onAction="ClickEvent" />
</group>
</tab>
</tabs>
</ribbon>
</customUI>
Download Practice File
You can also practice this through our practice files. Click on the below link to download the practice file.
Recommended Articles
- VBA to Read Excel Data using Connection String
- Excel VBA Tool to Get File Properties
- VBA Code to Re-link MS Access Link Tables
- VBA Code to List Files in Folder
- VBA Code to Check if File Exist in Folder
Excel VBA Course : Beginners to Advanced
We are offering Excel VBA Course for Beginners to Experts at discounted prices. The courses includes On Demand Videos, Practice Assignments, Q&A Support from our Experts. Also after successfully completion of the certification, will share the success with Certificate of Completion
This course is going to help you to excel your skills in Excel VBA with our real time case studies.
Lets get connected and start learning now. Click here to Enroll.
Secrets of Excel Data Visualization: Beginners to Advanced Course
Here is another best rated Excel Charts and Graph Course from ExcelSirJi. This courses also includes On Demand Videos, Practice Assignments, Q&A Support from our Experts.
This Course will enable you to become Excel Data Visualization Expert as it consists many charts preparation method which you will not find over the internet.
So Enroll now to become expert in Excel Data Visualization. Click here to Enroll.
Are you enjoying learning with us, please follow us on Social Media
Как написать и использовать собственную надстройку в Excel
Если пользователь давно и плотно работает с Excel, то рано или поздно у
него собирается приличное количество макросов для автоматизации своей
работы. Если хранить код макроса в рабочем файле, возникают следующие
трудности:
-
при открытии такого файла будет каждый раз срабатывать защита от макросов
и нужно будет всякий раз подтверждать исключение безопасности или отключить
защиту полностью, что небезопасно; - если макрос нужен везде, то и копировать код его придется в каждую книгу;
-
сохранять файл нужно в формате с поддержкой макросов (xlsm) или в формате
двоичной книги (xlsb).
Если макросов много, а используются они часто более рационально будет
создание собственной надстройки Excel — отдельного файла
особого формата (xla – Excel2003, xlam – Excel2010 и старше), содержащего
все макросы.
Плюсы такого подхода очевидны:
-
больше не будет срабатывать защита от макросов, потому
что надстройки по определению входят в доверенные источники; -
однократное подключение надстройки в Excel. Теперь её
VBA процедуры и функции можно будет использовать в любом файле на
компьютере. Сохранять ваши рабочие файлы в xlsm- и xlsb-форматы, также не
требуется потому, что исходный текст будет храниться не в них, а в
файле надстройки. - можно сделать отдельную вкладку на ленте Excel для запуска макросов надстройки.
- Надстройку легко переносить с компьютера на компьютер — это отдельный файл.
Рассмотрим процесс создания своей собственной надстройки для Excel на примере Excel 2010.
1. Создать файл надстройки
Открываем Excel с пустой книгой и сохраняем ее в формате надстройки с
помощью команды Файл — Сохранить как, например,ExcelPlus), указав тип файла Надстройка Excel (Excel Add-in):
По умолчанию Excel хранит надстройки в папке C:Users<Учетная запись пользователя
>AppDataRoamingMicrosoftAddIns, но можно указать и любую другую
папку.
2. Подключить созданную надстройку
Теперь созданную нами на прошлом шаге надстройку ExcelPlus надо
подключить к Excel. Для этого в меню Файл — Параметры — Надстройки, жмем на кнопку Перейти в нижней части окна:
Если вы скопировали файл надстройки в папку по умолчанию, то новая
надстройка ExcelPlus должна появиться в списке доступных
надстроек:
Либо в этом окне жмем Обзор и указываем
положение нашего файла надстройки.
Ставим флажок напротив названия настройки и жмем ОК.
3. Добавить макросы в надстройку
Теперь надстройка подключена к Excel, но она не может работать, так как в
ней отсутствуют макросы. Добавим макрос в надстройку. Для этого откроем
редактор VBA по Alt+F11 или кнопкой Visual Basic на
вкладке Разработчик:
В левом верхнем углу редактора должно быть окно Project
В этом окне отображаются все открытые книги и запущенные надстройки Excel,
в том числе и наша надстройка — VBAProject ( ExcelPlus.xlam) Выделите её мышью и добавьте в неё новый
модуль через меню Insert — Module.
В этом модуле будет хранится VBA-код макросов надстройки.
Добавим в добавленный пустой модуль код макроса, который производит поиск в
тексте кириллических символов:
После вставки кода нужно нажать на кнопку сохранения дискетку в левом
верхнем углу.
Такие макросы как FindCyr называют еще процедурами. Макросы в составе надстроек можно запустить также как
обычные макросы:
-
при помощи сочетания клавиш Alt+F8, а затем нажать кнопку Выполнить
(макросы надстроек здесь не видны. Несмотря на это, мы можем ввести имя нашей процедуры в поле Имя макроса); - назначить сочетание клавиш для быстрого запуска макроса — кнопка Параметры в окне Макрос
- создать кнопку для нашего макроса на панели быстрого доступа в левом верхнем углу окна.
Подробнее и с картинками о способах запуска макроса написано здесь.
Мы же позже разберем, как создать отдельную вкладку на ленте Excel для
запуска макросов надстройки, но сначала рассмотрим добавление в надстройку
пользовательских функций.
4. Добавить функции в надстройку
Кроме макросов-процедур, существуют еще и макросы-функции или
пользовательская функция. Создадим в нашей надстройке еще один
модуль меню Insert — Module и вставим туда код функции,
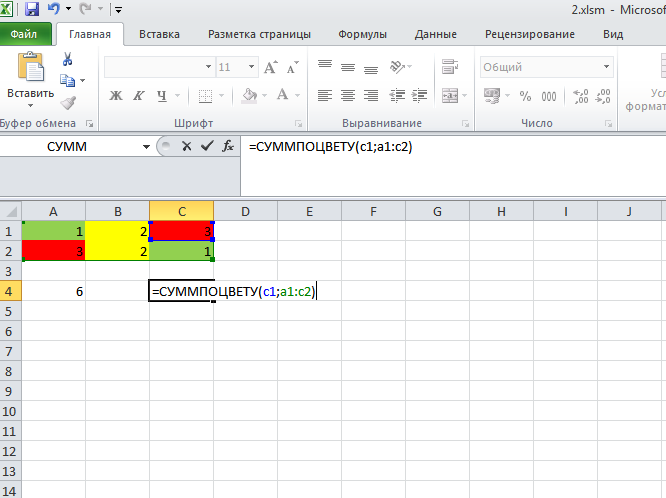
которая находит сумму ячеек нужного цвета:
Отличие функции от процедуры заключается в том, что результат функции
всегда присваивается переменной с названием функции.
Функцию невозможно запустить как предыдущий макрос-процедуру через
диалоговое окно Макросы и кнопку Выполнить. Ее нужно использовать как стандартную функцию
листа (СУММ, ЕСЛИ, …), т.е. просто ввести в любую ячейку, указав в
качестве аргументов ячейку с цветом-образцом и диапазон суммирования:
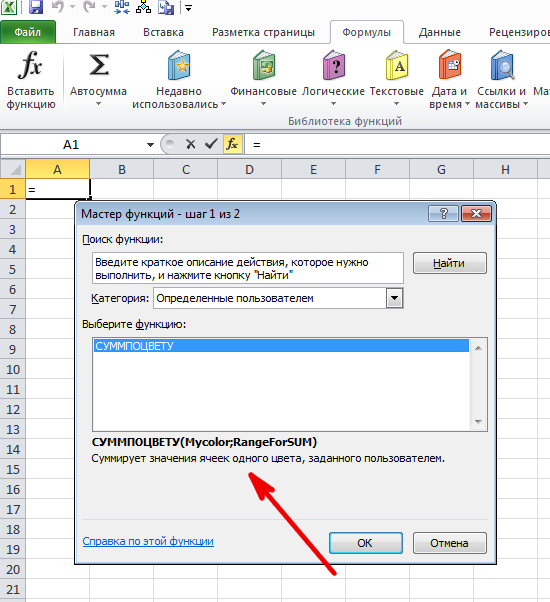
Или ввести через стандартное диалоговое окно вставки функции (кнопка fx в строке формул),
выбрав категорию Определенные пользователем:

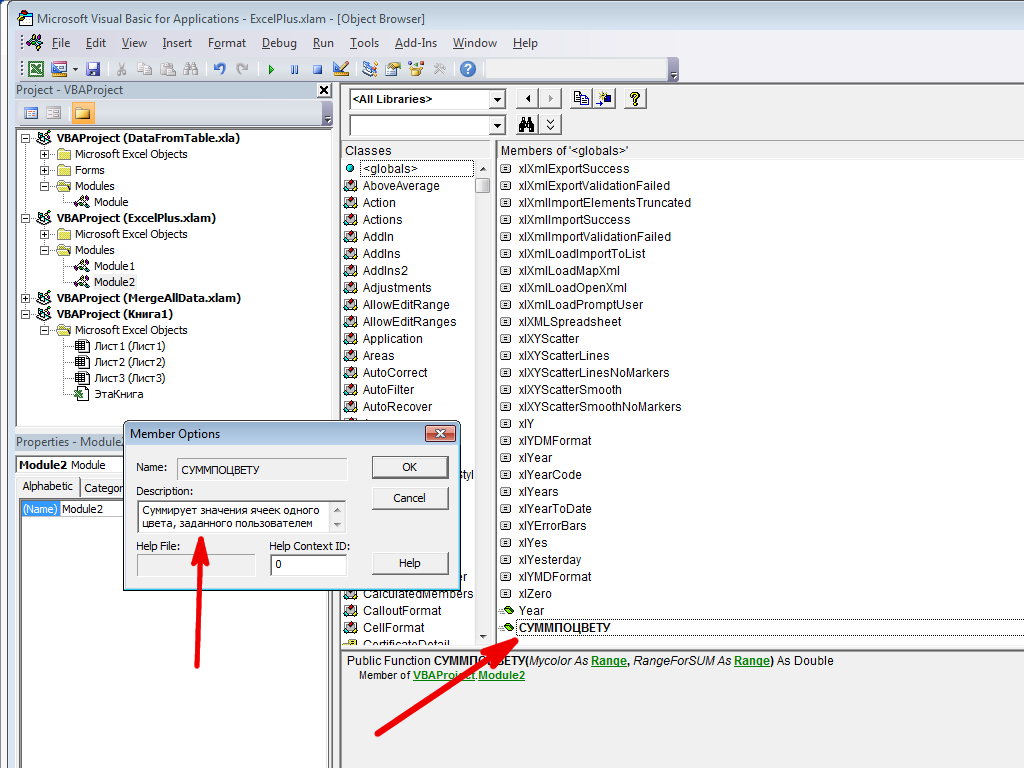
У созданных пользователем функций отсутствует описание функции в нижней
части окна. Чтобы его добавить, нужно:
- Открыть редактор VBA по Alt+F11.
-
Выделить нашу надстройку в панели Project и нажмите клавишу F2, чтобы
открыть окно Object Browser -
Выбрать в верхней части окна в выпадающем списке свой проект надстройки
(в конце списка) - Щелкнуть по появившейся функции правой кнопкой мыши и выберите команду Properties.
- Ввести описание функции в окно Description:
- Сохранить файл надстройки и перезапустите Excel.
После перезапуска у функции должно отобразиться описание:
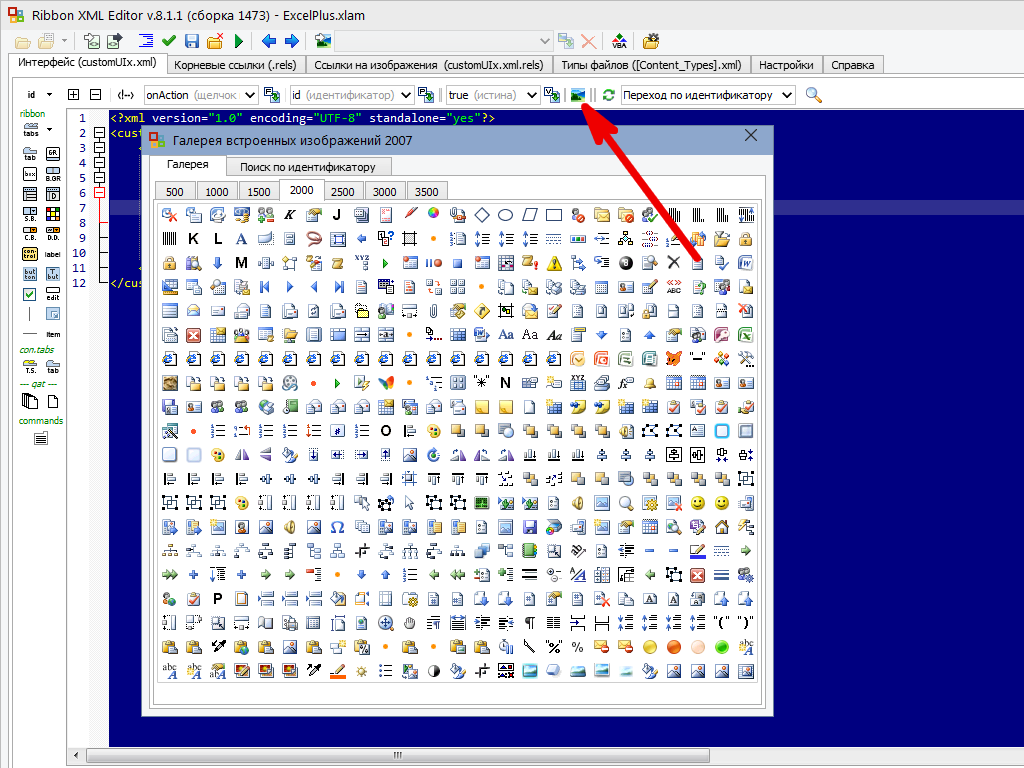
5. Создать вкладку надстройки в интерфейсе Excel
Отдельная вкладка с кнопкой запуска нашего макроса будет появляться в
интерфейсе Excel после подключения нашей надстройки.
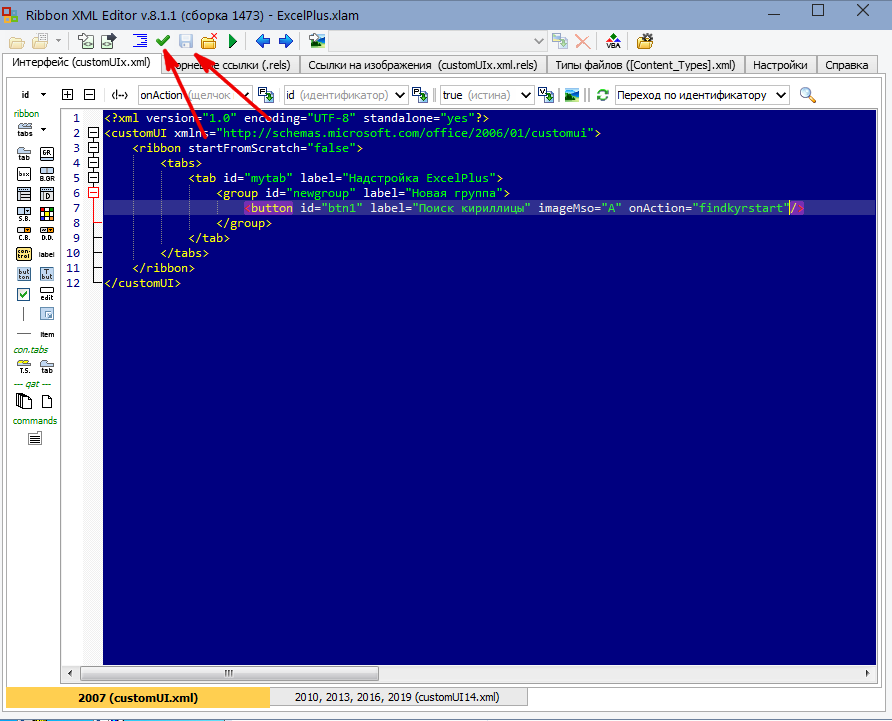
Мы будем писать код вкладки с помощью бесплатной программы для редактирования XML
Ribbon XML Editor
- Закрыть все окна Excel.
- Запустить программу Ribbon XML Editor и открыть в ней файл надстройки Excel Plus.xlam.
-
При помощи кнопки tabs в левом верхнем углу добавить
заготовку кода для новой вкладки -
В кавычки по стрелке нужно вписать id — любые уникальные
идентификаторы вкладки и группы, а в label — названия
вкладки и группы кнопок на ней: -
При помощи кнопки button на панели слева добавляем
заготовку кода для кнопки и дописываем к ней: -
Проверить правильность сделанного с помощью кнопки с зеленой галочкой
сверху на панели инструментов. Рядом с ней нажмите на кнопку с дискетой для
сохранения изменений: - Закрыть Ribbon XML Editor
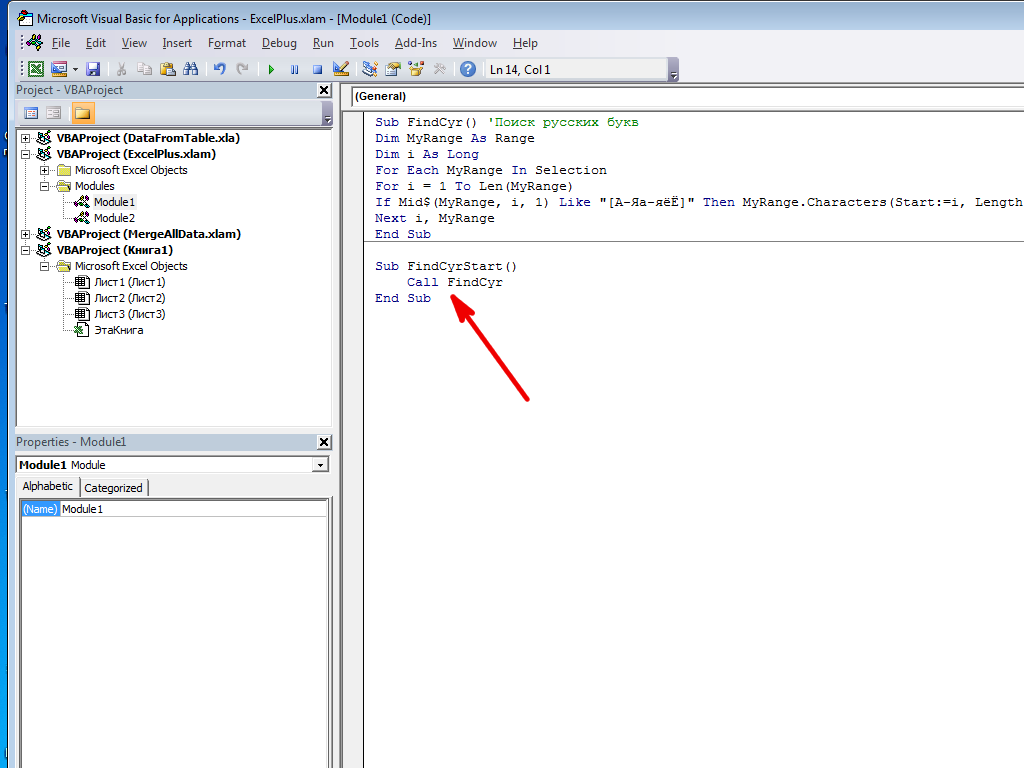
-
Открыть Excel, зайти в редактор VBA по Alt+F11 и добавить к нашему
макросу процедуру вызова FindCyrStart, для запуска
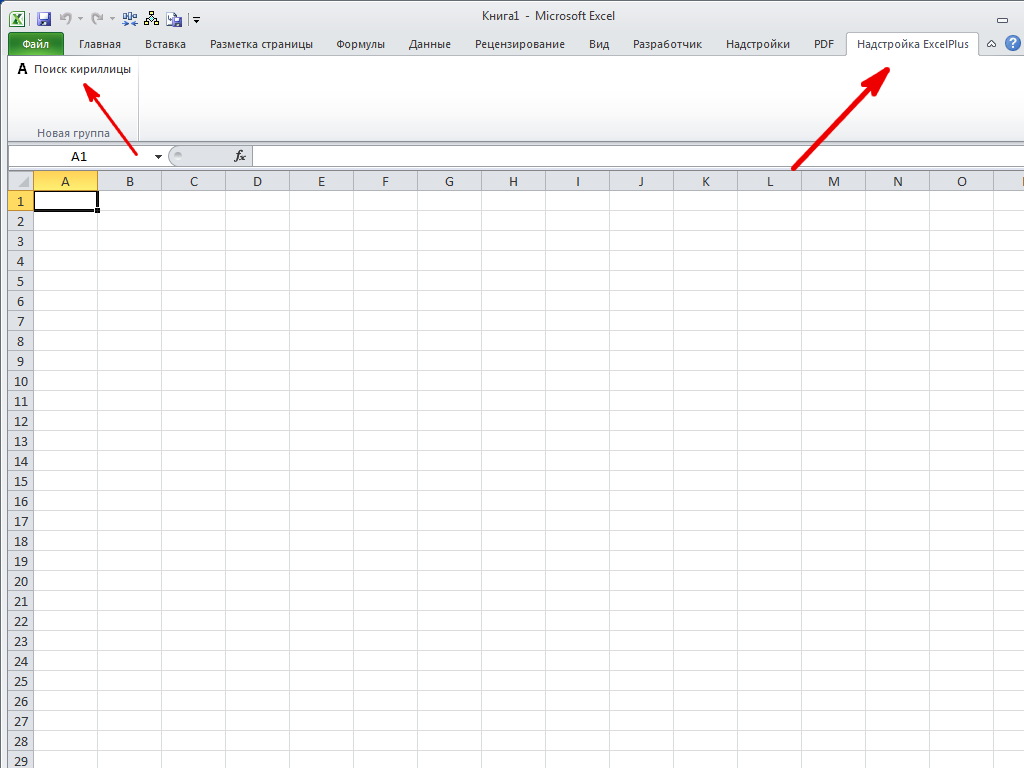
основного макросы поиска кириллицы. - Сохранить изменения в редакторе VBA и в Excel проверить результат:

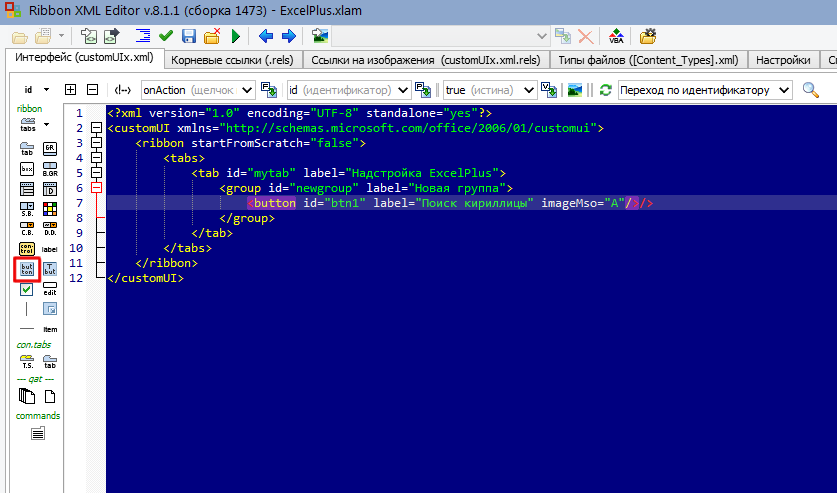
— Id – идентификатор кнопки;
— label — текст на кнопке;
— imageMso — условное название изображения на кнопке(иконка). Иконку можно выбрать из
большого числа изображений, щелкнув по кнопке:
— onAction
— имя процедуры обратного вызова — специального короткого макроса, который
будет запускать основной макрос FindCyr. Назвать эту
процедуру можно, например, FindCyrStart.
Это всё — надстройка готова к использованию. Теперь использовать макросы в
работе станет намного проще. Если показалось, что настройка ленты – это
слишком сложно, всегда можно использовать кнопки для запуска макросов из
панели быстрого запуска.


![]()