
Содержание
- Excel [DEPRECATED]
- General Limits
- Creating a connection
- Default
- Throttling Limits
- Actions
- Delete row [DEPRECATED]
- Parameters
- Get row [DEPRECATED]
- Parameters
- Returns
- Get rows [DEPRECATED]
- Parameters
- Returns
- Get tables [DEPRECATED]
- Parameters
- Returns
- Insert row [DEPRECATED]
- Parameters
- Returns
- Update row [DEPRECATED]
- Parameters
- Returns
- Definitions
- Table
- Подключение к источнику данных средствами MS Excel
- Excel Online (OneDrive)
- Known Issues and Limitations
- Column names handling
- Concepts and examples
- General Limits
- Throttling Limits
- Actions
- Add a key column to a table
- Parameters
- Add a row into a table
- Parameters
- Returns
- Add a row into a table [DEPRECATED]
- Parameters
- Returns
- Create table
- Parameters
- Returns
- Create worksheet
- Parameters
- Returns
- Delete a row
- Parameters
- Get a row
Excel [DEPRECATED]
Microsoft Excel is a spreadsheet developed by Microsoft. Connect to your Microsoft Excel spreadsheets in your file services like OneDrive for Business, OneDrive, Dropbox, Box, etc. You can perform various actions such as create, update, get, and delete on rows in a table.
This connector is available in the following products and regions:
| Service | Class | Regions |
|---|---|---|
| Power Automate | Standard | All Power Automate regions except the following: В В В В — В China Cloud operated by 21Vianet |
| Power Apps | Standard | All Power Apps regions except the following: В В В В — В China Cloud operated by 21Vianet |
| Contact | |
|---|---|
| Name | Microsoft |
| URL | Microsoft Power Automate Support Microsoft Power Apps Support |
| Connector Metadata | |
|---|---|
| Publisher | Microsoft |
| Website | https://products.office.com/excel |
The Excel Connector currently connects to Tables only. It will insert a column called __PowerAppsId__ to the Table if there is no such column. This column is used to keep track of changes in the row.
To use this connector in Power Apps, learn more here.
This connector is deprecated in Power Automate, Logic Apps and Power Apps. Please try using the new connectors to work with Excel files: Excel Online (Business) and Excel Online (OneDrive).
LIMITS
The following are some of the limits and restrictions:
- Maximum number of rows and columns on a worksheet — 1048576 rows and 16384 columns
General Limits
| Name | Value |
|---|---|
| Maximum file size (in bytes) | 2000000 |
| Maximum number of requests being processed by the connector concurrently (per Excel file) | 100 |
Creating a connection
The connector supports the following authentication types:
| Default | Parameters for creating connection. | All regions | Not shareable |
Default
Applicable: All regions
Parameters for creating connection.
This is not shareable connection. If the power app is shared with another user, another user will be prompted to create new connection explicitly.
| Name | Type | Description | Required |
|---|---|---|---|
| Connection to file source | connection | Connection to file source | True |
Throttling Limits
| Name | Calls | Renewal Period |
|---|---|---|
| API calls per connection | 100 | 60 seconds |
Actions
Deletes a row from an Excel table
Retrieves a single row from an Excel table
Retrieves rows from an Excel table
Retrieves table names from an Excel file
Inserts a new row into an Excel table
Updates an existing row in an Excel table
Delete row [DEPRECATED]
Deletes a row from an Excel table
Parameters
Excel file name
Excel table name
Unique identifier of the row to delete
Get row [DEPRECATED]
Retrieves a single row from an Excel table
Parameters
| Name | Key | Required | Type | Description |
|---|---|---|---|---|
Excel file name
Excel table name
Unique identifier of row to retrieve
Returns
Get rows [DEPRECATED]
Retrieves rows from an Excel table
Parameters
| Name | Key | Required | Type | Description |
|---|---|---|---|---|
Excel file name
Excel table name
Total number of entries to retrieve (default = all).
The number of entries to skip (default = 0).
Returns
Get tables [DEPRECATED]
Retrieves table names from an Excel file
Parameters
| Name | Key | Required | Type | Description |
|---|---|---|---|---|
Excel file name
Returns
Represents a list of tables.
Insert row [DEPRECATED]
Inserts a new row into an Excel table
Parameters
| Name | Key | Required | Type | Description |
|---|---|---|---|---|
Excel file name
Excel table name
Row to insert into the specified Excel table
Returns
Update row [DEPRECATED]
Updates an existing row in an Excel table
Parameters
| Name | Key | Required | Type | Description |
|---|---|---|---|---|
Excel file name
Excel table name
Unique identifier of the row to update
Row with updated values
Returns
Definitions
Table
Represents a table.
| Name | Key | Required | Type | Description |
|---|---|---|---|---|
The name of the table. The name is used at runtime.
Источник
Подключение к источнику данных средствами MS Excel
Бывают ситуации, когда на рабочей станции отсутствуют такие средства взаимодействия с БД как: MS SQL Server Management Studio, Aquafold Aqua Data Studio, DBeaver и т.п., а вероятность их установки в краткосрочной перспективе близка к нолю. В то же время, присутствует острая необходимость подключения к этой самой БД и работы с данными. Как оказалось, на помощь может прийти старый добрый MS Excel.
В моем случае требовалось подключиться к MS SQL Server, однако, MS Excel умеет устанавливать соединение не только с ним, но и с большинством современных БД: MySQL, PostgreeSQL, IBM DB2 и даже Oracle и Teradata, а также с файлами данных CSV, XML, JSON, XLS(X), MDB и другими.
Теперь немного о действиях, совершенных мной с целью подключения к базе:
В новой книге на ленте выбираем «(1) Данные» -> «(2) Получение внешних данных» -> «(3) Из других источников» -> «(4) С сервера SQL Server».
Далее, в окне Мастера подключения к данным, заполняем «(1) Имя сервера» -> «(2) Учетные сведения»[ -> «(3) Имя пользователя» и «Пароль»]. Таким образом, мы сообщаем MS Excel, с каким сервером мы хотим установить соединение и какой метод аутентификации хотим использовать. Я использовал «проверку подлинности Windows», но возможно также указать учетные данные отличные от установленных в Windows.
Выбираем целевую «(1) Базу данных» -> «(2)(3) Определенную таблицу» или «Несколько таблиц» или же базу в целом (тогда оба «чекбокса» оставляем пустыми).
После всех проделанных манипуляций, Мастер подключения предложит сохранить файл подключения. Потребуется задать «(1) Имя файла». Желательно также указать «(2) Описание» и «(3) Понятное имя файла», чтобы спустя время было понятно какой файл подключения к какой базе или таблице обращается.
Теперь выбрать созданное подключение можно будет следующим образом: «(1) Данные» -> «(2) Получение внешних данных» -> «(3) Существующие подключения».
Открыв только что созданное подключение, в случае если вы соединялись с базой в целом, MS Excel опять предложит выбрать одну или несколько конкретных таблиц:
Определив таблицы, MS Excel предложит выбрать «(1) Способ представления данных» и «(2) Куда следует поместить данные». Для простоты я выбрал табличное представление и размещение на уже имеющемся листе, чтобы не плодить новые. Далее следует нажать на «(3) Свойства».
В свойствах подключения, нужно перейти на вкладку «(1) Определение». Здесь можно выбрать «(2) Тип команды». Даже если требуется выгружать лишь одну таблицу без каких-либо связей, настоятельно рекомендую выбрать SQL команду, чтобы иметь возможность ограничить размер выгружаемой таблицы (например, с помощью TOP(n)). Так, если вы попытаетесь выгрузить целиком таблицу базы, это может привести в лучшем случае к замедлению работы MS Excel, а в худшем к падению программы, к тому же – это необоснованная нагрузка на сам сервер базы данных и на сеть. После того как «(3) Текст команды» будет введен и нажата кнопка «ОК», MS Excel предложит сохранить изменения запроса – отвечаем положительно.
В итоге получаем данные прямо из базы, что и требовалось.
Источник
Excel Online (OneDrive)
Excel Online (OneDrive) connection provider lets you work with Excel files stored in OneDrive. This connection provider only supports personal (MSA) accounts.
This connector is available in the following products and regions:
| Name | Path | Type | Description |
|---|---|---|---|
| Service | Class | Regions |
|---|---|---|
| Logic Apps | Standard | All Logic Apps regions |
| Power Automate | Standard | All Power Automate regions except the following: В В В В — В China Cloud operated by 21Vianet |
| Power Apps | Standard | All Power Apps regions except the following: В В В В — В China Cloud operated by 21Vianet |
| Connector Metadata | |
|---|---|
| Publisher | Microsoft |
Known Issues and Limitations
- The maximum size of an Excel file that is supported by the Excel Online (OneDrive) connector is 5 MB.
- The data may not be up to date (there may be some delay) when filtering or sorting is used in the List rows present in a table action.
- The List rows present in a table action supports basic filtering and sorting:
- Supports the following filter functions: eq, ne, contains, startswith, endswith.
- Only 1 filter function can be applied on a column.
- Only 1 column can be used for sorting.
- The List rows present in a table action returns up to 256 rows by default. In order to get all rows, please turn on pagination.
- An Excel file may be locked in OneDrive for an update or delete up to 12 minutes since the last use of the connector.
- Simultaneous file modifications made by other connectors or manual edits are not supported. Users should avoid writing data to a single Excel file from multiple clients concurrently (Excel Desktop, Excel Web, Power Automate, LogicApps or PowerApps). This can cause possible merge conflicts and data inconsistency.
- The connector supports files in Microsoft Excel Open XML Spreadsheet (*.xlsx) and Microsoft Excel Binary Workbook (.xlxb) formats.
- The connector retrieves rows for 500 columns maximum in the List rows present in a table action. Rows for first 500 columns are returned by default. You can provide comma-separated list of specific columns to retrieve in Select Query parameter.
- The connector doesn’t support using OData parameters for tables that contain hidden columns.
- The connector timeout caused by re-calculations can occur, either there are complicated formulas or there are too many rows in the worksheet. In both cases, data can be inserted multiple times because of retry policy. As a workaround, please see if the formulas could be simplified or reduced. Otherwise, you may set calculation mode for this workbook to Manual. For more details, please refer here
- Write access to a file is required for all actions, otherwise Graph API would return 403 Forbidden error. Also, connector will return the 502 BadGateway error if the spreadsheet is in a read-only mode. To disable read-only mode, please learn more here.
- Filter Query / Order By / Select Query operation parameters support only alphanumeric column names.
- Pivot tables are not supported due to Graph API limitations.
- If a user makes too many requests within a short period of time, it is possible to get a 429 response. The throttling limit is unique to each request and it varies based on the request count, memory used, and other important factors.
- In operations such as Delete a row , the key column field is case-sensitive .
- In case of multiple matches in operations such as Update a row , Delete a row operations, only the first row will be updated/deleted.
- Changes committed by operations such as Create a row , Update a row , Delete a row do not always take affect immediately after successful response from a corresponding Power Automate, LogicApps or Power Apps actions. Delays up to 30 seconds are expected due to underlying backend service limitations.
- The connector can populate up to 64000 rows automatically if Insert auto generated id into Excel table option is selected during a table import in PowerApps.
- Tables column headers that contain only a number can cause unexpected behavior in operations such as Update a row , Delete a row due to underlying backend service limitations. As a workaround please rename such columns so that they contain other characters as well.
- An Excel file may be modified and a new version may be visible in Version history of the file even when a «read-only» action is executed. This behavior is by design due to internal save mechanisms of the connector’s backend service.
Column names handling
Please note that column names in the action’s response results may be transformed in order to be compatible with OData format:
| Character | Encoded value |
|---|---|
| . | _x002e_ |
| @ | _x0040_ |
| : | _x003a_ |
| # | _x0023_ |
E.g. Column [one]#1 -> Column [one]_x0023_1
Concepts and examples
- Key column : column in a table that will be use to search a value ( key value )
- Key value : value in the key column that will be used to identify a specific row.
Take the following table as an example. To perform a row operation in the second row of the table, the key column should be Column 1 and key value should be 200 .
| Column 1 | Column 2 | Column 3 |
|---|---|---|
| 100 | A-2 | A-3 |
| 200 | B-2 | B-3 |
| 300 | C-2 | C-3 |
General Limits
| Name | Value |
|---|---|
| Maximum number of identity column variants that can be used to Get/Insert/Update/Delete a row from a single excel table. Current value is set to 2, which means that up to two column name variants should be in use across workflows for one particular table. | 2 |
| Maximum number of rows the connector can populate automatically if ‘Insert auto generated id into Excel table option’ is selected during a table import in PowerApps. | 64000 |
Throttling Limits
| Name | Calls | Renewal Period |
|---|---|---|
| API calls per connection | 100 | 60 seconds |
Actions
Add a key column to an Excel table. The new column will be appended to the right. The new key column must be unique in the table.
Add a new row into the Excel table.
This action has been deprecated. Please use Add a row into a table instead.
Add a new row into the Excel table.
Create a new table in the Excel workbook.
Create a new worksheet in the Excel workbook.
Delete a row using a key column.
Get a row using a key column. This action will retrieve all the values of the specified row given a column and key column.
Get a list of tables in the Excel workbook.
Get a list of worksheets in the Excel workbook.
List rows present in a table.
Update a row using a key column. The input value will overwrite the specified cells and columns left blank will not be updated. In order to append (instead of overwrite) a value, use the «Get a row» action to retrieve the content first.
Add a key column to a table
Add a key column to an Excel table. The new column will be appended to the right. The new key column must be unique in the table.
Parameters
Select an Excel file through File Browse.
Select a table from the drop-down.
Provide the key column name.
Add a row into a table
Add a new row into the Excel table.
Parameters
| Name | Key | Required | Type | Description |
|---|---|---|---|---|
Select an Excel file through File Browse.
Select a table from the drop-down.
Row to add into the specified Excel table.
Returns
Add a row into a table [DEPRECATED]
This action has been deprecated. Please use Add a row into a table instead.
Add a new row into the Excel table.
Parameters
| Name | Key | Required | Type | Description |
|---|---|---|---|---|
Select an Excel file through File Browse.
Select a table from the drop-down.
Row to insert into the specified Excel table.
Returns
Create table
Create a new table in the Excel workbook.
Parameters
| Name | Key | Required | Type | Description |
|---|---|---|---|---|
Select an Excel file through File Browse.
Enter the Excel table name.
Enter the table address using A1 notation.
Enter the columns names separated by ‘;’ or ‘,’.
Returns
Create worksheet
Create a new worksheet in the Excel workbook.
Parameters
| Name | Key | Required | Type | Description |
|---|---|---|---|---|
Select an Excel file through File Browse.
Returns
Delete a row
Delete a row using a key column.
Parameters
| Name | Key | Required | Type | Description |
|---|---|---|---|---|
Select an Excel file through File Browse.
Select a table from the drop-down.
Select a column from the drop-down.
Enter the key value.
Get a row
Get a row using a key column. This action will retrieve all the values of the specified row given a column and key column.
Источник
Adblock
detector
| Name | Key | Required | Type | Description |
|---|---|---|---|---|

Data Everywhere’s Excel Connector is an Excel Add-in. It is a program that is installed inside of your desktop version of Excel and gives your locally installed Excel the ability to communicate directly with Data Everywhere. Your spreadsheets can now send and receive data automatically with Data Everywhere, and with any other system that is integrated with Data Everywhere, for example, via a Data Everywhere database connector.
Features
- Automatically retrieve data from other systems, via Data Everywhere
- Publish data out to other systems, via Data Everywhere
- Share feed with other users
- View a full history of all changes to the data
System Requirements
The Excel Connector supports Excel on Windows. The connector does not support Mac Excel.
Connector Introduction
Connector is a Java based backend extension for WaveMaker applications. Connectors are built as Java modules & exposes java based SDK to interact with the connector implementation.
Each connector is built for a specific purpose and can be integrated with one of the external services. Connectors are imported & used in the WaveMaker application. Each connector runs on its own container thereby providing the ability to have it’s own version of the third party dependencies.
Features of Connectors
- Connector is a java based extension which can be integrated with external services and reused in many Wavemaker applications.
- Each connector can work as an SDK for an external system.
- Connectors can be imported once in a WaveMaker application and used many times in the applications by creating multiple instances.
- Connectors are executed in its own container in the WaveMaker application, as a result there are no dependency version conflict issues between connectors.
About Excel Connector
Excel Connector Introduction
Excel connector provides apis to parse the Excel files with tabular structures & returns the table data as java objects.
The return response can be directly mapped to entity classes that enable it to easily persist the entities into database tables directly.
Build
You can build this connector using following command
Deploy
You can import connector dist/excel-connector.zip artifact in WaveMaker Application using file upload option.
Using Excel Connector in WaveMaker Application
This connector will be exposing the following four api’s
readExcelAsMap(InputStream inputStream, boolean convertHeadersToFieldNames)
- This method will convert file inputStream to
List<Map<String, Object>> - convertHeaderToFieldNames if true it will convert headers in the Excel sheet to FieldNames
eg: Email address -> emailAddress
example:
      excelInput:
      sno  name    EmailAddress
      1    a       a@mail.com
      2    b       b@mail.com

      output:
        if convertHeadersToFieldNames is true
            [{emailAddress=a@gmail.com, sno=1.0, name=a}, {emailAddress=b@gmail.com, sno=2.0, name=b}]
        if convertHeadersToFileNames is false
            [{Sno=1.0, Email address=a@gmail.com, Name=a}, {Sno=2.0, Email address=b@gmail.com, Name=b}]
        we can observe that when convertHeadersToFieldNames is true we will be convering headers to fieldNames eg:Email address -> emailAddress
Invocation snippet:

List<Map<String, Object>> result = excelConnector.readExcelAsMap(getClass().getClassLoader().getResourceAsStream("sample.xlsx"),
                false);
readExcelAsMap(File file, boolean convertHeadersToFieldNames)
- This method is same as the previous method except that it takes
Java.io.Fileas an input instead ofJava.io.InputStream
Invocation snippet:

List<Map<String, Object>> employeeList = excelConnector.readExcelAsMap(new File(getClass().getClassLoader().getResource("sample.xlsx").getPath()),
                true);
readExcelAsObject(InputStream inputStream, Class cls)
- This method will convert file inputStream to
List<clsObjects> - cls to target object to which entities to be casted
example:
      excelInput:
      sno  name    EmailAddress
      1    a       a@mail.com
      2    b       b@mail.com

      cls Employee
      output: [Employee1,Employee2]
Invocation snippet:

List<Employee> employeeList = excelConnector.readExcelAsObject(getClass().getClassLoader().getResourceAsStream("sample.xlsx"),
                Employee.class);
readExcelAsObject(File file, Class cls)
- This method is same as the previous method except that it takes
Java.io.Fileas an input instead ofJava.io.InputStream
Invocation snippet:

List<Employee> employeeList = excelConnector.readExcelAsObject(new File(getClass().getClassLoader().getResource("sample.xlsx").getPath()),
                Employee.class);
User Guide for the Excel Connector
Excel Connector Overview
The excel connector is a custom connector for User & Group Sync, internally developed by the resolution team to aid with support cases. Since SAML 5.0 / User & Group Sync 2.0 it is already part of the app, for its ease of use and numerous advantages as an alternative to direct database modifications. Note that the import option should be used with caution.
![]()
By design, the Excel Import option of the Excel Connector will modify the information stored in your user directory to include data that has been manually manipulated and transformed on an excel file.
To avoid unexpected results, make sure you understand the consequences of every import, and always test in a development or staging environment before using the connector.
If you have doubts or questions about the process, please do not hesitate to contact us via https://www.resolution.de/go/support.
Features
-
Export the set of users from either the internal user directory of the Atlassian application or your Identity Provider into an Excel file
-
Import users and their attributes from an existing Excel file
![]()
Note that the following attributes are read-only and won’t be modified with any import:
-
ATTRIBUTE_ID
-
ATTRIBUTE_IS_ADMIN
-
ATTRIBUTE_IS_SYSADMIN
-
ATTRIBUTE_JIRA_KEY
-
ATTRIBUTE_CONFLUENCE_KEY
Use Cases
Migrations
-
Ensure username matches to prepare migrations from the Atlassian application’s internal directory to an Identity Provider with User & Group Sync
-
Export users and import them back into the Atlassian application’s internal directory before deprecating LDAP
Periodic exports
-
Create scheduled reports for auditing purposes
Bulk operations
-
Create new users
- Migrate users from one directory to another (see full tutorial)
-
Update user profiles
-
Rename users (see full tutorial)
-
Modify user attributes
-
Modify group memberships
-
Requirements
-
SAML SSO 3.5.4 or later or User & Group Sync 1.4.4 or later
- SAML SSO versions before 5.0 and User & Group Sync before 2.0 require the Excel connector to be installed first, please read here
-
Ideally a staging/ development environment to test the functionality before applying any changes to the user directories
How to activate the Excel Connector
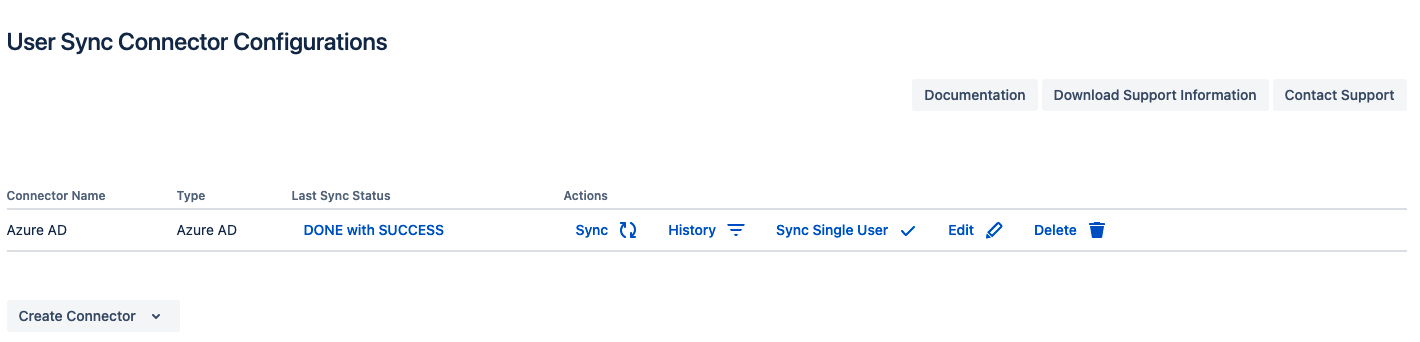
Navigate to the User & Group Sync connector list first:
Now press the key sequence xls on your keyboard. You’ll notice a confirmation: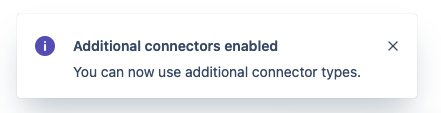
The Create Connector pick list now offers more connector types, two of them are
Export Users to Excel and Import Users from Excel connector: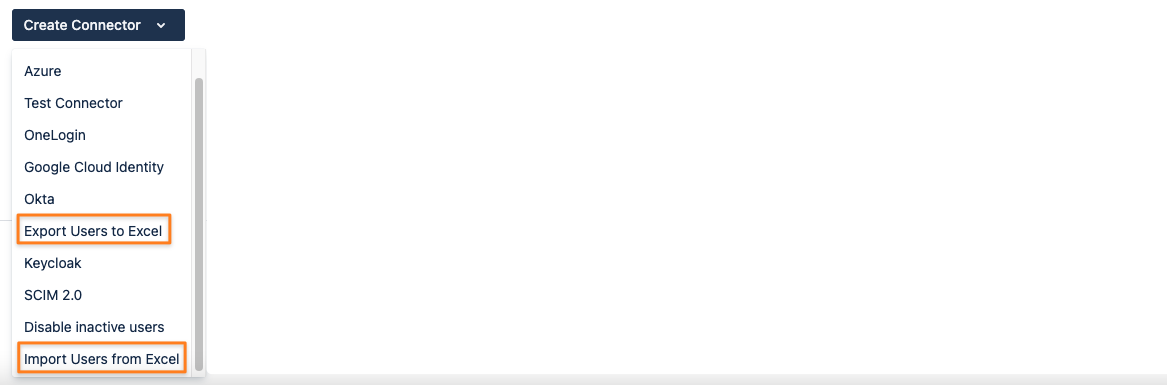
![]()
Please be aware that you need to enter the key sequence again whenever you reload the User & Group Sync page or continue working on it another day.
Additional connector types which have been added already will be preserved in the connector list, but you can’t add new ones, until you repeat the key sequence again.
![]()
We always recommend upgrading to the latest version of SAML SSO/ User & Group Sync, so that you can use the latest version of the Excel Connector as well.
How to Export Users with the Excel Connector
With the Excel Connector you can export the users stored in any user directory connected to your Atlassian applications.
![]()
The Excel Connector will export every user stored in the selected directory.
![]()
If you want to use the export to make modifications to existing users and import them back into the same user directory, remember to import only the modified users and delete the users without changes from the file.
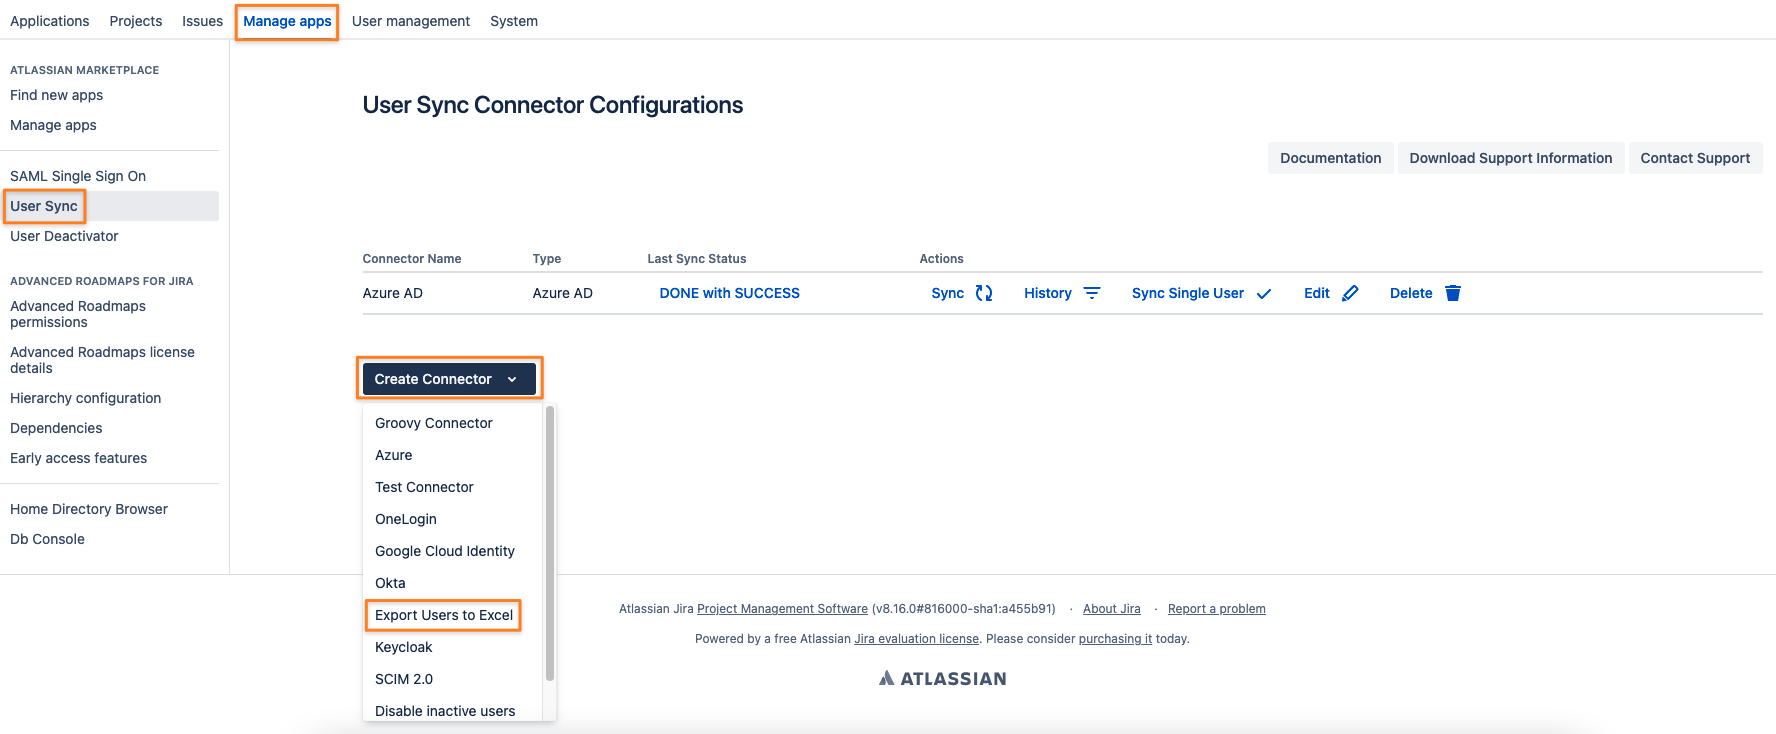
Step 1: Adding a new User & Group Sync Connector
-
Navigate to User & Group Sync in the User Management tab of the Administration section (Jira) or search for it in the general configuration list (Confluence)
- type the key sequence xls on your keyboard and wait for the confirmation popup
-
Click on Create Connector
-
Select the Export Users to Excel option
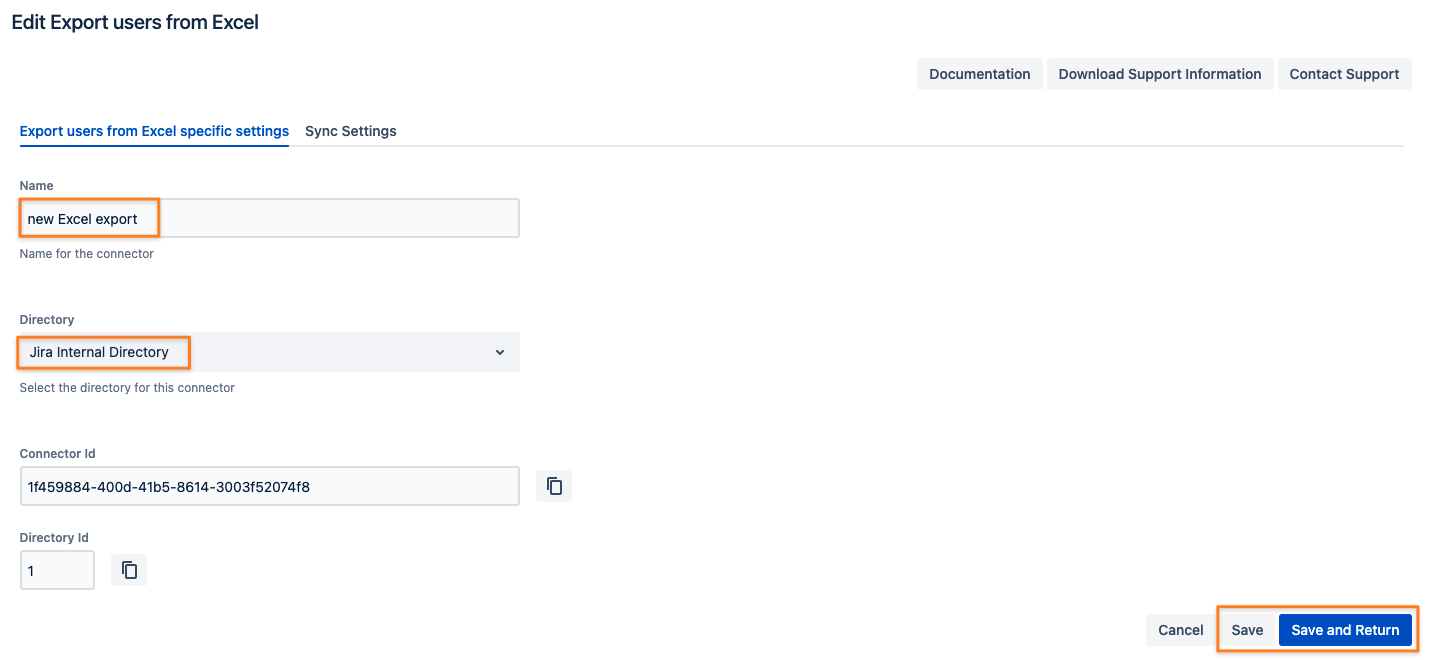
Step 2: Export settings
-
Name the excel export connector
-
Select the User Directory you want to export
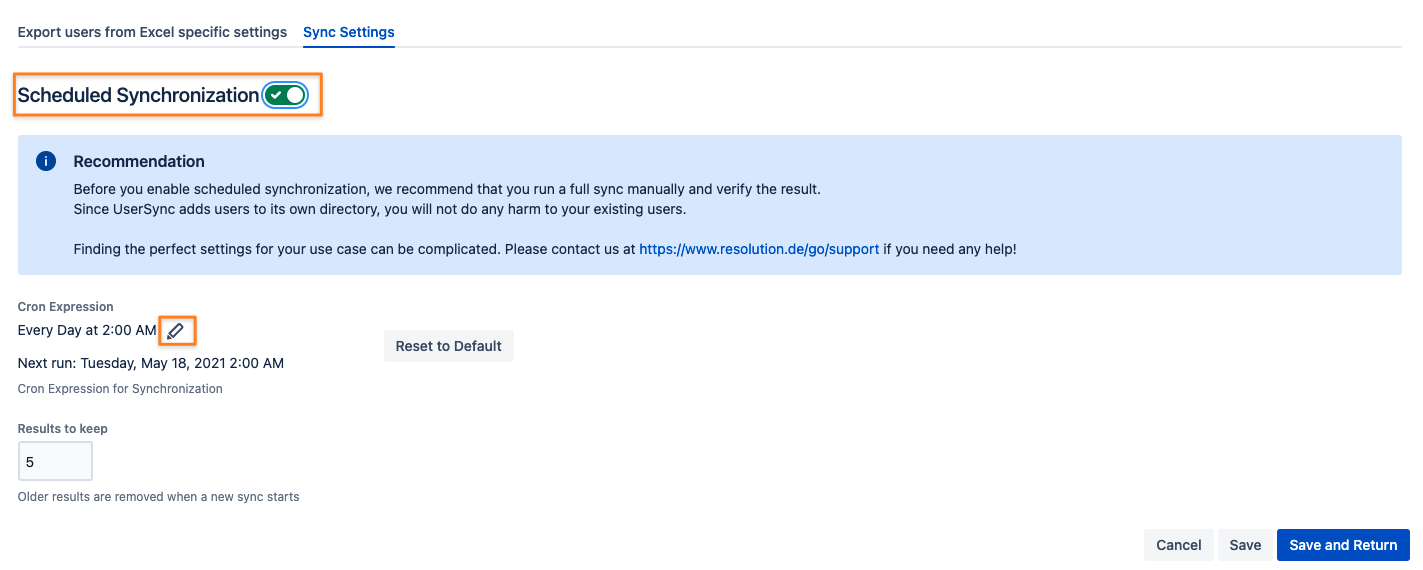
-
If you’re using the export for reporting or auditing, you can also enable scheduled synchronization via the Sync Settings tab

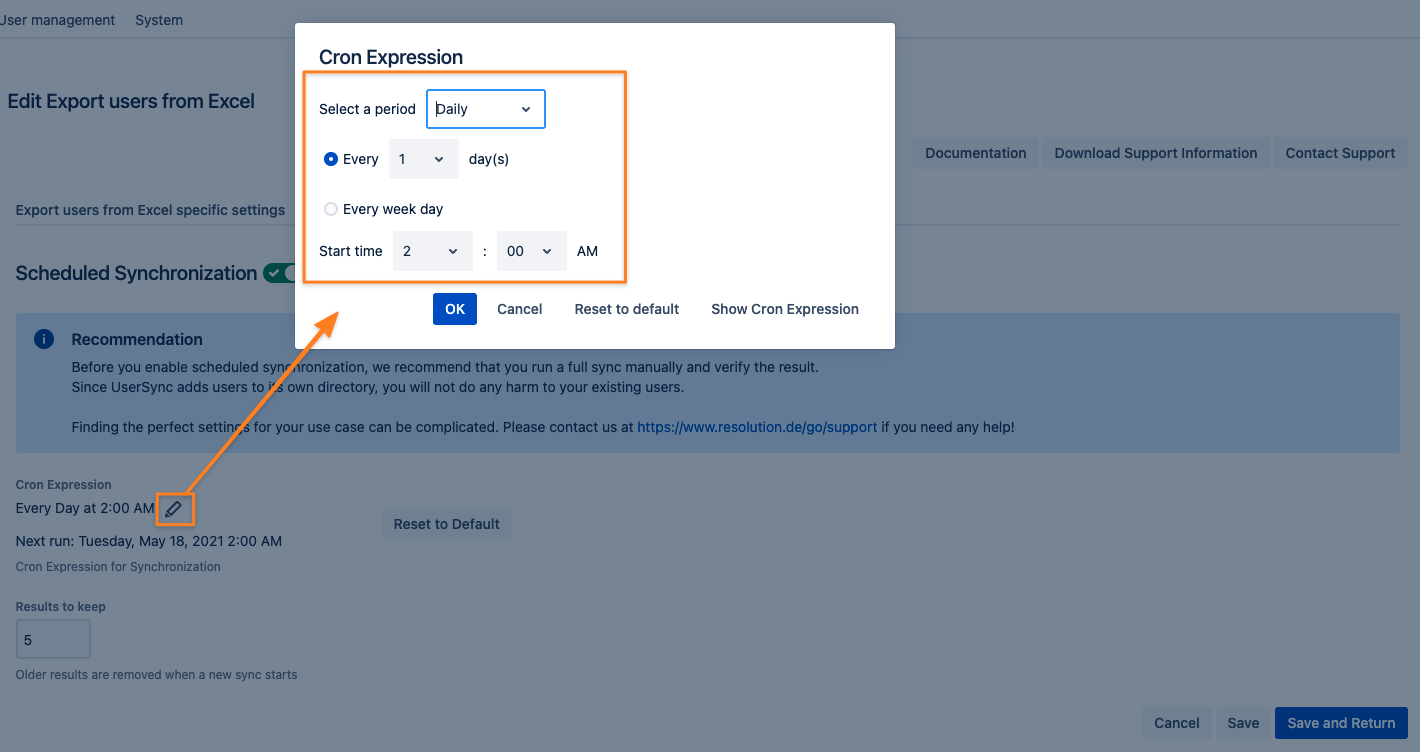
-
click on the Cron Expression pencil icon and change it according to your needs and press OK
-
Press Save and Return
Step 3: Running the synchronization
-
After saving the connector, you can press the Sync button

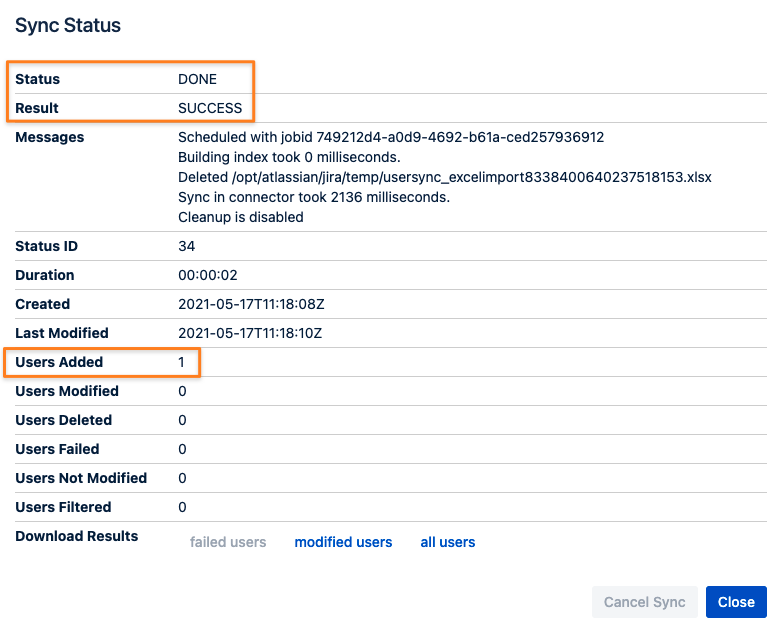
Step 4: Checking the Sync Status message
-
The Result field will confirm whether the synchronization has been successful or not
-
The Messages field will include the location and file name of the export on the server

Step 5: Saving the Excel file
-
press the Generated File link at the bottom of the modal window to download the excel file.
How to Import Users with the Excel Connector
Step 1: Adding a new User & Group Sync Connector
-
Navigate to User & Group Sync in the User Management tab of the Administration section (Jira) or search for it in the general configuration list (Confluence)
- type the key sequence xls on your keyboard and wait for the confirmation popup
-
Click on Create Connector
-
Select the Import Users from Excel option
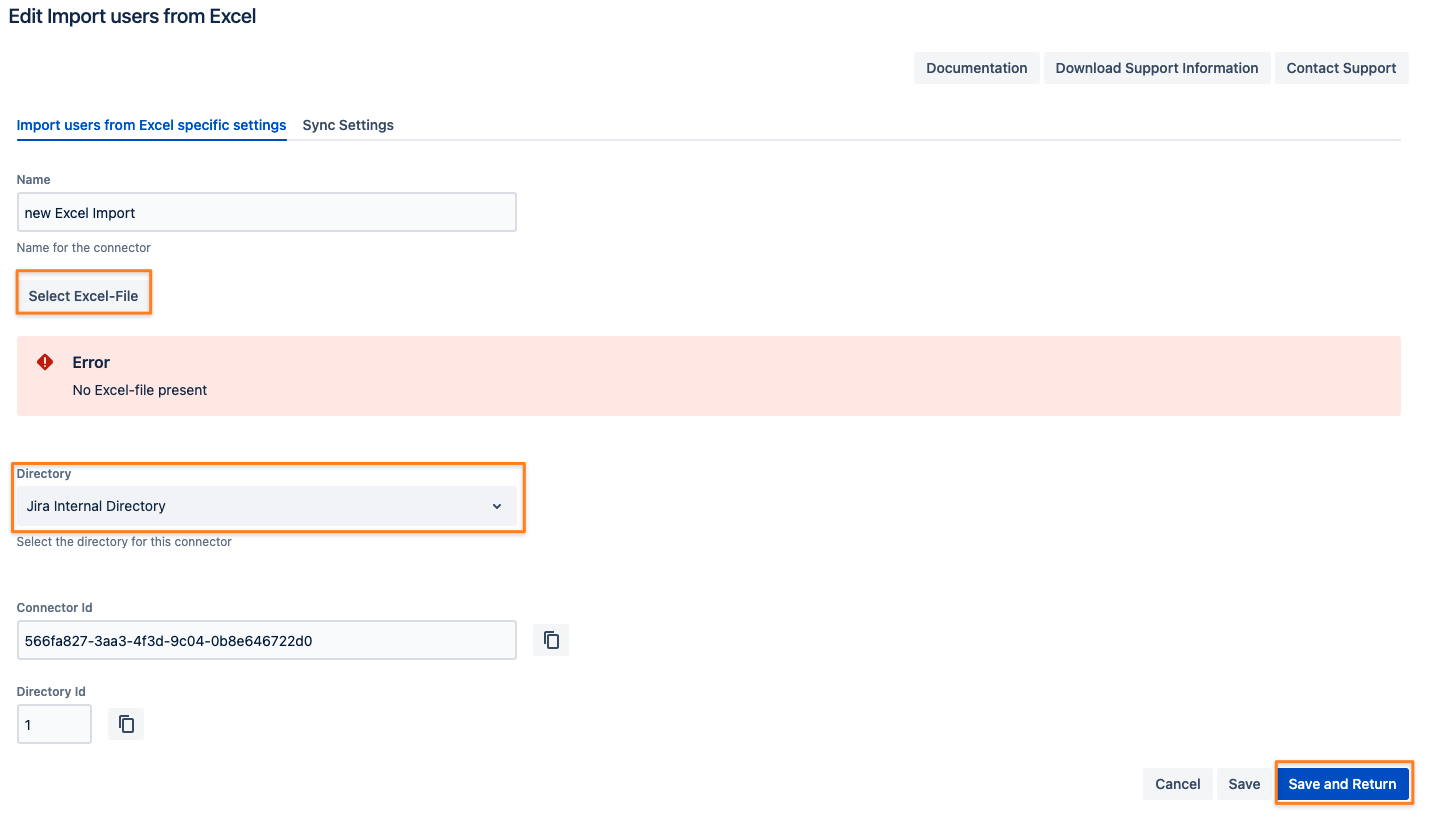
Step 2: Import settings
-
change the Excel import connector name if you like (optional)
-
Select the Excel file to be imported
- Select the target User Directory
-
Press Save and Return
Step 3: Running the synchronization
Now you can start the sync/ import process.

Once complete, you’ll see the amount of users added:
Step 4: Maintenance
Once synchronized, an excel import will display an Invalid! message, indicating that the original file is no longer present.
Note that the sync button has disappeared and the synchronization cannot be run again.

At this stage, it’s safe to delete the entry and remove it from your list of connectors.

Связанные цены акций

Связывание цен на акции с таблицами Excel может избавить вас от необходимости экспортировать новую информацию или, возможно, от постоянного просмотра в интернет-браузере или телефонном приложении для просмотра текущих цен на акции.
Создано Джошуа Краудером
Наличие книги Excel со связанной котировкой акций может иметь неоценимое значение. Особенно, если вы создаете собственную информацию о портфеле в Excel на основе курса акций. В этом руководстве мы будем искать в магазине Microsoft надстройку, которая будет отображать цены на акции в Excel. Кроме того, мы свяжем акции с надстройкой, и цены будут отображаться в электронной таблице.
Нужна надстройка
Более старые версии Excel позволяют обновлять ячейки прямо из MSN Money. Что ж, люди, те дни прошли. Еще один способ получать обновленные котировки акций на листах Excel — это надстройка. Если на ленте нет вкладки разработчика для управления надстройками, узнайте, как добавить ее сюда.
Чтобы найти надстройку, начните с нажатия на вкладку разработчика. Это открывает множество вариантов. Нажмите кнопку надстроек, расположенную в разделе надстроек.
Найти надстройки

Создано Джошуа Краудером
Искать в офисном магазине
Чтобы найти надстройки Excel в магазине Microsoft Store, нажмите кнопку с надписью Магазин Office.
Купить надстройку

Создано Джошуа Краудером
Выберите надстройку
Введите stock в поле поиска, и вы найдете несколько бесплатных надстроек Excel в списке. Выберите надстройку «Stock Connector», нажав кнопку «Добавить».
Добавляем Stock Connector

Вы не ограничены надстройкой Stock Contributor. Вы можете проверить, какие надстройки подходят вам лучше всего.
Создано Джошуа Краудером
Перейти к Stock Connection
После добавления надстройки вы сможете найти надстройку на главной вкладке всех ваших листов Excel.
Найдите надстройку

По умолчанию надстройка будет расположена на главной вкладке и появится в дальнем правом углу ленты.
Создано Джошуа Краудером
Запустить Stock Connector
Щелкните значок надстройки, чтобы запустить Stock Connector, и панель появится в правой части листа Excel.
Стандартная панель разъемов

На приведенной выше иллюстрации загружена надстройка Stock Connector, но нет ссылок на котировки акций.
Создано Джошуа Краудером
Найдите свой сток
Чтобы найти котировку акций, щелкните поле с надписью «Введите акцию» и введите либо название публичной компании, от которой вы хотите получить котировку акций, либо введите их тикер.
Далее появится окно. Щелкните ячейку, в которой цитата должна отображаться в вашей электронной таблице, затем нажмите кнопку ОК.
Подробная информация об этой акции, включая цену, изменение цены и обновленное время, появится на панели надстройки справа. Цитата также появится в выбранной вами ячейке.
Добавление цитаты в электронную таблицу

Создано Джошуа Краудером
Процентное изменение
Процентное изменение котируемой цены также может отображаться в вашей электронной таблице. Чтобы добавить процентное изменение, щелкните процент на панели, и появится окно с названием «Выбрать данные». Щелкните ячейку, в которой вы хотите отобразить процентное изменение, и нажмите ОК.
Добавление процентного изменения котировки акций на рабочий лист

Создано Джошуа Краудером
Форматирование
Надстройка даст вам только котировку акций и процентное увеличение или уменьшение для компании. Это означает, что вам нужно будет выполнить собственное форматирование, чтобы идентифицировать эту информацию.
Добавить заголовки столбцов и строк

Создано Джошуа Краудером
Чтобы узнать больше об использовании связывания книг Excel с внешними источниками, я рекомендую Библию Excel . Я использую Библию Excel в течение многих лет, чтобы лучше понять все аспекты этого продукта Microsoft.
© 2018 Джошуа Краудер