

Northwind Trading Company, a small wholesale food business, is doing quite well since they moved online. Retail merchants across the country buy everything from salmon to granola and have it shipped quickly to their stores.
Their customer information is stored in an Access database, and now, the marketing team needs a better way to view it. In particular, they are interested in seeing where their customers reside so they can more effectively target their advertising dollars.

Create a data connection between Excel and Access
Luckily, the same features that Excel provides for viewing and organizing information in a spreadsheet, such as filtering, charting, and grouping, can be used to view and organize information in an Access database. But first you need to create the connection.
Note: We’ll use the sample Northwind Access database to demonstrate how Excel connects to data sources. You can download it here: Northwind Web Database.
1. Go to the Data tab in Excel and click the From Access button.

2. On the Select Data Source dialog, go to the location where the Access database is stored, select it, and click the Open button

3. On the Select Table dialog, choose a table from the database to import.

4. Accept the default options on the Import Data dialog, and click OK.

Excel and Access are now connected, and the data from the Northwind CustomersExtended table appears in Excel.

Refresh data
Now that Northwind can now easily view and analyze the information in its Access database, they want to make sure they are reviewing the latest information.There’s a couple ways they can refresh the data in their workbook.
Forced Refresh
To force a refresh, click the Refresh All button on the Data tab. This will instantly import the latest Access data into Excel.

Customized Refresh
Northwind can customize the refresh behavior for their workbook in the following ways:
- Enable background refresh (this option allows them to continue working in Excel while the refresh operation executes).
- Refresh data after a specified time period (e.g. every 30 minutes)
- Refresh data when opening a workbook
1. Click the Connections button on the Data tab, and then click the Properties button on the Workbook Connections dialog.

2. On the Connection Properties dialog, select the desired Refresh control options and click OK.

All connected!
Northwind can now make better advertising decisions. Currently, they don’t have a single order from New York for their very popular gnocchi, and so they decide to focus their advertising on the the tratorrias of Little Italy.
Содержание
- Create, edit, and manage connections to external data
- Получение данных Excel в классических базах данных Access с помощью средства чтения с экрана
- В этом разделе
- Подготовка листа Excel к импорту или связыванию
- Подготовка конечной базы данных Access к импорту
- Импорт данных
- Создание ссылки на данные в Excel
- Запуск мастера создания электронных таблиц
- Открытие книги Excel в Access
- Использование диалогового окна Получение внешних данных — электронная таблица Excel
- Создание ссылки на данные Excel с помощью мастера создания электронной таблицы
- См. также
- Техническая поддержка пользователей с ограниченными возможностями
Create, edit, and manage connections to external data
You can use Excel to create and edit connections to external data sources that are stored in a workbook or in a connection file. You can easily manage these connections, including creating, editing, and deleting them using the current Queries & Connections pane or the Workbook Connections dialog box (available in previous versions).
Note: Connections to external data may be currently disabled on your computer. To connect to data when you open a workbook, you must enable data connections by using the Trust Center bar, or by putting the workbook in a trusted location. For more information, see Add, remove, or modify a trusted location for your files, Add, remove, or view a trusted publisher, and View my options and settings in the Trust Center.
Data in an Excel workbook can come from two different locations. The data may be stored directly in the workbook, or it may be stored in an external data source, such as a text file, a database, or an Online Analytical Processing (OLAP) cube. The external data source is connected to the workbook through a data connection, which is a set of information that describes how to locate, log in, query, and access the external data source.
When you are connected to an external data source, you can also perform a refresh operation to retrieve the updated data. Each time that you refresh data, you see the most recent version of the data, including any changes that were made to the data since it was last refreshed.
Connection information can either be stored in the workbook or in a connection file, such as an Office Data Connection (ODC) file (.odc) or a Universal Data Connection (UDC) file (.udcx). Connection files are particularly useful for sharing connections on a consistent basis and for facilitating data source administration.
If you use a connection file to connect to a data source, Excel copies the connection information from the connection file into the Excel workbook. When you make changes by using the Connection Properties dialog box, you are editing the data connection information that is stored in the current Excel workbook, and not the original data connection file that may have been used to create the connection, indicated by the file name that is displayed in the Connection File property. Once you edit the connection information (with the exception of the Connection Name and Connection Description properties), the link to the connection file is removed and the Connection File property is cleared.
By using the Connection Properties dialog box or the Data Connection Wizard, you can use Excel to create an Office Data Connection (ODC) file (.odc). For more information, see Connection properties and Share data with ODC.
Do one of the following:
Use an existing connection. For more information, see Connect to (Import) external data.
Save the connection information to a connection file by clicking Export Connection File on the Definition tab of the Connection Properties dialog box to display the File Save dialog box, and then save the current connection information to an ODC file.
Note The Queries & Connections pane is available in Microsoft Office 365 for Excel and Excel stand-alone version 2019 or later. It replaced the Workbook Connections dialog box which is available in Excel stand-alone versions 2010, 2013, and 2016.
The Queries & Connections pane (Select Data > Queries & Connections) In one location, you can get to all the information and commands you need to work with your external data. This pane has two tabs:
Queries Displays all the queries in the workbook. Right click a query to see available commands. For more information, see Manage queries.
Connections Displays all the connections in the workbook. Right click a connection to see available commands. For more information, see Connection properties.
Note The Workbook Connections dialog box is available in Excel stand-alone versions 2010, 2013, and 2016, but was replaced in Microsoft Office 365 for Excel and Excel stand-alone version 2019 with the Queries & Connections pane.
The Workbook Connections dialog box (Select Data > Connections) helps you manage one or more connections to external data sources in your workbook.
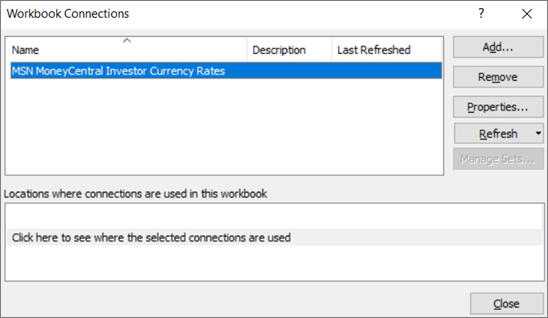
You can use this dialog box to do the following:
Create, edit, refresh, and delete connections that are in use in the workbook.
Verify where external data is coming from, because, for example, the connection was defined by another user.
Show where each connection is used in the current workbook.
Diagnose an error message about connections to external data.
Redirect a connection to a different server or data source, or replace the connection file for an existing connection.
Display the Existing Connections dialog box to create new connections. For more information, see Connect to (Import) external data.
Display the Connection Properties dialog box to modify data connection properties, edit queries, and change parameters. For more information, see Connection properties.
Make it easy to create and share connection files with users.
To manage the connections in the current workbook, do one or more of the following:
Identify a connection
In the top portion of the dialog box, all connections in the workbook are displayed automatically with the following information:
The name of the connection, defined in the Connection Properties dialog box.
An optional description of the connection, defined in the Connection Properties dialog box.
The date and time that the connection was last successfully refreshed. If blank, then the connection has never been refreshed.
Add a connection
Click Add to display the Existing Connections dialog box. For more information, see Connect to (Import) external data.
Display connection information
Select a connection, and then click Properties to display the Connection Properties dialog box. For more information, see Connection properties.
Refresh the external data
Click the arrow next to Refresh, and then do one of the following:
To refresh specific connections, select one or more connections, and then click Refresh.
To refresh all connections in the workbook, clear all connections, and then click Refresh All.
To get status information about a refresh operation, select one or more connections, and then click Refresh Status.
To stop the current refresh operation, click Cancel Refresh.
Remove one or more connections
Select one or more connections to be removed from the workbook, and then click Remove.
This button is disabled when the workbook is protected or an object, such as a PivotTable report, that uses the connection is protected.
Removing a connection only removes the connection and does not remove any object or data from the workbook.
Important: Removing a connection breaks the connection to the data source and may cause unintended consequences, such as different formula results and possible problems with other Excel features.
Display the locations of one or more connections in the workbook
Select one or more connections, and then under Locations where connections are used in this workbook, click the link Click here to see where the selected connections are used.
The following information is displayed.
The worksheet where the connection is used.
The Excel query name.
The reference to a cell, range, or object.
The value of a cell, or blank for a range of cells.
The formula of a cell, or for a range of cells.
Selecting another connection at the top of the dialog box clears the display of the current information.
Источник
Получение данных Excel в классических базах данных Access с помощью средства чтения с экрана
Эта статья предназначена для людей с нарушениями зрения или с когнитивными нарушениями, использующих программы чтения с экрана, например Экранный диктор корпорации Microsoft, JAWS или NVDA с продуктами Microsoft 365. Эта статья входит в набор содержимого поддержки средства чтения с экрана Microsoft 365, где содержатся дополнительные сведения о специальных возможностях в наших приложениях. Общие справочные сведения доступны на главной странице службы поддержки Майкрософт.
Используйте Access с клавиатурой и средством чтения с экрана, чтобы импортировать лист Excel для Access или связать его с Access на Excel лист. Мы проверили эту функцию с использованием экранного диктора, JAWS и NVDA, но она может работать и с другими средствами чтения с экрана, если они соответствуют общепринятым стандартам и методам для специальных возможностей.
Новые возможности Microsoft 365 становятся доступны подписчикам Microsoft 365 по мере выхода, поэтому в вашем приложении эти возможности пока могут отсутствовать. Чтобы узнать о том, как можно быстрее получать новые возможности, станьте участником программы предварительной оценки Office.
Дополнительные сведения о средствах чтения с экрана см. в статье О работе средств чтения с экрана в Microsoft 365.
В этом разделе
Подготовка листа Excel к импорту или связыванию
Прежде чем переносить данные с листа Excel на Access, уделите некоторое время, чтобы просмотреть лист и решить, как импортировать данные из него.
Определите, нужно ли связать или импортировать весь лист или только его часть. Если вы хотите перенести только часть листа в Access, можно определить именованный диапазон, включающий только ячейки, которые требуется перенести. Инструкции см . в статье Использование средства чтения с экрана для присвоения имени ячейке или диапазону данных в Excel.
Убедитесь, что Excel лист имеет формат неструктурированного файла, чтобы мастер легко обрабатывал данные в нем. Например, исправьте возможные значения ошибок, удалите ненужные пустые столбцы и строки и убедитесь, что каждый столбец содержит один и тот же тип данных в каждой строке. Более подробные сведения о том, как подготовиться к импорту или связыванию, см. в разделах Подготовка листа, Подготовка данных Excel и Устранение отсутствующих или неправильных значений в разделе Импорт или ссылка на данные в книге Excel.
Подготовка конечной базы данных Access к импорту
Прежде чем импортировать данные с листа Excel, убедитесь, что база данных назначения Access готова к импорту, и определите, как хранить импортированные данные.
Убедитесь, что целевая Access база данных не доступна только для чтения и у вас есть разрешения на внесение изменений в базу данных.
Решите, нужно ли хранить данные в новой или существующей таблице:
Если вы решили сохранить данные в новой таблице, Access создает таблицу и добавляет импортированные данные в эту таблицу. Если таблица с указанным именем уже существует, Access перезаписывает содержимое таблицы импортированными данными.
Если вы решили добавить данные в существующую таблицу, строки на Excel листе добавляются в указанную таблицу.
Если вы решили добавить данные Excel в существующую таблицу Access, убедитесь, что параметры структуры и полей в исходных данных в Excel совпадают с параметрами в целевой таблице в Access. Чтобы открыть таблицу Access в конструкторе для проверки, нажмите клавиши ALT+H, W, D. Проверьте таблицу с контрольным списком в разделе Подготовка целевой базы данных, шаг 2, в разделе Импорт или ссылка на данные в книге Excel.
Импорт данных
При импорте данных Access создает копию данных в новой или существующей таблице без изменения исходного Excel листа.
Примечание: Возможно, вам потребуется коллега, который поможет вам на шаге 9, чтобы выбрать поле, которое вы хотите изменить.
Закройте исходную Excel книгу, если она открыта.
Откройте целевую Access базу данных, в которой будут храниться импортированные данные.
Совет: Если вы хотите создать пустую базу данных, нажмите клавиши ALT+F, N, L.
Чтобы открыть диалоговое окно Получение внешних данных — электронная таблица Excel , выполните одно из следующих действий в зависимости от используемой версии Access:
В версии подписки Microsoft 365 или Access 2019 нажмите клавиши ALT+X, N, 1, затем F и X.
В Access 2016 илиAccess 2013 нажмите клавиши ALT+X, чтобы перейти на вкладку Внешние данные . Нажимайте клавишу TAB, пока не достигнете группы Импорт & ссылка , нажимайте клавишу СТРЕЛКА ВПРАВО, пока не услышите «Excel», и нажмите клавишу ВВОД.
Откроется диалоговое окно Получение внешних данных — электронная таблица Excel .
В диалоговом окне Получение внешних данных — электронная таблица Excel выполните одно из следующих действий, чтобы указать файл Excel, содержащий данные, которые требуется импортировать:
Чтобы переместить фокус в текстовое поле Имя файла , нажмите клавишу F, а затем вставьте или введите путь к файлу Excel.
Чтобы перейти к файлу, нажмите клавишу R. Откроется диалоговое окно Открыть файл . Перейдите к нужному файлу и нажмите клавишу ВВОД, чтобы выбрать его.
Чтобы указать способ хранения импортированных данных, выполните одно из следующих действий.
Если вы хотите сохранить данные в новой таблице, нажмите клавишу I, чтобы перейти к и выберите параметр Импортировать исходные данные в новую таблицу в текущей базе данных . Позднее будет предложено указать имя этой таблицы.
Если вы хотите добавить данные в существующую таблицу, нажмите клавишу A, чтобы перейти к и выберите параметр Добавить копию записей в таблицу . Чтобы выбрать таблицу, нажмите клавишу TAB один раз. Фокус переместится в список таблиц. Нажимайте клавиши ALT+СТРЕЛКА ВНИЗ, чтобы развернуть список, нажимайте клавишу СТРЕЛКА ВВЕРХ или СТРЕЛКА ВНИЗ, пока не услышите нужную таблицу, и нажмите клавишу ВВОД, чтобы выбрать ее. Этот параметр недоступен, если база данных не содержит таблиц.
Нажимайте клавишу TAB, пока не дойдете до кнопки ОК , и нажмите клавишу ВВОД. Запустится мастер импорта электронных таблиц .
Совет: Если средство чтения с экрана не считывает окна мастера автоматически, нажмите клавишу SR+W.
Если исходный Excel книги содержит только один лист без диапазонов, можно перейти к следующему шагу. Если книга содержит несколько листов или именованных диапазонов, выполните одно из следующих действий, чтобы выбрать лист или диапазон для импорта.
Чтобы выбрать лист, нажмите клавиши ALT+W, один раз нажимайте клавишу TAB, нажимайте клавишу СТРЕЛКА ВНИЗ, пока не услышите нужный лист, и нажмите клавишу ВВОД, чтобы выбрать его.
Чтобы выбрать именованный диапазон, нажмите клавиши ALT+R, один раз нажимайте клавишу TAB, нажимайте клавишу СТРЕЛКА ВНИЗ, пока не услышите нужный диапазон, и нажмите клавишу ВВОД, чтобы выбрать его.
Откроется следующее окно мастера.
Если первая строка исходного листа или диапазона содержит имена полей, нажмите клавишу I, чтобы перейти к и выберите параметр Первая строка содержит заголовки столбцов . Нажмите клавишу ВВОД, чтобы переместить фокус в следующее окно мастера.
При добавлении данных в существующую таблицу можно перейти к шагу 11.
При необходимости в окне нового мастера можно указать сведения о каждом импортируемом поле. Выбрано первое поле на листе или диапазоне. Здесь доступны перечисленные ниже возможности
Чтобы изменить имя текущего поля, нажмите клавиши ALT+M и введите новое имя.
Чтобы изменить тип данных поля, нажмите клавиши ALT+T. Фокус переместится в список Тип данных . Чтобы развернуть список, нажмите клавиши ALT+СТРЕЛКА ВНИЗ. Нажимайте клавишу СТРЕЛКА ВНИЗ, пока не услышите нужное значение, а затем нажмите клавишу TAB один раз.
Чтобы изменить индексирование поля, нажмите клавиши ALT+I. Вы услышите текущее значение. Чтобы развернуть список, нажмите клавиши ALT+СТРЕЛКА ВНИЗ. Нажимайте клавишу СТРЕЛКА ВНИЗ, пока не услышите нужное значение, а затем нажмите клавишу TAB один раз.
Если вы не хотите импортировать текущее поле, нажмите клавиши ALT+S, чтобы перейти к и выберите параметр Не импортировать поле .
Чтобы выбрать другое поле, нажимайте клавишу F6, пока не услышите сообщение «Область», и попросите коллегу помочь вам выбрать нужное поле. Измените поля, как описано выше. По завершении нажмите клавишу ВВОД, чтобы перейти к следующему окну мастера.
Добавьте первичный ключ для новой таблицы. Первичный ключ идентифицирует записи в таблице, что позволяет быстрее извлекать данные. Выполните одно из указанных ниже действий.
Чтобы позволить Access добавить первичный ключ, нажмите клавишу A.
Чтобы выбрать собственный первичный ключ, нажмите клавишу C. Чтобы определить используемую клавишу, нажмите клавишу TAB один раз. Фокус переместится в список ключей. Чтобы развернуть список, нажмите клавиши ALT+СТРЕЛКА ВНИЗ. Нажимайте клавишу СТРЕЛКА ВВЕРХ или СТРЕЛКА ВНИЗ, пока не услышите нужную клавишу.
Если вы не хотите использовать первичные ключи, нажмите клавишу O.
Чтобы переместить последнее окно мастера, нажмите клавишу ВВОД.
Откроется последнее окно мастера. Фокус находится в поле Импорт в таблицу , и вы услышите текущее имя целевой таблицы. Если вы хотите изменить имя таблицы, введите новое имя и нажмите клавишу ВВОД, чтобы завершить импорт.
Примечание: Если вы услышите оповещение о том, что таблица уже существует и хотите перезаписать существующую таблицу импортированными данными, нажмите клавишу Y. Если вы хотите переименовать таблицу, нажмите клавишу N. Нажмите клавиши ALT+I, чтобы переместить фокус обратно в поле Импорт в таблицу , введите другое имя таблицы и нажмите клавишу ВВОД.
Если импорт был выполнен полностью или частично успешно, Access отображает состояние импорта. Access также предлагает сохранить шаги импорта, чтобы быстро повторить их без мастера импорта. Чтобы выбрать этот параметр, нажмите клавиши ALT+V. Чтобы присвоить имена шагам импорта, нажмите клавиши ALT+A и введите имя операции импорта. Чтобы сохранить шаги импорта, нажмите клавиши ALT+S.
В случае сбоя импорта вы услышите сообщение «Произошла ошибка при попытке импорта файла», за которым следует имя файла. Нажмите клавишу ВВОД, чтобы выйти из оповещения.
Создание ссылки на данные в Excel
Используйте мастер создания связи с электронными таблицами , чтобы создать связь из базы данных Access с данными в Excel, чтобы можно было использовать средства запросов и отчетов в Access без необходимости поддерживать копию Excel данных в базе данных.
При связывании с листом Excel или именованным диапазоном Access создает новую таблицу, связанную с исходными ячейками. Все изменения, внесенные в исходные ячейки в Excel отображаются в связанной таблице в Access. Однако нельзя изменить содержимое соответствующей таблицы в Access. Если вы хотите добавить, изменить или удалить данные, необходимо внести изменения в исходный файл Excel.
База данных может содержать несколько связанных таблиц.
Запуск мастера создания электронных таблиц
В Access есть два способа выбрать Excel книгу, с которой требуется связаться, и запустить мастер связывания электронных таблиц. Книгу Excel можно открыть в Access или использовать диалоговое окно Получение внешних данных — электронная таблица Excel .
Открытие книги Excel в Access
Откройте базу данных Access, в которой вы хотите создать ссылку.
Нажмите клавиши ALT+F, O, чтобы перейти в меню Открыть .
Чтобы перейти к книге, нажмите кнопку O. Откроется диалоговое окно Открыть Windows.
Чтобы изменить тип файла, нажимайте клавишу TAB, пока не услышите фразу «Файлы типа, Microsoft Access», а затем нажимайте клавиши ALT+СТРЕЛКА ВНИЗ. Нажимайте клавишу СТРЕЛКА ВВЕРХ, пока не услышите фразу «Все файлы», и нажмите клавишу ВВОД.
Перейдите к нужной книге, а затем нажмите клавишу ВВОД, чтобы выбрать ее и запустить мастер связывания электронных таблиц.
Использование диалогового окна Получение внешних данных — электронная таблица Excel
Откройте базу данных Access, в которой вы хотите создать ссылку.
Совет: Если вы не хотите связываться с существующей базой данных, нажмите клавиши ALT+F, N, L, чтобы создать пустую базу данных.
Чтобы открыть диалоговое окно Получение внешних данных — электронная таблица Excel , выполните одно из следующих действий в зависимости от используемой версии Access:
В версии подписки Microsoft 365 или Access 2019 нажмите клавиши ALT+X, N, 1, затем F и X.
В Access 2016 или Access 2013 нажмите клавиши ALT+X, чтобы перейти на вкладку Внешние данные . Нажимайте клавишу TAB, пока не достигнете группы Импорт & ссылка , нажимайте клавишу СТРЕЛКА ВПРАВО, пока не услышите «Excel», и нажмите клавишу ВВОД.
Откроется диалоговое окно Получение внешних данных — электронная таблица Excel .
В диалоговом окне Получение внешних данных — электронная таблица Excel выполните одно из следующих действий, чтобы указать файл Excel, на который вы хотите создать ссылку:
Чтобы переместить фокус в текстовое поле Имя файла , нажмите клавишу F, а затем вставьте или введите путь к файлу Excel.
Чтобы перейти к файлу, нажмите клавишу R. Откроется диалоговое окно Открыть файл . Перейдите к нужному файлу и нажмите клавишу ВВОД, чтобы выбрать его.
Нажмите клавиши ALT+L, чтобы перейти к и выбрать параметр Связать с источником данных, создав связанную таблицу, и нажмите клавишу ВВОД. Запустится мастер связывания электронных таблиц .
Создание ссылки на данные Excel с помощью мастера создания электронной таблицы
Окна мастера связывания электронных таблиц помогут вам выполнить процесс связывания. Просто выберите нужные параметры и Excel данные будут связаны с базой данных в течение всего времени.
Совет: Если средство чтения с экрана не считывает окна мастера автоматически, нажмите клавишу SR+W.
Если исходный Excel книги содержит только один лист без диапазонов, можно перейти к следующему шагу. Если книга содержит несколько листов или именованных диапазонов, выполните одно из следующих действий, чтобы выбрать лист или диапазон.
Чтобы выбрать лист, нажмите клавиши ALT+W, один раз нажимайте клавишу TAB, нажимайте клавишу СТРЕЛКА ВНИЗ, пока не услышите нужный лист, и нажмите клавишу ВВОД, чтобы выбрать его.
Чтобы выбрать диапазон, нажмите клавиши ALT+R, один раз нажимайте клавишу TAB, нажимайте клавишу СТРЕЛКА ВНИЗ, пока не услышите нужный диапазон, и нажмите клавишу ВВОД, чтобы выбрать его.
Откроется следующее окно мастера.
Если первая строка исходного листа или диапазона содержит имена полей, нажмите клавишу I, чтобы перейти к и выберите параметр Первая строка содержит заголовки столбцов . Нажмите клавишу ВВОД, чтобы переместить фокус в следующее окно мастера.
Откроется последнее окно мастера. Фокус находится в поле Имя связанной таблицы , и вы услышите текущее имя связанной таблицы. Если вы хотите изменить имя таблицы, введите новое имя таблицы и нажмите клавишу ВВОД, чтобы завершить импорт.
Примечание: Если вы услышите оповещение о том, что таблица уже существует и хотите перезаписать существующую таблицу импортированными данными, нажмите клавишу Y. Если вы хотите переименовать целевую таблицу, нажмите клавишу N. Нажмите клавиши ALT+I, чтобы переместить фокус обратно в поле Импорт в таблицу , введите другое имя таблицы и нажмите клавишу ВВОД.
Если связывание прошло успешно, вы услышите сообщение «Завершено связывание таблицы с файлом», за которым следует Excel имя файла. Нажмите клавишу ВВОД, чтобы выйти из уведомления. Перейдите к связанной таблице и просмотрите ее содержимое. Сведения об устранении неполадок см. в статье Устранение неполадок #Num! и другие неверные значения в связанной таблице. в разделе Импорт или связывание данных в книге Excel.
Если не удалось выполнить связывание, снова проверьте исходный файл Excel в контрольном списке в разделе Подготовка целевой базы данных на шаге 2 статьи Импорт или связывание с данными в книге Excel.
См. также
Техническая поддержка пользователей с ограниченными возможностями
Корпорация Майкрософт стремится к тому, чтобы все наши клиенты получали наилучшие продукты и обслуживание. Если у вас ограниченные возможности или вас интересуют вопросы, связанные со специальными возможностями, обратитесь в службу Microsoft Disability Answer Desk для получения технической поддержки. Специалисты Microsoft Disability Answer Desk знакомы со многими популярными специальными возможностями и могут оказывать поддержку на английском, испанском, французском языках, а также на американском жестовом языке. Перейдите на сайт Microsoft Disability Answer Desk, чтобы узнать контактные сведения для вашего региона.
Если вы представитель государственного учреждения или коммерческой организации, обратитесь в службу Disability Answer Desk для предприятий.
Источник
Подключение из Excel к Access через VBA
Время создания: 10.10.2019 07:05
Текстовые метки: Connect Excel To Access, ADO, Connection, Recordset, Excel-Access, CursorLocation, RecordCount
Раздел: !Закладки — VBA — Access — ADO
Запись: xintrea/mytetra_db_adgaver_new/master/base/1570680318sot44eyn6o/text.html на raw.githubusercontent.com
|
|
Подключение из Excel к Access через VBA
Полезная функция по подключению из Excel к Access (предварительно надо подключить библиотеку MS ActiveX Data Objects 2.8 Library, как показано на картинке). Проверено — работает.
VBA Добавление Reference
Public Sub test_db()
ConnectionString = «Provider=Microsoft.ACE.OLEDB.12.0; Data Source=» & ActiveWorkbook.Path & «Database4.accdb; Jet OLEDB:Database;»
Dim con As New ADODB.Connection
con.Open ConnectionString
On Error GoTo not_table
con.Execute («SELECT TOP 1 * FROM Customers»)
con.Close
Exit Sub
not_table:
con.Close
End Sub
https://coderoad.ru/30364090/%D0%A1%D1%87%D0%B5%D1%82%D1%87%D0%B8%D0%BA-%D0%BD%D0%B0%D0%B1%D0%BE%D1%80%D0%BE%D0%B2-%D0%B7%D0%B0%D0%BF%D0%B8%D1%81%D0%B5%D0%B9-%D0%B2%D1%81%D0%B5%D0%B3%D0%B4%D0%B0-%D0%B2%D0%BE%D0%B7%D0%B2%D1%80%D0%B0%D1%89%D0%B0%D0%B5%D1%82-%D0%B7%D0%BD%D0%B0%D1%87%D0%B5%D0%BD%D0%B8%D0%B5-1
Вам нужно использовать статический курсор. Для этого вам нужно явно создать объект RecordSet, вот так:
Set objRS = Server.CreateObject(«ADODB.Recordset»)
objRS.CursorLocation = adUseClient
objRS.Open «SELECT * FROM « & viewName & «;», objConn, adOpenStatic,adLockReadOnly, adCmdText
Set objRS = Server.CreateObject(«ADODB.Recordset»)
objRS.CursorLocation = adUseClient
objRS.Open «SELECT * FROM » & viewName & «;», objConn, adOpenStatic,adLockReadOnly, adCmdText
Неявно созданные RecordSets имеют серверные курсоры, что приводит к возвращению значения -1.
Для получения дополнительной информации: http://www.adopenstatic.com/faq/recordcounterror.asp
http://www.adopenstatic.com/faq/recordcounterror.asp
NOTE: click here to see superior alternatives to .RecordCount.
RecordCount returns -1
The use of the ADO Recordset’s .RecordCount property requires either the use of:
- Static or Keyset server-side cursors or
- A client-side cursor (which returns a Static cursor)
(Note: some OLEDB Providers will return the correct recordcount with an adOpenDynamic cursor, others will not).
By default Recordsets are opened server-side, and with an adOpenForwardOnly cursor. Attempting to access the .RecordCount property with this type of cursor will return -1.
The easiest way to fix this is to change the cursor type to adOpenStatic. Doing this requires you to explicitly create a recordset object:
Set objRS = Server.CreateObject(«ADODB.Recordset»)
objRS.Open strSQL, objConn, adOpenStatic, adLockReadOnly, adCmdText
Attempting to implicitly create a recordset, eg like this:
Set objRS = objConn.execute(strSQL)
will not work, as the implicitly created recordset will have a default adOpenForwardOnly cursor.
As mentioned above, the alternative method is to use a client-side cursor. The client referred in this case is the OLEDB Cursor Service.
Set objRS = Server.CreateObject(«ADODB.Recordset»)
objRS.CursorLocation = adUseClient
objRS.Open strSQL, objConn,,adLockReadOnly, adCmdText
In order to be able to use server-side cursors and .Recordcount, the Recordset object must support either Approximate Positioning or Bookmarking. There has been discussion on the ActiveServerPages list to the effect that the MS Oracle OLEDB Provider (or earlier versions of this provider) do not support either Approximate Positioning or Bookmarking, hence require client-side cursors in order for .RecordCount to work.
The use of ADO constants requires you to define them. You can get information on doing this here. For more information on the Recordset’s .Open method click here.
Back to FAQ Listing
How to Connect Access Database in Excel Macros?
Updating Excel Spreadsheet from Access Database using this step by step Excel VBA Access Macro code is just that simple. We are going to use a ADODB connection in this sample code.
Just copy paste this Excel VBA Access MDB conenction code to your VBA Project.
Excel To Access Connection – Simplest Code
Just change these two things in the code. It is enough for this to work better.
- Database path – sDBPath : This should have the exact folder path & MDB Access file name that is being accessed with this code.
- Query String – sQuery : The SQL query in this variable should match the Database Table & the fields exactly as how it is defined in the MDB database.
Once these two fields are edited, then this code will perfectly fine in a Excel VB Editor.
'--------------------------------------------------------------------------------
'Code by author@officetricks.com (or) kumarapush777 (Fiverr)
'Visit https://officetricks.com to get more Free & Fully Functional VBA Codes
'--------------------------------------------------------------------------------
Sub VBA_Connect_To_MDB_ACCESS()

    'Make Reference to Microsoft AxticX Data Objects Library
    Dim dbConn As ADODB.Connection, dbRecSet As ADODB.Recordset
    Dim sConnString As String, sQuery As String
    Dim sDBPath As String

    'Define MDB ACCESS file path
    sDBPath = "D:OfficeTricksSalesOrders.accdb"

    'SQL Query String
    sQuery = "SELECT CustomerID, CustFirstName , CustLastName from Customers;"

    'ADODB Conenction String to initiate connection with MDB ACCESS
    sConnString = "Provider=Microsoft.ace.OLEDB.12.0; Data Source=" & sDBPath & ";"

    'Open Connection
    Set dbConn = New ADODB.Connection
    dbConn.Open ConnectionString:=sConnString

    'Execute SQL Query & Get Records matching the query to recordset
    Set dbRecSet = New ADODB.Recordset
    dbRecSet.Open Source:=sQuery, ActiveConnection:=dbConn

    'If Query Returned Values, Read them one by one
    If (dbRecSet.RecordCount <> 0) Then
        Do While Not dbRecSet.EOF
            MsgBox dbRecSet.Fields(1).Value
            dbRecSet.MoveNext
        Loop
    End If

    'Close Connection & RecordSet
    Set dbRecSet = Nothing
    dbConn.Close
    Set dbConn = Nothing
End Sub
Make sure that the MDB database Table has correct field names as specified in the query. Also it has enough data.
Note: Before executing this code, from your VB Edifor go to Tools in the menu -> References & add a reference to “Microsoft ActiveX Data Objects Library”. This is to make sure that ADODB object can be created from within the VBA Macro code.
The loop after that is present after the recordset.open command will get records from the table one by one, till end of the table. Make sure the replace the msgbox command with some assignment. If not you will end up in giving too many ‘OK’ clicks for the message box that pops up for every record fetch.
Apart from recordset.Movenext, there are other commands available to move the cursor or current position to First or last record or to any desired point as well.
In the next tutorial, we will see how to query Access database & load them to a list box in userform.
Using Excel Macros (VBA) you can connect to any Databases like SQL, Oracle or Access DB. In this Article you will learn, how you can do a connection with an Access Database. Access Database connection string is different for Access 2003 (*.mdb) and Access 2007/2010 (*.accdb) because Drivers are different for both the databases.
For Access 2003 Database the Provider is: Provider=Microsoft.Jet.OLEDB.4.0.
For Access 2007/2010 the Provider is Provider=Microsoft.ACE.OLEDB.12.0
Before running the below code, you need to Add reference for ADO DB Connection. Follow below steps to Add Reference:
How to add References in excel
1. Go to VB Editor Screen (Alt+F11)
2. Tools –> References…
3. From the List of Available References Select “Microsoft ActiveX Data Objects 2.0 Library” You can select 2.0 Version or any other higher version of this reference.
4. Click OK
Connection with Access 2003 Database
Sub ADO_Conn()

Dim conn As New Connection
Dim rs As New Recordset

    strcon = "Provider=Microsoft.Jet.OLEDB.4.0;" & _
    "Data Source=E:Student.accdb;" & _
    "User Id=admin;Password="

    conn.Open (strcon)

    qry = "SELECT * FROM students"
    rs.Open qry, conn, adOpenKeyset

    rs.Close
    conn.Close

End Sub
Connection with Access 2007/2010 Database
Sub ADO_Conn()

Dim conn As New Connection
Dim rs As New Recordset

    strcon = "Provider=Microsoft.ACE.OLEDB.12.0;" & _
    "Data Source=E:Student.accdb;" & _
    "User Id=admin;Password="

    conn.Open (strcon)

    qry = "SELECT * FROM students"
    rs.Open qry, conn, adOpenKeyset

    rs.Close
    conn.Close

End Sub
Read this Also:
- How to Connect to SQL Database using Excel Macros
- How to Connect to Oracle Database using Excel Macros