
Excel for Microsoft 365 Excel 2021 Excel 2019 Excel 2016 Excel 2013 Excel 2010 Excel 2007 Excel Starter 2010 More…Less
When you want to display a list of values that users can choose from, add a list box to your worksheet.
Add a list box to a worksheet
-
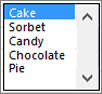
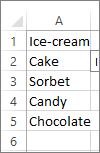
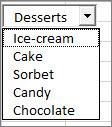
Create a list of items that you want to displayed in your list box like in this picture.

-
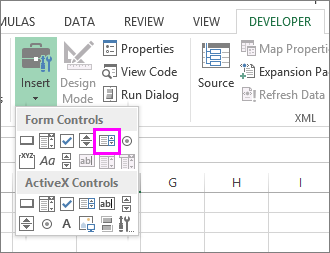
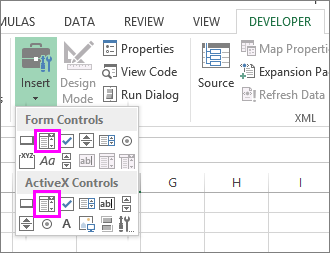
Click Developer > Insert.
Note: If the Developer tab isn’t visible, click File > Options > Customize Ribbon. In the Main Tabs list, check the Developer box, and then click OK.
-
Under Form Controls, click List box (Form Control).
-
Click the cell where you want to create the list box.
-
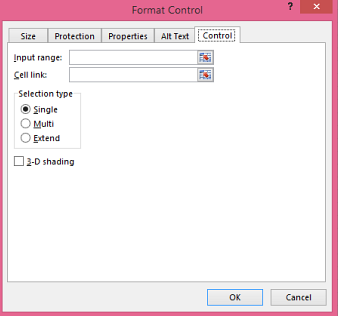
Click Properties > Control and set the required properties:
-
In the Input range box, type the range of cells containing the values list.
Note: If you want more items displayed in the list box, you can change the font size of text in the list.
-
In the Cell link box, type a cell reference.
Tip: The cell you choose will have a number associated with the item selected in your list box, and you can use that number in a formula to return the actual item from the input range.
-
Under Selection type, pick a Single and click OK.
Note: If you want to use Multi or Extend, consider using an ActiveX list box control.
-
Add a combo box to a worksheet
You can make data entry easier by letting users choose a value from a combo box. A combo box combines a text box with a list box to create a drop-down list.
You can add a Form Control or an ActiveX Control combo box. If you want to create a combo box that enables the user to edit the text in the text box, consider using the ActiveX Combo Box. The ActiveX Control combo box is more versatile because, you can change font properties to make the text easier to read on a zoomed worksheet and use programming to make it appear in cells that contain a data validation list.
-
Pick a column that you can hide on the worksheet and create a list by typing one value per cell.
Note: You can also create the list on another worksheet in the same workbook.
-
Click Developer > Insert.
Note: If the Developer tab isn’t visible, click File > Options > Customize Ribbon. In the Main Tabs list, check the Developer box, and then click OK.
-
Pick the type of combo box you want to add:
-
Under Form Controls, click Combo box (Form Control).
Or
-
Under ActiveX Controls, click Combo Box (ActiveX Control).
-
-
Click the cell where you want to add the combo box and drag to draw it.
Tips:
-
To resize the box, point to one of the resize handles, and drag the edge of the control until it reaches the height or width you want.
-
To move a combo box to another worksheet location, select the box and drag it to another location.
Format a Form Control combo box
-
Right-click the combo box and pick Format Control.
-
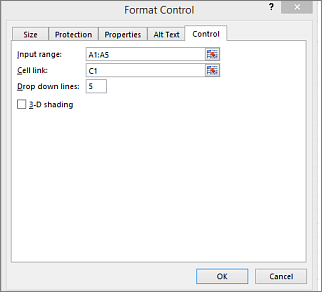
Click Control and set the following options:
-
Input range: Type the range of cells containing the list of items.
-
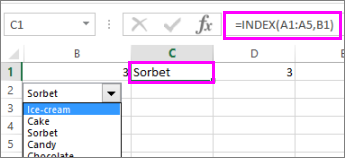
Cell link: The combo box can be linked to a cell where the item number is displayed when you select an item from the list. Type the cell number where you want the item number displayed.
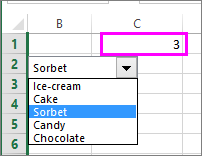
For example, cell C1 displays 3 when the item Sorbet is selected, because it’s the third item in our list.
Tip: You can use the INDEX function to show an item name instead of a number. In our example, the combo box is linked to cell B1 and the cell range for the list is A1:A2. If the following formula, is typed into cell C1: =INDEX(A1:A5,B1), when we select the item «Sorbet» is displayed in C1.
-
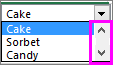
Drop-down lines: The number of lines you want displayed when the down arrow is clicked. For example, if your list has 10 items and you don’t want to scroll you can change the default number to 10. If you type a number that’s less than the number of items in your list, a scroll bar is displayed.
-
-
Click OK.
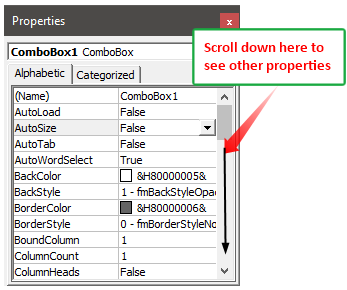
Format an ActiveX combo box
-
Click Developer > Design Mode.
-
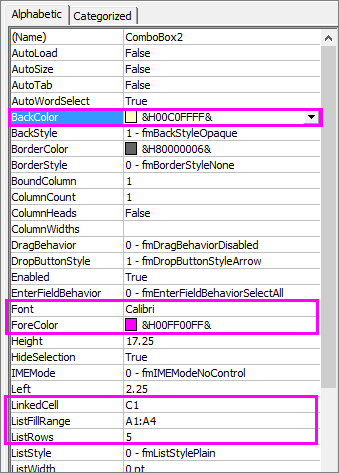
Right-click the combo box and pick Properties, click Alphabetic, and change any property setting that you want.
Here’s how to set properties for the combo box in this picture:
To set this property
Do this
Fill color
Click BackColor > the down arrow > Pallet, and then pick a color.
Font type, style or size
Click Font > the… button and pick font type, size, or style.
Font color
Click ForeColor > the down arrow > Pallet, and then pick a color.
Link a cell to display selected list value.
Click LinkedCell
Link Combo Box to a list
Click the box next to ListFillRange and type the cell range for the list.
Change the number of list items displayed
Click the ListRows box and type the number of items to be displayed.
-
Close the Property box and click Designer Mode.
-
After you complete the formatting, you can right-click the column that has the list and pick Hide.


Need more help?
You can always ask an expert in the Excel Tech Community or get support in the Answers community.
See Also
Overview of forms, Form controls, and ActiveX controls on a worksheet
Add a check box or option button (Form controls)
Need more help?
Элемент управления пользовательской формы ComboBox для выбора и ввода информации в VBA Excel. Свойства поля с раскрывающимся списком, заполнение, извлечение данных, примеры кода.

UserForm.ComboBox – это элемент управления пользовательской формы, предназначенный для передачи в код VBA информации, выбранной пользователем из раскрывающегося списка или введенной с клавиатуры.
ComboBox представляет из себя комбинацию двух элементов управления: текстового поля (TextBox) и списка (ListBox), поэтому его еще называют «комбинированным списком» или «полем со списком». Также ComboBox сочетает в себе свойства этих двух элементов управления.
Изначально комбинированный список прорисовывается на форме в виде текстового поля с кнопкой для отображения раскрывающегося списка. Далее по тексту будем использовать слово «поле» в значении текстового поля в составе элемента управления ComboBox, а словосочетание «раскрывающийся список» – в значении списка в составе элемента управления ComboBox.
Поле со списком используется в тех случаях, когда необходимо добавить в форму информацию, которая заранее известна, а ее отдельные позиции можно сгруппировать в список, а также для ручного ввода с клавиатуры или вставки из буфера обмена, если необходимое значение в списке отсутствует.
Элемент управления ComboBox незаменим при больших списках. При списках из нескольких позиций его можно заменить на ListBox, который отображает позиции для выбора сразу после загрузки формы, не требуя дополнительных действий от пользователя.
Свойства поля со списком
| Свойство | Описание |
|---|---|
| AutoSize | Автоподбор размера комбинированного поля. True – размер автоматически подстраивается под длину выбранной или введенной строки. False – размер элемента управления определяется свойствами Width и Height. |
| AutoTab | Включение автоматической табуляции – передачи фокуса следующему элементу управления при достижении максимального числа символов при значениях свойства MaxLenght > 0. True – автоматическая табуляция включена, False – выключена. |
| ColumnCount | Указывает количество столбцов в раскрывающемся списке. Значение по умолчанию = 1. |
| ColumnHeads | Добавляет строку заголовков в раскрывающийся список. True – заголовки столбцов включены, False – заголовки столбцов выключены. Значение по умолчанию = False. |
| ColumnWidths | Ширина столбцов в раскрывающемся списке. Значения для нескольких столбцов указываются в одну строку через точку с запятой (;). |
| ControlSource | Ссылка на ячейку для ее привязки к элементу управления ComboBox. |
| ControlTipText | Текст всплывающей подсказки при наведении курсора на элемент управления. |
| Enabled | Доступ пользователя к полю и раскрывающемуся списку. True – доступ разрешен, False – доступ запрещен*. Значение по умолчанию = True. |
| Font | Шрифт, начертание и размер текста в поле. |
| Height | Высота элемента управления ComboBox. |
| Left | Расстояние от левого края внутренней границы пользовательской формы до левого края комбинированного списка. |
| List | Позволяет заполнить ComboBox данными из одномерного или двухмерного массива, а также обращаться к отдельным элементам раскрывающегося списка по индексам для записи и чтения. |
| ListIndex | Номер выбранной пользователем строки в раскрывающемся списке. Нумерация начинается с нуля. Если ничего не выбрано, ListIndex = -1. |
| ListRows | Количество видимых строк в раскрытом списке. Если общее количество строк больше ListRows, появляется полоса прокрутки. Значение по умолчанию = 8. |
| Locked | Запрет на отображение раскрывающегося списка, ввод и редактирование данных в поле. True – ввод и редактирование запрещены**, False – ввод и редактирование разрешены. Значение по умолчанию = False. |
| MatchRequired | Задает проверку вводимых в поле строк с элементами списка. True – проверка включена (допускается ввод только строк, совпадающих с элементами списка), False – проверка выключена (допускается ввод любых строк). Значение по умолчанию = False. |
| MaxLenght | Максимальная длина строки в поле. Значение по умолчанию = 0, что означает – ограничений нет. |
| RowSource | Источник строк для раскрывающегося списка (адрес диапазона на рабочем листе Excel). |
| TabIndex | Целое число, определяющее позицию элемента управления в очереди на получение фокуса при табуляции. Отсчет начинается с 0. |
| Text | Текстовое содержимое (значение) поля (=Value). |
| TextAlign | Выравнивание текста в поле: 1 (fmTextAlignLeft) – по левому краю, 2 (fmTextAlignCenter) – по центру, 3 (fmTextAlignRight) – по правому краю. |
| Top | Расстояние от верхнего края внутренней границы пользовательской формы до верхнего края комбинированного списка. |
| Value | Текстовое содержимое (значение) поля (=Text). |
| Visible | Видимость поля со списком. True – ComboBox отображается на пользовательской форме, False – ComboBox скрыт. |
| Width | Ширина элемента управления. |
* При Enabled в значении False пользователь не может раскрывать список, а также вводить или редактировать данные в поле.
** Для элемента управления ComboBox действие свойства Locked в значении True аналогично действию свойства Enabled в значении False.
В таблице перечислены только основные, часто используемые свойства поля со списком. Еще больше доступных свойств отображено в окне Properties элемента управления ComboBox, а все методы, события и свойства – в окне Object Browser.
Вызывается Object Browser нажатием клавиши «F2». Слева выберите объект ComboBox, а справа смотрите его методы, события и свойства.
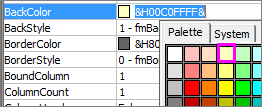
Свойства BackColor, BackStyle, BorderColor, BorderStyle отвечают за внешнее оформление комбинированного списка и его границ. Попробуйте выбирать доступные значения этих свойств в окне Properties, наблюдая за изменениями внешнего вида элемента управления ComboBox на проекте пользовательской формы.
Способы заполнения ComboBox
Используйте метод AddItem для загрузки элементов в поле со списком по одному:
|
With UserForm1.ComboBox1 .AddItem «Элемент 1» .AddItem «Элемент 2» .AddItem «Элемент 3» End With |
Используйте свойство List, чтобы скопировать одномерный массив значений в элемент управления ComboBox:
|
UserForm1.ComboBox1.List = Array(«Строка 1», _ «Строка 2», «Строка 3», «Строка 4», «Строка 5») |
Вместо функции Array можно использовать переменные одномерных и двухмерных массивов. При загрузке значений из двухмерного массива, требуется предварительно указать количество столбцов в комбинированном списке.
Используйте свойство RowSource, чтобы загрузить в ComboBox значения из диапазона ячеек рабочего листа:
|
UserForm1.ComboBox1.RowSource = «Лист5!B1:B15» |
При загрузке данных из диапазона, содержащего более одного столбца, требуется предварительно указать количество столбцов в комбинированном списке:
|
With UserForm1.ComboBox1 ‘Указываем количество столбцов .ColumnCount = 5 .RowSource = «‘Таблица с данными’!A1:E20» End With |
В качестве имени листа используется имя ярлыка. Если имя листа содержит пробелы, оно заключается в одинарные кавычки.
Подробнее о заполнении элемента управления ComboBox вы можете ознакомиться в отдельной статье с наглядными примерами. И еще более подробно – в статье о заполнении ListBox, так как ListBox заполняется теми же способами, что и ComboBox.
Привязка поля со списком к ячейке
Чтобы привязать комбинированный список к ячейке на рабочем листе Excel, необходимо свойству ControlSource присвоить адрес ячейки. Это можно сделать непосредственно в окне Properties элемента управления ComboBox или в коде VBA:
UserForm1.ComboBox1.ControlSource = "Лист1!B2"
Имя листа для составного адреса ячейки берется из названия ярлыка. Если имя листа содержит пробелы, оно заключается в одинарные кавычки. При указании адреса без имени листа, ComboBox привязывается к ячейке на активном листе.
В результате привязки образуется взаимосвязь между свойством Value комбинированного списка и значением ячейки. Все изменения в поле ComboBox дублируются в привязанной ячейке и наоборот, изменения в ячейке приводят к изменению текста в поле.
Чтобы протестировать результаты привязки ячейки к полю со списком ComboBox1, разместите на пользовательской форме UserForm1 еще какой-нибудь элемент управления и запустите следующий код VBA Excel:
|
Sub Test() With UserForm1.ComboBox1 ‘Заполняем список ComboBox1 данными .List = Array(«Красный», «Оранжевый», «Желтый», _ «Зеленый», «Голубой», «Синий», «Фиолетовый») ‘Привязываем ComboBox1 к ячейке «A1» .ControlSource = «A1» ‘Открываем форму в немодальном окне End With UserForm1.Show 0 End Sub |
В результате работы кода пользовательская форма откроется в немодальном окне со значением в поле, скопированном из ячейки «A1» активного листа. Немодальное окно формы позволит редактировать ячейку «A1», не закрывая форму.
Меняйте значение ячейки «A1», нажимайте клавишу «Tab» или «Enter», поле комбинированного списка примет значение ячейки. Меняйте значение поля ComboBox1 с помощью клавиатуры или выбирайте из раскрывающегося списка, нажимайте клавишу «Tab» или «Enter», ячейка «A1» примет значение поля со списком.
Дополнительный элемент управления на форме нужен для передачи ему фокуса нажатием клавиши «Tab» или «Enter», чтобы завершить ввод значения в поле ComboBox1. Иначе новое значение поля будет передано в ячейку «A1» только при закрытии формы.
Значение ComboBox по умолчанию
В раскрывающийся список элемента управления ComboBox1 загружены названия семи основных цветов:
|
Private Sub UserForm_Initialize() With Me.ComboBox1 .List = Array(«Красный», «Оранжевый», «Желтый», _ «Зеленый», «Голубой», «Синий», «Фиолетовый») ‘Сюда добавляем код вставки значения по умолчанию End With End Sub |
Есть несколько вариантов сделать так, чтобы при открытии пользовательской формы в поле ComboBox1 было отображено значение по умолчанию. Код следует вставлять перед строкой «End With».
|
‘Вариант 1 (произвольная строка) .Value = «Моя строка по умолчанию» ‘или .Value = «Синий» ‘Вариант 2 (произвольная строка) .ControlSource = «A1» Range(«A1») = «Моя строка по умолчанию» ‘или .ControlSource = «A1» Range(«A1») = «Желтый» ‘Вариант 3 (строка из списка) .ListIndex = 0 ‘Красный ‘или .ListIndex = 3 ‘Зеленый |
Кроме значения по умолчанию, в свойства комбинированного списка можно добавить текст всплывающей подсказки, который будет отображаться при наведении на ComboBox курсора:
UserForm1.ComboBox1.ControlTipText = "Выберите значение из списка"
Извлечение информации из ComboBox
Первоначально элемент управления ComboBox открывается с пустым полем или значением по умолчанию. Свойства Value и Text в этом случае возвращают пустую строку или текст по умолчанию.
Если пользователь выбрал новое значение из раскрывающегося списка или ввел его с клавиатуры, оно перезапишет значения свойств Value и Text. Из этих свойств мы с помощью кода VBA Excel извлекаем информацию, выбранную или введенную пользователем:
|
Dim myTxt As String myTxt = UserForm1.ComboBox1.Value ‘или myTxt = UserForm1.ComboBox1.Text |
Вторую строку кода можно записать myTxt = UserForm1.ComboBox1, так как Value является свойством поля со списком по умолчанию.
Если вас интересует, как извлечь значение из многостолбцового раскрывающегося списка, смотрите об этом в статье с описанием элемента управления ListBox. Извлечение данных из комбинированного поля аналогично извлечению данных из ListBox. Знакомясь со статьей, следует учесть, что у ComboBox отсутствует многострочный выбор.
Иногда перед загрузкой в ComboBox требуется отобрать уникальные элементы из имеющегося списка. Смотрите, как это сделать с помощью объектов Collection и Dictionary.
Add values to a ComboBox in a UserForm in Excel.
There are 3 simple ways to add values, two that require VBA, and one that doesn’t require any programming at all.
(If you read the tutorial on how to add values to a ListBox, it is exactly the same as this tutorial and the same methods are used.)
Sections:
Where to Add Items for the ComboBox
Add Values to ComboBox — Method 1
Add Values to ComboBox — Method 2
Add Values to ComboBox — Method 3
Notes
Where to Add Items for the ComboBox
To add items to a ComboBox using Method 2 and Method 3 below, we have to use some VBA code and this code must go within the UserForm. Skip this section if you want to store the list in a worksheet in Excel and use Method 1.
Go to the VBA window (Alt + F11) and make sure you are viewing the Project window (Ctrl + R).
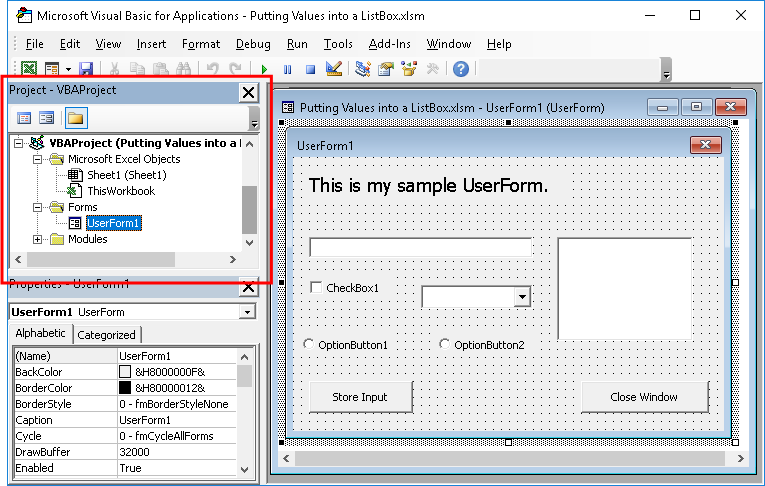
Right-click over the desired UserForm and click View Code.
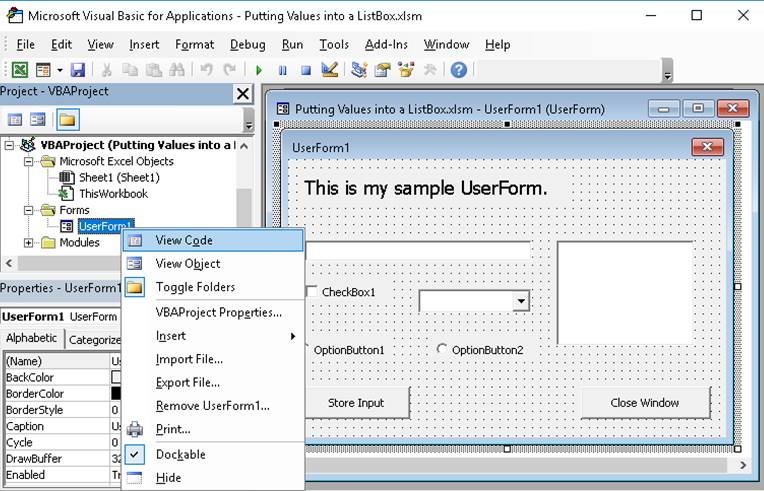
In the window that opens, select UserForm from the left drop-down menu and Initialize from the right drop-down menu.
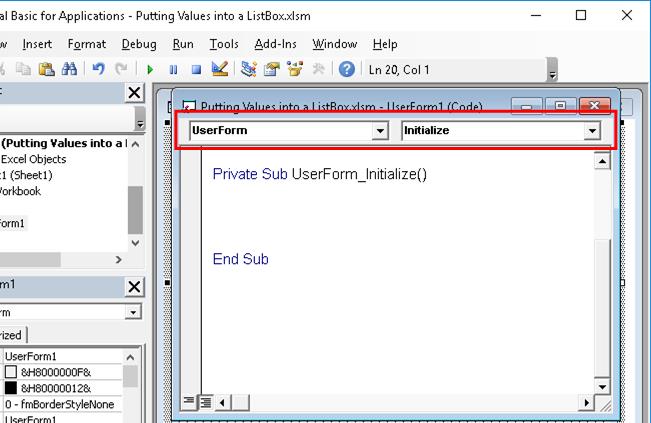
Once you do this, you will see the code section UserForm_Initialize() like in the above image.
This is where the code goes, inbetween the two lines of code above.
The reason the code goes here is because this is the code that will run when the UserForm starts-up or opens and we want the ComboBox to be filled with the desired values immediately when the form opens.
If you already have the UserForm_Initialize section with code in it, just add the code for the ComboBox in the existing section.
Add Values to ComboBox — Method 1
Simple and requires no coding.
We create this list from a range of values in Excel. There is no coding required, so we don’t need to use any VBA or go to the Code window like in the last section.
Go to the VBA window (Alt + F11) > double-click the UserForm from the Project window (Ctrl + R if it’s not visible) and then, once the form is visible, click the ComboBox that you want to fill with values.
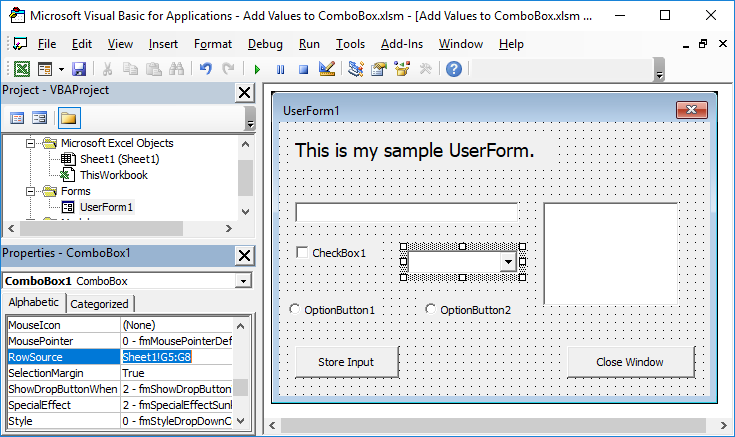
Look to the Properties window and scroll down to RowSource. If the Property window isn’t visible, hit F4.
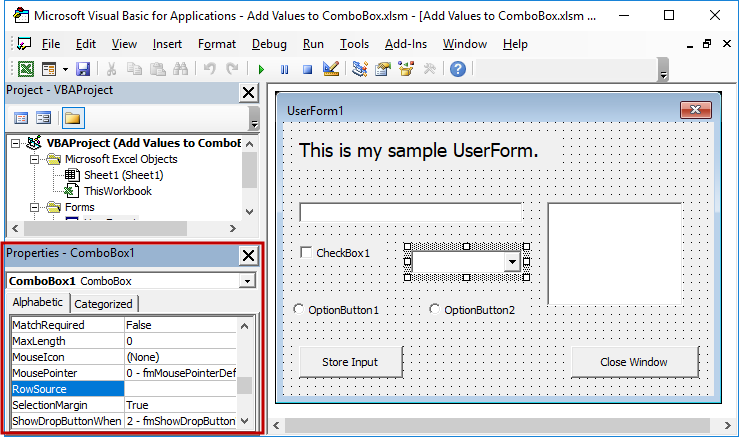
In there, enter the sheet and range reference to the list of data.
It is a good idea to include the sheet reference infront of the range, otherwise the ComboBox will assume the range is from the worksheet that you were on when you launched the UserForm.
In my example, the list is on sheet 1 in range G5 to G8: Sheet1!G5:G8
This is a very easy way to make and maintain a list for a ComboBox in Excel.
Tip: if you don’t want the user to be able to see or change this list, put it on a hidden worksheet.
Add Values to ComboBox — Method 2
Simple. Good for small lists. Requires VBA code — first section above explains where to put this code.
With ComboBox1
    .AddItem "Item 1"
    .AddItem "Item 2"
    .AddItem "Item 3"
    .AddItem "Item 4"
End With
ComboBox1 is the name of the ComboBox that we want to populate with data. The name of the ComboBox is found in the Properties window at the top and is called (Name).
.AddItem is what adds the value to the ComboBox.
Whatever you put inbetween the quotation marks after AddItem is what will be added to the list.
This method is cumbersome if you have a large list, but it is probably the most intuitive and easiest to understand.
Add Values to ComboBox — Method 3
More advanced, but not too difficult. Better for larger lists of items. Requires VBA code — first section above explains where to put this.
ComboBox1.List = Array("Item 1", "Item 2", "Item 3", "Item 4")ComboBox1 is the name of the ComboBox that we will fill with values. The name of the ComboBox is found in the Properties window at the top and is called (Name).
.List adds the items from the array.
Array is the function that is used to create an array of the items for the list. If this seems confusing, don’t worry about it, just follow the syntax from the example above.
Note on Array Creation
This example uses an array to fill the list. There are many ways to create an array and some work better than others for long lists.
Here is an example that works like the last one, just with a little extra code so that we can build the array in a more visually intuitive manner, hopefully.
'Put values into an array
myArray = Split("Item 1;Item 2;Item 3;Item 4", ";")

'Add the array to the ComboBox
ComboBox1.List = myArray
We use the Split function to turn the values in the parenthesis into an array and we use a semi-colon to separate each item in the list.
The highlight of this version is that you don’t have to put quotation marks around every single item.
Notes
As you can see, there are a number of ways to add a list to a ComboBox. Choose whichever method works best for you!
Make sure to download the sample file for this tutorial to see these examples in Excel — note that the examples with code have been commented-out, simply remove the comment (single quotation mark) from the lines with the code to test out those methods.
Similar Content on TeachExcel
Add Values to a ListBox
Tutorial: How to fill a Listbox with values in a UserForm.
By default, a Listbox in a form will be e…
Dependent ComboBox Drop Down Menus
Tutorial: How to create UserForm drop-down menus that change based on what was selected in another d…
Put Data into a UserForm
Tutorial: How to take data from Excel and put it into a UserForm. This is useful when you use a form…
Add Text to UserForms and Labels
Tutorial: Multiple methods for adding text to a UserForm via a Label.
This includes a simple way to …
Multi-Column ComboBox Drop Down Menus in Forms
Tutorial: Multiple columns of data within a UserForm ComboBox drop-down menu in Excel.
I’ll show you…
Pass Values from One Macro to Another Macro
Tutorial:
How to pass variables and values to macros. This allows you to get a result from one macr…
Subscribe for Weekly Tutorials
BONUS: subscribe now to download our Top Tutorials Ebook!
In this Article
- Create a ComboBox in Excel Worksheet
- Populate a ComboBox in VBA code
- Populate a ComboBox from a Cells Range
- Get a Selected Item of a ComboBox in VBA
- Clear a ComboBox
- Use a ComboBox in a Userform
This tutorial will demonstrate how to work with ComboBoxes in VBA.
ComboBoxes allow users to select an option from a drop-down menu list. ComboBoxes can be created in VBA UserForms or with an Excel worksheet. In this tutorial, you will learn how to create and manipulate ComboBoxes in VBA and in Excel worksheets.
If you want to learn how to create a Listbox, click here: VBA Listbox
If you want to learn how to create a Checkbox, click here: VBA Checkbox
Create a ComboBox in Excel Worksheet
In order to insert a ComboBox in the Worksheet, you need to go to the Developer tab, click Insert and under ActiveX Controls choose Combo Box:
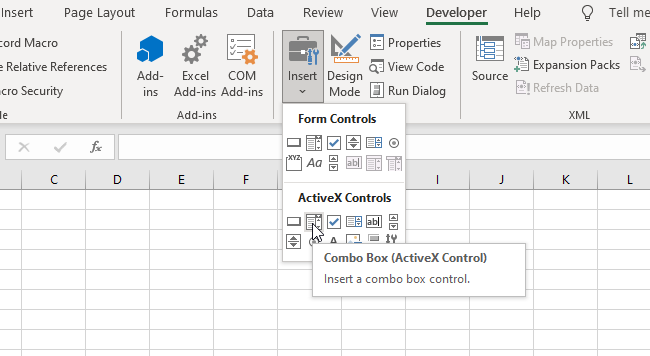
Image 1. Insert a ComboBox in the Worksheet
When you select the ComboBox which you inserted, you can click on Properties under the Developer tab:
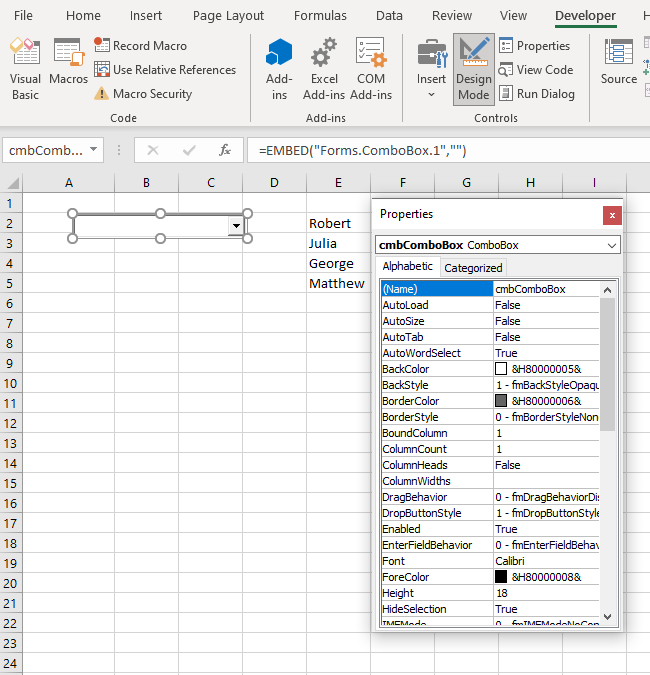
Image 2. Change ComboBox Properties
Here you can set different properties of the ComboBox. To start, we changed the attribute Name to cmbComboBox. Now, we can use the ComboBox with this name in VBA code.
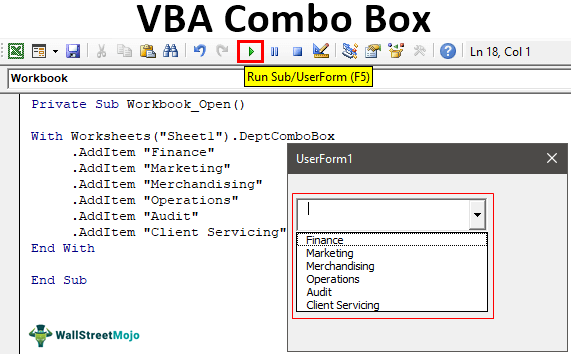
Populate a ComboBox in VBA code
First, we need to populate the ComboBox with values. In most cases, a ComboBox needs to be populated when the Workbook is opened. Because of this, we need to put a code for populating the ComboBox in object Workbook, procedure Open. This procedure is executed every time a user opens the Workbook. Here is the code:
With Sheet1.cmbComboBox

    .AddItem "John"
    .AddItem "Michael"
    .AddItem "Jennifer"
    .AddItem "Lilly"
    .AddItem "Robert"

End With
When you click on the drop-down menu, you will get 5 names to choose from (John, Michael, Jennifer, Lilly and Robert):
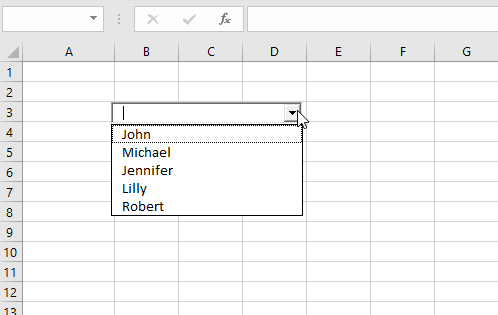
Image 3. Populate the ComboBox in VBA
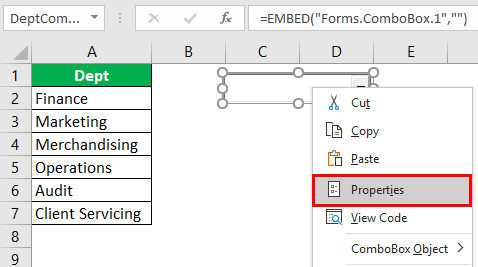
Populate a ComboBox from a Cells Range
Another possible way to populate a ComboBox is to let a user do it. A ComboBox can be linked to the cells range. In this approach, every time a user enters a new value in the cells range, the ComboBox will update with that value.
If you want to enable this, you have to go to the Properties of the ComboBox and set the attribute ListFillRange to the cells range (in our case E2:E5):
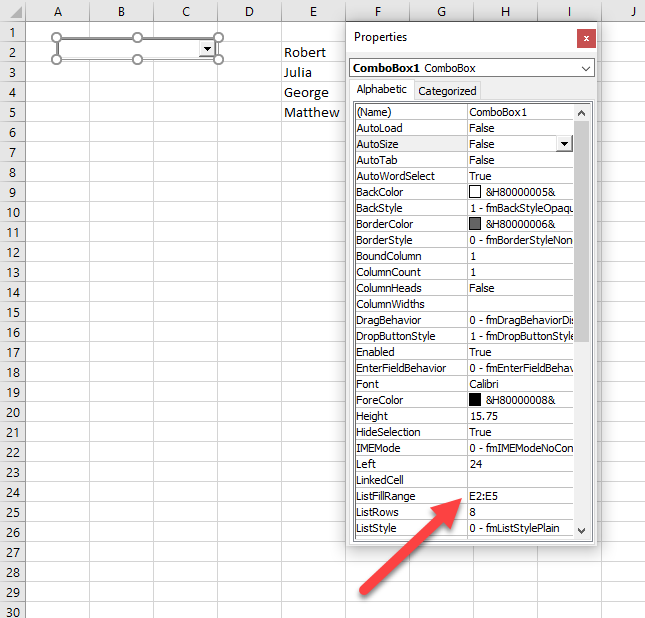
Image 4. Populate the ComboBox from the cells range
We linked our ComboBox with the range E2:E5, where we put names we want (Nathan, Harry, George, Roberta). As a result, the ComboBox is now populated with these names:
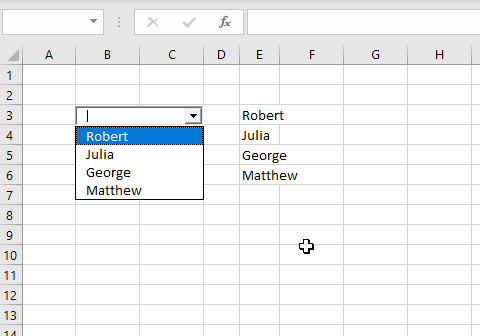
Image 5. Populated ComboBox from the cells range
Get a Selected Item of a ComboBox in VBA
The purpose of a ComboBox is to get a users choice. In order to retrieve a users choice, you need to use this code:
Dim strSelectedItem As Variant

strSelectedItem = Sheet1.cmbComboBox.Value
The users selection is in the attribute Value of Sheet1.cmbComboBox object. This value is assigned to the variable strSelectedItem:
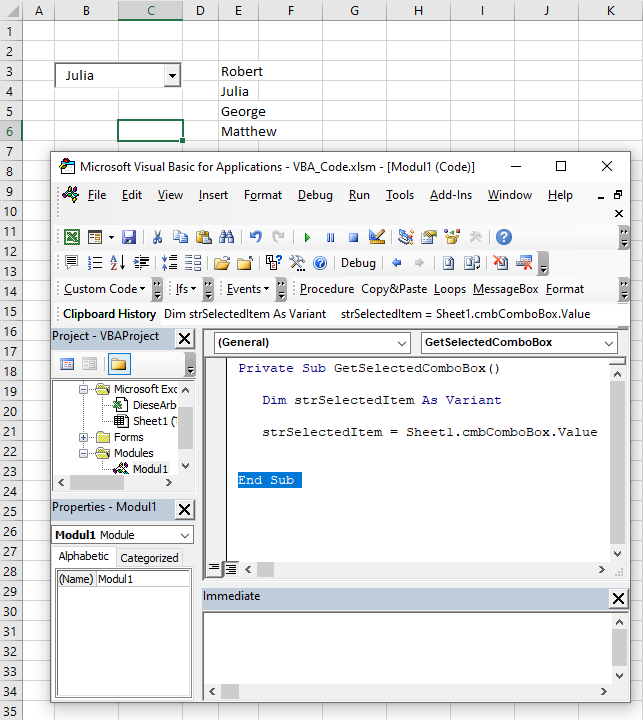
Image 6. Get a selected value from the ComboBox in VBA
We selected Julia in the ComboBox and executed the procedure. As you can see in Image 5, the value of the strSelectedItem is Julia, which is the value we selected. Now you can process this variable further in the code.
Clear a ComboBox
If you want to clear a ComboBox in VBA, you need to use Clear method of Sheet1.lstComboBox object. It will delete all the items from the ComboBox. Here is the code:
Sheet1.cmbComboBox.ClearNotice that the Clear method does not delete the attribute ListFillRange, so it must be removed from the properties of the ComboBox beforehand.
When we execute the code, we get the empty ComboBox:
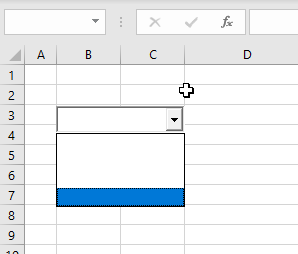
Image 7. Clear the ComboBox
Use a ComboBox in a Userform
As we mentioned, Combobox is most often used in Userforms. To explain how you can do it, we will first insert an Userform. In VBA editor, right-click on Module name, click on Insert and choose UserForm:
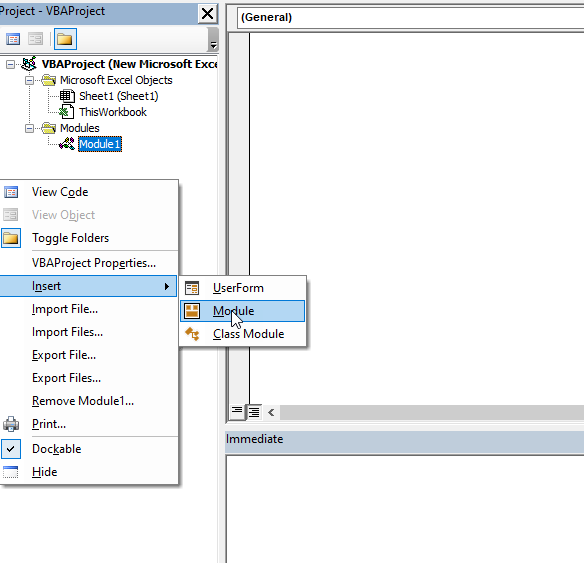
Image 8. Insert a Userform
To display controls for inserting, you need to enable the Toolbox. To do this, click on the Toolbox icon in the toolbar. After that, you will get the windows with all the controls available. You can click on ComboBox to create it in the Userform.
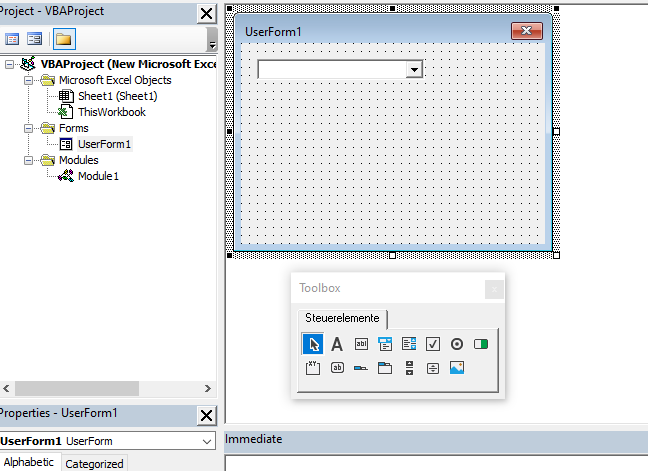
Image 9. Insert a ComboBox in the Userform
We will name the ComboBox cmbComboBox. In order to populate it with values, we need to put the following code into the method Initialize of the object UserForm:
Private Sub UserForm_Initialize()

    With UserForm1.cmbComboBox

        .AddItem "John"
        .AddItem "Michael"
        .AddItem "Jennifer"
        .AddItem "Lilly"
        .AddItem "Robert"

    End With

End Sub
This code triggers every time a user runs the Userform and populates the Combobox with these 5 names:
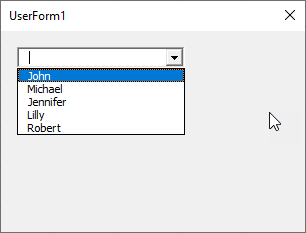
Image 10. The ComboBox with values in the Userform
If you want to get selected value from the ComboBox, you need to use the same logic for the Combobox in a Worksheet, which is explained earlier in the article.
VBA Coding Made Easy
Stop searching for VBA code online. Learn more about AutoMacro — A VBA Code Builder that allows beginners to code procedures from scratch with minimal coding knowledge and with many time-saving features for all users!

Learn More!
Содержание
- Элемент управления ComboBox
- Замечания
- См. также
- Поддержка и обратная связь
- ComboBox control
- Remarks
- See also
- Support and feedback
- How to Populate ComboBox on VBA Userforms
- The VBA Tutorials Blog
- Create the UserForm
- Populate the VBA Combobox
- Accessing the Initialization Event
- Populate ComboBox with .List
- Populate ComboBox with a Range
- Populating Multi-Column ComboBox
- Populate ComboBox with .AddItem
- Add Item to Different Positions in ComboBox
- Conclusion
- VBA ComboBox
- Excel VBA ComboBox
- Top 2 Ways of Creating a VBA ComboBox
- #1 – Using Direct Coding
- #2 – Using UserForm
- Things to Remember
- Recommended Articles
Элемент управления ComboBox
Объединяет функции ListBox и TextBox. Пользователь может ввести новое значение, как в текстовом поле, или выбрать существующее значение, как в ListBox.
Замечания
Если элемент ComboBoxпривязан к источнику данных, comboBox вставляет значение, которое пользователь вводит или выбирает в этот источник данных. Если поле со списком с несколькими столбцами привязано, свойство BoundColumn определяет, какое значение хранится в привязанном источнике данных.
Список в ComboBox состоит из строк данных. Каждая строка состоит из одного или нескольких столбцов с заголовками (или без них). Некоторые приложения не поддерживают заголовки столбцов, другие — только ограниченную поддержку.
Свойством ComboBox по умолчанию является Value. Событием ComboBox по умолчанию является Change.
Если требуется, чтобы в любое время отображалось несколько строк списка, можно использовать ListBox вместо ComboBox. Если вы хотите использовать ComboBox и ограничить значения в списке, можно задать свойство Styleобъекта ComboBox , чтобы элемент управления выглядел как раскрывающийся список.
См. также
Поддержка и обратная связь
Есть вопросы или отзывы, касающиеся Office VBA или этой статьи? Руководство по другим способам получения поддержки и отправки отзывов см. в статье Поддержка Office VBA и обратная связь.
Источник
ComboBox control
Combines the features of a ListBox and a TextBox. The user can enter a new value, as with a TextBox, or the user can select an existing value, as with a ListBox.
If a ComboBox is bound to a data source, the ComboBox inserts the value the user enters or selects into that data source. If a multi-column combo box is bound, the BoundColumn property determines which value is stored in the bound data source.
The list in a ComboBox consists of rows of data. Each row can have one or more columns, which can appear with or without headings. Some applications don’t support column headings, others provide only limited support.
The default property of a ComboBox is the Value property. The default event of a ComboBox is the Change event.
If you want more than a single line of the list to appear at all times, you might want to use a ListBox instead of a ComboBox. If you want to use a ComboBox and limit values to those in the list, you can set the Style property of the ComboBox so the control looks like a drop-down list box.
See also
Support and feedback
Have questions or feedback about Office VBA or this documentation? Please see Office VBA support and feedback for guidance about the ways you can receive support and provide feedback.
Источник
How to Populate ComboBox on VBA Userforms
The VBA Tutorials Blog
The ComboBox is a Control for VBA userforms that allows the user to choose from a list of options. It is also known as a drop-down menu, but to serve its purpose as a dropdown menu, you’ll first need to populate the combobox for the user so they can actually make a choice. There are two ways to populate a ComboBox with VBA:
- With the .AddItem method
- With the .List property
The rest of this tutorial will teach you how to add entries to, or populate, your own VBA userform comboboxes, and we’ll have a little fun teaching it!
Create the UserForm
Before we write any code to populate our combobox, we need to create the box itself and the userform on which it lives.
I’m sure you already have your own design, but in this tutorial, our userform will carry the name Combobox_Userform , our command button will be CmdButton_For_CB , and the combobox itself will be ComboBox_Demo1 .
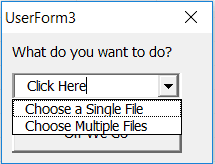
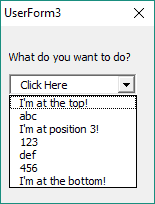
Here is what the layout looks like:
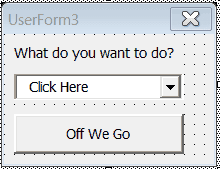
Userform with three elements: a combobox, a label, and a button
As you can see, we put default text “Click Here” into the combobox. This is not one of the dropdown options; it’s simply a filler before the user clicks the menu. You can edit it directly by clicking into the combobox in the preview window, just like for the Label and CommandButton controls, but what you really want to do is populate your combobox using VBA code, like we’ll demonstrate in the next section.
Populate the VBA Combobox
In this section, we will show you how to populate a combobox in the UserForm_Initialize VBA Event by either adding items sequentially or reading the values directly from an array.
Accessing the Initialization Event
VBA hands control off to the UserForm_Initialize Event only after the userform has been called. If you want a more in-depth discussion about the logic of showing a userform, check out our Userform Show article. In short, here’s the code for showing our particular userform:
Make sure you place this in a regular Module, not the userform’s dedicated private code.
Populate ComboBox with .List
Now we’re going to begin actually populating the values in our ComboBox. One way to add multiple values to your ComboBox is to use the ComboBox List property, or .List .
To use the ComboBox .List property, you simply need to put your dropdown menu options into an array and separate each dropdown item by a comma. You can use the Array function to create the array needed for the .List property. Don’t forget each option needs quotes since your entries are strings!
Here’s a sample code that goes into the userform’s private code, not a regular module, and adds two items to your dropdown list once the userform is initialized:
Make powerful macros with our free VBA Developer Kit
Tutorials like this can be complicated. That’s why we created our free VBA Developer Kit and our Big Book of Excel VBA Macros to supplement this tutorial. Grab them below and you’ll be writing powerful macros in no time.
When you run this code, you’ll get this beauty:
The userform with populated combobox open
Notice the userform’s caption is “UserForm3”, but the userform name is ComboBox_Userform . I’m pointing this out because the same distinction applies to your combobox. Don’t get the (Name) and Caption or Text values mixed up! You will get a runtime error if you try to use the caption as the object name. You can change the object name and caption in the Properties window (F4), typically on the bottom left of the VBE.
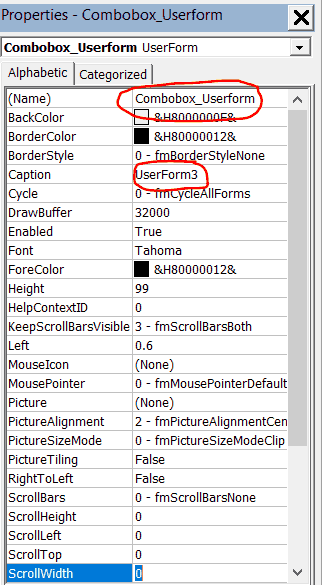
The Properties Window for Combobox_Userform with the Caption and Name Circled
Populate ComboBox with a Range
You can also use the .List property to populate a userform combobox with a range of cells in your spreadsheet. Take this macro, for example:
This macro will quickly add all the values in range A1:A10 to your ComboBox. It’s incredibly fast and very helpful if your userform is designed to accept data from your spreadsheet.
Populating Multi-Column ComboBox
Speaking of columns of data, the .List property also has an optional second argument, pvargColumn, to let you populate specific columns of a multicolumn ComboBox.
If you want to use the optional arguments in the .List property to create multi-columned comboboxes, there are some extra steps to take.
First you need to change the number of columns in your combobox, much like you would in my tutorial on aligning columns differently in a UserForm ListBox. You can do this under the Properties window mentioned earlier, or you can do it at runtime by using the .ColumnCount property of the combobox object, like this:
Then, you can create a dummy array that matches the dimensions you want for the list of options. Remember the .List array is zero-based. Let’s say you want a 3-row, 2-column list with any kind of data, like numbers or dates, so you dimensionalize an array, like this:
From here, you have two choices. You can either (1) populate your array and then populate your ComboBox with your full array, or (2) populate your ComboBox with an empty array and then fill each array element individually.
Either way, we’ll use the .List property, just like before, to add items to your ComboBox. The second option accesses each “cell” in the list to fill out the final dropdown menu.
Option 1: Pass Full Array to ComboBox
Option 2: Pass Empty Array to ComboBox
Whichever option you choose, you’ll be left with a nice two-column, three-row VBA ComboBox that’s fully populated, like this one:
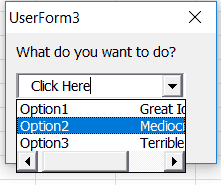
A Populated Multi-Column ComboBox
Populate ComboBox with .AddItem
If instead you want to add items with methods (as opposed to properties), you can use the ComboBox .AddItem method during initialization. Each time you call the AddItems method, a new item will appear in your ComboBox.
More interestingly, you can use .AddItems to add items dynamically after the userform has already been created.
In code, populating your UserForm ComboBox dynamically would look something like this:
We used the Event UserForm_Click , so when the user clicks on the userform area, an item is added to the bottom of our dropdown list. The initial userform has the default values we added with the .List property, but now we let the user add items by clicking on the userform, as well.
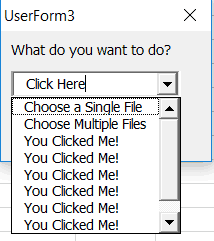
The dropdown menu after clicking on the userform several times
I know this is a silly example, but it demonstrates how you can dynamically alter your combobox when certain conditions are met; in this case, when the user clicks the form.
You could also populate the list with .AddItem in the initialization stage if you wanted, like this:
The VBA ComboBox AddItem method is the most popular way to add items to a userform, although I’ve found both options to be equally flexible.
Imagine you had a lot of rows in a text file or something that you wanted to add to your combobox. You could nest the .AddItem method inside a For Loop to programatically add each item. Placing the AddItem ComboBox method inside a loop is a common practice for populating a UserForm ComboBoxes.
Add Item to Different Positions in ComboBox
The AddItem method of userform comboboxes also accepts an optional second argument: pvargIndex. When included, the pvargIndex tells your combobox where you want to add your new entry.
The items in your combobox range from 0 (at the top) to .ListCount (at the bottom). For example, if you fed the argument a 0, it would add a new entry to the top of your userform. Omitting the argument is the same as passing the AddItem method an argument of ComboBox_Demo1 .ListCount .
Let’s look at a couple examples. In the following code, the “You Clicked Me!” item is added in the first position instead of the default last position.
to place the code at the top of your ComboBox (Position 0).
Let’s take a look at one more example.
In this example, we dynamically populated our combobox by adding an item to the top, bottom and at the 3rd entry in the dropdown menu by specifying a pvargIndex position. Notice how a pvargIndex of 2 added an item to the 3rd slot. Remember, ComboBox indexing begins at position 0!.
pvargIndex to add items to ComboBox
Conclusion
Creative developers can use both .List and .AddItem to make interactive userform dropdown lists. By using ComboBoxes (or dropdowns), developers are able to guide user interactions with the program while still allowing a degree of freedom to the end users.
We hope you enjoyed this tutorial. To take your VBA skills to the next level, check out more of our free VBA tutorials. Test your skills by trying to link concepts. For example, can you combine [VBA GetOpenFilename] feature with a ComboBox for an interactive dropdown. When you’re ready to take your VBA to the next level, subscribe using the form below.
Ready to do more with VBA?
We put together a giant PDF with over 300 pre-built macros and we want you to have it for free. Enter your email address below and we’ll send you a copy along with our VBA Developer Kit, loaded with VBA tips, tricks and shortcuts.
Before we go, I want to let you know we designed a suite of VBA Cheat Sheets to make it easier for you to write better macros. We included over 200 tips and 140 macro examples so they have everything you need to know to become a better VBA programmer.
This article was written by Cory Sarver, a contributing writer for The VBA Tutorials Blog. Visit him on LinkedIn and his personal page.
Источник
VBA ComboBox


Excel VBA ComboBox
Combo Box is the UserForm feature in VBA. They are different from the text boxes as text boxes used to contain only text. We allow the user to input any data, but by using combo boxes, we limit users to the desired response type. Thus, the data is in an orderly fashion. It is similar to the list data validation in Excel.
Combo Box can be compared to a dropdown list in Excel in worksheets. We used data validation to provide a dropdown. But in VBA, a UserForm feature provides a dropdown in any UserForm. But, if we want to use a combo box in Excel, we can access it from the “Developer” section. From there, we can create combo boxes for individual or multiple cells.
Combo Box is very similar to the dropdown list we have in an excel worksheet. With the combo box, we can store predetermined values so that users make the selection from the list available from the combo box. The combo box is generally used with UserForms to get the users’ input.
UserForms are useful but having other tools on the user form is what makes the user form so special. One of the tools that we often use as a tool for UserForm is “Combo Box.”
Table of contents
You are free to use this image on your website, templates, etc., Please provide us with an attribution link How to Provide Attribution? Article Link to be Hyperlinked
For eg:
Source: VBA ComboBox (wallstreetmojo.com)
Top 2 Ways of Creating a VBA ComboBox
#1 – Using Direct Coding

From “Active X Controls,” choose “Combo Box.”

Now you can draw this object on any of the worksheets.

Right-click on the combo box and choose the “Properties” option.
When you choose properties, it will open up a huge list of combo box properties.
We will give a list of department names for this combo box, so change the name property of the combo box to “DeptComboBox.”

This combo box will be referred to by the name “DeptComboBox.” We need to give pre-determined department names, so here I have a list of department names.


But we need to see these department names when the workbook opens up, so double click on “ThisWorkbook.”

From the dropdown list, choose “Workbook.”

From the options, choose “Open.”

Now it will create a blank like the one below.

Inside this macro, enter the below code.
Code:

Now save and close the workbook. When you reopen the workbook, we can see its department names.
#2 – Using UserForm
Another way to add values to the combo box is using the UserForm. First, give a name to cells as “Department.”


Now, it has created the new UserForm.

Next to the UserForm, we can see “Toolbox” from this toolbox. Then, finally, we can insert “ComboBox.”

Now, the combo box is embedded in the UserForm. To open the properties option, select the combo box and press the F4 key to open the properties window.

Scroll down the “Properties” tab and choose “RowSource.”
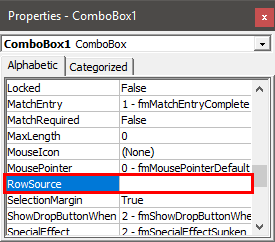
For this “RowSource,” enter the name we had given to department name cells.
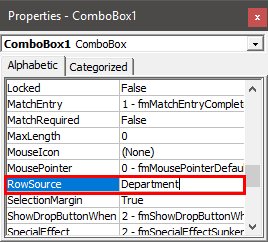
Now, this combo box holds the reference of the name “Department.”
Now, run the UserForm by using the “Run” button.

Now, we can see a list of department names in the combo box on the UserForm.

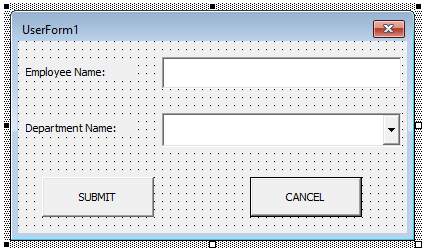
Practically UserForm is associated with a combo box, text box, and many other tools. Therefore, we will create a simple data entry UserForm with a text box and combo box.
Create a UserForm like the one below.

Create two “Command” buttons.
Double click on the “SUBMIT” button. It will open up below the macro.

Inside this macro, add the below code.
Code:

Now, double-click the “CANCEL” button and add the code below.

Now, in the worksheet, create a template like the one below.

Now, run the UserForm. It will open up like this.

Enter the employee name and pick the department name from the combo list.
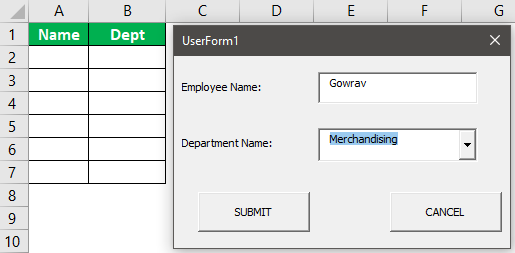
Click on the “SUBMIT” button and see the magic.

We got the values entered in the table format we have created.
Things to Remember
- The COMBO BOX has its properties as well.
- Adding values to the list comes in two ways. One is a coding way, and another is a range name reference.
- The COMBO BOX is usually part of the UserForm.
Recommended Articles
This article has been a guide to VBA Combo Box. Here, we discuss how to insert and use a combo box using VBA coding in Excel along with the downloadable template. Below you can find some useful Excel VBA articles: –
Источник