Содержание
- Excel Format Colors
- Colors
- Theme and Standard Colors
- Hexadecimal Colors
- RGB Colors
- Applying colors
- How to convert color codes (RGB, HSL, HSV, Hex, Long, CMYK)
- Excel’s different color code formats
- User Defined Functions for color conversion
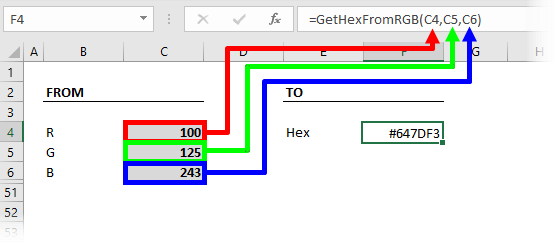
- Convert from RGB to hex
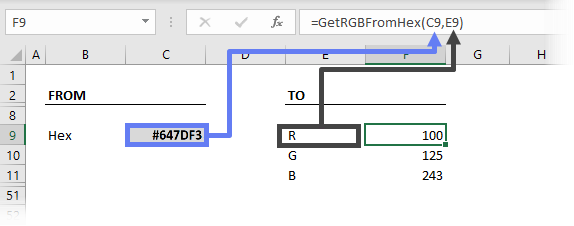
- Convert from hex to RGB
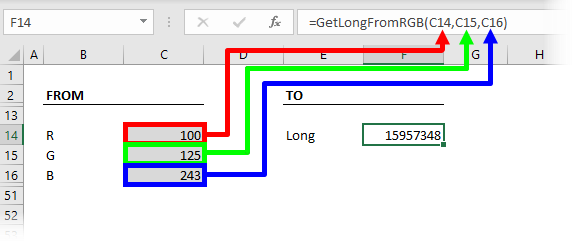
- Convert from RGB to long
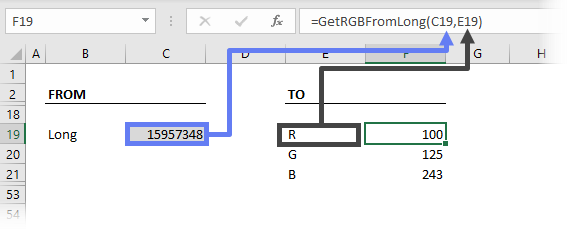
- Convert from long to RGB
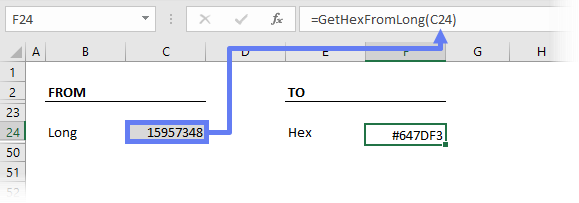
- Convert from long to hex
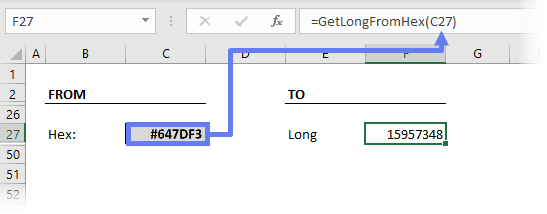
- Convert from hex to long
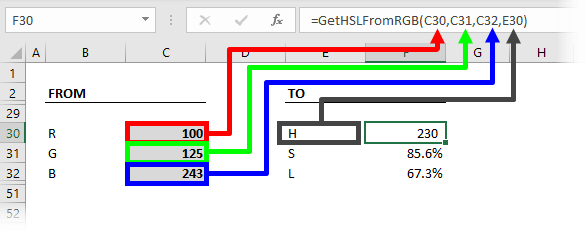
- Convert from RGB to HSL
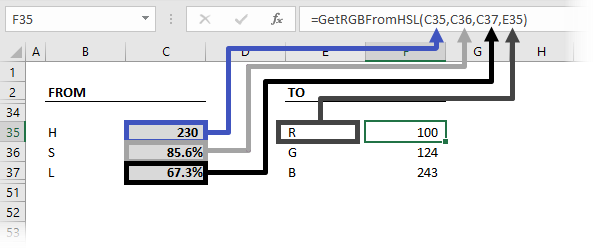
- Convert from HSL to RGB
- Convert from RGB to CMYK
- Convert from CMYK to RGB
- Convert from RGB to HSV
- Convert from HSV to RGB
- Color conversion add-in
- Conclusion
Excel Format Colors
Colors
Colors are specified by selection or by using Hexadecimal and RGB codes.
Tip: You can learn more about colors in our HTML/CSS Colors Tutorial.
Theme and Standard Colors
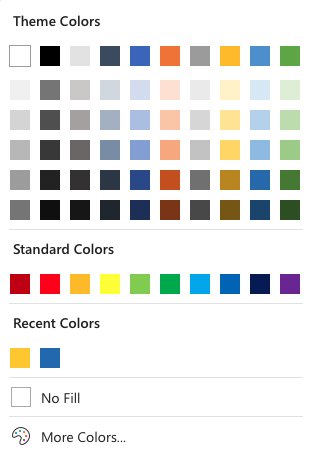
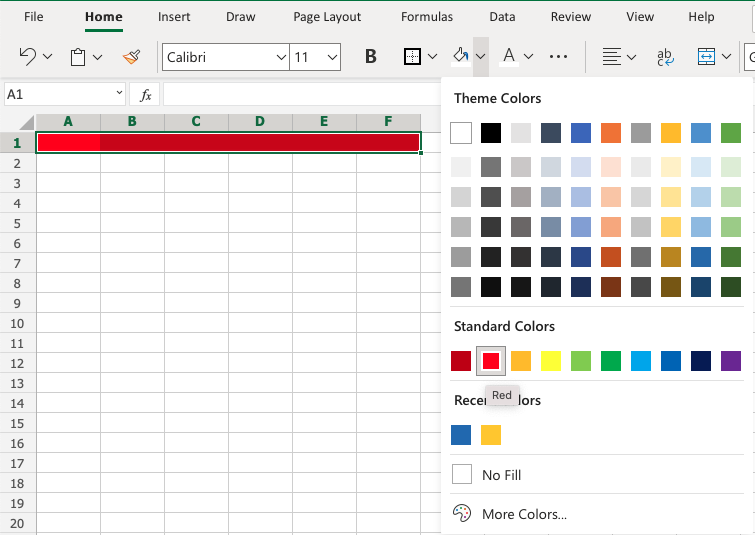
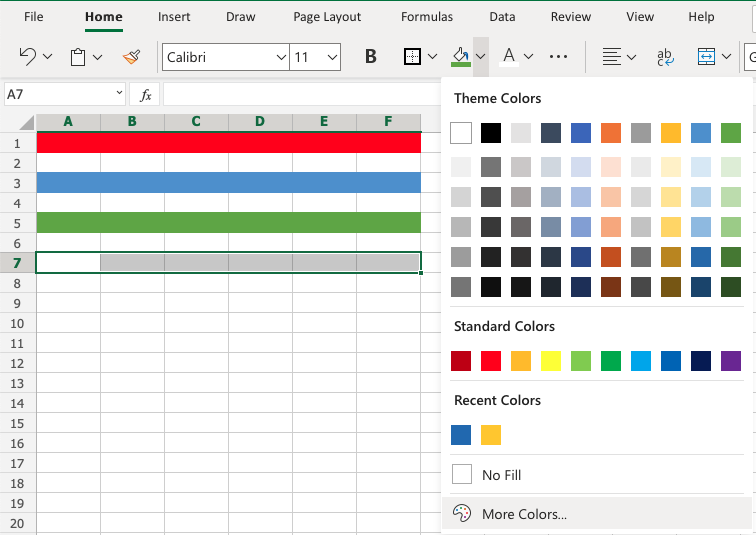
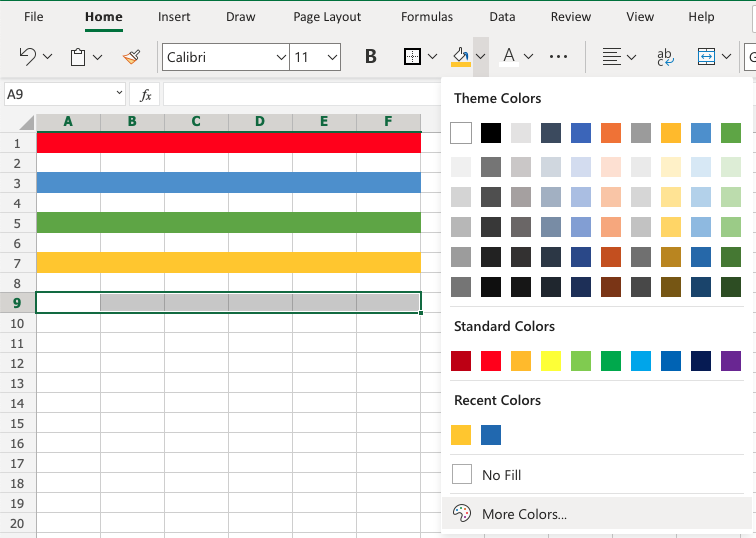
Excel has a set of themes and standard colors available for use. You select a color by clicking it:
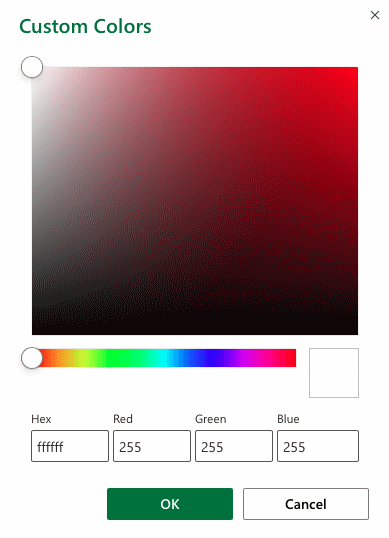
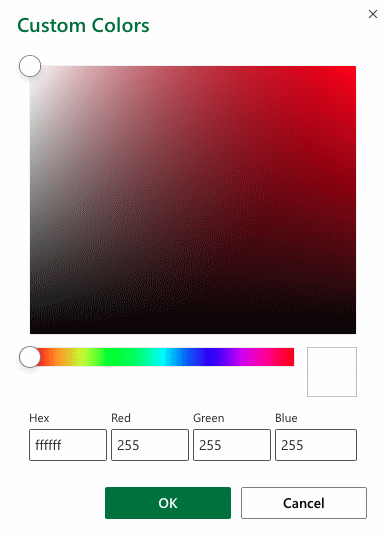
The «More Colors» option allows you to select custom colors by entering a RGB or HEX code.
Hexadecimal Colors
Excel supports Hexadecimal color values
A hexadecimal color is specified with: # RR GG BB .
RR (red), GG (green) and BB (blue) are hexadecimal integers between 00 and FF specifying the intensity of the color.
For example, #0000FF is displayed as blue, because the blue component is set to its highest value (FF) and the others are set to 00.
RGB Colors
Excel supports RGB color values.
An RGB color value is specified with: rgb( RED , GREEN , BLUE ) .
Each parameter defines the intensity of the color as an integer between 0 and 255.
For example, rgb(0,0,255) is rendered as blue, because the blue parameter is set to its highest value (255) and the others are set to 0.
Tip: Try W3schools.com color picker to find your color! https://www.w3schools.com/colors/colors_picker.asp
Applying colors
Colors can be applied to cells, text and borders.
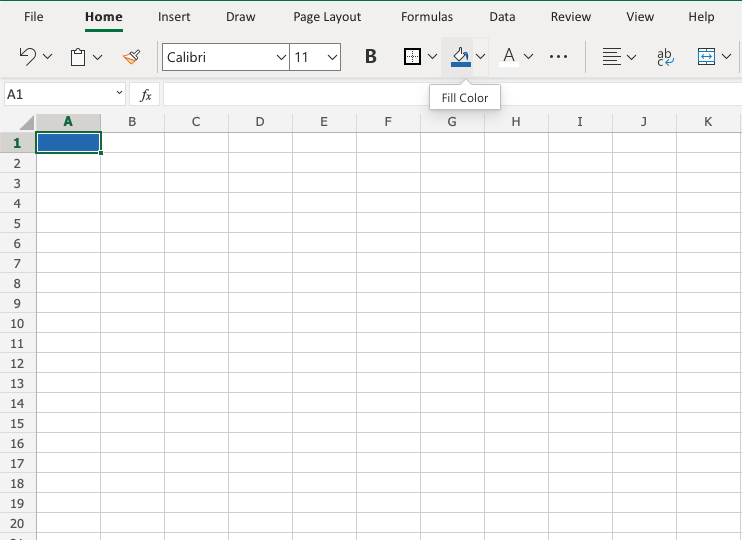
Colors are applied to cells by using the «Fill color» function.
How to apply colors to cells:
- Select color
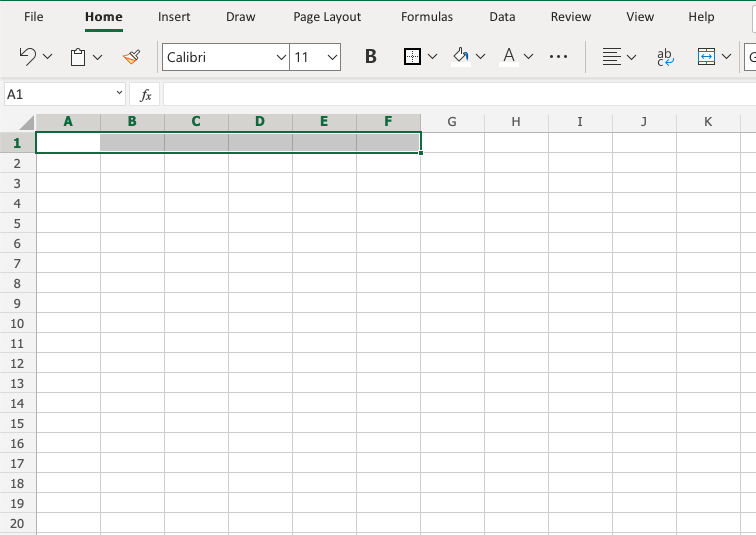
- Select range
- Click the Fill Color button
The «Fill color» button remembers the color you used the last time.
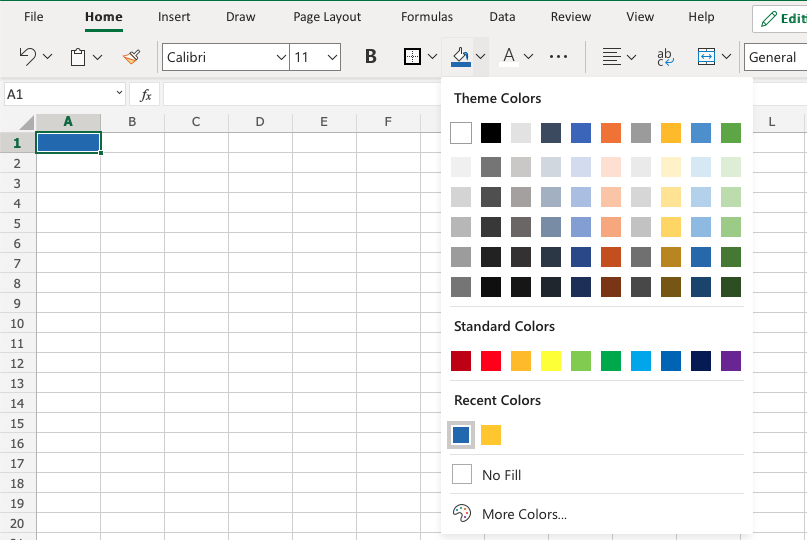
Color options are explored by clicking on the arrow-down icon (
The option allows selection of theme colors, standard colors or use of HEX or RGB codes by clicking on the More Colors option:
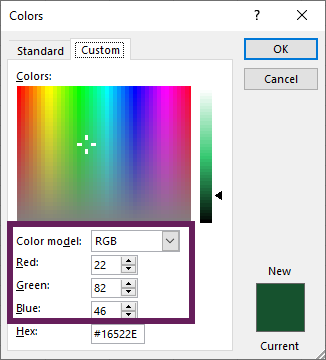
Colors are made from red, green, blue and are universal. Entering a color in one way will give you the code in the other. For example if you enter a HEX code, it will give you the RGB code for the same color.
Let’s try some examples.
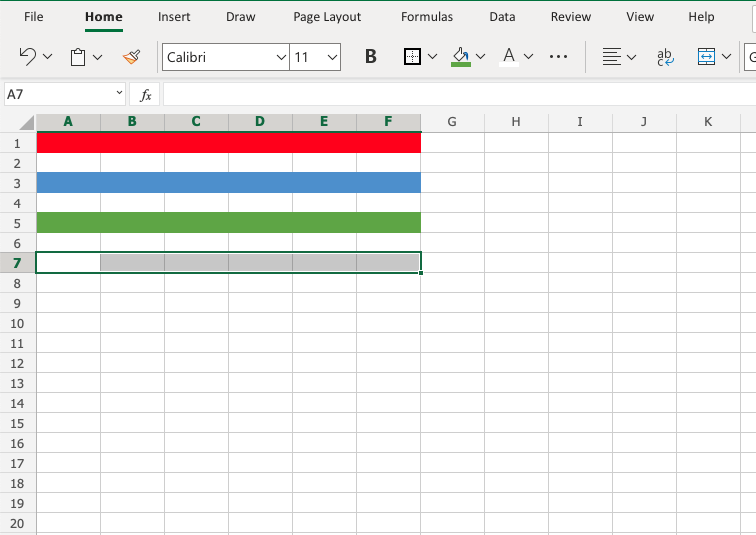
Starting with theme and standard colors:
Great!
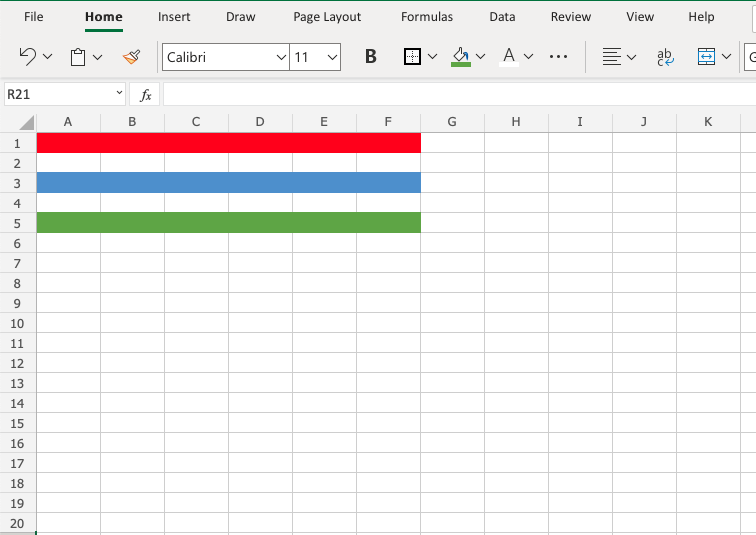
Try to apply the following colors:
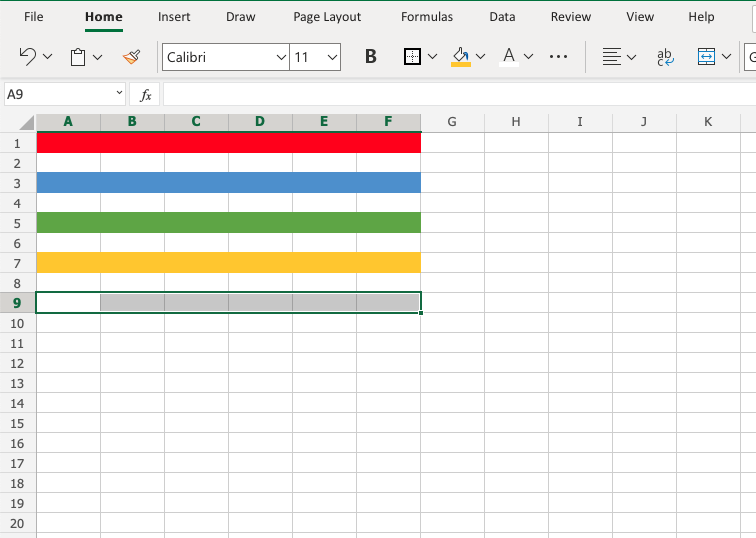
- Theme color blue (accent 5) to A3:F3.
- Theme color green (accent 6) and A5:F5.
Did you make it?
Let’s apply colors using HEX and RGB codes.
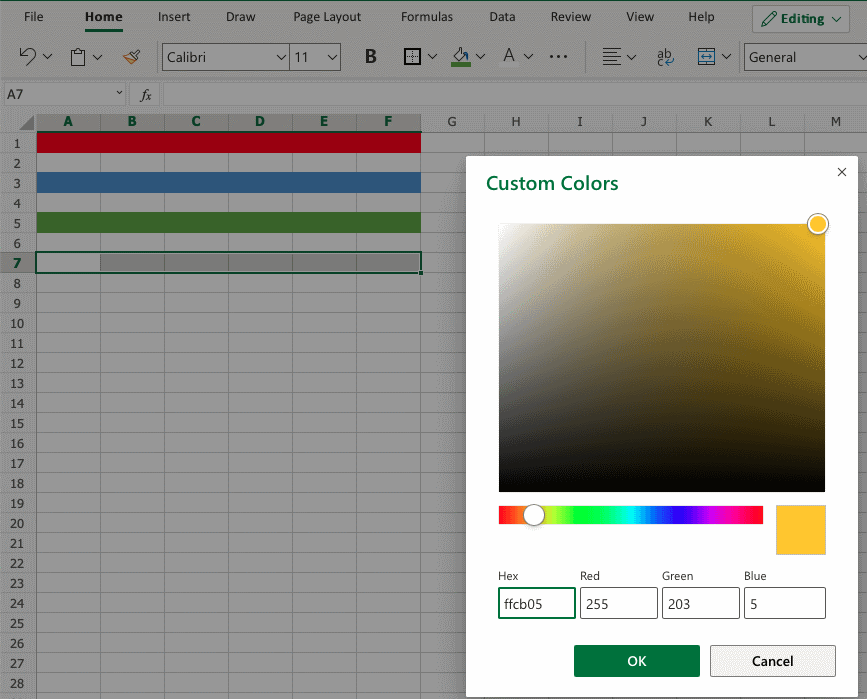
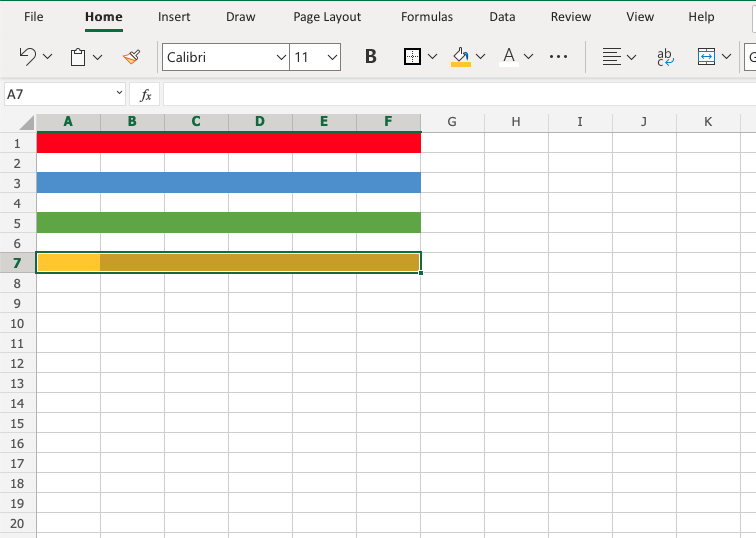
Apply HEX code #ffcb05 to A7:F7:
- Select A7:F7
- Open color options
- Click More colors
- Insert #ffcb05 in the HEX input field
- Hit enter
Notice that applying the HEX code gives the RGB code for the same color, and shows where that color is positioned on the color map.
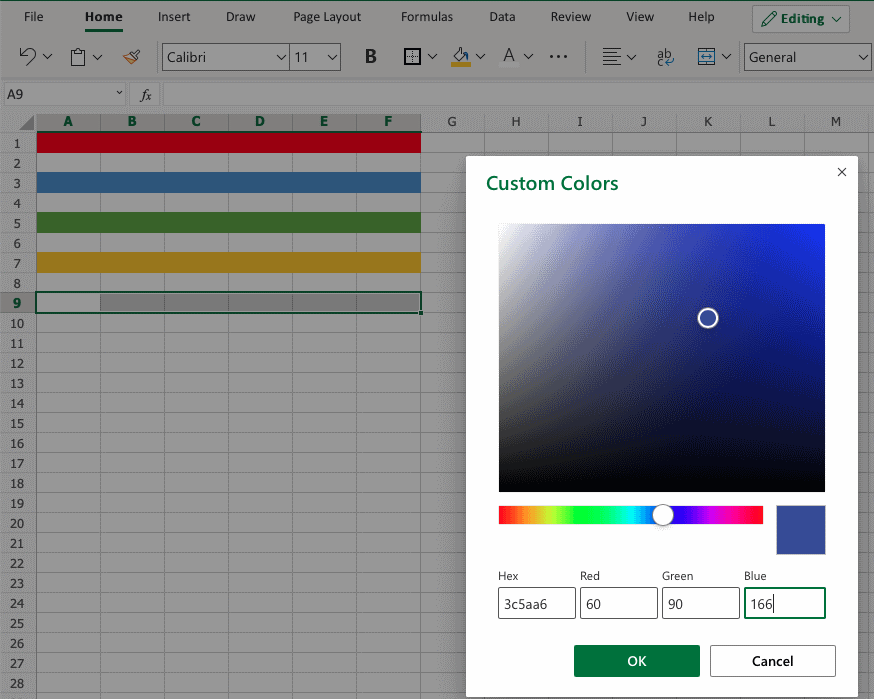
Apply RGB code 60 , 90 , 166 to A9:F9
- Select A9:F9
- Open color options
- Click More colors
- Insert 60 , 90 , 166 in the RGB input field
- Hit enter
Notice that entering the RGB code also gives the HEX code and shows you where the color is positioned on the color map.
Well done! You have successfully applied colors using the standard, theme, HEX and RGB codes.
Источник
How to convert color codes (RGB, HSL, HSV, Hex, Long, CMYK)
I often find myself converting between different formats of color codes; especially from hex to RGB and back again. Rather than firing up Google and searching for color conversion tools online, I decided to write my own User Defined Functions in Excel, now I can calculate the result within a worksheet instead.
The functions in this post include the conversions for RGB, hex, HSL, HSV, CMYK and long formats.
Using these color conversion functions, I created an add-in that makes the conversion even easier. Keep reading to find out how you can download the add-in for free.
Download the example file: Click the link below to download the example file used for this post:
The downloads include:
- 0006 Convert color codes.xlsm – includes all the custom functions
- ColorCodeConverter.xlam – Excel add-in for color conversion
- Add-in installation instructions.pdf – Add-in installation & xlsm unblocking instructions
Excel’s different color code formats
Even in Excel, there are four different methods of defining color; RGB, hex, HSL and long.
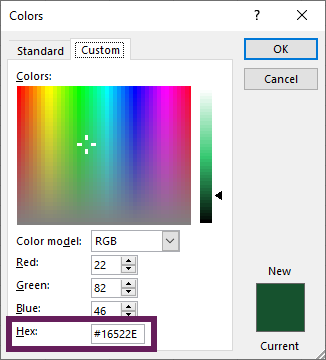
The RGB (Red, Green and Blue) color code is used within the standard color dialog box.
The individual colors Red, Green and Blue each have 256 different shades, which when mixed can create 16,777,216 different color combinations.
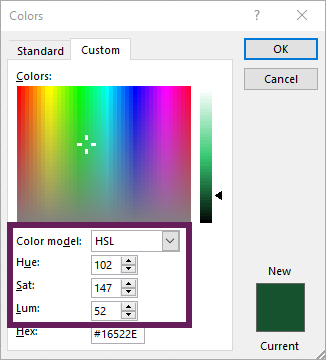
Within the standard color dialog box there is another code format; using the color model drop-down we can change to HSL. HSL uses Hue, Saturation and Luminance to create the color.
HSL tries to define colors closer to the way humans think about colors.
- Hue – is the degree on the color wheel from 0 to 360. 0 is red, 120 is green, 240 is blue.
- Saturation – is a percentage of the amount of color included. 100% is full color, 0% is no color (i.e. all grey)
- Luminance (or lightness) – is a percentage of grey. 0% is black, 100% is white.
Frustratingly, Excel does not handle HSL in the standard way. Instead, Excel measures all the numbers where 0 is the lowest and 255 is the biggest. But, it’s a quirk we can handle.
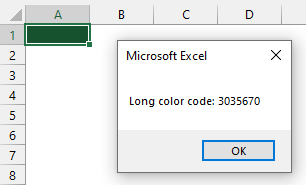
The long color code is used by VBA when displaying the color property of an item. The following macro displays the long code for the fill of the active cell.
Select a cell and run the macro.
The long code is a number from 0 to 16,777,215, where each separate number represents a color. The relationship between RGB and long is based on a simple calculation:
Long = Blue x 256 x 256 + Green x 256 + Red
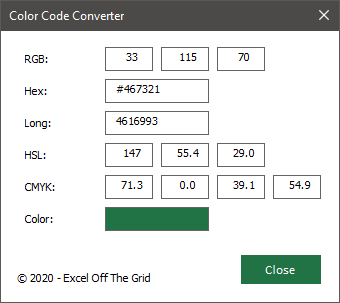
- Where Red: 33, Green: 115 and Blue: 70
- The result calculates as 70 x 256 x 256 + 115 x 256 + 33 = 4,616,993
Long and RGB are related; they are just different ways of calculating the same number.
Hex (which is short for hexadecimal) color codes are found in two places in Excel.
- Color picker – Excel 2021 and Excel 365
- VBA – All versions of Excel
Since the introduction of hex codes in the color picker, there is now native conversion between RGB, Hex and HSL color codes.
Hex color codes are similar to RGB as they also use 256 shades for each individual color. The critical difference is that the hex system represents the numbers from 0 to 255 using just two characters. This is possible because hex uses Base-16.
We generally use Base-10 in everyday life, which means that we have 10 digits (0, 1, 2, 3, 4, 5, 6, 7, 8, 9) available. As an example, the number 14 is created by using the formula (1 x base) + 4. The base is 10, so the result is calculated as (1 x 10) + 4, which equals 14.
For Base-16, there are 16 digits; however, as we don’t have enough number characters we use A, B, C, D, E and F to represent the numbers from 10 through 15.
As an example, the hex number AB equals 171.
- A = 10
- B = 11.
- The calculation is (A x base) + B = (10 x 16) + 11 = 171
In hex, the lowest value is zero and the highest value is F (which is equal to 15). Therefore, there are 16 possible individual digits. This means that from two digits we can create 256 shades (16 x 16 = 256), which is the same as RGB. Therefore, hex also has the same 16,777,216 combinations as RGB and long.
Hex codes are presented in same order to RGB, so if the hex color code is #467321 the first two characters represent red, the middle two characters represent green and the last two are blue.
Using the #467321 hex code as an example, the conversion to RGB would be:
- Red: Hex value of 46 calculates as (4 * 16) + 6 = 70
- Green: Hex value of 73 calculates as (7 * 16) + 3 = 115
- Blue: Hex value of 21 calculates as (2 * 16) + 1 = 33
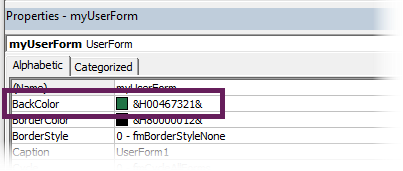
The hex codes are used within the VBA properties to define color.
The color code in the screenshot above is: &H00467321&. However, there is a very subtle difference when using the VBA code; the hex code needs to be reversed. The first two characters represent blue, the middle two characters represent green and last two are blue.
Normally, blue would be #0000FF, but for the VBA property the code would be: &H00FF0000&
- & = Start character
- H = Hex code
- 00 = Tells VBA to use a custom color
- FF0000 = the Hex color code with the RGB reversed
- & = End character
Another common color code system is CMYK. It is used primarily for printing, as it determines the amount of Cyan, Magenta, Yellow and blacK ink used in overlapping printed dots.
While Excel does not use CMYK, it is a common method, so I have included it within the scope of this post.
Finally, to complete the spectrum of color code systems, there is HSV. It is similar to HSL, but it uses Hue, Saturation, and Value as measures. This is not just HSL under a different name. While Hue is the same under both systems, Saturation and Value both calculate as different values.
Excel does not support HSV, but is included below because it is a common method.
User Defined Functions for color conversion
In the section above, I’ve tried to explain how each method defines colors, but converting between them is a different matter entirely, and is much harder. Thankfully, we can let Excel do the work for us. Below are the UDF’s to convert between the various methods.
REMEMBER! – To use VBA functions, the code must be included in a standard VBA code module.
RGB, hex and long are all based on whole numbers, so they should perfectly convert between each other. CMYK and HSL involve decimal places and percentages and therefore could create small differences in their conversions.
Convert from RGB to hex
The following UDF calculates the hex value based on the RGB color codes.
How to use the function:
The function contains 3 arguments, values between 0 and 255 for each individual Red, Green, or Blue value.
Convert from hex to RGB
The UDF below provides the Red, Green, or Blue value based on the hex color.
How to use the function:
The function contains 2 arguments;
- the hex code
- the letter R, G or B, to represent the color to be returned
Convert from RGB to long
This UDF provides the long value based on the RGB color codes.
How to use the function:
The function contains 3 arguments, values between 0 and 255 for each individual Red, Green, or Blue value.
Convert from long to RGB
To convert from RGB to the long color code, use the following UDF.
How to use the function:
The function contains 2 arguments;
- the long code
- the letter R, G, or B, depending on which color we want to return.
Convert from long to hex
The following UDF provides the hex code based on the long color code.
How to use the function:
The function has only one argument, which is the long color code.
Convert from hex to long
The UDF below converts the hex code into the long color code.
How to use the function:
The function has only one argument, which is the hex code.
Convert from RGB to HSL
The UDF below will return the degree of Hue, % of Saturation, or % of Luminance based on the RGB color codes.
How to use the function:
The function contains 4 arguments. The R, G and B values, then the letter H, S, or L, depending on the value to be returned by the function.
The calculation for converting to HSL is based on the calculation from here: http://www.niwa.nu/2013/05/math-behind-colorspace-conversions-rgb-hsl/
Convert from HSL to RGB
The following UDF calculates the RGB values based on the degree of Hue, % of Saturation and % of Luminance
How to use the function:
The function contains 4 arguments. The Hue degree, Saturation %, and Luminance %, plus the letter R, G or B depending on the value to be returned
The calculation for converting from HSL is based on the calculation from here: http://www.niwa.nu/2013/05/math-behind-colorspace-conversions-rgb-hsl/
Convert from RGB to CMYK
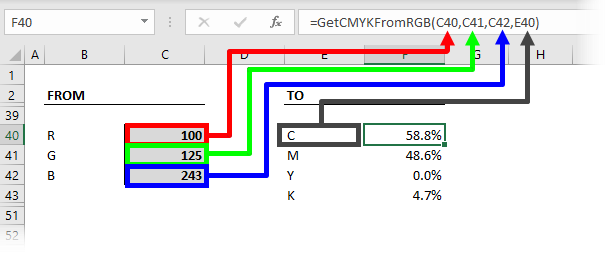
The following UDF provides the % value for Cyan, Magenta, Yellow, or Black based on the RGB color codes.
How to use the function:
The function requires 4 arguments. The R, G and B values, along with the letter C, M, Y or K, depending on the value to be returned.
The calculation for converting to CMYK is based on the calculation from here: https://www.easycalculation.com/colorconverter/cmyk-rgb-color-convertor.php
Convert from CMYK to RGB
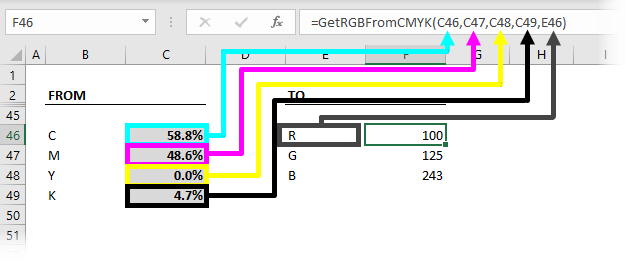
To get the C, M, Y, or K percentages from RGB use the UDF below.
How to use the function:
The function requires 5 arguments. The Cyan, Magenta, Yellow and Black percentages, plus the letter R, G or B, depending on the value to be returned.
Convert from RGB to HSV
The UDF below will return the degree of Hue, % of Saturation, or % of Value based on the RGB color codes.
The calculation for converting to HSV from RGB based on the calculation from here: https://www.calculatorology.com/hsv-to-rgb-conversion/
Convert from HSV to RGB
The following UDF calculates the RGB values based on the degree of Hue, Saturation % and Value % of the HSV method.
The calculation for converting to HSV from RGB based on the calculation from here: https://www.codespeedy.com/hsv-to-rgb-in-cpp/
Color conversion add-in
Using these conversion functions, I have created an Excel add-in that will quickly switch between the different color codes.
The add-in is included within the downloads at the top of the post. To install the add-in, follow the PDF instructions included in the download, or follow the instructions in this post.
Once installed, the EOTG menu will include an icon called Converter in the Color Codes group.
Click the button to open the tool. When entering values into any of the boxes, the other boxes will automatically display the converted codes.
Conclusion
I hope this post provides you with all the color conversions that you need. If you want to convert between two methods that I have not covered above (for example, hex to HSL has not been included), convert from the source code to RGB, then from RGB to the target mode.
Related posts:
About the author
Hey, I’m Mark, and I run Excel Off The Grid.
My parents tell me that at the age of 7 I declared I was going to become a qualified accountant. I was either psychic or had no imagination, as that is exactly what happened. However, it wasn’t until I was 35 that my journey really began.
In 2015, I started a new job, for which I was regularly working after 10pm. As a result, I rarely saw my children during the week. So, I started searching for the secrets to automating Excel. I discovered that by building a small number of simple tools, I could combine them together in different ways to automate nearly all my regular tasks. This meant I could work less hours (and I got pay raises!). Today, I teach these techniques to other professionals in our training program so they too can spend less time at work (and more time with their children and doing the things they love).
Do you need help adapting this post to your needs?
I’m guessing the examples in this post don’t exactly match your situation. We all use Excel differently, so it’s impossible to write a post that will meet everybody’s needs. By taking the time to understand the techniques and principles in this post (and elsewhere on this site), you should be able to adapt it to your needs.
But, if you’re still struggling you should:
- Read other blogs, or watch YouTube videos on the same topic. You will benefit much more by discovering your own solutions.
- Ask the ‘Excel Ninja’ in your office. It’s amazing what things other people know.
- Ask a question in a forum like Mr Excel, or the Microsoft Answers Community. Remember, the people on these forums are generally giving their time for free. So take care to craft your question, make sure it’s clear and concise. List all the things you’ve tried, and provide screenshots, code segments and example workbooks.
- Use Excel Rescue, who are my consultancy partner. They help by providing solutions to smaller Excel problems.
What next?
Don’t go yet, there is plenty more to learn on Excel Off The Grid. Check out the latest posts:
Источник
Наименования цветов стандартной палитры Excel из 56 оттенков на русском и английском языках. Соответствие цветов индексам VBA и их RGB и HEX коды.
Стандартная палитра из 56 цветов — это ограниченная палитра оттенков, которая существовала до версии Excel 2007 года, но продолжает использоваться до сих пор.
За ограниченную палитру в VBA Excel отвечает свойство ColorIndex, которое используется для записи и чтения:
|
Sub Primer() Range(«A1»).Interior.ColorIndex = 10 MsgBox Range(«A1»).Interior.ColorIndex End Sub |
Свойство ColorIndex принимает и возвращает значения от 1 до 56.
Наименования 56 цветов палитры
Наименования 56 цветов стандартной ограниченной палитры Excel на русском и английском языках:
| Индекс | Наименование по-русски |
Наименование по-английски | Оттенок |
|---|---|---|---|
| 1 | Черный | Black | |
| 2 | Белый | White | |
| 3 | Красный | Red | |
| 4 | Лайм | Lime | |
| 5 | Синий | Blue | |
| 6 | Желтый | Yellow | |
| 7 | Фуксия* | Fuchsia* | |
| 8 | Цвет морской волны | Aqua | |
| 9 | Темно-бордовый | Maroon | |
| 10 | Зеленый | Green | |
| 11 | Темно-синий | Navy blue | |
| 12 | Оливковый | Olive | |
| 13 | Пурпурный | Purple | |
| 14 | Бирюзовый | Teal | |
| 15 | Серебряный | Silver | |
| 16 | Серый | Gray | |
| 17 | Светло-пурпурно-синий | Light purple blue | |
| 18 | Розовато-лиловый | Mauve | |
| 19 | Бледно-желто-зеленый | Pale yellow green | |
| 20 | Бледно-голубой | Pale blue | |
| 21 | Сливовый | Plum | |
| 22 | Лососевый | Salmon | |
| 23 | Темно-сине-голубой | Light navy blue | |
| 24 | Барвинок | Periwinkle | |
| 25 | Темно-синий | Navy blue | |
| 26 | Фуксия* | Fuchsia* | |
| 27 | Желтый | Yellow | |
| 28 | Цвет морской волны | Aqua | |
| 29 | Пурпурный | Purple | |
| 30 | Коричнево-малиновый | Maroon | |
| 31 | Сине-зеленый | Teal | |
| 32 | Синий | Blue | |
| 33 | Небесно-голубой | Vivid sky blue | |
| 34 | Бледно-голубой | Pale blue | |
| 35 | Бледно-зеленый | Pale green | |
| 36 | Светло-желтый | Light yellow | |
| 37 | Сине-голубой | Shade of blue | |
| 38 | Бледно-пурпурно-розовый | Pale magenta pink | |
| 39 | Светло-сиреневый | Light lilac | |
| 40 | Оранжево-персиковый | Peach-orange | |
| 41 | Светло-синий | Light blue | |
| 42 | Светло-бирюзовый | Light turquoise | |
| 43 | Желто-зеленый | Yellow green | |
| 44 | Желтый мандарин | Tangerine yellow | |
| 45 | Сигнальный оранжевый | Safety orange | |
| 46 | Оранжевый | Orange | |
| 47 | Темно-сине-серый | Dark blue gray | |
| 48 | Светло-серый | Light gray | |
| 49 | Полуночно-синий | Midnight blue | |
| 50 | Зеленая трава | Green grass | |
| 51 | Темно-зеленый | Dark green | |
| 52 | Темно-коричневый | Dark brown | |
| 53 | Темно-красный | Dark red | |
| 54 | Розовато-лиловый | Mauve | |
| 55 | Синий пигмент | Blue pigment | |
| 56 | Темный уголь | Dark charcoal |
* Вместо термина Фуксия (Fuchsia) можно использовать термин Маджента (Magenta), так как в RGB-модели Фуксия и Маджента являются одним и тем же цветом.
Обратите внимание, что в стандартной палитре Excel из 56 цветов есть повторяющиеся оттенки. Наименования цветов (по их HEX-кодам) подобраны, главным образом, по статьям, опубликованным в Википедии.
RGB и HEX коды оттенков палитры
RGB и HEX коды оттенков 56-цветной палитры Excel:
| Индекс | Код HEX | Код RGB | Оттенок |
|---|---|---|---|
| 1 | #000000 | RGB(0, 0, 0) | |
| 2 | #ffffff | RGB(255, 255, 255) | |
| 3 | #ff0000 | RGB(255, 0, 0) | |
| 4 | #00ff00 | RGB(0, 255, 0) | |
| 5 | #0000ff | RGB(0, 0, 255) | |
| 6 | #ffff00 | RGB(255, 255, 0) | |
| 7 | #ff00ff | RGB(255, 0, 255) | |
| 8 | #00ffff | RGB(0, 255, 255) | |
| 9 | #800000 | RGB(128, 0, 0) | |
| 10 | #008000 | RGB(0, 128, 0) | |
| 11 | #000080 | RGB(0, 0, 128) | |
| 12 | #808000 | RGB(128, 128, 0) | |
| 13 | #800080 | RGB(128, 0, 128) | |
| 14 | #008080 | RGB(0, 128, 128) | |
| 15 | #c0c0c0 | RGB(192, 192, 192) | |
| 16 | #808080 | RGB(128, 128, 128) | |
| 17 | #9999ff | RGB(153, 153, 255) | |
| 18 | #993366 | RGB(153, 51, 102) | |
| 19 | #ffffcc | RGB(255, 255, 204) | |
| 20 | #ccffff | RGB(204, 255, 255) | |
| 21 | #660066 | RGB(102, 0, 102) | |
| 22 | #ff8080 | RGB(255, 128, 128) | |
| 23 | #0066cc | RGB(0, 102, 204) | |
| 24 | #ccccff | RGB(204, 204, 255) | |
| 25 | #000080 | RGB(0, 0, 128) | |
| 26 | #ff00ff | RGB(255, 0, 255) | |
| 27 | #ffff00 | RGB(255, 255, 0) | |
| 28 | #00ffff | RGB(0, 255, 255) | |
| 29 | #800080 | RGB(128, 0, 128) | |
| 30 | #800000 | RGB(128, 0, 0) | |
| 31 | #008080 | RGB(0, 128, 128) | |
| 32 | #0000ff | RGB(0, 0, 255) | |
| 33 | #00ccff | RGB(0, 204, 255) | |
| 34 | #ccffff | RGB(204, 255, 255) | |
| 35 | #ccffcc | RGB(204, 255, 204) | |
| 36 | #ffff99 | RGB(255, 255, 153) | |
| 37 | #99ccff | RGB(153, 204, 255) | |
| 38 | #ff99cc | RGB(255, 153, 204) | |
| 39 | #cc99ff | RGB(204, 153, 255) | |
| 40 | #ffcc99 | RGB(255, 204, 153) | |
| 41 | #3366ff | RGB(51, 102, 255) | |
| 42 | #33cccc | RGB(51, 204, 204) | |
| 43 | #99cc00 | RGB(153, 204, 0) | |
| 44 | #ffcc00 | RGB(255, 204, 0) | |
| 45 | #ff9900 | RGB(255, 153, 0) | |
| 46 | #ff6600 | RGB(255, 102, 0) | |
| 47 | #666699 | RGB(102, 102, 153) | |
| 48 | #969696 | RGB(150, 150, 150) | |
| 49 | #003366 | RGB(0, 51, 102) | |
| 50 | #339966 | RGB(51, 153, 102) | |
| 51 | #003300 | RGB(0, 51, 0) | |
| 52 | #333300 | RGB(51, 51, 0) | |
| 53 | #993300 | RGB(153, 51, 0) | |
| 54 | #993366 | RGB(153, 51, 102) | |
| 55 | #333399 | RGB(51, 51, 153) | |
| 56 | #333333 | RGB(51, 51, 51) |
RGB-коды можно использовать в VBA Excel наряду с индексами цветов стандартной палитры, а HEX-коды — в HTML.
Процент черного в оттенках серого
Процентное соотношение черного цвета в оттенках серого:
| Индекс | Наименование | Процент черного | Оттенок |
|---|---|---|---|
| 1 | Черный | 100% | |
| 2 | Белый | 0% | |
| 15 | Серебряный | 25% | |
| 16 | Серый | 50% | |
| 48 | Светло-серый | 40% | |
| 56 | Темный уголь | 80% |
Вывод 56-цветной палитры на лист
Вывод на рабочий лист Excel 56-цветной палитры с помощью кода VBA:
|
1 2 3 4 5 6 7 8 9 10 11 12 13 14 15 16 17 18 19 |
‘Функция, преобразующая десятичный код цвета в аргументы RGB Function DecToRGB(ByVal ColDec As Long) As String Dim r As Long Dim g As Long Dim b As Long r = (ColDec And &HFF&) 256 ^ 0 g = (ColDec And &HFF00&) 256 ^ 1 b = ColDec 256 ^ 2 DecToRGB = CStr(r) & «, « & CStr(g) & «, « & CStr(b) End Function ‘Вывод 56-цветной палитры на активный лист Sub Color56() Dim i As Integer For i = 1 To 56 Cells(i, 1) = i Cells(i, 2).Interior.ColorIndex = i Cells(i, 3).Value = «RGB(« & DecToRGB(Cells(i, 2).Interior.Color) & «)» Next End Sub |
Процедура Color56 записывает в ячейку первого столбца индекс цвета, ячейке второго столбца присваивается соответствующая индексу заливка, в ячейку третьего столбца записывается RGB-код соответствующего индексу цвета.
In this Article
- VBA Color Index Codes List
- VBA ColorIndex Examples
- VBA Color Property
- VB Color
- RGB Colors
- ColorIndex Codes List & RGB Colors in Access VBA
VBA Color Index Codes List
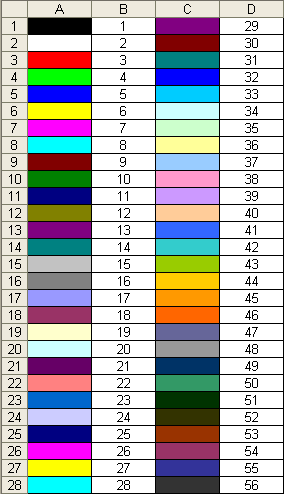
When using VBA to code the Colorindex (or background color) of a cell it is useful to know what integer will equal what color. Below is a reference picture which shows the color and lists it’s respective Colorindex. aka VBA Color Palette
Here’s the code to make one for yourself, or just bookmark this page:
Sub ColorRef()

Dim x As Integer

For x = 1 To 56
  If x < Then
    Cells(x, 1).Interior.ColorIndex = x
    Cells(x, 2) = x
  Else
    Cells(x - 28, 3).Interior.ColorIndex = x
    Cells(x - 28, 4) = x
  End If
Next x

End Sub
VBA ColorIndex Examples
Set Cell Background Color
This example sets the cell’s background color.
Range("A1").Interior.ColorIndex = 6Set Cell Font Color
This example sets the cell’s font color.
Range("A1").Font.ColorIndex = 5Set Cell Borders Color
This example sets the cell’s border color.
Range("A1").Borders.ColorIndex = 5Get Cell Background ColorIndex
This example gets the cell’s background color and assigns it to an Integer variable.
Dim col as Integer

col = Range("A1").Interior.ColorIndex
Set a Cell Background Color to Another Cell’s Color
This example sets a cell color equal to another cell color.
Range("A1").Interior.ColorIndex = Range("B1").Interior.ColorIndexVBA Color Property
Instead of using Excel / VBA’s ColorIndex property, you can use the Color property. The Color property takes two input types:
- vbColor
- RGB Colors
We will discuss these below:
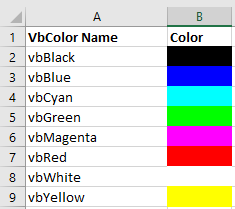
VB Color
VB Color is the easiest way to set colors in VBA. However, it’s also the least flexible. To set a color code using vbColor use the table below:
However, as you can see from the table, your options are extremely limited.
Set Cell Background Color
Range("A1").Interior.Color = vbYellowSet Cell Font Color
Range("A1").Font.Color = vbBlueSet Cell Borders Color
Range("A1").Borders.Color = vbRedSet a Cell Background Color to Another Cell’s Color
Range("A1").Interior.Color = Range("B1").Interior.ColorRGB Colors
RGB stands for Red Green Blue. These are the three primary colors that can be combined to produce any other color. When entering colors as RGB, enter a value between 0 and 255 for each color code.
Here’s an example:
Range("A1").Interior.Color = RGB(255,255,0)Above we’ve set Red = 255 (max value), Green = 255 (max value), and Blue = 0 (min value). This sets the cell background color to Yellow.
Instead we can set the cell font color to purple:
Range("A1").Interior.Color = RGB(128,0,128)There are numerous online tools to find the RGB code for your desired color (here’s one).
ColorIndex Codes List & RGB Colors in Access VBA
Access uses forms to display data. You can use the ColorIndex Codes to programmatically change the background color and foreground color of objects in your Access forms.
Private Sub cmdSave_Click()
'change the background color of the save button when the record is saved.
   DoCmd.RunCommand acCmdSaveRecord
   cmdSave.BackColor = vbGreen
End Sub
In this article, we will learn How to Color numbers based on the Value Result in Excel.
Scenario:
Formatting is only for the viewer’s perception of the data. Whenever a number is entered in a cell in excel, The cell is in its general formatting. As default, the excel doesn’t not assign any significance to the numbers that are being entered. But, for better presentation of data, the numbers need some different formatting. Hence, the range can be formatted as date or currency or accounting, percentage, fraction, etc. This function does not associate with the number, but just to the cell. Hence, if you enter a number 10/10/1986, the cell will format it as a date. But in the formula bar tab on the top of the worksheet, you will still see only 10/10/1986. A mere number such as ‘24’ can denote just about anything. But when you put a $ sign before it or a % sign after it, the entire value changes and so does the perception. These formatted numbers and signs do not interfere in any way with the calculations. That is why, in the formula bar, you will still see only the number.
Custom number formatting
Most of the time, Excel will suggest the formatting while the data is being typed in the cells. If it does not, then you can look for more options in the number format menu available in the home tab. If you do not find the required formatting in that list, you can create your own Excel custom format.
Home > Number > More number formats > Number tab > Custom. Here you will find existing number formats. This can be changed to create your own. The original from which the custom number format in Excel was made will still remain in the list, unchanged. If you no longer wish to use that custom format that you created, select it and click delete.
Conditional formatting
Conditional formatting is a whole different story. This is about formatting the individual cells in range affecting its colour, font, borders, etc. Where does the ‘condition’ in this come from? For example, you can set different conditions for the cell to change colour with. You can keep more than one condition for the same cell. For example, cell A1 containing a number less than 50 will be white; A2, 50 to 75 might be yellow and A3, 76 to 100 might be red. If you change the calculations or enter new data and the value of A3 drops down to 74, then it will automatically change colour from red to yellow.
Access Conditional formatting
Select a cell. Click on Home > Styles > conditional formatting. From the options you can create the conditions and choose different ways to exhibit it. You can highlight certain numbers that are being repetitive or are lesser than/greater than certain numbers, etc. Another option is to give a condition for highlighting % of a condition.
Example:
All of these might be confusing to understand. Let’s understand how to use the function using an example. Here we have some values on the left side on which conditional formatting is being applied.
And on the right side we have some values on which the conditional formatting values are based upon.
We need to follow some steps
Select the cells A1 : C9.
Go to Home > Conditional Formatting > Highlight Cells Rules > Greater Than..
A dialog box will appear in front. Select the F3 cell in the first bow and select the formatting of the cells to Yellow Fill with Dark Yellow Text.
Click Ok.
As you can see the format of all the values is changed wherever the condition matches.
You might also notice what happened to values between 42 & 50. Excel overwrites the first rule and gives preference to the last rule applied. If you wish to highlight the data with different colours. Make new rule in conditional formatting
Now we need to view the results based on another cell value. For that go through the same process. Starting from Selecting the range
Go to Home > Conditional Formatting > Highlight Cells Rules > Less Than..
A dialog box will appear in front
Select the G3 cell in the first bow and select the formatting of the cells to Green Fill with Dark Green Text as shown in the snapshot below.
Click Ok.
As you can see the new format of values is changed using Conditional formatting based on cell values.
Changing the values in the cell changes result.
As you can see we changed the value in G3 cell from 50 to
40 and can view the updated results.
Using Formula in Conditional formatting:
You can perform the above stated task using formulas in conditional formatting. Learning this will enhance your excel skills.
Here we have data on sales done by different dealerships in months of different years. I want to highlight sales in 2019 that are greater than sales in 2018.
To do so, follow these steps.
Select range D2:D12 (Sales of 2019)
Go to Home > Conditional Formatting > New Rule. Here, select «Use a formula to determine which cell to format»
In the formula box, write this excel formatting formula.
Select the formatting of the cell if the condition is true. I have selected a green fill.
Hit the OK button.
And it’s done. All the values in sales 2019 that are greater than the sales in 2018 are highlighted with green fill.
Explanation
It’s easy. First, we select the range on which we want the formula to apply. Next, we use a formula to determine which cell to format in the selected range. The formula is $D2>$C2. Here we have locked columns and allowed rows to change. This is called half absolute referencing. Now, D2 is compared with C2, since D2 is greater than C2, D2 is filled with green colour. Same happens with each cell.
If you wanted to highlight months instead of sales in 2019, you can directly change «formula applies to» to the range A2:A12.
Select any cell in D2:D12. Go to conditional formatting. Click on «Manage Rules».
Change the range in the «Applies to» box to A2:A12.
Hit the OK button.
You can see that formatting is applied to the mentioned reference. Similarly, you can format any range based on any column in excel. The column can be on a different sheet too. You just need to mention the range. You can also mention the non-connected ranges. Just use a comma between ranges in the «applied to» section.
As you can see the results in the snapshot above.
Here are all the observational notes using the formula in Excel.
Notes :
- Excel formatting is a helpful tool to display data in an easy to read manner. It also helps in analysis of the data with its in-built conditional formatting tools.
- Excel overwrites the first rule and provides preference to the last rule applied. If you wish to highlight the data with different colours. Make new rule in conditional formatting
Hope this article about How to How to Color numbers based on the Value Result in Excel is explanatory. Find more articles on calculating values and related Excel formulas here. If you liked our blogs, share them with your friends on Facebook. And also you can follow us on Twitter and Facebook. We would love to hear from you, do let us know how we can improve, complement or innovate our work and make it better for you. Write to us at info@exceltip.com.
Related Articles :
Find the partial match number from data in Excel : find the substring matching cell values using the formula in Excel
How to Highlight cells that contain specific text in Excel : Highlight cells based on the formula to find the specific text value within the cell in Excel.
Conditional formatting based on another cell value in Excel : format cells in Excel based on the condition of another cell using some criteria.
IF function and Conditional formatting in Excel : How to use IF condition in conditional formatting with formula in excel.
Perform Conditional Formatting with formula 2016 : Learn all default features of Conditional formatting in Excel
Conditional Formatting using VBA in Microsoft Excel : Highlight cells in the VBA based on the code in Excel.
Popular Articles :
50 Excel Shortcuts to Increase Your Productivity : Get faster at your tasks in Excel. These shortcuts will help you increase your work efficiency in Excel.
How to use the VLOOKUP Function in Excel : This is one of the most used and popular functions of excel that is used to lookup value from different ranges and sheets.
How to use the IF Function in Excel : The IF statement in Excel checks the condition and returns a specific value if the condition is TRUE or returns another specific value if FALSE.
How to use the SUMIF Function in Excel : This is another dashboard essential function. This helps you sum up values on specific conditions.
How to use the COUNTIF Function in Excel : Count values with conditions using this amazing function. You don’t need to filter your data to count specific values. Countif function is essential to prepare your dashboard.
Color Palette
Excel’s Color Palette has an index of 56 colors which can be used throughout your spreadsheet. Each of these colors in the palette is associated with a unique value in the ColorIndex. For reasons unknown, aside from the index value, Excel also recognizes the names for Colors 1 through 8 (Black, White, Red, Green, Blue, Yellow, Magenta, and Cyan).
| interior | ColorIndex | HTML | bgcolor= | Red | Green | Blue | Color |
| Black | [Color 1] | #000000 | #000000 | 0 | 0 | 0 | [Black] |
| White | [Color 2] | #FFFFFF | #FFFFFF | 255 | 255 | 255 | [White] |
| Red | [Color 3] | #FF0000 | #FF0000 | 255 | 0 | 0 | [Red] |
| Green | [Color 4] | #00FF00 | #00FF00 | 0 | 255 | 0 | [Green] |
| Blue | [Color 5] | #0000FF | #0000FF | 0 | 0 | 255 | [Blue] |
| Yellow | [Color 6] | #FFFF00 | #FFFF00 | 255 | 255 | 0 | [Yellow] |
| Magenta | [Color 7] | #FF00FF | #FF00FF | 255 | 0 | 255 | [Magenta] |
| Cyan | [Color 8] | #00FFFF | #00FFFF | 0 | 255 | 255 | [Cyan] |
| [Color 9] | [Color 9] | #800000 | #800000 | 128 | 0 | 0 | [Color 9] |
| [Color 10] | [Color 10] | #008000 | #008000 | 0 | 128 | 0 | [Color 10] |
| [Color 11] | [Color 11] | #000080 | #000080 | 0 | 0 | 128 | [Color 11] |
| [Color 12] | [Color 12] | #808000 | #808000 | 128 | 128 | 0 | [Color 12] |
| [Color 13] | [Color 13] | #800080 | #800080 | 128 | 0 | 128 | [Color 13] |
| [Color 14] | [Color 14] | #008080 | #008080 | 0 | 128 | 128 | [Color 14] |
| [Color 15] | [Color 15] | #C0C0C0 | #C0C0C0 | 192 | 192 | 192 | [Color 15] |
| [Color 16] | [Color 16] | #808080 | #808080 | 128 | 128 | 128 | [Color 16] |
| [Color 17] | [Color 17] | #9999FF | #9999FF | 153 | 153 | 255 | [Color 17] |
| [Color 18] | [Color 18] | #993366 | #993366 | 153 | 51 | 102 | [Color 18] |
| [Color 19] | [Color 19] | #FFFFCC | #FFFFCC | 255 | 255 | 204 | [Color 19] |
| [Color 20] | [Color 20] | #CCFFFF | #CCFFFF | 204 | 255 | 255 | [Color 20] |
| [Color 21] | [Color 21] | #660066 | #660066 | 102 | 0 | 102 | [Color 21] |
| [Color 22] | [Color 22] | #FF8080 | #FF8080 | 255 | 128 | 128 | [Color 22] |
| [Color 23] | [Color 23] | #0066CC | #0066CC | 0 | 102 | 204 | [Color 23] |
| [Color 24] | [Color 24] | #CCCCFF | #CCCCFF | 204 | 204 | 255 | [Color 24] |
| [Color 25] | [Color 25] | #000080 | #000080 | 0 | 0 | 128 | [Color 25] |
| [Color 26] | [Color 26] | #FF00FF | #FF00FF | 255 | 0 | 255 | [Color 26] |
| [Color 27] | [Color 27] | #FFFF00 | #FFFF00 | 255 | 255 | 0 | [Color 27] |
| [Color 28] | [Color 28] | #00FFFF | #00FFFF | 0 | 255 | 255 | [Color 28] |
| [Color 29] | [Color 29] | #800080 | #800080 | 128 | 0 | 128 | [Color 29] |
| [Color 30] | [Color 30] | #800000 | #800000 | 128 | 0 | 0 | [Color 30] |
| [Color 31] | [Color 31] | #008080 | #008080 | 0 | 128 | 128 | [Color 31] |
| [Color 32] | [Color 32] | #0000FF | #0000FF | 0 | 0 | 255 | [Color 32] |
| [Color 33] | [Color 33] | #00CCFF | #00CCFF | 0 | 204 | 255 | [Color 33] |
| [Color 34] | [Color 34] | #CCFFFF | #CCFFFF | 204 | 255 | 255 | [Color 34] |
| [Color 35] | [Color 35] | #CCFFCC | #CCFFCC | 204 | 255 | 204 | [Color 35] |
| [Color 36] | [Color 36] | #FFFF99 | #FFFF99 | 255 | 255 | 153 | [Color 36] |
| [Color 37] | [Color 37] | #99CCFF | #99CCFF | 153 | 204 | 255 | [Color 37] |
| [Color 38] | [Color 38] | #FF99CC | #FF99CC | 255 | 153 | 204 | [Color 38] |
| [Color 39] | [Color 39] | #CC99FF | #CC99FF | 204 | 153 | 255 | [Color 39] |
| [Color 40] | [Color 40] | #FFCC99 | #FFCC99 | 255 | 204 | 153 | [Color 40] |
| [Color 41] | [Color 41] | #3366FF | #3366FF | 51 | 102 | 255 | [Color 41] |
| [Color 42] | [Color 42] | #33CCCC | #33CCCC | 51 | 204 | 204 | [Color 42] |
| [Color 43] | [Color 43] | #99CC00 | #99CC00 | 153 | 204 | 0 | [Color 43] |
| [Color 44] | [Color 44] | #FFCC00 | #FFCC00 | 255 | 204 | 0 | [Color 44] |
| [Color 45] | [Color 45] | #FF9900 | #FF9900 | 255 | 153 | 0 | [Color 45] |
| [Color 46] | [Color 46] | #FF6600 | #FF6600 | 255 | 102 | 0 | [Color 46] |
| [Color 47] | [Color 47] | #666699 | #666699 | 102 | 102 | 153 | [Color 47] |
| [Color 48] | [Color 48] | #969696 | #969696 | 150 | 150 | 150 | [Color 48] |
| [Color 49] | [Color 49] | #003366 | #003366 | 0 | 51 | 102 | [Color 49] |
| [Color 50] | [Color 50] | #339966 | #339966 | 51 | 153 | 102 | [Color 50] |
| [Color 51] | [Color 51] | #003300 | #003300 | 0 | 51 | 0 | [Color 51] |
| [Color 52] | [Color 52] | #333300 | #333300 | 51 | 51 | 0 | [Color 52] |
| [Color 53] | [Color 53] | #993300 | #993300 | 153 | 51 | 0 | [Color 53] |
| [Color 54] | [Color 54] | #993366 | #993366 | 153 | 51 | 102 | [Color 54] |
| [Color 55] | [Color 55] | #333399 | #333399 | 51 | 51 | 153 | [Color 55] |
| [Color 56] | [Color 56] | #333333 | #333333 | 51 | 51 | 51 | [Color 56] |
The values in the above table were generated with help from the following macro.
Sub colors56()
  Application.ScreenUpdating = False
  Application.Calculation = xlCalculationManual
Dim i As Long
Dim str0 As String, str As String
For i = 0 To 56
  Cells(i + 1, 1).Interior.colorindex = i
  Cells(i + 1, 1).Value = "[Color " & i & "]"
  Cells(i + 1, 2).Font.colorindex = i
  Cells(i + 1, 2).Value = "[Color " & i & "]"
  str0 = Right("000000" & Hex(Cells(i + 1, 1).Interior.color), 6)
  'Excel shows nibbles in reverse order so make it as RGB
  str = Right(str0, 2) & Mid(str0, 3, 2) & Left(str0, 2)
  'generating 2 columns in the HTML table
  Cells(i + 1, 3) = "#" & str & "#" & str & ""
  Cells(i + 1, 4).Formula = "=Hex2dec(""" & Right(str0, 2) & """)"
  Cells(i + 1, 5).Formula = "=Hex2dec(""" & Mid(str0, 3, 2) & """)"
  Cells(i + 1, 6).Formula = "=Hex2dec(""" & Left(str0, 2) & """)"
  Cells(i + 1, 7) = "[Color " & i & ")"
Next i
done:
  Application.Calculation = xlCalculationAutomatic
  Application.ScreenUpdating = True
End Sub
Hex equivalents used in HTML
| #000000 | #993300 | #333300 | #003300 | #003366 | #000080 | #333399 | #333333 | ||||||||
| #800000 | #FF6600 | #808000 | #008000 | #008080 | #0000FF | #666699 | #808080 | ||||||||
| #FF0000 | #FF9900 | #99CC00 | #339966 | #33CCCC | #3366FF | #800080 | #969696 | ||||||||
| #FF00FF | #FFCC00 | #FFFF00 | #00FF00 | #00FFFF | #00CCFF | #993366 | #C0C0C0 | ||||||||
| #FF99CC | #FFCC99 | #FFFF99 | #CCFFCC | #CCFFFF | #99CCFF | #CC99FF | #FFFFFF | ||||||||
| Additional 16 colors below are not shown on the 40 color toolbar palette but can be seen under Format, Cells, Pattern | |||||||||||||||
| #9999FF | #993366 | #FFFFCC | #CCFFFF | #660066 | #FF8080 | #0066CC | #CCCCFF | ||||||||
| #000080 | #FF00FF | #FFFF00 | #00FFFF | #800080 | #800000 | #008080 | #0000FF |
Содержание
- Описание работы функции
- Пример использования
- Свойство .Interior.Color объекта Range
- Заливка ячейки цветом в VBA Excel
- Вывод сообщений о числовых значениях цветов
- Форматирование диапазона
- Нажатие кнопки Enter
- Вставка символа
- Добавление дополнительного символа
- Коды различных цветов в MS Excel 2003
Описание работы функции
Функция =ЦВЕТЗАЛИВКИ(ЯЧЕЙКА) возвращает код цвета заливки выбранной ячейки. Имеет один обязательный аргумент:
- ЯЧЕЙКА – ссылка на ячейку, для которой необходимо применить функцию.
Ниже представлен пример, демонстрирующий работу функции.
Следует обратить внимание на тот факт, что функция не пересчитывается автоматически. Это связано с тем, что изменение цвета заливки ячейки Excel не приводит к пересчету формул. Для пересчета формулы необходимо пользоваться сочетанием клавиш Ctrl+Alt+F9
Пример использования
Так как заливка ячеек значительно упрощает восприятие данных, то пользоваться ей любят практически все пользователи. Однако есть и большой минус – в стандартном функционале Excel отсутствует возможность выполнять операции на основе цвета заливки. Нельзя просуммировать ячейки определенного цвета, посчитать их количество, найти максимальное и так далее.
С помощью функции ЦВЕТЗАЛИВКИ все это становится выполнимым. Например, “протяните” данную формулу с цветом заливки в соседнем столбце и производите вычисления на основе числового кода ячейки.
Свойство .Interior.Color объекта Range
Начиная с Excel 2007 основным способом заливки диапазона или отдельной ячейки цветом (зарисовки, добавления, изменения фона) является использование свойства .Interior.Color объекта Range путем присваивания ему значения цвета в виде десятичного числа от 0 до 16777215 (всего 16777216 цветов).
Заливка ячейки цветом в VBA Excel
Пример кода 1:
|
Sub ColorTest1() Range(“A1”).Interior.Color = 31569 Range(“A4:D8”).Interior.Color = 4569325 Range(“C12:D17”).Cells(4).Interior.Color = 568569 Cells(3, 6).Interior.Color = 12659 End Sub |
Поместите пример кода в свой программный модуль и нажмите кнопку на панели инструментов «Run Sub» или на клавиатуре «F5», курсор должен быть внутри выполняемой программы. На активном листе Excel ячейки и диапазон, выбранные в коде, окрасятся в соответствующие цвета.
Есть один интересный нюанс: если присвоить свойству .Interior.Color отрицательное значение от -16777215 до -1, то цвет будет соответствовать значению, равному сумме максимального значения палитры (16777215) и присвоенного отрицательного значения. Например, заливка всех трех ячеек после выполнения следующего кода будет одинакова:
|
Sub ColorTest11() Cells(1, 1).Interior.Color = –12207890 Cells(2, 1).Interior.Color = 16777215 + (–12207890) Cells(3, 1).Interior.Color = 4569325 End Sub |
Вывод сообщений о числовых значениях цветов
Числовые значения цветов запомнить невозможно, поэтому часто возникает вопрос о том, как узнать числовое значение фона ячейки. Следующий код VBA Excel выводит сообщения о числовых значениях присвоенных ранее цветов.
Пример кода 2:
|
Sub ColorTest2() MsgBox Range(“A1”).Interior.Color MsgBox Range(“A4:D8”).Interior.Color MsgBox Range(“C12:D17”).Cells(4).Interior.Color MsgBox Cells(3, 6).Interior.Color End Sub |
Вместо вывода сообщений можно присвоить числовые значения цветов переменным, объявив их как Long.
Форматирование диапазона
Самый известный способ поставить прочерк в ячейке – это присвоить ей текстовый формат. Правда, этот вариант не всегда помогает.
- Выделяем ячейку, в которую нужно поставить прочерк. Кликаем по ней правой кнопкой мыши. В появившемся контекстном меню выбираем пункт «Формат ячейки». Можно вместо этих действий нажать на клавиатуре сочетание клавиш Ctrl+1.
- Запускается окно форматирования. Переходим во вкладку «Число», если оно было открыто в другой вкладке. В блоке параметров «Числовые форматы» выделяем пункт «Текстовый». Жмем на кнопку «OK».
После этого выделенной ячейке будет присвоено свойство текстового формата. Все введенные в нее значения будут восприниматься не как объекты для вычислений, а как простой текст. Теперь в данную область можно вводить символ «-» с клавиатуры и он отобразится именно как прочерк, а не будет восприниматься программой, как знак «минус».
Существует ещё один вариант переформатирования ячейки в текстовый вид. Для этого, находясь во вкладке «Главная», нужно кликнуть по выпадающему списку форматов данных, который расположен на ленте в блоке инструментов «Число». Открывается перечень доступных видов форматирования. В этом списке нужно просто выбрать пункт «Текстовый».
Нажатие кнопки Enter
Но данный способ не во всех случаях работает. Зачастую, даже после проведения этой процедуры при вводе символа «-» вместо нужного пользователю знака появляются все те же ссылки на другие диапазоны. Кроме того, это не всегда удобно, особенно если в таблице ячейки с прочерками чередуются с ячейками, заполненными данными. Во-первых, в этом случае вам придется форматировать каждую из них в отдельности, во-вторых, у ячеек данной таблицы будет разный формат, что тоже не всегда приемлемо. Но можно сделать и по-другому.
- Выделяем ячейку, в которую нужно поставить прочерк. Жмем на кнопку «Выровнять по центру», которая находится на ленте во вкладке «Главная» в группе инструментов «Выравнивание». А также кликаем по кнопке «Выровнять по середине», находящейся в том же блоке. Это нужно для того, чтобы прочерк располагался именно по центру ячейки, как и должно быть, а не слева.
- Набираем в ячейке с клавиатуры символ «-». После этого не делаем никаких движений мышкой, а сразу жмем на кнопку Enter, чтобы перейти на следующую строку. Если вместо этого пользователь кликнет мышкой, то в ячейке, где должен стоять прочерк, опять появится формула.
Данный метод хорош своей простотой и тем, что работает при любом виде форматирования. Но, в то же время, используя его, нужно с осторожностью относиться к редактированию содержимого ячейки, так как из-за одного неправильного действия вместо прочерка может опять отобразиться формула.
Вставка символа
Ещё один вариант написания прочерка в Эксель – это вставка символа.
- Выделяем ячейку, куда нужно вставить прочерк. Переходим во вкладку «Вставка». На ленте в блоке инструментов «Символы» кликаем по кнопке «Символ».
- Находясь во вкладке «Символы», устанавливаем в окне поля «Набор» параметр «Символы рамок». В центральной части окна ищем знак «─» и выделяем его. Затем жмем на кнопку «Вставить».
После этого прочерк отразится в выделенной ячейке.
Существует и другой вариант действий в рамках данного способа. Находясь в окне «Символ», переходим во вкладку «Специальные знаки». В открывшемся списке выделяем пункт «Длинное тире». Жмем на кнопку «Вставить». Результат будет тот же, что и в предыдущем варианте.
Данный способ хорош тем, что не нужно будет опасаться сделанного неправильного движения мышкой. Символ все равно не изменится на формулу. Кроме того, визуально прочерк поставленный данным способом выглядит лучше, чем короткий символ, набранный с клавиатуры. Главный недостаток данного варианта – это потребность выполнить сразу несколько манипуляций, что влечет за собой временные потери.
Добавление дополнительного символа
Кроме того, существует ещё один способ поставить прочерк. Правда, визуально этот вариант не для всех пользователей будет приемлемым, так как предполагает наличие в ячейке, кроме собственно знака «-», ещё одного символа.
- Выделяем ячейку, в которой нужно установить прочерк, и ставим в ней с клавиатуры символ «‘». Он располагается на той же кнопке, что и буква «Э» в кириллической раскладке. Затем тут же без пробела устанавливаем символ «-».
- Жмем на кнопку Enter или выделяем курсором с помощью мыши любую другую ячейку. При использовании данного способа это не принципиально важно. Как видим, после этих действий на листе был установлен знак прочерка, а дополнительный символ «’» заметен лишь в строке формул при выделении ячейки.
Существует целый ряд способов установить в ячейку прочерк, выбор между которыми пользователь может сделать согласно целям использования конкретного документа. Большинство людей при первой неудачной попытке поставить нужный символ пытаются сменить формат ячеек. К сожалению, это далеко не всегда срабатывает. К счастью, существуют и другие варианты выполнения данной задачи: переход на другую строку с помощью кнопки Enter, использование символов через кнопку на ленте, применение дополнительного знака «’». Каждый из этих способов имеет свои достоинства и недостатки, которые были описаны выше. Универсального варианта, который бы максимально подходил для установки прочерка в Экселе во всех возможных ситуациях, не существует.
Коды различных цветов в MS Excel 2003
Коды различных цветов при использовании конструкции типа .Interior.ColorIndex. Бесцветный код: -4142
Источники
- https://micro-solution.ru/projects/addin_vba-excel/color_interior
- https://vremya-ne-zhdet.ru/vba-excel/tsvet-yacheyki-zalivka-fon/
- http://word-office.ru/kak-sdelat-chtoby-vmesto-nulya-byl-procherk-v-excel.html
- http://aqqew.blogspot.com/2011/03/ms-excel-2003.html
Hello all,
I`m a new member in this forum and this is my first post here.
I use excel more and more in my day job and have discovered that excel is a very powerful tool with tons of functionality that can be used in various ways.
I try to learn as I go along within excel.
No to my question this time:
How can I assign colors that I choice to specific numbers in excel?
1 equals green, 2 equals blue etc… so every time a user press 1 in any cell within the specific sheet the background color will change according the color assigned to the specific number.
Hopes this makes sense, and that someone are able to help.
Attached a very simple example file to help explain what I want to achieve. This is basically for my learning howto do it.
BR
Niclas
| interior | font | HTML | bgcolor= | Red< | Green | Blue | Color |
| Black | [Color 1] | #000000 | #000000 | 0 | 0 | 0 | [Black] |
| White | [Color 2] | #FFFFFF | #FFFFFF | 255 | 255 | 255 | [White] |
| Red | [Color 3] | #FF0000 | #FF0000 | 255 | 0 | 0 | [Red] |
| Green | [Color 4] | #00FF00 | #00FF00 | 0 | 255 | 0 | [Green] |
| Blue | [Color 5] | #0000FF | #0000FF | 0 | 0 | 255 | [Blue] |
| Yellow | [Color 6] | #FFFF00 | #FFFF00 | 255 | 255 | 0 | [Yellow] |
| Magenta | [Color 7] | #FF00FF | #FF00FF | 255 | 0 | 255 | [Magenta] |
| Cyan | [Color 8] | #00FFFF | #00FFFF | 0 | 255 | 255 | [Cyan] |
| [Color 9] | [Color 9] | #800000 | #800000 | 128 | 0 | 0 | [Color 9] |
| [Color 10] | [Color 10] | #008000 | #008000 | 0 | 128 | 0 | [Color 10] |
| [Color 11] | [Color 11] | #000080 | #000080 | 0 | 0 | 128 | [Color 11] |
| [Color 12] | [Color 12] | #808000 | #808000 | 128 | 128 | 0 | [Color 12] |
| [Color 13] | [Color 13] | #800080 | #800080 | 128 | 0 | 128 | [Color 13] |
| [Color 14] | [Color 14] | #008080 | #008080 | 0 | 128 | 128 | [Color 14] |
| [Color 15] | [Color 15] | #C0C0C0 | #C0C0C0 | 192 | 192 | 192 | [Color 15] |
| [Color 16] | [Color 16] | #808080 | #808080 | 128 | 128 | 128 | [Color 16] |
| [Color 17] | [Color 17] | #9999FF | #9999FF | 153 | 153 | 255 | [Color 17] |
| [Color 18] | [Color 18] | #993366 | #993366 | 153 | 51 | 102 | [Color 18] |
| [Color 19] | [Color 19] | #FFFFCC | #FFFFCC | 255 | 255 | 204 | [Color 19] |
| [Color 20] | [Color 20] | #CCFFFF | #CCFFFF | 204 | 255 | 255 | [Color 20] |
| [Color 21] | [Color 21] | #660066 | #660066 | 102 | 0 | 102 | [Color 21] |
| [Color 22] | [Color 22] | #FF8080 | #FF8080 | 255 | 128 | 128 | [Color 22] |
| [Color 23] | [Color 23] | #0066CC | #0066CC | 0 | 102 | 204 | [Color 23] |
| [Color 24] | [Color 24] | #CCCCFF | #CCCCFF | 204 | 204 | 255 | [Color 24] |
| [Color 25] | [Color 25] | #000080 | #000080 | 0 | 0 | 128 | [Color 25] |
| [Color 26] | [Color 26] | #FF00FF | #FF00FF | 255 | 0 | 255 | [Color 26] |
| [Color 27] | [Color 27] | #FFFF00 | #FFFF00 | 255 | 255 | 0 | [Color 27] |
| [Color 28] | [Color 28] | #00FFFF | #00FFFF | 0 | 255 | 255 | [Color 28] |
| [Color 29] | [Color 29] | #800080 | #800080 | 128 | 0 | 128 | [Color 29] |
| [Color 30] | [Color 30] | #800000 | #800000 | 128 | 0 | 0 | [Color 30] |
| [Color 31] | [Color 31] | #008080 | #008080 | 0 | 128 | 128 | [Color 31] |
| [Color 32] | [Color 32] | #0000FF | #0000FF | 0 | 0 | 255 | [Color 32] |
| [Color 33] | [Color 33] | #00CCFF | #00CCFF | 0 | 204 | 255 | [Color 33] |
| [Color 34] | [Color 34] | #CCFFFF | #CCFFFF | 204 | 255 | 255 | [Color 34] |
| [Color 35] | [Color 35] | #CCFFCC | #CCFFCC | 204 | 255 | 204 | [Color 35] |
| [Color 36] | [Color 36] | #FFFF99 | #FFFF99 | 255 | 255 | 153 | [Color 36] |
| [Color 37] | [Color 37] | #99CCFF | #99CCFF | 153 | 204 | 255 | [Color 37] |
| [Color 38] | [Color 38] | #FF99CC | #FF99CC | 255 | 153 | 204 | [Color 38] |
| [Color 39] | [Color 39] | #CC99FF | #CC99FF | 204 | 153 | 255 | [Color 39] |
| [Color 40] | [Color 40] | #FFCC99 | #FFCC99 | 255 | 204 | 153 | [Color 40] |
| [Color 41] | [Color 41] | #3366FF | #3366FF | 51 | 102 | 255 | [Color 41] |
| [Color 42] | [Color 42] | #33CCCC | #33CCCC | 51 | 204 | 204 | [Color 42] |
| [Color 43] | [Color 43] | #99CC00 | #99CC00 | 153 | 204 | 0 | [Color 43] |
| [Color 44] | [Color 44] | #FFCC00 | #FFCC00 | 255 | 204 | 0 | [Color 44] |
| [Color 45] | [Color 45] | #FF9900 | #FF9900 | 255 | 153 | 0 | [Color 45] |
| [Color 46] | [Color 46] | #FF6600 | #FF6600 | 255 | 102 | 0 | [Color 46] |
| [Color 47] | [Color 47] | #666699 | #666699 | 102 | 102 | 153 | [Color 47] |
| [Color 48] | [Color 48] | #969696 | #969696 | 150 | 150 | 150 | [Color 48] |
| [Color 49] | [Color 49] | #003366 | #003366 | 0 | 51 | 102 | [Color 49] |
| [Color 50] | [Color 50] | #339966 | #339966 | 51 | 153 | 102 | [Color 50] |
| [Color 51] | [Color 51] | #003300 | #003300 | 0 | 51 | 0 | [Color 51] |
| [Color 52] | [Color 52] | #333300 | #333300 | 51 | 51 | 0 | [Color 52] |
| [Color 53] | [Color 53] | #993300 | #993300 | 153 | 51 | 0 | [Color 53] |
| [Color 54] | [Color 54] | #993366 | #993366 | 153 | 51 | 102 | [Color 54] |
| [Color 55] | [Color 55] | #333399 | #333399 | 51 | 51 | 153 | [Color 55] |
| [Color 56] | [Color 56] | #333333 | #333333 | 51 | 51 | 51 | [Color 56] |
|
Excel only recognizes names for Color 1 through 8 (Black, White, Red, Green, Blue, Yellow, Magenta, and Cyan). The colors 1-16 are widely understood color names from the VGA color palette. Of the 56 colors only 40 colors appear on the palette. The 40 colors names indicated on the Excel color palette (see below) are for descriptive purposes only. |

