
Insert or delete rows and columns
Insert and delete rows and columns to organize your worksheet better.

Note: Microsoft Excel has the following column and row limits: 16,384 columns wide by 1,048,576 rows tall.
Insert or delete a column
-
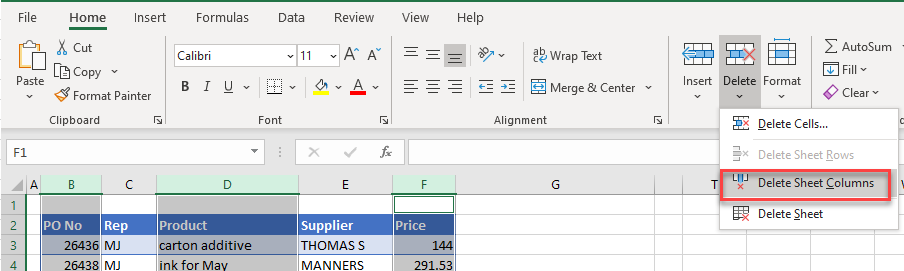
Select any cell within the column, then go to Home > Insert > Insert Sheet Columns or Delete Sheet Columns.
-
Alternatively, right-click the top of the column, and then select Insert or Delete.
Insert or delete a row
-
Select any cell within the row, then go to Home > Insert > Insert Sheet Rows or Delete Sheet Rows.
-
Alternatively, right-click the row number, and then select Insert or Delete.
Formatting options
When you select a row or column that has formatting applied, that formatting will be transferred to a new row or column that you insert. If you don’t want the formatting to be applied, you can select the Insert Options button after you insert, and choose from one of the options as follows:
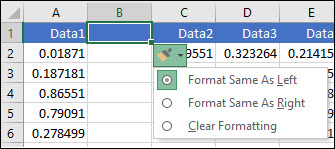
If the Insert Options button isn’t visible, then go to File > Options > Advanced > in the Cut, copy and paste group, check the Show Insert Options buttons option.
Insert rows
To insert a single row: Right-click the whole row above which you want to insert the new row, and then select Insert Rows.
To insert multiple rows: Select the same number of rows above which you want to add new ones. Right-click the selection, and then select Insert Rows.
Insert columns
To insert a single column: Right-click the whole column to the right of where you want to add the new column, and then select Insert Columns.
To insert multiple columns: Select the same number of columns to the right of where you want to add new ones. Right-click the selection, and then select Insert Columns.
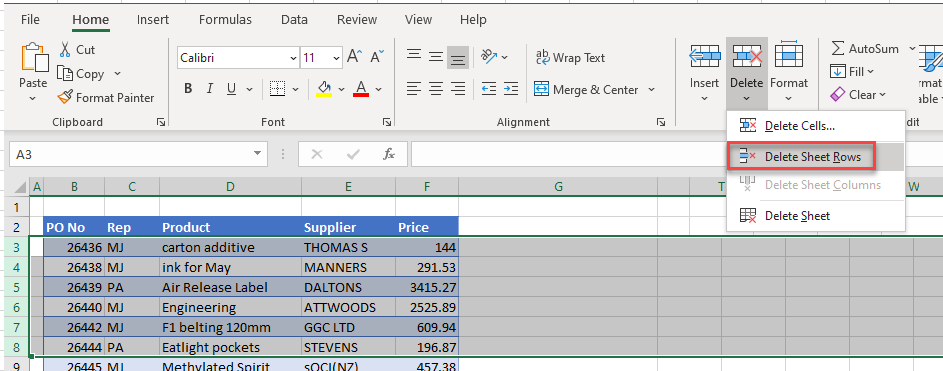
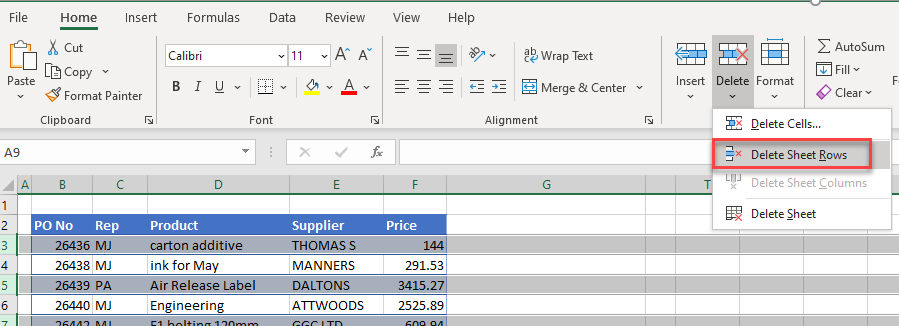
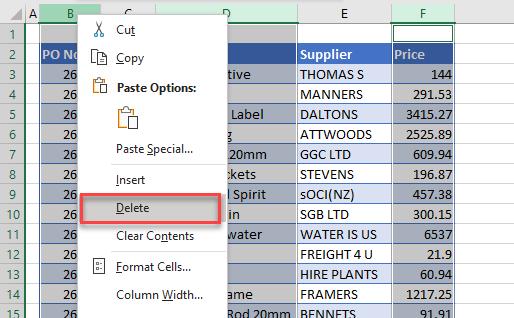
Delete cells, rows, or columns
If you don’t need any of the existing cells, rows or columns, here’s how to delete them:
-
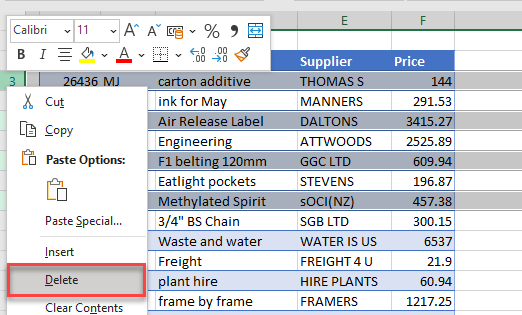
Select the cells, rows, or columns that you want to delete.
-
Right-click, and then select the appropriate delete option, for example, Delete Cells & Shift Up, Delete Cells & Shift Left, Delete Rows, or Delete Columns.
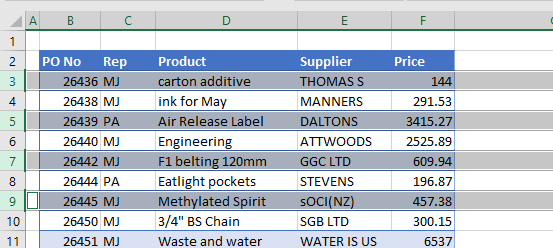
When you delete rows or columns, other rows or columns automatically shift up or to the left.
Tip: If you change your mind right after you deleted a cell, row, or column, just press Ctrl+Z to restore it.
Insert cells
To insert a single cell:
-
Right-click the cell above which you want to insert a new cell.
-
Select Insert, and then select Cells & Shift Down.
To insert multiple cells:
-
Select the same number of cells above which you want to add the new ones.
-
Right-click the selection, and then select Insert > Cells & Shift Down.
Need more help?
You can always ask an expert in the Excel Tech Community or get support in the Answers community.
See Also
Basic tasks in Excel
Overview of formulas in Excel
Need more help?
Want more options?
Explore subscription benefits, browse training courses, learn how to secure your device, and more.
Communities help you ask and answer questions, give feedback, and hear from experts with rich knowledge.
Value 1 Value 2 Value 3 Value 4 Value 5 Value 6
123     3       43      567     53      3
111     123     2       3       9       0
8       8       3       2       3       98
So I have 5 columns where user can write values. All the rest of columns have to be invisible, or deleted. I don’t want to blank, hide or block them, or remove values from them. I want them to not exist.
![]()
asked Mar 3, 2014 at 9:57
![]()
13
First unlock the first 5 columns:

Then, hide the other columns:

Then go to Review > Protect Sheet, then uncheck Select Locked Cells (columns cannot be unhidden if they cannot be selected in the first place):

Use some password and save. Only users with the password will be able to unhide the columns.
answered Mar 3, 2014 at 10:37
![]()
JerryJerry
70.1k13 gold badges99 silver badges143 bronze badges
only for the first 5 columns to remain A:E. In that case you could select entire column F and then press
CTRL+RIGHT ARROW
to select all columns to right from column E and then
hide them
This is what you want
answered Mar 3, 2014 at 10:27
![]()
NabinNabin
11k8 gold badges64 silver badges98 bronze badges
you can right cick the columns in the top. Lets say «a» right click and then *Hide. i hope this helps ;)!
answered Mar 3, 2014 at 10:02
![]()
4
See all How-To Articles
This tutorial demonstrates how to delete multiple rows or columns in Excel and Google Sheets.
By selecting multiple rows or columns in Excel, you can quickly delete any number of rows or columns using the right mouse button or the Excel Ribbon. This can also be done with VBA.
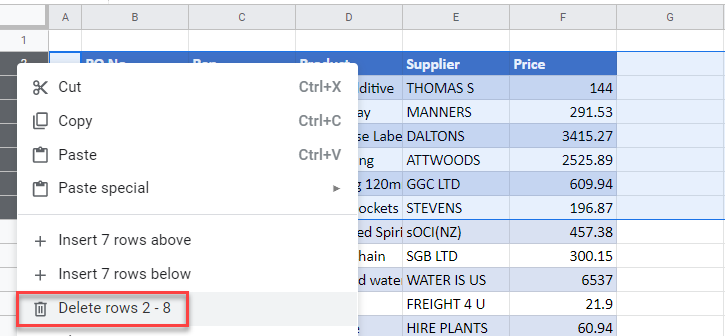
Delete Adjacent Rows
To delete multiple rows in your worksheet, select the rows you wish to delete by clicking on the row header and dragging down to the header of the last row you wish to delete.
Right-click on the row header and select Delete.
OR
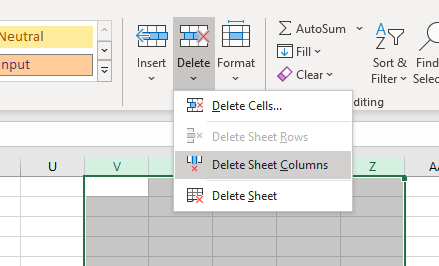
In the Ribbon, select Home > Cells > Delete > Delete Sheet Rows.
Delete Non-Adjacent Rows
To delete multiple non-adjacent rows, select the first row you wish to delete by clicking on the row header, and then, holding down the CTRL key, click on each additional row you wish to delete.
Right-click on the row header and select Delete.
OR
In the Ribbon, select Home > Cells > Delete > Delete Sheet Rows.
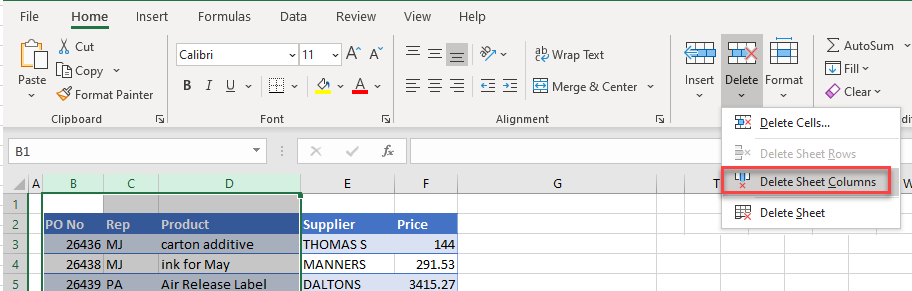
Delete Adjacent Columns
To delete multiple adjacent columns, select the columns you wish to delete by clicking on the column header and dragging across to the header of the last column you wish to delete.
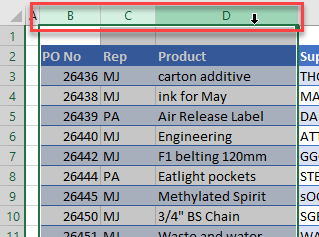
Right-click on the column header and select Delete.
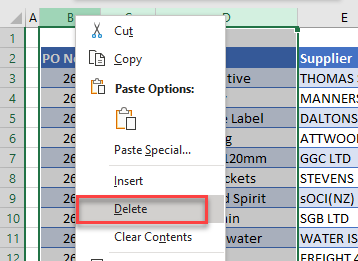
OR
In the Ribbon, select Home > Cells > Delete > Delete Sheet Columns.
Delete Non-Adjacent Columns
To delete multiple non-adjacent columns, select the columns you wish to delete by clicking on the first column header and then, holding down the CTRL key, click on each additional column header of the columns you wish to delete.
Right-click on the column header and select Delete.
OR
In the Ribbon, select Home > Cells > Delete > Delete Sheet Columns.
Delete Multiple Rows and Columns in Google Sheets
Deleting multiple rows and columns in Google Sheets works much the same as it does in Excel.
You can select adjacent rows or columns by clicking on the row or column header and dragging down or across to the row or column header of the last row or column you wish to delete.
You can select non-adjacent rows or columns by clicking on the first row or column header, and then, holding down the CTRL key, click on any further row or column headers required.
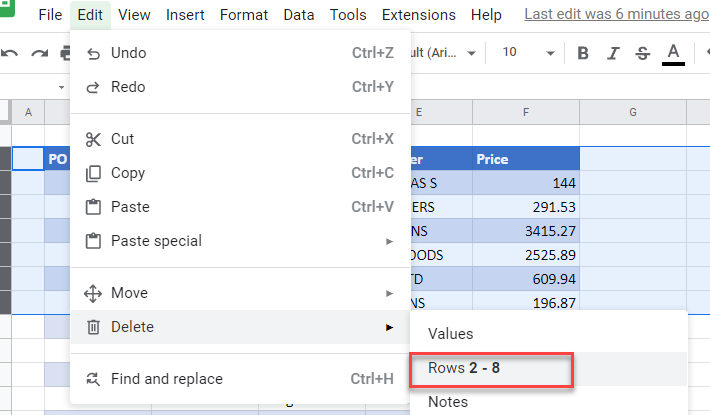
As with Excel, click on the row/column header with the right mouse button and select the Delete option from the quick menu (e.g., Delete rows 2 – 8).
OR
In the Menu, select Edit > Delete, and then select the options (e.g., Rows 2 – 8) as shown below.
Bottom line: Learn some of my favorite keyboard shortcuts when working with rows and columns in Excel.
Skill level: Easy

Whether you are creating a simple list of names or building a complex financial model, you probably make a lot of changes to the rows and columns in the spreadsheet. Tasks like adding/deleting rows, adjusting column widths, and creating outline groups are very common when working with the grid.
This post contains some of my favorite shortcuts that will save you time every day.
I’ve also listed the equivalent shortcuts for the Mac version of Excel where available.
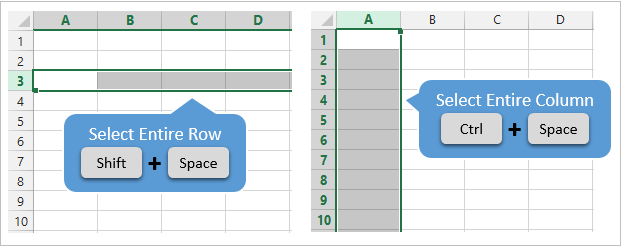
#1 – Select Entire Row or Column
Shift+Space is the keyboard shortcut to select an entire row.
Ctrl+Space is the keyboard shortcut to select an entire column.
Mac Shortcuts: Same as above
The keyboard shortcuts by themselves don’t do much. However, they are the starting point for performing a lot of other actions where you first need to select the entire row or column. This includes tasks like deleting rows, grouping columns, etc.
These shortcuts also work for selecting the entire row or column inside an Excel Table.
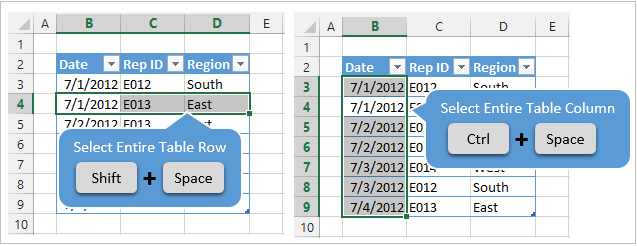
When you press the Shift+Space shortcut the first time it will select the entire row within the Table. Press Shift+Space a second time and it will select the entire row in the worksheet.
The same works for columns. Ctrl+Space will select the column of data in the Table. Pressing the keyboard shortcut a second time will include the column header of the Table in the selection. Pressing Ctrl+Space a third time will select the entire column in the worksheet.
You can select multiple rows or columns by holding Shift and pressing the Arrow Keys multiple times.
![]()
#2 – Insert or Delete Rows or Columns
There are a few ways to quickly delete rows and columns in Excel.
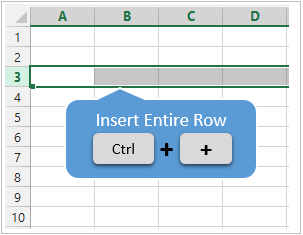
If you have the rows or columns selected, then the following keyboard shortcuts will quickly add or delete all selected rows or columns.
Ctrl++ (plus character) is the keyboard shortcut to insert rows or columns. If you are using a laptop keyboard you can press Ctrl+Shift+= (equal sign).
Mac Shortcut: Cmd++ or Cmd+Shift+
Ctrl+- (minus character) is the keyboard shortcut to delete rows or columns.
Mac Shortcut: Cmd+-

So for the above shortcuts to work you will first need to select the entire row or column, which can be done with the Shift+Space or Ctrl+Space shortcuts explained in #1.
If you do not have the entire row or column selected then you will be presented with the Insert or Delete Menus after pressing Ctrl++ or Ctrl+-.
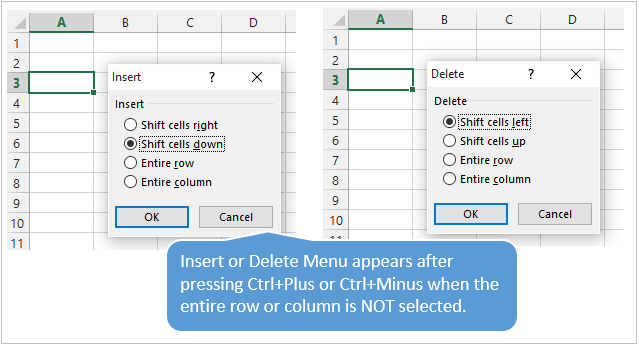
You can then press the up or down arrow keys to make your selection from the menu and hit Enter. For me it is easier to first select the entire row or column, then press Ctrl++ or Ctrl+-.
So, the entire keyboard shortcut to delete a column would be Ctrl+Space, Ctrl+-. You could also use the keyboard shortcut Alt+H+D+C to delete columns and Alt+H+D+R to delete rows. There are lots of ways to do a simple task… 🙂
#3 – AutoFit Column Width
There are also a lot of different ways to AutoFit column widths. AutoFit means that the width of the column will be adjusted to fit the contents of the cell.
You can use the mouse and double-click when you hover the cursor between columns when you see the resize column cursor.
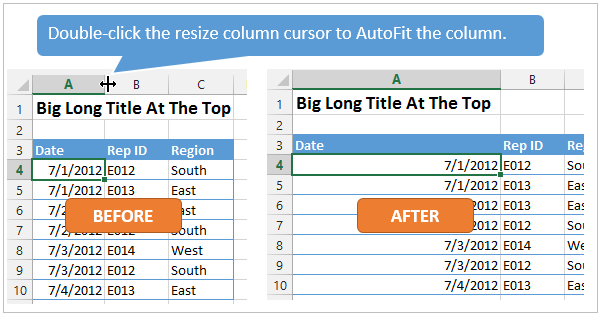
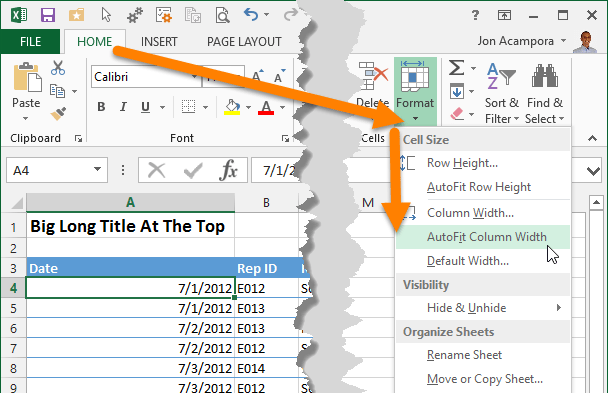
The problem with this is that you might just want to resize the column for the date in cell A4, instead of the big long title in cell A1. To accomplish this you can use the AutoFit Column Width button. It is located on the Home tab of the Ribbon in the Format menu.
The AutoFit Column Width button bases the width of the column on the cells you have selected. In the image above I have cell A4 selected. So the column width will be adjusted to fit the contents of A4, as shown in the results below.
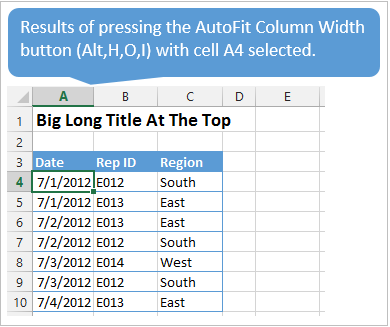
Alt,H,O,I is the keyboard shortcut for the AutoFit Column Width button. This is one I use a lot to get my reports looking shiny. 🙂
Alt,H,O,A is the keyboard shortcut to AutoFit Row Height. It doesn’t work exactly the same as column width, and will only adjust the row height to the tallest cell in the entire row.
Mac Shortcuts: None that I know of. The Mac version does not use the Alt key sequence which I believe is a limitation of the Mac OS.
#3.5 – Manually Adjust Row or Column Width
The column width or row height windows can be opened with keyboard shortcuts as well.
Alt,O,R,E is the keyboard shortcut to open the Row Height window.
Alt,O,C,W is the keyboard shortcut to open the Column Width window.
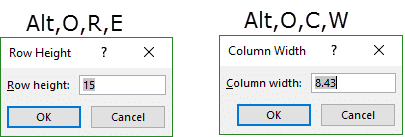
The row height or column width will be applied to the rows or columns of all the cells that are currently selected.
These are old shortcuts from Excel 2003, but they still work in the modern versions of Excel.
Mac Shortcuts: None that I know of. The Mac version does not use the Alt key sequence which I believe is a limitation of the Mac OS.
#4 – Hide or Unhide Rows or Columns
There are several dedicated keyboard shortcuts to hide and unhide rows and columns.
- Ctrl+9 to Hide Rows
- Ctrl+0 (zero) to Hide Columns
- Ctrl+Shift+( to Unhide Rows
- Ctrl+Shift+) to Unhide Columns – If this doesn’t work for you try Alt,O,C,U (old Excel 2003 shortcut that still works). You can also modify a Windows setting to prevent the conflict with this shortcut. See the comment from Pablo Baez on Oct 5, 2015 below for further instructions. Thanks Pablo! 🙂
Mac Shortcuts: Same as above
The buttons are also located on the Format menu on the Home tab of the Ribbon. You can hover over any of the items in the menu and the keyboard shortcut will display in the screentip (see screenshot below).
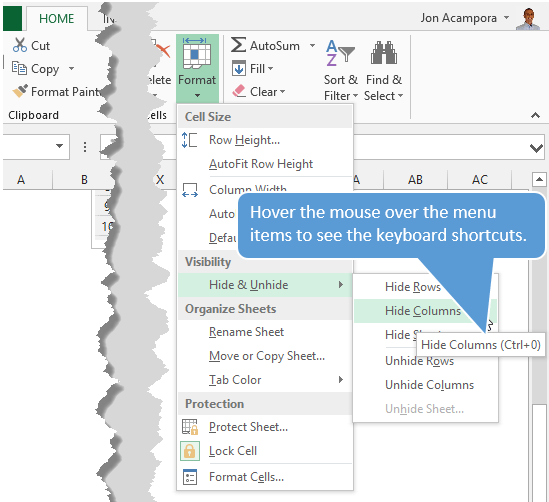
The trick with getting these shortcuts to work is to have the proper cells selected first.
To hide rows or columns you just need to select cells in the rows or columns you want to hide, then press the Ctrl+9 or Ctrl+Shift+( shortcut.
To unhide rows or columns you first need to select the cells that surround the rows or columns you want to unhide. In the screenshot below I want to unhide rows 3 & 4. I first select cell B2:B5, cells that surround or cover the hidden rows, then press Ctrl+Shift+( to unhide the rows.
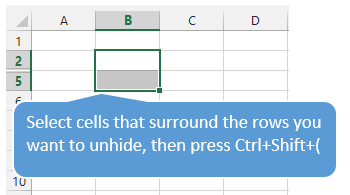
The same technique works to unhide columns.
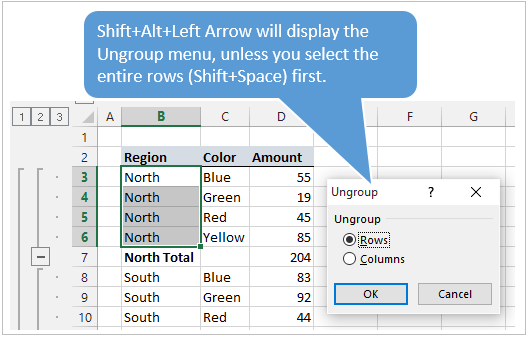
#5 – Group or Ungroup Rows or Columns
Row and Column groupings are a great way to quickly hide and unhide columns and rows.
Shift+Alt+Right Arrow is the shortcut to group rows or columns.
Mac Shortcut: Cmd+Shift+K
Shift+Alt+Left Arrow is the shortcut to ungroup.
Mac Shortcut: Cmd+Shift+J
Again, the trick here is to select the entire rows or columns you want to group/ungroup first. Otherwise you will be presented with the Group or Ungroup menu.
Alt,A,U,C is the keyboard shortcut to remove all the row and columns groups on the sheet. This is the same as pressing the Clear Outline button on the Ungroup menu of the Data tab on the Ribbon.
*Bonus funny: At some point when using the group/ungroup shortcuts, you will accidentally press Ctrl+Alt+Right Arrow. This is a Windows shortcut that orientates the entire screen to the right. I call it “neck ache view”. To get it back to normal press Ctrl+Alt+Up Arrow.
If your co-worker or boss accidentally leaves their computer unlocked and you want to play a joke on them, press Ctrl+Alt+Down Arrow. This will turn their screen upside down. Don’t forget to record a video of their WTF reaction… 🙂
What Are Your Favorites?
There are a ton of keyboard shortcuts for working with rows and columns. The above are some of my favorites that I use everyday. What are some of your favorites? Please leave a comment below. Thanks! 🙂
Would you like to know how you could easily delete one or more columns in Excel? We can take a look at it together in this tutorial!
See the video tutorial and transcription below:
See this video on YouTube:
https://www.youtube.com/watch?v=RYwLnhpooiA
If you’re asking how to remove columns in Excel, you’re in the right place! To find the answer, we’ll use the data table you can see right in front of you now.
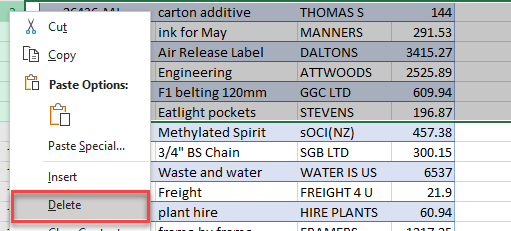
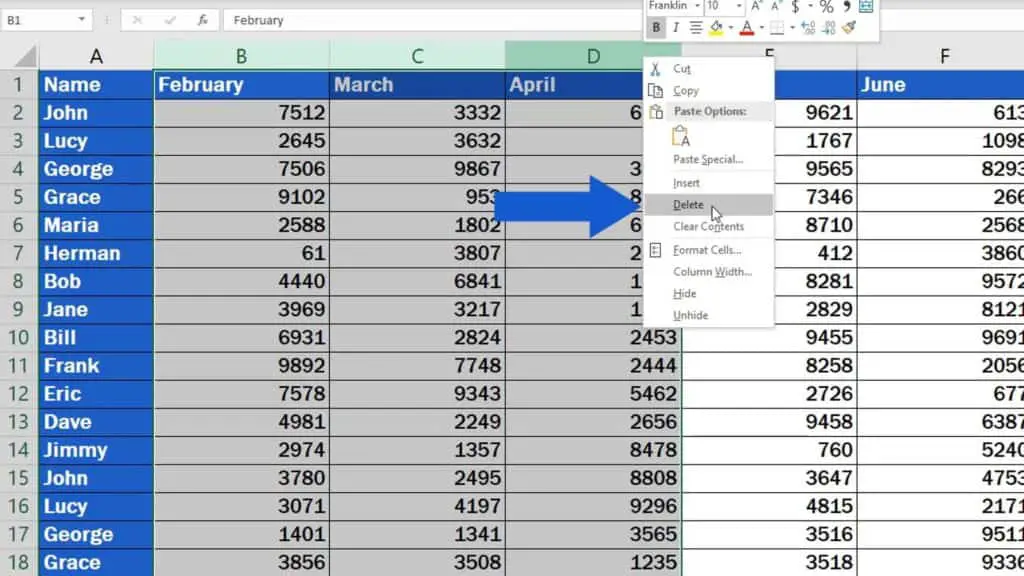
First, you need to click on the selected column heading represented by a letter located on the top of the spreadsheet. That’s how you mark the column you want to remove. In our case, this is gonna be column B.
Now right-click and choose the option ‘Delete’.
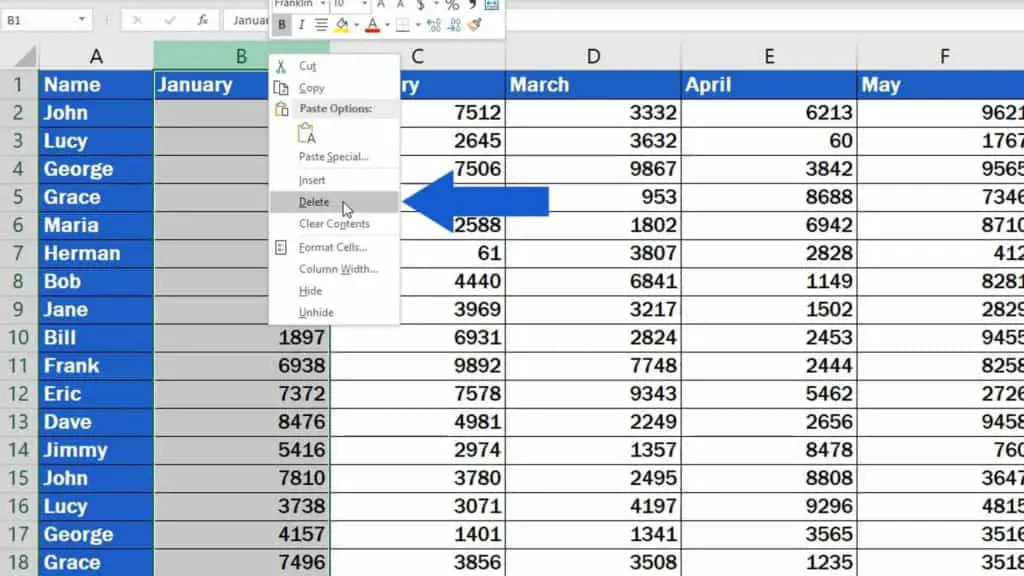
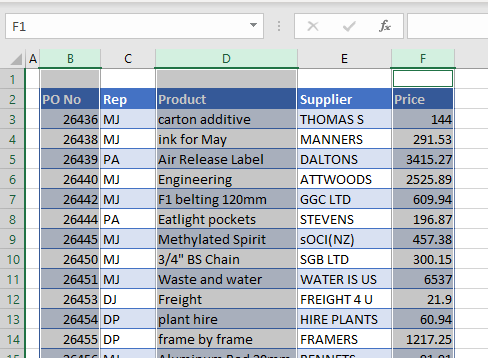
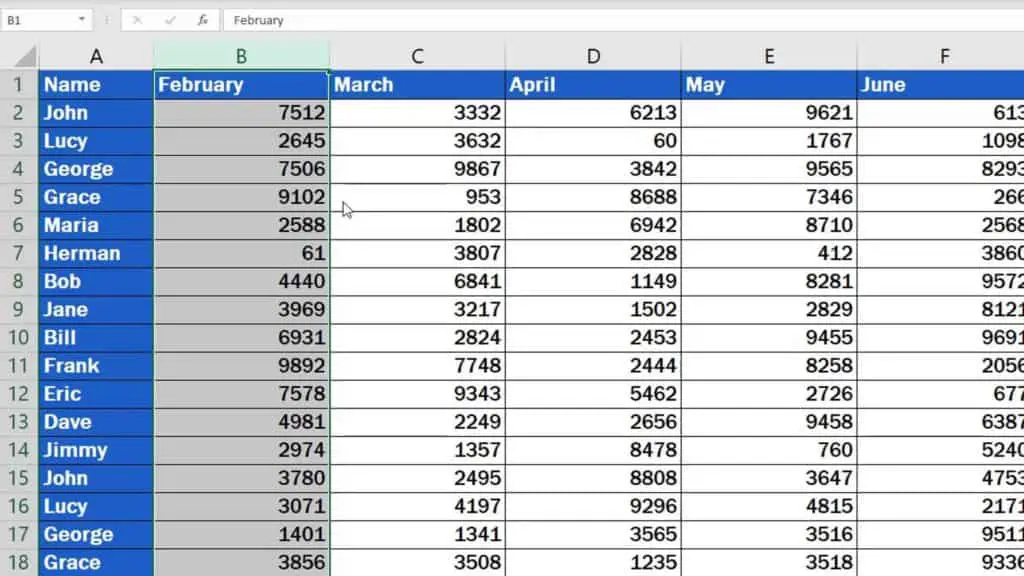
And that’s all you need to do! You may have spotted that the order of the columns got adjusted to the change we’ve made. February’s not in column C anymore, but it’s moved to column B.
And here are two tips to make your life with Excel easier:
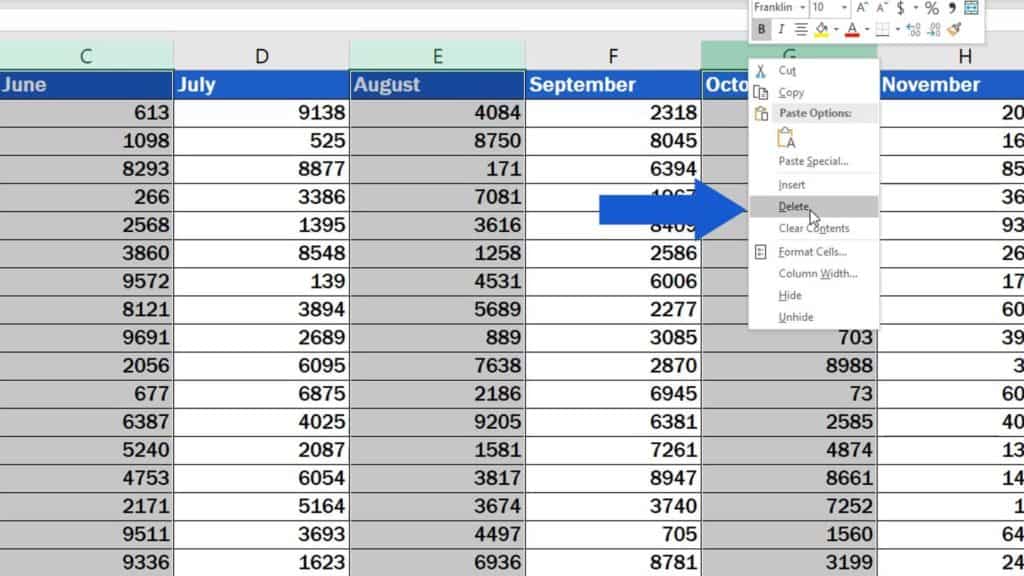
How to Remove Multiple Columns That Are Next to Each Other at Once in Excel
If you need to remove multiple columns that are next to each other at once, select the first column of the batch – click on the left button of the mouse, then hold and drag through all the columns you want to delete.
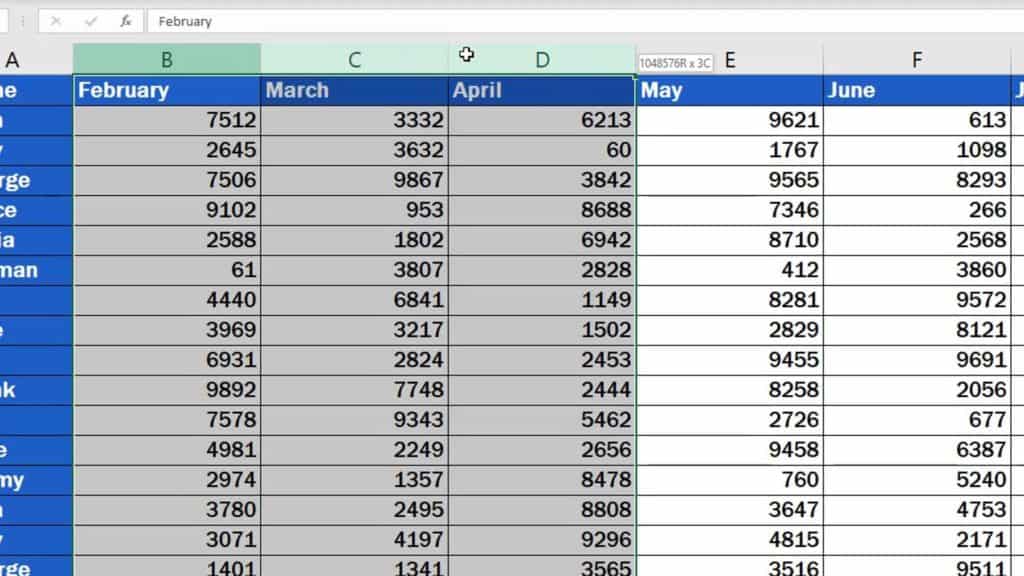
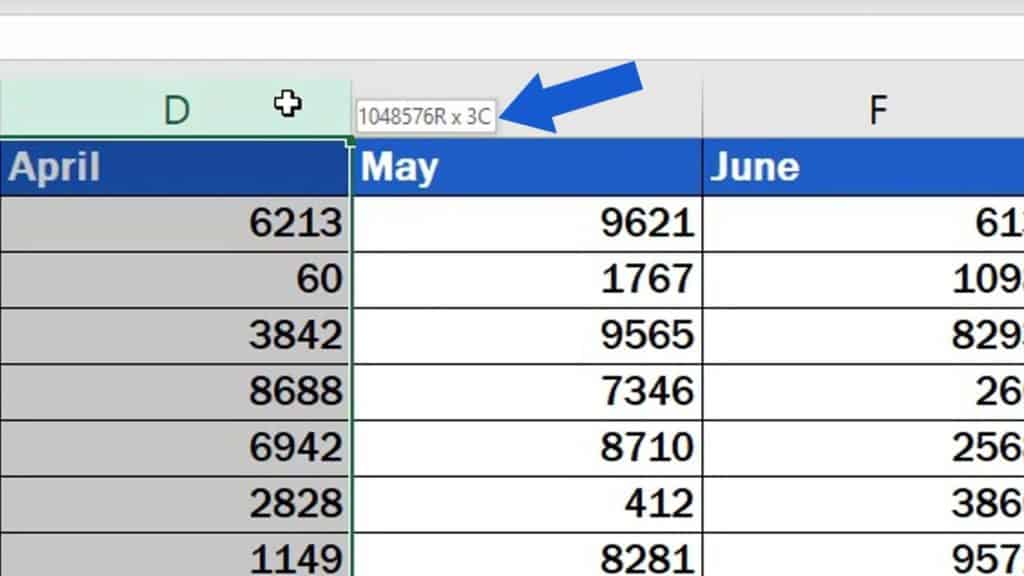
You don’t need to waste your time counting the number of columns you’re highlighting – Excel will do that for you! Just look at the little box on the right where you’ll see the selected column count.
Once you’ve marked all the columns you want to remove, repeat the steps you already know – right-click into the highlighted area and select ‘Delete’. Good job!
But watch out!
How to Remove Multiple Columns That Are Not Consecutive
If the columns you need to delete are not consecutive, you’ll have to try a slightly different way to remove them.
Select the columns by clicking on the first one, then find and press on the keyboard the ‘Ctrl’ key. While holding it, select any column you need by simply clicking on it. Let’s pick columns C, E and G, now.
Use the right-click, choose ‘Delete’, and we’re done!
There’s one thing to keep in mind, though.
How to Prevent Loss of Data in Excel
In this tutorial, you saw how to delete columns from a spreadsheet. Before you remove any columns, make sure you won’t need the data they contain, since all the information becomes lost after deletion.
If you still need the information contained in the columns you intend to remove, it’s always better to hide them.
Don’t miss out a great opportunity to learn:
- How to Hide Columns in Excel
- How to Unhide Columns in Excel
- How to Insert Column in Excel
- How to Sum a Column in Excel
See you in the next tutorial!