
Synopsis: Sometimes you need to process project information in a way that Project 2010 itself does not support. In this article, we look at the facilities in exporting project data to Microsoft Excel.
Project 2010 includes flexible facilities for both the import and export of data. Wizard features are provided to assist with both of these. They use import and export maps to both make the process easier and readily repeatable.
Here is a schedule for a building project with the Cost table shown.

Let’s see how to export the cost information to MS Excel.
First, note that there are important Excel options to check and potentially set if you are dealing with older (legacy) and non-default file types, such as those used in older versions of MS Excel.
Click on File to enter Backstage View. Select Options. Then, select Trust Center.

Click the Trust Center Settings… button and then select Legacy Formats.

You can select for first option if you do not intend to use older or non-default formats such as CSV or Excel 97-2003. Alternatively select one of the other 2 options. Choosing the last option means that you will not be prompted to confirm the use of an older or non-default format. I’m staying with the Prompt option. Save your choice by clicking OK.

Now, let’s do the export. Let’s choose Excel 97-2003 format. If you’re not already in Backstage View, click File to get there. Then click Save As. Click the dropdown next to Save As Type….

Select Excel 97-2003 Workbook (*.xls) as the type. Leave the File Name at its default value. The dialog now looks like this.

Click Save.
Free Microsoft Project 2016 Training. Master Your Projects On Time & Budget. Click Here to Get Started.
Because I left the option above at Prompt, I see this warning.

Click Yes and continue. The first screen of the Export Wizard appears.

Click Next.

The first choice is whether to export all of the data in the project file, or just selected items. On this occasion we’ll export it all, so let’s choose Project Excel Template. Make that selection, then click Finish.
The resulting Excel workbook looks like this.

Note that there are 3 tabs in the workbook. The first lists the tasks, the second the resources and the third the assignments. I can now work on all of this data in MS Excel in whatever way I need to.
Now, let’s see what happens if we make a different selection in the wizard. This time, we’ll choose Selected Data. Click Next.

To only export selected data MS Project needs a map of the data and how it will be exported. It’s possible to use an existing map or to create a new one. Let’s use an existing map. Make that selection and then click Next.

There are several standard maps to choose from. Select Cost data by task and then click Finish. Here is the resulting workbook.

There is a single worksheet with the name Task_Costs. This contains the information that is held in the Cost table in Project 2010.
Free Microsoft Project 2016 Training. Master Your Projects On Time & Budget. Click Here to Get Started.
Making a different selection of existing template would result in different data being exported to the Excel workbook.
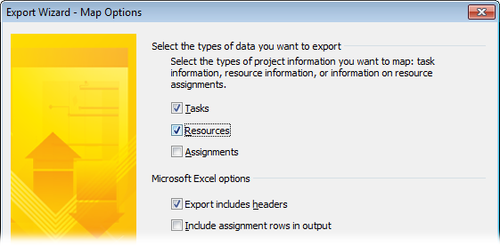
If you select New map instead of Use existing map above, not only can you choose whether to export task data, resource data or assignment data, but you can also choose which specific fields to export and how to name them in the resulting Excel workbook.

Simon Calder

Chris “Simon” Calder was working as a Project Manager in IT for one of Los Angeles’ most prestigious cultural institutions, LACMA.He taught himself to use Microsoft Project from a giant textbook and hated every moment of it. Online learning was in its infancy then, but he spotted an opportunity and made an online MS Project course — the rest, as they say, is history!
Find out how you can easily move data between Project 2010 and Excel 2010 so you can work on data analysis in Excel and regular project work in Project at any time in the life of a project.
Whether you’re a seasoned Project user or just starting to use it you may have wondered if you can move data between Project 2010 and Excel 2010. The data tables in Project are similar in appearance to Excel tables and can be formatted to hold different data types just like Excel. This article summarises how data can be moved between the two applications in two different ways; by simple copy and paste actions and by using Project 2010’s Export or Import Wizards.
Copying and Pasting between Project 2010 and Excel 2010
If you have created a Project 2010 plan, the data will be built into several Project tables. For example the entry table will show along with the Gantt chart in the default project view. You can simply copy and paste this table, or any other table, directly into Excel 2010 and then use Excel for further analysis, for example to group and subtotal data or create charts. You can amend this data in Excel 2010 and provided you have kept the original table formatting you can copy and paste the table back into Project and carry on working.
To do this, ensure Project 2010 is open and displaying a project plan. Choose the default Gantt chart view with the table entry displayed on the left of the screen. Now select the entire table or only some or all of the tasks and choose copy.
Whether you select the entire table or only some of the tasks, Project 2010 helpfully include the task headings within the copied data. Note that earlier versions of Project do not include the table headings if you copy table data.
Then in a new empty Excel workbook select a cell and choose paste. The resulting Excel table will have all the original data and the correct headings from Project 2010. Try making some changes to the data in the Excel 2010 table, for example by altering some task durations. To return the data to Project 2010, copy all the data in the Excel table, but do not select the headings, and choose copy. Then switch back to Project 2010, select the first cell under the task mode heading and choose paste. Now you’ll see the updated project data complete with updated Gantt chart.
If you didn’t set new Projects in Project 2010 to be auto scheduled the resulting project tasks will all be manually scheduled. You can change the first task to auto scheduled if necessary and then fill down the entire task list to change all tasks to auto scheduled.
Using Project 2010 Export or Import Wizard
We’ll work through this using a Project containing only tasks, but the process is very similar for projects also containing resources.
With a project plan currently open in Project 2010 we can export the table entry to Excel using the Export Wizard. To do this choose file, save as and select a location to save the file. Then change the file type to Excel workbook and click save.
The Project Export Wizard launches. You then proceed through the wizard stages ensuring you choose selected data, new map, tables, then choose ‘Based On’ and choose the entry table. Once you’ve waded through all these steps, the entry table will be saved in Excel format. You can then open the exported file in Excel, carry out some analysis if you wish, and perhaps change some data. Try changing some tasks durations as an example, then save the Excel 2010 file.
To import the Excel data back into Project 2010, choose file, open, change the file type to Excel, navigate to the stored file location and double click the file. The Project Import Wizard launches. You can proceed through the wizard stages ensuring you choose new map, as new project, tasks. The table will be automatically recognized so you can then click finish to complete.
Using Excel Template
You can also create Project data directly in Excel by using the Excel 2010 template with the rather long title of Microsoft Project Plan Import Export Template. If you create a new Excel 2010 file based on this template you’ll see sheets created for tasks, resources, work assignments, and general information. The general information sheet contains some explanatory notes and the tables and resources sheets have the correct headings and formatting for you to add data which you can then import into Project 2010 using its Import Wizard. In this way you can easily create original Project data in Excel, carry out processing and then import into Project.
Interested in taking your Project 2010 skills further forward? A really effective way is to attend a training course. The best ones have lots of practical exercises and this can really boost your Project 2010 skills.

Популярное


Microsoft Project 2010— приложение от компании Microsoft, которое предназначено для управления проектами, с его помощью можно разрабатывать планы, распределять ресурсы между задачами, контролировать выполнение работ и анализировать прогресс текущих заданий. Утилита планирует расписания по технологии критического пути, она концентрирует внимание пользователя на наиболее важных для успешного завершения проекта задачах, которым стоит уделять повышенное внимание. При составлении графиков работ учитываются доступные ресурсы, а окончательная последовательность действий отображается на диаграмме Ганта.
Руководители и администраторы проектных групп чаще всего выбирают Microsoft Project 2010, скачать бесплатно эту программу для комплексного управления проектами они могут с нашего сайта. Утилита поддерживает возможность экспорта текстов, таблиц, презентаций и графиков во всех популярных форматах и хорошо синхронизируется с приложениями Mail, Server, Office. В ее состав входит обширный набор инструментов, расположенных в панели главного меню, которое выполнено на русском языке.
Скачать Майкрософт Проджект 2010 можно для 7, 8 и 10 версия Виндовс систем, небольшое время обучения позволит сразу же преступить к работе с программой. Русская версия приложения позволяет выполнять настройку, подобную использованию формул в MS Excel, интерфейс MS Project также выполнен в стиле схожим с оформлением Microsoft Excel. Помимо этого в Microsoft Project есть мастер, с помощью которого делаются снимки плана проекта, которые позже можно использовать в любом из других приложений. Каждый пользователь утилиты может подстроить ее под свои потребности после того, как загрузит продукт на компьютер. Это можно сделать при помощи одного из языков программирования или загрузки готовых расширений.
Основные возможности офисной программы Microsoft Project 2010:
- выбор длительности проектов и ограничение их по срокам;
- создание логических связей между задачами;
- создание расписания по принципу критического пути;
- планирование работы согласно доступным ресурсам;
- подсчет трудоемкости и стоимости выполнения задач.
Смотрите также
Microsoft Project 2010
Microsoft Project 2010— приложение от компании Microsoft, которое предназначено для управления проек…

Правила дорожного движения 2023
Данная программа создана с одной единственной целью – подготовить учащихся автошкол к успешной сдаче…

Строительный калькулятор
Программа Строительный калькулятор – это настоящий помощник для всех, кто серьёзно занимается строит…

XMind
XMind – это инструмент, без которого не обойдется ни один проект. Во время проведения мозгового штур…

Ежедневник
Ежедневник – это приложение, предназначенное для того, чтобы пользователь мог вести свой дневник. Пр…

Калькулятор металлопроката
При помощи данной программы можно быстро осуществлять расчеты различных изделий из металлопроката (т…
Добавить комментарий
Автор: Baguvix от 12-07-2018, 21:53, Посмотрело: 12 963, Обсуждения: 0

Microsoft Office 2010 SP2 Professional Plus + Visio Premium + Project Pro 14.0.7208.5000 (2018.07) RePack by KpoJIuK [Multi/Ru]
Версия программы: 14.0.7208.5000
Язык интерфейса: Русский, Английский, Украинский
Лечение: не требуется (инсталлятор уже пролечен)
Системные требования:
Windows XP с пакетом обновления 3 (SP3) (32-разрядная версия)
Windows Vista с пакетом обновления 1 (SP1)
Windows 7
Windows Server 2003 с пакетом обновления 2 (SP2) и MSXML 6.0
Windows Server 2008
Описание:
Microsoft Office 2010 — один из лучших наборов офисных программ для ПК, браузеров и телефонов. Данный пакет имеет все функции, которые нужны многим уже сегодня, а некоторые могут пригодиться в будущем. С данным набором вы можете успешно принять вызов сегодняшней экономической ситуации. и не упустить факторы достижения успеха в области IT. Обычные сотрудники смогут выполнить работу гораздо быстрее и эффективнее, работая в одиночку или в группе, в дороге или в офисе. ИТ-специалисты получат набор интеллектуальных приложений, легко интегрируемых в систему с повышенной безопасностью и работающих на имеющемся оборудовании, обеспечивая развитие бизнеса.
©Torrent-Soft.Pro


Загрузил: Baguvix (12 июля 2018 21:52)
Взяли: 4774 | Размер: 4,48 Gb
Последняя активность: не наблюдалась
Microsoft Office 2010 SP2 Professional Plus + Visio Premium + Project Pro 14.0.7208.5000 (2018.07) RePack by KpoJIuK (2 файла)
![]() Microsoft.Office.Pro-Plus.2010×64.v2018.07.exe (2,38 Gb)
Microsoft.Office.Pro-Plus.2010×64.v2018.07.exe (2,38 Gb)![]() Microsoft.Office.Pro-Plus.2010×86.v2018.07.exe (2,1 Gb)
Microsoft.Office.Pro-Plus.2010×86.v2018.07.exe (2,1 Gb)
- 80
- 1
- 2
- 3
- 4
- 5
Категория: Офис / Редакторы
Уважаемый посетитель, Вы зашли на сайт как незарегистрированный пользователь.
Мы рекомендуем Вам зарегистрироваться либо войти на сайт под своим именем.
|
||||||||||||||||||||
![Microsoft Office 2010 Professional Plus + Project Pro + Visio + обновления на 01.10.2010 [2010, RUS, VL, x86+x64]](https://torrent-wind.net/uploads/posts/2011-08/1313735515_4ace9df4d7617c12731b1122c04f815a.jpeg)
- Размер: 2,16 GB
- Категория: Программы / Офис
- Загрузок: 28 290
- Комментарии: 3
- Дата обновления:19.08.2011
полный обзор Microsoft Office 2010
Год Выпуска: 2010
Версия: 14.0.4763.1000
Год выхода: 2010
Разработчик: Microsoft
Сборка от: idimm
Платформа: х86(32bit) / x64(64bit)
Совместимость с Windows7: Полная
Язык интерфейса: Русский
Работоспособность: Полная
Системные требования:
Office x86
Операционная система:
— Windows XP с пакетом обновления 3 (SP3) (только 32-разрядная версия)
— Windows Server 2003 R2 с пакетом обновления 2 (SP2) (32- и 64-разрядная версия)
— Windows Server 2008 с пакетом обновления 1 (SP1) (32- и 64-разрядная версия)
— Windows Vista с пакетом обновления 1 (SP1) (32- и 64-разрядная версия)
— Windows 7 (32- и 64-разрядная версия)
— Windows Server 2008 R2 (64-разрядная версия)
Office x64
Операционная система:
— Windows Server 2008 с пакетом обновления 1 (SP1) (64-разрядная версия)
— Windows Vista с пакетом обновления 1 (SP1) (64-разрядная версия)
— Windows 7 (64-разрядная версия)
— Windows Server 2008 R2 (64-разрядная версия)
Компьютер и процессор: ПК с процессором 500 МГц или более, 256 или более МБ ОЗУ; дисковод для DVD-дисков; ПК с процессором 1 ГГц и 512 МБ ОЗУ (или более мощный компьютер) необходим для работы с Microsoft Office Outlook 2010 с диспетчером контактов
Жесткий диск: Для установки необходимо 2ГБ; часть этого объема будет освобождена после установки, когда исходный установочный файл будет удален
Разрешение экрана: Минимум 800×600 точек; рекомендовано 1024×768 или более
Описание:
Microsoft Office 2010 предоставляет удобные и простые средства для увеличения продуктивности работы отдельно взятой персоны, а также упрощения командной работы, оптимизации бизнес-процессов и документооборота, а также проведения бизнес-анализа. Полностью пересмотрены существующие принципы организации пользовательского интерфейса для того, чтобы облегчить конечным пользователям работу, помочь им быстрее достигать впечатляющих результатов. С помощью нового интерфейса, модифицированного механизма работы с графиков улучшенных функций визуализации информации и обновленных инструментов управления задачами пользователи смогут создавать технично выглядящие документы, быстрее находить и анализировать информацию нужную и эффективнее проводить планирование времени и расстановку приоритетов.
Система Microsoft Office 2010 является полным комплектом настольного и серверного программного обеспечения, которое может помочь упорядочить ведение дел сотрудниками предприятия. Последний выпуск данного пакета программ предоставляет новые возможности, помогающие существенно повысить индивидуальную производительность труда, упростить порядок совместной работы, упорядочить процессы и управление корпоративным содержимым, а также улучшить качество анализа дел в организации.
Пакет включает в себя следующие продукты:
✹ Office 2010 Professional Plus
* Microsoft Excel 2010
* Microsoft Outlook 2010
* Microsoft PowerPoint 2010
* Microsoft Word 2010
* Microsoft Access 2010
* Microsoft InfoPath 2010
* Microsoft Publisher 2010
* Microsoft OneNote2010
* Microsoft SharePoint Workspace 2010
* Microsoft Office Applications for Web
✹ Microsoft Project Professional 2010
✹ Microsoft Visio 2010
Дополнительная информация:
По умолчанию ставится 32-битная версия продукта. Для установки 64-битных версий необходимо запустить установку через setup.exe в папке x64.
Активация:
В комплекте активатор и подробная инструкция.
Контрольные суммы:
Office_2010_Proplus_VL_RU.iso:
CRC32: 85507616
MD5: 05EE129320DD27CF36F143B759E99BA6
SHA-1: 0C697A93A88F5905DAE26AAECB1571EBD572F07D
Скриншоты:
![Microsoft Office 2010 Professional Plus + Project Pro + Visio + обновления на 01.10.2010 [2010, RUS, VL, x86+x64]](https://torrent-wind.net/programmy/ofis/2012-06/01/siltc0g73btxy8sorfu4btjqz.jpg "Microsoft Office 2010 Professional Plus + Project Pro + Visio + обновления на 01.10.2010 [2010, RUS, VL, x86+x64]")
![Microsoft Office 2010 Professional Plus + Project Pro + Visio + обновления на 01.10.2010 [2010, RUS, VL, x86+x64]](https://torrent-wind.net/programmy/ofis/2012-06/01/1iu4w46eu9uxwbstm0i8u07tu.jpg "Microsoft Office 2010 Professional Plus + Project Pro + Visio + обновления на 01.10.2010 [2010, RUS, VL, x86+x64]")
![Microsoft Office 2010 Professional Plus + Project Pro + Visio + обновления на 01.10.2010 [2010, RUS, VL, x86+x64]](https://torrent-wind.net/programmy/ofis/2012-06/01/s97xpvmnotui5hle0ms91gjq6.jpg "Microsoft Office 2010 Professional Plus + Project Pro + Visio + обновления на 01.10.2010 [2010, RUS, VL, x86+x64]")
с нашего сервера
Релиз проверен Администрацией! Можно качать, На этой странице доступно для скачивания Microsoft Office 2010 Professional Plus + Project Pro + Visio + обновления на 01.10.2010 [2010, RUS, VL, x86+x64]
оставайтесь на раздаче, оставляйте комментарии и помогите другим оценить качество сборки windows и программы
Hi,
I’m quite new in MS Project and I want to import an Excel 2010 file into MS Project 2010.
The excel file contains following colums:
ID, Task, Resource (person’s name), Estimated workload, start date, end date (ms project should calculate this automatically), % done, and some comment fields.
Our resources only use excel to enter their tasks, start date, etc. So each time they enter a new task (new row) in excel, ms project should be updated automatically.
When I try to open the excel-file in ms-excel I get a wizard. At the end of the wizard I always receive an error message saying: cannot create a map with duplicate table names.
Which view do I need to use? Ghant?
I heard there is a web form you can use. In that cas we’re thinking to replace our excel file by a webform, so our resources can enter their tasks in this web form.
Can someone please help me with this?
Thanks,
Christophe Trefois