
PowerPoint for Microsoft 365 PowerPoint 2021 PowerPoint 2019 PowerPoint 2016 PowerPoint 2013 PowerPoint 2010 More…Less
If you are using PowerPoint 2013 or a newer version, you can link data from a saved Excel worksheet to your PowerPoint presentation. That way, if data in the worksheet changes, you can easily update it in your PowerPoint presentation.
Link an entire Excel worksheet to PowerPoint
-
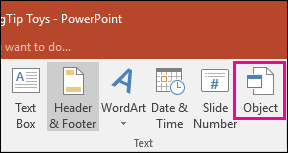
In PowerPoint, on the Insert tab, click or tap Object.

-
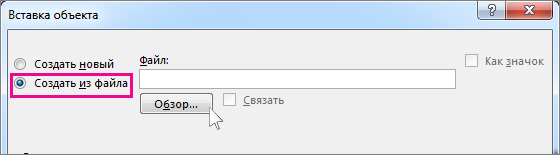
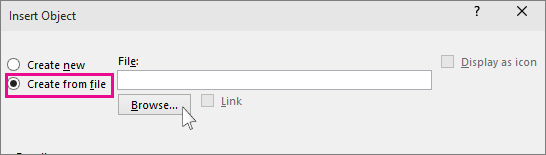
In the Insert Object dialog box, select Create from file.
-
Click or tap Browse, and in the Browse box, find the Excel workbook with the data you want to insert and link to.
-
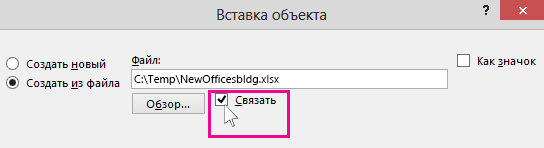
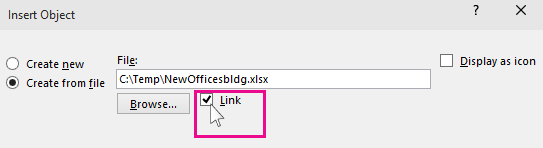
Before you close the Insert Object box, select Link, and click OK.
Important: The linked object in your presentation displays all the data from the active, top worksheet in the linked Excel workbook. When you save the Excel workbook, make sure the worksheet you want in your presentation is the one you see when you first open the workbook.
Link a section of data in Excel to PowerPoint
-
In Excel, open the saved workbook with the data you want to insert and link to.
-
Drag over the area of data you want to link to in PowerPoint, and on the Home tab, click or tap Copy.
-
In PowerPoint, click the slide where you want to paste the copied worksheet data.
-
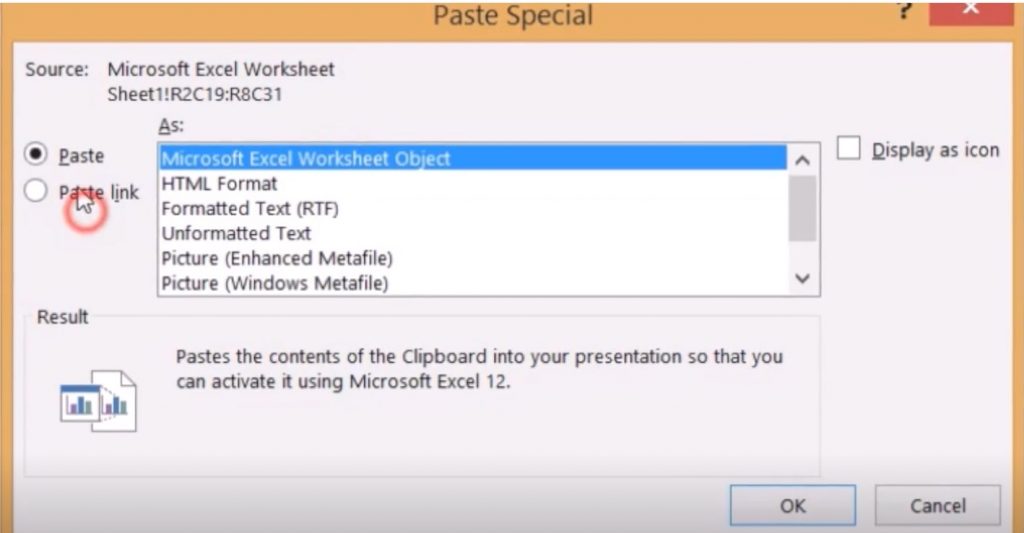
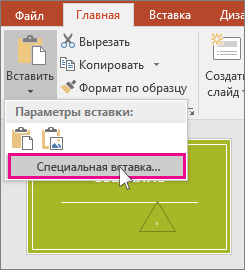
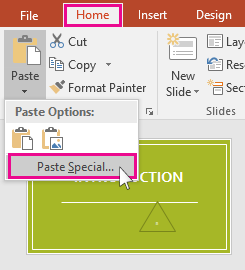
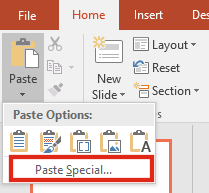
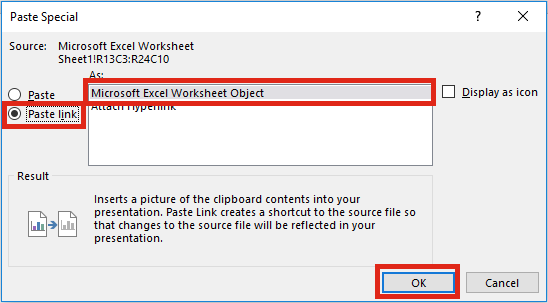
On the Home tab, click the arrow below Paste, and select Paste Special.
-
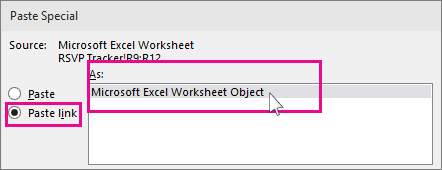
In the Paste Special box, click Paste link, and then, under As, select Microsoft Excel Worksheet Object.
Copy and paste (unlinked) Excel data in PowerPoint
In this case, the Excel data will not be linked to your PowerPoint presentation. You copy the data from an Excel worksheet and paste it into your presentation. The worksheet does not send automatic updates to PowerPoint.
-
In Excel, open the workbook with the data you want to copy.
-
Drag over the area of data you want to copy, and on the Home tab, click or tap Copy.
-
In PowerPoint, click the slide where you want to paste the copied worksheet data.
-
On the Home tab, in the Clipboard group, click the arrow below Paste.
-
Under Paste Options, pick one of the following. Move the mouse pointer over each Paste option to see a preview of what it would look like.
Use Destination Styles to copy the data as a PowerPoint table, using the format of the presentation
Keep Source Formatting to copy the Excel data as a PowerPoint table, using the format of the worksheet
Embed to copy the data as information that can be edited in Excel later
Picture to copy the data as a picture that can’t be edited in Excel
Keep Text Only to copy all the data as a single text box
See Also
Copy an Excel chart to another Office program
Insert a linked worksheet
To insert and link a saved Excel worksheet onto your PowerPoint slide, do the following:
Important: The linked object in your presentation displays all data from the active, top worksheet in the linked Excel workbook.
-
In PowerPoint 2010, on the Insert tab, in the Text group, click Object.
-
In the Insert Object dialog box, select Create from file.
-
Click Browse, and in the Browse dialog box, browse to and then select the Excel workbook that contains the information that you want to insert, and then click OK.
-
In the Insert Object dialog box, select Link and then click OK.
To edit a linked Excel worksheet, do one of the following:
-
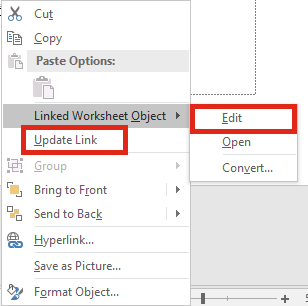
To edit the data from within Excel, right-click the object on the slide, point to Linked Worksheet Object, and select Edit.
-
To update the data on the slide to match the data in the original Excel file, right-click the object on the slide, and click Update Link.
Insert a linked selection from a worksheet
To insert and link a selection of data from a saved Excel worksheet, do the following:
-
In Excel, open the workbook containing that data that you want to insert.
-
Select and copy the data that you want.
Keyboard shortcut You can press CTRL+C to copy the data.
-
In PowerPoint 2010, click the slide where you want to paste the copied worksheet data.
-
On the Home tab, in the Clipboard group, click the arrow below Paste, and select Paste Special.
-
In the Paste Special dialog box, under As, select a Microsoft Excel Worksheet Object.
-
Select the Paste link check box and click OK.
To edit a selection of cells from a linked Excel worksheet, do one of the following:
-
To edit the data from within Excel, right-click the object on the slide, point to Linked Worksheet Object, and select Edit.
-
To update the data on the slide to match the data in the original Excel file, right-click the object on the slide, and click Update Link.
Copy a selection of cells onto a slide
To paste a copy a selection of Excel data onto your PowerPoint slide, do the following:
Note: Data copied and pasted onto a PowerPoint slide does not automatically update when the data is changed in the Excel workbook. To link the data on the PowerPoint slide to the original Excel data source, see the «Insert a linked selection from a worksheet» section immediately above.
-
In Excel, open the workbook that contains the information that you want to copy.
-
Select and copy the data that you want.
Keyboard shortcut You can press CTRL+C to copy the data.
-
In PowerPoint 2010, click the slide where you want to paste the copied worksheet data.
-
On the Home tab, in the Clipboard group, click the arrow below Paste.
-
Under Paste Options, do one of the following:
-
Select Keep Source Formatting if you want to copy the data as a PowerPoint table, but want it keep the appearance of the original Excel worksheet.
-
Select Use Destination Styles if you want to copy the data as a PowerPoint table, but want it to assume the appearance of the PowerPoint presentation.
-
Select Embed if you want to copy the data as information that can be edited in PowerPoint.
-
Select Picture if you want to copy the data as an un-editable picture.
-
Select Keep Text Only if you want to copy all the data as a single text box.
-
See Also
Import content from other applications
Copy an Excel chart to another Office program
Need more help?
Want more options?
Explore subscription benefits, browse training courses, learn how to secure your device, and more.
Communities help you ask and answer questions, give feedback, and hear from experts with rich knowledge.
Graphs and charts are a major part of almost any presentation deck design. Allowing to present data in a clear and convenient way, they are a must, especially when you’re dealing with data-driven stuff, either for school or for business. While some presentation-making tools allow you to create graphs to a certain degree, for a more professional approach, and especially if you need more complex graphs done fast, nothing would match Excel. The problem is though, Excel is not presentation software (obviously). So, you’ll have to somehow integrate it into your presentation and link Excel tables or data to PowerPoint. How to do it? Let’s find out together!
Why link Excel and PowerPoint?
As we already mentioned, Excel allows you to make graphs easily. However, another great feature is that you can actually make the data in your presentation dynamic. This means that updating the numbers in your Excel sheet would make the graphs implemented in the presentation updated as well. It’s a great feature to use for continuous presentations, such as monthly reports, powerpoint data visualization etc.
Another great feature is the ability to use multiple different graphs, derived from different sheets, bringing various sources of data together. While they won’t affect each other when you change some of the data, they would be stored in one place and even in one slide (that is if you could fit more than two graphs on one slide).
The first thing to know is that the Excel integration with presentation software is mostly limited to PowerPoint or Google Slides. Since both Excel and PowerPoint are Microsoft products, they are integrated quite well. So, there should be no problem with inserting an Excel sheet in PowerPoint or putting the graph from Excel into your slide. Actually, there are several methods of connecting your Excel and PowerPoint data
Method 1: Copy & Paste
Literally, just copy the graphs from the Excel sheet and paste them into your presentation. The graph would be pasted like an image (in the PNG format), and you can then adjust its height and width, as well as positioning on the slide, just like with any other picture. While really simple and quick, this method would strip the graph from some of the really important qualities. Most importantly, you won’t be able to automatically update data in it. However, you can paste it as an Excel file as well, giving the graph all of the functionality of an Excel file.
Method 2: Special Paste
This method involves a bit more complexity. It allows you to insert both charts and related graphs into your presentation. You can do it in Excel by selecting the Home tab, selecting Copy in the Clipboard group. In PowerPoint, choose the Home tab, select Special Paste, and choose the Paste Link in the submenu. This method allows you to put more data, and work both with the graph and the chart with the graph’s data.
However, keep in mind that the chart you have inserted is linked with a fixed number of cells in the Excel sheet. That means that if you want to add another variable or to expand the existing rows and columns, the data imported into PowerPoint won’t be updated, and an error message will be displayed. What is more, your data in PowerPoint will only be linked to the sheet from which you copied it. So, if you will make a copy and start to make changes to it, they will not be linked to PowerPoint.
Method 3: Data only
If for some reason, you just want to have only the numerical or text data copied from Excel, you can do that quite easily. While you won’t be truly embedding excel in PowerPoint, you can use this data to make the graphs inside a presentation software, using the graph creating tools available in PowerPoint. You can either copy the data as plain text or go with the embed Excel in the PowerPoint function so that the data in the presentation would upgrade along with the change you make in Excel.
While you can make graphs in PowerPoint as well, it’s better to do it in Excel though. So, this method might be useful mostly if you have a specific need to make a graph in PowerPoint. On the other hand, you can use it for the data that needs no graphic presentation. After all, Excel is a powerful counting tool and if you simply want to present a chart with your results, this method would definitely work great for you, saving your time by using Excel formulas.
Method 4: Linking to Excel files
This method allows you to put the links to the Excel files into the PowerPoint slide and basically make a PowerPoint link to Excel. When clicking on the link, it will send right into the spreadsheet. It’s a perfect way of storing large amounts of data, as it occupies less space on the slide, and reduces the file size of your presentation. You can link Excel to PowerPoint by choosing Link in the Insert menu. There, you can choose a file you need either from the computer storage or your cloud.
The main disadvantage to this method is that it might be quite confusing and inconvenient. It involves switching between the two apps, which usually takes up more time and complicates your presentation process. What is more, the links simply do not look good on the slide in most cases. However, for presenting really large projects with lots of graphics and complex Excel spreadsheets this method can be the only viable choice.
In conclusion
As you can see, there are several ways of PowerPoint link to Excel and your choice mainly depends on what kind of Excel integration you want. For the most part, simply posting the graph as a picture or as an Excel file should do the trick, though, in some more specific cases, stuff like links to Excel can help as well. We really hope that this article provided some valuable insights on Excel and PowerPoint integration!
Содержание
- Insert Excel data
- Try it!
- Добавление листа Excel в PowerPoint
- Связывание всего листа Excel с PowerPoint
- Связывание раздела данных в Excel с PowerPoint
- Копирование и вставка (без связи) данных Excel в PowerPoint
- См. также
- Вставка связанного листа
- Вставка связанного выделения с листа
- Копирование выделенного фрагмента ячеек на слайд
- Insert Excel data in PowerPoint
- Link an entire Excel worksheet to PowerPoint
- Link a section of data in Excel to PowerPoint
- Copy and paste (unlinked) Excel data in PowerPoint
- See Also
- Insert a linked worksheet
- Insert a linked selection from a worksheet
- Copy a selection of cells onto a slide
Insert Excel data

Try it!
In PowerPoint, you can embed tables and worksheets from Excel in your presentation slides.
In Excel, click and drag to highlight the cells you want to copy.
Right-click the copied cells and select Copy.
In your PowerPoint presentation, right-click and select the Paste Options you want:
Use Destination Styles – Choose to edit your copied cells like a PowerPoint table, but with PowerPoint’s color scheme and fonts.
Keep Source Formatting – Choose to keep your table editable in PowerPoint while maintaining the same source formatting from Excel.
Embed – Choose to keep a copy of your table in PowerPoint in case you want to edit the data, which will open in Excel.
Note: If you’re working with a large Excel file, it’ll inflate your PowerPoint presentation to a big size. You may also unintentionally be giving more access to your Excel file than you intend to.
Picture – Choose to paste your table as a picture to get the same benefits as embedding except you can format your cells like a picture and add effects to it. You won’t be able to edit data once it’s been pasted though.
Keep Text Only – Choose to paste your table as straight text and to do all formatting in PowerPoint.
If you pasted as a picture, on the Picture Tools Format tab, select the quick picture style you want to use. Adjust the table to your liking.
Источник
Добавление листа Excel в PowerPoint
Если вы используетеPowerPoint 2013 или более новую версию, можно связать данные из сохраненного листа Excel с презентацией PowerPoint. Таким образом, если данные на листе изменяются, их можно легко обновить в презентации PowerPoint.
Связывание всего листа Excel с PowerPoint
В PowerPoint на вкладке Вставка нажмите кнопку Объект.

В диалоговом окне Вставка объекта выберите пункт Создать из файла.
Нажмите кнопку Обзор, а затем найдите книгу Excel с нужными данными в окне Обзор.
Прежде чем закрывать окно Вставка объекта, установите флажок Связать и нажмите кнопку ОК.
Важно: Связанный объект в презентации отображает все данные из активного верхнего листа в связанной книге Excel. При сохранении книги Excel убедитесь, что нужный лист в презентации отображается при первом открытии книги.
Связывание раздела данных в Excel с PowerPoint
В Excel откройте сохраненную книгу с данными, которые нужно вставить и связать.
Перетащите указатель мыши на область данных, с которой нужно связаться в PowerPoint, а затем на вкладке Главная щелкните или коснитесь кнопки Копировать.
В PowerPoint выберите слайд, на который нужно вставить скопированные данные листа.
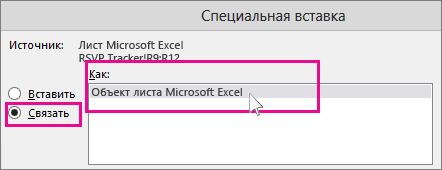
На вкладке Главная нажмите стрелку под кнопкой Вставить и выберите пункт Специальная вставка.
В окне Специальная вставка установите переключатель Связать, а затем в поле Как выберите пункт Лист Microsoft Excel.
Копирование и вставка (без связи) данных Excel в PowerPoint
В таком случае данные Excel не будут связаны с презентацией PowerPoint. Данные копируются с листа Excel и вставляются в презентацию. Лист не будет автоматически отправлять обновления в PowerPoint.
Откройте в Excel книгу с данными, которые нужно скопировать.
Выделите область данных, которые нужно скопировать, а затем на вкладке Главная нажмите кнопку Копировать.
В PowerPoint выберите слайд, на который нужно вставить скопированные данные листа.
На вкладке Главная в группе Буфер обмена щелкните стрелку под кнопкой Вставка.
В разделе Параметры вставки выберите один из следующих вариантов. Наведите указатель мыши на каждый параметр Вставить, чтобы просмотреть предварительный просмотр того, как он будет выглядеть.

Использование стилей назначения для копирования данных в виде таблицы PowerPoint с использованием формата презентации

Сохранение исходного форматирования для копирования данных Excel в виде таблицы PowerPoint с использованием формата листа

Внедрение для копирования данных в виде сведений, которые можно изменить в Excel позже

Рисунок для копирования данных в виде рисунка, который нельзя изменить в Excel

Сохранение только текста для копирования всех данных в виде одного текстового поля
См. также
Вставка связанного листа
Чтобы вставить сохраненный лист Excel и связать его с PowerPoint слайдом, сделайте следующее:
Важно: Связанный объект в презентации отображает все данные с активного верхнего листа в связанной Excel книге.
В PowerPoint 2010 на вкладке Вставка в группе Текст щелкните Объект.
В диалоговом окне Вставка объекта выберите пункт Создать из файла.
Нажмите кнопку Обзор и в диалоговом окне Обзор найдите и выберите книгу Excel, содержащую сведения, которые нужно вставить, и нажмите кнопку ОК.
В диалоговом окне Вставка объекта выберите Ссылка и нажмите кнопку ОК.
Чтобы изменить связанный лист Excel, выполните одно из следующих действий:
Чтобы изменить данные из Excel, щелкните правой кнопкой мыши объект на слайде, наведите указатель мыши на связанный лист объект и выберите Изменить.
Чтобы обновить данные на слайде в соответствии с данными в исходном файле Excel, щелкните правой кнопкой мыши объект на слайде и выберите команду Обновить ссылку.
Вставка связанного выделения с листа
Чтобы вставить и связать выбранный фрагмент данных с сохраненного листа Excel, выполните следующие действия.
В Excel откройте книгу, содержащую данные, которые нужно вставить.
Выберите и скопируйте нужные данные.
Сочетание клавиш Чтобы скопировать данные, нажмите клавиши CTRL+C.
В PowerPoint 2010 щелкните слайд, куда нужно вставить скопированные данные листа.
На вкладке Главная в группе Буфер обмена щелкните стрелку под кнопкой Вставить и выберите Специальная вставка.
В диалоговом окне Специальная вставка в разделе Как выберите объект Листа Microsoft Excel.
Установите флажок Вставить ссылку и нажмите кнопку ОК.
Чтобы изменить выбор ячеек из связанного Excel листа, выполните одно из следующих действий:
To edit the data from within Excel, right-click the object on the slide, point to Linked Worksheet Object, and select Edit.
To update the data on the slide to match the data in the original Excel file, right-click the object on the slide, and click Update Link.
Копирование выделенного фрагмента ячеек на слайд
Чтобы скопировать выбранный фрагмент данных Excel на слайд PowerPoint, сделайте следующее:
Примечание: Данные, скопированные и вставленные на слайд PowerPoint, не обновляются автоматически при изменении данных в книге Excel. Сведения о связывании данных на слайде PowerPoint с исходным источником данных Excel см. в разделе «Вставка связанного фрагмента с листа» непосредственно выше.
В Excel откройте книгу, содержащую сведения, которые нужно скопировать.
Select and copy the data that you want.
Сочетание клавиш You can press CTRL+C to copy the data.
In PowerPoint 2010, click the slide where you want to paste the copied worksheet data.
На вкладке Главная в группе Буфер обмена щелкните стрелку под кнопкой Вставка.
В разделе Параметры вставки выполните одно из следующих действий.
Выберите Сохранить исходное форматирование , если вы хотите скопировать данные в виде PowerPoint таблицы, но сохранить внешний вид исходного листа Excel.
Выберите Использовать стиль назначения, если вы хотите скопировать данные в виде таблицы PowerPoint, но хотите, чтобы она предполагала внешний вид презентации PowerPoint.
Выберите Внедрить, чтобы скопировать данные в виде сведений, которые можно изменить в PowerPoint.
Выберите Рисунок , если вы хотите скопировать данные как нередактируемый рисунок.
Выберите Сохранить только текст , если вы хотите скопировать все данные в виде одного текстового поля.
Источник
Insert Excel data in PowerPoint
If you are using PowerPoint 2013 or a newer version, you can link data from a saved Excel worksheet to your PowerPoint presentation. That way, if data in the worksheet changes, you can easily update it in your PowerPoint presentation.
Link an entire Excel worksheet to PowerPoint
In PowerPoint, on the Insert tab, click or tap Object.
In the Insert Object dialog box, select Create from file.
Click or tap Browse, and in the Browse box, find the Excel workbook with the data you want to insert and link to.
Before you close the Insert Object box, select Link, and click OK.
Important: The linked object in your presentation displays all the data from the active, top worksheet in the linked Excel workbook. When you save the Excel workbook, make sure the worksheet you want in your presentation is the one you see when you first open the workbook.
Link a section of data in Excel to PowerPoint
In Excel, open the saved workbook with the data you want to insert and link to.
Drag over the area of data you want to link to in PowerPoint, and on the Home tab, click or tap Copy.
In PowerPoint, click the slide where you want to paste the copied worksheet data.
On the Home tab, click the arrow below Paste, and select Paste Special.
In the Paste Special box, click Paste link, and then, under As, select Microsoft Excel Worksheet Object.
Copy and paste (unlinked) Excel data in PowerPoint
In this case, the Excel data will not be linked to your PowerPoint presentation. You copy the data from an Excel worksheet and paste it into your presentation. The worksheet does not send automatic updates to PowerPoint.
In Excel, open the workbook with the data you want to copy.
Drag over the area of data you want to copy, and on the Home tab, click or tap Copy.
In PowerPoint, click the slide where you want to paste the copied worksheet data.
On the Home tab, in the Clipboard group, click the arrow below Paste.
Under Paste Options, pick one of the following. Move the mouse pointer over each Paste option to see a preview of what it would look like.

Use Destination Styles to copy the data as a PowerPoint table, using the format of the presentation

Keep Source Formatting to copy the Excel data as a PowerPoint table, using the format of the worksheet

Embed to copy the data as information that can be edited in Excel later

Picture to copy the data as a picture that can’t be edited in Excel

Keep Text Only to copy all the data as a single text box
See Also
Insert a linked worksheet
To insert and link a saved Excel worksheet onto your PowerPoint slide, do the following:
Important: The linked object in your presentation displays all data from the active, top worksheet in the linked Excel workbook.
In PowerPoint 2010, on the Insert tab, in the Text group, click Object.
In the Insert Object dialog box, select Create from file.
Click Browse, and in the Browse dialog box, browse to and then select the Excel workbook that contains the information that you want to insert, and then click OK.
In the Insert Object dialog box, select Link and then click OK.
To edit a linked Excel worksheet, do one of the following:
To edit the data from within Excel, right-click the object on the slide, point to Linked Worksheet Object, and select Edit.
To update the data on the slide to match the data in the original Excel file, right-click the object on the slide, and click Update Link.
Insert a linked selection from a worksheet
To insert and link a selection of data from a saved Excel worksheet, do the following:
In Excel, open the workbook containing that data that you want to insert.
Select and copy the data that you want.
Keyboard shortcut You can press CTRL+C to copy the data.
In PowerPoint 2010, click the slide where you want to paste the copied worksheet data.
On the Home tab, in the Clipboard group, click the arrow below Paste, and select Paste Special.
In the Paste Special dialog box, under As, select a Microsoft Excel Worksheet Object.
Select the Paste link check box and click OK.
To edit a selection of cells from a linked Excel worksheet, do one of the following:
To edit the data from within Excel, right-click the object on the slide, point to Linked Worksheet Object, and select Edit.
To update the data on the slide to match the data in the original Excel file, right-click the object on the slide, and click Update Link.
Copy a selection of cells onto a slide
To paste a copy a selection of Excel data onto your PowerPoint slide, do the following:
Note: Data copied and pasted onto a PowerPoint slide does not automatically update when the data is changed in the Excel workbook. To link the data on the PowerPoint slide to the original Excel data source, see the «Insert a linked selection from a worksheet» section immediately above.
In Excel, open the workbook that contains the information that you want to copy.
Select and copy the data that you want.
Keyboard shortcut You can press CTRL+C to copy the data.
In PowerPoint 2010, click the slide where you want to paste the copied worksheet data.
On the Home tab, in the Clipboard group, click the arrow below Paste.
Under Paste Options, do one of the following:
Select Keep Source Formatting if you want to copy the data as a PowerPoint table, but want it keep the appearance of the original Excel worksheet.
Select Use Destination Styles if you want to copy the data as a PowerPoint table, but want it to assume the appearance of the PowerPoint presentation.
Select Embed if you want to copy the data as information that can be edited in PowerPoint.
Select Picture if you want to copy the data as an un-editable picture.
Select Keep Text Only if you want to copy all the data as a single text box.
Источник
Get our FREE VBA eBook of the 30 most useful Excel VBA macros.
Automate Excel so that you can save time and stop doing the jobs a trained monkey could do.
Claim your free eBook

If you regularly create PowerPoint presentations that include information from Excel, you will know how frustrating it can be. Having to re-copy and re-paste the information every time a change is made in the original Excel documents. Have you come across the feature which enables you to link your Excel workbook directly into your PowerPoint presentation? When you use this feature, the presentation changes automatically each time your workbook changes. This is what we will be covering in this post.
Linking an Excel document to a PowerPoint presentation
The process of linking an Excel document to a PowerPoint presentation is pretty straightforward. Simply copy a range from Excel (Home -> Copy in the Ribbon, or Ctrl+C as a shortcut). Then, in PowerPoint click Home -> Paste -> Paste Special . . .
From the Paste Special window select Paste link, click Microsoft Excel Worksheet Object, then click OK.
The pasted image will now be linked to Excel. If the Excel file and PowerPoint presentation are both open any changes will update automatically.
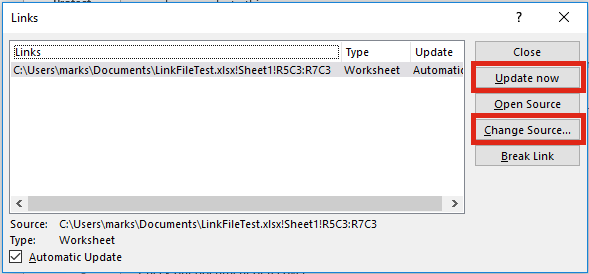
Update and edit links
Once the links are created in the presentation, you may need to update them at a future point. If the Excel file is not open it is possible to update links using the following methods.
Updating when opening the presentation
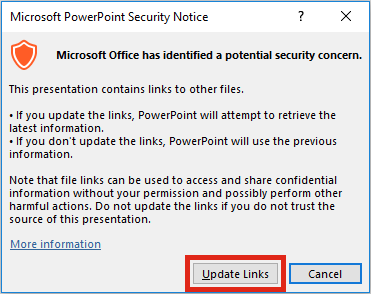
When opening a presentation, PowerPoint will ask if you wish to update the links. Just click the Update Links button and the presentation will be updated with the latest information.
Updating on demand
If you just want to update a single linked image you can right-click the image, then select Update Link from the menu.
This menu also gives you the option to Edit the link to the original document.
Update with the “edit links” option
On the ribbon click File -> Info -> Edit Links to Files (it’s in the bottom right corner).
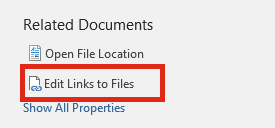
The Links window will open, which provides you with various options to update, edit and break links.
My top tips
If you link Excel files to PowerPoint presentations often, you will soon find it doesn’t always behave how you might expect. Here are my top tips to get the best results:
- Use named ranges. Adding rows and columns in a worksheet will not change the link reference in PowerPoint. For example, if PowerPoint is linked to Cell A1, then you inserted a new column at the start, Cell A1 would become Cell B1. But, PowerPoint still references Cell A1. This would now be the wrong cell. A named range helps to ensure the correct range is displayed in the presentation.
- PowerPoint updates links one at a time. If you have 100 links to the same Excel workbook it will open the same Excel workbook 100 times, which can be very time consuming. If you open the Excel document first the updating process is much faster.
- PowerPoint will not know if you change the name or file path of a linked file (see point 4 below for the exception). You need to ensure the most up-to-date version of the Excel file always has the same file name and file path, so that PowerPoint can find it.
- The fastest method of changing the source of an Excel file is to have both the Excel and linked PowerPoint files open. Then save the Excel file with a new path or file name. In this circumstance, PowerPoint will update the reference to the file.

About the author
Hey, I’m Mark, and I run Excel Off The Grid.
My parents tell me that at the age of 7 I declared I was going to become a qualified accountant. I was either psychic or had no imagination, as that is exactly what happened. However, it wasn’t until I was 35 that my journey really began.
In 2015, I started a new job, for which I was regularly working after 10pm. As a result, I rarely saw my children during the week. So, I started searching for the secrets to automating Excel. I discovered that by building a small number of simple tools, I could combine them together in different ways to automate nearly all my regular tasks. This meant I could work less hours (and I got pay raises!). Today, I teach these techniques to other professionals in our training program so they too can spend less time at work (and more time with their children and doing the things they love).
Do you need help adapting this post to your needs?
I’m guessing the examples in this post don’t exactly match your situation. We all use Excel differently, so it’s impossible to write a post that will meet everybody’s needs. By taking the time to understand the techniques and principles in this post (and elsewhere on this site), you should be able to adapt it to your needs.
But, if you’re still struggling you should:
- Read other blogs, or watch YouTube videos on the same topic. You will benefit much more by discovering your own solutions.
- Ask the ‘Excel Ninja’ in your office. It’s amazing what things other people know.
- Ask a question in a forum like Mr Excel, or the Microsoft Answers Community. Remember, the people on these forums are generally giving their time for free. So take care to craft your question, make sure it’s clear and concise. List all the things you’ve tried, and provide screenshots, code segments and example workbooks.
- Use Excel Rescue, who are my consultancy partner. They help by providing solutions to smaller Excel problems.
What next?
Don’t go yet, there is plenty more to learn on Excel Off The Grid. Check out the latest posts:
What happens when we want to combine each app’s strengths? When you’re ready to take your data and charts from Excel to PowerPoint, you have options. There are different ways to paste and link your data between these apps.
In this tutorial, you’ll learn how to embed or link an Excel file in PowerPoint. Soon, you’ll know how to embed Excel graphs and charts inside of a PowerPoint presentation. Embedding Excel into PowerPoint is a top skill in 2023, and you’ll find yourself doing it every day.
We also have a useful complement to this tutorial. Quickly grab it before you read on. Download our FREE eBook: The Complete Guide to Making Great Presentations, which will help you write, design, and deliver the perfect presentation.


How to Embed Excel Files & Link Data into PowerPoint (Quick Video)
In this quick three minute screencast below, I’ll show you how to work back and forth between Excel and PowerPoint. You’ll learn to embed Excel files in PowerPoint, link your data between the two apps, and can keep your data up to date.
Read on to learn more about different methods for working with data between Excel and PowerPoint.
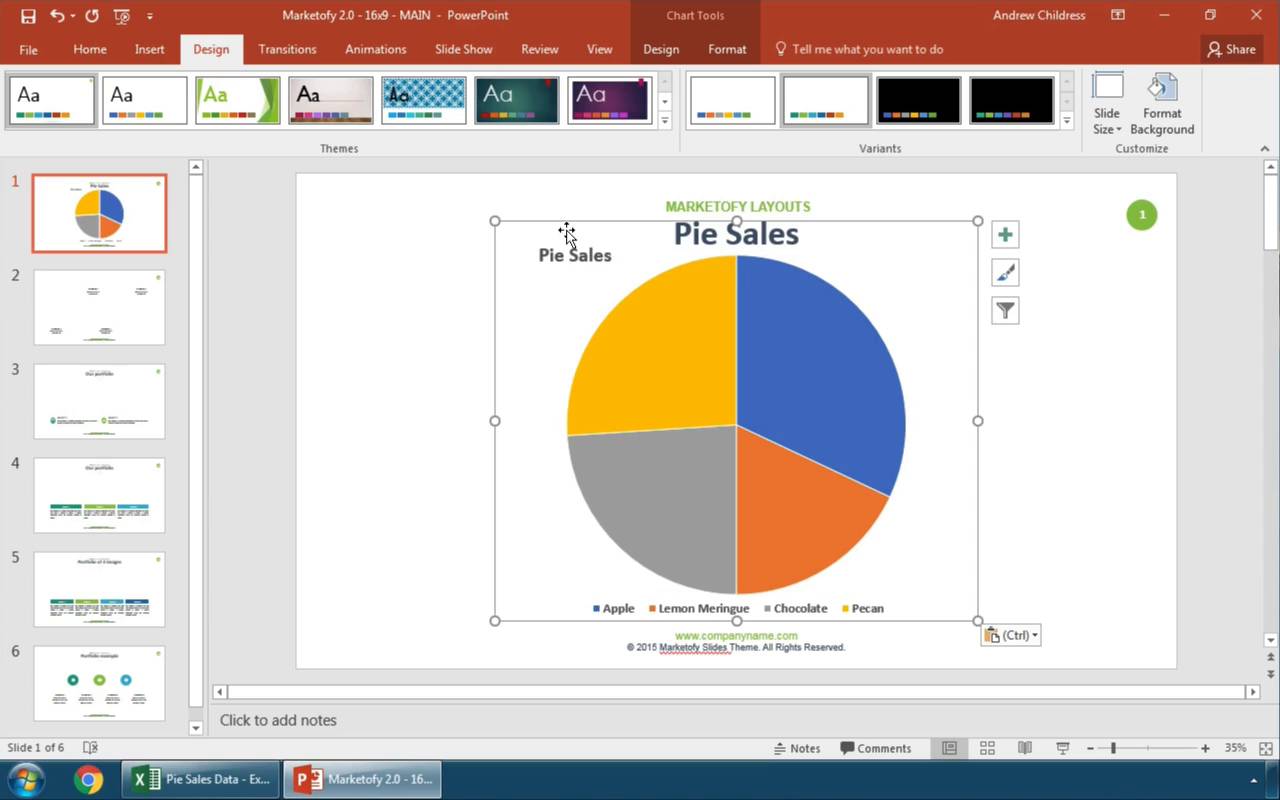
In this video, we used the now-discontinued Marketofy PowerPoint Template from GraphicRiver. When you need an embedded Excel in PPT, turn to the vast Envato Elements library for thousands of custom PowerPoint options. You’ll find template designs for all topics.
How to Embed Excel Charts in PowerPoint
Imagine that we’ve built a great-looking Excel chart. It features plenty of data and a stylish design aesthetic. But Excel isn’t the best tool for sharing with an audience. It’s best to embed Excel in PowerPoint to present with.
Remember: Excel and PowerPoint are both part of the Microsoft Office suite of productivity apps. They work well together. You can finish styling the chart in PowerPoint.
But you might not be done making style changes. Fortunately, you’re in luck.


Throughout this tutorial, you’ll see the SIMPLECO PowerPoint template featured. It’s a robust premium design from Envato Elements. Download it today to follow along.
The tips in this section were written using Windows and Office 365. If you’ve got a different operating system or a different version of the apps, your steps may be slightly different.
Start Embedding Excel Into PowerPoint
Now, let’s get started with the simplest way to make a PowerPoint embedded Excel. The first step is to click on your chart inside of Excel and make sure it’s selected. Then, you can press copy, either by pressing Ctrl + C on your keyboard or pressing the Copy button on Excel’s ribbon.


Now, let’s switch over to the SIMPLECO template, which is open in PowerPoint. Find some space on one of your slides. Then, press either Ctrl + V on your keyboard, or press the Paste button on PowerPoint’s ribbon. Below, you can see that the data and amounts match when you paste.


Notice that it brought over the same data from our Excel workbook, but it reformatted the style to match the PPT presentation. These are the default options to take charts from Excel to PowerPoint.
This is the most basic way to place an Excel chart inside your PowerPoint file. But as always, there’s more power hidden behind the scenes in PowerPoint.
Excel to PowerPoint Paste Options Explained
Maybe you want to paste your chart as a picture that the viewer can’t edit. Or maybe you want to link your Excel chart to PowerPoint so that they update data and stay synced.
When you’re taking charts from Excel to PowerPoint, you really have two choices to make:
- How do you want to handle the data — should it be linked to an Excel workbook, or embedded right inside the PowerPoint file?
- Should the style of the chart stay the same, or should it match the rest of your presentation?
These options are all available when you Right-click inside PowerPoint with a chart on your clipboard.


There are actually five ways that you can take data from Excel to PowerPoint, and each of them handles your data a bit differently. For your reference, here are the descriptions of each of the paste options in PowerPoint:
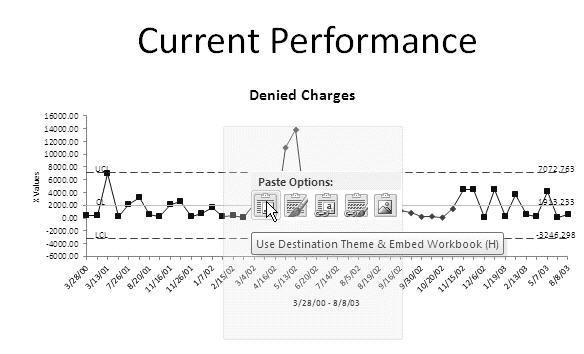
- Use Destination Theme and Embed Workbook
- Keep Source Formatting and Embed Workbook
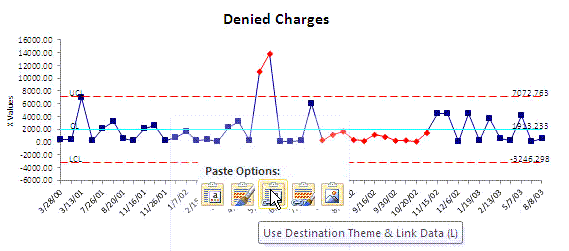
- Use Destination Theme and Link Data
- Keep Source Formatting and Link Data
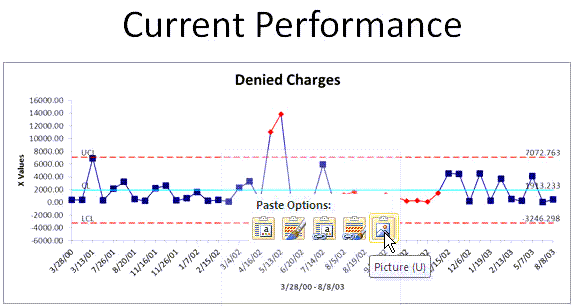
- Paste as picture
I think of the major categories as embedding, linking, and pasting as a picture. Let’s learn about each of those categories.
1. Embed Excel Workbook in PowerPoint
The first two icons (1 and 2) allow you to embed data inside the PowerPoint file. This means that PowerPoint stores the data behind the scenes inside the PowerPoint file.
Once you paste the file in and embed the workbook, the data is separated from the Excel file and stored inside the PowerPoint file.
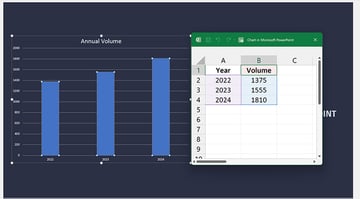
If Excel’s data updates, the PowerPoint chart won’t update automatically.


To update the data inside of an embedded Excel file, you can right-click the chart and choose Edit Data from the menu. This opens an embedded Excel spreadsheet inside the PowerPoint file where you can edit the data in the chart.


Embedding data has many advantages. The charts in your presentation work whether or not you’ve got access to the original Excel file. Embedding does increase the size of your PowerPoint file.
The major downside to embedding data is that it doesn’t stay synced to the Excel file that you’re doing analysis and data review inside of. If you’re going back and forth between the two apps, linking might be a better choice.
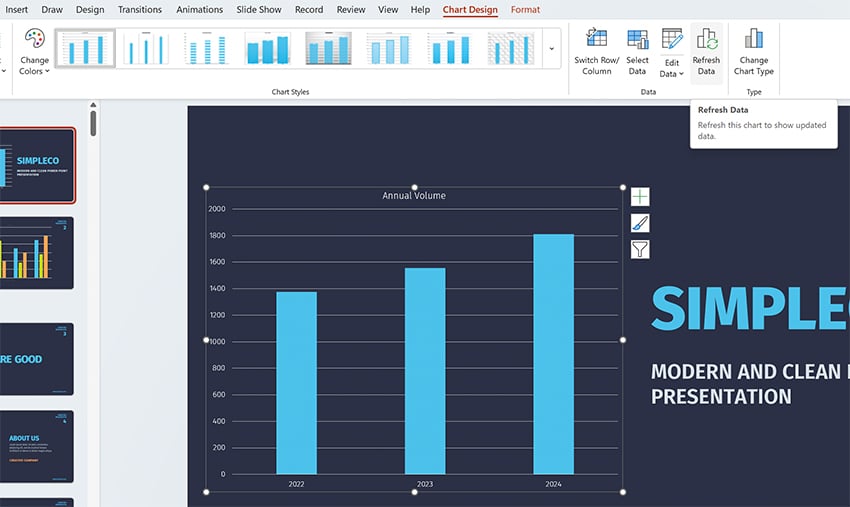
2. Link Excel Data to PowerPoint
Linking data (icons 3 and 4) keeps your PowerPoint and Excel file in sync. If you change the data for the chart in Excel, you can update the pasted chart in PowerPoint to use the latest data.
When PowerPoint and Excel are both open at the same time, this happens automatically for linked data. Make a change in Excel, and the linked PowerPoint chart updates in real time.
If you’re working in Excel and PowerPoint at different times, you’ll want to update your data. Make sure to hit Refresh Data on the Chart Design tab on PowerPoint’s ribbon.


Linking is great to keep the data connected so that you don’t have to keep rebuilding your charts as you move from Excel to PowerPoint.
But linking your data directly to Excel isn’t always the right choice. The downside to using the linked option is two-fold:
- If you send your PowerPoint file to someone and they don’t have access to the Excel file, refreshing data won’t work.
- If others are changing the linked Excel file behind the scenes without your knowledge, you run the risk of updating your presentation with incorrect data.
If you’re still a bit fuzzy about choosing between embedding and linking data from Excel to PowerPoint, check out the official Microsoft help page to see a comparison of the two.
3. Paste Excel Chart as Picture in PowerPoint
The final option to place a chart in PowerPoint is to simply paste the chart you built in Excel as a flattened, non-editable picture.
When you paste a chart as a picture, the styles will appear the same as the Excel version of the chart and no longer be editable within PowerPoint.


This feature is handy when you want to ensure that the data isn’t changed or altered by the recipient. But pasting as a picture causes you to lose any ability to edit or change the chart.
Excel to PowerPoint Paste Formatting Options
Whether you choose to embed or link your data, you can choose how to handle the style of your charts when you move from Excel to PowerPoint. Both «embed» and «link» options have two choices for how to handle styling.
Let’s look at the difference between «Use Destination Theme» and «Keep Source Formatting.» These options don’t change the way we work with data—both options embed your data in the PowerPoint file—but they do change the appearance of the charts.
- Keep Source Formatting. Uses the same chart style used in Excel.
- Use Destination Theme. Matches the style of your chart to the PowerPoint theme.
In the screenshot below, you can see examples of each option. Using Keep Source Formatting kept the chart exactly the same as it appeared in Excel. Use Destination Theme helps your charts blend in with the rest of the presentation.


Once a chart is placed in the PowerPoint file, you can edit and restyle the presentation. Think of this paste option as the starting point.
We’ve learned about embedding Excel into PowerPoint. As you can see, linking the two apps is a seamless process. It helps you keep data and charts up to date to share with your audience. But sharing data can still seem daunting. What are some good rules of thumb? What do you need to do to succeed?
Read on for five of my favorite tips for effectively sharing data in PowerPoint. Embrace these ideas to succeed in 2023:
1. Opt for Colorful Styling
Bland, flat styles never inspired anyone. The trick is to use bright, colorful styles. You’ll enjoy several benefits when you do this. First, you’ll have shareable charts that are creative and engaging. You won’t bore your audience.


Plus, the creative use of color helps add contrast. For example, if you’re sharing charts, you can make each data series a different color. This makes your PowerPoint embedded Excel much easier to read and understand.
2. Animate to Control the Pace and Flow
Data is best shared as part of a narrative flow. In other words, you don’t always want your audience to see it all at once. That’s especially true if you’re providing details along the way. Data without context is “information overload” and can quickly become confusing.
Using animations in PowerPoint is a great way to control the pace and flow of your data slides. You can present Excel-based data in a certain order, rather than all at once.
Learn how with our full tutorial on PowerPoint’s Animation pane, the control center for slide animation:
3. Use Unconventional Charts and Infographics
Often, basic Excel charts and graphs work well for sharing your data. But sometimes, it pays to be creative. Unique infographics and charts help you share information in new and creative ways.


Even PowerPoint’s built-in chart features are robust enough to craft new designs. Next time you’re linking data to Excel, try out a funnel, waterfall, or sunburst chart. These are tailor-made for custom data sharing. You can use them all when you’re embedding Excel into PowerPoint.
4. Expand Beyond Numerical Data
When you think of data, it’s easy to think of numbers. And of course, that’s likely the most common type of data. But you can use charts and graphics to share data that isn’t numerical. Remember: these are tools to share ideas.
For example, you can use a chart to introduce your team and explain your organization’s structure. It’s a good way to illustrate an idea that may be hard to explain with words alone. And of course, you can embed this right from Excel using PPT tables and more.
For a detailed look at org charts in PPT, view our tutorial now:
5. Be Specific with Design
Premium PowerPoint themes from Envato Elements are available for any subject. Many are well-suited for any topic with a few quick edits. But others are specific and intentional with their themes.


For example, you’ll find many PPT templates geared toward a specific industry. This extends to their layouts, themes, and your ability to embed data. Why not choose a custom, themed template for your next project? These templates look amazing, and they deliver design inspiration on every slide.
Keep Learning More About Excel and PowerPoint
Keep in mind that there are different ways to manage your data based upon the paste option you use. On Envato Tuts+, we have a wealth of resources that help you master both apps!
Dig into more helpful Excel and PowerPoint tutorials on Envato Tuts+:
Make Great Presentations (Free eBook Download)


We have the perfect compliment to this tutorial, which will walk you through the complete presentation process. Learn how to write your presentation, design it like a pro, and prepare it to present powerfully.
Download our Book: The Complete Guide to Making Great Presentations. It’s available for free with a subscription to the Tuts+ Business Newsletter.
Now You Know How to Embed Excel in PowerPoint
Keeping your PowerPoint graphs linked to Excel data is handy. Embedded data gives you the flexibility to edit your data right inside the presentation. It comes down to how you want (or don’t want) to keep your data synced between Excel and PowerPoint.
With linked data, you don’t have to recreate and reformat your charts each time the original data changes. This embedded Excel in PPT approach ensures you won’t forget to make an update. Go practice it now with a presentation of your own!
Editor’s Note: This tutorial was first published in July of 2017. It’s been comprehensively updated for accuracy by Andrew Childress.
Why do we need to link Excel to PowerPoint?
Excel and PowerPoint are often used in conjunction with one another to produce financial reports, audit reports, due diligence reports, pitchbooks, investment memorandum, portfolio reviews, and more.
When it comes to budgeting and long-range planning tools, Microsoft Excel continues to dominate; it’s frequently used by accounting and finance professionals at businesses of all sizes.
> Discover 8 Ways to Make Beautiful Financial Charts in Excel
PowerPoint is the most popular choice when it comes to presenting these results. More often than not, people will copy and paste tables and charts from Excel and then add analysis within PowerPoint.
However, when data changes in Excel (for example when you receive the new period’s figures from your ERP system), this means you’ll need to manually update all the tables and charts in PowerPoint whilst being as careful as possible not to make any mistakes. This is when individuals want to link their Excel data to PowerPoint.
If you’re one of those people, you’re in luck; we’ve asked our UpSlide consultants to explain the three different options for linking data between Excel and PowerPoint, to save you some time:
Option 1: Use normal paste options to link Excel data to PowerPoint
- Open the Excel workbook which has the chart you want.
- Select the chart.
- On the Home tab, in the Clipboard group, click Copy (or press Ctrl+C).
- Open the PowerPoint presentation, select the slide that you want to insert the chart into.
- On the Home tab click the arrow below Paste, and then do one of the following:
- If you want the chart to keep the same look and appearance as the Excel file, select Keep Source Formatting & Link Data.
- If you want the chart to use the look and appearance of the PowerPoint presentation, select Use Destination Theme & Link Data.

How to update your data in PowerPoint:
- Scenario 1: PowerPoint and Excel are open and you have just created the link. Any changes on the Excel are automatically changed in your presentation.
- Scenario 2: Your Excel file (saved or not) is open and you have opened your PowerPoint presentation.
Right click on the chart and select “Edit Data” or “Edit Data in Excel”
Note: Do the same if PowerPoint is already open and you have just opened your modified Excel file.
- Scenario 3: Your Excel file is closed:
> “Edit Data” will open the linked data on a basic spreadsheet to allow you to make changes to the input. Changes made here will be saved to that Excel spreadsheet and it will have an impact on your source file. The interface is also limited.
> “Edit Data in Excel” will open the source file.
Limitations for normal Paste options
If you move the Excel file to another folder while the PowerPoint file is closed, the link between the chart in the PowerPoint presentation and the data in the Excel spreadsheet will break.
Likewise, if you duplicate your Excel file, the link will be broken with the new version. Also note that the update is not available when pasting tables.
Option 2: Use Special Paste to link Excel to PowerPoint
- Open the Excel workbook that has the chart that you want.
- Select the chart.
- On the Home tab, in the Clipboard group, click Copy (or press Ctrl+C).
- Open the PowerPoint presentation, select the slide you want to insert the chart into.
- On the Home tab click the arrow below Paste, and then click Special Paste.
- Select Paste Link.
- Select “Microsoft Excel Worksheet Object” or “Microsoft Excel chart Object” if it is a chart.

How to update your data in PowerPoint:
- Scenario 1: PowerPoint and Excel are open and you have just created the link: Any changes on the Excel spreadsheet are automatically made on your presentation.
- Scenario 2: Excel file (saved or not) is open or closed and you open your PowerPoint presentation:
You are asked if you want to “Update the links” or not.
Note: The above process works exactly the same for tables.
Limitations for Special Paste Options
The range of cells pasted into PowerPoint corresponds to a fixed field (example: B2; D10) in the Excel sheet. It means that when you add columns or lines to your tables (example: B2; F15) in Excel, the linked table in your presentation will not extend but will keep the same range of cells (B2; D10) hence providing you with the wrong data.
When you go to re-open your PowerPoint presentation, you are asked to update the links. This scenario can happen…

- If the Excel source file is already open, your presentation will be updated.
- If the Excel source file is not open, it will force the update to occur (this takes some time, even with a small amount of data).
- If the Excel source file has been renamed, it will not update your presentation.
- If you move the Excel source file, the link will not be able to update as it won’t be able to find the file in the original location.
Note: While working on PowerPoint and Excel, if your PowerPoint presentation remains open and you close the Excel file and rename it just after, you will be able to open the Excel source file directly from PowerPoint and update your data. But if you close your PowerPoint presentation while renaming your Excel file, once you open it again you won’t be able to access the Excel source file.
Why the native Excel to PowerPoint Link is restrictive for financial controlling or reporting:
Imagine you are working on a monthly report (May for example), and you duplicate your Excel file and your PowerPoint presentation to update them with the new figures for June. The PowerPoint presentation for June remains linked to the Excel source file of May. You won’t be able to update your presentation with the duplicated Excel file.
> Get to know our Top 3 Productivity Tips to become an Excel Champion
Option 3: Use the UpSlide Excel to PowerPoint Link
As you can see, there are many problems with using the native options when linking Excel to PowerPoint, which is why many people prefer to stick with copy and paste. But manually checking that every figure and comment has been updated properly, plus resizing and aligning tables and charts takes a great deal of time and energy, and opens up the opportunity for errors to occur. So, how can you link PowerPoint to Excel for dynamic data updates?
UpSlide is specifically designed to automatically link Excel and PowerPoint. The link enables you to populate PowerPoint from your Excel data and, if you later change the data, you can update your PowerPoint or Word document with the click of a button.

Without UpSlide, how long does it take to update a 200 page report? A whole day perhaps? With UpSlide’s fast, robust and flexible Excel to PowerPoint link, it can be done in a few seconds.
Benefits of UpSlide’s Excel to PowerPoint Link
- Export Excel tables or charts to PowerPoint or Word with a single click.
- Update your tables and charts with new values, by simply clicking ‘update’. Choose to update one object at a time, or all at once.
- Automatically resize your tables and charts to fit the space. If the Excel data changes, just click once and your document will be updated.
- Rename, move or work on several versions of the Excel source file and still update the linked Excel parts of your documents.
- Export your source data as an enhanced metafile, keeping the file size under control to create size optimized presentations.
- Find the source easily and see when the last update occurred and by whom, all within PowerPoint. UpSlide will know which source is the most recent and should be used for the update.

With UpSlide, be assured that file sizes are kept 10x lighter than with the native paste.
Let’s see in this example. (Presentation weight: Based on 100 simple charts and 100 simple tables).

Evidently, UpSlide’s benefits are numerous, including boosting productivity and ensuring data safety. Discover how UpSlide users in Investment Banking save on average 7hrs/month/user with UpSlide’s main features:

We’re also constantly developing and improving our link to ensure that we can help our users work better in Microsoft Office. We’ve recently introduced four new advanced options, created based on user feedback, to improve your control over how the link works. > Find out more
How to link Power BI to PowerPoint
Do you find yourself creating more reports in Power BI nowadays? Or, are you considering making the transition to Power BI company-wide?
Our Power BI to PowerPoint Link will enable you to leverage your Power BI reports to tell more inspiring stories with your data.
.
We hope you found this useful. Do let us know what you think in the comments!
People often use PowerPoint to show their Six Sigma improvement projects. While this can be done, it may not be the easiest way to do it. And, customers have found that there are glitches in the PowerPoint-Excel interface that can cause problems.
Embedding Excel Charts in PowerPoint
If you are going to use Excel charts in PowerPoint (PPT), there are three main ways to do it:
Embed the Chart
Advantage
You can open the Excel workbook from PowerPoint, but changes stay within PowerPoint.
Disadvantage
File size grows with each Excel workbook.
 )
)
Embed a Link to an Excel File Containing a Chart
Advantage
You can change the Excel file and update the presentation when you open in PowerPoint.
Disadvantage
It takes longer for PowerPoint to open all of the links. And too many links may cause problems.
Paste the Chart as a Picture
Advantage
No messy links to Excel and minimal increase in file size.
Disadvantage
You can’t update the chart
For a one-time presentation, pasting a picture of the Excel chart is the best choice.
For weekly or monthly reporting, embedding a link seems like the best option, but we have found that there are limits to how many links PowerPoint will tolerate. When you exceed those limits, PowerPoint either crashes or freezes. If this happens, split the presentation into two or more parts.
Using Excel for Presentations
When someone says «presentation» everyone automatically thinks PowerPoint, but PowerPoint is not your only choice. If your presentation or improvement project contains several Excel charts or tables, it may be easier to use Excel for the presentation rather than going through all of the extra work of putting the charts into PowerPoint.
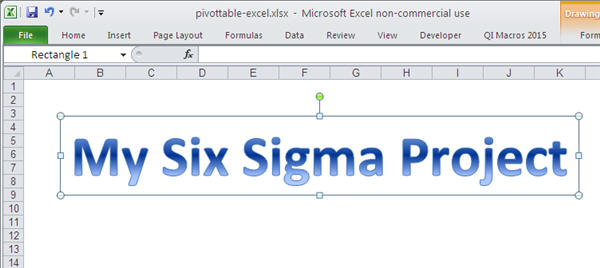
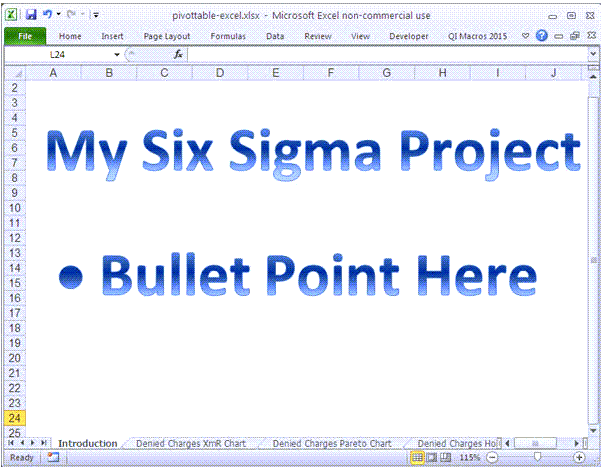
Creating Title Pages in Excel
To create a title or bullet point page from a blank worksheet, select the View tab on Excel’s menu and then uncheck the box next to Gridlines.
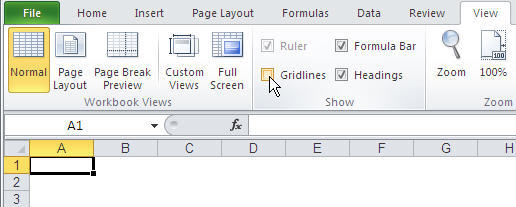
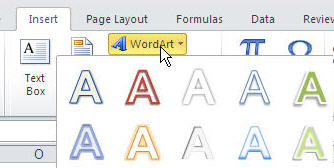
Insert WordArt to create a Title.
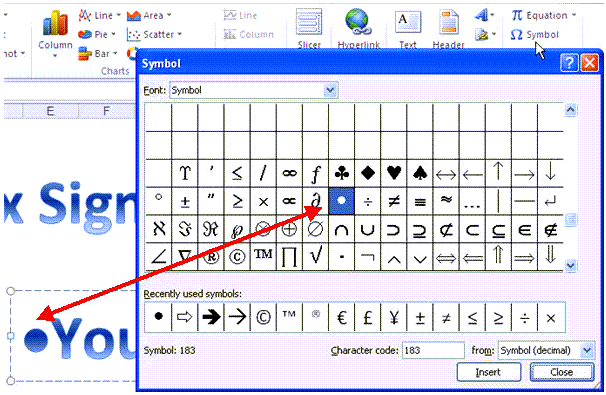
You can also use Insert-Symbol to create bullet points.
Sequencing the Presentation
Excel workbooks consist of one or more worksheets. You can reorder these by clicking and dragging each worksheet around to get them in the order you want for your presentation.

Giving the Presentation
Click on each subsequent worksheet or use CTRL-PageDown to scroll through the presentation.
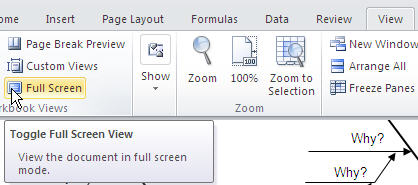
Tip: if you use Excel’s Full Screen Option or hide Excel’s Ribbon Menu, the presentation will look better.

An Improvement Project Presentation
An improvement project presentation given in Excel might look like the following:

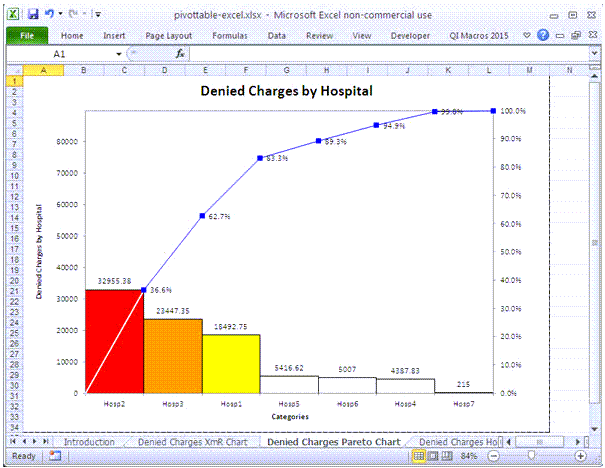
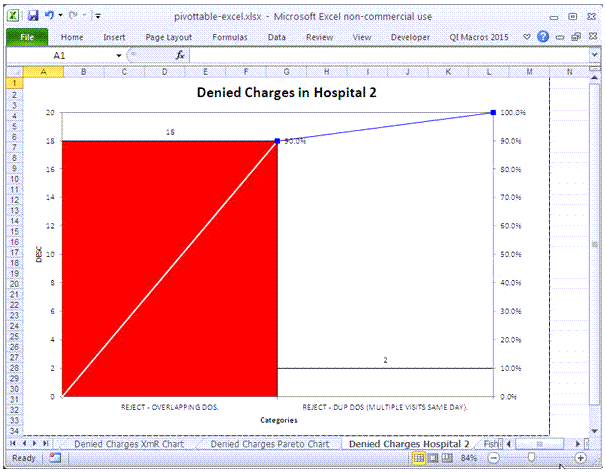
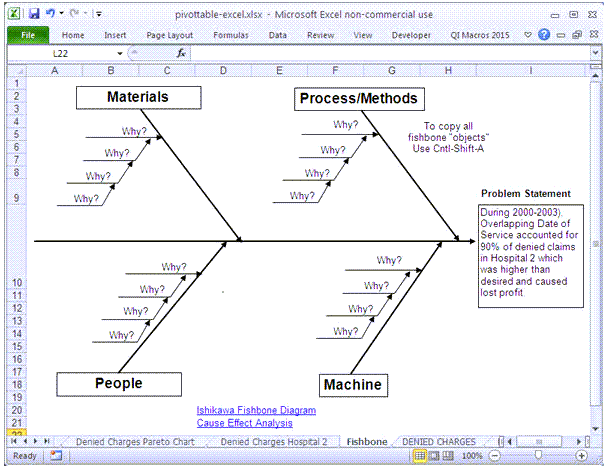
Get the Idea?
Excel can serve as your presentation tool as well as your data analysis tool. Why not put everything you need in Excel and skip the extra work of copying and pasting the charts and data into PowerPoint? Save yourself some time and hassle. Use Excel for Six Sigma project and monthly reporting instead of PowerPoint.