
Нижний регистр
В отличие от Word, в Excel нет кнопки смены регистра. Для перевода текста в нижний регистр – например, чтобы вместо «СЕРГЕЙ ИВАНОВ» или «Сергей Иванов» стало «сергей иванов» – необходимо воспользоваться функцией «СТРОЧН» . Преимущество использования функции заключается в том, что вы можете изменить регистр всего столбца текста одновременно. В примере ниже показано, каким образом это сделать.
-
Вставьте новый столбец возле столбца, содержащего текст, который необходимо преобразовать.Предположим, что новый столбец – это столбец B, а первоначальный столбец – это столбец A, и что ячейка A1 содержит заголовок столбца.
-
В ячейке B2 введите =LOWER(A2) и нажмите клавишу «ВВОД». Текст в ячейке B2 должен стать строчным.
-
Заполните этой формулой столбец B.
-
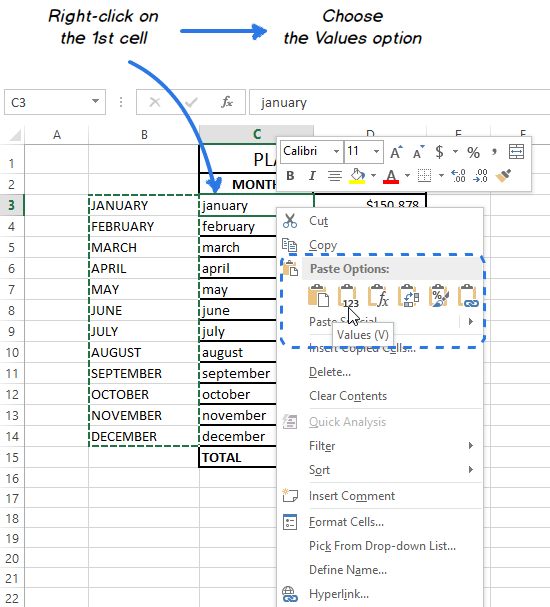
Теперь выберите преобразованные значения в столбце B, скопируйте их ивставьте как значенияповерх значений в столбце A.
-
Удалите столбец B, поскольку больше он вам не понадобится.
Верхний регистр
В отличие от Word, в Excel нет кнопки смены регистра. Для перевода текста в верхний регистр – например, чтобы вместо «сергей иванов» или «Сергей Иванов» стало «СЕРГЕЙ ИВАНОВ» – необходимо воспользоваться функцией «ПРОПИСН». Преимущество использования функции заключается в том, что вы можете изменить регистр всего столбца текста одновременно. В примере ниже показано, каким образом это сделать.
-
Вставьте новый столбец возле столбца, содержащего текст, который необходимо преобразовать.Предположим, что новый столбец – это столбец B, а первоначальный столбец – это столбец A, и что ячейка A1 содержит заголовок столбца.
-
В ячейке B2 введите =ПРОПИСН(A2) и нажмите клавишу «ВВОД». Текст в ячейке B2 должен стать прописным.
-
Заполните этой формулой столбец B.
-
Теперь выберите преобразованные значения в столбце B, скопируйте их ивставьте как значенияповерх значений в столбце A.
-
Удалите столбец B, поскольку больше он вам не понадобится.
Каждое слово с заглавной буквы
В отличие от Word, в Excel нет кнопки смены регистра. Для преобразования текста таким образом, чтобы все слова в тексте были с заглавной буквы – например, чтобы вместо «Сергей ИВАНОВ» или «СЕРГЕЙ ИВАНОВ» стало «Сергей Иванов» – необходимо воспользоваться функцией «ПРОПНАЧ» Преимущество использования функции заключается в том, что вы можете изменить регистр всего столбца текста одновременно. В примере ниже показано, каким образом это сделать.
-
Вставьте новый столбец возле столбца, содержащего текст, который необходимо преобразовать.Предположим, что новый столбец – это столбец B, а первоначальный столбец – это столбец A, и что ячейка A1 содержит заголовок столбца.
-
В ячейке B2 введите =ПРОПНАЧ(A2) и нажмите клавишу «ВВОД». Текст в ячейке B2 должен изменить регистр.
-
Заполните этой формулой столбец B.
-
Теперь выберите преобразованные значения в столбце B, скопируйте их ивставьте как значенияповерх значений в столбце A.
-
Удалите столбец B, поскольку больше он вам не понадобится.
Нужна дополнительная помощь?
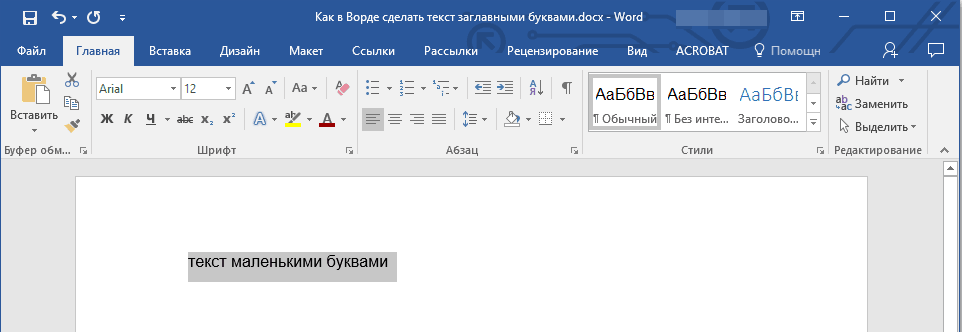
Чтобы поменять заглавные буквы на прописные, нажмите клавишу Caps Lock на клавиатуре. Если нужно напечатать небольшое количество заглавных букв, прижмите клавишу Shift, и, не отпуская ее, нажимайте нужные буквы. В том случае, когда текст напечатан, измените его регистр с помощью комбинации клавиш Shift+F3. В текстовом редакторе Word имеется специальный пункт меню, отвечающий за регистр.
Вам понадобится
- клавиатура
Инструкция
После этого продолжайте набор текста прописными буквами. Если нужно снова продолжить набор заглавными буквами – снова нажмите Caps Lock. Если эта клавиша нажата, и набор будет производиться заглавными буквами – в правой верхней части клавиатуры будет гореть соответствующий индикатор.
Оцените статью!
Приветствую вас, уважаемые читатели. Сегодня я с вами поделюсь некоторой очень полезной функцией в Excel, а именно расскажу о том, как сделать все буквы ЗАГЛАВНЫМИ в Excel. При работе с Word это делается довольно просто, если знать. А как это делать в Excel? Давайте вместе разберемся.
Как делается это в Word? Нужно выделить слово и нажать на клавишу SHIFT + F3. После нескольких нажатий мы получим все слова в ВЕРХНЕМ регистре. А что происходит в Excel? Он предлагает ввести формулу.
Дело в том, что в таблице Эксель нужно использовать специальные формулы, которые приводят слова к ВЕРХНЕМ или нижнему регистру. Рассмотрим два случая – когда все написано ЗАГЛАВНЫМИ буквами, и когда маленькими буквами.
Я подготовил таблицу к одному из уроков (), ей я и воспользуюсь. Работать я буду в Excel 2013. Но способ по превращению заглавных букв в маленькие и наоборот будет работать в Excel 2010, 2007.
Как маленькие буквы сделать БОЛЬШИМИ
В моей таблице данные расположены в столбце А, потому формулу я буду вводить в столбце В. Вы же в своей таблице делайте в любом свободном столбце, либо добавьте новый.
Итак, начнем с ячейки А1. Ставим курсор на ячейку В1, открываем вкладку «Формулы» и в разделе «Библиотека функций» выбираем «Текстовые».
В выпадающем меню находим «ПРОПИСН». У нас откроется окно «Аргументы функций», которое запрашивает адрес ячейки, из который будут взяты данные. В моем случае – это ячейка А1. Ее я и выбираю.
После этого нажимаю на «ОК», а быстрее, нажать на ENTER на клавиатуре.
Теперь в ячейке В1 написано «=ПРОПИСН(A1)», что значит «сделать ПРОПИСНЫМИ все буквы в ячейке А1». Отлично, осталось лишь применить эту же формулу для остальных ячеек в столбце.
Подводим курсор к правому краю ячейки и курсор становиться в виде жирного крестика. Зажимаем левую кнопку мыши и тащим до конца столбца с данными. Отпускаем и формула применяется для всех выделенных строк.
На этом все. Смотрите, как это выглядит у меня.
Как БОЛЬШИЕ буквы сделать маленькими
Когда у нас получилось образовать в заглавные буквы, я покажу, как их вернуть в строчные. Столбец В у меня заполнен большими словами, и я воспользуюсь столбцом С.
Начну с ячейки В1, потому ставлю курсор в С1. Отрываем вкладку «Формулы», затем «Текстовые» в «Библиотеке функций». В этом списке нужно найти «СТРОЧН» от слова «строчные».
Снова выскакивает окно, просящее указать ячейку с данными. Я выбираю В1 и жму Enter (либо кнопку «ОК).
Далее применяю эту же формулу ко всему столбцу. Подвожу курсор к правому нижнему углу ячейки, курсор превратился в толстый крестик, зажимаю левую кнопку мыши и тяну до конца данных. Отпускаю, и, дело сделано. Все БОЛЬШИЕ буквы стали маленькими.
Как сохранить данные после изменения?
Думаю, это хороший вопрос, ведь, если удалить первоначальные значения из столбца А, то и все результаты работы формулы пропадут.
Смотрите, что нужно для этого сделать.
Выделяем в столбце с результатом все полученные данные. Копируем их CTRL + V (русская М), либо правой кнопкой мыши – «Копировать».
Выбираем пустой столбец. Затем нажимаем в нем правой кнопкой мыши, находим специальные параметры Вставки и выбираем «Значения».
Вот такая хитрость. Теперь вас не смутит необходимость перевести все буквы в ВЕРХНИЙ или нижний регистр.
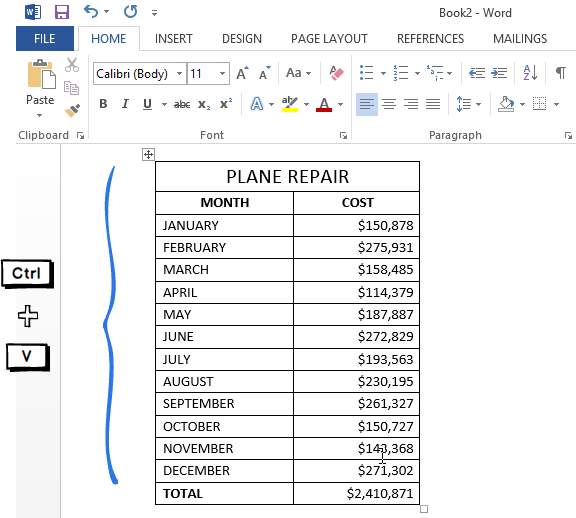
Доброго всем времени суток, мои дорогие друзья и читатели блога сайт. У вас наверняка случалось такое, что вы писали какое-либо слово или предложение в ворде, но вдруг захотели как-то выделить текст и сделать, чтобы каждая буковка в тексте стала прописной, а не строчной. А может наоборот? Вы написали текст с зажатым Caps Lock и хотите сделать все буковки строчными? Так вот сегодня я вам и покажу, как сделать все буквы заглавными в word и наоборот, причем сразу двумя способами.
Способ №1
Самый простой способ, который будет работать в любой версии Word — это выделить ту часть текста, которую нужно сделать полностью прописной, после чего нажать комбинацию клавиш SHIFT+F3
. Но что самое интересное, изменение регистра происходит в два этапа: сначала заглавными становятся только первые буквы каждого слова, а при повторном нажатии абсолютно все буквы становятся прописными.
Способ №2
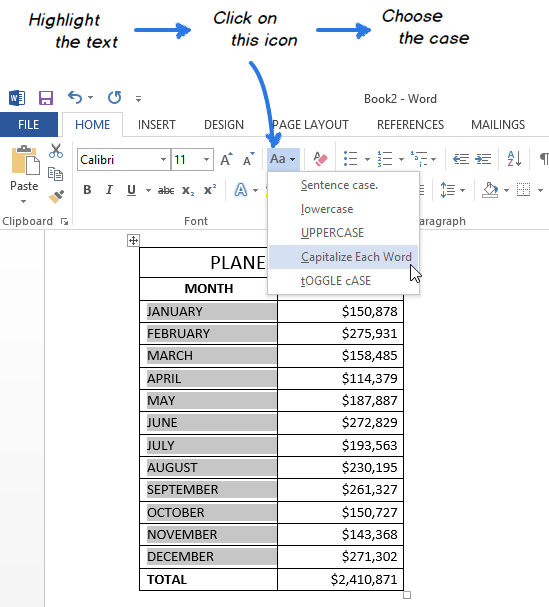
Второй способ еще проще чем первый. Вам просто нужно будет выделить тот фрагмент, где вы хотите сменить регистр, после чего идти во вкладку «Главная»
и нажать на кнопку «Регистр»
. На скриншоте ниже показано, как она выглядит. И вот тут вам сразу выдается несколько вариантов развития событий. Не буду перечислять, все и так должно быть понятно.

Ну а вообще, если уж вы надумали делать все символы прописными, то не забывайте перед печатанием нажимать волшебную клавишу Caps Lock
. Тогда и не придется больше совершать какие-то манипуляции с изменением регистра).
Вот в принципе и всё. Теперь и вы знаете, как сделать строчные буквы заглавными, и я очень надеюсь, что моя сегодняшняя статья вам помогла, поэтому не забывайте подписываться на обновление статей моего блога. Будет интересно. Удачи вам. Пока-пока!
С уважением, Дмитрий Костин.
Знакома ли вам ситуация, когда вы набираете текст в документе, а затем смотрите на экран и понимаете, что забыли отключить CapsLock? Все буквы в тексте получаются заглавными (большими), их приходится удалять, а затем заново набирать.
О том, как решить эту проблему, мы уже писали. Однако, иногда возникает необходимость выполнить кардинально противоположное действие в Ворде — сделать все буквы большими. Именно об этом мы и расскажем ниже.
1. Выделите текст, который должен быть напечатан большими буквами.
2. В группе “Шрифт”
, расположенной во вкладке “Главная”
, нажмите кнопку “Регистр”
.
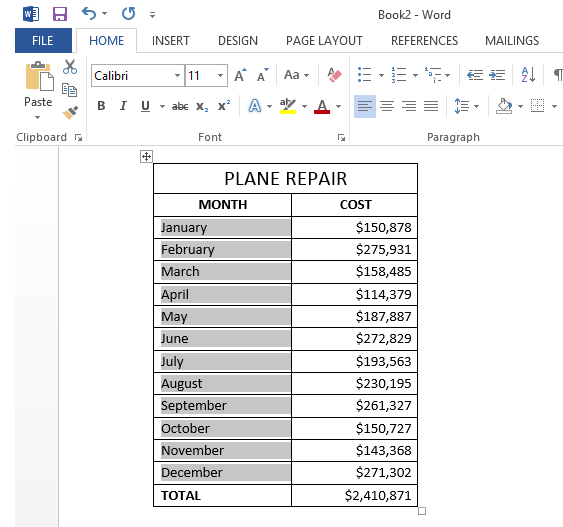
3. Выберите необходимый тип регистра. В нашем с вами случае — это “ВСЕ ПРОПИСНЫЕ”
.

4. Все буквы в выделенном фрагменте текста изменятся на заглавные.

Сделать заглавными буквы в Ворде можно и с помощью использования горячих клавиш.
1. Выделите текст или фрагмент текста, который должен быть написан прописными буквами.

2. Нажмите дважды “SHIFT+F3”
.
3. Все маленькие буквы станут большими.

Вот так просто можно в Ворде сделать прописные буквы из маленьких. Желаем вам успехов в дальнейшем изучении функций и возможностей этой программы.
How to Convert Small Letters into Uppercase Letters for few columns using VBA in Microsoft Excel
In this article we will learn how to convert text into capital letters in specific columns (not all cells) using VBA code.
Question): I want code that will replace the text enter in small letters into upper case in some columns (not all of them).
Say I do not want the code to run on columns 4, 6, 9, 12, & 13 i.e. if any text is entered in these columns then the code will not be triggered.
In order to get the upper case letters as you type in small letters; we need to follow the below steps to launch VB editor
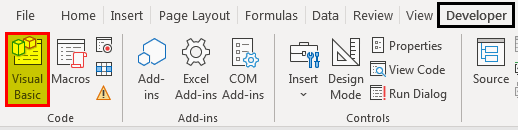
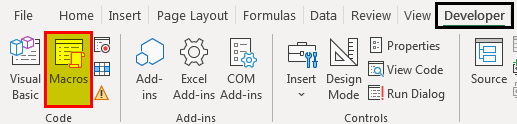
- Click on Developer tab
- From Code group, select Visual Basic

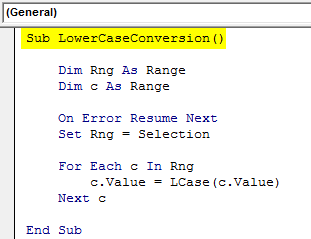
Copy the following code in Sheet module
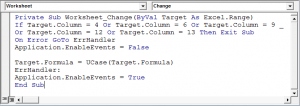
Private Sub Worksheet_Change(ByVal Target As Excel.Range)
If Target.Column = 4 Or Target.Column = 6 Or Target.Column = 9 _
Or Target.Column = 12 Or Target.Column = 13 Then Exit Sub
On Error GoTo ErrHandler
Application.EnableEvents = False
Target.Formula = UCase(Target.Formula)
ErrHandler:
Application.EnableEvents = True
End Sub
- The code will work in sheet1 only as the code is entered in sheet1
- The code will automatically replace the small letter typed by mistake or in ignorance immediately into upper case letter in all columns except 4, 6, 9, 12, & 13.
In this way, we can convert text to caps in specific columns using VBA code.
![]()
Download — How To Convert Small Letters Into Uppercase Letters — xlsm
Содержание
- Change the case of text
- How to Change Case
- Need more help?
- Lower Case in Excel
- Top 6 Methods to Change Capital Letters to Lower Case
- #1 Using Lower Function to change case in Excel
- Example
- #2 Using VBA Command Button
- Example
- #3 Using the VBA Shortcut key
- Example
- #4 Using Flash Fill
- Example
- #5 Enter Text in Lower Case Only
- Example
- #6 Using Microsoft Word
- Example
- Things to Remember
- Recommended Articles
- 4 ways for changing case in Excel
- Excel functions for changing text case
- Enter an Excel formula
- Copy a formula down a column
- Remove a helper column
- Use Microsoft Word to change case in Excel
- Converting text case with a VBA macro
- Quickly change case with the Cell Cleaner add-in
- Video: how to change case in Excel
Change the case of text
Unlike Microsoft Word, Microsoft Excel doesn’t have a Change Case button for changing capitalization. However, you can use the UPPER, LOWER, or PROPER functions to automatically change the case of existing text to uppercase, lowercase, or proper case. Functions are just built-in formulas that are designed to accomplish specific tasks—in this case, converting text case.
How to Change Case
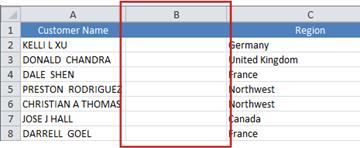
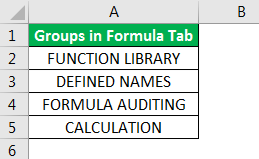
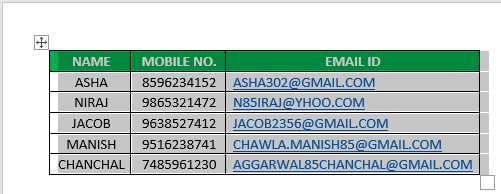
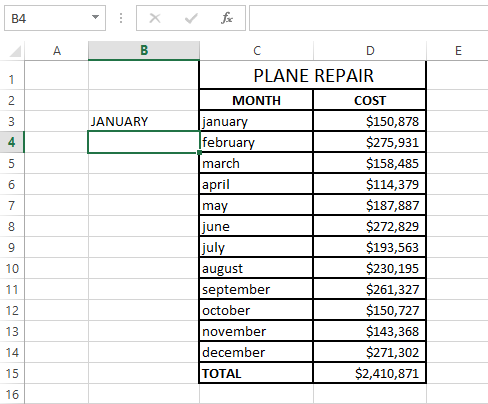
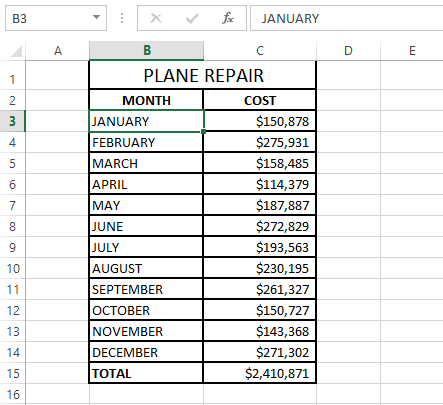
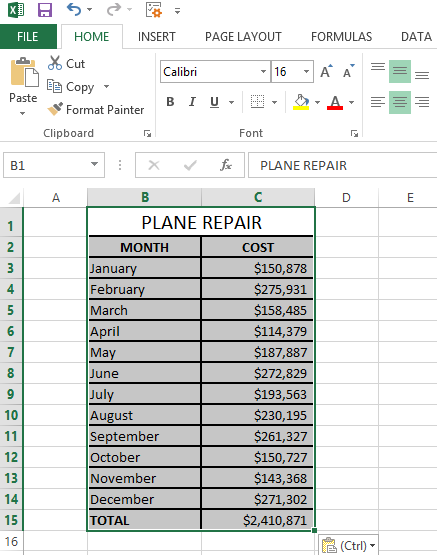
In the example below, the PROPER function is used to convert the uppercase names in column A to proper case, which capitalizes only the first letter in each name.
First, insert a temporary column next to the column that contains the text you want to convert. In this case, we’ve added a new column (B) to the right of the Customer Name column.
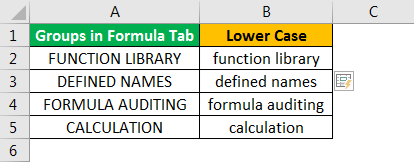
In cell B2, type =PROPER(A2), then press Enter.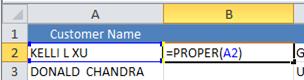
This formula converts the name in cell A2 from uppercase to proper case. To convert the text to lowercase, type =LOWER(A2) instead. Use =UPPER(A2) in cases where you need to convert text to uppercase, replacing A2 with the appropriate cell reference.
Now, fill down the formula in the new column. The quickest way to do this is by selecting cell B2, and then double-clicking the small black square that appears in the lower-right corner of the cell.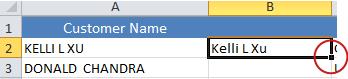
Tip: If your data is in an Excel table, a calculated column is automatically created with values filled down for you when you enter the formula.
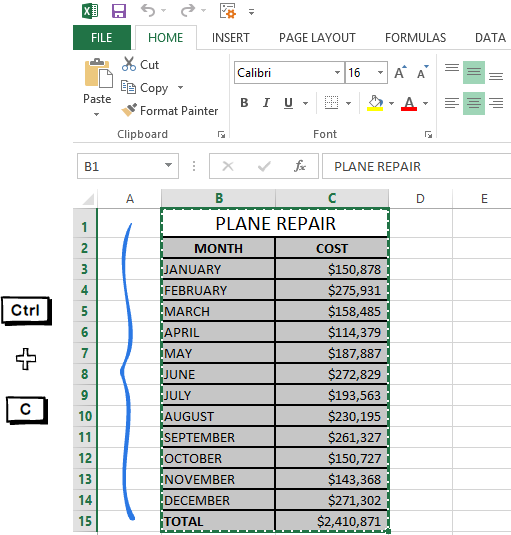
At this point, the values in the new column (B) should be selected. Press CTRL+C to copy them to the Clipboard.
Right-click cell A2, click Paste, and then click Values. This step enables you to paste just the names and not the underlying formulas, which you don’t need to keep.
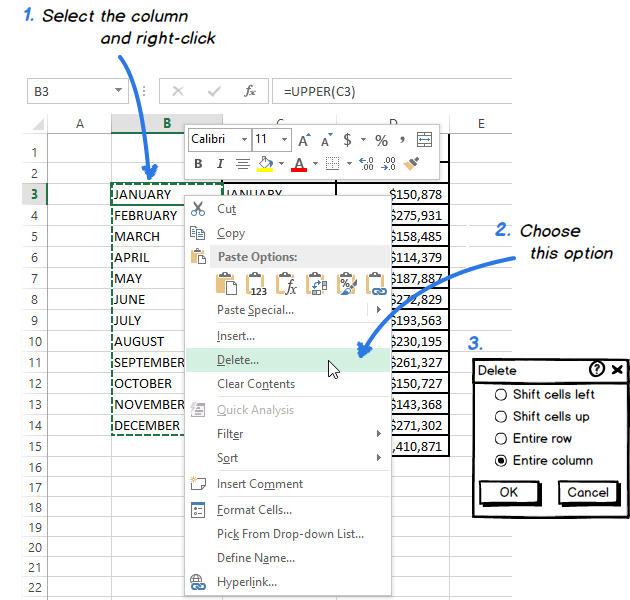
You can then delete column (B), since it is no longer needed.
Need more help?
You can always ask an expert in the Excel Tech Community or get support in the Answers community.
Источник
Lower Case in Excel


Top 6 Methods to Change Capital Letters to Lower Case
There are many methods to change capital letter text to lowercase in Excel. This guide will look at the top 6 ways to make capital letters into lower cases.
Table of contents
#1 Using Lower Function to change case in Excel
MS Excel has a built-in function for decapitalizing each character in a word, a LOWER function.
Example
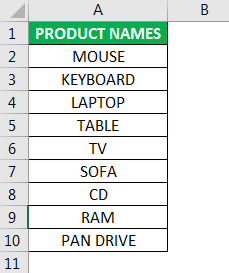
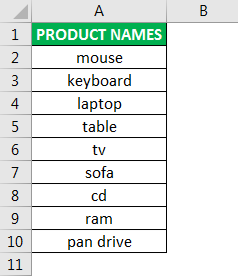
Suppose we have a list of some verbs in Excel. We want to change the case of the text to lowercase.

To change the case to lower, we need to write the function in cell C2 as ‘=LOWER(A2)’. The”=’ or ‘+’ sign is used to write the function, the “LOWER” is the function name, and A2 is the cell reference Cell Reference Cell reference in excel is referring the other cells to a cell to use its values or properties. For instance, if we have data in cell A2 and want to use that in cell A1, use =A2 in cell A1, and this will copy the A2 value in A1. read more for the text we want to change the case.
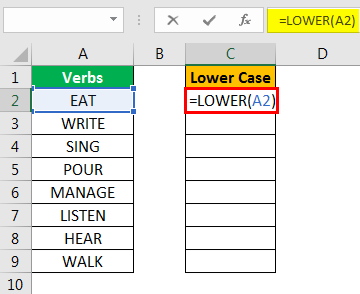
Press the “Enter” key. This function will convert all letters in a text string to lowercase.
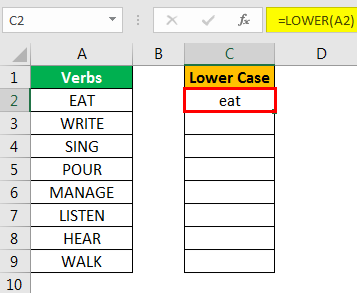
One value is converted now. For other values, we can either press the “Ctrl+D” key after selecting all the cells with the top cell or press the “Ctrl+C” and “Ctrl+V” for copying and pasting the function. Else, we can drag the formula to other cells to get the answer.
#2 Using VBA Command Button
We can create a VBA command button and assign the code to change the following text to lowercase using the command button.
Example
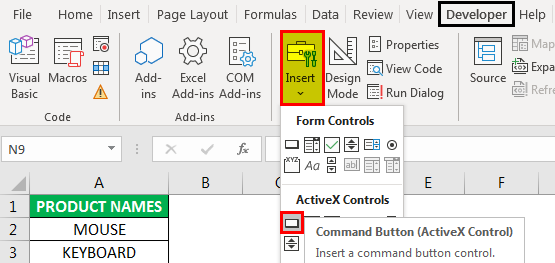
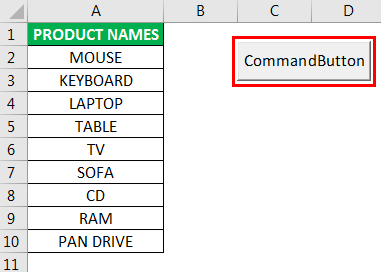
Step 2: Click the worksheet location where we want the command button to appear. We can resize the command button using the “ALT” button.
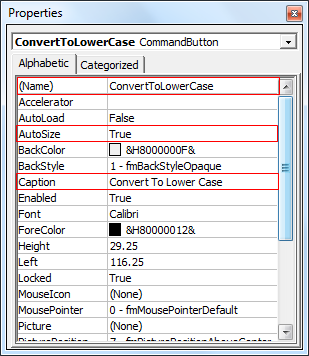
Step 3: Using the “Properties” command, change the properties of the command button like caption, name, AutoSize, WordWrap, etc.
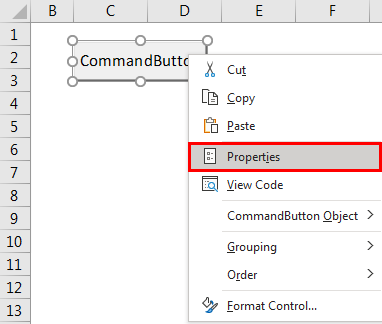
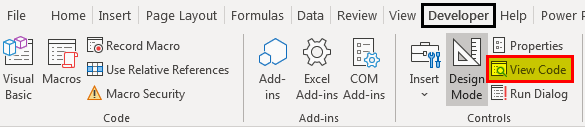
Step 4: To assign the code to the command button, we must click on the “View Code” command in the “Controls” group in the “Developer” tab. Ensure “Design Mode” is activated.
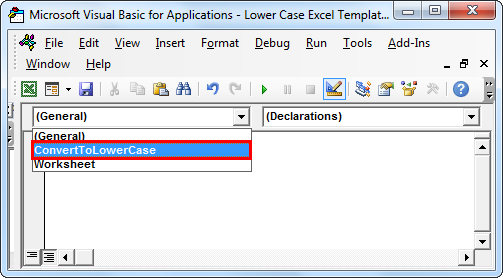
Step 5: Please select “ConvertToLowerCase” from the drop-down list in the opened window.
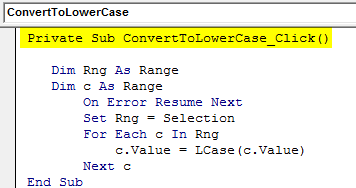
Step 6: Paste the following code in between the lines.
Code:
Step 7: Exit the Visual Basic Editor. Ensure the file is saved with the .xlsm extension as we have a macro in the workbook.
Step 8: Now, deactivate “Design Mode.” After selecting the required cells, the values are converted to lowercase whenever we click on the command button.
Select all the values from A2:A10 and click on the command button. The text will get changed to lowercase.
#3 Using the VBA Shortcut key
This way is similar to the above, except we do not need to create the command button here.
Example
Step 1: Open the Visual Basic Editor from the “Developer” tab or use using the excel shortcut key Using The Excel Shortcut Key An Excel shortcut is a technique of performing a manual task in a quicker way. read more (Alt+ F11).
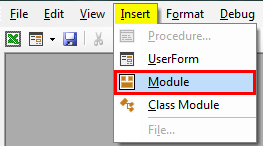
Step 2: Insert the module using the Insert menu -> Module command.
Step 3: Paste the following code.
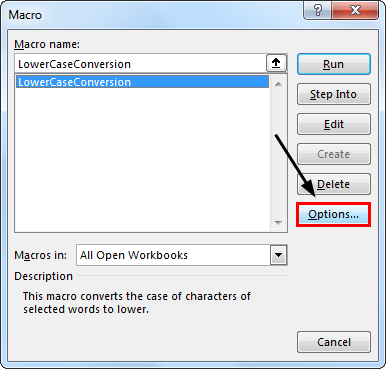
Step 5: Now, choose the “Macros” in the “Code” group in the “Developer” tab.
Step 6: Then click on “Options” and assign the shortcut key to the macro. We can write a description as well.
In our case, we have been assigned “Ctrl+Shift+L.”
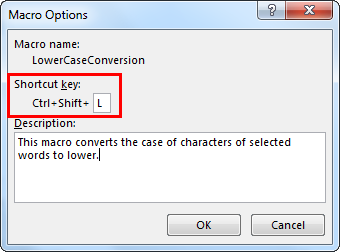
Step 7: Macro is ready to use. Select the required cells to change the values into lowercase and press the “Ctrl+Shift+L” keys.
#4 Using Flash Fill
Example
Suppose we have the following data, which we want to get in lowercase.
We need to manually write the first list value in the lower case in the adjacent cell to do the same.

Come to the next cell in the same column and press the “Ctrl+E” keys.

Choose “Accept Suggestions” from the box menu that appeared.
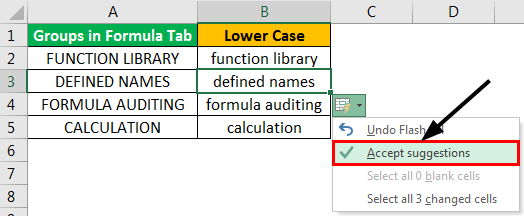
That is it. We have all the values in the lower case now. So, we can copy the values, paste the same onto the original list, and delete the extra value from the right.
#5 Enter Text in Lower Case Only
We can make a restriction so that the user can enter text values in lowercase only.
Example
To do this, the steps are:
- We must select the cells which we want to restrict.
- Then, choose “Data Validation” from the “Data Tools” group from the “Data” tab.
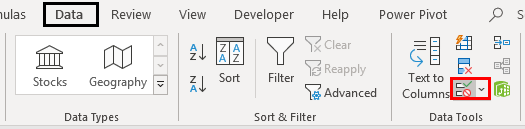
- Apply the settings explained in the figure below.
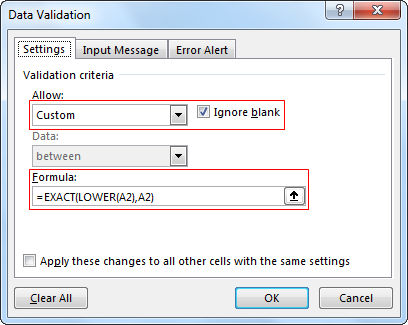
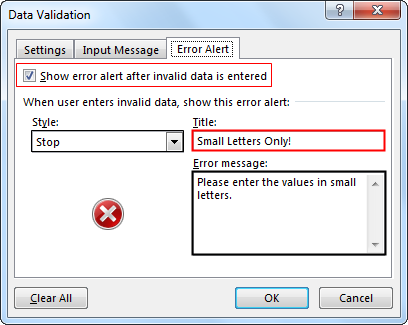
- Whenever the user enters the value in capital letters, MS Excel will stop and show the following message.

#6 Using Microsoft Word
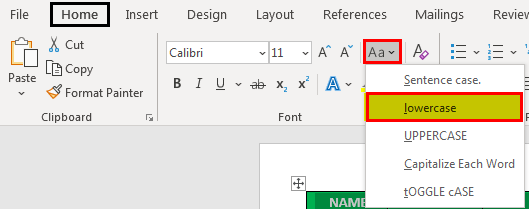
In Microsoft Word, unlike Excel, we have a command named “Change Case” in the “Font” group in the “Home” tab.
Example
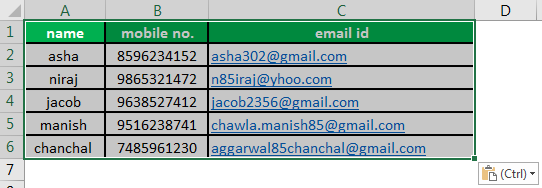
Suppose we have the following data table for which we want to change the text case to the “lower” case.
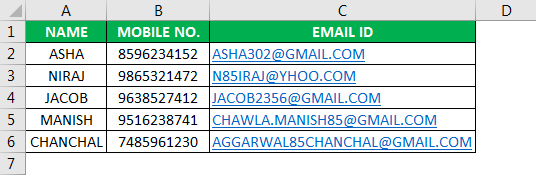
First, we will copy the data from MS Excel and paste it into MS Word to change the case. To do the same, the steps are:
Select the data from MS Excel. And press the “Ctrl+C” key to copy data from MS Excel.
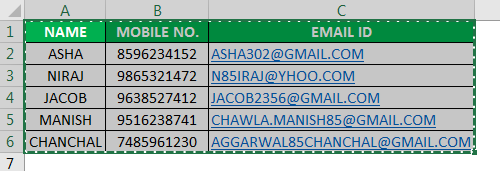
Open the MS Word application and paste the table using the “Ctrl+V” shortcut key.

Select the table using the “Plus” sign on the left-top side of the table.
Choose the “Change Case” command from the “Font” group and select “lowercase” from the list.
Now, the data table is converted to “Lower.” After selecting the “Plus” sign from the left top corner, we can copy the table and paste it into Excel.
We can delete the old table using the “Contextual” menu, which we can get by right-clicking on the table.
Things to Remember
Using the VBA code (command button or shortcut key) to convert the values into lowercase, we must save the file with the .xlsm extension as we have macros in the workbook.
Recommended Articles
This article is a guide to Lowercase in Excel. We discuss the top 6 ways to change capital letters to the lower cases, including – the LOWER function, VBA Code, Flash Fill, VBA shortcut keys, etc., along with examples. You can learn more about Excel functions from the following articles: –
Источник
4 ways for changing case in Excel
 by Ekaterina Bespalaya, updated on November 24, 2022
In this article I’d like to tell you about different ways to change Excel uppercase to lowercase or proper case. You’ll learn how to perform these tasks with the help of Excel lower/upper functions, VBA macros, Microsoft Word, and an easy-to-use add-in by Ablebits.
The problem is that Excel doesn’t have a special option for changing text case in worksheets. I don’t know why Microsoft provided Word with such a powerful feature and didn’t add it to Excel. It would really make spreadsheets tasks easier for many users. But you shouldn’t rush into retyping all text data in your table. Fortunately, there are some good tricks to convert the text values in cells to uppercase, proper or lowercase. Let me share them with you.
Excel functions for changing text case
Microsoft Excel has three special functions that you can use to change the case of text. They are UPPER, LOWER and PROPER. The function allows you to convert all lowercase letters in a text string to uppercase. The function helps to exclude capital letters from text. The function makes the first letter of each word capitalized and leaves the other letters lowercase (Proper Case).
All three of these options work on the same principle, so I’ll show you how to use one of them. Let’s take the Excel uppercase function as an example.
Enter an Excel formula
- Insert a new (helper) column next to the one that contains the text you want to convert.
Note: This step is optional. If your table is not large, you can just use any adjacent blank column.
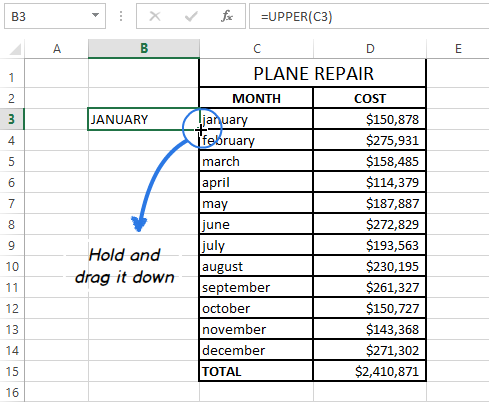
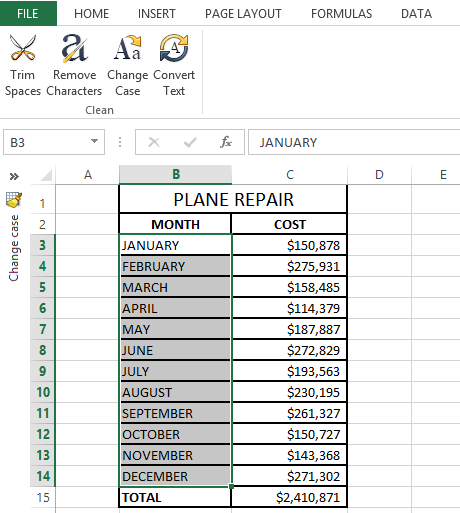
Your formula should look like this =UPPER(C3) , where C3 is the cell in the original column that has the text for conversion.
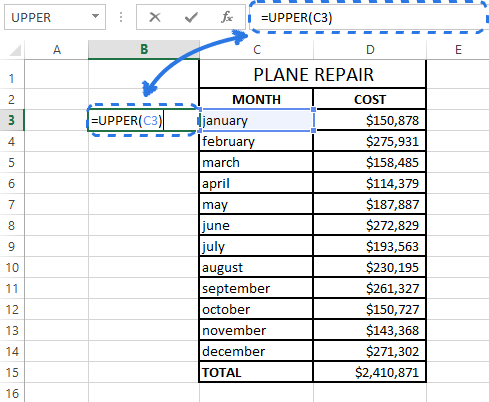
As you can see in the screenshot above, cell B3 contains the uppercase version of the text from cell C3.
Copy a formula down a column
Now you need to copy the formula to other cells in the helper column.
- Select the cell that includes the formula.
- Move your mouse cursor to the small square (fill handle) in the lower-right corner of the selected cell until you see a small cross.
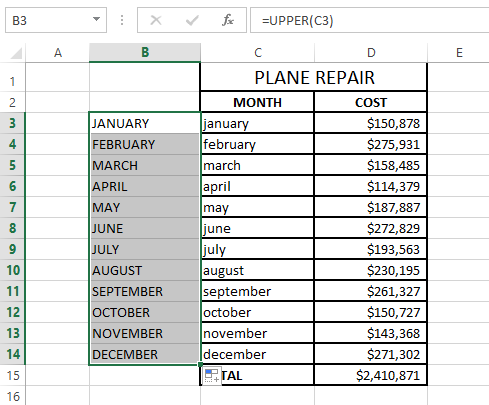
Note: If you need to fill the new column down to the end of the table, you can skip steps 5-7 and just double-click on the fill handle.
Remove a helper column
So you have two columns with the same text data, but in different case. I suppose you’d like to leave only the correct one. Let’s copy the values from the helper column and then get rid of it.
- Highlight the cells that contain the formula and press Ctrl + C to copy them.
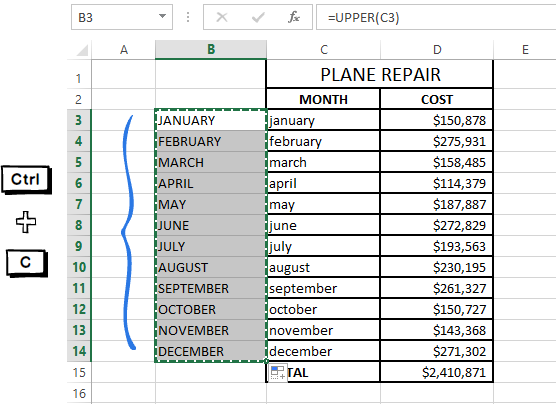
Since you need only the text values, pick this option to avoid formula errors later.
This theory might look very complicated to you. Take it easy and try to go through all these steps yourself. You’ll see that changing case with the use of Excel functions is not difficult at all.
Use Microsoft Word to change case in Excel
If you don’t want to mess with formulas in Excel, you can use a special command for changing text case in Word. Feel free to discover how this method works.
- Select the range where you want to change case in Excel.
- Press Ctrl + C or right-click on the selection and choose the Copy option from the context menu.
Now you’ve got your Excel table in Word.
Note: You can also select your text and press Shift + F3 until the style you want is applied. Using the keyboard shortcut you can choose only upper, lower or sentence case.
Now you have your table with the text case converted in Word. Just copy and paste it back to Excel.
Converting text case with a VBA macro
You can also use a VBA macro for changing case in Excel. Don’t worry if your knowledge of VBA leaves much to be desired. A while ago I didn’t know much about it as well, but now I can share three simple macros that make Excel convert text to uppercase, proper or lowercase.
I won’t labor the point and tell you how to insert and run VBA code in Excel because it was well described in one of our previous blog posts. I just want to show the macros that you can copy and paste into the code Module.
If you want to convert text to uppercase, you can use the following Excel VBA macro:
To apply Excel lowercase to your data, insert the code shown below into the Module window.
Pick the following macro if you want to convert your text values to proper / title case.
Quickly change case with the Cell Cleaner add-in
Looking at the three methods described above you might still think that there is no easy way to change case in Excel. Let’s see what the Cell Cleaner add-in can do to solve the problem. Probably, you’ll change your mind afterwards and this method will work best for you.
- Download the add-in and install it on your computer.
After the installation the new Ablebits Data tab appears in Excel.
The Change case pane displays to the left of your worksheet.
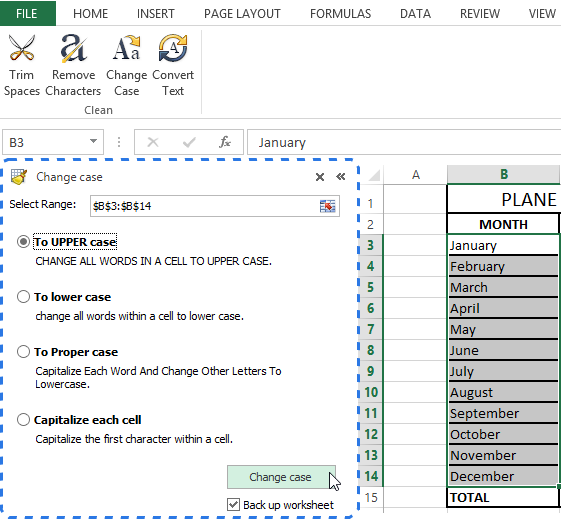
Note: If you want to keep the original version of your table, check the Back up worksheet box.
With Cell Cleaner for Excel the changing case routine seems to be much easier, doesn’t it?
Besides changing text case Cell Cleaner can help you to convert numbers in the text format to the number format, delete unwanted characters and excess spaces in your Excel table. Download the free 30-day trial version and check out how useful the add-in can be for you.
Video: how to change case in Excel
I hope now that you know nice tricks for changing case in Excel this task will never be a problem. Excel functions, Microsoft Word, VBA macros or Ablebits add-in are always there for you. You have a little left to do — just choose the tool that will work best for you.
Источник
![]()
Download Article
![]()
Download Article
When you’re working with improperly-capitalized data in Microsoft Excel, there’s no need to make manual corrections! Excel comes with two text-specific functions that can really be helpful when your data is in the wrong case. To make all characters appear in uppercase letters, you can use a simple function called UPPERCASE to convert one or more cells at a time. If you need your text to be in proper capitalization (first letter of each name or word is capitalized while the rest is lowercase), you can use the PROPER function the same way you’d use UPPERCASE. This wikiHow teaches you how to use the UPPERCASE and PROPER functions to capitalize your Excel data.
Steps
-

1
Type a series of text in a column. For example, you could enter a list of names, artists, food items—anything. The text you enter can be in any case, as the UPPERCASE or PROPER function will correct it later.[1]
-
2
Insert a column to the right of your data. If there’s already a blank column next to the column that contains your data, you can skip this step. Otherwise, right-click the column letter above your data column and select Insert.
- You can always remove this column later, so don’t worry if it messes up the rest of your spreadsheet right now.
Advertisement
-
3
Click the first cell in your new column. This is the cell to the right of the first cell you want to capitalize.
-
4
Click fx. This is the function button just above your data. The Insert Function window will expand.
-
5
Select the Text category from the menu. This displays Excel functions that pertain to handling text.
-
6
Select UPPER from the list. This function converts all letters to uppercase.
- If you’d rather just capitalize the first character of each part of a name (or the first character of each word, if you’re working with words), select PROPER instead.
- You could also use the LOWER function to convert all characters to lowercase.
-
7
Click OK. Now you’ll see «UPPER()» appear in the cell you clicked earlier. The Function Arguments window will also appear.
-
8
Highlight the cells you want to make uppercase. If you want to make everything in the column uppercase, just click the column letter above your data. A dotted line will surround the selected cells, and you’ll also see the range appear in the Function Arguments window.
- If you’re using PROPER, select all of the cells you want to make proper case—the steps are the same no matter which function you’re using.
-
9
Click OK. Now you’ll see the uppercase version of the first cell in your data appear at the first cell of your new column.
-
10
Double-click the bottom-right corner of the cell that contains your formula. This is the cell at the top of the column you inserted. Once you double-click the dot at the bottom of this cell, the formula will propagate to the remaining cells in the column, displaying the uppercase versions of your original column data.
- If you have trouble double-clicking that bottom-right corner, you can also drag that corner all the way down the column until you’ve reached the end of your data.
-
11
Copy the contents of your new column. For example, if your new column (the one that contains the now-uppercase versions of your original data) is column B, you’ll right-click the B above the column and select Copy.
-
12
Paste the values of the copied column over your original data. You’ll need to use a feature called Paste Values, which is different than traditional pasting. This option will replace your original data with just the uppercase versions of each entry (not the formulas). Here’s how to do it:
- Right-click the first cell in your original data. For example, if you started typing names or words into A1, you’d right-click A1.
- The Paste Values option might be in a different place, depending on your version of Excel. If you see a Paste Special menu, click that, select Values, and then click OK.
- If you see an icon with a clipboard that says «123,» click that to paste the values.
- If you see a Paste menu, select that and click Values.
-
13
Delete the column you inserted. Now that you’ve pasted the uppercase versions of your original data over that data, you can delete the formula column without harm. To do so, right-click the letter above the column and click Delete.


Advertisement

Add New Question
-
Question
Can I change to uppercase for an entire working sheet at one time?

Yes, you can do this by selecting the entire sheet then specifying you want it to be uppercase.
-
Question
How do I do uppercase when putting in a password?
You can’t use caps lock on some operating systems; try using the uppercase button
Ask a Question
200 characters left
Include your email address to get a message when this question is answered.
Submit
Advertisement
Thanks for submitting a tip for review!
About This Article
Article SummaryX
You can use the «UPPER» function in Microsoft Excel to transform lower-case letters to capitals. Start by inserting a blank column to the right of the column that contains your data. Click the first blank cell of the new column. Then, click the formula bar at the top of your worksheet—it’s the typing area that has an «fx» on its left side. Type an equal (=) sign, followed by the word «UPPER» in all capital letters. To tell the «UPPER» function which data to convert, click the first cell in your original data column. Press the Enter or Return key on your keyboard to apply the formula. The first cell of your original data column is now converted to uppercase letters. To apply this change to the entire column, click the cell containing the uppercase letters to select it. Then, drag the small square at the bottom-right corner of the cell down to the final row.
Did this summary help you?
Thanks to all authors for creating a page that has been read 1,463,174 times.