
Add or subtract days from a date
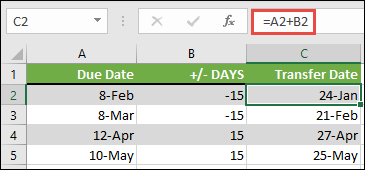
Suppose that a bill of yours is due on the second Friday of each month. You want to transfer funds to your checking account so that those funds arrive 15 calendar days before that date, so you’ll subtract 15 days from the due date. In the following example, you’ll see how to add and subtract dates by entering positive or negative numbers.
-
Enter your due dates in column A.
-
Enter the number of days to add or subtract in column B. You can enter a negative number to subtract days from your start date, and a positive number to add to your date.
-
In cell C2, enter =A2+B2, and copy down as needed.
Add or subtract months from a date with the EDATE function
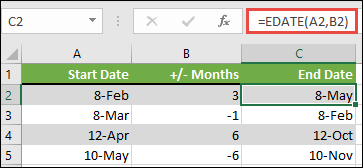
You can use the EDATE function to quickly add or subtract months from a date.
The EDATE function requires two arguments: the start date and the number of months that you want to add or subtract. To subtract months, enter a negative number as the second argument. For example, =EDATE(«9/15/19»,-5) returns 4/15/19.
-
For this example, you can enter your starting dates in column A.
-
Enter the number of months to add or subtract in column B. To indicate if a month should be subtracted, you can enter a minus sign (-) before the number (e.g. -1).
-
Enter =EDATE(A2,B2) in cell C2, and copy down as needed.
Notes:
-
Depending on the format of the cells that contain the formulas that you entered, Excel might display the results as serial numbers. For example, 8-Feb-2019 might be displayed as 43504.
-
Excel stores dates as sequential serial numbers so that they can be used in calculations. By default, January 1, 1900 is serial number 1, and January 1, 2010 is serial number 40179 because it is 40,178 days after January 1, 1900.
-
If your results appear as serial numbers, select the cells in question and continue with the following steps:
-
Press Ctrl+1 to launch the Format Cells dialog, and click the Number tab.
-
Under Category, click Date, select the date format you want, and then click OK. The value in each of the cells should appear as a date instead of a serial number.
-
-
Add or subtract years from a date
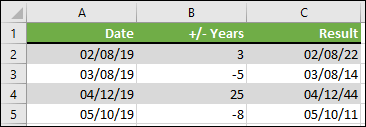
In this example, we’re adding and subtracting years from a starting date with the following formula:
=DATE(YEAR(A2)+B2,MONTH(A2),DAY(A2))
How the formula works:
-
The YEAR function looks at the date in cell A2, and returns 2019. It then adds 3 years from cell B2, resulting in 2022.
-
The MONTH and DAY functions only return the original values from cell A2, but the DATE function requires them.
-
Finally, the DATE function then combines these three values into a date that’s 3 years in the future — 02/08/22.
Add or subtract a combination of days, months, and years to/from a date
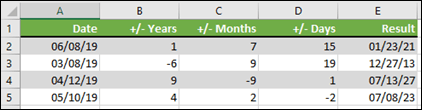
In this example, we’re adding and subtracting years, months and days from a starting date with the following formula:
=DATE(YEAR(A2)+B2,MONTH(A2)+C2,DAY(A2)+D2)
How the formula works:
-
The YEAR function looks at the date in cell A2, and returns 2019. It then adds 1 year from cell B2, resulting in 2020.
-
The MONTH function returns 6, then adds 7 to it from cell C2. This gets interesting, because 6 + 7 = 13, which is 1-year and 1-month. In this case, the formula will recognize that and automatically add another year to the result, bumping it from 2020 to 2021.
-
The DAY function returns 8, and adds 15 to it. This will work similarly to the MONTH portion of the formula if you go over the number of days in a given month.
-
The DATE function then combines these three values into a date that is 1 year, 7 months, and 15 days in the future — 01/23/21.
Here are some ways you could use a formula or worksheet functions that work with dates to do things like, finding the impact to a project’s schedule if you add two weeks, or time needed to complete a task.
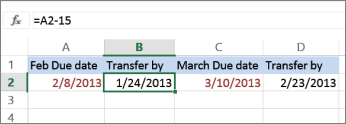
Let’s say your account has a 30-day billing cycle, and you want to have the funds in your account 15 days before the March 2013 billing date. Here’s how you would do that, using a formula or function to work with dates.
-
In cell A1, type 2/8/13.
-
In cell B1, type =A1-15.
-
In cell C1, type =A1+30.
-
In cell D1, type =C1-15.

Add months to a date
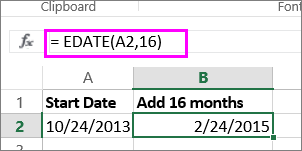
We’ll use the EDATE function and you’ll need the start date and the number of months you want to add. Here’s how to add 16 months to 10/24/13:
-
In cell A1, type 10/24/13.
-
In cell B1, type =EDATE(A1,16).
-
To format your results as dates, select cell B1. Click the arrow next to Number Format, > Short Date.
Subtract months from a date
We’ll use the same EDATE function to subtract months from a date.
Type a date in Cell A1 and in cell B1, type the formula =EDATE(4/15/2013,-5).
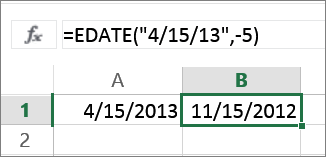
Here, we’re specifying the value of the start date entering a date enclosed in quotation marks.
You can also just refer to a cell that contains a date value or by using the formula =EDATE(A1,-5)for the same result.
More examples
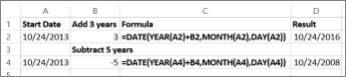
To add years to or subtract years from a date
|
Start Date |
Years added or subtracted |
Formula |
Result |
|---|---|---|---|
|
10/24/2013 |
3 (add 3 years) |
=DATE(YEAR(A2)+B2,MONTH(A2),DAY(A2)) |
10/24/2016 |
|
10/24/2013 |
-5 (subtract 5 years) |
=DATE(YEAR(A4)+B4,MONTH(A4),DAY(A4)) |
10/24/2008 |
Today, I am going to equip you with a few formulas that will enable you to add Days (Months or even Years) to a Date in Excel.
These are particularly useful for financial analysts because it helps them play around with and manipulate time periods in their financial models. For example, while projecting cash flows, you may want to project them monthly, quarterly, semi-annually, or annually. All you have to do then is use these formulas and add 1, 3, 5, or 11 to your dates, and you are set.
With that foundation, let’s jump in.

Add Days to a Date in Excel
We all know that Excel stores dates as serial numbers. There is no magical formula that Excel uses to assign serial numbers to dates, though. The serial numbers are assigned such that January 1, 1900 is considered as 1, and thereafter the numbers increment with each day. Based on the same logic, Dec 25, 2001, corresponds to 37,250 because it is 37,249 days after January 1, 1900.
Just for this reason, when you want to add a certain number of days to a date in Excel, you can just put in the number of days you want to add and you will have your output date.
We will use the following formula (which is actually just plain addition) to add 31 days to a date:
=A2 + 31

Excel will add 31 days to 12/25/2001 (or 37250 as a serial number) and arrive at the serial number 37281, i.e. the serial number for 01/25/2002.
Recommended Reading: How to add Days to Date In Excel
Add Months to a Date in Excel
To add months to a given date in your worksheet, we will use the EDATE function.
Syntax for the EDATE function:
=EDATE(start_date, number_of_months)
Arguments:
start_date: This is a required argument where you will refer to a cell containing the date.number_of_months: This is a required argument where you may enter a number or refer to a cell containing the number of months you want to add to the date.
In our example, we will try to add 2 months to a date and for that, we will use the formula:
=EDATE(A2, 2)

Instead of writing ‘2’ in the number of months argument, we could just as well refer to a cell containing the number 2. Also, ensure that the output cell is formatted to display a date.
Recommended Reading: How to add Months to Date In Excel
Add Years to a Date in Excel
We will use the DATE function for adding years to a date in Excel. If you are not familiar with the DATE function, go check out our tutorial on the DATE function. Along with the DATE function, we will also use the YEAR, MONTH, and DAY functions.
Alright, so this is the formula we are going to use to add 5 years to a given date:
=DATE(YEAR(A2) + 5,MONTH(A2),DAY(A2))

Notice the +5 tucked away in the first argument? That is the number of years we want to add to our date. Alternatively, you could also reference a cell containing the number ‘5.’
The YEAR, MONTH, and DAY functions have a small role to play here. All they do is derive a specific component of a date. All these functions are nested into the DATE function. So, upon deriving their respective values, they will supply those values to DATE function as an argument.
In our case, here is what each function will derive:
- YEAR(A2): 2001
- MONTH(A2): 12
- DAY(A2): 25
So, our DATE function at this point looks like this:
=DATE(2001 + 5, 12, 25)
Looks pretty simple now, right?
The DATE function will then just add 5 to 2001 and give us the final output as 12/25/2006.
Recommended Reading: How to add Years to Date In Excel
Add Working Days to a Date in Excel
Now, onto some interesting formulas. Let’s say we want to add days to a given date. But, we would like Excel to skip over the weekends and holidays.
To accomplish this, we will use the WORKDAY function in Excel. This function will skip over weekends (Saturday and Sunday) by default, but you will need to supply a list of holidays (if any) as an argument in the WORKDAY function.
Syntax for the WORKDAY function:
=WORKDAY(start_date, add_days, holidays)
Arguments:
start_date: This is a required argument where you will refer to a cell containing the date.sdd_days: This is a required argument where you may enter a number or refer to a cell containing the number of days you want to add to the date.holidays: This is an optional argument where you may supply a list of holidays by referencing a range of cells that contain the list of holidays.
The formula we will use in our example is:
=WORKDAY(A2, 60, D2:D4)

What we are doing in this example is trying to compute the date that falls 60 working days after 12/25/2001, provided that there is 1 holiday in December 2001, and 2 in January 2002.
Notice that we supplied the list of holidays separately, while the weekends were factored in by the formula by default.
The return we get is 03/21/2002, which is the date that falls 60 working days after 12/25/2001.
The formula also works if you want to compute working days in reverse and arrive at a date that falls a certain number of days before 12/25/2001. For example, entering -60 instead of 60 in the add_days argument will return 10/02/2001.
Add Hours, Minutes, or Seconds to a DateTime in Excel
We are now ready to take on some larger formulas. Let’s try to play around with some DateTimes and see how we can manipulate them.
Add Hours to a DateTime in Excel
In this example, we will use 3 functions to build a formula for adding 30 hours to a DateTime. The functions that we are going to use are – TIME, MOD, and INT.
The formula would be:
=TIME(MOD(30, 24), 0, 0) + A2 + INT(30/24)

Okay, let’s disassemble this formula one function at a time.
We will start with the simple ones first. Cell A2 is just the starting date that we want to add the hours to.
Refer to our example #1 and see how all it takes to add days to a date in Excel is a ‘+’ and the number of days. That is what the INT function is doing here. If the hours exceed 24, it will add a day to the date so our final output is adjusted accordingly. This means that if you are adding less than 24 hours, this component will not have any effect on the formula because it will return 0.
With the TIME function, we are instructing Excel to add a certain number of hours to the time in cell A2. The second and third arguments are ‘0’ because we do not wish to add any minutes or seconds to the time just yet.
The first argument is where we enter the number of hours, but we will use a MOD function to compute the number of hours to be added.
MOD function gives us the remainder from a certain division. In our case, we divide 30 by 24, which gives us 6. If you had slept through your Class 12 Maths class, just think of it like this (if you know how modulus works, feel free to skip to the next part):
- When the number of hours to be added is below 24, the MOD function returns the same number (if the number were 15, MOD would return 15).
- When the number of hours to be added is 24, the MOD function returns 0.
- When the number of hours to be added (X) is more than 24 but less than 48, the MOD function returns (X – 24).
- The MOD function will return 0 again if you add 48 hours, and beyond 48 hours, it will continue to deliver an outcome like so: (X – 48). At 48, 72, 96 hours (i.e., after every 24 hours), the MOD function will return a 0, and beyond those numbers, the MOD function will return: (X – relevant multiple of 24).
If you find it difficult to wrap your head around, just read the first 3 points, and that will suffice.
Okay, so we have come a long way in dismantling this formula. Let’s take stock of where we stand:
=TIME(6, 0, 0) + A2 + 1
We know the MOD function will return a ‘6,’ and we know the INT function will return a ‘1.’
Essentially, we have now asked Excel to pick up the DateTime in cell A2, add 1 day to it (via the INT function), and add 6 hours (via the TIME and MOD function).
The final output, of course, is 12/26/2001 6:00:00 AM.
Add Minutes to a DateTime in Excel
Let’s now try to add 2500 minutes to a DateTime in Excel. A lot of what we discussed in the previous example remains unchanged here. So, we will first look at what needs to be done differently.
Point of difference #1: The most basic difference in our next formula will be the denominators used. In the previous example, we used 24 since we wanted to convert days to hours. This time around, we will use 1440 as our denominator to convert days into minutes since there are 1440 minutes in a day.
Point of difference #2: The second difference is that instead of 1, we will use 2 INT functions in the next formula.
Point of difference #3: We will also use 2 MOD functions instead of 1.
Why the difference?
Let’s circle back to the “why” after setting up our example.
Here is the formula we will use:
=TIME(INT(MOD(2500, 1440)/60), MOD(2500, 60), 0) + A2 + INT(2500/1440)

Let’s nail the easy ones first. We know cell A2 is the date we want to add minutes to. The INT function at the tail of the formula returns 1 (because we need to add 1 day) since the number of minutes we are adding exceeds 1440 but does not exceed 2880.
Alright, so the complexity is tucked inside the 3 arguments of the TIME function. Since we now know what the TIME function does, let’s jump onto the role these arguments play in there.
The first argument has, in total, 3 operations and 2 functions.
The first operation is the computation of the MOD function. We know the pattern that the output of the MOD function follows, right? So, the MOD function will give us 1060 (or 2500 – 1440).
The second operation is the division of the MOD function’s output by 60. So, why is there a 60 in the formula? Well, when the MOD function gives us 1060, it is trying to tell us that you need to add these many minutes to your DateTime to get the final output. To convert it to hours, we divide it by 60, which gives us ~ 17.67 hours.
Perfect. What if I tell you I will be 3.5 hours late today? You will interpret it as 3 hours and 30 minutes, right?
That is precisely what the INT function is there for in the first argument. Any time you see hours being written with a decimal, it is interpreted as minutes. But remember, we cannot have minutes in the hours’ argument of the TIME function, so we must remove it by eliminating the value after the decimal using the INT function. Finally, the hours’ argument has the value ‘17.’
The second argument has just one operation and one function.
In the second argument, we need the number of minutes that need to be added to our final output. To do this, we will use another MOD function.
No other complexities, though (or maybe give it 10 seconds). Just the good ol’ MOD function with dividend as 2500 and the divisor as 60. Right?
Wait, why 60?
In the previous argument, we used the INT function to remove the minutes component from the return. So, we are going to transfer it to this argument because this is where minutes belong.
If this is difficult to understand, let me reverse engineer it for you. Remember how in the previous argument, we used the INT function to remove .67 after the 17 hours? Those 0.67 hours are what we are trying to add here. 0.67 (or 2/3rd) hours is 40 minutes.
Guess what MOD (2500, 60) gives us?
40!
The third argument is 0, at least for now.
This is what our formula looks like at this point:
=TIME(17, 40, 0) + A2 + 1
Looks pretty simple now, right? Essentially, the formula will add 1 day, 17 hours, and 40 minutes to 12/25/2001 12:00:00 AM and gives us our final output as 12/26/2001 5:40:00 PM.
Add Seconds to a DateTime in Excel
Now, let’s take a step further and try to add 90000 seconds to the given date. The formula remains the same across all three scenarios for adding hours, minutes, or seconds—with just some logical tweaking involved.
We will use the same formula we used previously, with slight modification, like so:
=TIME(INT(MOD(90000, 86400)/3600), INT(MOD(90000, 3600)), MOD(90000, 60)) + A2 + INT(90000/86400)

I know the formula looks as big as the Everest, but let’s take it one step at a time.
Our objective is to add 90,000 seconds to the DateTime given in cell A2. The logic for the formula remains the same, except for the arguments in the TIME function.
The hours argument
As always, we want this argument to end up with a value that is in terms of hours.
The MOD function in the hours argument will return 3600 (90,000 – 86400). In other words, we must add 3600 seconds to the time component of our DateTime to get our final output. However, to convert 3600 seconds to hours, we must divide it by the number of seconds in an hour, like so:
$$3600 seconds over [(3600 seconds)/(1 hour)]$$
OR
$$3600 seconds times [(1 hour)/(3600 seconds)]$$
This gives us 1 hour in the hours argument.
The minutes argument
Recollect how we tackled the second argument in the previous example where we had eliminated 0.67 hours from the first argument since this value actually represents minutes and should go in the second argument?
Well, this time around, our hours argument has returned just 1 hour—no decimals. This means we need to add nothing in the minutes argument.
If you check, the MOD function in the second argument will return a 0. If this baffles you, scroll back up and read the four pointers where we discussed how to compute the output for a MOD function. Basically, since 90,000 is perfectly divisible by 3600, it returns 0.
The seconds argument
Again, since we have just 1 full hour in the first argument and have no seconds component, the MOD function here will return a 0.
Add Hours, Minutes, or Seconds to a Time in Excel
After the extensive examples we have discussed thus far, this may feel like child’s play. But, let’s quickly run through some examples.

Add Hours to a Time in Excel
By now, you may be a TIME function ninja. So, see if you can figure out the formula before you look at it.
The formula we will use here:
=TIME(1, 0, 0) + A2
All we are doing here is instructing Excel that we want to add 1 hour (via the TIME function) to the Time in cell A2.
Add Minutes to a Time in Excel
We will use the same formula, but set the minutes argument to a certain number instead of 0 to add that many minutes, like so:
=TIME(1, 20, 0) + A2
This time around, we are adding 1 hour and 20 minutes to the TIME in cell A2.
Add Seconds to a Time in Excel
Again, no change:
=TIME(1, 20, 45) + A2
All we did differently this time is that we included the seconds argument, so Excel will add 1 hour, 20 minutes, and 45 seconds to the Time in cell A2.
That marks the end of our methods to add Dates, Time, and DateTime in Excel. Go ahead and use these formulas in your spreadsheet at work or just for fun. By the time you champion these, we will come back with another set of formulas for you to master.
Microsoft Excel stores dates and times as numbers, which allows the user to easily add and subtract days to a date in Excel.
It also makes it really easy when you want to find out the total number of days between two dates, as you can simply subtract one from the other.
In this tutorial, I’ll show you a couple of really easy ways to add or subtract days to dates in Excel.
So let’s get started!
Add or Subtract Days to Dates in Excel Using Paste Special
Recently, I was working with one of the content writers on one of my projects. I sent her a list of articles with the due dates to the writer (as shown below).

The writer came back to me and asked me to shift all these due dates by 10 days, as she had some urgent stuff to take care of and needed 10 days off.
This is a perfect example where I would need to add a fixed number of days to the due date so that I can get the new date for each task.
Excel has an in-built Paste Special functionality that allows you to quickly add or subtract a fixed number from a range of selected cells.
Below are the steps to add 10 days to the existing dates in our data set:
- In an empty cell, enter 10 (the number that we want to add to the dates)

- Copy this cell (the one in which we enter the value 10)
- Select the cells that have the dates

- Right-click on the selection
- Click on Paste Special. This will open the Paste Special dialog box

- In the Paste option, select ‘Values’

- In the Operation options, select ‘Add’
- Click Ok


That’s it!
The above steps would add 10 to all the dates in the selection.

In case you want to subtract from a date, select the Subtract option in Step 7.
Note: It’s important to select the Value option in Step 6 as this makes sure that the format of the dates remains unchanged. If you don’t do this, it would change the formatting of your dates (as it also copies the formatting from the copied cell).
This method is best used when you want to add a fixed number of days to dates. In case you want to add a variable number of days to a date, it’s best to use the formula method (covered next).
Also read: How to Add Week to Date in Excel?
Add or Subtract Days to Dates Using Formulas
With formulas, you get a lot of flexibility while adding or subtracting dates.
For example, you can add a different number of days to date by just having that number in an additional column.
You can also only add the weekdays (while ignoring the weekends).
Let’s see a couple of examples that will make these scenarios easy to understand.
Adding Fixed Number of Days to a Date
Suppose you have a data set as shown below and you want to add a fixed number of days to each of these dates.

Below is the formula to do this:
=B2+10

Since dates are stored as numbers in Excel, all you need to do is add the value by which you want to extend the date.
In this example, I have simply added 10 to the date in each cell to get the date after 10 days.
You can copy and paste the above formula to all the cells in the column to apply it for all the dates.
Adding Varying Number of Days to a Date
What if you don’t want to add the same number to each date? What if you want to have a variable date added two different existing dates.
For example, in some of these dates, I may want to add 10 days, and in some others, I may want to add 5 days or 15 days.
In such a scenario, it’s best to insert a helper column and have your variable dates in that helper column.
Below I have the example data set where I have a helper column (columns C) it has the days to add.

Below is the formula that I can use to add these days in the helper column to the existing dates:
=B2+C2

This is pretty straight forward, as we are simply adding two numbers.
And in case you want to subtract days from a date, use the minus sign instead of the plus sign in the above formula.
Note: In some cases, you may see a serial number instead of the date (or the date may be in a different format). If that happens, you simply need to change the format of the cell to show it in the expected date format.
But now, what if only want to add weekdays to the existing date (i.e., ignore the weekends – Saturday and Sunday)?
You can do that as well (as covered in the next section).
Adding Only Weekdays to a Date
Below I have the data set where the dates are in column B and the number of weekdays that I want to add are in column C.
Below is the formula that would give you the date after adding the given number of working days:
=WORKDAY(B2,C2)
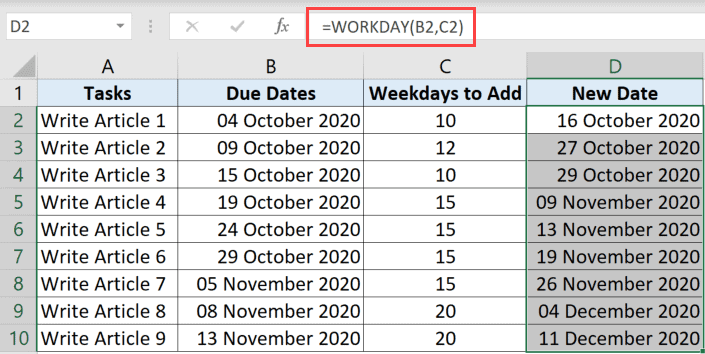
WORKDAY function in Excel takes three arguments:
- The date to which you want to add a specific number of workdays (B2 in our example)
- The total number of workdays that you want to add (C2 in our example)
- [Optional Argument] List of holidays that should not be counted
In our example, since we do not have the list of holidays, I am only using the first two arguments. This function only counts the weekdays (i.e., Monday to Friday), and ignore the weekends days (i.e., Saturday and Sunday).
In case you want to add weekend days that are different than Saturday and Sunday (say Friday and Saturday or only Sunday), you can do that by using a slightly different formula.
Below is the formula that would give me the final result considering Friday and Saturday as the weekend days
=WORKDAY.INTL(B2,C2,7)
The WORKDAY.INTL formula is a slight improvement over the WORKDAY function, as it allows you to choose the weekend days.

For example, in the above formula, I have specified the third argument as 7, which indicates that I want to consider Friday and Saturday as the weekend days.
Similarly, you can also choose to only have Sunday as the weekend day. In fact, you can choose to have any single day or combination of two consecutive days as the weekend days within this formula.
Note: In case you want to subtract days instead of adding days, use a negative number as the day value. For example, instead of 10 use -10 in Column c.
These are two simple ways you can use to add or subtract days from a date in Excel. If you want to quickly add a fixed number of days, you can use the paste special technique or a simple addition formula.
In case you want to only add the weekdays and ignore the weekends, you can also do that using the WORKDAY or the WORKDAY.INTL formulas.
I hope you found this tutorial useful.
Other Excel tutorials you may like:
- How to SUM values between two dates (using SUMIFS formula)
- Calculate the Number of Months Between Two Dates in Excel
- How to Stop Excel from Changing Numbers to Dates Automatically
- How to Calculate the Number of Days Between Two Dates in Excel
- How to Calculate Age in Excel using Formulas + FREE Calculator Template
- How to Add Months to Date in Excel
- How To Subtract In Excel (Subtract Cells, Column, Dates/Time)
- Get Day Name from Date in Excel
- How to Autofill Only Weekday Dates in Excel (Formula)
How to Use Excel > Excel Formula > How to Add Days, Weeks, Months and Years to a Date in Excel

How to add DAYS to a date in Excel
Excel stores date value in integer number, to find out n days after a date, add the date and number of days.

The Result

The formula in cell B2 adds a date in cell A2 with number 20. The result, 20 days after May 16, 2019, is June 5, 2019.
There are many ways to get a date value, for the first formula the date value is inserted in a cell, the second formula uses the DATE function then added to the number 20. The result is the same as the first formula.
The third formula uses the TODAY function, this function returning a different date depending on what date it is today. Incidentally, today is May 16, 2019 add number 20 the result is the same as the two previous formulas.
How to add WEEKS to a date in Excel
To find out n weeks after a date, use the addition and multiplication formula. The multiplication formula used to convert weeks into days by multiplying by 7. The addition formula used to add the results of the multiplication formula with a date. The result is n weeks after a date.

The result

1 week after May 16, 2019, is May 23, 2019, and 4 weeks after May 16, 2019, is June 13, 2019.
You can use negative numbers to find n weeks before a date. The result of the formula in cell C3 shows that May 2, 2019, is 2 weeks before May 16, 2019.
How to add MONTHS to a date in Excel
How to add months to a date is different by adding days/weeks to a date.
The first step to do is to extract the year, month, and day of date by using the YEAR, MONTH, and DAY functions. To add n months after a date, add the n value to the MONTH function result, then arrange them all with the DATE function to find out the date after n months.

The result

1 month and 3 months after May 16, 2019, are June 16, 2019, and August 16, 2019, while 2 months and 5 months before May 16, 2019, are March 16, 2019, and December 16, 2019.
You got the same date even though several months have different days.
How to add YEARS to a date in Excel
To get n years after a date is like to get n months after a date. You must extract the date value using the YEAR, MONTH, and DAY functions.
Add the YEAR function result by to the desired n year value, then arrange them all with the DATE function.

The result

You got the same date and month, the different only in year value.
How to add YEARS, MONTHS, DAYS to a date in Excel
What date is 1 year 4 months 17 days after May 16, 2019?
The first step is to extract the date value using the YEAR, MONTH, and DAY functions.
The second step, add number 1 to the YEAR function result, add number 4 to the MONTH function result and add number 17 to the DAY function result.
The third step arranges all in the DATE function.
The formula
=DATE(YEAR(A2)+B2,MONTH(A2)+C2,DAY(A2)+D2)
The result

1 year 4 months 17 days after May 16, 2019, is Oct 3, 2020.
**
What date are 2 years 10 months 5 days before May 16, 2019?
The formula
=DATE(YEAR(A2)+B2,MONTH(A2)+C2,DAY(A2)+D2)
The result

The formula is the same as the previous formula. Use negative numbers to find out the date before a date.
2 years 10 months 5 days before May 16, 2019, is July 11, 2016.
Related Function
Function used in this article
Bottom line: Learn 3 different ways to add or subtract days to dates in Excel using formulas, copy & paste, and VBA macros. Includes video tutorial.
Skill level: Beginner
Video Tutorial
Download the File
Download the Excel file used in the video.
Michael asked a great question on how to add days to existing cells that contain dates. He has a data set with a column of dates, and wants to be able to easily add or subtract days to the dates.
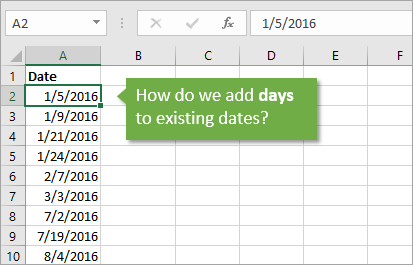
This is useful when your system has the wrong date or time setting, or if you are trying to create forecast data for a certain number of days in the future.
So let’s take a look at three methods to shift dates by a specific number of days.
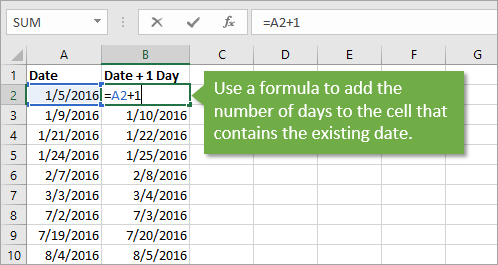
Method #1: Use a Formula
The easiest option is to use a simple formula to add or subtract the number of days to the cell that contains the date.
In Excel, dates are actually numbers that are formatted as a date. If you change the number formatting of a cell that contains a date to General or Number, you will see number between 1 and 40,000+. This is the number of days that have elapsed since January 1, 1900, the day the calendar starts in Excel.
Checkout my article & video on how the date system works in Excel for more on this.
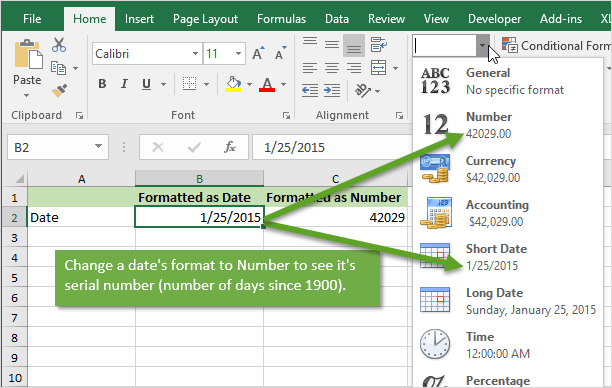
One day in Excel is represented by one whole number. Therefore, we can easily offset the date by adding or subtracting a whole number (the number of days).
In the example below we create a simple formula that references the cell that contains the date (A2) and add 1 to it. Copy the formula down to create a column of the new date that has one day added to it.
You can then copy and paste values over the existing date column to complete the update. This technique will work great if your data is the source of a pivot table and you want your reports to use the existing date field.
Method #2: Paste Special Operation
The Paste Special feature is another option when you don’t want to create a separate column of formulas.
Paste Special has Operations that allow us to add, subtract, multiply, or divide existing values by a number.
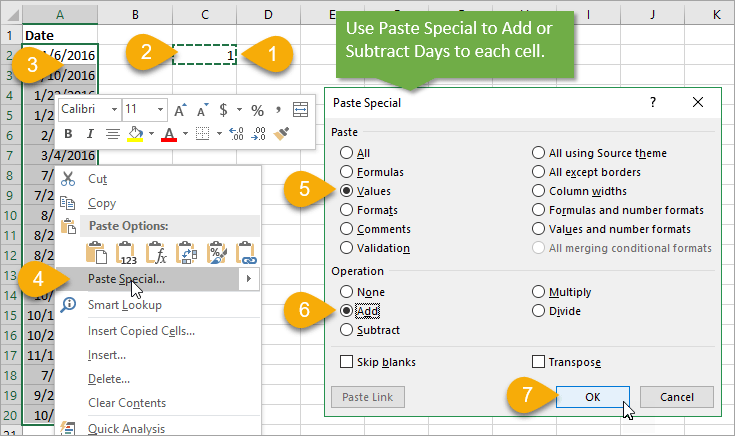
Here are instructions on how to use the Paste Special Operation to add or subtract dates:
- Type the number of days you want to add or subtract in a blank cell. For this example I entered a 1 in cell C2.
- Copy the cell (Right-click > Copy or Ctrl +C).
- Select the cells that contain the dates.
- Right-click and choose Paste Special (keyboard shortcut: Alt, E, S).
- Select the Values radio button from the Paste section on the Paste Special menu (keyboard shortcut: V).
- Select the Add radio button from the Operation section (keyboard shortcut: D).
- Click OK or press Enter.
The copied number (1) will be added to the values in each cell.
The full keyboard shortcut to Paste Special > Add > Values is:
Alt, E, S, V, D, Enter (press & release each key in order)
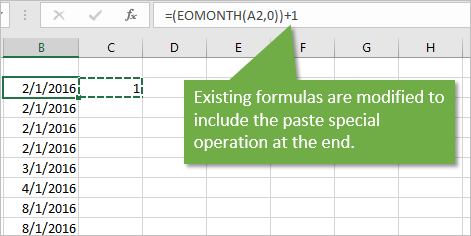
How does Paste Special Work?
The Paste Special Operation will modify the value in the cell if the cell contains a values.
If the cell contains a formula then the formula will be modified and a +1 will be added to the end of each formula. I explain this in more detail in the video above.
The Subtract operation can be used to subtract days from the existing dates. If you want to add or subtract a different number of days, then put a different number in the blank cell in step 1.
This is a quick way to add or subtract days without having to create a new column of formulas.
Method #3: VBA Macro
If this is a task you do frequently, or want the users of your spreadsheet to be able to add and subtract dates, then a macro is a great solution. A macro can be used to change the existing value in the cell(s) by any number of days you specify in the code.
Here are some simple VBA macro code examples that add or subtract days to the active (selected) cell.
Sub Add_Day_To_Date()
'Adds 1 to the active cell

  ActiveCell.Value = ActiveCell.Value + 1

End Sub
Sub Subtract_Day_From_Date()
'Subtracts 1 from the activecell

  ActiveCell.Value = ActiveCell.Value - 1

End Sub
If you want to modify the dates in multiple cells then we can use a For Next Loop to loop through the range and modify each cell.
Sub Add_Day_To_Range()
'Adds 1 to each cell in the selected range
'For Next Loop explained: https://www.excelcampus.com/vba/for-each-next-loop/

Dim c As Range

    For Each c In Selection.Cells
      c.Value = c.Value + 1
    Next c

End Sub
The example file (download above) also contains a sheet with buttons in the header cell. These buttons are triangle shapes that are assigned to the Add and Subtract macros.
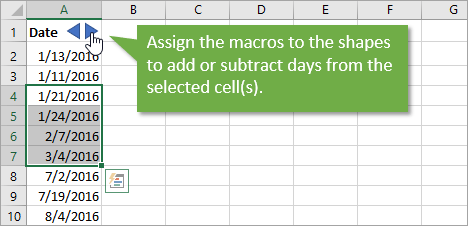
This makes it easy for your users to modify dates in the selected cell without having to type anything. There are a lot of possibilities with a macro based solution.
Free Training Webinar on the Power Tools
Right now I’m running a free training webinar on all of the Power Tools in Excel. This includes Power Query, Power Pivot, Power BI, pivot tables, macros & VBA, and more.
It’s called The Modern Excel Blueprint. During the webinar I explain what these tools are and how they can fit into your workflow.

You will also learn how to become the Excel Hero of your organization, that go-to gal or guy that everyone relies on for Excel help and fun projects.
The webinar is running at multiple days and times. Please click the link below to get registered and save your seat.
Click Here to Register for the Free Webinar
Other Techniques for Adding Days to Dates?
There are a lot of ways to accomplish this task in Excel. Please leave a comment below and share a technique that you use to add days to dates. I’m looking forward to learning something new.
Thank you! 🙂