VBA Add row to Table in Excel. We can add a single row or multiple rows and data to table. Default new rows added at the end of the table. In this tutorial we have explained multiple examples with explanation. We also shown example output screenshots. We have specified three examples in the following tutorial. You can change table and sheet name as per your requirement. We also specified step by step instructions how to run VBA macro code at the end of the session.
Table of Formats:
- Objective
- Syntax to Add Row to Table using VBA in Excel
- Example to Add New Row to Table on the Worksheet in Excel
- Add Multiple Rows to Table in Excel using VBA
- Add Row & Data to Table on the Worksheet in Excel
- Instructions to Run VBA Macro Code
- Other Useful Resources
Syntax to Add Row to Table using VBA in Excel
Here is the syntax to add new row to table on the worksheet using VBA in Excel.
expression.Add(Position, AlwaysInsert)
Where expression represents the ListRows.
Position is an optional parameter. It represents the relative position of the new row. Accepts the Integer value.
AlwaysInsert is an optional parameter. It represents the cells to be shifted to down or not, based on Boolean value. Accepts the Boolean value either True or False.
Note: If position is not specified, default adds new row at the end of the table.
Example to Add New Row to Table on the Worksheet
Let us see the example to add new row to table on the worksheet. The sheet name defined as ‘Table‘. And we use table name as ‘MyDynamicTable‘. You can change these two as per your requirement. We Add method of the ListObject object.
 'VBA Add New Row to Table
Sub VBAF1_Add_Row_to_Table()

    'Declare Variables
    Dim oSheetName As Worksheet
    Dim sTableName As String
    Dim loTable As ListObject

    'Define Variable
    sTableName = "MyDynamicTable"

    'Define WorkSheet object
    Set oSheetName = Sheets("Table")

    'Define Table Object
    Set loTable = oSheetName.ListObjects(sTableName)

    'Add New row to the table
    loTable.ListRows.Add

End Sub
Output: Here is the following output screenshot of above example macro VBA code.
Add Multiple Rows to Table in Excel using VBA
Here is another example to add multiple rows to table. In this example we add five(5) rows to the table. You can specify the number of rows count in the for loop.
'VBA Add Multiple Rows to Table
Sub VBAF1_Add_Multiple_Rows_to_Table()

    'Declare Variables
    Dim oSheetName As Worksheet
    Dim sTableName As String
    Dim loTable As ListObject
    Dim iCnt As Integer

    'Define Variable
    sTableName = "MyDynamicTable"

    'Define WorkSheet object
    Set oSheetName = Sheets("Table")

    'Define Table Object
    Set loTable = oSheetName.ListObjects(sTableName)

    For iCnt = 1 To 5 'You can change based on your requirement
        'Add multiple rows to the table
        loTable.ListRows.Add
    Next

End Sub
Output: Let us see the following output screenshot of above example macro VBA code.
Add Row & Data to Table on the Worksheet in Excel
Let us see how to add new row and data to the table using VBA in Excel. In the below example we add new row and data of 5 columns.
 'VBA Add Row and Data to Table
Sub VBAF1_Add_Row_And_Data_to_Table()

    'Declare Variables
    Dim oSheetName As Worksheet
    Dim sTableName As String
    Dim loTable As ListObject
    Dim lrRow As ListRow

    'Define Variable
    sTableName = "MyDynamicTable"

    'Define WorkSheet object
    Set oSheetName = Sheets("Table")

    'Define Table Object
    Set loTable = oSheetName.ListObjects(sTableName)

    'Add New row to the table
    Set lrRow = loTable.ListRows.Add

    'Add Data to recently added row
    With lrRow
        .Range(1) = 20
        .Range(2) = 30
        .Range(3) = 40
        .Range(4) = 50
        .Range(5) = 60
    End With

End Sub
Output: Here is the following output screenshot of above example VBA macro code.
Instructions to Run VBA Macro Code or Procedure:
You can refer the following link for the step by step instructions.
Instructions to run VBA Macro Code
Other Useful Resources:
Click on the following links of the useful resources. These helps to learn and gain more knowledge.
VBA Tutorial VBA Functions List VBA Arrays in Excel VBA Tables and ListObjects
VBA Editor Keyboard Shortcut Keys List VBA Interview Questions & Answers Blog
I have an excel which serves to record the food you ingest for a specific day and meal. I hav a grid in which each line represent a food you ate, how much sugar it has, etc.
Then i’ve added an save button to save all the data to a table in another sheet.
This is what i have tried
    Public Sub addDataToTable(ByVal strTableName As String, ByRef arrData As Variant)
    Dim lLastRow As Long
    Dim iHeader As Integer
    Dim iCount As Integer

    With Worksheets(4).ListObjects(strTableName)
        'find the last row of the list
        lLastRow = Worksheets(4).ListObjects(strTableName).ListRows.Count

        'shift from an extra row if list has header
        If .Sort.Header = xlYes Then
            iHeader = 1
        Else
            iHeader = 0
        End If
    End With

    'Cycle the array to add each value
    For iCount = LBound(arrData) To UBound(arrData)
        **Worksheets(4).Cells(lLastRow + 1, iCount).Value = arrData(iCount)**
    Next iCount
End Sub
but i keep getting the same error on the highlighted line:
Application-defined or object-defined error
What i am doing wrong?
Thanks in advance!
asked Sep 6, 2012 at 10:11
Miguel TeixeiraMiguel Teixeira
7731 gold badge10 silver badges29 bronze badges
You don’t say which version of Excel you are using. This is written for 2007/2010 (a different apprach is required for Excel 2003 )
You also don’t say how you are calling addDataToTable and what you are passing into arrData.
I’m guessing you are passing a 0 based array. If this is the case (and the Table starts in Column A) then iCount will count from 0 and .Cells(lLastRow + 1, iCount) will try to reference column 0 which is invalid.
You are also not taking advantage of the ListObject. Your code assumes the ListObject1 is located starting at row 1. If this is not the case your code will place the data in the wrong row.
Here’s an alternative that utilised the ListObject
Sub MyAdd(ByVal strTableName As String, ByRef arrData As Variant)
    Dim Tbl As ListObject
    Dim NewRow As ListRow

    ' Based on OP
    ' Set Tbl = Worksheets(4).ListObjects(strTableName)
    ' Or better, get list on any sheet in workbook
    Set Tbl = Range(strTableName).ListObject
    Set NewRow = Tbl.ListRows.Add(AlwaysInsert:=True)

    ' Handle Arrays and Ranges
    If TypeName(arrData) = "Range" Then
        NewRow.Range = arrData.Value
    Else
        NewRow.Range = arrData
    End If
End Sub
Can be called in a variety of ways:
Sub zx()
    ' Pass a variant array copied from a range
    MyAdd "MyTable", [G1:J1].Value
    ' Pass a range
    MyAdd "MyTable", [G1:J1]
    ' Pass an array
    MyAdd "MyTable", Array(1, 2, 3, 4)
End Sub
answered Sep 6, 2012 at 11:06
chris neilsenchris neilsen
52.2k10 gold badges84 silver badges122 bronze badges
6
Tbl.ListRows.Add doesn’t work for me and I believe lot others are facing the same problem. I use the following workaround:
    'First check if the last row is empty; if not, add a row
    If table.ListRows.count > 0 Then
        Set lastRow = table.ListRows(table.ListRows.count).Range
        For col = 1 To lastRow.Columns.count
            If Trim(CStr(lastRow.Cells(1, col).Value)) <> "" Then
                lastRow.Cells(1, col).EntireRow.Insert
                'Cut last row and paste to second last
                lastRow.Cut Destination:=table.ListRows(table.ListRows.count - 1).Range
                Exit For
            End If
        Next col
    End If

    'Populate last row with the form data
    Set lastRow = table.ListRows(table.ListRows.count).Range
    Range("E7:E10").Copy
    lastRow.PasteSpecial Transpose:=True
    Range("E7").Select
    Application.CutCopyMode = False
Hope it helps someone out there.
answered Mar 25, 2013 at 10:22
1
I had the same error message and after lots of trial and error found out that it was caused by an advanced filter which was set on the ListObject.
After clearing the advanced filter .listrows.add worked fine again.
To clear the filter I use this — no idea how one could clear the filter only for the specific listobject instead of the complete worksheet.
Worksheets("mysheet").ShowAllData
answered Dec 4, 2014 at 17:18
1
I actually just found that if you want to add multiple rows below the selection in your table
Selection.ListObject.ListRows.Add AlwaysInsert:=True works really well. I just duplicated the code five times to add five rows to my table
answered Sep 28, 2015 at 20:16
I had the same problem before and i fixed it by creating the same table in a new sheet and deleting all the name ranges associated to the table, i believe whene you’re using listobjects you’re not alowed to have name ranges contained within your table hope that helps thanks
answered Jun 25, 2017 at 20:13
0
Ran into this issue today (Excel crashes on adding rows using .ListRows.Add).
After reading this post and checking my table, I realized the calculations of the formula’s in some of the cells in the row depend on a value in other cells.
In my case of cells in a higher column AND even cells with a formula!
The solution was to fill the new added row from back to front, so calculations would not go wrong.
Excel normally can deal with formula’s in different cells, but it seems adding a row in a table kicks of a recalculation in order of the columns (A,B,C,etc..).
Hope this helps clearing issues with .ListRows.Add
answered Sep 4, 2018 at 12:35
As using ListRow.Add can be a huge bottle neck, we should only use it if it can’t be avoided.
If performance is important to you, use this function here to resize the table, which is quite faster than adding rows the recommended way.
Be aware that this will overwrite data below your table if there is any!
This function is based on the accepted answer of Chris Neilsen
Public Sub AddRowToTable(ByRef tableName As String, ByRef data As Variant)
    Dim tableLO As ListObject
    Dim tableRange As Range
    Dim newRow As Range

    Set tableLO = Range(tableName).ListObject
    tableLO.AutoFilter.ShowAllData

    If (tableLO.ListRows.Count = 0) Then
        Set newRow = tableLO.ListRows.Add(AlwaysInsert:=True).Range
    Else
        Set tableRange = tableLO.Range
        tableLO.Resize tableRange.Resize(tableRange.Rows.Count + 1, tableRange.Columns.Count)
        Set newRow = tableLO.ListRows(tableLO.ListRows.Count).Range
    End If

    If TypeName(data) = "Range" Then
        newRow = data.Value
    Else
        newRow = data
    End If
End Sub
answered Apr 25, 2017 at 23:41
Jonas_HessJonas_Hess
1,8241 gold badge20 silver badges32 bronze badges
1
Just delete the table and create a new table with a different name. Also Don’t delete entire row for that table. It seems when entire row containing table row is delete it damages the DataBodyRange is damaged
answered Jun 11, 2016 at 13:19
Bhanu SinhaBhanu Sinha
1,51612 silver badges10 bronze badges
We can use Excel VBA to insert rows and columns into an Excel table and add data to the table.
In this tutorial, we demonstrate how we can use Excel VBA in different ways to add data to a table and insert rows and columns into an existing table.
Insert a row and add data to an existing table using Excel VBA
Example 1: Insert a row to the bottom of an existing table and add data
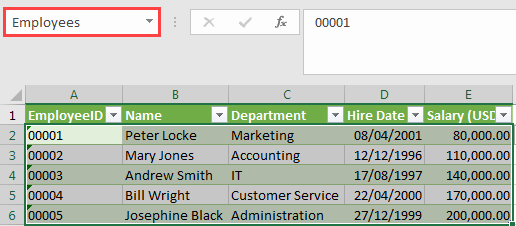
In this example, we will use the following table named Employees.
We use the following steps to add a new row to a table after the last row and add data:
- In the active worksheet that contains the table, press Alt + F11 to open the Visual Basic Editor (VBE). Alternatively, click Developer >> Code >> Visual Basic.
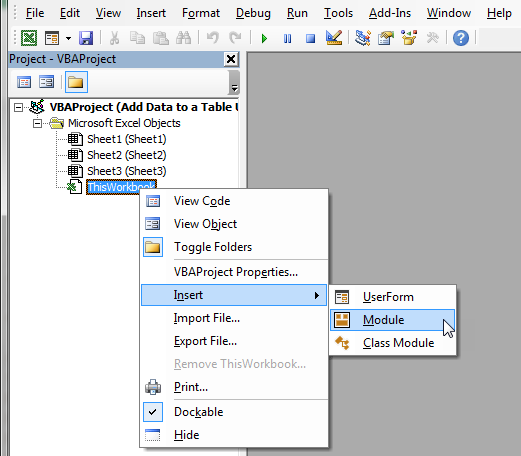
- In the Project Window of the VBE, right-click the ThisWorkbook object and click Insert >> Module on the shortcut menu.
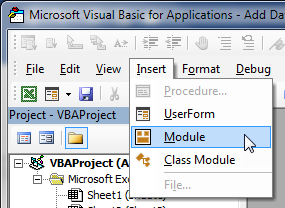
Alternatively, on the menu bar click Insert >> Module:
- In the new module enter the following procedure:
|
Sub addRowData() Dim tableName As ListObject Set tableName = ActiveSheet.ListObjects(«Employees») Dim addedRow As ListRow Set addedRow = tableName.ListRows.Add() With addedRow .Range(1) = «00006» .Range(2) = «Nelson Biden» .Range(3) = «Research» .Range(4) = «30/11/2002» .Range(5) = 150000 End With End Sub |
- Save the procedure and save the workbook as a macro-enabled workbook.
- Place the cursor anywhere in the procedure and press F5 to run the code. Alternatively, we can click the Run button on the toolbar:
- Press Alt + F11 to switch back to the active worksheet to see the results of the procedure. Alternatively, we can click the View Microsoft Excel button on the toolbar.
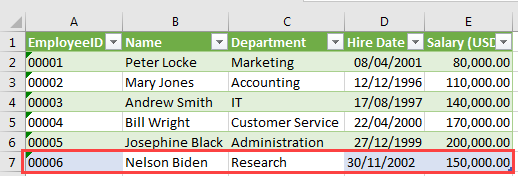
We can see that a new row of data has been added to the bottom of the table:
Additional information and explanation of the procedure
- The ListObject object represents an Excel table. It is a member of the ListObjects collection which contains all the list objects or Excel tables on a worksheet.
- The tableName variable is declared as a ListObject type.
- Set tableName = ActiveSheet.ListObjects(“Employees”). The Employees table is assigned to the tableName variable using the Set keyword.
- The ListRow object represents a row in the Excel table. It is a member of the ListRows collection which contains all the rows in a list object or Excel table.
- The addedRow variable of the ListRow object type is declared.
- Set addedRow = tableName.ListRows.Add(). A new row is added to the Employees table using the ListRows.Add method. This row is then assigned to the addedRow variable using the Set keyword.
- The ListRows.Add method takes two optional arguments: Position and AlwaysInsert. The Position argument is of Integer data type and specifies the relative position of the new row.
- The AlwaysInsert argument is of Boolean data type. It specifies whether to always shift data in cells below the last row of the table when the new row is inserted regardless of the row below the table being empty. If TRUE, cells below the table will be shifted down one row. If FALSE, if the table below the table is empty, the table expands to occupy that row without shifting the cells below it. If the row below the table contains data, those cells are shifted down when the new row is inserted.
- If the Position argument is not specified, a new row is added to the bottom of the table. If the AlwaysInsert argument is not specified, the cells below the table will be shifted down one row because TRUE is the default value.
- Since we didn’t specify any arguments for the ListRows.Add method, the new row is added to the bottom of the table and the cells below the table are shifted down one row. We are not able to see this shift because the cells are empty.
- The specified data is finally set to each of the cells of the inserted row.
Example 2: Insert a new row to a specific position in an existing table and add data
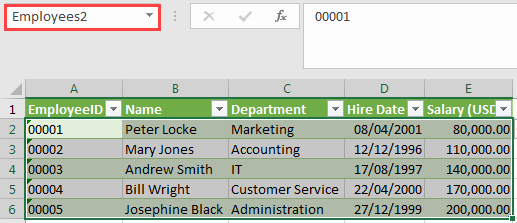
In this example we will use the following table named Employees2:
In this example, we are going to insert a new row to the relative position 3 of the Employees2 table and set new employee data to its cells.
We use the following steps:
- In the active worksheet that contains the Employees2 table, press Alt + F11 to open the Visual Basic Editor.
- Insert a new module and type in the following procedure:
|
Sub addRowDataSpecific() Dim tableName As ListObject Set tableName = ActiveSheet.ListObjects(«Employees2») Dim addedRow As ListRow Set addedRow = tableName.ListRows.Add(3) With addedRow .Range(1) = «00006» .Range(2) = «Nelson Biden» .Range(3) = «Research» .Range(4) = «30/11/2002» .Range(5) = 150000 End With End Sub |
- Place the cursor anywhere in the procedure and press F5 to run the code.
- Press Alt + F11 to switch back to the active sheet.
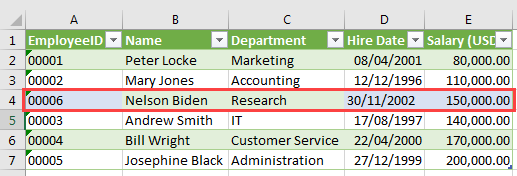
A new row has been inserted to the relative position 3 of the table and the specified data set to each of its cells.
Explanation of the procedure
The code produced this result because the Position argument of value 3 was passed to the ListRows.Add method. Since the AlwaysInsert argument was not specified, the default value of TRUE was applied and the cells of the row that was in relative position 3 of the table were shifted down one row.
Example 3: Add a new row of data to the bottom of an existing table based on user input
Unlike in the previous examples where employee data was hard-coded into the procedure, in this example, we add a new row of data based on user input.
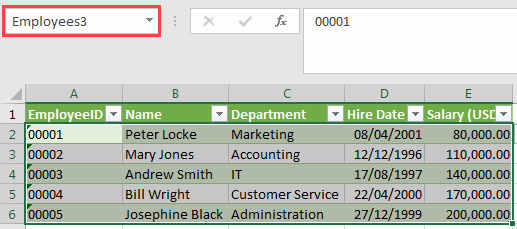
In this example we will use the following table named Employees3:
We use the following steps:
- In the active worksheet that contains the Employees3 table, press Alt + F11 to open the Visual Basic Editor.
- Insert a new module and type in the following procedure:
|
1 2 3 4 5 6 7 8 9 10 11 12 13 14 15 16 17 18 19 20 21 22 23 24 25 26 27 28 29 30 31 |
Sub addRowDataToTable() Dim tblName As ListObject Dim A, B, C, D, E, tName As String, Msg As String On Error GoTo Message tName = InputBox(«Enter Name of the Table: «, «Table Name») Set tblName = ActiveSheet.ListObjects(tName) If tName = «» Then Exit Sub A = InputBox(«Enter Employee ID: «, «Employee ID») If A = «» Then Exit Sub B = InputBox(«Enter Employee Name: «, «Employee Name») If B = «» Then Exit Sub C = InputBox(«Enter Department: «, «Department») If C = «» Then Exit Sub D = InputBox(«Enter Hire Date: «, «Hire Date», «Like 22/04/2015») If D = «» Then Exit Sub E = InputBox(«Enter Salary: «, «Salary») If E = «» Then Exit Sub Dim addedRow As ListRow Set addedRow = tblName.ListRows.Add() With addedRow .Range(1) = A .Range(2) = B .Range(3) = C .Range(4) = D .Range(5) = E End With Exit Sub Message: Msg = «The table was Not found.» MsgBox Msg, vbCritical End Sub |
- Save the procedure and save the workbook as a macro-enabled workbook.
- Place the cursor anywhere in the procedure and press F5 to run it.
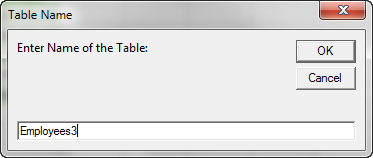
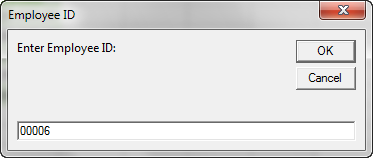
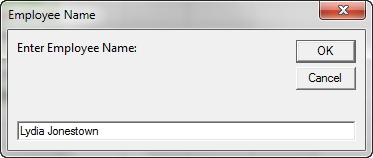
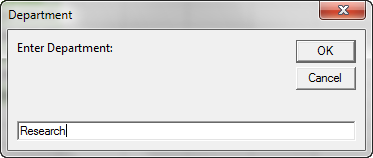
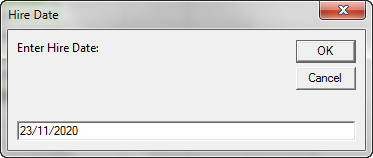
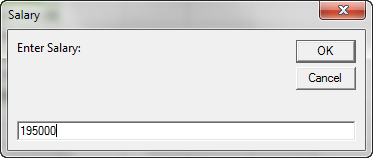
- We are prompted for different pieces of information as follows:
- Press Alt + F11 to switch back to the active worksheet.
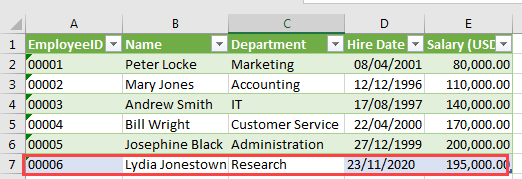
A new row with data has been inserted at the bottom of the table.
Explanation of the procedure
- The procedure uses ListRows.Add method to insert a new row to the bottom of the Employees3 table.
- The procedure uses the InputBox function to send dialog boxes to the screen that prompt different pieces of employee data.
- The different pieces of information are set to the different cells of the added row.
- The procedure uses the If Then construct to check if the Cancel button on the dialog box is pressed. If it is pressed the procedure is exited without doing anything.
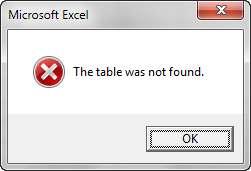
- Error handling is incorporated such that if we enter the name of a non-existent table in the Table Name dialog box, a message box pops up displaying the message, “The table was not found”.
Example 4: Change or update data in an existing Excel table
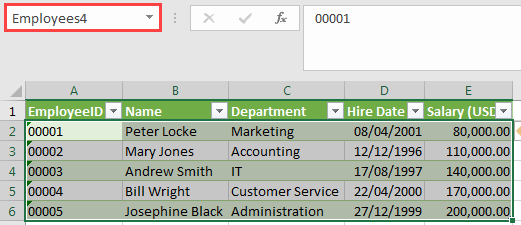
We can use Excel VBA to change or update data in an existing Excel table. We will use the following table named Employees4 to show how this can be done.
Suppose Andrew Smith has been moved to the Production department.
We use the following steps to update the dataset:
- In the active worksheet that contains the Employees4 table press Alt + F11 to open the Visual Basic Editor.
- Insert a new module and type in the code below:
|
Sub updateDataInTable() Dim tableName As ListObject Set tableName = ActiveSheet.ListObjects(«Employees4») Dim addedRow As ListRow Set addedRow = tableName.ListRows(3) With addedRow .Range(1) = «00003» .Range(2) = «Andrew Smith» .Range(3) = «Production» .Range(4) = «17/08/1997» .Range(5) = 140000 End With End Sub |
- Save the procedure and save the workbook as a macro-enabled workbook.
- Place the cursor anywhere in the procedure and press F5 to run it.
- Press Alt + F11 to switch back to the active workbook.
The Department for Andrew Smith has been updated accordingly.
Explanation of the procedure
- Set addedRow = tableName.ListRows(3). This procedure uses the ListObject.ListRows property instead of the ListRows.Add method we used previously. The ListObject.ListRows property returns a ListRows object that represents all the rows of data in the ListObject object/Excel table. In this case the ListObject.ListRows property returns the third row of the Employees4 table.
- The returned row is assigned to the addedRow variable.
- The updated data is set to the cell of the third row that contains Department data.
How to add column(s) to an existing table using Excel VBA
We can insert one or multiple columns into a table using Excel VBA.
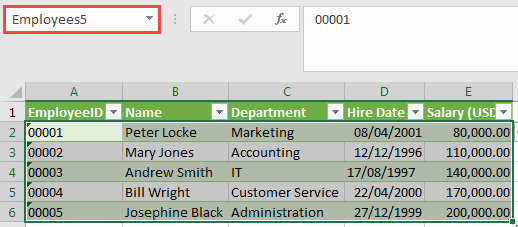
We will use the following table named Employees5 to explain how this can be done.
Example 1: Insert a single column
To insert a new column before column B that contains employee names, we do the following:
- In the active sheet that contains the Employees5 table press Alt + F11 to open the Visual Basic Editor.
- Insert a new module and type in the following procedure:
|
Sub insertSingleColumn() ActiveSheet.Range(«B2»).EntireColumn.Insert End Sub |
- Save the procedure and save the workbook as a macro-enable workbook. The procedure uses cell B2 but any other cell reference in column B would do.
- Place the cursor anywhere in the procedure and press F5 to run it.
- Press Alt + F11 to switch to the active workbook.
A new column has been added before the Name column.
Example 2: Insert multiple columns
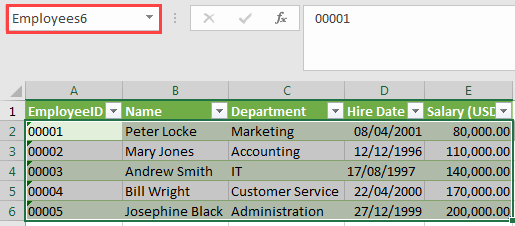
We can insert two columns before the Department column in the Employees6 table below:
Using the steps outlined previously, we enter the following code in a new module:
|
Sub insertMultipleColumns() Dim insertColumns As Integer Dim i As Integer insertColumns = 2 For i = 1 To insertColumns ActiveSheet.Range(«C3»).EntireColumn.Insert Next i End Sub |
When we run the code, two columns are inserted before the Departments column as seen below:
Explanation of the procedure
The procedure uses For Next loop. Every time the loop iterates, the Insert method of the EntireColumn property inserts a column before the indicated cell C3. In this case, the method inserts 2 columns because the loop iterates 2 times. If we want to insert more columns, we need to update the number we assign to the insertColumns variable.
Example 3: Insert a column after a fixed interval
We can use Excel VBA to insert one or more columns in a table after a fixed interval.
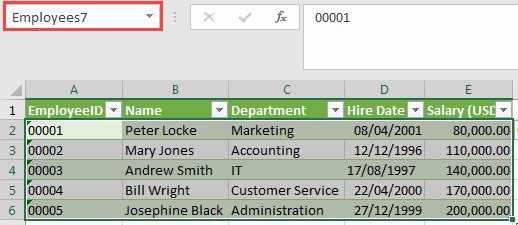
We use the Employees7 table to demonstrate how this works.
Using the steps outlined previously, insert the following procedure in a new module:
|
Sub insertColumnAfterInterval() Dim Interval As Integer, insertColumns As Integer Dim Count As Integer, i As Integer, j As Integer Interval = 1 insertColumns = 2 Count = 0 For i = 1 To ActiveSheet.UsedRange.Columns.Count — 1 Count = Count + Interval + 1 For j = 0 To insertColumns — 1 Count = Count + j ActiveSheet.UsedRange.Cells(1, Count).EntireColumn.Insert Next j Next i End Sub |
When we run the procedure, 2 columns are inserted into the table after each column in the dataset.
Explanation of the procedure
The procedure used 2 nested For Next loops. When the outer loop runs once, the inner loop runs twice to insert 2 columns.
If we want, we can assign different numbers to the Interval variable to achieve different results.
Example 4: Use the ListColumns.Add method to insert a column to a table
We can use the ListColumns.Add method to add columns to a table.
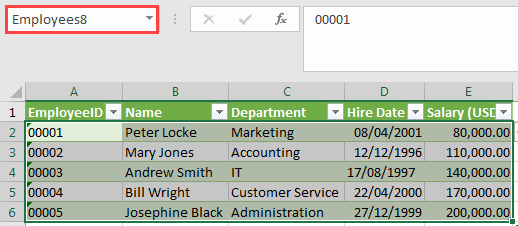
We will use the following table named Employees8 to explain how this method works:
We want to insert two columns into the table, one with the header MaritalStatus and the other with the header Hobby.
Using the steps outlined previously we insert a new module and key in the following procedure:
|
Sub addColumn() Dim ws As Worksheet Set ws = ActiveSheet Dim tbl As ListObject Set tbl = ws.ListObjects(«Employees8») tbl.ListColumns.Add(6).Name = «MaritalStatus» tbl.ListColumns.Add.Name = «Hobby» End Sub |
When we run the procedure, two columns are inserted at the end of the table.
The explanation for the ListColumns.Add method is similar to the one that was previously given for the ListRows.Add method.
Conclusion
In this tutorial, we have looked at several ways that Excel VBA can be used to add data to a table and insert rows and columns into an existing table.
Post Views: 3,963
In this Article
- VBA Tables and ListObjects
- Create a Table With VBA
- Inserting a Column at the End of the Table with VBA
- Inserting a Row at the Bottom of the Table with VBA
- Adding a Simple Sort with VBA
- Filter a Table With VBA
- Clear the Filter with the ShowAllData Method in VBA
- Clear All Filters From An Excel Table
- Deleting A Row With VBA
- Deleting a Column With VBA
- Converting a Table Back to a Range in VBA
- Adding Banded Columns and formatting to all the Tables in a Worksheet using VBA
- Creating a Table in Access in VBA Using DoCmd.RunSQL
- Filtering a Table in Access Using VBA
This tutorial will demonstrate how to work with Tables and ListObjects in VBA.
VBA Tables and ListObjects
Tables are one of Excel’s most useful and powerful features, in this tutorial, we will go over how to use VBA to create a table, add a simple sort to a table, filter a table and perform other table-related tasks.
Create a Table With VBA
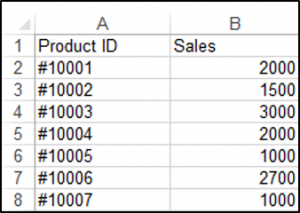
The ListObjects.Add Method can add a table to a worksheet, based on a range in that worksheet. We have the range shown in ($A$1:$B$8) on a worksheet called Sheet1.
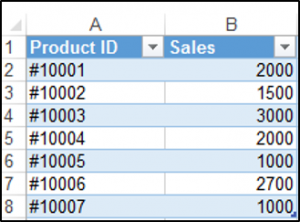
The following code will add a table, called Table1 to your worksheet, based on the range ($A$1:$B$8) using the default Table Style:
Sub CreateTableInExcel()

ActiveWorkbook.Sheets("Sheet1").ListObjects.Add(xlSrcRange, Range("$A$1:$B$8"), , xlYes).Name = _
"Table1"

End Sub
The result is:
Inserting a Column at the End of the Table with VBA
You can use the ListColumns.Add method in order to add a column to the end of your table. We have our table called Table1 shown below.
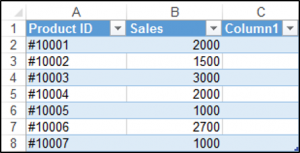
You can add a column to your table using the following code, which will always add a column to the end of the table:
Sub AddColumnToTheEndOfTheTable()

ActiveWorkbook.Sheets("Sheet1").ListObjects("Table1").ListColumns.Add

End Sub
The result is:
Inserting a Row at the Bottom of the Table with VBA
You can use the ListRows.Add method to add a row to the bottom of your table. We have our table called Table1 shown below.
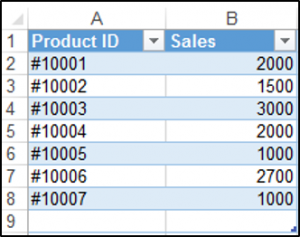
The following code will always add a row to the bottom of your table.
Sub AddRowToTheBottomOfTheTable()

ActiveSheet.ListObjects("Table1").ListRows.Add

End Sub
The result is:
Adding a Simple Sort with VBA
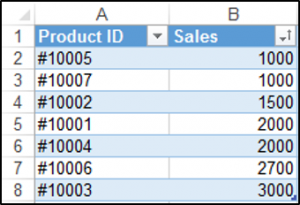
You can sort a table with VBA. We have our table called Table1 shown below and we can use VBA to sort the Sales Column from lowest to highest.
The following code will sort the Sales column in ascending order.
Sub SimpleSortOnTheTable()

Range("Table1[[#Headers],[Sales]]").Select
ActiveWorkbook.Worksheets("Sheet1").ListObjects("Table1").Sort.SortFields.Clear
ActiveWorkbook.Worksheets("Sheet1").ListObjects("Table1").Sort.SortFields.Add _
Key:=Range("Table1[[#All],[Sales]]"), SortOn:=xlSortOnValues, Order:= _
xlAscending, DataOption:=xlSortNormal

With ActiveWorkbook.Worksheets("Sheet1").ListObjects("Table1").Sort

.Header = xlYes
.MatchCase = False
.Orientation = xlTopToBottom
.SortMethod = xlPinYin
.Apply

End With

End Sub
The result is:
Filter a Table With VBA
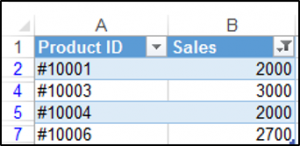
You can also filter an Excel table using VBA. We have our table called Table1 and we would like to filter the table so that only sales of greater than 1500 are shown.
We can use the Autofilter method, which has five optional parameters. Since we’d like to filter the Sales column which is the second column we set the Field to 2, and we use the xlAnd operator parameter, which is used for dates and numbers.
Sub SimpleFilter()

 ActiveWorkbook.Sheets("Sheet1").ListObjects("Table1").Range.AutoFilter Field:=2, Criteria1:= _
 ">1500", Operator:=xlAnd

End Sub
The result is:
VBA Coding Made Easy
Stop searching for VBA code online. Learn more about AutoMacro — A VBA Code Builder that allows beginners to code procedures from scratch with minimal coding knowledge and with many time-saving features for all users!
Learn More
Clear the Filter with the ShowAllData Method in VBA
You can access the ShowAllData Method of the Worksheet class in order to clear the filter. If it’s a table’s filter(s) that you want to clear, then you first have to select a cell in the table, which you can do in VBA.
The ShowAllData method will generate an error if one does not use conditional logic in order to check if there has been a filter applied in the worksheet. The following code shows you how to do this:
Sub ClearingTheFilter()

Range("Table1[[#Headers],[Sales]]").Select
If ActiveWorkbook.Worksheets("Sheet1").FilterMode = True Then
ActiveSheet.ShowAllData

End If

End Sub
Clear All Filters From An Excel Table
You can access the ShowAllData Method of the ListObject class without having to select a cell in the table first. The following code shows you how to do this:
Sub ClearAllTableFilters()
ActiveWorkbook.Worksheets("Sheet1").ListObjects("Table1").AutoFilter.ShowAllData
End Sub
Deleting A Row With VBA
You can delete a row in the databody of your table using the ListRows.Delete method. You have to specify which row using the row number. We have the following table called Table1.
Let’s say you wanted to delete the second row in the databody of your table, the following code would allow you to do this:
Sub DeleteARow()

ActiveWorkbook.Worksheets("Sheet1").ListObjects("Table1").ListRows(2).Delete

End Sub
The result is:
VBA Programming | Code Generator does work for you!
Deleting a Column With VBA
You can delete a column from your table using the ListColumns.Delete method. We have the following table called Table1 shown below:
In order to delete the first column, you would use the following code:
Sub DeleteAColumn()

ActiveWorkbook.Worksheets("Sheet1").ListObjects("Table1").ListColumns(1).Delete

End Sub
The result is:
Converting a Table Back to a Range in VBA
You can convert a table back to a normal range using VBA. The following code shows you how to convert a table called Table1 back to a range:
Sub ConvertingATableBackToANormalRange()

ActiveWorkbook.Sheets("Sheet1").ListObjects("Table1").Unlist

End Sub
Adding Banded Columns and formatting to all the Tables in a Worksheet using VBA
You can access all the tables in your worksheet using the ListObjects collection. In the sheet below we have two tables and we would like to add a Banded Column to both the tables at once and change the font of the data section of both tables to bold, using VBA.
Sub AddingBandedColumns()

Dim tbl As ListObject
Dim sht As Worksheet

Set sht = ThisWorkbook.ActiveSheet

For Each tbl In sht.ListObjects
tbl.ShowTableStyleColumnStripes = True
tbl.DataBodyRange.Font.Bold = True
Next tbl

End Sub
The result is:
Creating a Table in Access in VBA Using DoCmd.RunSQL
One of the main ways to create a table in Access in VBA, is through using the DoCmd.RunSQL method to run an action query with a SQL statement.
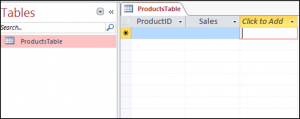
We have a button on our sample form and when we click on the button we’d like to create a table called ProductsTable with two fields or columns, one would be the primary key field called ProductsID and the other would be a field called Sales.
In order to create this table we would use the following code:
Private Sub cmdCreateProductsTable_Click()

DoCmd.RunSQL "CREATE TABLE ProductsTable " _
& "(ProductID INTEGER PRIMARY KEY, Sales Integer);"

End Sub
The result is:
Filtering a Table in Access Using VBA
You can also filter a table in Access using the DoCmd.ApplyFilter method. We have our simple table shown below in Access called ProductsTable.
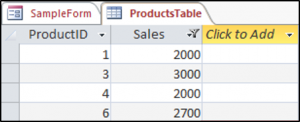
We would like to press this button on our form and then only see Sales that are greater than 1500.
So, we would use the following code to do this:
Private Sub cmdFilter_Click()

DoCmd.OpenTable "ProductsTable"

DoCmd.ApplyFilter , "[Sales]>1500"

End Sub
The result is:
Add a Column to a Table
To add a column to an Excel table use ListColumns.Add and specify the position of the new column.
Dim ws As Worksheet
Set ws = ActiveSheet
Dim tbl As ListObject
Set tbl = ws.ListObjects("Sales_Table")
'add a new column as the 5th column in the table
tbl.ListColumns.Add(5).Name = "TAX"
'add a new column at the end of the table
tbl.ListColumns.Add.Name = "STATUS"
5 FREE EXCEL TEMPLATES
Plus Get 30% off any Purchase in the Simple Sheets Catalogue!
Add a Row to a Table
To add a row to an Excel table use ListRows.Add and specify the position of the new row.
Dim ws As Worksheet
Set ws = ActiveSheet
Dim tbl As ListObject
Set tbl = ws.ListObjects("Sales_Table")
‘add a row at the end of the table
tbl.ListRows.Add
‘add a row as the fifth row of the table (counts the headers as a row)
tbl.ListRows.Add 5
Add Row and Enter Data
Dim ws As Worksheet
Set ws = ActiveSheet
Dim tbl As ListObject
Set tbl =ws.ListObjects("Sales_Table")
Dim newrow As ListRow
Set newrow = tbl.ListRows.Add
With newrow
    .Range(1) = 83473
    .Range(2) = "HJU -64448"
    .Range(3) = 5
End With
Add/Overwrite Data in a Specific Record
Dim ws AsWorksheet
Set ws =ActiveSheet
Dim tbl AsListObject
Set tbl =ws.ListObjects("Sales_Table")
Withtbl.ListRows(3)
   .Range(3)= 8
   .Range(6)= "CASH"
End With
Delete Row or Column
Dim ws As Worksheet
Set ws = ActiveSheet
Dim tbl As ListObject
Set tbl = ws.ListObjects("Sales_Table")
tbl.ListColumns(2).Delete
tbl.ListRows(2).Delete


