
Add-ins provide optional commands and features for Microsoft Excel. By default, add-ins are not immediately available in Excel, so you must first install and (in some cases) activate these add-ins so that you can use them.
Are you looking for information about Office Add-ins based on HTML, CSS, and JS? If you are, see Get an Office Add-in for Excel.
Some add-ins are built in to Excel, such as Solver and the Analysis ToolPak. Other add-ins are available from the Download Center and must first be downloaded and installed. Finally, there are add-ins that are created by third parties, such as a programmer in your organization or a software solution provider. These can be Component Object Model (COM) add-ins, Visual Basic for Applications (VBA) add-ins, and DLL add-ins. These add-ins must also be installed to use them.
Most add-ins can be categorized into three different types:
-
Excel add-ins These typically include Excel add-in (.xlam), Excel 97-2003 add-in (.xla), or DLL add-in (.xll) files or they are automation add-ins. Some Excel add-ins, such as Solver and the Analysis ToolPak, may be available after you install Excel or Microsoft Office. Typically, you only need to activate these add-ins to use them.
-
Downloadable add-ins Additional add-ins for Excel can be downloaded and installed from Downloads at Office.com.
-
Custom add-ins Developers and solution providers usually design custom Component Object Model (COM) add-ins, automation add-ins, VBA add-ins, and XLL add-ins. These must be installed for you to use them.
After you have installed or activated an add-in, the add-in and its commands may be available in one of the following locations:
-
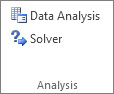
Data tab. After you install and activate the Analysis ToolPak and Solver add-ins, the Data Analysis and Solver commands are available in the Analysis group.

-
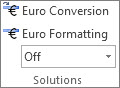
Formulas tab. After you install and activate the Euro Currency Tools, the Euro Conversion and Euro Formatting commands are displayed in the Solutions group.
-
Add-Ins tab. Other add-ins may be added to the Add-Ins tab. This tab is added to the ribbon when you install and activate the first add-in that is shown in the Add-Ins tab. If you don’t see the Add-Ins tab, you should exit and then restart Excel.
Other add-ins, such as the Get Started tab, are available in other places in Excel, such as a tab on the ribbon, or through macros or customized menus.
Important: If you are a software developer, you can use this procedure to install or remove an automation program before you design installation and removal programs for your add-in.
To activate an Excel add-in
-
Click the File tab, click Options, and then click the Add-Ins category.
-
In the Manage box, click Excel Add-ins, and then click Go.
The Add-Ins dialog box appears.
-
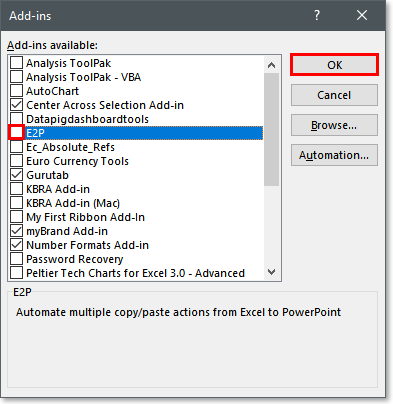
In the Add-Ins available box, select the check box next to the add-in that you want to activate, and then click OK.
If you cannot find the add-in that you want to activate in the Add-Ins available box, you may need to install it.
To install an Excel add-in
-
To install an add-in that is typically installed with Excel, such as Solver or the Analysis ToolPak, run the setup program for Excel or Microsoft Office and choose the Change option to install the add-in. After you restart Excel, the add-in should appear in the Add-Ins available box.
-
Some Excel add-ins are located on your computer and can be installed or activated by clicking Browse (in the Add-Ins dialog box) to locate the add-in, and then clicking OK.
-
Some Excel add-ins require running an installation package. You may need to download or copy the installation package to your computer (an installation package is typically a file with an .msi file name extension), and then run it.
-
Other add-ins that are not available on your computer can be downloaded and installed through a Web browser from Downloads or from other sites on the Internet or a server in your organization. Follow the setup instructions for the download as needed.
To inactivate an Excel add-in
-
Click the File tab, click Options, and then click the Add-Ins category.
-
In the Manage box, click Excel Add-ins, and then click Go.
-
In the Add-Ins available box, clear the check box next to the add-in that you want to inactivate, and then click OK.
In many cases, when you inactivate an add-in, it is removed from its group on the ribbon. In other cases, to remove the add-in from the ribbon, you may need to restart Excel.
Note Inactivating an add-in does not remove the add-in from your computer. To remove the add-in from your computer, you must uninstall it.
To remove an Excel add-in
Important: If you originally installed the Excel add-in from a network file server or from a shared folder, you might need to remove the add-in from that location. If you installed the Excel add-in from a CD and you mapped your CD drive to a new drive letter after installing the add-in, you need to reinstall the add-in from the CD. If you are running any Excel add-ins from the CD, you must uninstall the Excel add-ins, and then reinstall them from the CD.
-
Click the File tab, and then click Exit.
-
In Control Panel, click Programs and Features (Windows 7 and Windows Vista) or Add/Remove Programs (Windows XP).
-
Do one of the following:
-
If you installed Excel as part of Microsoft Office, click Microsoft Office in the list of installed programs, and then click the Change button.
-
If you installed Excel individually, click the name of your program in the list of installed programs, and then click the Change button.
-
If you installed the add-in from the Download Center, click the name of your program in the list of installed programs, and then click the Uninstall button.
-
-
Follow the instructions in the installation program.
Important: If you are a software developer, you can use this procedure to install or remove an automation program before you design installation and removal programs for your add-in. If you are not a developer, you should not need to use this procedure. Contact the system administrator who provided the add-in if you want installation and removal instructions.
Add a COM add-in
-
Click the File tab, click Options, and then click the Add-Ins category.
-
In the Manage box, click COM Add-ins, and then click Go.
The COM Add-Ins dialog box appears.
-
In the Add-Ins available box, select the check box next to the add-in that you want to install, and then click OK.
Tip If the add-in that you want to use is not listed in the Add-Ins available box, click Add, and then locate the add-in.
Remove a COM add-in
-
Click the File tab, click Options, and then click the Add-Ins category.
-
In the Manage box, click COM Add-ins, and then click Go.
The COM Add-Ins dialog box appears.
-
In the Add-Ins available box, clear the check box next to the add-in that you want to remove, and then click OK.
Note This removes the add-in from memory but keeps its name in the list of available add-ins. It does not delete the add-in from your computer.
-
To remove a COM add-in from the list of available add-ins and to delete the add-in from your computer, click its name in the Add-ins available box, and then click Remove.
Note: If you are a software developer, you can use this procedure to install or remove an automation program before you design installation and removal programs for your add-in. If you are not a developer, you should not need to use this procedure. Contact the system administrator who provided the add-in if you want installation and removal instructions.
-
Click the File tab, click Options, and then click the Add-Ins category.
-
In the Manage box, click Excel Add-ins, and then click Go.
The Add-Ins dialog box appears.
-
To install an automation add-in, in the Automation servers available box, click Automation, and then click the add-in that you want.
Tip If the add-in that you want isn’t in the list, click Browse, locate the add-in, and then click OK.
-
To remove an automation add-in, you must remove it from the registry. See your system administrator for details.
Some add-ins are built in to Excel, such as Solver and the Analysis ToolPak. Other add-ins are available from the Download Center and must first be downloaded and installed. Finally, there are add-ins that are created by third parties, such as a programmer in your organization or a software solution provider. These can be Component Object Model (COM) add-ins, Visual Basic for Applications (VBA) add-ins, and DLL add-ins. These add-ins must also be installed to use them.
Most add-ins can be categorized into three different types:
-
Excel add-ins These typically include Excel add-in (.xlam), Excel 97-2003 add-in (.xla), or DLL add-in (.xll) files or they are automation add-ins. Some Excel add-ins, such as Solver and the Analysis ToolPak, may be available after you install Excel or Microsoft Office. Typically, you only need to activate these add-ins to use them.
-
Downloadable add-ins Additional add-ins for Excel can be downloaded and installed from Downloads at Office.com.
-
Custom add-ins Developers and solution providers usually design custom Component Object Model (COM) add-ins, automation add-ins, VBA add-ins, and XLL add-ins. These must be installed for you to use them.
After you have installed or activated an add-in, the add-in and its commands may be available in one of the following locations:
-
Data tab. After you install and activate the Analysis ToolPak and Solver add-ins, the Data Analysis and Solver commands are available in the Data tab on the ribbon.
-
Home tab. Other add-ins may be added to the Home tab.
Other add-ins, such as the Get Started tab, are available in other places in Excel, such as a tab on the ribbon, or through macros or customized menus.
Important: If you are a software developer, you can use this procedure to install or remove an automation program before you design installation and removal programs for your add-in.
To activate a pre-installed Excel add-in
-
On the Tools menu, select Add-ins.
-
In the Add-Ins available box, select the check box for the Add-in you want to activate, and then click OK.
To install an Excel add-in
-
Some Excel add-ins are located on your computer and can be installed or activated by clicking Browse (in the Add-Ins dialog box above) to locate the add-in, and then clicking OK.
-
Some Excel add-ins require running an installation package. You may need to download or copy the installation package to your computer (an installation package is typically a file with an .msi file name extension), and then run it.
-
Other add-ins that are not available on your computer can be downloaded and installed through a Web browser from Downloads or from other sites on the Internet, a server in your organization, , or using the built-in Store option in Excel. Follow the setup instructions for the download as needed.
To install Add-ins from the Store
-
Click the Insert tab in the ribbon.
-
Click the Store button.
-
Use the Categories or Search field to find Add-ins.
-
Click Add to install the Add-in.
Note: Some Add-ins need to be purchased.
-
To remove an Excel add-in
-
Click the Insert tab, and then click My Add-ins.
-
In Office Add-ins, click the 3 dots menu next to the Add-in.
-
Click Remove.
-
Read the notice that appears regarding other devices and click Remove.
April 29, 2015/
Chris Newman
Installing Your Excel Add-in
So you just downloaded or purchased a shiny, new add-in program to take your Office capabilities to the next level. The only problem is that there isn’t an installer program to get it running on your computer! Let’s walk through the steps to get your add-in file up and running in no time.
Simply clicking on your add-in file will only open it in the Office Program for a single-use. You want that add-in file to open automatically every time you start up the Office application. For this to occur, you need to properly install the add-in.
This article will show you the 3 steps to take to ensure your add-in file gets properly installed.
Note: I will be using Microsoft Excel for this demonstration, but PowerPoint add-ins will have the EXACT SAME process.
1. Ensure Your Excel Add-in File Is Unblocked
Microsoft Files with malicious VBA code are rampant throughout the internet. Many hackers will embed malicious VBA code into Office files and get unsuspecting victims to run the code and cause all sorts of havoc.
For this reason, Microsoft has been beefing up the way they handle Office files that are downloaded from the internet. One thing they have implemented recently is blocking the code from running by default.
This serves as an annoyance for white-hat developers like me as it adds extra steps (and confusion) for my customers to get the add-in installed. But it’s ultimately Microsoft’s program, so we have to play by Microsoft’s rules!
The first thing you will want to do after you download or receive your add-in file ensures it has not been set to a “Blocked” state.
-
Right-click on the add-in file while it is closed (not running in Excel)
-
Click the Properties menu item
-
In the General tab, look to see if there is a Security section at the very bottom
-
If visible, check the Unblock checkbox
-
Click the Apply button
If done properly, the Security section within the General tab should disappear.
2. Save Your Excel Add-in File To Your Computer
You can save your add-in file anywhere you wish, but I recommend you save it in the default add-in folder for Office. This folder location varies based on which operating system you are using.
Windows XP
C:Documents and Settings[insert your username]Application DataMicrosoftAddIns
Windows Vista / Windows 7 / Windows 8 / Windows 10
C:Users[insert your username]AppDataRoamingMicrosoftAddIns
3. Enable Your Add-in File In Excel
The Quick Way (Office 2010+)
-
Go to the Developer tab
-
Click the Add-ins Button
-
Inside the Add-ins Dialog Box, click the Browse… button
-
The Explorer Window should default to the Microsoft add-in folder location
-
Navigate and select your add-in file, then click OK
-
Ensure the newly added add-in name is checked in the dialog’s listbox & click OK
-
Your add-in is now installed!
The Slightly Longer Way (Office 2007+)
-
Go to File inside your Excel Program
-
Select Excel Options
-
Select Add-ins from the left-hand pane
-
Make sure Excel Add-ins is chosen in the Manage drop-down menu and click Go…
-
Inside the Add-ins Dialog Box, click the Browse… button
-
The Explorer Window should default to the Microsoft add-in folder location
-
Navigate and select your add-in file, then click OK
-
Ensure the newly added add-in name is checked in the dialog’s listbox & click OK
-
Your add-in is now installed!
Temporarily Disable An Excel Add-in
If you want to stop using a particular add-in for a temporary period of time, you can navigate back to the Add-ins dialog box and simply uncheck the add-in’s name, then click OK. The add-in will disappear from your current session and also will no longer auto-load when you start up your application.
Add-in Disappearing When Restarting Excel?
In July 2016, Microsoft decided to heighten its security features and block files that are downloaded from the internet or another computer by default. With regular files like a .xlsx or .pptx there is a prompt that notifies you the file is currently being blocked. Unfortunately, Microsoft was not kind enough to do the same thing with add-in files (.xlam or .ppam). Hence, leaving a TON of users scratching their heads as to why add-ins keep disappearing from their ribbon.
If you would like details on how to “Trust” your add-in file, check out this post:
ARTICLE: Prevent Microsoft Office Add-ins From Disappearing From The Ribbon Interface
Uninstalling An Excel Add-in
If you want to get rid of your add-in permanently, you can use the following steps:
-
Close out of your application (ie Excel)
-
Delete your add-in file* or move it to a new file path location
-
Re-open your application (ie Excel)
-
Navigate to the Add-ins dialog box (see Section A above)
-
Try to check or uncheck the add-in name and you should get a message box stating that the add-in could not be found and asking if you would like to remove it from the add-in list
-
Confirm the removal
*Bonus Tip: If you do not know where you saved your add-in, you can carry out the following steps to find the file location on your computer:
-
Use the shortcut Alt + F11 to open up the Visual Basic Editor
-
In the Visual Basic Editor window, use the shortcut ctrl + g to open up the Immediate Window
-
In the Project Pane, highlight the name of your add-in
-
In the Immediate Window, paste in the following line of code and hit the Enter key
After executing the above line of code in the Immediate Window, your add-in’s file path should be displayed! Here’s a visual for you in case those steps were a little confusing.
Надстройки — это файлы MS Excel с расширением .xlam (2007, 2010, 2013, 2016, 2019 и 365) или .xla (2003), которые содержат макросы и которые пишутся для расширения возможностей MS Excel. В этой статье я расскажу, как подключать такие надстройки и как настроить MS Excel, чтобы надстройки могли свободно функционировать.
Начнем с настройки MS Excel. Чтобы надстройки работали нормально, необходимо настроить параметры безопасности MS Excel. Создатели надстроек обычно пишут в сопроводительной документации какие параметры необходимо установить для нормальной работы той или иной надстройки. Нельзя забывать, что любые макросы — это потенциальная угроза безопасности компьютера, поэтому рекомендую брать надстройки только из проверенных источников и относиться к настройке параметров безопасности со всей серьезностью.
Для нормальной работы большинства надстроек достаточно параметров безопасности, установленных по умолчанию. Поэтому перед подключением надстроек необходимо просто проверить эти параметры и, если они были изменены, вернуть их в исходное состояние.
Так как версий MS Excel существует на сегодняшний день как минимум 7 и в разных версиях эти процессы осуществляются по-разному, я описал каждую процедуру для каждой версии MS Excel:
1
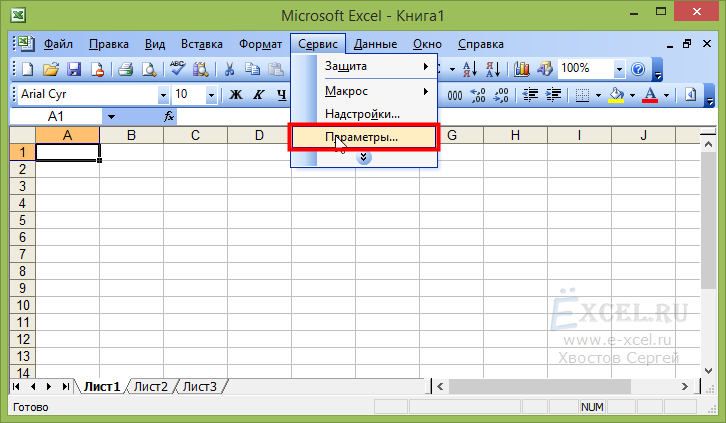
В главном меню выберите пункт «Сервис«, в выпавшем меню выберите пункт «Параметры…«:
2
В открывшемся диалоговом окне выберите вкладку «Безопасность«:
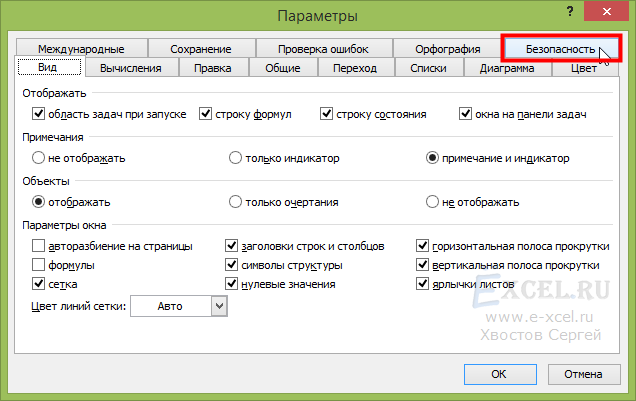
3
Во вкладке безопасность нажмите на кнопку «Безопасность макросов…«:
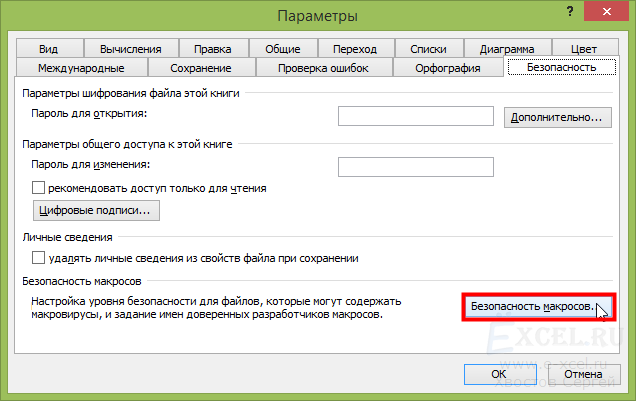
4
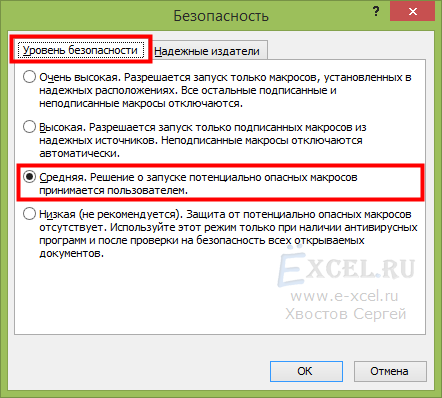
В открывшемся диалоговом окне, во вкладке «Уровень безопасности» установите галочку напротив пункта «Средняя«:
5
Во вкладке «Надежные издатели» установите галочку напротив пункта «Доверять всем установленным надстройкам и шаблонам» и нажмите кнопку «ОК«:
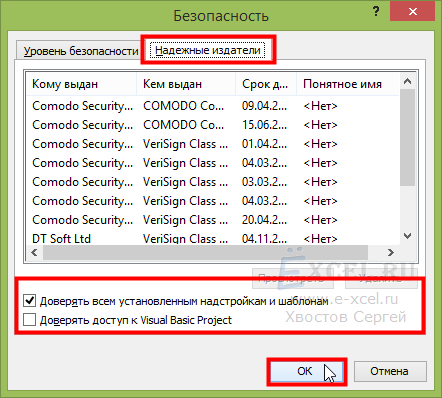
6
В диалоговом окне «Параметры» так же нажмите кнопку «ОК«:
Настройка MS Excel закончена. Можно подключать надстройку.
1
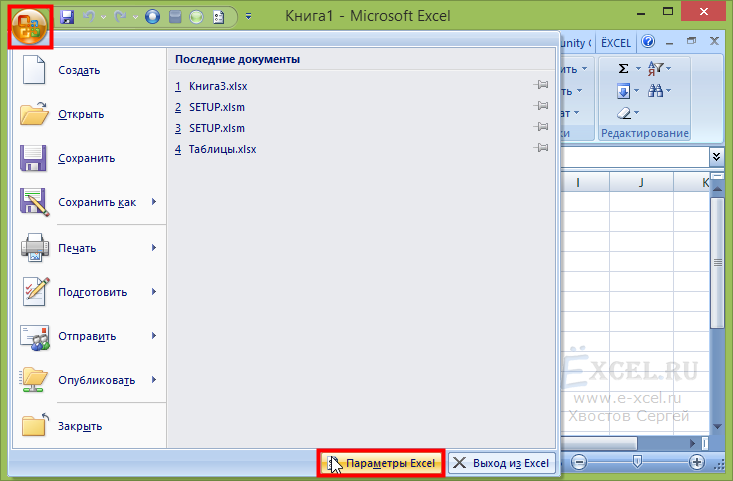
В левом верхнем углу нажмите большую круглую кнопку «Office«, в выпавшем меню нажмите кнопку «Параметры Excel«:
2
В открывшемся диалоговом окне слева выберите пункт «Центр управления безопасностью«:
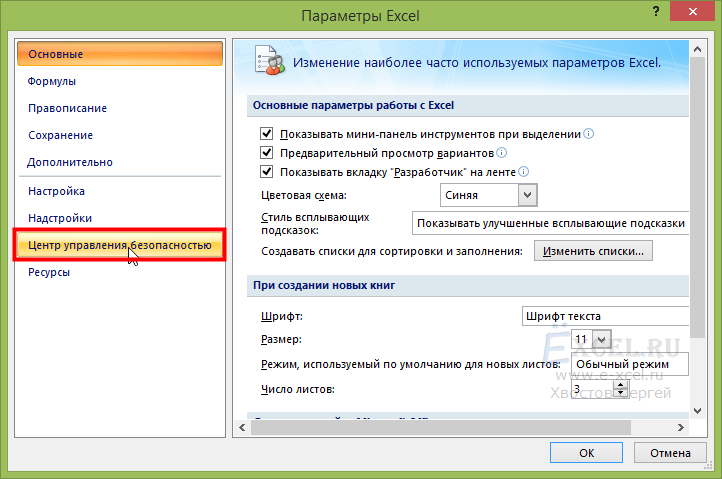
3
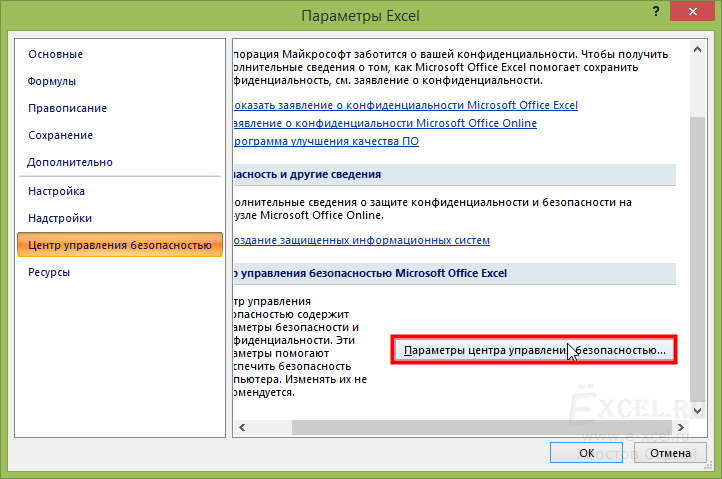
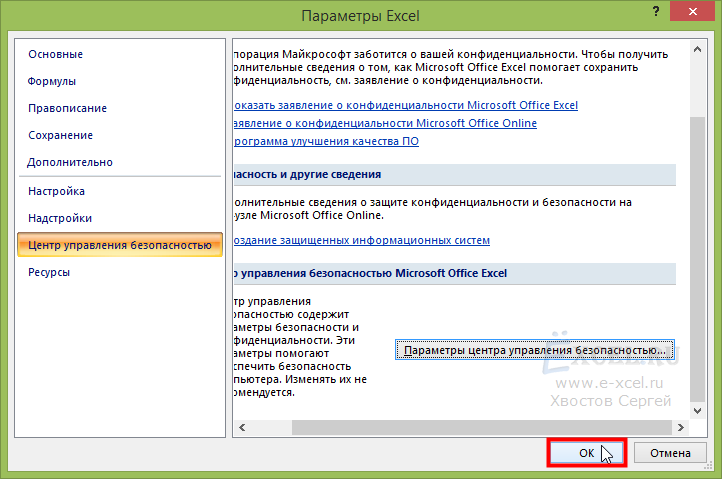
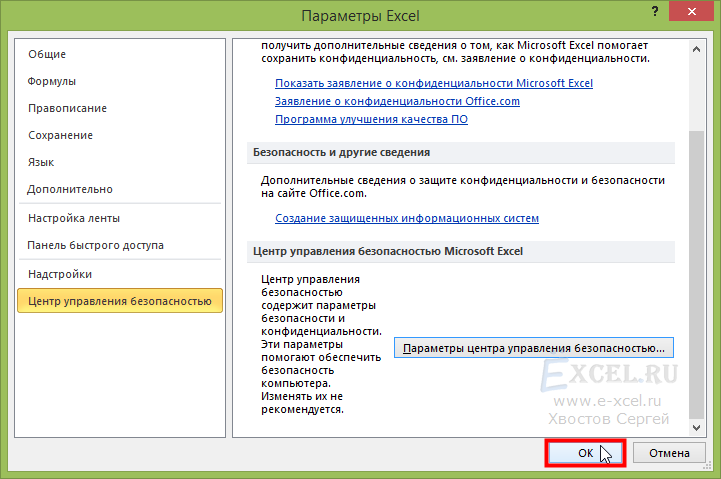
В открывшейся вкладке справа нажмите на кнопку «Параметры центра управления безопасностью…«:
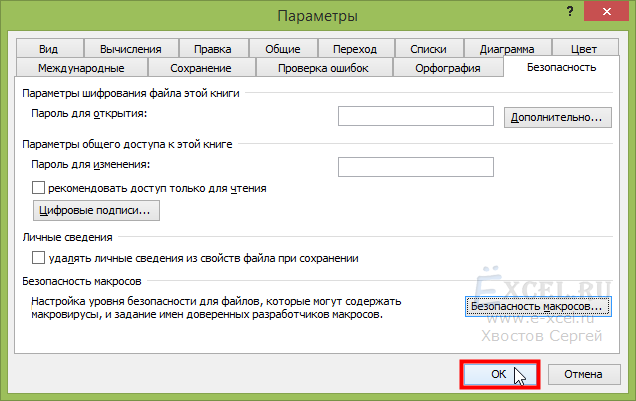
4
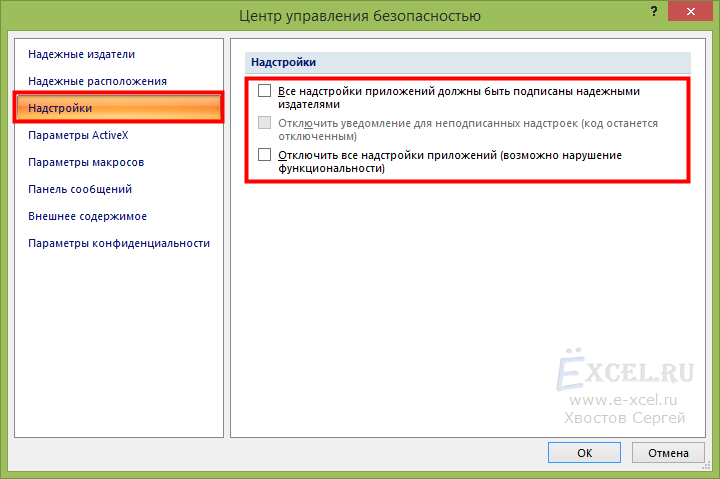
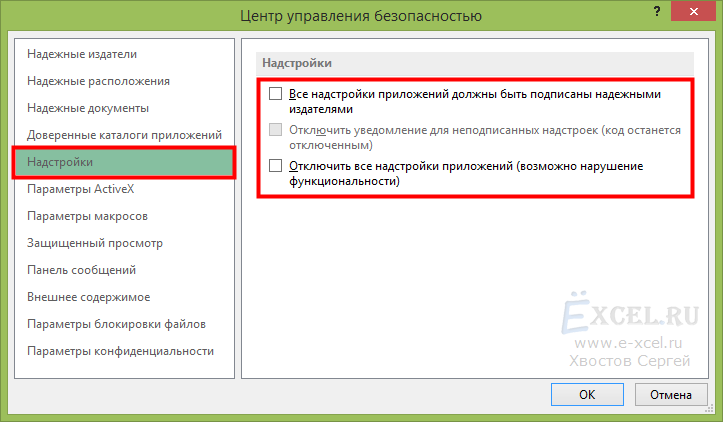
В открывшемся диалоговом окне во вкладке «Надстройки» убедитесь, что бы все галочки были сняты:
5
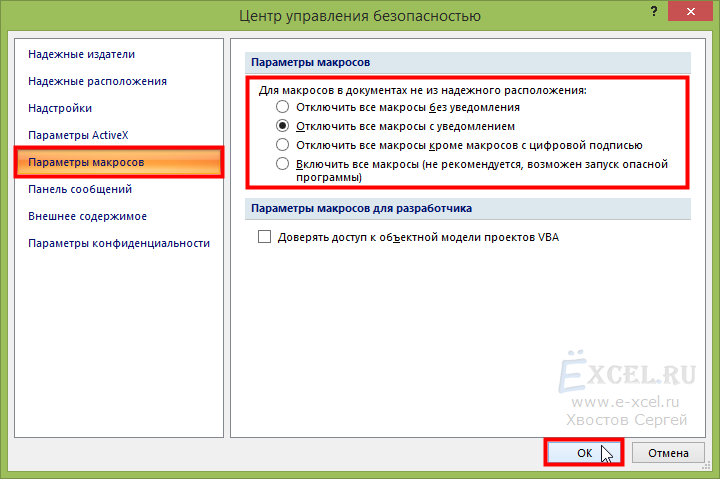
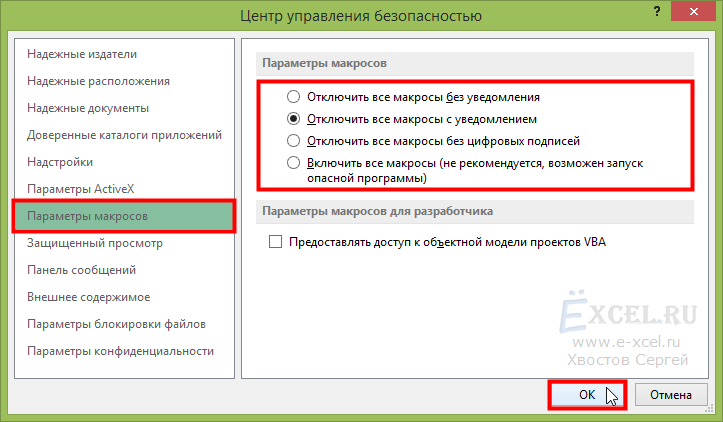
Во вкладке «Параметры макросов» выберите пункт «Отключить все макросы с уведомлением» и нажмите кнопку «ОК«:
6
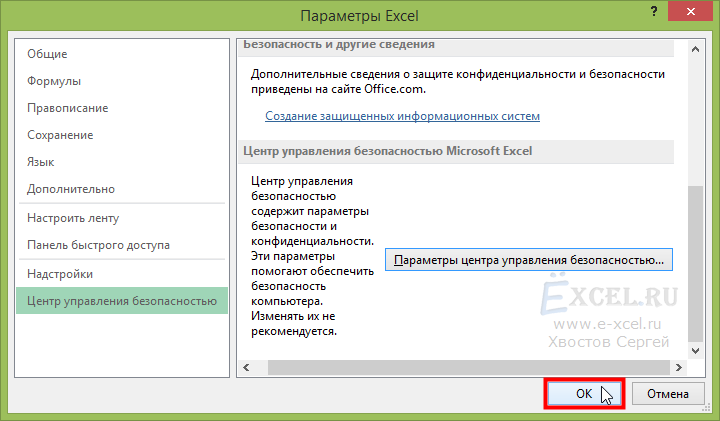
В диалоговом окне «Параметры Excel» так же нажмите кнопку «ОК«:
Настройка MS Excel закончена. Можно подключать надстройку.
1
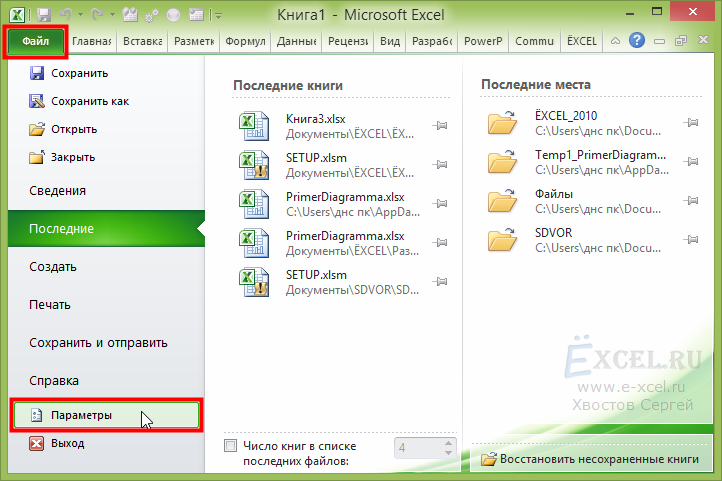
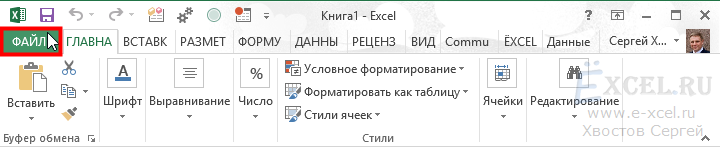
В левом верхнем углу нажмите зеленую кнопку «Файл«, в выпавшем меню выберите пункт «Параметры«:
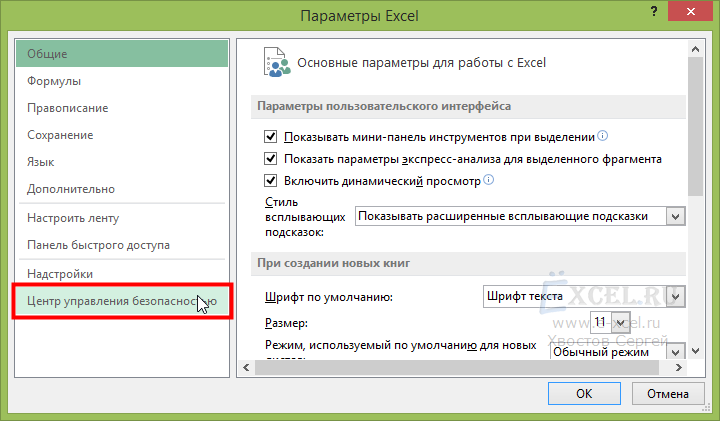
2
В открывшемся диалоговом окне слева выберите пункт «Центр управления безопасностью«:
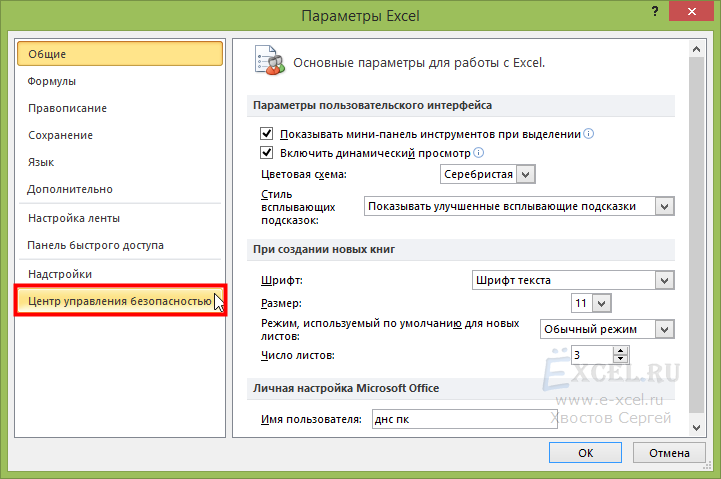
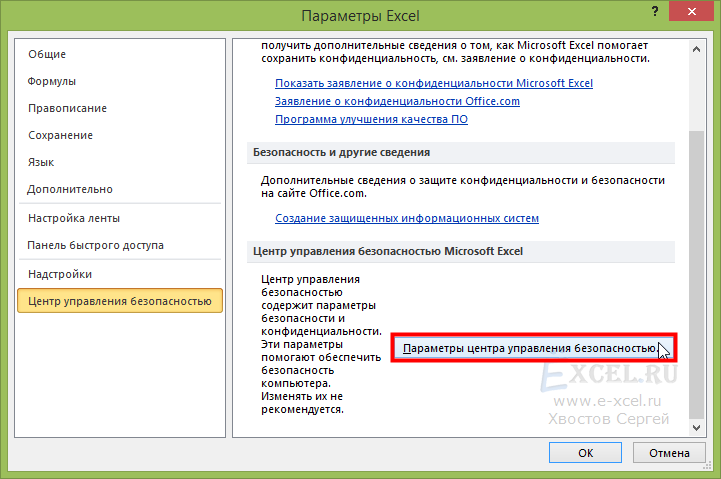
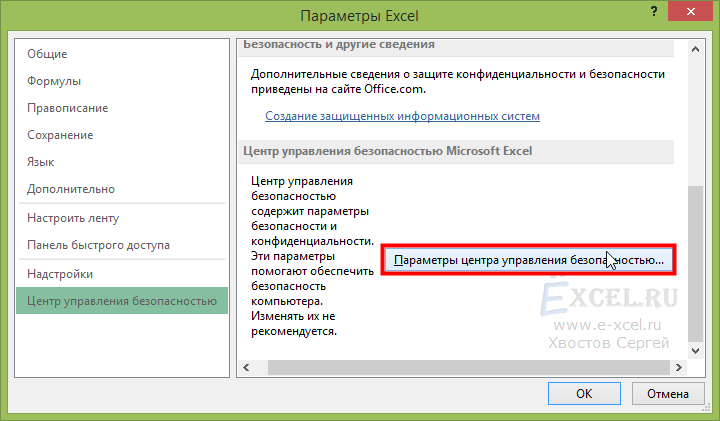
3
В открывшейся вкладке справа нажмите на кнопку «Параметры центра управления безопасностью…«:
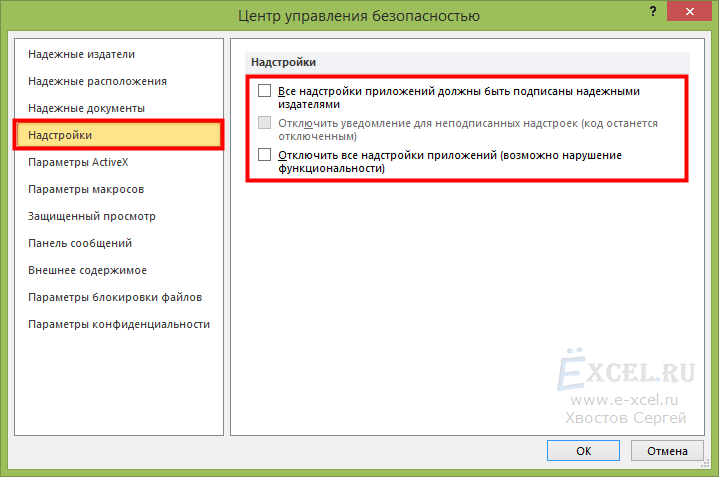
4
В открывшемся диалоговом окне во вкладке «Надстройки» убедитесь, что бы все галочки были сняты:
5
Во вкладке «Параметры макросов» выберите пункт «Отключить все макросы с уведомлением» и нажмите кнопку «ОК«:
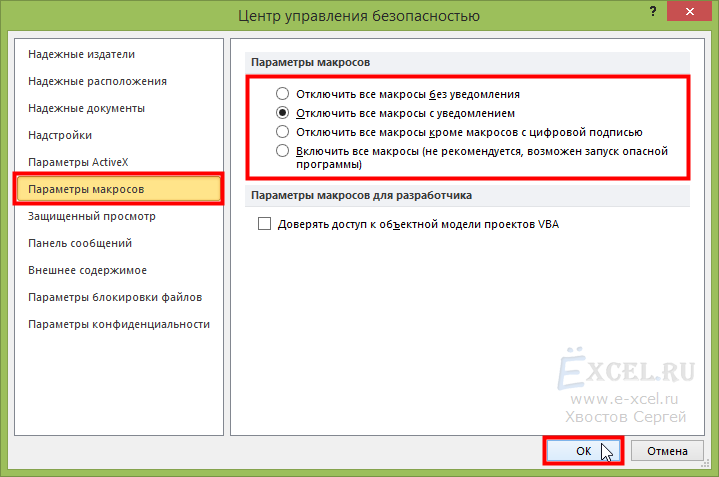
6
В диалоговом окне «Параметры Excel» так же нажмите кнопку «ОК«:
Настройка MS Excel закончена. Можно подключать надстройку.
1
В левом верхнем углу нажмите зеленую кнопку «Файл«:
2
В открывшемся меню выберите пункт «Параметры«:

3
В открывшемся диалоговом окне слева выберите пункт «Центр управления безопасностью«:
4
В открывшейся вкладке справа нажмите на кнопку «Параметры центра управления безопасностью…«:
5
В открывшемся диалоговом окне во вкладке «Надстройки» убедитесь, что бы все галочки были сняты:
6
Во вкладке «Параметры макросов» выберите пункт «Отключить все макросы с уведомлением» и нажмите кнопку «ОК«:
7
В диалоговом окне «Параметры Excel» так же нажмите кнопку «ОК«:
Настройка MS Excel закончена. Можно подключать надстройку.
1
Скачайте и сохраните у себя на компьютере файл надстройки (с расширением *.xla). Место сохранения не имеет значение, главное не менять место сохранения файла после подключения к MS Excel.
Закройте все открытые копии MS Excel и все открытые файлы. Откройте MS Excel заново. Важно чтобы перед подключением была открыта всего одна копия MS Excel.
2
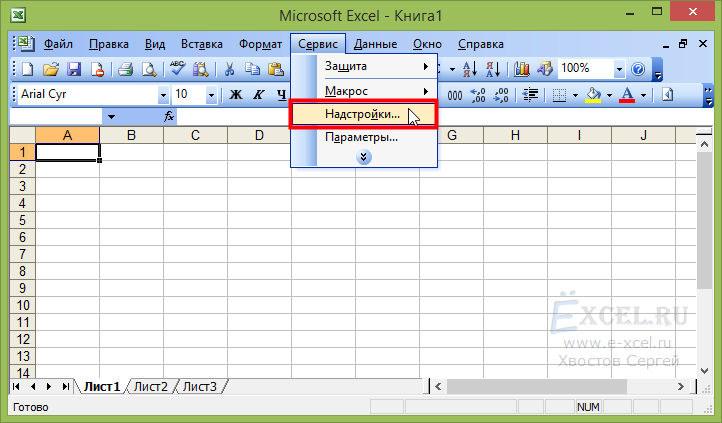
В главном меню выберите пункт «Сервис«, в выпавшем меню выберите пункт «Надстройки«:
3
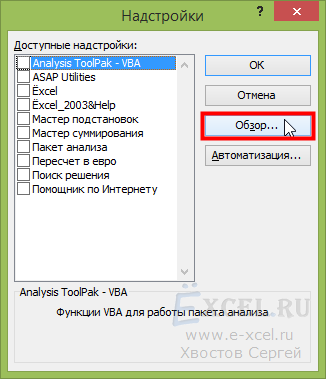
В открывшемся диалоговом окне «Надстройки» нажмите кнопку «Обзор«:
4
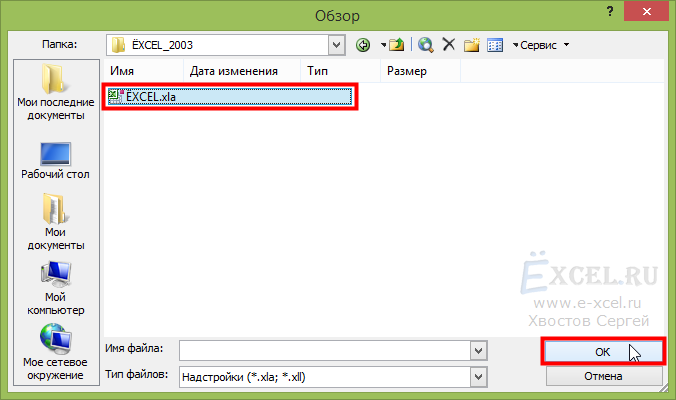
В открывшемся окне выберите в соответствующей папке файл надстройки с расширением *.xla и нажмите кнопку «ОК«:
5
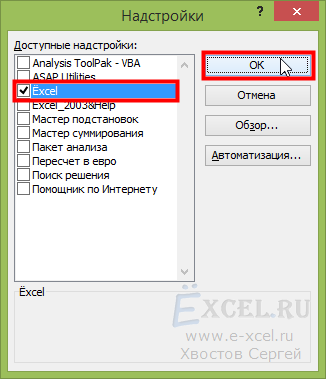
В диалоговом окне «Надстройки» в поле «Доступные надстройки» появиться ваша надстройка, отмеченная галочкой, если так и произошло нажмите кнопку «ОК«:
6
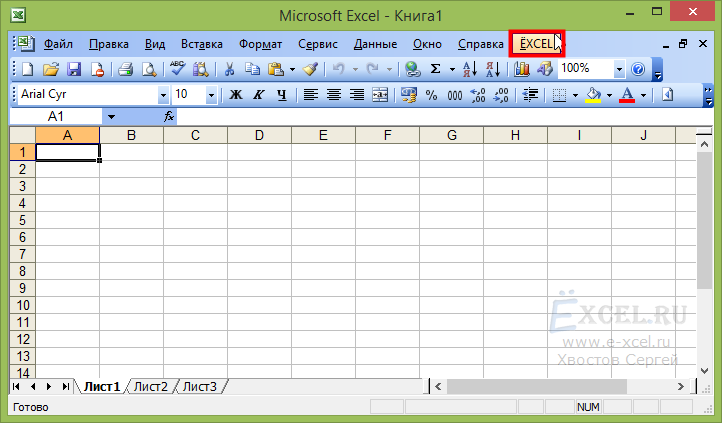
Диалоговое окно «Надстройки» закроется, а в главном меню появиться новый пункт — меню подключенной надстройки (если конечно у нее есть меню):
Надстройка подключена.
1
Скачайте и сохраните у себя на компьютере файл надстройки (с расширением *.xlam). Место сохранения не имеет значение, главное не менять место сохранения файла после подключения к MS Excel.
Закройте все открытые копии MS Excel и все открытые файлы. Откройте MS Excel заново. Важно чтобы перед подключением была открыта всего одна копия MS Excel.
2
В левом верхнем углу нажмите большую круглую кнопку «Office«, в выпавшем меню нажмите кнопку «Параметры Excel«:
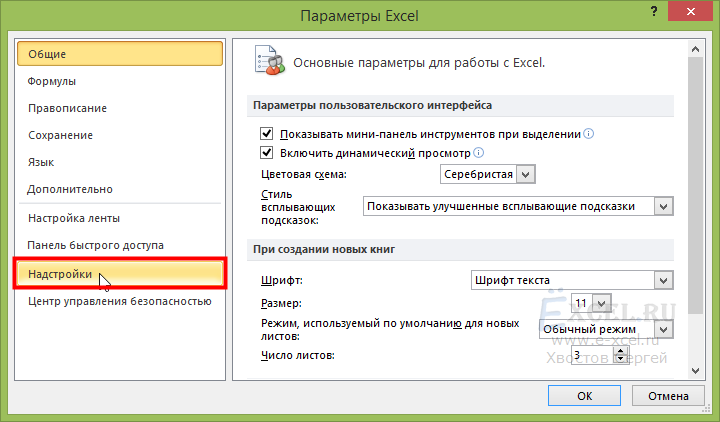
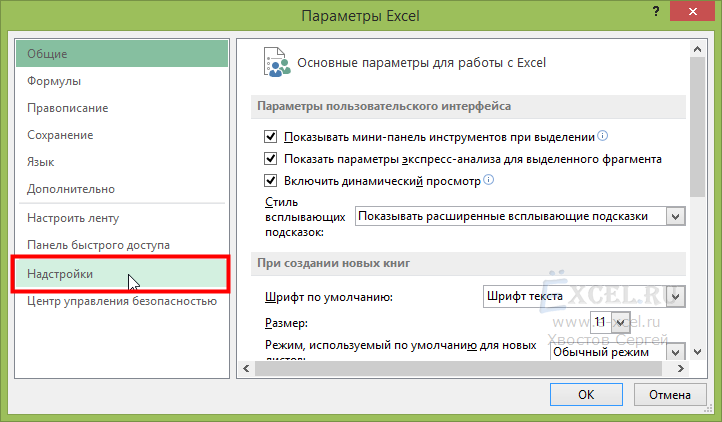
3
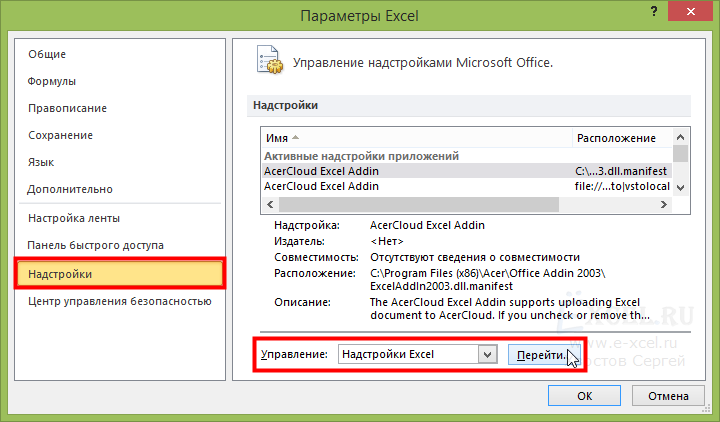
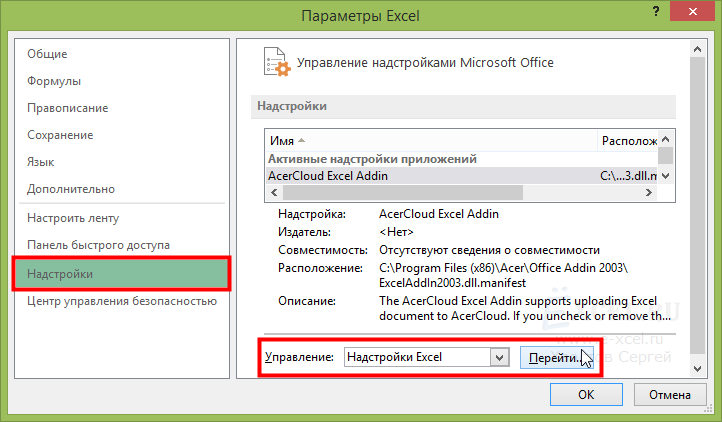
В открывшемся диалоговом окне слева выберите пункт «Надстройки«:

4
В открывшейся вкладке справа убедитесь, что в поле «Управление:» выбрано значение «Надстройки Excel» и нажмите кнопку «Перейти…«:
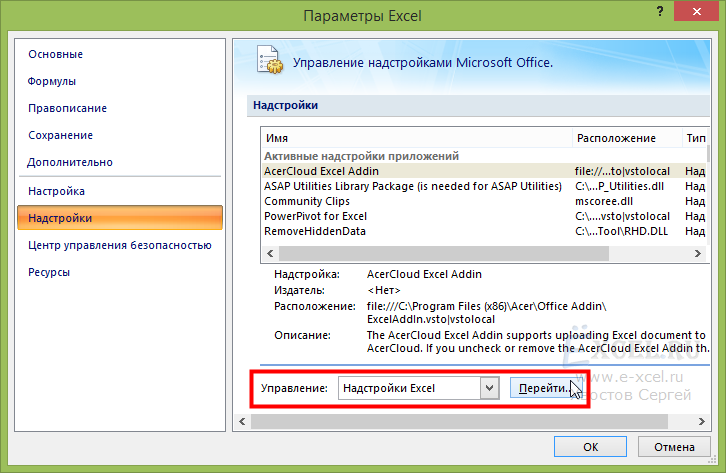
5
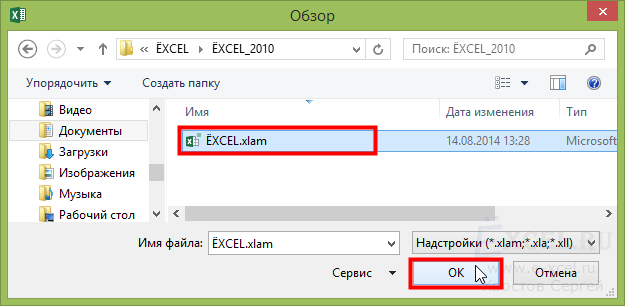
В открывшемся диалоговом окне «Надстройки» нажмите кнопку «Обзор«:
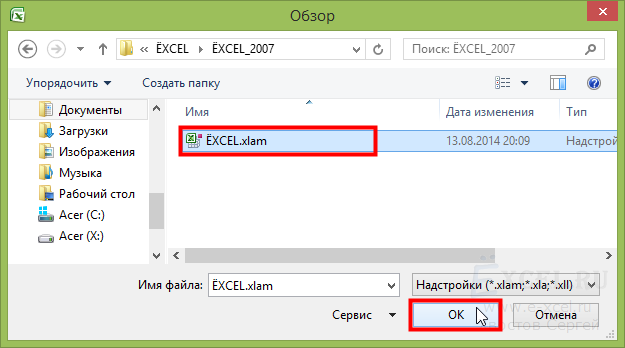
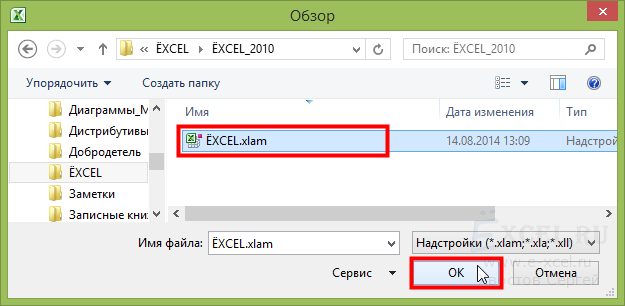
6
В открывшемся окне выберите в соответствующей папке файл надстройки с расширением *.xlam и нажмите кнопку «ОК«:
7
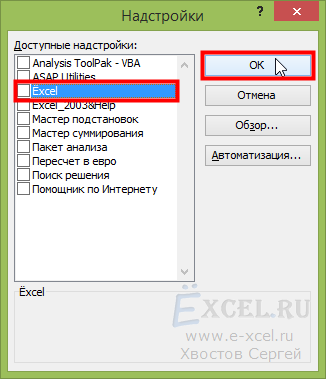
В диалоговом окне «Надстройки» в поле «Доступные надстройки» появиться ваша надстройка, отмеченная галочкой, если так и произошло нажмите кнопку «ОК«:
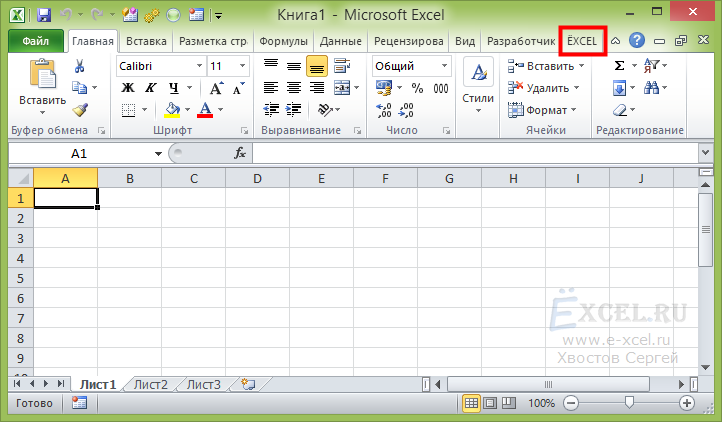
8
Диалоговое окно «Надстройки» закроется, а в главном меню появиться новый пункт — меню подключенной надстройки (если конечно у нее есть меню):
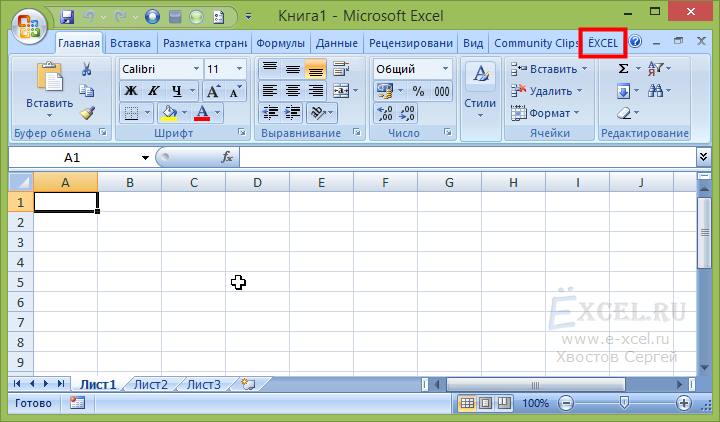
Надстройка подключена.
1
Скачайте и сохраните у себя на компьютере файл надстройки (с расширением *.xlam). Место сохранения не имеет значение, главное не менять место сохранения файла после подключения к MS Excel.
Закройте все открытые копии MS Excel и все открытые файлы. Откройте MS Excel заново. Важно чтобы перед подключением была открыта всего одна копия MS Excel.
2
В левом верхнем углу нажмите зеленую кнопку «Файл«, в выпавшем меню выберите пункт «Параметры«:
3
В открывшемся диалоговом окне слева выберите пункт «Надстройки«:
4
В открывшейся вкладке справа убедитесь, что в поле «Управление:» выбрано значение «Надстройки Excel» и нажмите кнопку «Перейти…«:
5
В открывшемся диалоговом окне «Надстройки» нажмите кнопку «Обзор…«:
6
В открывшемся окне выберите в соответствующей папке файл надстройки с расширением *.xlam и нажмите кнопку «ОК«:
7
В диалоговом окне «Надстройки» в поле «Доступные надстройки» появиться ваша надстройка, отмеченная галочкой, если так и произошло нажмите кнопку «ОК«:
8
Диалоговое окно «Надстройки» закроется, а в главном меню появиться новый пункт — меню подключенной надстройки (если конечно у нее есть меню):
Надстройка подключена.
1
Скачайте и сохраните у себя на компьютере файл надстройки (с расширением *.xlam). Место сохранения не имеет значение, главное не менять место сохранения файла после подключения к MS Excel.
Закройте все открытые копии MS Excel и все открытые файлы. Откройте MS Excel заново. Важно чтобы перед подключением была открыта всего одна копия MS Excel.
2
В левом верхнем углу нажмите зеленую кнопку «Файл«:
3
В открывшемся меню выберите пункт «Параметры«:
4
В открывшемся диалоговом окне слева выберите пункт «Надстройки«:
5
В открывшейся вкладке справа убедитесь, что в поле «Управление:» выбрано значение «Надстройки Excel» и нажмите кнопку «Перейти…«:
6
В открывшемся диалоговом окне «Надстройки» нажмите кнопку «Обзор«:
7
В открывшемся окне выберите в соответствующей папке файл надстройки с расширением *.xlam и нажмите кнопку «ОК«:
8
В диалоговом окне «Надстройки» в поле «Доступные надстройки» появиться ваша надстройка, отмеченная галочкой, если так и произошло нажмите кнопку «ОК«:
9
Диалоговое окно «Надстройки» закроется, а в главном меню появиться новый пункт — меню подключенной надстройки (если конечно у нее есть меню):

Надстройка подключена.
1
В главном меню выберите пункт «Сервис«, в выпавшем меню выберите пункт «Надстройки«:
2
В открывшемся окне «Надстройки«, снимите галочку с соответствующей надстройки и нажмите «ОК«:
1
В левом верхнем углу нажмите большую круглую кнопку «Office«, в выпавшем меню нажмите кнопку «Параметры Excel«:
2
В открывшемся диалоговом окне слева выберите пункт «Надстройки«:
3
В открывшейся вкладке справа убедитесь, что в поле «Управление:» выбрано значение «Надстройки Excel» и нажмите кнопку «Перейти…«:
4
В открывшемся окне «Надстройки«, снимите галочку с соответствующей надстройки и нажмите «ОК«:
1
В левом верхнем углу нажмите зеленую кнопку «Файл«, в выпавшем меню выберите пункт «Параметры«:
2
В открывшемся диалоговом окне слева выберите пункт «Надстройки«:
3
В открывшейся вкладке справа убедитесь, что в поле «Управление:» выбрано значение «Надстройки Excel» и нажмите кнопку «Перейти…«:
4
В открывшемся окне «Надстройки«, снимите галочку с соответствующей надстройки и нажмите «ОК«:
1
В левом верхнем углу нажмите зеленую кнопку «Файл«:
2
В открывшемся меню выберите пункт «Параметры«:
3
В открывшемся диалоговом окне слева выберите пункт «Надстройки«:
4
В открывшейся вкладке справа убедитесь, что в поле «Управление:» выбрано значение «Надстройки Excel» и нажмите кнопку «Перейти…«:
5
В открывшемся окне «Надстройки«, снимите галочку с соответствующей надстройки и нажмите «ОК«:
Делаю все правильно, а надстройка не подключается. Надстройка перестала подключаться автоматически при открытии MS Excel. Что делать?
Возможные причины:
- Вы не извлекли надстройку из архива перед подключением (Решение: извлеките файл надстройки из архива и заново подключите его к MS Excel);
- Вы, после подключения надстройки, переименовали одну из папок, в которых она хранится (Решение: заново подключите надстройку к MS Excel);
- У Вас Windows 8 или Windows 10, которые блокируют файлы, полученные из интернета.
Как избавиться от блокировки файла надстройки Windows 8 и Windows 10?
Закройте MS Excel. В проводнике Windows найдите файл надстройки и кликните по нему правой клавишей мышки, в открывшемся контекстном меню выберите пункт «Свойства«:
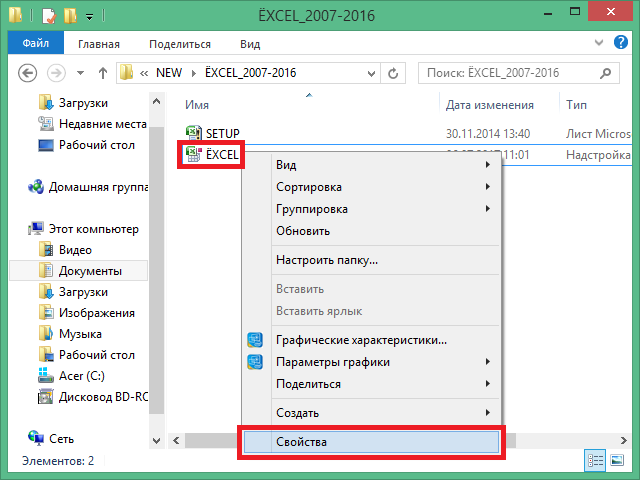
В нижней части открывшегося окна нажмите кнопку «Разблокировать» или установите галочку напротив этого пункта (Windows 8 — кнопка, Windows 10 — галочка) и нажмите кнопку «ОК«:
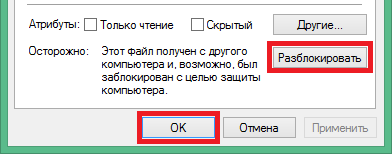
После этого откройте MS Excel, если надстройка уже была подключена — появится ее меню, если надстройка не была подключена — подключите ее и наслаждайтесь новыми командами и функциями.