
Достаточно часто системному администратору Windows приходится делать различные выгрузки по информации о пользователях домена Active Directory. Представим, что у нас есть список учетных записей (имена пользователя в формате samAccountName), и нам, например, необходимо получить информацию о том, в какой организации эти пользователи работают и их Canonical Name (CN). Ранее для получения такой информации мне приходилось писать небольшой скрипт на vbs, который последовательно перебирает все записи в Excel и возвращает обратно требуемую информацию из Active Directory. Такой механизм полностью работоспособен, но не очень удобен, поэтому я решил воспользоваться мощью языка Visual Basic from Application и выполнять запросы к Active Directory прямо из Excel (из макроса), т.к. такая методика была бы достаточно универсальной и в принципе все эти скрипты можно со спокойной совестью передавать менее подкованным бухгалтерам и экономистам!
Я создал новый макрос в книге Excel, и создал функцию с именем GetADInfo, которая на входе получает имя поля, по которому осуществляется поиск (в моем случае это имя пользователя, которое хранится в атрибуте Active Directory – samAccountName), значение этого поля (значение ячейки с именем пользователя) и имя артибута AD, значение которого функция должна вернуть.

Как же все это работает? В моем примере в ячейке A2 содержится имя пользователя домена, и я хочу для этого пользователя узнать компанию, в которой он числится (поле AD “Company”) и его каноническое имя (поле AD «distinguishedName»), в этом случае формулы для ячеек соответственно будут выглядеть следующим образом:
Ячейка B2 (наименование организации):
=GetADInfo("samAccountName";A2; "Company")
Ячейка C2 (CN):
=GetADInfo("samAccountName";A2; "distinguishedName")
Код макроса на VBA для получения данных из AD следующий:
Function GetADInfo(ByVal SearchField, ByVal SearchString, ByVal ReturnField) ' Указываем имя домена ("dc=domain, dc=local") Dim adoCommand, strDomain, objConnection strDomain = "dc=winitpro,dc=ru"

Set objConnection = CreateObject("ADODB.Connection") objConnection.Open "Provider=ADsDSOObject;" ' Подключаемся Set adoCommand = CreateObject("ADODB.Command") adoCommand.ActiveConnection = objConnection ' Рекурсивный поиск по AD, начиная с корня домена adoCommand.CommandText = _ "<LDAP://" & strDomain & ">;(&(objectCategory=" & "User" & ")" & _ "(" & SearchField & "=" & SearchString & "));" & SearchField & "," & ReturnField & ";subtree" ' создаем набор записей RecordSet  Dim objRecordSet Set objRecordSet = adoCommand.Execute If objRecordSet.RecordCount = 0 Then GetADInfo = "not found" ' ничего не найдено Else GetADInfo = objRecordSet.Fields(ReturnField) ' возвращаемое значение End If ' Закрываем подключение objConnection.Close ' Очищаем переменные Set objRecordSet = Nothing  Set objCommand = Nothing Set objConnection = Nothing End Function
Чтобы данная функция заработала, необходимо подключить ряд библиотек в VBA. В редакторе VBA выбираем меню Tools->References и в появившемся окне отмечаем следующие библиотеки:

- Visual Basic For Application
- Microsoft Excel 14.0 Object Library
- OLE Automation
- Microsoft Office 14.0 Object Library
- Microsoft ActiveX Data Objects 2.8 Library (или около того)
- Microsoft Scripting Runtime
- Microsoft VBScript Regular Expressions 5.5
После того, как вы активируете следующие компоненты, сохраните макрос VBAи книгу Excel, и в результате в соответствующих полях Excel появится информация из Active Directory. Прелесть данного скрипта состоит в том, что он достаточно универсальный и с небольшими модификациями он поможет динамически получать практически любую информацию из Active Directory прямо в книге прямо в книге Excel!
Using Excel 2016 to query Active Directory (AD) directly is my personal favorite Get & Transform feature. Excel 2010 and Excel 2013 users can download the free Microsoft Power Query plug-in for Excel.
Contents
- Example 1: Extract user information
- Selecting only columns that contain requested information
- Expand columns to choose individual attributes
- Filtering columns to show only attributes matching certain criteria
- Make the result more user-friendly
- Example 2: Extract computer information
- Selecting only columns that contain requested information
- Expand columns to choose individual attributes
- Filtering columns to show only attributes matching certain criteria
- Transform the existing column and remove the unneeded one
- Adding new columns to extend current possibilities
- Aggregate information with a pivot table
- Aggregate information with a pivot chart
- Author
- Recent Posts

Ruben is an infrastructure specialist with strong backround in Active Directory, PKI, and System Center Operations Manager. He automates in VBS, PowerShell and C#.
You can follow him on Twitter @Ruben8Z.
After years of creating Visual Basic and PowerShell scripts, I finally found a way to coach IT users to get AD data themselves. Excel stores all steps performed to extract, transform, and load the information as an M query within the workbook. You can also select an option to refresh the data when opening it or on a schedule.
See two examples below showing Get & Transform features and what you can do with the information.
Example 1: Extract user information
In the first example we extract the first name, last name, user ID, telephone number, division, city, last logon, and employment date. Furthermore, we set only enabled users from two cities as criteria. We also set the employment date as equal to the creation date of the user account.

Excel table showing specific up to date user information
To avoid high memory consumption and long durations, we split all the steps into smaller pieces.
Selecting only columns that contain requested information
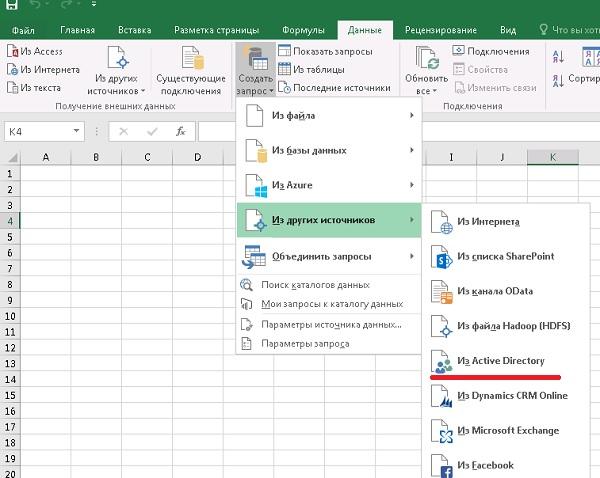
Open a new Excel workbook and navigate to the Data ribbon. In the New Query drop-down menu, point to From Other Sources and select From Active Directory.

Selecting From Active Directory
In the next window, confirm or change the current logged-on domain by clicking OK.
In the Navigator window, type in user to specify the concrete object class and proceed by clicking Edit.
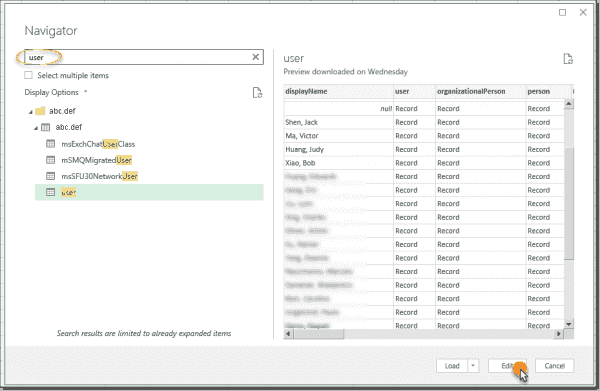
Navigate to the user object class
Within the Query Editor, first select displayName, user, organizationalPerson, person, top, and securityPrincipal. Then click on Remove Other Columns.
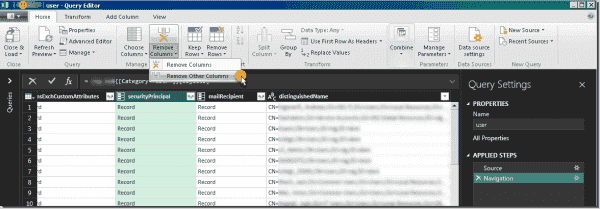
Reduce the query to required columns only
Finish the first query by giving it a name (such as qry_AD_Usr_Raw) and clicking Close & Load.
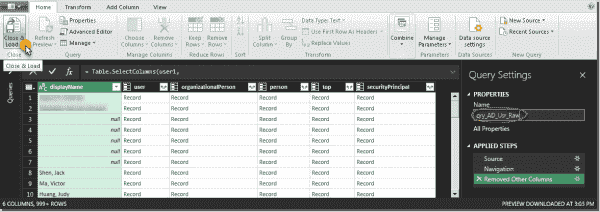
Confirm and close after naming the query
Expand columns to choose individual attributes
To proceed with the data based on the first query, qry_AD_Usr_Raw, create a Reference to it.
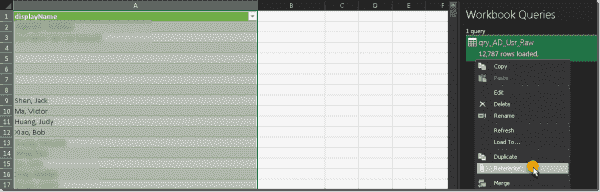
Referencing the first query
In the Query Editor, start with the user column and clear the defaults by unchecking (Select All Columns) and Use the original column name as prefix.

Clearing defaults in the column context window
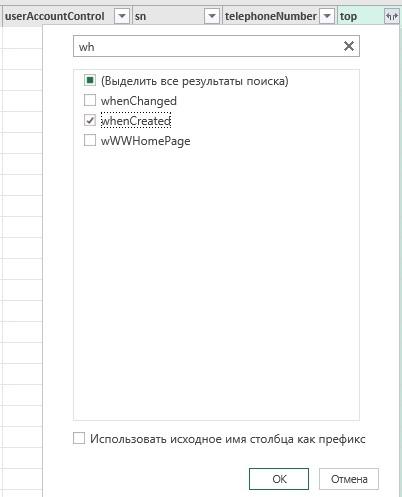
Proceed by selecting the attributes givenName, lastLogonTimestamp, and userAccountControl.
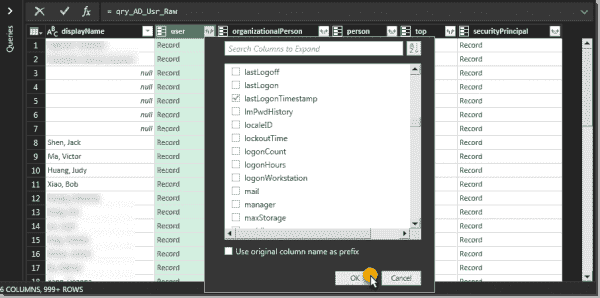
Select the necessary attributes in the column context window
Proceed by filtering other columns as follows:
- L and company from organizationalPerson
- sn and telephoneNumber from person
- whencreated from top
- SamAccountName from securityPrincipal
Finalize the second query by giving it a proper name (such as qry_AD_Usr_Expand) and clicking Close & Load.
Filtering columns to show only attributes matching certain criteria
Based on qry_AD_user_Expand, create a reference. Within the Query Editor, start by limiting it to enabled users (User Account Control = 512).

Set a number filter on the userAccountControl column
In case city names are not consistently in proper case, ensure this by fixing the Format of the l column.
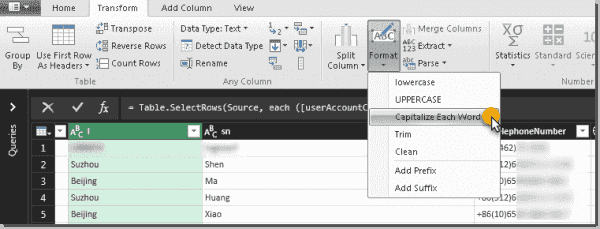
Capitalize Each Word to harmonize names
Use the check boxes to limit the cities to those of your interest, such as Suzhou and Shanghai.
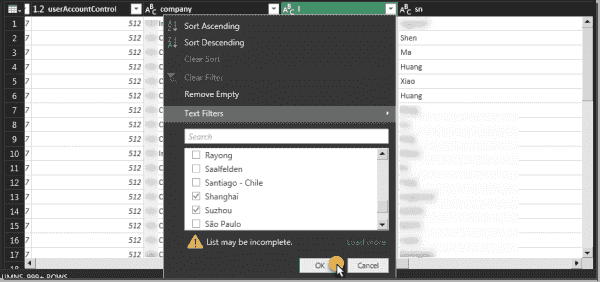
Select the desired cities in the column context
If Excel does not interpret the logonTimeStamp correctly, fix it by changing it to the correct data type (Date/Time).

Correct data type for logonTimeStamp
You can arrange columns in a different order simply by dragging and dropping them.

Reorder columns via drag and drop
As we don’t need the displayName and userAccountControl columns, Remove them from the query.

Remove the DisplayName and userAccountControl columns
Sort the city in Ascending order by clicking the option in the l column.

Apply ascending sorting for the selected column
Omit records with empty telephone numbers by unchecking (null) values.
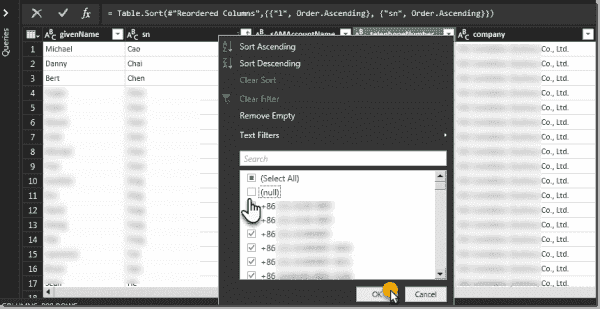
Deselecting (null) values for the telephoneNumber
Last, change the query name to qry_AD_Usr_ActiveChina, and load the result back into the workbook.
Make the result more user-friendly
Depending on the audience, you may need to make the results a bit easier to understand. To do so, create a reference for qry_AD_Usr_ActiveChina.
Perform the following transformations:
- Rename the columns by double-clicking givenName to First Name, sn to Last Name, l to City, company to Division, lastLogonTimestamp to Last Logon, and whenCreated to Employment Date.
- Change the Employment Date data type from Date/Time/Timezone to Date.
- Rename the query to qry_AD_Usr_ActiveChina_Friendly and click on Close & Load.
On Excel’s Design ribbon, choose the table styles to change from the defaults.
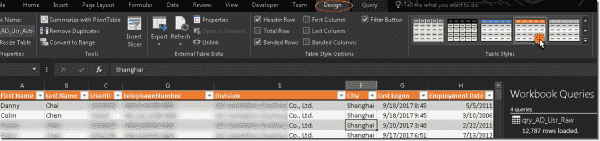
Choose table style to change defaults
As the last step, configure automatic data refreshing so it automatically updates information upon opening the workbook.

Refresh data when opening the file
Example 2: Extract computer information
In the second example, we extract computer object information. Queried attributes are cn, operatingSystem, operatingSystemServicePack, operatingSystemVersion, and whenCreated.
Set a filter to include only server operating systems (OSes).
Server names here derive from a name convention where the third to fifth characters stand for a site code.
For example: XZLINVM123 (LIN is the site code).
The query result aggregated in a pivot table will show the number of servers created each year aligned with the three-character site code they belong to.
Excel pivot table aggregating OS versions and computer object creation date
A diagram as a second aggregation will show the distribution of OS versions in use.
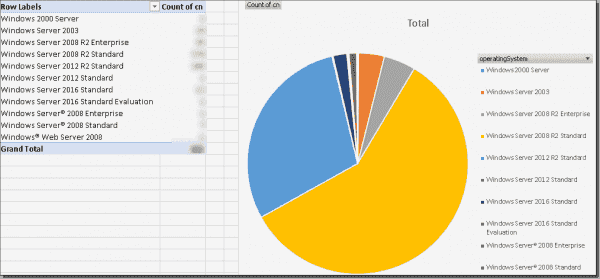
Excel pivot chart visualizing the distribution of OS versions
Selecting only columns that contain requested information
Open a new Excel workbook and navigate to the Data ribbon. In the New Query drop-down menu, point to From Other Sources and select From Active Directory.
In the next window, confirm or change the current logged-on domain by clicking OK.
Type or select the computer class in the Navigator window and continue by clicking Edit.
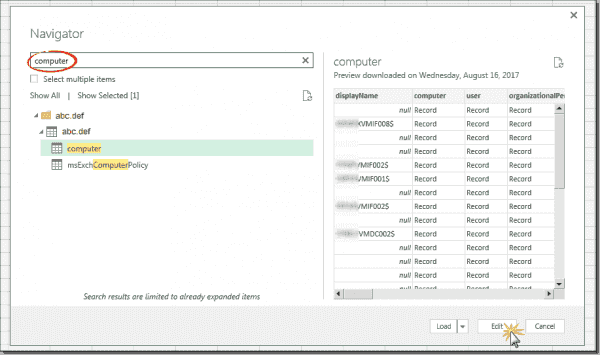
Select the computer class in the Navigator window
Keep the columns displayName, computer, and top. Rename the query (e.g., qry_AD_computer_raw) and confirm by clicking Close & Load.

Name the query properly and close it
Create a reference based on qry_AD_computer_raw.
Expand columns to choose individual attributes
In the Query Editor, expand the computer column. First uncheck (Select All Columns) and Use original column name as prefix.
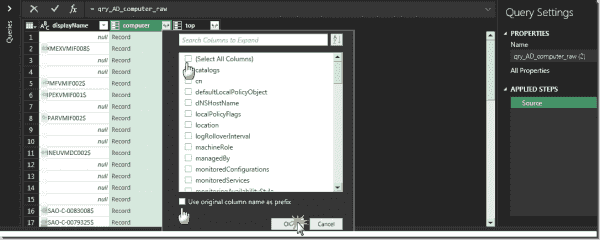
Clear defaults in computer column properties
Stay in the computer column and select the attributes cn, operatingSystem, operatingSystemServicePack, and operatingSystemVersion. Confirm by clicking OK.
In the top column, limit the selection to the whenCreated attribute.
Rename the query to qry_AD_computer_filtered and click on Close & Load.
Create a new query referencing qry_AD_computer_filtered.
Filtering columns to show only attributes matching certain criteria
Back in the Query Editor, filter the operatingSystem column so it shows only server OSes. Use the Text Filter Contains… for this.
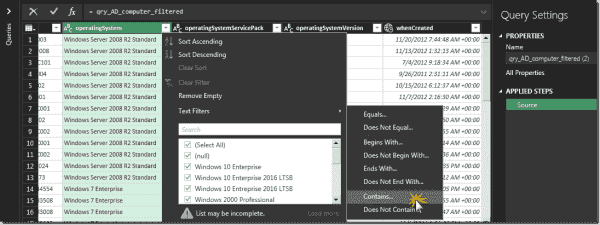
Set a text filter on the operatingSystem column
Type Server in the text box and confirm by clicking OK.
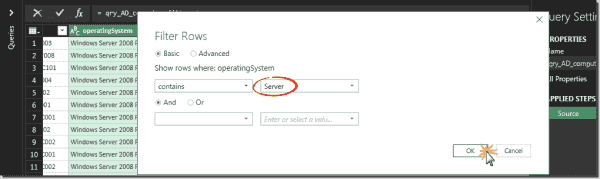
Specify and apply filter
Transform the existing column and remove the unneeded one
Stay in the current query and choose the Transform ribbon. Select the whenCreated column and pick Year in the Date drop-down menu.
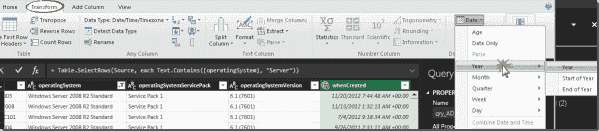
Transform whenCreated date to Year
Remove the displayName column.
Adding new columns to extend current possibilities
Change to the Add Column ribbon and click on Custom Column. Type in Site as a new column name.
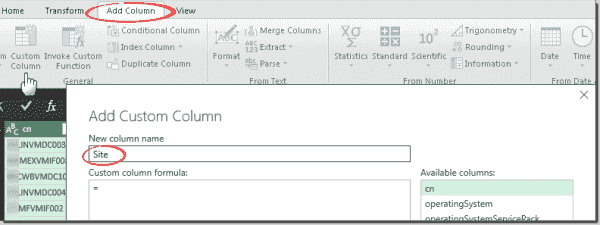
Add a custom column for site information
Double-click on the cn column and confirm by clicking OK.
Change to the Transform ribbon, select the Site column, and choose Range in the Extract drop-down menu.
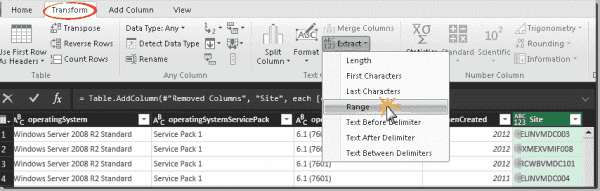
Extract a Range from the Site column
Choose 2 for Starting Index and 3 for Number of Characters. Confirm by clicking OK.
Rename the query to qry_AD_computer_Servers and click on Close & Load.
Aggregate information with a pivot table
In Excel, change to the Insert ribbon, place the cursor in the table, and click on Pivot Table.

Insert a pivot table
Confirm the default settings in the Create PivotTable dialog.
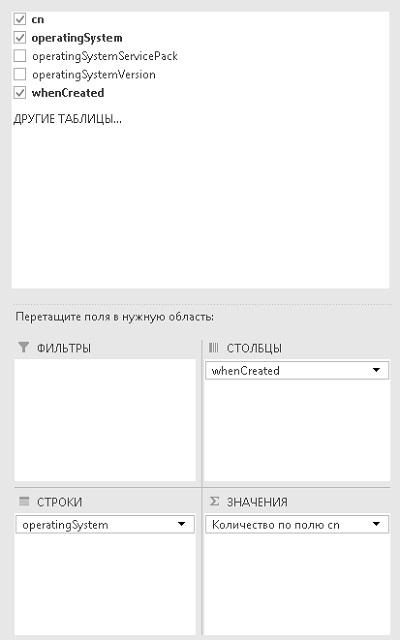
In the pivot table field selector window, drag operatingSystem and Site into Rows, cn into Values, and whenCreated into the Columns section.

Drag columns into the field areas
On the Design ribbon, click on Subtotals and choose Do Not Show Subtotals.
To improve visibility, pick one of the PivotTable Styles and check Banded Rows and Banded Columns.

Check PivotTable Style Options and Styles
Aggregate information with a pivot chart
In Excel, change to the Insert ribbon, place the cursor in the table, and click on PivotChart.

Click PivotChart in the Insert ribbon
Confirm the default settings in the Create PivotChart dialog.
Pull cn into Values and operatingSystem into Axis.
Change the chart type by selecting it and clicking on Change Chart Type in the Design ribbon.

Change Chart Type of the selected bar diagram
Choose Pie (for example) and Confirm the window.
![]()
Содержание
- Active Directory Queries in Excel/VBA
- Запрос к Active Directory из Excel
- Excel вместо PowerShell: запросы к AD и системные отчеты «на коленке»
- Разминка: посмотрим, когда наши пользователи логинились
- Создаем адресную книгу, или что делать, когда корпоративный портал с AD не дружит
- Быстрый отчет по составу рабочих станций, без внедрения агентов и прочей подготовки
- Но и это еще не все
Active Directory Queries in Excel/VBA

Here’s the problem. You need to do some reconciliation of group members in an active directory group – or you want to confirm a user should have access to some particular parts of your spreadsheet (perhaps you’ve customised a dashboard for different types of users).
This is a problem that I’ve come up against a number of times in my career. In a previous role I needed to reconcile members of an AD group. I needed the report of everyone in the AD group. To get this I relied on a technology partner (which goes by a three letter initialisation, and used to make machines for international business…) who I spent 4-6 hours in teleconferences with, over a period of two months, and who in the end finally managed to provide me with this data.
Over the same period however, I needed to actually do the reporting. So, I pull out my trusty excel toolkit to do the job. It took a couple of hours, and I had a fully customisable system for getting me the information I needed. (more time doing, less time meeting, can be really productive sometimes!)
First requirment. You need to be on the same network / have access to the AD domain controllers.
Second requirement. Excel / VBA.
- You call this function with a full LDAP search string. Eg. (&(ObjectCategory=user)(MemberOf=CN=MYGROUPX, OU=resources, OU=group))
- You need to tell it what you want back using returnFields eg. “CN, mail”
- It returns a collection which will need to be iterated over using another function. Even if there are no results. you could just return the first item as text using something like GetAdsProp(“queryString”,”returnFields”)(1)
It’s worth reading through the code, and checking out the references I used most when putting this solution together (again):
Источник
Запрос к Active Directory из Excel
Достаточно часто системному администратору Windows приходится делать различные выгрузки по информации о пользователях домена Active Directory. Представим, что у нас есть список учетных записей (имена пользователя в формате samAccountName), и нам, например, необходимо получить информацию о том, в какой организации эти пользователи работают и их Canonical Name (CN). Ранее для получения такой информации мне приходилось писать небольшой скрипт на vbs, который последовательно перебирает все записи в Excel и возвращает обратно требуемую информацию из Active Directory. Такой механизм полностью работоспособен, но не очень удобен, поэтому я решил воспользоваться мощью языка Visual Basic from Application и выполнять запросы к Active Directory прямо из Excel (из макроса), т.к. такая методика была бы достаточно универсальной и в принципе все эти скрипты можно со спокойной совестью передавать менее подкованным бухгалтерам и экономистам!
Я создал новый макрос в книге Excel, и создал функцию с именем GetADInfo, которая на входе получает имя поля, по которому осуществляется поиск (в моем случае это имя пользователя, которое хранится в атрибуте Active Directory – samAccountName), значение этого поля (значение ячейки с именем пользователя) и имя артибута AD, значение которого функция должна вернуть.
Как же все это работает? В моем примере в ячейке A2 содержится имя пользователя домена, и я хочу для этого пользователя узнать компанию, в которой он числится (поле AD “Company”) и его каноническое имя (поле AD «distinguishedName»), в этом случае формулы для ячеек соответственно будут выглядеть следующим образом:
Ячейка B2 (наименование организации):
Код макроса на VBA для получения данных из AD следующий:
Чтобы данная функция заработала, необходимо подключить ряд библиотек в VBA. В редакторе VBA выбираем меню Tools->References и в появившемся окне отмечаем следующие библиотеки:
- Visual Basic For Application
- Microsoft Excel 14.0 Object Library
- OLE Automation
- Microsoft Office 14.0 Object Library
- Microsoft ActiveX Data Objects 2.8 Library (или около того)
- Microsoft Scripting Runtime
- Microsoft VBScript Regular Expressions 5.5
После того, как вы активируете следующие компоненты, сохраните макрос VBAи книгу Excel, и в результате в соответствующих полях Excel появится информация из Active Directory. Прелесть данного скрипта состоит в том, что он достаточно универсальный и с небольшими модификациями он поможет динамически получать практически любую информацию из Active Directory прямо в книге прямо в книге Excel!
Источник

В комментариях к предыдущей статье вспомнили про учет в Excel вместо 1С. Что ж, проверим, насколько вы знаете Excel. Сегодня я покажу, как получать данные из Active Directory и работать с ними без макросов и PowerShell — только штатными механизмами Office. Например, можно запросто получить аналитику по использованию операционных систем в организации, если у вас еще нет чего-либо вроде Microsoft SCOM. Ну, или просто размяться и отвлечься от скриптов.
Конечно, получить данные как в примерах ниже можно буквально одной строчкой на PowerShell. Но, во-первых, PowerShell — это слишком скучно, а во-вторых, Excel умеет динамически обновлять данные ― получившиеся документы можно опубликовать в сети и забыть про их актуализацию.
Для работы с данными я буду использовать механизм Power Query. Для офиса 2010 и 2013 придется устанавливать плагин, в Microsoft Office 2016 этот модуль уже встроен. К сожалению, стандартной редакции нам не хватит, понадобится Professional.
Сам механизм предназначен для получения и обработки данных из самых разных источников ― от старого ODBC и текстовых файлов, до Exchange, Oracle и Facebook. Подробнее о механизме и встроенном скриптовом языке «M» уже писали на Хабре, я же разберу пару примеров использования Power Query для получения данных из Active Directory.
Разминка: посмотрим, когда наши пользователи логинились
Сам запрос к базе домена создается на вкладке «Данные ― Новый запрос ― Из других источников ― Из Active Directory».
Указываем источник данных.
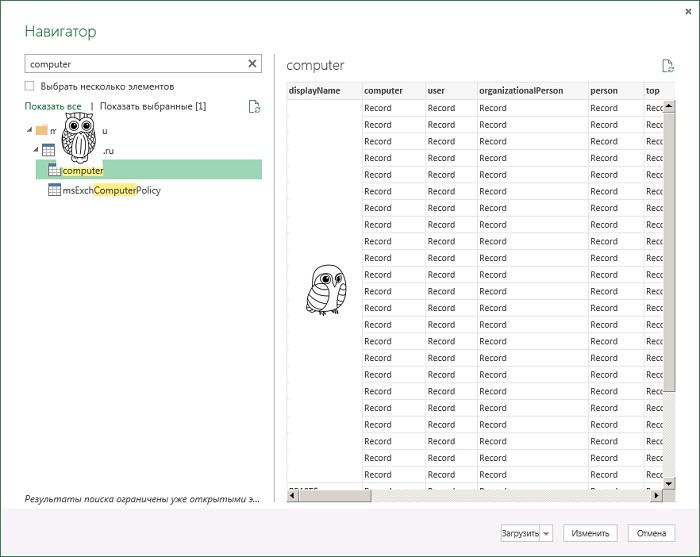
Понадобится выбрать название домена, указать необходимые данные для подключения. Далее выберем тип объектов, в этом примере ― user. Справа в окне предпросмотра запрос уже выполняется, показывая предварительный вид данных.
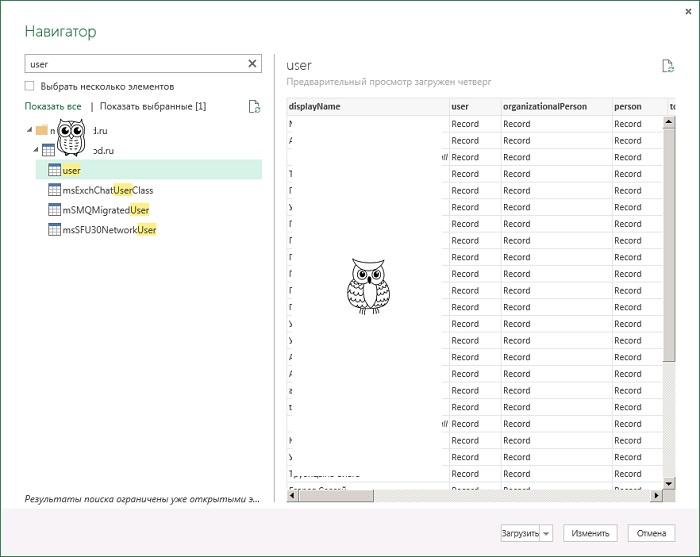
Подготавливаем запрос, любуемся предпросмотром.
Предварительно запрос стоит подготовить, нажав кнопку «изменить» и выбрав нужные колонки. По сути эти колонки ― это классы Каждый из них содержит набор определенных атрибутов объекта Active Directory, кроме основной колонки displayName, которая сама является атрибутом. Я остановлюсь на классах user, person, top и securityPrincipal. Теперь необходимо выбрать нужные атрибуты из каждого класса с помощью «расширения» ― значок с двумя стрелочками у заголовка колонки:
- класс user расширим, выбрав lastLogonTimestamp и userAccountControl;
- в person выберем telephoneNumber;
- в top ― whenCreated;
- и в securityPrincipal ― SamAccountName.
Расширяем запрос.
Теперь настроим фильтр: в частности, чтобы не получить заблокированные аккаунты, нужно чтобы атрибут userAccountControl имел значение 512 или 66048. Фильтр может быть другой в вашем окружении. Подробнее про атрибут можно прочитать в документации Microsoft.
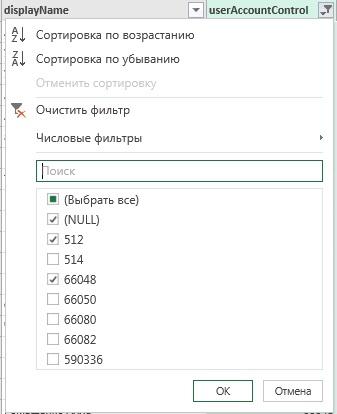
Применяем фильтр.
Иногда Excel неверно определяет формат данных, особенно значения атрибута lastLogonTimestamp. Если вдруг постигла такая беда, на вкладке «Преобразовать» можно выставить верный формат.
Теперь столбец userAccountControl стоит удалить ― в отображении он не нужен совершенно. И нажимаем «Загрузить и закрыть».
Получилась табличка, которую осталось совсем немного довести до ума. Например, переименовать столбцы в что-то удобочитаемое. И настроить автоматическое обновление данных.
Автоматическое обновление при открытии таблицы или по таймауту настраивается во вкладке «Данные» в «Свойствах».

Настройка обновления данных.
После того, как настройка обновления будет завершена, можно смело отдавать таблицу сотрудникам отдела персонала или службе безопасности ― пусть знают, кто и когда входил в систему.
Создаем адресную книгу, или что делать, когда корпоративный портал с AD не дружит
Другой вариант использования Excel в связке с Active Directory ― это формирование адресной книги, исходя из данных AD. Понятно, что адресная книга получится актуальной, только если в домене порядок.
Создадим запрос по объекту user, развернем класс user в mail, а класс person в telephoneNumber. Удалим все столбцы, кроме distinguishedName ― структура домена повторяет структуру предприятия, поэтому названия Organizational Units соответствуют названиям подразделений. Аналогично в качестве основы названий подразделений можно использовать и группы безопасности.
Теперь из строки CN=Имя Пользователя, OU=Отдел Бухгалтерии, OU=Подразделения, DC=domain, DC=ru нужно извлечь непосредственно название отдела. Проще всего это сделать с использованием разделителей на вкладке «Преобразование».

Извлекаем текст.
В качестве разделителей я использую OU= и ,OU=. В принципе, достаточно и запятой, но я перестраховываюсь.

Вводим разделители.
Теперь с помощью фильтра можно отсечь ненужные OU, вроде заблокированных пользователей и Builtin, настроить сортировку и загрузить данные в таблицу.

Вид итоговой таблицы.
Быстрый отчет по составу рабочих станций, без внедрения агентов и прочей подготовки
Теперь попробуем создать полезную таблицу, получив данные по компьютерам. Сделаем отчет по используемым компанией операционным системам: для этого создадим запрос, но в навигаторе на этот раз выберем computer.
Делаем запрос по объекту computer.
Оставим классы-колонки computer и top и расширим их:
- класс computer расширим, выбрав cn, operatingSystem, operatingSystemServicePack и operatingSystemVersion;
- в классе top выберем whenCreated.
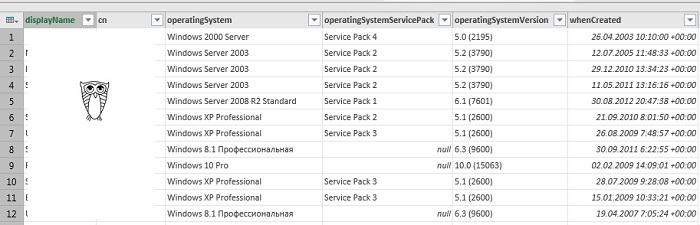
Расширенный запрос.
При желании можно сделать отчет только по серверным операционным системам. Например, применить фильтр по атрибуту operatingSystem или operatingSystemVersion. Я не буду этого делать, но поправлю отображение времени создания ― мне интересен только год. Для этого на вкладке «Преобразование» выберем нужную нам колонку и в меню «Дата» выберем «Год».
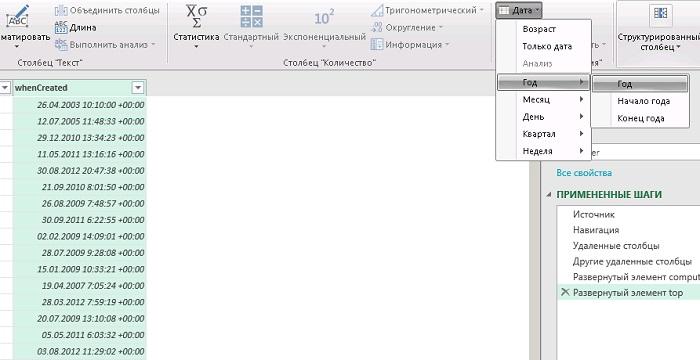
Извлекаем год из времени ввода компьютера в домен.
Теперь останется удалить столбец displayname за ненадобностью и загрузить результат. Данные готовы. Теперь можно работать с ними, как с обычной таблицей. Для начала сделаем сводную таблицу на вкладке «Вставка» ― «Сводная таблица». Согласимся с выбором источника данных и настроим ее поля.
Настройки полей сводной таблицы.
Теперь остается настроить по вкусу дизайн и любоваться итогом:
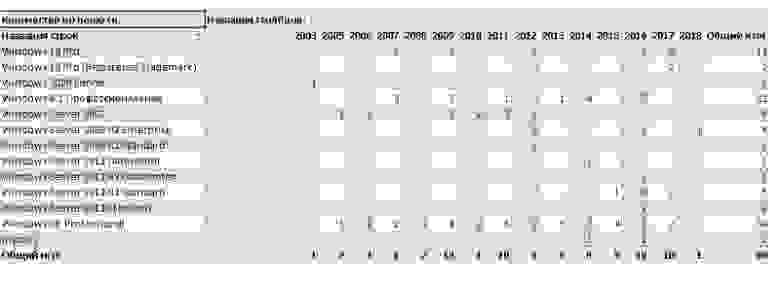
Сводная таблица по компьютерам в AD.
При желании можно добавить сводный график, также на вкладке «Вставка». В «Категории» (или в «Ряды», по вкусу) добавим operatingSystem, в данные ― cn. На вкладке «Конструктор» можно выбрать тип диаграммы по душе, я предпочел круговую.
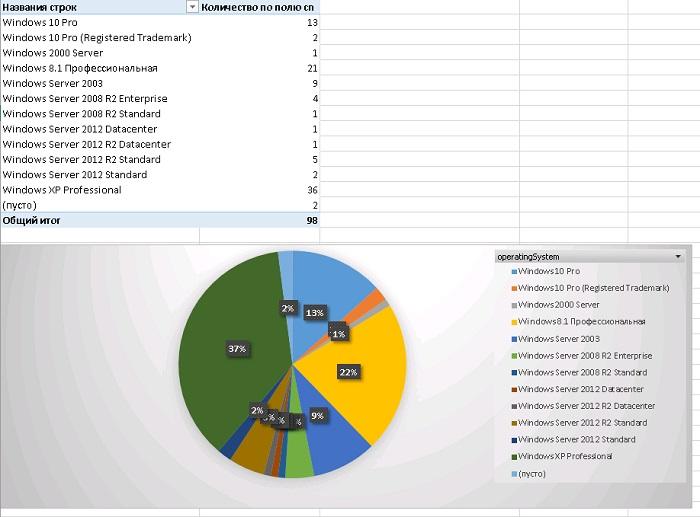
Круговая диаграмма.
Теперь наглядно видно, что, несмотря на идущее обновление, общее количество рабочих станций с Windows XP и серверов с Windows 2003 довольно велико. И есть к чему стремиться.
Но и это еще не все
Надо отметить, что Excel умеет составлять не только любимые бухгалтерией таблички. При умелом подходе ему по плечу и аналитика многомерных данных (OLAP-кубы), и решение системы уравнений с помощью матриц. А для тех, у кого на стенке пылится сертификат от Microsoft – есть вариант заморочиться даже с 3D-играми. Не Doom конечно, но вечер точно займет.
А что вы думаете про Excel как инструмент администратора? Доводилось использовать что-то из описанного?
Источник
- Remove From My Forums
-
Question
-
I’m having a quite big AD OU-structure, and would like to do a Excel «Power Query» towards my AD only including some OU’s. Anyone that knows how to limit the query to just a few OU’s, or to just exclude some OU’s. Filtering using RegExp even
better, but I don’t thing that is possible
Answers
-
Haven’t worked with AD queries myself, so might not be a good help here.
But if these long strings all sit in 1 column, you better use a text filter «Doesn’t contain»:
= Table.SelectRows(Source, each not Text.Contains([AD], «OU=Test») and not Text.Contains([AD], «OU=Admin»))
This is also clickable: In the column filter you’ll find Text-Filters — last line then is doesn’t contain:

Imke Feldmann TheBIccountant.com
-
Proposed as answer by
Monday, September 21, 2015 6:03 PM
-
Marked as answer by
Michael Amadi
Saturday, October 17, 2015 11:30 PM
-
Proposed as answer by