
Работа с текстом в коде VBA Excel. Функции, оператор & и другие ключевые слова для работы с текстом. Примеры использования некоторых функций и ключевых слов.
Функции для работы с текстом
Основные функции для работы с текстом в VBA Excel:
| Функция | Описание |
|---|---|
| Asc(строка) | Возвращает числовой код символа, соответствующий первому символу строки. Например: MsgBox Asc(«/Stop»). Ответ: 47, что соответствует символу «/». |
| Chr(код символа) | Возвращает строковый символ по указанному коду. Например: MsgBox Chr(47). Ответ: «/». |
| Format(Expression, [FormatExpression], [FirstDayOfWeek], [FirstWeekOfYear]) | Преобразует число, дату, время в строку (тип данных Variant (String)), отформатированную в соответствии с инструкциями, включенными в выражение формата. Подробнее… |
| InStr([начало], строка1, строка2, [сравнение]) | Возвращает порядковый номер символа, соответствующий первому вхождению одной строки (строка2) в другую (строка1) с начала строки. Подробнее… |
| InstrRev(строка1, строка2, [начало, [сравнение]]) | Возвращает порядковый номер символа, соответствующий первому вхождению одной строки (строка2) в другую (строка1) с конца строки. Подробнее… |
| Join(SourceArray,[Delimiter]) | Возвращает строку, созданную путем объединения нескольких подстрок из массива. Подробнее… |
| LCase(строка) | Преобразует буквенные символы строки в нижний регистр. |
| Left(строка, длина) | Возвращает левую часть строки с заданным количеством символов. Подробнее… |
| Len(строка) | Возвращает число символов, содержащихся в строке. |
| LTrim(строка) | Возвращает строку без начальных пробелов (слева). Подробнее… |
| Mid(строка, начало, [длина]) | Возвращает часть строки с заданным количеством символов, начиная с указанного символа (по номеру). Подробнее… |
| Replace(expression, find, replace, [start], [count], [compare]) | Возвращает строку, полученную в результате замены одной подстроки в исходном строковом выражении другой подстрокой указанное количество раз. Подробнее… |
| Right(строка, длина) | Возвращает правую часть строки с заданным количеством символов. Подробнее… |
| RTrim(строка) | Возвращает строку без конечных пробелов (справа). Подробнее… |
| Space(число) | Возвращает строку, состоящую из указанного числа пробелов. Подробнее… |
| Split(Expression,[Delimiter],[Limit],[Compare]) | Возвращает одномерный массив подстрок, извлеченных из указанной строки с разделителями. Подробнее… |
| StrComp(строка1, строка2, [сравнение]) | Возвращает числовое значение Variant (Integer), показывающее результат сравнения двух строк. Подробнее… |
| StrConv(string, conversion) | Изменяет регистр символов исходной строки в соответствии с заданным параметром «conversion». Подробнее… |
| String(число, символ) | Возвращает строку, состоящую из указанного числа символов. В выражении «символ» может быть указан кодом символа или строкой, первый символ которой будет использован в качестве параметра «символ». Подробнее… |
| StrReverse(строка) | Возвращает строку с обратным порядком следования знаков по сравнению с исходной строкой. Подробнее… |
| Trim(строка) | Возвращает строку без начальных (слева) и конечных (справа) пробелов. Подробнее… |
| UCase(строка) | Преобразует буквенные символы строки в верхний регистр. |
| Val(строка) | Возвращает символы, распознанные как цифры с начала строки и до первого нецифрового символа, в виде числового значения соответствующего типа. Подробнее… |
| WorksheetFunction.Trim(строка) | Функция рабочего листа, которая удаляет все лишние пробелы (начальные, конечные и внутренние), оставляя внутри строки одиночные пробелы. |
В таблице перечислены основные функции VBA Excel для работы с текстом. С полным списком всевозможных функций вы можете ознакомиться на сайте разработчика.
Ключевые слова для работы с текстом
| Ключевое слово | Описание |
|---|---|
| & | Оператор & объединяет два выражения (результат = выражение1 & выражение2). Если выражение не является строкой, оно преобразуется в Variant (String), и результат возвращает значение Variant (String). Если оба выражения возвращают строку, результат возвращает значение String. |
| vbCrLf | Константа vbCrLf сочетает в себе возврат каретки и перевод строки (Chr(13) + Chr(10)) и переносит последующий текст на новую строку (результат = строка1 & vbCrLf & строка2). |
| vbNewLine | Константа vbNewLine в VBA Excel аналогична константе vbCrLf, также сочетает в себе возврат каретки и перевод строки (Chr(13) + Chr(10)) и переносит текст на новую строку (результат = строка1 & vbNewLine & строка2). |
Примеры
Вывод прямых парных кавычек
Прямые парные кавычки в VBA Excel являются спецсимволами и вывести их, заключив в самих себя или в одинарные кавычки (апострофы), невозможно. Для этого подойдет функция Chr:
|
Sub Primer1() ‘Вывод одной прямой парной кавычки MsgBox Chr(34) ‘Отображение текста в прямых кавычках MsgBox Chr(34) & «Волга» & Chr(34) ‘Вывод 10 прямых парных кавычек подряд MsgBox String(10, Chr(34)) End Sub |
Смотрите интересное решение по выводу прямых кавычек с помощью прямых кавычек в первом комментарии.
Отображение слов наоборот
Преобразование слова «налим» в «Милан»:
|
Sub Primer2() Dim stroka stroka = «налим» stroka = StrReverse(stroka) ‘милан stroka = StrConv(stroka, 3) ‘Милан MsgBox stroka End Sub |
или одной строкой:
|
Sub Primer3() MsgBox StrConv(StrReverse(«налим»), 3) End Sub |
Преобразование слова «лето» в «отель»:
|
Sub Primer4() Dim stroka stroka = «лето» stroka = StrReverse(stroka) ‘отел stroka = stroka & «ь» ‘отель MsgBox stroka End Sub |
или одной строкой:
|
Sub Primer5() MsgBox StrReverse(«лето») & «ь» End Sub |
Печатная машинка
Следующий код VBA Excel в замедленном режиме посимвольно печатает указанную строку на пользовательской форме, имитируя печатную машинку.
Для реализации этого примера понадобится пользовательская форма (UserForm1) с надписью (Label1) и кнопкой (CommandButton1):

Код имитации печатной машинки состоит из двух процедур, первая из которых замедляет выполнение второй, создавая паузу перед отображением очередного символа, что и создает эффект печатающей машинки:
|
1 2 3 4 5 6 7 8 9 10 11 12 13 14 15 16 17 18 |
Sub StopSub(Pause As Single) Dim Start As Single Start = Timer Do While Timer < Start + Pause DoEvents Loop End Sub Private Sub CommandButton1_Click() Dim stroka As String, i As Byte stroka = «Печатная машинка!» Label1.Caption = «» For i = 1 To Len(stroka) Call StopSub(0.25) ‘пауза в секундах ‘следующая строка кода добавляет очередную букву Label1.Caption = Label1.Caption & Mid(stroka, i, 1) Next End Sub |
Обе процедуры размещаются в модуле формы. Нажатие кнопки CommandButton1 запустит замедленную печать символов в поле надписи, имитируя печатную машинку.
На чтение 23 мин. Просмотров 18.4k.

Содержание
- Краткое руководство по текстовым функциям
- Введение
- Прочитайте это в первую очередь!
- Добавление строк
- Извлечение части строки
- Поиск в строке
- Удаление пробелов
- Длина строки
- Перевернуть текст
- Сравнение
- Сравнение строк с использованием сопоставления с шаблоном
- Заменить часть строки
- Преобразовать типы в строку (базовый)
- Преобразовать строку в число — CLng, CDbl, Val и т.д.
- Генерация строки элементов — функция строки
- Преобразовать регистр / юникод — StrConv, UCase, LCase
- Использование строк с массивами
- Форматирование строки
- Заключение
Краткое руководство по текстовым функциям
| Текстовые операции | Функции |
| Добавить две или более строки | Format or «&» |
| Построить текст из массива | Join |
| Сравнить | StrComp or «=» |
| Сравнить — шаблон | Like |
| Преобразовать в текст | CStr, Str |
| Конвертировать текст в дату | Просто: CDate Дополнительно: Format |
| Преобразовать текст в число | Просто: CLng, CInt, CDbl, Val Дополнительно: Format |
| Конвертировать в юникод, широкий, узкий | StrConv |
| Преобразовать в верхний / нижний регистр | StrConv, UCase, LCase |
| Извлечь часть текста | Left, Right, Mid |
| Форматировать текст | Format |
| Найти символы в тексте | InStr, InStrRev |
| Генерация текста | String |
| Получить длину строки | Len |
| Удалить пробелы | LTrim, RTrim, Trim |
| Заменить часть строки | Replace |
| Перевернуть строку | StrReverse |
| Разобрать строку в массив | Split |
Введение
Использование строк является очень важной частью VBA. Есть много типов манипуляций, которые вы можете делать со строками. К ним относятся такие задачи, как:
- извлечение части строки
- сравнение строк
- преобразование чисел в текст
- форматирование даты для включения дня недели
- найти символ в строке
- удаление пробелов
- парсинг в массив
- и т. д.
Хорошей новостью является то, что VBA содержит множество функций, которые помогут вам легко выполнять эти задачи.
Эта статья содержит подробное руководство по использованию строки в VBA. Он объясняет строки в простых терминах с понятными примерами кода. Изложение в статье поможет легко использовать ее в качестве краткого справочного руководства.
Если вы собираетесь использовать строки часто, я рекомендую вам прочитать первый раздел, так как он относится ко многим функциям. В противном случае вы можете прочитать по порядку или просто перейти в нужный раздел.
Прочитайте это в первую очередь!
Следующие два пункта очень важны при работе со строковыми функциями VBA.
Исходная строка не изменяется
Важно помнить, что строковые функции VBA не изменяют исходную строку. Они возвращают новую строку с изменениями, внесенными функцией. Если вы хотите изменить исходную строку, вы просто назначаете результат исходной строке. См. Раздел «Извлечение части строки» для примеров.
Как использовать Compare
Некоторые строковые функции, такие как StrComp (), Instr () и т.д. имеют необязательный параметр Compare. Он работает следующим образом:
vbTextCompare: верхний и нижний регистры считаются одинаковыми
vbBinaryCompare: верхний и нижний регистр считаются разными
Следующий код использует функцию сравнения строк StrComp () для демонстрации параметра Compare.
Sub Comp1()

    ' Печатает 0  : Строки совпадают
    Debug.Print StrComp("АБВ", "абв", vbTextCompare)
    ' Печатает -1 : Строки не совпадают
    Debug.Print StrComp("АБВ", "абв", vbBinaryCompare)

End Sub
Вы можете использовать параметр Option Compare вместо того, чтобы каждый раз использовать этот параметр. Опция сравнения устанавливается в верхней части модуля. Любая функция, которая использует параметр Compare, примет этот параметр по умолчанию. Два варианта использования Option Compare:
- Oпция Compare Text: делает vbTextCompare аргументом сравнения по умолчанию
Option Compare Text

Sub Comp2()
    ' Соответствие строк - использует vbCompareText в качестве 'аргумента сравнения
    Debug.Print StrComp("АБВ", "абв")
    Debug.Print StrComp("ГДЕ", "где")
End Sub
- Опция Compare Binary: делает vbBinaryCompare аргументом сравнения по умолчанию.
Option Compare Binary

Sub Comp2()
    ' Строки не совпадают - использует vbCompareBinary в качестве 'аргумента сравнения
    Debug.Print StrComp("АБВ", "абв")
    Debug.Print StrComp("ГДЕ", "где")
End Sub
Если Option Compare не используется, то по умолчанию используется Option Compare Binary.
Теперь, когда вы понимаете эти два важных момента о строке, мы можем продолжить и посмотреть на строковые функции индивидуально.
Добавление строк

Вы можете добавлять строки, используя оператор &. Следующий код показывает несколько примеров его использования.
Sub Dobavlenie()

    Debug.Print "АБВ" & "ГДЕ"
    Debug.Print "Иван" & " " & "Петров"
    Debug.Print "Длинный " & 22
    Debug.Print "Двойной " & 14.99
    Debug.Print "Дата " & #12/12/2015#

End Sub
В примере вы можете видеть, что различные типы, такие как даты и числа, автоматически преобразуются в строки. Вы можете увидеть оператор +, используемый для добавления строк. Разница в том, что этот оператор будет работать только со строковыми типами. Если вы попытаетесь использовать его с другим типом, вы получите ошибку.
 Это даст сообщение об ошибке: «Несоответствие типов»
    Debug.Print "Длинный " + 22
Если вы хотите сделать более сложное добавление строк, вы можете использовать функцию форматирования, описанную ниже.
Извлечение части строки
Функции, обсуждаемые в этом разделе, полезны при базовом извлечении из строки. Для чего-то более сложного можете посмотреть раздел, как легко извлечь любую строку без использования VBA InStr.
| Функция | Параметры | Описание | Пример |
| Left | строка, длина | Вернуть символы с левой стороны |
Left(«Иван Петров»,4) |
| Right | строка, длина | Вернуть символы с правой стороны |
Right(«Иван Петров»,5) |
| Mid | строка, начало, длина | Вернуть символы из середины |
Mid(«Иван Петров»,3,2) |
Функции Left, Right и Mid используются для извлечения частей строки. Это очень простые в использовании функции. Left читает символы слева, Right справа и Mid от указанной вами начальной точки.
Sub IspLeftRightMid()

    Dim sCustomer As String
    sCustomer = "Иван Васильевич Петров"

    Debug.Print Left(sCustomer, 4)  '  Печатает: Иван
    Debug.Print Right(sCustomer, 6) '  Печатает: Петров

    Debug.Print Left(sCustomer, 15)  '  Печатает: Иван Васильевич
    Debug.Print Right(sCustomer, 17)  '  Печатает: Васильевич Петров

    Debug.Print Mid(sCustomer, 1, 4) ' Печатает: Иван
    Debug.Print Mid(sCustomer, 6, 10) ' Печатает: Васильевич
    Debug.Print Mid(sCustomer, 17, 6) ' Печатает: Петров

End Sub
Как упоминалось в предыдущем разделе, строковые функции VBA не изменяют исходную строку. Вместо этого они возвращают результат в виде новой строки.
В следующем примере вы увидите, что строка Fullname не была изменена после использования функции Left.
Sub PrimerIspolzovaniyaLeft()

    Dim Fullname As String
    Fullname = "Иван Петров"

    Debug.Print "Имя: "; Left(Fullname, 4)
    ' Исходная строка не изменилась
    Debug.Print "Полное имя: "; Fullname

 End Sub
Если вы хотите изменить исходную строку, вы просто присваиваете ей возвращаемое значение функции.
Sub IzmenenieStroki()

    Dim name As String
    name = "Иван Петров"

    ' Присвойте возвращаемую строку переменной имени
    name = Left(name, 4)

    Debug.Print "Имя: "; name

 End Sub
Поиск в строке
| Функция | Параметры | Описание | Пример |
| InStr | Текст1, текст2 |
Находит положение текста |
InStr(«Иван Петров»,»в») |
| InStrRev | Проверка текста, соответствие текста |
Находит позицию текста с конца |
InStrRev(«Иван Петров»,»в») |
InStr и InStrRev — это функции VBA, используемые для поиска текста в тексте. Если текст поиска найден, возвращается позиция (с начала строки проверки) текста поиска. Когда текст поиска не найден, возвращается ноль. Если какой-либо текст имеет значение null, возвращается значение null.
InStr Описание параметров
InStr() Start[Необязат], String1, String2, Compare[Необязат]
- Start [Необязательно — по умолчанию 1]: это число, указывающее начальную позицию поиска слева
- String1: текст, в котором будем искать
- String2: текст, который будем искать
- Compare как vbCompareMethod: см. Раздел «Сравнить» для получения более подробной информации.
Использование InStr и примеры
InStr возвращает первую позицию в тексте, где найден данный текст. Ниже приведены некоторые примеры его использования.
Sub PoiskTeksta()

    Dim name As String
    name = "Иван Петров"

    ' Возвращает 3 - позицию от первой
    Debug.Print InStr(name, "а")
    ' Возвращает 10 - позиция первого "а", начиная с позиции 4
    Debug.Print InStr(4, name, "а")
    ' Возвращает 8
    Debug.Print InStr(name, "тр")
    ' Возвращает 6
    Debug.Print InStr(name, "Петров")
    ' Возвращает 0 - текст "ССС" не найдет
    Debug.Print InStr(name, "ССС")

End Sub
InStrRev Описание параметров
InStrRev() StringCheck, StringMatch, Start[Необязат], Compare[Необязат]
- StringCheck: текст, в котором будем искать
- StringMatch: Текст, который будем искать
- Start [Необязательно — по умолчанию -1]: это число, указывающее начальную позицию поиска справа
- Compare как vbCompareMethod: см. Раздел «Сравнить» для получения более подробной информации.
Использование InStrRev и примеры
Функция InStrRev такая же, как InStr, за исключением того, что она ищет с конца строки. Важно отметить, что возвращаемая позиция является позицией с самого начала. Поэтому, если существует только один экземпляр элемента поиска, InStr () и InStrRev () будут возвращать одно и то же значение.
В следующем коде показаны некоторые примеры использования InStrRev.
Sub IspInstrRev()

    Dim name As String
    name = "Иван Петров"

    ' Обе возвращают 1 - позицию, только И
    Debug.Print InStr(name, "И")
    Debug.Print InStrRev(name, "И")

    ' Возвращает 11 - вторую в
    Debug.Print InStrRev(name, "в")
    ' Возвращает 3 - первую в с позиции 9
    Debug.Print InStrRev(name, "в", 9)

    ' Returns 1
    Debug.Print InStrRev(name, "Иван")

End Sub
Функции InStr и InStrRev полезны при работе с базовым поиском текста. Однако, если вы собираетесь использовать их для извлечения текста из строки, они могут усложнить задачу. Я написал о гораздо лучшем способе сделать это в своей статье Как легко извлечь любой текст без использования VBA InStr.
Удаление пробелов
| Функция | Параметры | Описание | Пример |
| LTrim | Текст | Убирает пробелы слева |
LTrim(» Иван «) |
| RTrim | Текст | Убирает пробелы справа |
RTrim(» Иван «) |
| Trim | Текст | Убирает пробелы слева и справа |
Trim(» Иван «) |
Функции Trim — это простые функции, которые удаляют пробелы в начале или конце строки.
Функции и примеры использования триммера Trim
- LTrim удаляет пробелы слева от строки
- RTrim удаляет пробелы справа от строки
- Trim удаляет пробелы слева и справа от строки
Sub TrimStr()

    Dim name As String
    name = "  Иван Петров  "

    ' Печатает "Иван Петров  "
    Debug.Print LTrim(name)
    ' Печатает "  Иван Петров"
    Debug.Print RTrim(name)
    ' Печатает "Иван Петров"
    Debug.Print Trim(name)

End Sub
Длина строки
| Функция | Параметры | Описание | Пример |
| Len | Текст | Возвращает длину строки |
Len («Иван Петров») |
Len — простая функция при использовании со строкой. Она просто возвращает количество символов, которое содержит строка. Если используется с числовым типом, таким как long, он вернет количество байтов.
Sub IspLen()

    Dim name As String
    name = "Иван Петров"

    ' Печатает 11
    Debug.Print Len("Иван Петров")
    ' Печатает 3
    Debug.Print Len("АБВ")

    ' Печатает 4 с Long - это размер 4 байта
    Dim total As Long
    Debug.Print Len(total)

End Sub
Перевернуть текст
| Функция | Параметры | Описание | Пример |
| StrReverse | Текст | Перевернуть текст |
StrReverse («Иван Петров») |
StrReverse — еще одна простая в использовании функция. Он просто возвращает данную строку с обратными символами.
Sub RevStr()

    Dim s As String
    s = "Иван Петров"
    ' Печатает: вортеП навИ
    Debug.Print StrReverse(s)

End Sub
Сравнение
| Функция | Параметры | Описание | Пример |
| StrComp | Текст1, текст2 | Сравнивает 2 текста |
StrComp («Иван», «Иван») |
Функция StrComp используется для сравнения двух строк. Следующие подразделы описывают, как используется.
Описание параметров
StrComp() String1, String2, Compare[Необязат]
- String1: первая строка для сравнения
- String2: вторая строка для сравнения
- Compare как vbCompareMethod: см. Раздел «Сравнить» для получения более подробной информации.
StrComp Возвращаемые значения
| Возвращаемое значение | Описание |
| 0 | Совпадение строк |
| -1 | строка1 меньше строки2 |
| 1 | строка1 больше строки2 |
| Null | если какая-либо строка равна нулю |
Использование и примеры
Ниже приведены некоторые примеры использования функции StrComp.
Sub IspStrComp()

   ' Возвращает  0
   Debug.Print StrComp("АБВ", "АБВ", vbTextCompare)
   ' Возвращает 1
   Debug.Print StrComp("АБВГ", "АБВ", vbTextCompare)
   ' Возвращает -1
   Debug.Print StrComp("АБВ", "АБВГ", vbTextCompare)
   ' Returns Null
   Debug.Print StrComp(Null, "АБВГ", vbTextCompare)

End Sub
Сравнение строк с использованием операторов
Вы также можете использовать знак равенства для сравнения строк. Разница между сравнением equals и функцией StrComp:
- Знак равенства возвращает только true или false.
- Вы не можете указать параметр Compare, используя знак равенства — он использует настройку «Option Compare».
Ниже приведены некоторые примеры использования equals для сравнения строк.
Option Compare Text

Sub CompareIspEquals()

    ' Возвращает true
    Debug.Print "АБВ" = "АБВ"
    ' Возвращает true, потому что «Сравнить текст» установлен выше
    Debug.Print "АБВ" = "абв"
    ' Возвращает false
    Debug.Print "АБВГ" = "АБВ"
    ' Возвращает false
    Debug.Print "АБВ" = "АБВГ"
    ' Возвращает null
    Debug.Print Null = "АБВГ"

End Sub
Сравнение строк с использованием сопоставления с шаблоном
| Функция | Параметры | Описание | Пример |
| Like | Текст, шаблон | проверяет, имеет ли строка заданный шаблон |
«abX» Like «??X» «54abc5» Like «*abc#» |
| Знак | Значение |
| ? | Любой одиночный символ |
| # | Любая однозначная цифра (0-9) |
| * | Ноль или более символов |
| [charlist] | Любой символ в списке |
| [!charlist] | Любой символ не в списке символов |
Сопоставление с шаблоном используется для определения того, имеет ли строка конкретный образец символов. Например, вы можете проверить, что номер клиента состоит из 3 цифр, за которыми следуют 3 алфавитных символа, или в строке есть буквы XX, за которыми следует любое количество символов.
Если строка соответствует шаблону, возвращаемое значение равно true, в противном случае — false.
Сопоставление с образцом аналогично функции формата VBA в том смысле, что его можно использовать практически безгранично. В этом разделе я приведу несколько примеров, которые объяснят, как это работает. Это должно охватывать наиболее распространенные виды использования.
Давайте посмотрим на базовый пример с использованием знаков. Возьмите следующую строку шаблона.
[abc][!def]?#X*
Давайте посмотрим, как работает эта строка
[abc] — символ, который является или a, b или c
[! def] — символ, который не является d, e или f
? любой символ
# — любая цифра
X — символ X
* следуют ноль или более символов
Поэтому следующая строка действительна
apY6X
а — один из символов a,b,c
p — не один из символов d, e или f
Y — любой символ
6 — это цифра
Х — это буква Х
В следующих примерах кода показаны результаты различных строк с этим шаблоном.
Sub Shabloni()

    ' ИСТИНА
    Debug.Print 1; "apY6X" Like "[abc][!def]?#X*"
    ' ИСТИНА - любая комбинация символов после x действительна
    Debug.Print 2; "apY6Xsf34FAD" Like "[abc][!def]?#X*"
    ' ЛОЖЬ - символ не из[abc]
    Debug.Print 3; "dpY6X" Like "[abc][!def]?#X*"
    ' ЛОЖЬ - 2-й символ e находится в [def]
    Debug.Print 4; "aeY6X" Like "[abc][!def]?#X*"
    ' ЛОЖЬ - A в позиции 4 не является цифрой
    Debug.Print 5; "apYAX" Like "[abc][!def]?#X*"
    ' ЛОЖЬ - символ в позиции 5 должен быть X
    Debug.Print 1; "apY6Z" Like "[abc][!def]?#X*"

End Sub
Реальный пример сопоставления с образцом
Чтобы увидеть реальный пример использования сопоставления с образцом, ознакомьтесь с Примером 3: Проверьте, допустимо ли имя файла.
Важное примечание о сопоставлении с образцом VBA
Оператор Like использует двоичное или текстовое сравнение на основе параметра Option Compare. Пожалуйста, смотрите раздел Сравнение для более подробной информации.
Заменить часть строки
| Функция | Параметры | Описание | Пример |
| Replace | строка, найти, заменить, начать, считать, сравнивать |
Заменяет текст | Replace («Ива»,»а»,»ан») |
Replace используется для замены текста в строке другим текстом. Он заменяет все экземпляры текста, найденные по умолчанию.
Replace описание параметров
Replace() Expression, Find, Replace, Start[Необязат], Count[Необязат], Compare[Необязат]
- Expression: текст, в котором нужна замена символов
- Find: текст для замены в строке выражения
- Replace: строка для поиска замены текста поиска
- Start [Необязательно — по умолчанию 1]: начальная позиция в строке
- Count [Необязательно — по умолчанию -1]: количество замен. По умолчанию -1 означает все.
- Compare как vbCompareMethod: см. Раздел «Сравнить» для получения более подробной информации.
Использование и примеры
В следующем коде показаны некоторые примеры использования функции замены.
Sub PrimeriReplace()

    ' Заменяет все знаки вопроса (?) на точку с запятой (;)
    Debug.Print Replace("A?B?C?D?E", "?", ";")
    ' Заменить Петров на Иванов
    Debug.Print Replace("Евгений Петров,Артем Петров", "Петров", "Иванов")
    ' Заменить AX на AB
    Debug.Print Replace("ACD AXC BAX", "AX", "AB")

End Sub
На выходе:
A;B;C;D;E
Евгений Иванов,Артем Иванов
ACD ABC BAB
В следующих примерах мы используем необязательный параметр Count. Count определяет количество замен. Так, например, установка Count равной единице означает, что будет заменено только первое вхождение.
Sub ReplaceCount()

    ' Заменяет только первый знак вопроса
    Debug.Print Replace("A?B?C?D?E", "?", ";", Count:=1)
    ' Заменяет первые три знака вопроса
    Debug.Print Replace("A?B?C?D?E", "?", ";", Count:=3)

End Sub
На выходе:
A;B?C?D?E
A;B;C;D?E
Необязательный параметр Start позволяет вам вернуть часть строки. Позиция, которую вы указываете с помощью Start, — это место, откуда начинается возврат строки. Он не вернет ни одной части строки до этой позиции, независимо от того, была ли произведена замена или нет.
Sub ReplacePartial()

    ' Использовать оригинальную строку из позиции 4
    Debug.Print Replace("A?B?C?D?E", "?", ";", Start:=4)
    ' Используйте оригинальную строку из позиции 8
    Debug.Print Replace("AA?B?C?D?E", "?", ";", Start:=8)
    ' Элемент не заменен, но по-прежнему возвращаются только последние '2 символа
    Debug.Print Replace("ABCD", "X", "Y", Start:=3)

End Sub
На выходе:
;C;D;E
;E
CD
Иногда вы можете заменить только заглавные или строчные буквы. Вы можете использовать параметр Compare для этого. Он используется во многих строковых функциях. Для получения дополнительной информации об этом проверьте раздел сравнения.
Sub ReplaceCase()

    ' Заменить только заглавные А
    Debug.Print Replace("AaAa", "A", "X", Compare:=vbBinaryCompare)
    ' Заменить все А
    Debug.Print Replace("AaAa", "A", "X", Compare:=vbTextCompare)

End Sub
На выходе:
XaXa
XXXX
Многократные замены
Если вы хотите заменить несколько значений в строке, вы можете вкладывать вызовы. В следующем коде мы хотим заменить X и Y на A и B соответственно.
Sub ReplaceMulti()

    Dim newString As String

    ' Заменить А на Х
    newString = Replace("ABCD ABDN", "A", "X")
    ' Теперь замените B на Y в новой строке
    newString = Replace(newString, "B", "Y")

    Debug.Print newString

End Sub
В следующем примере мы изменим приведенный выше код для выполнения той же задачи. Мы будем использовать возвращаемое значение первой замены в качестве аргумента для второй замены.
Sub ReplaceMultiNested()

    Dim newString As String

    ' Заменить A на X, а B на Y
    newString = Replace(Replace("ABCD ABDN", "A", "X"), "B", "Y")

    Debug.Print newString

End Sub
Результатом обоих этих Subs является:
XYCD XYDN
Преобразовать типы в строку (базовый)
Этот раздел о преобразовании чисел в строку. Очень важным моментом здесь является то, что в большинстве случаев VBA автоматически конвертируется в строку для вас. Давайте посмотрим на некоторые примеры:
Sub AutoConverts()

    Dim s As String
    ' Автоматически преобразует число в строку
    s = 12.99
    Debug.Print s

    ' Автоматически преобразует несколько чисел в строку
    s = "ABC" & 6 & 12.99
    Debug.Print s

    ' Автоматически преобразует двойную переменную в строку
    Dim d As Double, l As Long
    d = 19.99
    l = 55
    s = "Значения: " & d & " " & l
    Debug.Print s

End Sub
Когда вы запустите приведенный выше код, вы увидите, что число было автоматически преобразовано в строки. Поэтому, когда вы присваиваете значение строке, VBA будет следить за преобразованием большую часть времени. В VBA есть функции преобразования, и в следующих подразделах мы рассмотрим причины их использования.
Явное преобразование
| Функция | Параметры | Описание | Пример |
| CStr | выражение | Преобразует числовую переменную в строку |
CStr («45.78») |
| Str | число | Преобразует числовую переменную в строку |
Str («45.78») |
В некоторых случаях вы можете захотеть преобразовать элемент в строку без необходимости сначала помещать его в строковую переменную. В этом случае вы можете использовать функции Str или CStr. Оба принимают выражение как функцию, и это может быть любой тип, например long, double, data или boolean.
Давайте посмотрим на простой пример. Представьте, что вы читаете список значений из разных типов ячеек в коллекцию. Вы можете использовать функции Str / CStr, чтобы гарантировать, что они все хранятся в виде строк. Следующий код показывает пример этого:
Sub IspStr()

    Dim coll As New Collection
    Dim c As Range

    ' Считать значения ячеек в коллекцию
    For Each c In Range("A1:A10")
        ' Используйте Str для преобразования значения ячейки в строку
        coll.Add Str(c)
    Next

    ' Распечатайте значения и тип коллекции
    Dim i As Variant
    For Each i In coll
        Debug.Print i, TypeName(i)
    Next

End Sub
В приведенном выше примере мы используем Str для преобразования значения ячейки в строку. Альтернативой этому может быть присвоение значения строке, а затем присвоение строки коллекции. Итак, вы видите, что использование Str здесь намного эффективнее.
Multi Region
Разница между функциями Str и CStr заключается в том, что CStr преобразует в зависимости от региона. Если ваши макросы будут использоваться в нескольких регионах, вам нужно будет использовать CStr для преобразования строк.
Хорошей практикой является использование CStr при чтении значений из ячеек. Если ваш код в конечном итоге используется в другом регионе, вам не нужно вносить какие-либо изменения, чтобы он работал правильно.
Преобразовать строку в число — CLng, CDbl, Val и т.д.
| Функция | Возвращает | Пример |
| CBool | Boolean | CBool(«True»), CBool(«0») |
| CCur | Currency | CCur(«245.567») |
| CDate | Date | CDate(«1/1/2019») |
| CDbl | Double | CDbl(«245.567») |
| CDec | Decimal | CDec(«245.567») |
| CInt | Integer | CInt(«45») |
| CLng | Long Integer | CLng(«45.78») |
| CVar | Variant | CVar(«») |
Вышеуказанные функции используются для преобразования строк в различные типы. Если вы присваиваете переменную этого типа, VBA выполнит преобразование автоматически.
Sub StrToNumeric()

    Dim l As Long, d As Double, c As Currency
    Dim s As String
    s = "45.923239"

    l = s
    d = s
    c = s

    Debug.Print "Long is "; l
    Debug.Print "Double is "; d
    Debug.Print "Currency is "; c

End Sub
Использование типов преобразования дает большую гибкость. Это означает, что вы можете определить тип во время выполнения. В следующем коде мы устанавливаем тип на основе аргумента sType, передаваемого в функцию PrintValue. Поскольку этот тип может быть прочитан из внешнего источника, такого как ячейка, мы можем установить тип во время выполнения. Если мы объявим переменную как Long, то при выполнении кода она всегда будет длинной.
Sub Test()
    ' Печатает  46
    PrintValue "45.56", "Long"
    ' Печатает 45.56
    PrintValue "45.56", ""
End Sub

Sub PrintValue(ByVal s As String, ByVal sType As String)

    Dim value

    ' Установите тип данных на основе строки типа
    If sType = "Long" Then
        value = CLng(s)
    Else
        value = CDbl(s)
    End If
    Debug.Print "Type is "; TypeName(value); value

End Sub
Если строка не является допустимым числом (т.е. Содержит символы, другие цифры), вы получаете ошибку «Несоответствие типов».
Sub InvalidNumber()

    Dim l As Long

    ' Даст ошибку несоответствия типов
    l = CLng("45A")

End Sub
Функция Val
Функция преобразует числовые части строки в правильный тип числа.
Val преобразует первые встреченные числа. Как только он встречает буквы в строке, он останавливается. Если есть только буквы, то в качестве значения возвращается ноль. Следующий код показывает некоторые примеры использования Val
Sub IspVal()

    ' Печатает 45
    Debug.Print Val("45 Новая улица")

    ' Печатает 45
    Debug.Print Val("    45 Новая улица")

    ' Печатает 0
    Debug.Print Val("Новая улица 45")

    ' Печатает 12
    Debug.Print Val("12 f 34")

End Sub
Val имеет два недостатка
- Не мультирегиональный — Val не распознает международные версии чисел, такие как запятые вместо десятичных. Поэтому вы должны использовать вышеуказанные функции преобразования, когда ваше приложение будет использоваться в нескольких регионах.
- Преобразует недопустимые строки в ноль — в некоторых случаях это может быть нормально, но в большинстве случаев лучше, если неверная строка вызывает ошибку. Затем приложение осознает наличие проблемы и может действовать соответствующим образом. Функции преобразования, такие как CLng, вызовут ошибку, если строка содержит нечисловые символы.
Генерация строки элементов — функция строки
| Функция | Параметры | Описание | Пример |
| String | число, символ | Преобразует числовую переменную в строку |
String (5,»*») |
Функция String используется для генерации строки повторяющихся символов. Первый аргумент — это количество повторений, второй аргумент — символ.
Sub IspString()

    ' Печатает: AAAAA
    Debug.Print String(5, "A")
    ' Печатает: >>>>>
    Debug.Print String(5, 62)
    ' Печатает: (((ABC)))
    Debug.Print String(3, "(") & "ABC" & String(3, ")")

End Sub
Преобразовать регистр / юникод — StrConv, UCase, LCase
| Функция | Параметры | Описание | Пример |
| StrConv | строка, преобразование, LCID |
Преобразует строку |
StrConv(«abc»,vbUpperCase) |
Если вы хотите преобразовать регистр строки в верхний или нижний регистр, вы можете использовать функции UCase и LCase для верхнего и нижнего соответственно. Вы также можете использовать функцию StrConv с аргументом vbUpperCase или vbLowerCase. В следующем коде показан пример использования этих трех функций.
Sub ConvCase()

    Dim s As String
    s = "У Мэри был маленький ягненок"

    ' верхний
    Debug.Print UCase(s)
    Debug.Print StrConv(s, vbUpperCase)

    ' нижний
    Debug.Print LCase(s)
    Debug.Print StrConv(s, vbLowerCase)

    ' Устанавливает первую букву каждого слова в верхний регистр
    Debug.Print StrConv(s, vbProperCase)

End Sub
На выходе:
У МЭРИ БЫЛ МАЛЕНЬКИЙ ЯГНЕНОК
У МЭРИ БЫЛ МАЛЕНЬКИЙ ЯГНЕНОК
у мэри был маленький ягненок
у мэри был маленький ягненок
У Мэри Был Маленький Ягненок
Другие преобразования
Как и в случае, StrConv может выполнять другие преобразования на основе параметра Conversion. В следующей таблице приведен список различных значений параметров и того, что они делают. Для получения дополнительной информации о StrConv проверьте страницу MSDN.
| Постоянные | Преобразует | Значение |
| vbUpperCase | 1 | в верхний регистр |
| vbLowerCase | 2 | в нижнем регистре |
| vbProperCase | 3 | первая буква каждого слова в верхнем регистре |
| vbWide* | 4 | от узкого к широкому |
| vbNarrow* | 8 | от широкого к узкому |
| vbKatakana** | 16 | из Хираганы в Катакану |
| vbHiragana | 32 | из Катаканы в Хирагану |
| vbUnicode | 64 | в юникод |
| vbFromUnicode | 128 | из юникода |
Использование строк с массивами
| Функция | Параметры | Описание | Пример |
| Split | выражение, разделитель, ограничить, сравнить |
Разбирает разделенную строку в массив |
arr = Split(«A;B;C»,»;») |
| Join | исходный массив, разделитель |
Преобразует одномерный массив в строку |
s = Join(Arr, «;») |
Строка в массив с использованием Split
Вы можете легко разобрать строку с разделителями в массив. Вы просто используете функцию Split с разделителем в качестве параметра. Следующий код показывает пример использования функции Split.
Sub StrToArr()

    Dim arr() As String
    ' Разобрать строку в массив
    arr = Split("Иван,Анна,Павел,София", ",")

    Dim name As Variant
    For Each name In arr
        Debug.Print name
    Next

End Sub
На выходе:
Иван
Анна
Павел
София
Если вы хотите увидеть некоторые реальные примеры использования Split, вы найдете их в статье Как легко извлечь любую строку без использования VBA InStr.
Массив в строку, используя Join
Если вы хотите построить строку из массива, вы можете легко это сделать с помощью функции Join. По сути, это обратная функция Split. Следующий код предоставляет пример использования Join
Sub ArrToStr()

    Dim Arr(0 To 3) As String
    Arr(0) = "Иван"
    Arr(1) = "Анна"
    Arr(2) = "Павел"
    Arr(3) = "София"

    ' Построить строку из массива
    Dim sNames As String
    sNames = Join(Arr, ",")

    Debug.Print sNames

End Sub
На выходе:
Иван, Анна, Павел, София
Форматирование строки
| Функция | Параметры | Описание | Пример |
| Format | выражение, формат, firstdayofweek, firstweekofyear |
Форматирует строку |
Format(0.5, «0.00%») |
Функция Format используется для форматирования строки на основе заданных инструкций. В основном используется для размещения даты или числа в определенном формате. Приведенные ниже примеры показывают наиболее распространенные способы форматирования даты.
Sub FormatDate()

    Dim s As String
    s = "31/12/2019 10:15:45"

    ' Печатает: 31 12 19
    Debug.Print Format(s, "DD MM YY")
    ' Печатает: Thu 31 Dec 2019
    Debug.Print Format(s, "DDD DD MMM YYYY")
    ' Печатает: Thursday 31 December 2019
    Debug.Print Format(s, "DDDD DD MMMM YYYY")
    ' Печатает: 10:15
    Debug.Print Format(s, "HH:MM")
    ' Печатает: 10:15:45 AM
    Debug.Print Format(s, "HH:MM:SS AM/PM")

End Sub
В следующих примерах представлены некоторые распространенные способы форматирования чисел.
Sub FormatNumbers()

    ' Печатает: 50.00%
    Debug.Print Format(0.5, "0.00%")
    ' Печатает: 023.45
    Debug.Print Format(23.45, "00#.00")
    ' Печатает: 23,000
    Debug.Print Format(23000, "##,000")
    ' Печатает: 023,000
    Debug.Print Format(23000, "0##,000")
    ' Печатает: $23.99
    Debug.Print Format(23.99, "$#0.00")

End Sub
Функция «Формат» — довольно обширная тема, и она может самостоятельно занять всю статью. Если вы хотите получить больше информации, то страница формата MSDN предоставляет много информации.
Полезный совет по использованию формата
Быстрый способ выяснить используемое форматирование — использовать форматирование ячеек на листе Excel. Например, добавьте число в ячейку. Затем щелкните правой кнопкой мыши и отформатируйте ячейку так, как вам нужно. Если вы довольны форматом, выберите «Пользовательский» в списке категорий слева. При выборе этого вы можете увидеть строку формата в текстовом поле типа. Это формат строки, который вы можете использовать в VBA.

Заключение
Практически в любом типе программирования вы потратите много времени на манипулирование строками. В этой статье рассматриваются различные способы использования строк в VBA.
Чтобы получить максимальную отдачу, используйте таблицу вверху, чтобы найти тип функции, которую вы хотите использовать. Нажав на левую колонку этой функции, вы попадете в этот раздел.
Если вы новичок в строках в VBA, то я предлагаю вам ознакомиться с разделом «Прочтите это в первую очередь» перед использованием любой из функций.
Quick Guide to String Functions
| String operations | Function(s) |
|---|---|
| Append two or more strings | Format or «&» |
| Build a string from an array | Join |
| Compare — normal | StrComp or «=» |
| Compare — pattern | Like |
| Convert to a string | CStr, Str |
| Convert string to date | Simple: CDate Advanced: Format |
| Convert string to number | Simple: CLng, CInt, CDbl, Val Advanced: Format |
| Convert to unicode, wide, narrow | StrConv |
| Convert to upper/lower case | StrConv, UCase, LCase |
| Extract part of a string | Left, Right, Mid |
| Format a string | Format |
| Find characters in a string | InStr, InStrRev |
| Generate a string | String |
| Get length of a string | Len |
| Remove blanks | LTrim, RTrim, Trim |
| Replace part of a string | Replace |
| Reverse a string | StrReverse |
| Parse string to array | Split |
The Webinar
If you are a member of the website, click on the image below to view the webinar for this post.
(Note: Website members have access to the full webinar archive.)

Introduction
Using strings is a very important part of VBA. There are many types of manipulation you may wish to do with strings. These include tasks such as
- extracting part of a string
- comparing strings
- converting numbers to a string
- formatting a date to include weekday
- finding a character in a string
- removing blanks
- parsing to an array
- and so on
The good news is that VBA contains plenty of functions to help you perform these tasks with ease.
This post provides an in-depth guide to using string in VBA. It explains strings in simple terms with clear code examples. I have laid it out so the post can be easily used as a quick reference guide.
If you are going to use strings a lot then I recommend you read the first section as it applies to a lot of the functions. Otherwise you can read in order or just go to the section you require.
Read This First!
The following two points are very important when dealing with VBA string functions.
The Original String is not Changed
An important point to remember is that the VBA string functions do not change the original string. They return a new string with the changes the function made. If you want to change the original string you simply assign the result to the original string. See the section Extracting Part of a String for examples of this.
How To Use Compare
Some of the string functions such as StrComp() and Instr() etc. have an optional Compare parameter. This works as follows:
vbTextCompare: Upper and lower case are considered the same
vbBinaryCompare: Upper and lower case are considered different
The following code uses the string comparison function StrComp() to demonstrate the Compare parameter
' https://excelmacromastery.com/
Sub Comp1()

    ' Prints 0  : Strings match
    Debug.Print StrComp("ABC", "abc", vbTextCompare)
    ' Prints -1 : Strings do not match
    Debug.Print StrComp("ABC", "abc", vbBinaryCompare)

End Sub
You can use the Option Compare setting instead of having to use this parameter each time. Option Compare is set at the top of a Module. Any function that uses the Compare parameter will take this setting as the default. The two ways to use Option Compare are:
1. Option Compare Text: makes vbTextCompare the default Compare argument
' https://excelmacromastery.com/
Option Compare Text

Sub Comp2()
    ' Strings match - uses vbCompareText as Compare argument
    Debug.Print StrComp("ABC", "abc")
    Debug.Print StrComp("DEF", "def")
End Sub
2. Option Compare Binary: Makes vbBinaryCompare the default Compare argument
' https://excelmacromastery.com/
Option Compare Binary

Sub Comp2()
    ' Strings do not match - uses vbCompareBinary as Compare argument
    Debug.Print StrComp("ABC", "abc")
    Debug.Print StrComp("DEF", "def")
End Sub
If Option Compare is not used then the default is Option Compare Binary.
Now that you understand these two important points about string we can go ahead and look at the string functions individually.
Go back to menu
Appending Strings

ABC Cube Pile © Aleksandr Atkishkin | Dreamstime.com
You can append strings using the & operator. The following code shows some examples of using it
' https://excelmacromastery.com/
Sub Append()

    Debug.Print "ABC" & "DEF"
    Debug.Print "Jane" & " " & "Smith"
    Debug.Print "Long " & 22
    Debug.Print "Double " & 14.99
    Debug.Print "Date " & #12/12/2015#

End Sub
You can see in the example that different types such as dates and number are automatically converted to strings. You may see the + operator being used to append strings. The difference is that this operator will only work with string types. If you try to use it with other type you will get an error.
    ' This will give the error message:  "Type Mismatch"
    Debug.Print "Long " + 22
If you want to do more complex appending of strings then you may wish to use the Format function described below.
Go back to menu
Extracting Part of a String
The functions discussed in this section are useful when dealing with basic extracting from a string. For anything more complicated you might want to check out my post on How to Easily Extract From Any String Without Using VBA InStr.
| Function | Parameters | Description | Example |
|---|---|---|---|
| Left | string, length | Return chars from left side | Left(«John Smith»,4) |
| Right | string, length | Return chars from right side | Right(«John Smith»,5) |
| Mid | string, start, length | Return chars from middle | Mid(«John Smith»,3,2) |
The Left, Right, and Mid functions are used to extract parts of a string. They are very simple functions to use. Left reads characters from the left, Right from the right and Mid from a starting point that you specify.
' https://excelmacromastery.com/
Sub UseLeftRightMid()

    Dim sCustomer As String
    sCustomer = "John Thomas Smith"

    Debug.Print Left(sCustomer, 4)  '  Prints: John
    Debug.Print Right(sCustomer, 5) '  Prints: Smith

    Debug.Print Left(sCustomer, 11)  '  Prints: John Thomas
    Debug.Print Right(sCustomer, 12)  '  Prints: Thomas Smith

    Debug.Print Mid(sCustomer, 1, 4) ' Prints: John
    Debug.Print Mid(sCustomer, 6, 6) ' Prints: Thomas
    Debug.Print Mid(sCustomer, 13, 5) ' Prints: Smith

End Sub
As mentioned in the previous section, VBA string functions do not change the original string. Instead, they return the result as a new string.
In the next example you can see that the string Fullname was not changed after using the Left function
' https://excelmacromastery.com/
Sub UsingLeftExample()

    Dim Fullname As String
    Fullname = "John Smith"

    Debug.Print "Firstname is: "; Left(Fullname, 4)
    ' Original string has not changed
    Debug.Print "Fullname is: "; Fullname

 End Sub
If you want to change the original string you simply assign it to the return value of the function
' https://excelmacromastery.com/
Sub ChangingString()

    Dim name As String
    name = "John Smith"

    ' Assign return string to the name variable
    name = Left(name, 4)

    Debug.Print "Name is: "; name

 End Sub
Go back to menu
Searching Within a String
| Function | Params | Description | Example |
|---|---|---|---|
| InStr | String1, String2 | Finds position of string | InStr(«John Smith»,»h») |
| InStrRev | StringCheck, StringMatch | Finds position of string from end | InStrRev(«John Smith»,»h») |
InStr and InStrRev are VBA functions used to search through strings for a substring. If the search string is found then the position(from the start of the check string) of the search string is returned. If the search string is not found then zero is returned. If either string is null then null is returned.
InStr Description of Parameters
InStr() Start[Optional], String1, String2, Compare[Optional]
- Start As Long[Optional – Default is 1]: This is a number that specifies the starting search position from the left
- String1 As String: The string to search
- String2 As String: The string to search for
- Compare As vbCompareMethod : See the section on Compare above for more details
InStr Use and Examples
InStr returns the first position in a string where a given substring is found. The following shows some examples of using it
' https://excelmacromastery.com/
Sub FindSubString()

    Dim name As String
    name = "John Smith"

    ' Returns 3 - position of first h
    Debug.Print InStr(name, "h")
    ' Returns 10 - position of first h starting from position 4
    Debug.Print InStr(4, name, "h")
    ' Returns 8
    Debug.Print InStr(name, "it")
    ' Returns 6
    Debug.Print InStr(name, "Smith")
    ' Returns 0 - string "SSS" not found
    Debug.Print InStr(name, "SSS")

End Sub
InStrRev Description of Parameters
InStrRev() StringCheck, StringMatch, Start[Optional], Compare[Optional]
- StringCheck As String: The string to search
- StringMatch: The string to search for
- Start As Long[Optional – Default is -1]: This is a number that specifies the starting search position from the right
- Compare As vbCompareMethod: See the section on Compare above for more details
InStrRev Use and Examples
The InStrRev function is the same as InStr except that it searches from the end of the string. It’s important to note that the position returned is the position from the start. Therefore if there is only one instance of the search item then both InStr() and InStrRev() will return the same value.
The following code show some examples of using InStrRev
' https://excelmacromastery.com/
Sub UsingInstrRev()

    Dim name As String
    name = "John Smith"

    ' Both Return 1 - position of the only J
    Debug.Print InStr(name, "J")
    Debug.Print InStrRev(name, "J")

    ' Returns 10 - second h
    Debug.Print InStrRev(name, "h")
    ' Returns 3 - first h as searches from position 9
    Debug.Print InStrRev(name, "h", 9)

    ' Returns 1
    Debug.Print InStrRev(name, "John")

End Sub
The InStr and InStrRev functions are useful when dealing with basic string searches. However, if you are going to use them for extracting text from a string they can make things complicated. I have written about a much better way to do this in my post How to Easily Extract From Any String Without Using VBA InStr.
Go back to menu
Removing Blanks
| Function | Params | Description | Example |
|---|---|---|---|
| LTrim | string | Removes spaces from left | LTrim(» John «) |
| RTrim | string | Removes spaces from right | RTrim(» John «) |
| Trim | string | Removes Spaces from left and right | Trim(» John «) |
The Trim functions are simple functions that remove spaces from either the start or end of a string.
Trim Functions Use and Examples
- LTrim removes spaces from the left of a string
- RTrim removes spaces from the right of a string
- Trim removes spaces from the left and right of a string
' https://excelmacromastery.com/
Sub TrimStr()

    Dim name As String
    name = "  John Smith  "

    ' Prints "John Smith  "
    Debug.Print LTrim(name)
    ' Prints "  John Smith"
    Debug.Print RTrim(name)
    ' Prints "John Smith"
    Debug.Print Trim(name)

End Sub
Go back to menu
Length of a String
| Function | Params | Description | Example |
|---|---|---|---|
| Len | string | Returns length of string | Len («John Smith») |
Len is a simple function when used with a string. It simply returns the number of characters the string contains. If used with a numeric type such as long it will return the number of bytes.
' https://excelmacromastery.com/
Sub GetLen()

    Dim name As String
    name = "John Smith"

    ' Prints 10
    Debug.Print Len("John Smith")
    ' Prints 3
    Debug.Print Len("ABC")

    ' Prints 4 as Long is 4 bytes in size
    Dim total As Long
    Debug.Print Len(total)

End Sub
Go back to menu
Reversing a String
| Function | Params | Description | Example |
|---|---|---|---|
| StrReverse | string | Reverses a string | StrReverse («John Smith») |
StrReverse is another easy-to-use function. It simply returns the given string with the characters reversed.
' https://excelmacromastery.com/
Sub RevStr()

    Dim s As String
    s = "Jane Smith"
    ' Prints: htimS enaJ
    Debug.Print StrReverse(s)

End Sub
Go back to menu
Comparing Strings
| Function | Params | Description | Example |
|---|---|---|---|
| StrComp | string1, string2 | Compares 2 strings | StrComp («John», «John») |
The function StrComp is used to compare two strings. The following subsections describe how it is used.
Description of Parameters
StrComp() String1, String2, Compare[Optional]
- String1 As String: The first string to compare
- String2 As String: The second string to compare
- Compare As vbCompareMethod : See the section on Compare above for more details
StrComp Return Values
| Return Value | Description |
|---|---|
| 0 | Strings match |
| -1 | string1 less than string2 |
| 1 | string1 greater than string2 |
| Null | if either string is null |
Use and Examples
The following are some examples of using the StrComp function
' https://excelmacromastery.com/
Sub UsingStrComp()

   ' Returns 0
   Debug.Print StrComp("ABC", "ABC", vbTextCompare)
   ' Returns 1
   Debug.Print StrComp("ABCD", "ABC", vbTextCompare)
   ' Returns -1
   Debug.Print StrComp("ABC", "ABCD", vbTextCompare)
   ' Returns Null
   Debug.Print StrComp(Null, "ABCD", vbTextCompare)

End Sub
Compare Strings using Operators
You can also use the equals sign to compare strings. The difference between the equals comparison and the StrComp function are:
- The equals sign returns only true or false.
- You cannot specify a Compare parameter using the equal sign – it uses the “Option Compare” setting.
The following shows some examples of using equals to compare strings
' https://excelmacromastery.com/
Option Compare Text

Sub CompareUsingEquals()

    ' Returns true
    Debug.Print "ABC" = "ABC"
    ' Returns true because "Compare Text" is set above
    Debug.Print "ABC" = "abc"
    ' Returns false
    Debug.Print "ABCD" = "ABC"
    ' Returns false
    Debug.Print "ABC" = "ABCD"
    ' Returns null
    Debug.Print Null = "ABCD"

End Sub
The Operator “<>” means “does not equal”. It is essentially the opposite of using the equals sign as the following code shows
' https://excelmacromastery.com/
Option Compare Text

Sub CompareWithNotEqual()

    ' Returns false
    Debug.Print "ABC" <> "ABC"
    ' Returns false because "Compare Text" is set above
    Debug.Print "ABC" <> "abc"
    ' Returns true
    Debug.Print "ABCD" <> "ABC"
    ' Returns true
    Debug.Print "ABC" <> "ABCD"
    ' Returns null
    Debug.Print Null <> "ABCD"

End Sub
Go back to menu
Comparing Strings using Pattern Matching
| Operator | Params | Description | Example |
|---|---|---|---|
| Like | string, string pattern | checks if string has the given pattern | «abX» Like «??X» «54abc5» Like «*abc#» |
| Token | Meaning |
|---|---|
| ? | Any single char |
| # | Any single digit(0-9) |
| * | zero or more characters |
| [charlist] | Any char in the list |
| [!charlist] | Any char not in the char list |
Pattern matching is used to determine if a string has a particular pattern of characters. For example, you may want to check that a customer number has 3 digits followed by 3 alphabetic characters or a string has the letters XX followed by any number of characters.
If the string matches the pattern then the return value is true, otherwise it is false.
Pattern matching is similar to the VBA Format function in that there are almost infinite ways to use it. In this section I am going to give some examples that will explain how it works. This should cover the most common uses. If you need more information about pattern matching you can refer to the MSDN Page for the Like operator.
Lets have a look at a basic example using the tokens. Take the following pattern string
[abc][!def]?#X*
Let’s look at how this string works
[abc] a character that is either a,b or c
[!def] a character that is not d,e or f
? any character
# any digit
X the character X
* followed by zero or more characters
Therefore the following string is valid
apY6X
a is one of abc
p is not one of the characters d, e or f
Y is any character
6 is a digit
X is the letter X
The following code examples show the results of various strings with this pattern
' https://excelmacromastery.com/
Sub Patterns()

    ' True
    Debug.Print 1; "apY6X" Like "[abc][!def]?#X*"
    ' True - any combination of chars after x is valid
    Debug.Print 2; "apY6Xsf34FAD" Like "[abc][!def]?#X*"
    ' False - char d not in [abc]
    Debug.Print 3; "dpY6X" Like "[abc][!def]?#X*"
    ' False - 2nd char e is in [def]
    Debug.Print 4; "aeY6X" Like "[abc][!def]?#X*"
    ' False - A at position 4 is not a digit
    Debug.Print 5; "apYAX" Like "[abc][!def]?#X*"
    ' False - char at position 5 must be X
    Debug.Print 6; "apY6Z" Like "[abc][!def]?#X*"

End Sub
Real-World Example of Pattern Matching
To see a real-world example of using pattern matching check out Example 3: Check if a filename is valid.
Important Note on VBA Pattern Matching
The Like operator uses either Binary or Text comparison based on the Option Compare setting. Please see the section on Compare above for more details.
Go back to menu
Replace Part of a String
| Function | Params | Description | Example |
|---|---|---|---|
| Replace | string, find, replace, start, count, compare |
Replaces a substring with a substring | Replace («Jon»,»n»,»hn») |
Replace is used to replace a substring in a string by another substring. It replaces all instances of the substring that are found by default.
Replace Description of Parameters
Replace() Expression, Find, Replace, Start[Optional], Count[Optional], Compare[Optional]
- Expression As String: The string to replace chars in
- Find As String: The substring to replace in the Expression string
- Replace As String: The string to replace the Find substring with
- Start As Long[Optional – Default is 1]: The start position in the string
- Count As Long[Optional – Default is -1]: The number of substitutions to make. The default -1 means all.
- Compare As vbCompareMethod : See the section on Compare above for more details
Use and Examples
The following code shows some examples of using the Replace function
' https://excelmacromastery.com/
Sub ReplaceExamples()

    ' Replaces all the question marks with(?) with semi colons(;)
    Debug.Print Replace("A?B?C?D?E", "?", ";")
    ' Replace Smith with Jones
    Debug.Print Replace("Peter Smith,Ann Smith", "Smith", "Jones")
    ' Replace AX with AB
    Debug.Print Replace("ACD AXC BAX", "AX", "AB")

End Sub
Output
A;B;C;D;E
Peter Jones,Sophia Jones
ACD ABC BAB
In the following examples we use the Count optional parameter. Count determines the number of substitutions to make. So for example, setting Count equal to one means that only the first occurrence will be replaced.
' https://excelmacromastery.com/
Sub ReplaceCount()

    ' Replaces first question mark only
    Debug.Print Replace("A?B?C?D?E", "?", ";", Count:=1)
    ' Replaces first three question marks
    Debug.Print Replace("A?B?C?D?E", "?", ";", Count:=3)

End Sub
Output
A;B?C?D?E
A;B;C;D?E
The Start optional parameter allow you to return part of a string. The position you specify using Start is where it starts returning the string from. It will not return any part of the string before this position whether a replace was made or not.
' https://excelmacromastery.com/
Sub ReplacePartial()

    ' Use original string from position 4
    Debug.Print Replace("A?B?C?D?E", "?", ";", Start:=4)
    ' Use original string from position 8
    Debug.Print Replace("AA?B?C?D?E", "?", ";", Start:=8)
    ' No item replaced but still only returns last 2 characters
    Debug.Print Replace("ABCD", "X", "Y", Start:=3)

End Sub
Output
;C;D;E
;E
CD
Sometimes you may only want to replace only upper or lower case letters. You can use the Compare parameter to do this. This is used in a lot of string functions. For more information on this check out the Compare section above.
' https://excelmacromastery.com/
Sub ReplaceCase()

    ' Replace capital A's only
    Debug.Print Replace("AaAa", "A", "X", Compare:=vbBinaryCompare)
    ' Replace All A's
    Debug.Print Replace("AaAa", "A", "X", Compare:=vbTextCompare)

End Sub
Output
XaXa
XXXX
Multiple Replaces
If you want to replace multiple values in a string you can nest the calls. In the following code we want to replace X and Y with A and B respectively.
' https://excelmacromastery.com/
Sub ReplaceMulti()

    Dim newString As String

    ' Replace A with X
    newString = Replace("ABCD ABDN", "A", "X")
    ' Now replace B with Y in new string
    newString = Replace(newString, "B", "Y")

    Debug.Print newString

End Sub
In the next example we will change the above code to perform the same task. We will use the return value of the first replace as the argument for the second replace.
' https://excelmacromastery.com/
Sub ReplaceMultiNested()

    Dim newString As String

    ' Replace A with X and B with Y
    newString = Replace(Replace("ABCD ABDN", "A", "X"), "B", "Y")

    Debug.Print newString

End Sub
The result of both of these Subs is
XYCD XYDN
Go back to menu
Convert Types to String(Basic)
This section is about converting numbers to a string. A very important point here is that most the time VBA will automatically convert to a string for you. Let’s look at some examples
' https://excelmacromastery.com/
Sub AutoConverts()

    Dim s As String
    ' Automatically converts number to string
    s = 12.99
    Debug.Print s

    ' Automatically converts multiple numbers to string
    s = "ABC" & 6 & 12.99
    Debug.Print s

    ' Automatically converts double variable to string
    Dim d As Double, l As Long
    d = 19.99
    l = 55
    s = "Values are " & d & " " & l
    Debug.Print s

End Sub
When you run the above code you can see that the number were automatically converted to strings. So when you assign a value to a string VBA will look after the conversion for you most of the time. There are conversion functions in VBA and in the following sub sections we will look at the reasons for using them.
Explicit Conversion
| Function | Params | Description | Example |
|---|---|---|---|
| CStr | expression | Converts a number variable to a string | CStr («45.78») |
| Str | number | Converts a number variable to a string | Str («45.78») |
In certain cases you may want to convert an item to a string without have to place it in a string variable first. In this case you can use the Str or CStr functions. Both take an expression as a function and this can be any type such as long, double, data or boolean.
Let’s look at a simple example. Imagine you are reading a list of values from different types of cells to a collection. You can use the Str/CStr functions to ensure they are all stored as strings. The following code shows an example of this
' https://excelmacromastery.com/
Sub UseStr()

    Dim coll As New Collection
    Dim c As Range

    ' Read cell values to collection
    For Each c In Range("A1:A10")
        ' Use Str to convert cell value to a string
        coll.Add Str(c)
    Next

    ' Print out the collection values and type
    Dim i As Variant
    For Each i In coll
        Debug.Print i, TypeName(i)
    Next

End Sub
In the above example we use Str to convert the value of the cell to a string. The alternative to this would be to assign the value to a string and then assigning the string to the collection. So you can see that using Str here is much more efficient.
Multi Region
The difference between the Str and CStr functions is that CStr converts based on the region. If your macros will be used in multiple regions then you will need to use CStr for your string conversions.
It is good to practise to use CStr when reading values from cells. If your code ends up being used in another region then you will not have to make any changes to make it work correctly.
Go back to menu
Convert String to Number- CLng, CDbl, Val etc.
| Function | Returns | Example |
|---|---|---|
| CBool | Boolean | CBool(«True»), CBool(«0») |
| CCur | Currency | CCur(«245.567») |
| CDate | Date | CDate(«1/1/2017») |
| CDbl | Double | CCur(«245.567») |
| CDec | Decimal | CDec(«245.567») |
| CInt | Integer | CInt(«45») |
| CLng | Long Integer | CLng(«45.78») |
| CVar | Variant | CVar(«») |
The above functions are used to convert strings to various types. If you are assigning to a variable of this type then VBA will do the conversion automatically.
' https://excelmacromastery.com/
Sub StrToNumeric()

    Dim l As Long, d As Double, c As Currency
    Dim s As String
    s = "45.923239"

    l = s
    d = s
    c = s

    Debug.Print "Long is "; l
    Debug.Print "Double is "; d
    Debug.Print "Currency is "; c

End Sub
Using the conversion types gives more flexibility. It means you can determine the type at runtime. In the following code we set the type based on the sType argument passed to the PrintValue function. As this type can be read from an external source such as a cell, we can set the type at runtime. If we declare a variable as Long then it will always be long when the code runs.
' https://excelmacromastery.com/
Sub Test()
    ' Prints  46
    PrintValue "45.56", "Long"
    ' Print 45.56
    PrintValue "45.56", ""
End Sub

Sub PrintValue(ByVal s As String, ByVal sType As String)

    Dim value

    ' Set the data type based on a type string
    If sType = "Long" Then
        value = CLng(s)
    Else
        value = CDbl(s)
    End If
    Debug.Print "Type is "; TypeName(value); value

End Sub
If a string is not a valid number(i.e. contains symbols other numeric) then you get a “Type Mismatch” error.
' https://excelmacromastery.com/
Sub InvalidNumber()

    Dim l As Long

    ' Will give type mismatch error
    l = CLng("45A")

End Sub
The Val Function
The value function convert numeric parts of a string to the correct number type.
The Val function converts the first numbers it meets. Once it meets letters in a string it stops. If there are only letters then it returns zero as the value. The following code shows some examples of using Val
' https://excelmacromastery.com/
Sub UseVal()

    ' Prints 45
    Debug.Print Val("45 New Street")

    ' Prints 45
    Debug.Print Val("    45 New Street")

    ' Prints 0
    Debug.Print Val("New Street 45")

    ' Prints 12
    Debug.Print Val("12 f 34")

End Sub
The Val function has two disadvantages
1. Not Multi-Region – Val does not recognise international versions of numbers such as using commas instead of decimals. Therefore you should use the above conversion functions when you application will be used in multiple regions.
2. Converts invalid strings to zero – This may be okay in some instances but in most cases it is better if an invalid string raises an error. The application is then aware there is a problem and can act accordingly. The conversion functions such as CLng will raise an error if the string contains non-numeric characters.
Go back to menu
Generate a String of items – String Function
| Function | Params | Description | Example |
|---|---|---|---|
| String | number, character | Converts a number variable to a string | String (5,»*») |
The String function is used to generate a string of repeated characters. The first argument is the number of times to repeat it, the second argument is the character.
' https://excelmacromastery.com/
Sub GenString()

    ' Prints: AAAAA
    Debug.Print String(5, "A")
    ' Prints: >>>>>
    Debug.Print String(5, 62)
    ' Prints: (((ABC)))
    Debug.Print String(3, "(") & "ABC" & String(3, ")")

End Sub
Go back to menu
Convert Case/Unicode – StrConv, UCase, LCase
| Function | Params | Description | Example |
|---|---|---|---|
| StrConv | string, conversion, LCID | Converts a String | StrConv(«abc»,vbUpperCase) |
If you want to convert the case of a string to upper or lower you can use the UCase and LCase functions for upper and lower respectively. You can also use the StrConv function with the vbUpperCase or vbLowerCase argument. The following code shows example of using these three functions
' https://excelmacromastery.com/
Sub ConvCase()

    Dim s As String
    s = "Mary had a little lamb"

    ' Upper
    Debug.Print UCase(s)
    Debug.Print StrConv(s, vbUpperCase)

    ' Lower
    Debug.Print LCase(s)
    Debug.Print StrConv(s, vbLowerCase)

    ' Sets the first letter of each word to upper case
    Debug.Print StrConv(s, vbProperCase)

End Sub
Output
MARY HAD A LITTLE LAMB
MARY HAD A LITTLE LAMB
mary had a little lamb
mary had a little lamb
Mary Had A Little Lamb
Other Conversions
As well as case the StrConv can perform other conversions based on the Conversion parameter. The following table shows a list of the different parameter values and what they do. For more information on StrConv check out the MSDN Page.
| Constant | Value | Converts |
|---|---|---|
| vbUpperCase | 1 | to upper case |
| vbLowerCase | 2 | to lower case |
| vbProperCase | 3 | first letter of each word to uppercase |
| vbWide* | 4 | from Narrow to Wide |
| vbNarrow* | 8 | from Wide to Narrow |
| vbKatakana** | 16 | from Hiragana to Katakana |
| vbHiragana | 32 | from Katakana to Hiragana |
| vbUnicode | 64 | to unicode |
| vbFromUnicode | 128 | from unicode |
Go back to menu
Using Strings With Arrays
| Function | Params | Description | Example |
|---|---|---|---|
| Split | expression, delimiter, limit, compare |
Parses a delimited string to an array | arr = Split(«A;B;C»,»;») |
| Join | source array, delimiter | Converts a one dimensional array to a string | s = Join(Arr, «;») |
String to Array using Split
You can easily parse a delimited string into an array. You simply use the Split function with the delimiter as parameter. The following code shows an example of using the Split function.
' https://excelmacromastery.com/
Sub StrToArr()

    Dim arr() As String
    ' Parse string to array
    arr = Split("John,Jane,Paul,Sophie", ",")

    Dim name As Variant
    For Each name In arr
        Debug.Print name
    Next

End Sub
Output
John
Jane
Paul
Sophie
You can find a complete guide to the split function here.
Array to String using Join
If you want to build a string from an array you can do so easily using the Join function. This is essentially a reverse of the Split function. The following code provides an example of using Join
' https://excelmacromastery.com/
Sub ArrToStr()

    Dim Arr(0 To 3) As String
    Arr(0) = "John"
    Arr(1) = "Jane"
    Arr(2) = "Paul"
    Arr(3) = "Sophie"

    ' Build string from array
    Dim sNames As String
    sNames = Join(Arr, ",")

    Debug.Print sNames

End Sub
Output
John,Jane,Paul,Sophie
Go back to menu
Formatting a String
| Function | Params | Description | Example |
|---|---|---|---|
| Format | expression, format, firstdayofweek, firstweekofyear |
Formats a string | Format(0.5, «0.00%») |
The Format function is used to format a string based on given instructions. It is mostly used to place a date or number in certain format. The examples below show the most common ways you would format a date.
' https://excelmacromastery.com/
Sub FormatDate()

    Dim s As String
    s = "31/12/2015 10:15:45"

    ' Prints: 31 12 15
    Debug.Print Format(s, "DD MM YY")
    ' Prints: Thu 31 Dec 2015
    Debug.Print Format(s, "DDD DD MMM YYYY")
    ' Prints: Thursday 31 December 2015
    Debug.Print Format(s, "DDDD DD MMMM YYYY")
    ' Prints: 10:15
    Debug.Print Format(s, "HH:MM")
    ' Prints: 10:15:45 AM
    Debug.Print Format(s, "HH:MM:SS AM/PM")

End Sub
The following examples are some common ways of formatting numbers
' https://excelmacromastery.com/
Sub FormatNumbers()

    ' Prints: 50.00%
    Debug.Print Format(0.5, "0.00%")
    ' Prints: 023.45
    Debug.Print Format(23.45, "00#.00")
    ' Prints: 23,000
    Debug.Print Format(23000, "##,000")
    ' Prints: 023,000
    Debug.Print Format(23000, "0##,000")
    ' Prints: $23.99
    Debug.Print Format(23.99, "$#0.00")

End Sub
The Format function is quite a large topic and could use up a full post on it’s own. If you want more information then the MSDN Format Page provides a lot of information.
Helpful Tip for Using Format
A quick way to figure out the formatting to use is by using the cell formatting on an Excel worksheet. For example add a number to a cell. Then right click and format the cell the way you require. When you are happy with the format select Custom from the category listbox on the left. When you select this you can see the format string in the type textbox(see image below). This is the string format you can use in VBA.

Format Cells Dialog
Go back to menu
Conclusion
In almost any type of programming, you will spend a great deal of time manipulating strings. This post covers the many different ways you use strings in VBA.
To get the most from use the table at the top to find the type of function you wish to use. Clicking on the left column of this function will bring you to that section.
If you are new to strings in VBA, then I suggest you check out the Read this First section before using any of the functions.
What’s Next?
Free VBA Tutorial If you are new to VBA or you want to sharpen your existing VBA skills then why not try out the The Ultimate VBA Tutorial.
Related Training: Get full access to the Excel VBA training webinars and all the tutorials.
(NOTE: Planning to build or manage a VBA Application? Learn how to build 10 Excel VBA applications from scratch.)
In this Article
- String Variable Type
- Fixed String Variable
- Declare String Variable at Module or Global Level
- Module Level
- Global Level
- Convert Values stored as String
- Convert String Stored as Values
String Variable Type
The String data type is one of the most common data types in VBA. It stores “strings” of text.
To declare an variable String variable, you use the Dim Statement (short for Dimension):
Dim strName as StringTo assign a value to a variable, you use the equal sign:
strName = "Fred Smith"Putting this in a procedure looks like this:
Sub strExample()
'declare the string
Dim strName as string
'populate the string
strName = "Fred Smith"
'show the message box
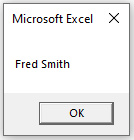
MsgBox strname
End SubIf you run the code above, the following message box will be shown.
Fixed String Variable
There are actually 2 types of string variables – fixed and variable.
The “variable” string variable (shown in the previous example) allows your string to be any length. This is most common.
The “fixed” string variable defines the size of the string. A fixed string can hold up to 65,400 characters.
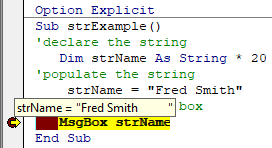
Dim strName as string *20When you define a fixed variable, the number of characters in the variable is locked in place, even if you use fewer characters.
Notice the spaces in the graphic below – the variable has place holders for the rest of the characters in the string as ‘Fred Smith’ is less than 20 characters.
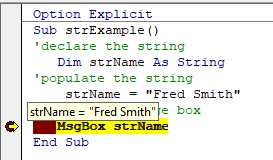
However, if you have declared a string without specifying the length, then the string will only hold as many characters as are passed to it.
Declare String Variable at Module or Global Level
In the previous example, you declared the String variable within a procedure. Variables declared with a procedure can only be used within that procedure.
Instead, you can declare String variables at the module or global level.
Module Level
Module level variables are declared at the top of code modules with the Dim statement.
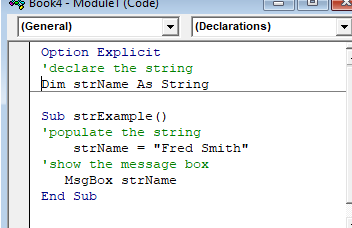
These variables can be used with any procedure in that code module.
Global Level
Global level variables are also declared at the top of code modules. However, instead of using the Dim statement, you use the Public statement to indicate that the string variable is available to be used throughout your VBA Project.
Public strName as String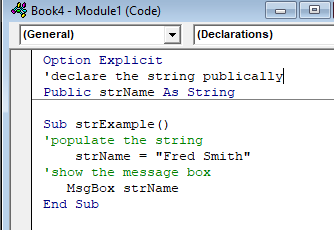
If you declared the string variable at a module level and used in a different module, an error would occur.
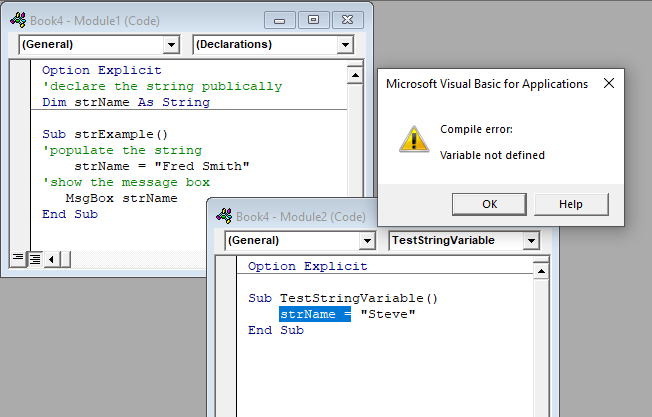
However, if you use the Public keyword to declare the string variable, the error would not occur and the procedure would run perfectly.
Convert Values stored as String
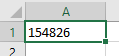
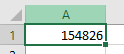
There may be a time when you have values in Excel that are stored as text – for example, you may have imported a CSV file which may have brought in text instead of numbers.
Note that the value in A1 is left-aligned, indicating a text value.
You can use a VBA Function can be used to convert these numbers to text
Sub ConvertValue()
'populate the string
    strQty = Range("A1")
'populate the double with the string
    dblQty = strQty
'populate the range with the number
    Range("A1") = dblQty
End Sub
Once you run the code, the number will move to the right-indicating that it is now stored as a number.
This is particularly useful when you loop through a large range of cells.
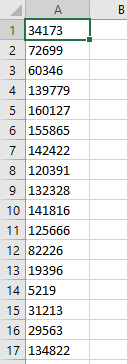
Sub ConvertValue()
    Dim strQty As String, dblQty As Double
    Dim rw As Integer, i As Integer
'count the rows to convert
    rw = Range("A1", Range("A1").End(xlDown)).Rows.Count
'loop through the cells and convert each one to a number
    For i = 0 To rw – 1
'populate the string
        strQty = Range("A1").Offset(i, 0)
'populate the double with the string
        dblQty = strQty
'populate the range with the number
        Range("A1").Offset(i, 0) = dblQty
    Next i
End Sub
The result will be that all the cells are then converted to numbers
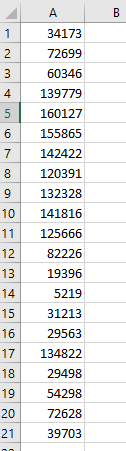
VBA Coding Made Easy
Stop searching for VBA code online. Learn more about AutoMacro — A VBA Code Builder that allows beginners to code procedures from scratch with minimal coding knowledge and with many time-saving features for all users!

Learn More
Convert String Stored as Values
Similarly, there might be values that you need to convert from a string to a value – for example, if you require a leading zero on a telephone number.
Sub ConvertString()
    Dim strPhone As String, dblPhone As Double
    Dim rw As Integer, i As Integer
'count the rows to convert
    rw = Range("A1", Range("A1").End(xlDown)).Rows.Count
'loop through the cells and convert each one to a number
    For i = 0 To rw – 1
'populate the string
        dblPhone = Range("A1").Offset(i, 0)
'populate the double with the string
        strPhone = "'0" & dblPhone
'populate the range with the number
        Range("A1").Offset(i, 0) = strphone
    Next i
End Sub
Note that you need to begin the text string with an apostrophe (‘), before the zero in order to tell Excel to enter the value as string.
 In certain cases, you may need to automate the process of inserting a row (or several rows) in a worksheet. This is useful, for example, when you’re (i) manipulating or adding data entries, or (ii) formatting a worksheet that uses blank rows for organization purposes.
The information and examples in this VBA Tutorial should allow you to insert rows in a variety of circumstances.
This VBA Tutorial is accompanied by Excel workbooks containing the data and macros I use in the examples below. You can get immediate free access to these example workbooks by clicking the button below.

Use the following Table of Contents to navigate to the section you’re interested in.
Insert Rows in Excel
When working manually with Excel, you can insert rows in the following 2 steps:
- Select the row or rows above which to insert the row or rows.
- Do one of the following:
- Right-click and select Insert.
- Go to Home > Insert > Insert Sheet Rows.
- Use the “Ctrl + Shift + +” keyboard shortcut.

You can use the VBA constructs and structures I describe below to automate this process to achieve a variety of results.
Excel VBA Constructs to Insert Rows
Insert Rows with the Range.Insert Method
Purpose of Range.Insert
Use the Range.Insert method to insert a cell range into a worksheet. The 2 main characteristics of the Range.Insert method are the following:
- Range.Insert can insert a single cell or a cell range. For purposes of this VBA Tutorial, you’re interested in inserting entire rows.
- To make space for the newly-inserted cells, Range.Insert shifts other cells away.
Syntax of Range.Insert
expression.Insert(Shift, CopyOrigin)
“expression” is a Range object. Therefore, I simplify as follows:
Range.Insert(Shift, CopyOrigin)
Parameters of Range.Insert
- Parameter: Shift.
- Description: Specifies the direction in which cells are shifted away to make space for the newly-inserted row.
- Optional/Required: Optional.
- Data type: Variant.
- Values: Use a constant from the xlInsertShiftDirection Enumeration:
- xlShiftDown or -4121: Shifts cells down.
- xlShiftToRight or -4161: Shifts cells to the right.
- Default: Excel decides based on the range’s shape.
- Usage notes: When you insert a row: (i) use xlShiftDown or -4121, or (ii) omit parameter and rely on the default behavior.
- Parameter: CopyOrigin.
- Description: Specifies from where (the origin) is the format for the cells in the newly inserted row copied.
- Optional/Required: Optional.
- Data type: Variant.
- Values: A constant from the xlInsertFormatOrigin Enumeration:
- xlFormatFromLeftOrAbove or 0: Newly-inserted cells take formatting from cells above or to the left.
- xlFormatFromRightOrBelow or 1: Newly-inserted cells take formatting from cells below or to the right.
- Default: xlFormatFromLeftOrAbove or 0. Newly-inserted cells take the formatting from cells above or to the left.
How to Use Range.Insert to Insert Rows
Use the Range.Insert method to insert a row into a worksheet. Use a statement with the following structure:
Range.Insert Shift:=xlShiftDown CopyOrigin:=xlInsertFormatOriginConstant
For these purposes:
- Range: Range object representing an entire row. Use the Worksheet.Rows or Range.EntireRow properties to return a Range object that represents the entire row. Please refer to the sections about the Rows and EntireRow properties below.
- xlInsertFormatOriginConstant: xlFormatFromLeftOrAbove or xlFormatFromRightOrBelow. xlFormatFromLeftOrAbove is the default value. Therefore, when inserting rows with formatting from row above, you can usually omit the CopyOrigin parameter.
You can usually omit the Shift parameter. By default, VBA decides how to shift the cells based on the range’s shape. When inserting a row, this usually results in Excel shifting the cells down.
Specify Rows with the Worksheet.Rows Property
Purpose of Worksheet.Rows
Use the Worksheet.Rows property to return a Range object representing all the rows within the worksheet the property works with.
Worksheet.Rows is read-only.
Syntax of Worksheet.Rows
expression.Rows
“expression” is a Worksheet object. Therefore, I simplify as follows:
Worksheet.Rows
How to Use Worksheet.Rows to Insert Rows
Use the Worksheet.Rows property to specify the row or rows above which new rows are inserted.
To insert a row, use a statement with the following structure:
Worksheets.Rows(row#).Insert
“row#” is the number of the row above which the row is inserted.
To insert multiple rows, use a statement with the following structure:
Worksheet.Rows("firstRow#:lastRow#").Insert
“firstRow#” is the row above which the rows are inserted. The number of rows VBA inserts is calculated as follows:
lastRow# - firstRow# + 1
Specify the Active Cell with the Application.ActiveCell Property
Purpose of Application.ActiveCell
Use the Application.ActiveCell property to return a Range object representing the active cell.
Application.ActiveCell is read-only.
Syntax of Application.ActiveCell
expression.ActiveCell
“expression” is the Application object. Therefore, I simplify as follows:
Application.ActiveCell
How to Use Application.ActiveCell To Insert Rows
When you insert a row, use the Application.ActiveCell property to return the active cell. This allows you to use the active cell as reference for the row insertion operation.
Use the Range.Offset property to return a Range object a specific number of rows above or below the active cell. Use the Range.EntireRow property to return a Range object representing the entire row or rows above which to insert the new row. Please refer to the sections about the Offset and EntireRow properties below.
To insert a row above the active cell, use the following statement:
ActiveCell.EntireRow.Insert Shift:=xlShiftDown
To insert a row a specific number of rows above or below the active cell, use a statement with the following structure:
ActiveCell.Offset(RowOffset).EntireRow.Insert Shift:=xlShiftDown
Specify a Cell Range with the Worksheet.Range Property
Purpose of Worksheet.Range
Use the Worksheet.Range property to return a Range object representing a single cell or a cell range.
Syntax of Worksheet.Range
expression.Range(Cell1, Cell2)
“expression” is a Worksheet object. Therefore, I simplify as follows:
Worksheet.Range(Cell1, Cell2)
Parameters of Worksheet.Range
- Parameter: Cell1.
- Description:
- If you use Cell1 alone (omit Cell2), Cell1 specifies the cell range.
- If you use Cell1 and Cell2, Cell1 specifies the cell in the upper-left corner of the cell range.
- Required/Optional: Required.
- Data type: Variant.
- Values:
- If you use Cell1 alone (omit Cell2): (i) range address as an A1-style reference in language of macro, or (ii) range name.
- If you use Cell1 and Cell2: (i) Range object, (ii) range address, or (iii) range name.
- Description:
- Parameter: Cell2.
- Description: Cell in the lower-right corner of the cell range.
- Required/Optional: Optional.
- Data type: Variant.
- Values: (i) Range object, (ii) range address, or (iii) range name.
How to Use Worksheet.Range to Insert Rows
When you insert a row, use the Worksheet.Range property to return a cell or cell range. This allows you to use a specific cell or cell range as reference for the row insertion operation.
Use the Range.Offset property to return a Range object a specific number of rows above or below the cell or cell range. Use the Range.EntireRow property to return a Range object representing the entire row or rows above which to insert the new row or rows. Please refer to the sections about the Offset and EntireRow properties below.
To insert rows above the cell range specified by Worksheet.Range, use a statement with the following structure:
Worksheet.Range(Cell1, Cell2).EntireRow.Insert Shift:=xlShiftDown
To insert rows a specific number of rows above or below the cell range specified by Worksheet.Range use a statement with the following structure:
Worksheet.Range(Cell1, Cell2).Offset(RowOffset).EntireRow.Insert Shift:=xlShiftDown
If the cell range represented by the Worksheet.Range property spans more than 1 row, the Insert method inserts several rows. The number of rows inserted is calculated as follows:
lastRow# - firstRow# + 1
Please refer to the section about the Worksheet.Rows property above for further information about this calculation.
Specify a Cell with the Worksheet.Cells and Range.Item Properties
Purpose of Worksheet.Cells and Range.Item
Use the Worksheet.Cells property to return a Range object representing all the cells within a worksheet.
Once your macro has all the cells within the worksheet, use the Range.Item property to return a Range object representing one of those cells.
Syntax of Worksheet.Cells and Range.Item
Worksheet.Cells
expression.Cells
“expression” is a Worksheet object. Therefore, I simplify as follows:
Worksheet.Cells
Range.Item
expression.Item(RowIndex, ColumnIndex)
“expression” is a Range object. Therefore, I simplify as follows:
Range.Item(RowIndex, ColumnIndex)
Worksheet.Cells and Range.Item Together
Considering the above:
Worksheet.Cells.Item(RowIndex, ColumnIndex)
However, Item is the default property of the Range object. Therefore, you can generally omit the Item keyword before specifying the RowIndex and ColumnIndex arguments. I simplify as follows:
Worksheet.Cells(RowIndex, ColumnIndex)
Parameters of Worksheet.Cells and Range.Item
- Parameter: RowIndex.
- Description:
- If you use RowIndex alone (omit ColumnIndex), RowIndex specifies the index of the cell you work with. Cells are numbered from left-to-right and top-to-bottom.
- If you use RowIndex and ColumnIndex, RowIndex specifies the row number of the cell you work with.
- Required/Optional: Required.
- Data type: Variant.
- Values: You usually specify RowIndex as a value.
- Description:
- Parameter: ColumnIndex.
- Description: Column number or letter of the cell you work with.
- Required/Optional: Optional.
- Data type: Variant.
- Values: You usually specify ColumnIndex as a value (column number) or letter within quotations (“”).
How to use Worksheet.Cells and Range.Item to Insert Rows
When you insert a row, use the Worksheet.Cells and Range.Item properties to return a cell. This allows you to use a specific cell as reference for the row insertion operation.
Use the Range.Offset property to return a Range object a specific number of rows above or below the cell. Use the Range.EntireRow property to return a Range object representing the entire row above which to insert the row. Please refer to the sections about the Offset and EntireRow properties below.
To insert a row above the cell specified by Worksheet.Cells, use a statement with the following structure:
Worksheet.Cells(RowIndex, ColumnIndex).EntireRow.Insert Shift:=xlShiftDown
To insert a row a specific number of rows above or below the cell specified by Worksheet.Cells, use a statement with the following structure:
Worksheet.Cells(RowIndex, ColumnIndex).Offset(RowOffset).EntireRow.Insert Shift:=xlShiftDown
Specify a Cell Range a Specific Number of Rows Below or Above a Cell or Cell Range with the Range.Offset Property
Purpose of Range.Offset
Use the Range.Offset property to return a Range object representing a cell range located a number of rows or columns away from the range the property works with.
Syntax of Range.Offset
expression.Offset(RowOffset, ColumnOffset)
“expression” is a Range object. Therefore, I simplify as follows:
Range.Offset(RowOffset, ColumnOffset)
Parameters of Range.Offset
- Parameter: RowOffset.
- Description: Number of rows by which cell or cell range is offset.
- Required/Optional: Optional.
- Data type: Variant.
- Values:
- Positive number: Moves down the worksheet.
- Negative number: Moves up the worksheet.
- 0: Stays on the same row.
- Default: 0. Stays on the same row.
- Parameter: ColumnOffset.
- Description: Number of columns by which cell or cell range is offset.
- Required/Optional: Optional.
- Data type: Variant.
- Values:
- Positive number: Moves towards the right of the worksheet.
- Negative number: Moves towards the left of the worksheet.
- 0: Stays on the same column.
- Default: 0. Stays on the same column.
- Usage notes: When you insert a row, you can usually omit the ColumnOffset parameter. You’re generally interested in moving a number of rows (not columns) above or below.
How to Use Range.Offset to Insert Rows
When you insert a row, use the Range.Offset property to specify a cell or cell range located a specific number of rows below above another cell or cell range. This allows you to use this new cell or cell range as reference for the row insertion operation.
Use properties such as Application.ActiveCell, Worksheet.Range and Worksheet.Cells to specify the base range the Offset property works with. Please refer to the sections about the ActiveCell, Range and Cells properties above.
Specify Entire Row with the Range.EntireRow Property
Purpose of Range.EntireRow
Use the Range.EntireRow property to return a Range object representing the entire row or rows containing the cell range the property works with.
Range.EntireRow is read-only.
Syntax of Range.EntireRow
expression.EntireRow
“expression” is a Range object. Therefore, I simplify as follows:
Range.EntireRow
How to Use Range.EntireRow to Insert Rows
When you insert a row, use the Range.EntireRow property to return the entire row or rows above which the new row or rows are inserted.
Use properties such as Application.ActiveCell, Worksheet.Range and Worksheet.Cells to specify the range the EntireRow property works with. Please refer to the sections about the ActiveCell, Range and Cells properties above.
Clear Row Formatting with the Range.ClearFormats Method
Purpose of Range.ClearFormats
Use the Range.ClearFormats method to clear the formatting of a cell range.
Syntax of Range.ClearFormats
expression.ClearFormats
“expression” is a Range object. Therefore, I simplify as follows:
Range.ClearFormats
How to Use Range.ClearFormats to Insert Rows
The format of the newly-inserted row is specified by the CopyOrigin parameter of the Range.Insert method. Please refer to the description of Range.Insert and CopyOrigin above.
When you insert a row, use the Range.ClearFormats method to clear the formatting of the newly-inserted rows. Use a statement with the following structure after the statement that inserts the new row (whose formatting you want to clear):
Range.ClearFormats
“Range” is a Range object representing the newly-inserted row.
Use the Worksheet.Rows or Range.EntireRow properties to return a Range object that represents the newly-inserted row. Please refer to the sections about the Rows and EntireRow properties above.
Copy Rows with the Range.Copy Method
Purpose of Range.Copy
Use the Range.Copy method to copy a cell range to another cell range or the Clipboard.
Syntax of Range.Copy
expression.Copy(Destination)
“expression” is a Range object. Therefore, I simplify as follows:
Range.Copy(Destination)
Parameters of Range.Copy
- Parameter: Destination.
- Description: Specifies the destination cell range to which the copied cell range is copied.
- Required/Optional: Optional parameter.
- Data type: Variant.
- Values: You usually specify Destination as a Range object.
- Default: Cell range is copied to the Clipboard.
- Usage notes: When you insert a copied row, omit the Destination parameter to copy the row to the Clipboard.
How to Use Range.Copy to Insert Rows
Use the Range.Copy method to copy a row which you later insert.
Use a statement with the following structure before the statement that inserts the row:
Range.Copy
“Range” is a Range object representing an entire row.
Use the Worksheet.Rows or Range.EntireRow properties to return a Range object that represents a row. Please refer to the sections about the Rows and EntireRow properties above.
Related VBA and Macro Tutorials
- General VBA constructs and structures:
- Introduction to Excel VBA constructs and structures.
- The Excel VBA Object Model.
- How to declare variables in Excel VBA.
- Excel VBA data types.
- Practical VBA applications and macro examples:
- How to copy and paste with Excel VBA.
You can find additional VBA and Macro Tutorials in the Archives.
Example Workbooks
This VBA Tutorial is accompanied by Excel workbooks containing the data and macros I explain below. If you want to follow and practice, you can get immediate free access to these example workbooks by clicking the button below.
Each worksheet within the workbook contains a single data range. Most of the entries simply state “Data”.

Example #1: Excel VBA Insert Row
VBA Code to Insert Row
The following macro inserts a row below row 5 of the worksheet named “Insert row”.
Sub insertRow()
    'Source: powerspreadsheets.com/
    'For further information: https://powerspreadsheets.com/excel-vba-insert-row/
    Worksheets("Insert row").Rows(6).Insert Shift:=xlShiftDown
End Sub

Process Followed by Macro

VBA Statement Explanation
Worksheets(“Insert row”).Rows(6).Insert Shift:=xlShiftDown
- Item: Worksheets(“Insert row”).
- VBA construct: Workbook.Worksheets property.
- Description: Returns a Worksheet object representing the “Insert row” worksheet.
- Item: Rows(6).
- VBA construct: Worksheets.Rows property.
- Description: Returns a Range object representing row 6 of the worksheet returned by item #1 above.
- Item: Insert.
- VBA construct: Range.Insert method.
- Description: Inserts a new row above the row returned by item #2 above.
- Item: Shift:=xlShiftDown.
- VBA construct: Shift parameter of Range.Insert method.
- Description:
- Shifts rows down (xlShiftDown) to make space for the row inserted by item #3 above.
- You can usually omit this parameter. By default, VBA decides how to shift the cells based on the range’s shape. When inserting a row, this usually results in Excel shifting the cells down.
Effects of Executing the Macro
The following GIF illustrates the results of executing this macro. As expected, VBA inserts a row below row 5 of the worksheet.

Example #2: Excel VBA Insert Multiple Rows
VBA Code to Insert Multiple Rows
The following macro inserts 5 rows below row 10 of the worksheet named “Insert row”.
Sub insertMultipleRows()
    'Source: powerspreadsheets.com/
    'For further information: https://powerspreadsheets.com/excel-vba-insert-row/
    Worksheets("Insert row").Rows("11:15").Insert Shift:=xlShiftDown
End Sub

Process Followed by Macro

VBA Statement Explanation
Worksheets(“Insert row”).Rows(“11:15”).Insert Shift:=xlShiftDown
- Item: Worksheets(“Insert row”).
- VBA construct: Workbook.Worksheets property.
- Description: Returns a Worksheet object representing the “Insert row” worksheet.
- Item: Rows(“11:15”).
- VBA construct: Worksheet.Rows property.
- Description: Returns a Range object representing rows 11 to 15 of the worksheet returned by item #1 above.
- Item: Insert.
- VBA construct: Range.Insert method.
- Description:
- Inserts new rows above the rows returned by item #2 above.
- The number of inserted rows is equal to the number of rows returned by item #2 above. This is calculated as follows:
lastRow# - firstRow# + 1
In this example:
15 - 11 + 1 = 5
- Item: Shift:=xlShiftDown.
- VBA construct: Shift parameter of Range.Insert method.
- Description:
- Shifts rows down (xlShiftDown) to make space for the rows inserted by item #3 above.
- You can usually omit this parameter. By default, VBA decides how to shift the cells based on the range’s shape. When inserting a row, this usually results in Excel shifting the cells down.
Effects of Executing the Macro
The following GIF illustrates the results of executing this macro. As expected, VBA inserts 5 rows below row 10 of the worksheet.

Example #3: Excel VBA Insert Row with Same Format as Row Above
VBA Code to Insert Row with Same Format as Row Above
The following macro (i) inserts a row below row 20, and (ii) applies the formatting of row 20 to the newly-inserted row.
Sub insertRowFormatFromAbove()
    'Source: powerspreadsheets.com/
    'For further information: https://powerspreadsheets.com/excel-vba-insert-row/
    Worksheets("Insert row").Rows(21).Insert Shift:=xlShiftDown, CopyOrigin:=xlFormatFromLeftOrAbove
End Sub

Process Followed by Macro

VBA Statement Explanation
Worksheets(“Insert row”).Rows(21).Insert Shift:=xlShiftDown, CopyOrigin:=xlFormatFromLeftOrAbove
- Item: Worksheets(“Insert row”).
- VBA construct: Workbook.Worksheets property.
- Description: Returns a Worksheet object representing the “Insert row” worksheet.
- Item: Rows(21).
- VBA construct: Worksheet.Rows property.
- Description: Returns a Range object representing row 21 of the worksheet returned by item #1 above.
- Item: Insert.
- VBA construct: Range.Insert method.
- Description: Inserts a new row above the row returned by item #2 above.
- Item: Shift:=xlShiftDown.
- VBA construct: Shift parameter of Range.Insert method.
- Description:
- Shifts rows down (xlShiftDown) to make space for the row inserted by item #3 above.
- You can usually omit this parameter. By default, VBA decides how to shift the cells based on the range’s shape. When inserting a row, this usually results in Excel shifting the cells down.
- Item: CopyOrigin:=xlFormatFromLeftOrAbove.
- VBA construct: CopyOrigin parameter of Range.Insert method.
- Description:
- Sets formatting of row inserted by item #3 above to be equal to that of row above (xlFormatFromLeftOrAbove).
- You can usually omit this parameter. xlFormatFromLeftOrAbove (or 0) is the default value of CopyOrigin.
Effects of Executing the Macro
The following GIF illustrates the results of executing this macro. As expected, VBA (i) inserts a row below row 20, and (ii) applies the formatting of row 20 to the newly-inserted row.

Example #4: Excel VBA Insert Row with Same Format as Row Below
VBA Code to Insert Row with Same Format as Row Below
The following macro (i) inserts a row below row 25, and (ii) applies the formatting of the row below to the newly-inserted row.
Sub insertRowFormatFromBelow()
    'Source: powerspreadsheets.com/
    'For further information: https://powerspreadsheets.com/excel-vba-insert-row/
    Worksheets("Insert row").Rows(26).Insert Shift:=xlShiftDown, CopyOrigin:=xlFormatFromRightOrBelow
End Sub

Process Followed by Macro

VBA Statement Explanation
Worksheets(“Insert row”).Rows(26).Insert Shift:=xlShiftDown, CopyOrigin:=xlFormatFromRightOrBelow
- Item: Worksheets(“Insert row”).
- VBA construct: Workbook.Worksheets property.
- Description: Returns a Worksheet object representing the “Insert row” worksheet.
- Item: Rows(26).
- VBA construct: Worksheet.Rows property.
- Description: Returns a Range object representing row 26 of the worksheet returned by item #1 above.
- Item: Insert.
- VBA construct: Range.Insert method.
- Description: Inserts a new row above the row returned by item #2 above.
- Item: Shift:=xlShiftDown.
- VBA construct: Shift parameter of Range.Insert method.
- Description:
- Shifts rows down (xlShiftDown) to make space for the row inserted by item #3 above.
- You can usually omit this parameter. By default, VBA decides how to shift the cells based on the range’s shape. When inserting a row, this usually results in Excel shifting the cells down.
- Item: CopyOrigin:=xlFormatFromRightOrBelow.
- VBA construct: CopyOrigin parameter of Range.Insert method.
- Description: Sets formatting of row inserted by item #3 above to be equal to that of row below (xlFormatFromRightOrBelow).
Effects of Executing the Macro
The following GIF illustrates the results of executing this macro. As expected, VBA (i) inserts a row below row 25, and (ii) applies the formatting of the row below to the newly-inserted row.

Example #5: Excel VBA Insert Row without Formatting
VBA Code to Insert Row without Formatting
The following macro inserts a row below row 30 without applying the formatting from the rows above or below the newly- inserted row.
Sub insertRowWithoutFormat()
    'Source: powerspreadsheets.com/
    'For further information: https://powerspreadsheets.com/excel-vba-insert-row/
    Dim myNewRowNumber As Long
    myNewRowNumber = 31
    With Worksheets("Insert row")
        .Rows(myNewRowNumber).Insert Shift:=xlShiftDown
        .Rows(myNewRowNumber).ClearFormats
    End With
End Sub

Process Followed by Macro

VBA Statement Explanation
Lines #4 and #5: Dim myNewRowNumber As Long | myNewRowNumber = 31
- Item: Dim myNewRowNumber As Long.
- VBA construct: Dim statement.
- Description:
- Declares a new variable (myNewRowNumber) as of the Long data type.
- myNewRowNumber represents the number of the newly inserted row.
- Item: myNewRowNumber = 31.
- VBA construct: Assignment statement.
- Description: Assigns the value 31 to myNewRowNumber
Lines #6 and #9: With Worksheets(“Insert row”) | End With
- Item: With | End With.
- VBA construct: With… End With statement.
- Description: Statements within the With… End With statement (lines #7 and #8 below) are executed on the worksheet returned by item #2 below.
- Item: Worksheets(“Insert row”).
- VBA construct: Workbook.Worksheets property.
- Description: Returns a Worksheet object representing the “Insert row” worksheet.
Line #7: .Rows(myNewRowNumber).Insert Shift:=xlShiftDown
- Item: Rows(myNewRowNumber).
- VBA construct: Worksheet.Rows property.
- Description:
- Returns a Range object representing a row (whose number is represented by myNewRowNumber) of the worksheet in the opening statement of the With… End With statement (line #6 above).
- In this example, myNewRowNumber equals 31. Therefore, Worksheet.Rows returns row 31 prior to the insertion of the new row. This is a different row from that returned by Worksheet.Rows in line #8 below.
- This line #7 returns a row prior to the row insertion. This line is that above which the new row is inserted.
- Line #8 below returns a row after the row insertion. This line is the newly-inserted row.
- Item: Insert.
- VBA construct: Range.Insert method.
- Description: Inserts a new row above the row returned by item #1 above.
- Item: Shift:=xlShiftDown.
- VBA construct: Shift parameter of Range.Insert method.
- Description:
- Shifts rows down (xlShiftDown) to make space for the row inserted by item #2 above.
- You can usually omit this parameter. By default, VBA decides how to shift the cells based on the range’s shape. When inserting a row, this usually results in Excel shifting the cells down.
Line #8: .Rows(myNewRowNumber).ClearFormats
- Item: Rows(myNewRowNumber).
- VBA construct: Worksheet.Rows property.
- Description:
- Returns a Range object representing a row (whose number is represented by myNewRowNumber) of the worksheet in the opening statement of the With… End With statement (line #6 above).
- In this example, myNewRowNumber equals 31. Therefore, Worksheet.Rows returns row 31 after the insertion of the new row. This is a different row from that returned by Worksheet.Rows in line #7 above.
- This line #8 returns a row after the row insertion. This line is the newly-inserted row.
- Line #7 above returns a row prior to the row insertion. This line is that below the newly-inserted row.
- Item: ClearFormats.
- VBA construct: Range.ClearFormats method.
- Description: Clears the formatting of the row returned by item #1 above.
Effects of Executing the Macro
The following GIF illustrates the results of executing this macro. As expected, VBA inserts a row below row 30 without applying the formatting from the rows above or below the newly- inserted row.

Example #6: Excel VBA Insert Row Below Active Cell
VBA Code to Insert Row Below Active Cell
The following macro inserts a row below the active cell.
Sub insertRowBelowActiveCell()
    'Source: powerspreadsheets.com/
    'For further information: https://powerspreadsheets.com/excel-vba-insert-row/
    ActiveCell.Offset(1).EntireRow.Insert Shift:=xlShiftDown
End Sub

Process Followed by Macro

VBA Statement Explanation
ActiveCell.Offset(1).EntireRow.Insert Shift:=xlShiftDown
- Item: ActiveCell.
- VBA construct: Application.ActiveCell property.
- Description: Returns a Range object representing the active cell.
- Item: Offset(1).
- VBA construct: Range.Offset property.
- Description:
- Returns a Range object representing the cell range 1 row below the cell returned by item #1 above.
- In this example, Range.Offset returns the cell immediately below the active cell.
- Item: EntireRow:
- VBA construct: Range.EntireRow property.
- Description: Returns a Range object representing the entire row containing the cell range returned by item #2 above.
- Item: Insert.
- VBA construct: Range.Insert method.
- Description: Inserts a new row above the row returned by item #3 above.
- Item: Shift:=xlShiftDown.
- VBA construct: Shift parameter of Range.Insert method.
- Description:
- Shifts rows down (xlShiftDown) to make space for the row inserted by item #4 above.
- You can usually omit this parameter. By default, VBA decides how to shift the cells based on the range’s shape. When inserting a row, this usually results in Excel shifting the cells down.
Effects of Executing the Macro
The following GIF illustrates the results of executing this macro. When I execute the macro, the active cell is B35. As expected, inserts a row below the active cell.

Example #7: Excel VBA Insert Copied Row
VBA Code to Insert Copied Row
The following macro (i) copies row 45, and (ii) inserts the copied row below row 40.
Sub insertCopiedRow()
    'Source: powerspreadsheets.com/
    'For further information: https://powerspreadsheets.com/excel-vba-insert-row/
    With Worksheets("Insert row")
        .Rows(45).Copy
        .Rows(41).Insert Shift:=xlShiftDown
    End With
    Application.CutCopyMode = False
End Sub

Process Followed by Macro

VBA Statement Explanation
Lines #4 and #7: With Worksheets(“Insert row”) | End With
- Item: With | End With.
- VBA construct: With… End With statement.
- Description: Statements within the With… End With statement (lines #5 and #6 below) are executed on the worksheet returned by item #2 below.
- Item: Worksheets(“Insert row”).
- VBA construct: Workbook.Worksheets property.
- Description: Returns a Worksheet object representing the “Insert row” worksheet.
Line #5: .Rows(45).Copy
- Item: Rows(45).
- VBA construct: Worksheet.Rows property.
- Description: Returns a Range object representing row 45 of the worksheet in the opening statement of the With… End With statement (line #4 above).
- Item: Copy.
- VBA construct: Range.Copy method.
- Description: Copies the row returned by item #1 above to the Clipboard.
Line #6: .Rows(41).Insert Shift:=xlShiftDown
- Item: Rows(41).
- VBA construct: Worksheet.Rows property.
- Description: Returns a Range object representing row 41 of the worksheet in the opening statement of the With… End With statement (line #4 above).
- Item: Insert.
- VBA construct: Range.Insert method.
- Description:
- Inserts a new row above the row returned by item #1 above.
- The newly-inserted row isn’t blank. VBA inserts the row copied by line #5 above.
- Item: Shift:=xlShiftDown.
- VBA construct: Shift parameter of Range.Insert method.
- Description:
- Shifts rows down (xlShiftDown) to make space for the row inserted by item #2 above.
- You can usually omit this parameter. By default, VBA decides how to shift the cells based on the range’s shape. When inserting a row, this usually results in Excel shifting the cells down.
Line #8: Application.CutCopyMode = False
- Item: Application.CutCopyMode = False.
- VBA construct: Application.CutCopyMode property.
- Description: Cancels (False) the Cut or Copy mode and removes the moving border that accompanies this mode.
Effects of Executing the Macro
The following GIF illustrates the results of executing this macro. As expected, VBA (i) copies row 45, and (ii) inserts the copied row below row 40.

Example #8: Excel VBA Insert Blank Rows Between Rows in a Data Range
VBA Code to Insert Blank Rows Between Rows in a Data Range
The following macro inserts blank rows within the specified data range. This results in all rows within the data range being separated by a blank row.
Sub insertBlankRowsBetweenRows()
    'Source: powerspreadsheets.com/
    'For further information: https://powerspreadsheets.com/excel-vba-insert-row/
    Dim myFirstRow As Long
    Dim myLastRow As Long
    Dim myWorksheet As Worksheet
    Dim iCounter As Long
    myFirstRow = 5
    Set myWorksheet = Worksheets("Insert blank rows")
    myLastRow = myWorksheet.Cells.Find( _
                                        What:="*", _
                                        LookIn:=xlFormulas, _
                                        LookAt:=xlPart, _
                                        SearchOrder:=xlByRows, _
                                        SearchDirection:=xlPrevious).Row
    For iCounter = myLastRow To (myFirstRow + 1) Step -1
        myWorksheet.Rows(iCounter).Insert Shift:=xlShiftDown
    Next iCounter
End Sub

Process Followed by Macro

VBA Statement Explanation
Lines #4 through #9: Dim myFirstRow As Long | Dim myLastRow As Long | Dim myWorksheet As Worksheet | Dim iCounter As Long | myFirstRow = 5 | Set myWorksheet = Worksheets(“Insert blank rows”)
- Item: Dim myFirstRow As Long.
- VBA construct: Dim statement.
- Description:
- Declares a new variable (myFirstRow) as of the Long data type.
- myFirstRow represents the number of the first row with data in the data range you work with.
- Item: Dim myLastRow As Long.
- VBA construct: Dim statement.
- Description:
- Declares a new variable (myLastRow) as of the Long data type.
- myLastRow represents the number of the last row with data in the data range you work with.
- Item: Dim myWorksheet As Worksheet.
- VBA construct: Dim statement.
- Description:
- Declares a new object variable (myWorksheet) to reference a Worksheet object.
- myWorksheet represents the worksheet you work with.
- Item: Dim iCounter As Long.
- VBA construct: Dim statement.
- Description:
- Declares a new variable (iCounter) as of the Long data type.
- iCounter represents a loop counter.
- Item: myFirstRow = 5.
- VBA construct: Assignment statement.
- Description: Assigns the value 5 to myFirstRow.
- Item: Set myWorksheet = Worksheets(“Insert blank rows”).
- VBA constructs:
- Set statement.
- Workbooks.Worksheets property.
- Description: Assigns the Worksheet object representing the “Insert blank rows” worksheet to myWorksheet.
- VBA constructs:
Lines #10 through #15: myLastRow = myWorksheet.Cells.Find( What:=”*”, LookIn:=xlFormulas, LookAt:=xlPart, SearchOrder:=xlByRows, SearchDirection:=xlPrevious).Row
- Item: myLastRow =.
- VBA construct: Assignment statement.
- Description: Assigns the value returned by items #2 through #9 below to myLastRow.
- Item: myWorksheet.Cells.
- VBA construct: Worksheet.Cells property.
- Description: Returns a Range object representing all cells on myWorksheet.
- Item: Find.
- VBA construct: Range.Find method.
- Description:
- Finds information in the cell range returned by item #2 above and returns a Range object representing the first cell where the information is found.
- In this example, the Range object Range.Find returns represents the last cell with data in last row with data in myWorksheet.
- Item: What:=”*”.
- VBA construct: What parameter of Range.Find method.
- Description: Specifies the data Range.Find searches for. The asterisk (*) is a wildcard and, therefore, Range.Find searches for any character sequence.
- Item: LookIn:=xlFormulas.
- VBA construct: LookIn parameter of Range.Find method.
- Description: Specifies that Range.Find looks in formulas (xlFormulas).
- Item: LookAt:=xlPart.
- VBA construct: LookAt parameter of Range.Find method.
- Description: Specifies that Range.Find looks at (and matches) a part (xlPart) of the search data.
- Item: SearchOrder:=xlByRows.
- VBA construct: SearchOrder parameter of Range.Find method.
- Description: Specifies that Range.Find searches by rows (xlByRows).
- Item: SearchDirection:=xlPrevious.
- VBA construct: SearchDirection parameter of Range.Find method.
- Description: Specifies that Range.Find searches for the previous match (xlPrevious).
- Item: Row.
- VBA construct: Range.Row property.
- Description:
- Returns the row number of the Range object returned by item #3 above.
- In this example, the number returned by Range.Row corresponds to the last row with data in myWorksheet.
Lines #16 and #18: For iCounter = myLastRow To (myFirstRow + 1) Step -1 | Next iCounter
- Item: For | Next iCounter.
- VBA construct: For… Next statement.
- Description:
- Repeats the statement inside the For… Next loop (line #17 below) a specific number of times.
- In this example:
- The macro starts on the last row of the data range as specified by item #2 below.
- Every iteration, the loop counter decreases by 1, as specified by item #4 below. Therefore, the macro moves to the previous row.
- The macro exits the loop after working with the second row in the data range (myFirstRow + 1), as specified by item #3 below.
- Item: iCounter = myLastRow.
- VBA construct: Counter and Start of For… Next statement.
- Description: Specifies myLastRow as the initial value of the loop counter (iCounter).
- Item: To (myFirstRow + 1).
- VBA construct: End of For… Next statement.
- Description: Specifies the value represented by myFirstRow plus 1 (myFirstRow + 1) as the final value of the loop counter.
- Item: Step -1.
- VBA construct: Step of For… Next statement.
- Description: Specifies that the loop counter (iCounter) decreases by 1 (-1) every loop iteration.
Line #17: myWorksheet.Rows(iCounter).Insert Shift:=xlShiftDown
- Item: myWorksheet.Rows(iCounter).
- VBA construct: Worksheet.Rows property.
- Description:
- Returns a Range object representing the row (whose number is represented by iCounter) of myWorksheet.
- Worksheet.Rows returns the row through which the macro is currently looping.
- Item: Insert.
- VBA construct: Range.Insert method.
- Description:
- Inserts a new row above the row returned by item #1 above.
- The macro loops through each line in the data range (excluding the first) as specified by lines #16 and #18 above. Therefore, Range.Insert inserts a row between all rows with data.
- Item: Shift:=xlShiftDown.
- VBA construct: Shift parameter of Range.Insert method.
- Description:
- Shifts rows down (xlShiftDown) to make space for the row inserted by item #2 above.
- You can usually omit this parameter. By default, VBA decides how to shift the cells based on the range’s shape. When inserting a row, this usually results in Excel shifting the cells down.
Effects of Executing the Macro
The following GIF illustrates the results of executing this macro. As expected, VBA inserts blank rows within the specified data range. This results in all rows within the data range being separated by a blank row.

Example #9: Excel VBA Insert a Number of Rows Every Number of Rows in a Data Range
VBA Code to Insert a Number of Rows Every Number of Rows in a Data Range
The following macro inserts 2 rows every 3 rows within the specified data range.
Sub insertMRowsEveryNRows()
    'Source: powerspreadsheets.com/
    'For further information: https://powerspreadsheets.com/excel-vba-insert-row/
    Dim myFirstRow As Long
    Dim myLastRow As Long
    Dim myNRows As Long
    Dim myRowsToInsert As Long
    Dim myWorksheet As Worksheet
    Dim iCounter As Long
    myFirstRow = 5
    myNRows = 3
    myRowsToInsert = 2
    Set myWorksheet = Worksheets("Insert M rows every N rows")
    myLastRow = myWorksheet.Cells.Find( _
                                        What:="*", _
                                        LookIn:=xlFormulas, _
                                        LookAt:=xlPart, _
                                        SearchOrder:=xlByRows, _
                                        SearchDirection:=xlPrevious).Row
    For iCounter = myLastRow To (myFirstRow + myNRows) Step -1
        If (iCounter - myFirstRow) Mod myNRows = 0 Then myWorksheet.Rows(iCounter & ":" & iCounter + myRowsToInsert - 1).Insert Shift:=xlShiftDown
    Next iCounter
End Sub

Process Followed by Macro

VBA Statement Explanation
Lines #4 through 13: Dim myFirstRow As Long | Dim myLastRow As Long | Dim myNRows As Long | Dim myRowsToInsert As Long | Dim myWorksheet As Worksheet | Dim iCounter As Long | myFirstRow = 5 | myNRows = 3 | myRowsToInsert = 2 | Set myWorksheet = Worksheets(“Insert M rows every N rows”)
- Item: Dim myFirstRow As Long.
- VBA construct: Dim statement.
- Description:
- Declares a new variable (myFirstRow) as of the Long data type.
- myFirstRow represents the number of the first row with data in the data range you work with.
- Item: Dim myLastRow As Long.
- VBA construct: Dim statement.
- Description:
- Declares a new variable (myLastRow) as of the Long data type.
- myLastRow represents the number of the last row with data in the data range you work with.
- Item: Dim myNRows As Long.
- VBA construct: Dim statement.
- Description:
- Declares a new variable (myNRows) as of the Long data type.
- myNRows represents the number of rows per block. The macro doesn’t insert rows between these rows.
- Item: Dim myRowsToInsert As Long.
- VBA construct: Dim statement.
- Description:
- Declares a new variable (myRowsToInsert) as of the Long data type.
- myRowsToInsert represents the number of rows to insert.
- Item: Dim myWorksheet As Worksheet.
- VBA construct: Dim statement.
- Description:
- Declares a new object variable (myWorksheet) to reference a Worksheet object.
- myWorksheet represents the worksheet you work with.
- Item: Dim iCounter As Long.
- VBA construct: Dim statement.
- Description:
- Declares a new variable (iCounter) as of the Long data type.
- iCounter represents a loop counter.
- Item: myFirstRow = 5.
- VBA construct: Assignment statement.
- Description: Assigns the value 5 to myFirstRow.
- Item: myNRows = 3.
- VBA construct: Assignment statement.
- Description: Assigns the value 3 to myNRows.
- Item: myRowsToInsert = 2.
- VBA construct: Assignment statement.
- Description: Assigns the value 2 to myRowsToInsert.
- Item: Set myWorksheet = Worksheets(“Insert M rows every N rows”).
- VBA constructs:
- Set statement.
- Workbooks.Worksheets property.
- Description: Assigns the Worksheet object representing the “Insert M rows every N rows” worksheet to myWorksheet.
- VBA constructs:
Lines #14 through #19: myLastRow = myWorksheet.Cells.Find( What:=”*”, LookIn:=xlFormulas, LookAt:=xlPart, SearchOrder:=xlByRows, SearchDirection:=xlPrevious).Row
- Item: myLastRow =.
- VBA construct: Assignment statement.
- Description: Assigns the value returned by items #2 through #9 below to myLastRow.
- Item: myWorksheet.Cells.
- VBA construct: Worksheet.Cells property.
- Description: Returns a Range object representing all cells on myWorksheet.
- Item: Find.
- VBA construct: Range.Find method.
- Description:
- Finds information in the cell range returned by item #2 above and returns a Range object representing the first cell where the information is found.
- In this example, the Range object Range.Find returns represents the last cell with data in last row with data in myWorksheet.
- Item: What:=”*”.
- VBA construct: What parameter of Range.Find method.
- Description: Specifies the data Range.Find searches for. The asterisk (*) is a wildcard and, therefore, Range.Find searches for any character sequence.
- Item: LookIn:=xlFormulas.
- VBA construct: LookIn parameter of Range.Find method.
- Description: Specifies that Range.Find looks in formulas (xlFormulas).
- Item: LookAt:=xlPart.
- VBA construct: LookAt parameter of Range.Find method.
- Description: Specifies that Range.Find looks at (and matches) a part (xlPart) of the search data.
- Item: SearchOrder:=xlByRows.
- VBA construct: SearchOrder parameter of Range.Find method.
- Description: Specifies that Range.Find searches by rows (xlByRows).
- Item: SearchDirection:=xlPrevious.
- VBA construct: SearchDirection parameter of Range.Find method.
- Description: Specifies that Range.Find searches for the previous match (xlPrevious).
- Item: Row.
- VBA construct: Range.Row property.
- Description:
- Returns the row number of the Range object returned by item #3 above.
- In this example, the number returned by Range.Row corresponds to the last row with data in myWorksheet.
Lines #20 and #22: For iCounter = myLastRow To (myFirstRow + myNRows) Step -1 | Next iCounter
- Item: For | Next iCounter.
- VBA construct: For… Next statement.
- Description:
- Repeats the statement inside the For… Next loop (line #21 below) a specific number of times.
- In this example:
- The macro starts on the last row of the data range as specified by item #2 below.
- Every iteration, the loop counter decreases by 1, as specified by item #4 below. Therefore, the macro moves to the previous row.
- The macro exits the loop after working with the row below the first block of rows you want to keep, as specified by item #3 below. Each block of rows has a number of rows equal to myNRows.
- In this example, myNRows equals 3. Therefore, the macro exits the loop after working with the fourth row in the data range.
- Item: iCounter = myLastRow.
- VBA constructs: Counter and Start of For… Next statement.
- Description: Specifies myLastRow as the initial value of the loop counter (iCounter).
- Item: To (myFirstRow + myNRows).
- VBA construct: End of For… Next statement.
- Description: Specifies the value represented by myFirstRow plus myNRows (myFirstRow + myNRows) as the final value of the loop counter.
- Item: Step -1.
- VBA construct: Step of For… Next statement.
- Description: Specifies that the loop counter (iCounter) decreases by 1 (-1) every loop iteration.
Line #21: If (iCounter – myFirstRow) Mod myNRows = 0 Then myWorksheet.Rows(iCounter & “:” & iCounter + myRowsToInsert – 1).Insert Shift:=xlShiftDown
- Item: If | Then.
- VBA construct: If… Then… Else statement.
- Description: Conditionally executes the statement specified by items #3 and #4 below, subject to condition specified by item #2 below being met.
- Item: (iCounter – myFirstRow) Mod myNRows = 0.
- VBA constructs:
- Condition of If… Then… Else statement.
- Numeric expression with Mod operator.
- Description:
- The Mod operator (Mod) (i) divides one number (iCounter – myFirstRow) by a second number (myNRows), and (ii) returns the remainder of the division.
- The condition ((iCounter – myFirstRow) Mod myNRows = 0) is met (returns True) if the remainder returned by Mod is 0.
- The condition is met (returns True) every time the macro loops through a row above which blank rows should be added.
- iCounter represents the number of the row through which the macro is currently looping.
- (iCounter – myFirstRow) is the number of rows (in the data range) above the row through which the macro is currently looping.
- ((iCounter – myFirstRow) Mod myNRows) equals 0 when the number of rows returned by (iCounter – myFirstRow) is a multiple of myNRows. This ensures that the number of rows left above the row through which the macro is currently looping can be appropriately separated into blocks of myNRows. In this example, myNRows equals 3. Therefore, the condition is met every 3 rows.
- VBA constructs:
- Item: myWorksheet.Rows(iCounter & “:” & iCounter + myRowsToInsert – 1).
- VBA constructs:
- Statements executed if the condition specified by item #2 above is met.
- Worksheet.Rows property.
- Description:
- Returns an object representing several rows of myWorksheet. The first row is represented by iCounter. The last row is represented by (iCounter + myRowsToInsert – 1).
- The number of rows Worksheet.Rows returns equals the number of rows to insert (myRowsToInsert).
- iCounter represents the number of the row through which the macro is currently looping.
- (iCounter + myRowsToInsert – 1) returns a row located a number of rows (myRowsToInsert – 1) below the row through which the macro is currently looping. In this example, myRowsToInsert equals 2. Therefore, (iCounter + myRowsToInsert – 1) returns a row located 1 (2 – 1) rows below the row through which the macro is currently looping.
- VBA constructs:
- Item: Insert.
- VBA construct: Range.Insert method.
- Description:
- Inserts new rows above the rows returned by item #3 above.
- The number of inserted rows is equal to the value of myRowsToInsert. This is calculated as follows:
lastRow# - firstRow# + 1
(iCounter + myRowsToInsert - 1) - iCounter + 1 = myRowsToInsert
In this example, if the current value of iCounter is 8:
(8 + 2 - 1) - 8 + 1
9 - 8 + 1 = 2
- Item: Shift:=xlShiftDown.
- VBA construct: Shift parameter of Range.Insert method.
- Description:
- Shifts rows down (xlShiftDown) to make space for the rows inserted by item #4 above.
- You can usually omit this parameter. By default, VBA decides how to shift the cells based on the range’s shape. When inserting a row, this usually results in Excel shifting the cells down.
Effects of Executing the Macro
The following GIF illustrates the results of executing this macro. As expected, VBA inserts 2 rows every 3 rows within the specified data range.
