

This Excel tutorial explains how to open the Visual Basic Editor in Excel 2003 (with screenshots and step-by-step instructions).
How to open the VBA environment
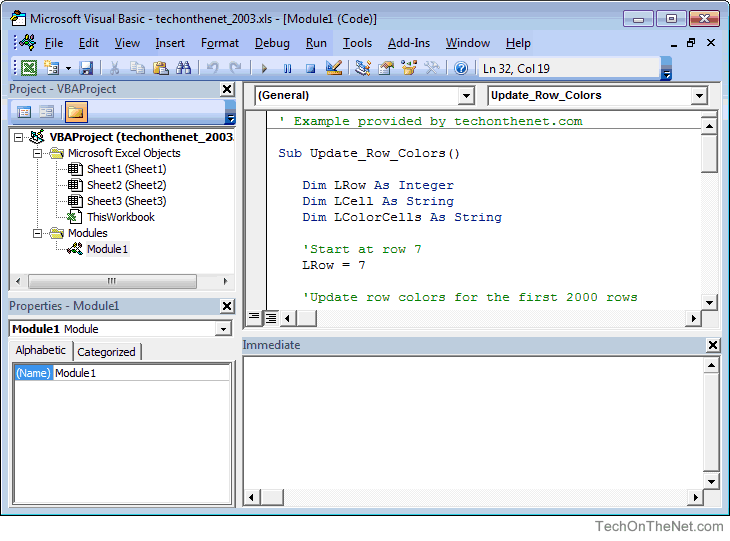
You can access the VBA environment in Excel 2003 by opening the Microsoft Visual Basic window.
To open the Microsoft Visual Basic window, select Macro > Visual Basic Editor under the Tools menu. Or you can use Alt+F11 as the shortcut to quickly open the Visual Basic Editor.

Now the Microsoft Visual Basic editor should appear and you can view your VBA code.
Введение
Всем нам приходится — кому реже, кому чаще — повторять одни и те же действия и операции в Excel. Любая офисная работа предполагает некую «рутинную составляющую» — одни и те же еженедельные отчеты, одни и те же действия по обработке поступивших данных, заполнение однообразных таблиц или бланков и т.д. Использование макросов и пользовательских функций позволяет автоматизировать эти операции, перекладывая монотонную однообразную работу на плечи Excel. Другим поводом для использования макросов в вашей работе может стать необходимость добавить в Microsoft Excel недостающие, но нужные вам функции. Например функцию сборки данных с разных листов на один итоговый лист, разнесения данных обратно, вывод суммы прописью и т.д.
Макрос — это запрограммированная последовательность действий (программа, процедура), записанная на языке программирования Visual Basic for Applications (VBA). Мы можем запускать макрос сколько угодно раз, заставляя Excel выполнять последовательность любых нужных нам действий, которые нам не хочется выполнять вручную.
В принципе, существует великое множество языков программирования (Pascal, Fortran, C++, C#, Java, ASP, PHP…), но для всех программ пакета Microsoft Office стандартом является именно встроенный язык VBA. Команды этого языка понимает любое офисное приложение, будь то Excel, Word, Outlook или Access.
Способ 1. Создание макросов в редакторе Visual Basic
Для ввода команд и формирования программы, т.е. создания макроса необходимо открыть специальное окно — редактор программ на VBA, встроенный в Microsoft Excel.
- В старых версиях (Excel 2003 и старше) для этого идем в меню Сервис — Макрос — Редактор Visual Basic (Toos — Macro — Visual Basic Editor).
- В новых версиях (Excel 2007 и новее) для этого нужно сначала отобразить вкладку Разработчик (Developer). Выбираем Файл — Параметры — Настройка ленты (File — Options — Customize Ribbon) и включаем в правой части окна флажок Разработчик (Developer). Теперь на появившейся вкладке нам будут доступны основные инструменты для работы с макросами, в том числе и нужная нам кнопка Редактор Visual Basic (Visual Basic Editor)
 :
:
 :
:К сожалению, интерфейс редактора VBA и файлы справки не переводятся компанией Microsoft на русский язык, поэтому с английскими командами в меню и окнах придется смириться:

Макросы (т.е. наборы команд на языке VBA) хранятся в программных модулях. В любой книге Excel мы можем создать любое количество программных модулей и разместить там наши макросы. Один модуль может содержать любое количество макросов. Доступ ко всем модулям осуществляется с помощью окна Project Explorer в левом верхнем углу редактора (если его не видно, нажмите CTRL+R). Программные модули бывают нескольких типов для разных ситуаций:
- Обычные модули — используются в большинстве случаев, когда речь идет о макросах. Для создания такого модуля выберите в меню Insert — Module. В появившееся окно нового пустого модуля можно вводить команды на VBA, набирая их с клавиатуры или копируя их из другого модуля, с этого сайта или еще откуда нибудь:

- Модуль Эта книга — также виден в левом верхнем углу редактора Visual Basic в окне, которое называется Project Explorer. В этот модуль обычно записываются макросы, которые должны выполнятся при наступлении каких-либо событий в книге (открытие или сохранение книги, печать файла и т.п.):

- Модуль листа — доступен через Project Explorer и через контекстное меню листа, т.е. правой кнопкой мыши по ярлычку листа — команда Исходный текст (View Source). Сюда записывают макросы, которые должны выполняться при наступлении определенных событий на листе (изменение данных в ячейках, пересчет листа, копирование или удаление листа и т.д.)


Обычный макрос, введенный в стандартный модуль выглядит примерно так:

Давайте разберем приведенный выше в качестве примера макрос Zamena:
- Любой макрос должен начинаться с оператора Sub, за которым идет имя макроса и список аргументов (входных значений) в скобках. Если аргументов нет, то скобки надо оставить пустыми.
- Любой макрос должен заканчиваться оператором End Sub.
- Все, что находится между Sub и End Sub — тело макроса, т.е. команды, которые будут выполняться при запуске макроса. В данном случае макрос выделяет ячейку заливает выделенных диапазон (Selection) желтым цветом (код = 6) и затем проходит в цикле по всем ячейкам, заменяя формулы на значения. В конце выводится окно сообщения (MsgBox).
С ходу ясно, что вот так сразу, без предварительной подготовки и опыта в программировании вообще и на VBA в частности, сложновато будет сообразить какие именно команды и как надо вводить, чтобы макрос автоматически выполнял все действия, которые, например, Вы делаете для создания еженедельного отчета для руководства компании. Поэтому мы переходим ко второму способу создания макросов, а именно…
Способ 2. Запись макросов макрорекордером
Макрорекордер — это небольшая программа, встроенная в Excel, которая переводит любое действие пользователя на язык программирования VBA и записывает получившуюся команду в программный модуль. Если мы включим макрорекордер на запись, а затем начнем создавать свой еженедельный отчет, то макрорекордер начнет записывать команды вслед за каждым нашим действием и, в итоге, мы получим макрос создающий отчет как если бы он был написан программистом. Такой способ создания макросов не требует знаний пользователя о программировании и VBA и позволяет пользоваться макросами как неким аналогом видеозаписи: включил запись, выполнил операци, перемотал пленку и запустил выполнение тех же действий еще раз. Естественно у такого способа есть свои плюсы и минусы:
- Макрорекордер записывает только те действия, которые выполняются в пределах окна Microsoft Excel. Как только вы закрываете Excel или переключаетесь в другую программу — запись останавливается.
- Макрорекордер может записать только те действия, для которых есть команды меню или кнопки в Excel. Программист же может написать макрос, который делает то, что Excel никогда не умел (сортировку по цвету, например или что-то подобное).
- Если во время записи макроса макрорекордером вы ошиблись — ошибка будет записана. Однако смело можете давить на кнопку отмены последнего действия (Undo) — во время записи макроса макрорекордером она не просто возрвращает Вас в предыдущее состояние, но и стирает последнюю записанную команду на VBA.
Чтобы включить запись необходимо:
- в Excel 2003 и старше — выбрать в меню Сервис — Макрос — Начать запись (Tools — Macro — Record New Macro)
- в Excel 2007 и новее — нажать кнопку Запись макроса (Record macro) на вкладке Разработчик (Developer)
Затем необходимо настроить параметры записываемого макроса в окне Запись макроса:

- Имя макроса — подойдет любое имя на русском или английском языке. Имя должно начинаться с буквы и не содержать пробелов и знаков препинания.
- Сочетание клавиш — будет потом использоваться для быстрого запуска макроса. Если забудете сочетание или вообще его не введете, то макрос можно будет запустить через меню Сервис — Макрос — Макросы — Выполнить (Tools — Macro — Macros — Run) или с помощью кнопки Макросы (Macros) на вкладке Разработчик (Developer) или нажав ALT+F8.
- Сохранить в… — здесь задается место, куда будет сохранен текст макроса, т.е. набор команд на VBA из которых и состоит макрос.:
- Эта книга — макрос сохраняется в модуль текущей книги и, как следствие, будет выполнятся только пока эта книга открыта в Excel
- Новая книга — макрос сохраняется в шаблон, на основе которого создается любая новая пустая книга в Excel, т.е. макрос будет содержаться во всех новых книгах, создаваемых на данном компьютере начиная с текущего момента
- Личная книга макросов — это специальная книга Excel с именем Personal.xls, которая используется как хранилище макросов. Все макросы из Personal.xls загружаются в память при старте Excel и могут быть запущены в любой момент и в любой книге.
После включения записи и выполнения действий, которые необходимо записать, запись можно остановить командой Остановить запись (Stop Recording).
Запуск и редактирование макросов
Управление всеми доступными макросами производится в окне, которое можно открыть с помощью кнопки Макросы (Macros) на вкладке Разработчик (Developer) или — в старых версиях Excel — через меню Сервис — Макрос — Макросы (Tools — Macro — Macros):

- Любой выделенный в списке макрос можно запустить кнопкой Выполнить (Run).
- Кнопка Параметры (Options) позволяет посмотреть и отредактировать сочетание клавиш для быстрого запуска макроса.
- Кнопка Изменить (Edit) открывает редактор Visual Basic (см. выше) и позволяет просмотреть и отредактировать текст макроса на VBA.
Создание кнопки для запуска макросов
Чтобы не запоминать сочетание клавиш для запуска макроса, лучше создать кнопку и назначить ей нужный макрос. Кнопка может быть нескольких типов:
Кнопка на панели инструментов в Excel 2003 и старше
Откройте меню Сервис — Настройка (Tools — Customize) и перейдите на вкладку Команды (Commands). В категории Макросы легко найти веселый желтый «колобок» — Настраиваемую кнопку (Custom button):

Перетащите ее к себе на панель инструментов и затем щелкните по ней правой кнопкой мыши. В контекстом меню можно назначить кнопке макрос, выбрать другой значок и имя:

Кнопка на панели быстрого доступа в Excel 2007 и новее
Щелкните правой кнопкой мыши по панели быстрого доступа в левом верхнем углу окна Excel и выберите команду Настройка панели быстрого доступа (Customise Quick Access Toolbar):

Затем в открывшемся окне выберите категорию Макросы и при помощи кнопки Добавить (Add) перенесите выбранный макрос в правую половину окна, т.е. на панель быстрого доступа:

Кнопка на листе
Этот способ подходит для любой версии Excel. Мы добавим кнопку запуска макроса прямо на рабочий лист, как графический объект. Для этого:
- В Excel 2003 и старше — откройте панель инструментов Формы через меню Вид — Панели инструментов — Формы (View — Toolbars — Forms)
- В Excel 2007 и новее — откройте выпадающий список Вставить (Insert) на вкладке Разработчик (Developer)
Выберите объект Кнопка (Button):

Затем нарисуйте кнопку на листе, удерживая левую кнопку мыши. Автоматически появится окно, где нужно выбрать макрос, который должен запускаться при щелчке по нарисованной кнопке.
Создание пользовательских функций на VBA
Создание пользовательских функций или, как их иногда еще называют, UDF-функций (User Defined Functions) принципиально не отличается от создания макроса в обычном программном модуле. Разница только в том, что макрос выполняет последовательность действий с объектами книги (ячейками, формулами и значениями, листами, диаграммами и т.д.), а пользовательская функция — только с теми значениями, которые мы передадим ей как аргументы (исходные данные для расчета).
Чтобы создать пользовательскую функцию для расчета, например, налога на добавленную стоимость (НДС) откроем редактор VBA, добавим новый модуль через меню Insert — Module и введем туда текст нашей функции:

Обратите внимание, что в отличие от макросов функции имеют заголовок Function вместо Sub и непустой список аргументов (в нашем случае это Summa). После ввода кода наша функция становится доступна в обычном окне Мастера функций (Вставка — Функция) в категории Определенные пользователем (User Defined):

После выбора функции выделяем ячейки с аргументами (с суммой, для которой надо посчитать НДС) как в случае с обычной функцией:


По Excel написано немало книг. Но книга, которую вы держите в своих руках, является особенной — в ней разработка приложений электронных таблиц рассматривается в широком контексте. VBA — это всего лишь один из компонентов среды разработки пользовательских приложений, хотя и довольно существенный. Данная книга поможет вам разобраться в тонкостях разработки приложений с помощью VBA. В ней описаны многочисленные средства языка VBA, его возможности и среда использования. Вначале вашему вниманию будет предложен обзор возможностей программы, далее вы перейдете к определению концепций VBA-программирования, а затем познакомитесь с самим языком. Если вы начинающий программист на VBA, то в данном издании найдете всю необходимую информацию, которая потребуется для дальнейшей работы. Если вы уже обладаете завидным опытом работы с VBA, то эта книга обогатит и приумножит ваши знания, пополнив их новыми методиками и примерами из реальной жизни.
На русском языке.
Качество:
хорошее (с примерами файлов)
Первое знакомство с редактором VBA Excel, создание процедур (подпрограмм) и написание простейшего кода, работающего с переменными и ячейками рабочего листа.
Начинаем программировать с нуля
Часть 1. Первая программа
[Часть 1] [Часть 2] [Часть 3] [Часть 4]
Эта статья предназначена для тех, кто желает научиться программировать в VBA Excel с нуля. Вы увидите, как это работает, и убедитесь, что не все так сложно, как кажется с первого взгляда. Свою первую программу вы напишите за 7 простых шагов.
- Создайте новую книгу Excel и сохраните ее как книгу с поддержкой макросов с расширением .xlsm. В старых версиях Excel по 2003 год – как обычную книгу с расширением .xls.
- Нажмите сочетание клавиш «Левая_клавиша_Alt+F11», которое откроет редактор VBA. С правой клавишей Alt такой фокус не пройдет. Также, в редактор VBA можно перейти по ссылке «Visual Basic» из панели инструментов «Разработчик» на ленте быстрого доступа. Если вкладки «Разработчик» на ленте нет, ее следует добавить в настройках параметров Excel.

В левой части редактора VBA расположен проводник проекта, в котором отображены все открытые книги Excel. Верхней строки, как на изображении, у вас скорее всего не будет, так как это – личная книга макросов. Справа расположен модуль, в который записываются процедуры (подпрограммы) с кодом VBA. На изображении открыт модуль листа, мы же далее создадим стандартный программный модуль.
- Нажмите кнопку «Module» во вкладке «Insert» главного меню. То же подменю откроется при нажатии на вторую кнопку после значка Excel на панели инструментов.

После нажатия кнопки «Module» вы увидите ссылку на него, появившуюся в проводнике слева.
Первая программа на VBA Excel
Добавляем на стандартный модуль шаблон процедуры – строки ее начала и завершения, между которыми мы и будем писать свою первую программу (процедуру, подпрограмму).
- Откройте стандартный модуль двойным кликом по его ссылке в проводнике. Поместите в него курсор и нажмите кнопку «Procedure…» во вкладке «Insert» главного меню. Та же ссылка будет доступна при нажатии на вторую кнопку после значка Excel на панели инструментов.

В результате откроется окно добавления шаблона процедуры (Sub).

- Наберите в поле «Name» имя процедуры: «Primer1», или скопируйте его отсюда и вставьте в поле «Name». Нажмите кнопку «OK», чтобы добавить в модуль первую и последнюю строки процедуры.

Имя процедуры может быть написано как на латинице, так и на кириллице, может содержать цифры и знак подчеркивания. Оно обязательно должно начинаться с буквы и не содержать пробелы, вместо которых следует использовать знак подчеркивания.
- Вставьте внутрь шаблона процедуры следующую строку:
MsgBox "Привет".

Функция MsgBox выводит информационное сообщение с указанным текстом. В нашем примере – это «Привет».
- Проверьте, что курсор находится внутри процедуры, и запустите ее, нажав клавишу «F5». А также, запустить процедуру на выполнение можно, нажав на треугольник (на изображении под пунктом меню «Debug») или на кнопку «Run Sub/UserForm» во вкладке «Run» главного меню редактора VBA Excel.

Если вы увидели такое сообщение, как на изображении, то, поздравляю – вы написали свою первую программу!
Работа с переменными
Чтобы использовать в процедуре переменные, их необходимо объявить с помощью ключевого слова «Dim». Если при объявлении переменных не указать типы данных, они смогут принимать любые доступные в VBA Excel значения. Комментарии в тексте процедур начинаются со знака «’» (апостроф).
Пример 2
Присвоение переменным числовых значений:
|
Public Sub Primer2() ‘Объявляем переменные x, y, z Dim x, y, z ‘Присваиваем значение переменной x x = 25 ‘Присваиваем значение переменной y y = 35 ‘Присваиваем переменной z сумму ‘значений переменных x и y z = x + y ‘Выводим информационное сообщение ‘со значением переменной z MsgBox z End Sub |
Пример 3
Присвоение переменным строковых значений:
|
Public Sub Primer3() ‘Объявляем переменные x, y, z Dim x, y, z ‘Присваиваем строку переменной x x = «Добрый» ‘Присваиваем строку переменной y y = «день!» ‘Присваиваем переменной z строку, ‘состоящую из строк x и y ‘с пробелом между ними z = x & » « & y ‘Выводим информационное сообщение ‘со значением переменной z MsgBox z End Sub |
Скопируйте примеры процедур в стандартный модуль и запустите их на выполнение.
Изменение содержимого ячеек
Для обозначения диапазонов, в том числе и отдельных ячеек, в VBA Excel имеется ключевое слово «Range». Ячейке A1 на рабочем листе будет соответствовать выражение Range("A1") в коде VBA Excel.
Пример 4
|
Public Sub Primer4() ‘Объявляем переменную x Dim x ‘Присваиваем значение переменной x x = 125.61 ‘Присваиваем ячейке A1 ‘значение переменной x Range(«A1») = x ‘Присваиваем значение ячейке B1 Range(«B1») = 356.24 ‘Записываем в ячейку C1 ‘сумму ячеек A1 и B1 Range(«C1») = Range(«A1») + Range(«B1») End Sub |
Скопируйте процедуру этого примера в стандартный модуль и запустите на выполнение. Перейдите на активный рабочий лист Excel, чтобы увидеть результат.
Now, after having learned what Excel VBA is, let’s move a bit further and see what is VB Editor.
VB Editor (or more commonly known as VBE) is the tool used to create, modify and maintain Visual Basic for Applications (VBA) procedures and modules in Excel.
NOTE: Many people also refer VBE as Excel IDE, IDE stands for integrated development environment. So, do not confuse between these terms as they are more or less same.
Now, let’s see how you can access VBE.
How to Open VBE in Excel:
Opening and accessing VBE is very simple, there are various ways to do it and below I am going to show you top three ways to do it:
1. Using Shortcut Key to open VBE [The Easiest Way]: Open your spreadsheet and then simply press ALT + F11 key while in the main/normal Excel window, to open the Visual Basic Editor.
2. Access VBE from Menu in Excel 2003: To open VBE in Excel 2003, navigate to Tools > Macro > Visual Basic Editor. As shown below:
 : VBA Basics 002 1")
3. Access VBE from Ribbon in Excel 2007 and Later Versions: Visual Basic Editor in Excel 2007 or later Versions can be opened from ‘Developer’ Tab. But generally, Developer tab is hidden by default in Excel. So, first you need to un-hide the developer tab and then open the VB Editor.
To display Developer tab in Excel 2007 or later version simply navigate to File > Options > Customize Ribbon, check the ‘Developer’ checkbox and click ‘Ok’.
As shown in the below image.
 : VBA Basics 002 2")
After this, your Developer Tab will become visible. And now to open VB Editor, simply navigate to Developer Tab in the ribbon and click the Visual basic button as shown.
 : VBA Basics 002 3")
Getting Familiar with VBE:
When you open VBE using any of the methods mentioned above, you will typically see a window that is more or less like the one in below image.
 : VBA Basics 002 4")
VBE can be divided into 5 basic parts (represented by the numbers), below is the description about them:
1. Menu Bar: This the first and one of the most important part that you see in the Visual Basic Editor. Menu Bar contains menus to access most functions of the VBE. Clicking the menu label brings up the corresponding menu.
 : VBA Basics 002 5")
Below the Menu Bar, there is a standard toolbar that holds the most frequently used commands in VBE. Above image shows the various options present on the standard toolbar.
2. Project Window: Project Window is located to the immediate left of Code window, it shows you all the projects that you have and enables you to easily navigate through them. If Project Window is not opened by default in VBE, then press Ctrl + R to open it.
3. Properties Window: The Properties window displays and allows editing of the properties of the currently active object. If Properties window is not opened by default in VBE, then press F4 to open it.
4. Code Window: The code window is the area where we will actually write the code. The macros that you record in the workbook, are recorded on module sheets to which generic names are assigned, such as Module1, Module2, and so forth.
These module sheets are visible in the Project window and when you double click them in the project window they open up and show the code inside them in the code window.
5 Immediate Window: In the Immediate window, you can type in commands, set values, examine values and debug or evaluate expressions. If immediate window is not opened by default in VBE, then press CTRL + ALT + I to open it.
Note: There is nothing to panic, if at first you don’t see all the windows in your Visual Basic Editor. If some of the windows are missing you can add them from the ‘View’ tab. You can also re-position these windows based on your personal preferences and ease of use.
Now, after understanding the significance of all these windows in Visual Basic Editor, I suggest you to take 10-15 minutes out of your busy schedule and open the VB Editor in Excel and then explore various options and menus on the editor. Because the more time you spend on this, more confident you will feel while using it next time.
Cheers! Have a nice day.
Microsoft Excel is a deep program rich in features and functionality. One of the most powerful features of Excel is the ability to write programs in Visual Basic for Applications that run «behind» your worksheets to turn Excel into a calculation-oriented development platform for creating special purpose spreadsheets which can function as applications in their own right.
Service Pack[edit | edit source]
A service pack (in short SP) is a collection of updates, fixes or enhancements to a software program delivered in the form of a single installable package.
A service pack can be incremental, which means it only contains the updates that were not present in the previous service packs or, it can be cumulative, which means it includes the contents of all its predecessors. In the case of Microsoft’s products, an incremental update was called a service release. For example, Office 2000 must be upgraded to service release 1 (SR-1) before one can install SP2.
Macro Security[edit | edit source]
Macro security settings are located in the Trust Center. However, if you work in an organization, your system administrator might have changed the default settings to prevent anyone from changing any settings and execute macros.
Macro Recording[edit | edit source]
A great way of learning about Excel VBA is using its macro recording function. With the function, you tell Excel to start recording, then perform various steps as if you were working without a macro recorder, and finally, tell Excel to stop recording. VBA code corresponding to what you did using Excel GUI has been recorded by Excel. While the code often cannot be meaningfully used without a modification, by starting from it and modifying it you can save a lot of time that would otherwise be spent reading the VBA documentation.
Menu paths:
- Excel 2000, 2003: Tools > Macro > Record New Macro.
- Excel 2007: View (tab) > Macros (group) > down-pointing triangle below Macros button > Record Macro
- Excel 2007: Developer (tab) > Code (group) > Record Macro
Links:
- Use Microsoft Office Excel 2007 macros to speed up work at microsoft.com
- Create a macro (Excel 2003) at microsoft.com
- Record and use Excel macros (Excel 2000) at microsoft.com
Enabling Developer tab[edit | edit source]
Developer tab allows you to insert various user interface controls such as buttons. In order to use it, you first have to enable it.
Menu paths to enable the tab:
- Excel 2007: round Office button > Excel Options (button at bottom) > Popular > Show Developer tab in the Ribbon (check box)
- Excel 2010: File (tab) > Options (button) > Customize Ribbon (button) > Developer (check box)
Links:
- How to: Show the Developer Tab on the Ribbon for Excel 2007 at microsoft.com
- How to: Show the Developer Tab on the Ribbon for Excel 2010 at microsoft.com
Making an XLA[edit | edit source]
- Works on: Excel 2002 SP-2, Excel 2000 SR-1
An XLA is one way to make a VBA code-library. It’s basically just a normal spreadsheet(.xls file) but has its worksheets hidden. Here’s how to create a new one:
- New Workbook
- Save-As …Name it whatever
- Hit Alt-F11
- In the Project-tree, select VBAProject(whatever.xls)/ThisWorkbook
- Hit F4 to get Properties View
- Find Property IsAddin and set to True
- Hit Save
- Close Excel
- Rename whatever.xls to whatever.xla
Alternatively, you can use Save As / Excel AddIn.
Accessing the Registry[edit | edit source]
- Works on: Microsoft Excel 2002 SP-2
This recipe is for reading/writing keys local to your application—this is to provide persistent settings for your VBA app. It does not cover arbitrary access to the Registry (i.e. looking at any key).
The VBA sub/functions are SaveSetting and GetSetting. You can type the following into the Immediate window to get a feel for how these work:
SaveSetting "MyApplicationName", "MyConfigSection", "MyKeyName", "Hello World"
MsgBox GetSetting("MyApplicationName", "MyConfigSection", "MyKeyName")
If you want to iterate over all keys in a given section you can do so as follows:
Sub ShowAllKeys()
   Dim mySettings As Variant
   mySettings = GetAllSettings("MyApplicationName", "MyConfigSection")
   If Not IsEmpty(MySettings) Then
      Dim counter As Integer
      For counter = LBound(mySettings) To UBound(mySettings)
          Dim keyname As String: keyname = mySettings(counter, 0)
          Dim keyval As String: keyval = mySettings(counter, 1)
          MsgBox keyname & "=" & keyval
      Next
   End If
End Sub
You can also delete a registry key as follows:
DeleteSetting "MyApplicationName", "MyConfigSection", "MyKeyName"
FYI: Excel/VBA sticks this in the following registry location:
MyComputerHKEY_CURRENT_USERSoftwareVB and VBA Program SettingsMyApplicationNameMyConfigSection
…where MyApplication and MyConfigSection are whatever you specified in your SaveSettings call.
They end up in HKEY_CURRENT_USERSoftwareVB and VBA Program SettingsMyApplicationNameMyConfigSection.
[edit | edit source]
- Works on: Microsoft Excel 2002 SP-2
Make the following call from VBA:
Application.DisplayAlerts = False
Making Cells Read-Only[edit | edit source]
- Works on: Microsoft Excel 2002 SP-2
Sub ProtectMe()
  Range("A1:IV65536").Locked = False
  Range("A1").Locked = True
  ActiveSheet.Protect Password:="Test"
End Sub
Finding Non-Empty Portion of Worksheet[edit | edit source]
A Worksheet has a maximum size of 65536 rows by 256 columns. However if you want to iterate over all cells you probably don’t want to visit all of the empty ones. For this purpose the Worksheet provides the UsedRange property. For example:
ActiveSheet.UsedRange.Rows.Count
tells you how many non-empty rows are in the given worksheet. Empty rows which are in between the first and last used row are counted as well. Example: If a given Worksheet has entries in cells A7 and B16, used range is considered to be A7:B16, which counts for a total of 10 rows.
Using Events[edit | edit source]
- Works on: Microsoft Excel 2002 SP-2
Consider the following class definition—Assume its a class called CMyClass:
Option Explicit
Dim WithEvents mySheet As Worksheet

Public Sub Init(aWS as Worksheet)
   Set MySheet = aWS
End Sub

Private Sub mySheet_SelectionChange(ByVal Target As Range)
   Dim MyRange As Range
   For Each MyRange in Target
      Debug.Print CStr(MyRange)
   Next
End Sub
The main ideas here are:
- By declaring mySheet WithEvents, you’re saying that CMyClass is listening to mySheet’s events.
- By declaring the member sub mySheet_SelectionChange you’re indicating how an instance of CMyClass should react if mySheet experiences a selection change (i.e. the user selects a new cell or range of cells); The general pattern for events is sub memberVarName_EventName(params).
- You can disconnect the eventing between the given worksheet and CMyClass by setting mySheet = nothing;
- You can create classes that throw events of your design using:
- You would declare at the top of the class: Public Event SomeNiceEventName(YourFavoriteParam1 as WhateverType, etc…),
- You could then raise that event (i.e. firing it to whatever listeners your class has) using RaiseEvent SomeNiceEvent(«Some nice event happened.»);
- VBA in Excel doesn’t like the letters r or c used as variables. Those letters mean ‘row’ and ‘column’ elsewhere.
A little more detail is given here: [1]
Caveat: Uncaught Exceptions[edit | edit source]
Caveat: Uncaught exceptions in event-handlers cause VBE to mysteriously reset. If you are causing an uncaught exception in an event-handler, you probably won’t get an error popup. Instead, VBE will just reset. For this reason you should make sure you’re catching exceptions in all of your event handlers.
Caveat: Online-Help Typos[edit | edit source]
Some versions of Excel can have typos in the F1-help. Here’s an example of a Click handler with the correct parameters:
 Private Sub clicksrc_Click(ByVal Ctrl As Office.CommandBarButton, CancelDefault As Boolean)
    MsgBox "I got a click!"
 End Sub
Iterating Over MultiSelected Cells[edit | edit source]
- Works on: Microsoft Excel 2002 SP-2
The following code-snippet writes «YAY!» in each cell selected by the user:
For Each Cell in Selection
   Cell.Value = "YAY!"
Next
Exporting VBA Code[edit | edit source]
- Works on Microsoft Excel 2002 SP-2
The following code provides a very primitive routine to write serializes the VBA code in your modules to files:
Option Explicit
Private Sub Workbook_BeforeSave(ByVal SaveAsUI As Boolean, Cancel As Boolean)
  Dim objModule As Object
  On Error Resume Next

  For Each objModule In ThisWorkbook.VBProject.VBComponents
    DoEvents
    If objModule.CodeModule.CountOfLines > 0 Then
      objModule.Export objModule.Name & ".bas"
    End If
  Next objModule

End Sub
Resize a Named Range[edit | edit source]
- Excel 2003
Note that the Resize property of Range objects does not change the size of the range object. It returns a new anonymous Range object. Easiest way to do this is to set the .Name property of the Resized range:
Sub ResizeRange(ByVal RangeName As String, _
                Optional NewRowCount As Long = 0, _
                Optional NewColumnCount As Long = 0)

  Dim oRange As Range
  Set oRange = Range(RangeName)
  If NewRowCount = 0 Then
    NewRowCount = oRange.Rows.Count
  End If
  If NewColumnCount = 0 Then
    NewColumnCount = oRange.Columns.Count
  End If

  oRange.Resize(NewRowCount, NewColumnCount).Name = RangeName

End Sub
Creating a Named Range[edit | edit source]
- Excel 2002
Named Ranges allow the user to refer to a cell or range of cells by name instead of by their cell address. This name can be used in other cell formulas as well as in VBA (e.g. using the [SomeName]). There are two sorts of named ranges: Workbook Names and Worksheet Names.
To create a Workbook Name you can select the cell you want to name, pull down Insert—>Name—>Define… This will bring up the «Define Name» dialog. Here you can enter the new name for your cell.
The create a Worksheet Name you follow the same procedure but precede the name with Sheetname!, e.g. Sheet1!InitialValue to create a named-range only visible from within worksheet Sheet1.
When there are two variables with the same name, one local (Worksheet Name) and one global (Workbook Name), the spreadsheet uses the local variable.
There is no way to visualize a named range. The closest thing is to pull down again Insert—>Name—>Define…, but this method does not show if a variable is a local Worksheet Name or a global Workbook Name.
The named range can be a single cell, part of a row, part of a column or a rectangular group of cells. Each one behaves differently:
- A single cell can be referenced anywhere in the worksheet or, if it’s defined globally (workbook name), anywhere in any worksheet.
- A group of cells composing part of a row can only be referenced in a parallel row. For example, if the named variable is mass and it spans the cells C5:L5, then a reference to mass’ at cell E8 (say, a formula like =mass * (3e8)^2) would take the value at C8, but a reference to mass at cell M9 would return an error
- Similarly, a group of cells composing part of a column can only be referenced in a parallel column. Cells outside the range will return an error
- A group of cells that define a rectangular array of sides greater than one is only useful to be referenced in other worksheets — so, there’s no point in defining them locally (worksheet name). For example, if covmatrix are the cells Sheet1!B2:D4, then if cell Sheet2!C3 has the formula =1/sqrt(covmatrix), then it will return 1/sqrt(Sheet1!C3).
Reading a File[edit | edit source]
Reading a file line by line AKA for each line of a file:
  MyFileName = "C:UsersJoeDesktopFile.txt"
  FileNo = FreeFile()
  Open MyFileName For Input As #FileNo
  While Not EOF(FileNo)
    Line Input #FileNo, MyLine
    MsgBox MyLine
  Wend
  Close #FileNo
Links:
- Open at Visual Basic for Applications Reference, msdn.microsoft.com
- Close at Visual Basic for Applications Reference, msdn.microsoft.com
- Line Input at Visual Basic for Applications Reference, msdn.microsoft.com
Writing to a File[edit | edit source]
Writing to a file:
  MyFileName = "C:UsersJoeDesktopFile.txt"
  FileNo = FreeFile()
  Open MyFileName For Output As #FileNo
  For I = 1 To 10
    Print #FileNo, Str(I);
    ' The semicolon above prevents printing of a newline
  Next
  Close #FileNo
Writing the tab-separated content of the current worksheet to a text file, disregarding some of cell content formatting such as percentages:
  MyFileName = "C:UsersJoeDesktopFile.txt"
  FileNo = FreeFile()
  Open MyFileName For Output As #FileNo
  RowCount = ActiveSheet.UsedRange.Cells.Rows.Count
  ColumnCount = ActiveSheet.UsedRange.Cells.Columns.Count
  For RowNo = 1 To RowCount
    For ColNo = 1 To ColumnCount
      Print #FileNo, Cells(RowNo, ColNo); ' The semicolon bars newline printing
      If ColNo < ColumnCount Then
        Print #FileNo, vbTab;
      End If
    Next
    If RowNo < RowCount Then
      Print #FileNo, vbNewline;
    End If
  Next
  Close #FileNo
Links:
- Open at Visual Basic for Applications Reference, msdn.microsoft.com
- Close at Visual Basic for Applications Reference, msdn.microsoft.com
- Print # at Visual Basic for Applications Reference, msdn.microsoft.com
File Existence[edit | edit source]
Testing whether a file exists:
  If Dir(MyFileName) <> "" Then
    MsgBox "The file exists."
  End If
Directories[edit | edit source]
Making a directory:
MkDir "C:UsersJoeDesktopTestFolder"
Removing a directory:
RmDir "C:UsersJoeDesktopTestFolder"
Changing to a directory:
Changing the current drive:
Listing the content of a directory, using a custom filter encompassing two file extensions:
Directory = "C:UsersJoe Hoe"
Set Files = New Collection
Set FileFullPaths = New Collection
MyFile = Dir(Directory)
While MyFile <> ""
  Extension = LCase(Right(MyFile, 4))
  If Extension = ".txt" Or Extension = ".bat" Then
    Files.Add MyFile
    FileFullPaths.Add Directory & MyFile
  End If
  MyFile = Dir() 'Next file or folder
Wend
Links:
- ChDir at Visual Basic for Applications Reference, msdn.microsoft.com
- ChDrive at Visual Basic for Applications Reference, msdn.microsoft.com
- Dir at Visual Basic for Applications Reference, msdn.microsoft.com
- MkDir at Visual Basic for Applications Reference, msdn.microsoft.com
- RmDir at Visual Basic for Applications Reference, msdn.microsoft.com
Grep[edit | edit source]
Searching for a regular expression in the lines of the files of a directory aka grepping:
Directory = "C:UsersJoe Hoe"
PatternString = "target.*path"

MyFile = Dir(Directory)
Set Lines = New Collection
Set RegExp = CreateObject("VBScript.RegExp")
RegExp.Pattern = PatternString
RegExp.IgnoreCase = True
While MyFile <> ""
  Extension = LCase(Right(MyFile, 4))
  If Extension = ".txt" Or Extension = ".bat" Then
    MyFullFileName = Directory & MyFile
    FileNo = FreeFile()
    Open MyFullFileName For Input As #FileNo
    While Not EOF(FileNo)
      Line Input #FileNo, MyLine
      If RegExp.Test(MyLine) Then
        Lines.Add MyLine
      End If
    Wend
    Close #FileNo
  End If
  MyFile = Dir() 'Next file or folder
Wend
'Lines is a collection of the matching lines
Clipboard[edit | edit source]
Prerequisites: Accessing the clipboard from an Excel sheet requires that a reference to MSForms (Microsoft Forms Object Library) is set in the sheet. You can set the reference by adding and subsequent removing of a user form, via Insert > UserForm in a pop-up menu. To check the presence of a reference, see Tools > References menu.
Placing text on the clipboard:
Set MyClipboard = New MSForms.DataObject
MyClipboard.SetText "My string"
MyClipboard.PutInClipboard
Getting text from the clipboard:
Set MyClipboard = New MSForms.DataObject
MyClipboard.GetFromClipboard
TextContent = MyClipboard.GetText
Links:
- DataObject Class at msdn.microsoft.com; contains a section on Visual Basic, whose applicability to Excel VBA is unclear
Range[edit | edit source]
A range is a set of cells. The cells in a range do not need to be adjacent. However, the cells in a single range do need to belong to a single worksheet.
Defining a new range:
Set MyRange = Selection 'The current selection, possibly of multiple cells
Set MyRange = ActiveCell 'The single active cell
Set MyRange = Cells(1, 2) 'Row=1, Column=2 AKA B
Set MyRange = Cells(1, 1).Offset(0, 1) '=Cells(1, 2)
Set MyRange = Cells(1, 2).Offset(0, -1) '=Cells(1, 1)
Set MyRange = Cells(1, 1).Offset(0, -1) 'An error
Set MyRange = Range("A1:C2") 'Letters indicate columns; numbers indicate rows
Set MyRange = Range("A1:A3,C1:C3") 'A discontinuous range
Set MyRange = Range("B2:C2").Cells(1, 1) '=Cells(2, 2) =Range("B2")
Set MyRange = Rows(1) 'An entire row
Set MyRange = Columns(1) 'An entire column
Set MyRange = Cells(2,2).EntireRow
Set MyRange = Cells(2,2).EntireColumn
Set MyRange = Range("B1:C1").EntireColumn 'Two entire columns
Set MyRange = Range("B2:D4").End(xlUp) '=Cells(1, 2) =Range("B1")
Set MyRange = Range("B2:D4").End(xlToLeft) '=Cells(2, 1) = Range("A2")
Set MyRange = Range("B2:D4").End(xlDown) '=Cells(<last row number>, 2)
Set MyRange = Range("B2:D4").End(xlToRight) '=Cells(2, <last column number>)
Iterating a range AKA for each cell in a range:
Set MyRange = Selection
For Each Cell in MyRange
  MsgBox Cell
Next
Iterating rows and iterating columns AKA for each row of a range and for each column of a range, even if discontiguous:
Set Rng = Range("A1:B1,D3:E3") 'Discontiguous range
For Each Row In Rng.Rows
  RowNo = Row.Row
Next
For Each Column In Rng.Columns
  ColNo = Column.Column
Next
Making an union (a range subsuming both) or intersection (a range covering only cells in common) of two ranges:
Set MyRange = Range("A1:C2")
Set MyRange = Union(MyRange, Range("A5:C5"))
MyRange.Interior.Color = RGB(230, 230, 0)
Set MyRange = Intersect(MyRange, Columns(2))
MyRange.Interior.Color = RGB(230, 100, 0)
Selecting a range:
Set MyRange = Sheets(1).Range("A1:B1,D1:E1")
MyRange.Select 'Even a discontinuous range can be selected
Activating a cell:
Range("A1:B2").Select 'Affects Selection, generally of multiple cells
Range("A2").Activate 'Affects ActiveCell, the single one
Finding out about a range AKA learning about a range, including the number of cells AKA cell count, the first row, the last row, the first column, the last column, row count, and column count:
Set Rng = Range("B2:D4") 'Contiguous range
NumberOfCells = Rng.Cells.Count
FirstRowNo = Rng.Row
LastRowNo = Rng.Row + Rng.Rows.Count - 1 'Only for contiguous ranges
FirstColNo = Rng.Column
LastColNo = Rng.Column + Rng.Columns.Count - 1 'Only for contiguous ranges

Set Rng = Range("A1:B1,D1:E1") 'Discontiguous range
BrokenLastColNo = Rng.Column + Rng.Columns.Count - 1 'Only for contiguous ranges
'Do it the correct way for discontiguous range
LastColNo = 0
For Each Cell in Rng
  If Cell.Column > LastColNo then
    LastColNo = Cell.Column
  End If
Next

Set RangeWorksheet = Rng.Worksheet
Links:
- Range Collection at Excel 2003 VBA Language Reference at msdn
- Referring to Multiple Ranges at Excel 2003 VBA Language Reference at msdn
- End Property at Excel 2003 VBA Language Reference at msdn
- Intersect Method at Excel 2003 VBA Language Reference at msdn
- Union Method at Excel 2003 VBA Language Reference at msdn
Worksheet[edit | edit source]
To create, access, or delete worksheets, you can use the methods of Worksheet objects. Examples follow.
Set MyNewWorksheet = Sheets.Add 'Create
Set MyNewWorksheet2 = Sheets.Add(After:=Sheets(Sheets.Count)) 'Create and place as the last sheet
MyNewWorksheet.Name = "My Sheet"
Set IndexedWorksheet = Sheets(1) 'Access by index
Set NamedWorksheet = Sheets("Name") 'Access by name
Set NamedWorksheet2 = Worksheets("Name") 'Does the same thing as the line above
MyNewWorksheet.Delete
Sheets("Name").Cells(1,1) = "New Value" 'Access the cells of the worksheet
Sheets("Name").Cells.Clear 'Clear an entire worksheet, including formatting and cell values
Sheets("Name").Columns(1).Sort key1:=Sheets("Name").Range("A1") 'Sort the first column
Sheets("Name").Columns(1).Sort key1:=Sheets("Name").Range("A1"), _
  order1:=xlDescending, header:=xlYes 'Use descending instead of ascending; do not sort
                                      ' the first cell, considering it a header
MyNewWorksheet2.Visible = xlSheetHidden
MyNewWorksheet2.Visible = xlSheetVisible
Obtaining an existing sheet by name or creating it if it does not exist:
NewSheetName = "My Sheet"
Set MySheet = Nothing
On Error Resume Next
Set MySheet = Sheets(NewSheetName)
On Error GoTo 0
If MySheet Is Nothing Then
  Set MySheet = Sheets.Add(After:=Sheets(Sheets.Count))
  MySheet.Name = NewSheetName
End If
Links:
- Worksheet Object at Excel 2003 VBA Language Reference at mdsn
- Sheets Collection Object at Excel 2003 VBA Language Reference at mdsn
Searching[edit | edit source]
You can search for values in a sheet as follows:
Dim SoughtString As String
SoughtString = "London"
Set ForeignKeySheet = Sheets("CitySize")
Set FoundCell = ForeignKeySheet.Columns(1).Find(SoughtString, LookAt:=xlWhole)
If Not FoundCell Is Nothing Then
  'The value associated with the key is in column 2
  CitySize = FoundCell.Offset(0, 1)
End If
If you want to have a substring match, drop «LookAt:=xlWhole» or use «LookAt:=xlPart».
Links:
- Find Method (Excel 2003 VBA Language Reference) at msdn
Cell Formatting[edit | edit source]
You can format cells including text color, background color, font properties and border, but also formatting as a number, percent or text from VBA as follows:
  Selection.Characters.Font.Color = RGB(0, 0, 255) 'Foreground color AKA text color
  Selection.Interior.Color = RGB(230, 230, 230) 'Background color
  Selection.Characters.Font.ColorIndex = xlAutomatic 'Reset foreground color
  Selection.Interior.Color = xlAutomatic 'Reset background color
  Selection.Font.Name = "Verdana" 'Font face
  Selection.Font.Size = 8 'Font size
  Selection.Font.Bold = True
  Selection.Font.Italic = True
  Selection.Font.Underline = True
  'Selection.Font.Strikethrough = True
  Selection.Font.Name = Application.StandardFont 'See also ClearFormats below
  Selection.Font.Size = Application.StandardFontSize 'See also ClearFormats below
  'Selection.Borders.LineStyle = xlLineStyleNone or xlDouble or xlDashDotDot or other
  Selection.Borders.Weight = xlMedium ' xlHairline, xlThin, xlMedium, or xlThick
  'Selection.Borders(xlEdgeBottom).Weight = xlThick
  ' LineStyle and Weight interact in strange ways.
  Selection.Borders.Color = RGB(127, 127, 0) 'Will be overridden below; applies to all borders
  Selection.Borders(xlEdgeBottom).Color = RGB(255, 0, 0)
  Selection.Borders(xlEdgeTop).Color = RGB(0, 255, 0)
  Selection.Borders(xlEdgeLeft).Color = RGB(0, 0, 255)
  Selection.Borders(xlEdgeRight).Color = RGB(0, 127, 127)
  Selection.Borders(xlInsideHorizontal).Color = &H7FFF00 'A tricky hex matching RGB(0, 255, 127)
  Selection.Borders(xlInsideVertical).Color = RGB(255, 127, 0)

  Selection.NumberFormat = "General"
  Selection.NumberFormat = "00" 'As a number with zero decimal places, showing at least two digits
  Selection.NumberFormat = "0.000" 'As a number, showing three decimal places and no more
  Selection.NumberFormat = "0.0%" 'As a percent with one decimal place
  Selection.NumberFormat = "@" 'As text
  Selection.NumberFormat = "0.00E+00" 'As a number in scientific notation,
                                      'the string before E formatting the significand
  Selection.NumberFormat = "m/d/yyyy" 'As a date; whether "/" is shown depends on locale
  Selection.NumberFormat = "d. mmmm yyyy hh:mm:ss" 'As date, showing the month using a word,
                                      'also showing time

  Selection.ClearFormats 'Remove formatting, keeping cell content.
                         'Removes also the formatting set using NumberFormat.
Links:
- Font Object (Excel 2003 VBA Language Reference) at msdn
- Borders Collection (Excel 2003 VBA Language Reference) at msdn
- LineStyle Property (Excel 2003 VBA Language Reference) at msdn
- Weight Property (Excel 2003 VBA Language Reference) at msdn
- NumberFormat Property (Excel 2003 VBA Language Reference) at msdn
Color[edit | edit source]
In Excel VBA, RGB colors are plain numbers rather than objects. Some color examples are listed in #Cell Formatting.
Some examples:
Selection.Characters.Font.Color = RGB(0, 0, 255) 'Foreground color AKA text color
Selection.Interior.Color = RGB(230, 230, 230) 'Background color
Selection.Characters.Font.ColorIndex = xlAutomatic 'Reset foreground color
Selection.Comment.Shape.Fill.ForeColor.RGB = RGB(220, 255, 160)
'The above is the fill color, that is, the background color
Selection.Comment.Shape.TextFrame.Characters.Font.ColorIndex = 3 'Red per default
'Selection.Comment.Shape.TextFrame.Characters.Font.Color = RGB(255, 0, 0) 'Does not work in Excel 2007
If False Then
  ActiveWorkbook.Colors(3) = RGB(200, 0, 0) 'Make the red in the index 5 a bit darker
End If
Setting the background color of the cells of the 1st column to the row number color index:
For ColorIndex = 1 to 56
  Cells(ColorIndex,1).Interior.ColorIndex = ColorIndex
Next
Color index in the default palette:
- 0 — Automatic
- 1 — Black
- 2 — White
- 3 — Red
- 4 — Green
- 5 — Blue
- 6 — Yellow
- 7 — Magenta
- 8 — Cyan
- 9 — Dark red
- 10 — Dark green
- 11 — Dark blue
- … etc., through 56
Finding all cells whose text color approaches green:
  TargetColor = RGB(0, 255, 0)
  Tolerance = 200
  'Extract the color components. The extraction is unneeded, but if the target
  'color came from the color of a selected cell, it would be needed.
  TmpColor = TargetColor
  TargetColorRed = TmpColor Mod 256
  TmpColor = TmpColor  256
  TargetColorGreen = TmpColor Mod 256
  TmpColor = TmpColor  256
  TargetColorBlue = TmpColor Mod 256

  For Each Cell In ActiveSheet.UsedRange.Cells
    MyColor = Cell.Characters.Font.Color 'Color is a number
    'Extract the RGB components of the color
    Red = MyColor Mod 256
    MyColor = MyColor  256
    Green = MyColor Mod 256
    MyColor = MyColor  256
    Blue = MyColor Mod 256
    'Find the distance from the target color
    Distance = ((Red - TargetColorRed) ^ 2 + _
                (Green - TargetColorGreen) ^ 2 + _
                (Blue - TargetColorBlue) ^ 2) ^ 0.5
    If Distance < Tolerance Then
      Cell.Interior.Color = RGB(230, 230, 230) 'Mark the cell using its background color
    End If
  Next
Links:
- Color Property at Excel 2003 VBA Language Reference at msdn
- ColorIndex Property at Excel 2003 VBA Language Reference at msdn
- Colors Property at Excel 2003 VBA Language Reference at msdn
- ColorType Property at Excel 2003 VBA Language Reference at msdn
- PatternColor Property at Excel 2003 VBA Language Reference at msdn
- PatternColorIndex Property at Excel 2003 VBA Language Reference at msdn
Visibility[edit | edit source]
Hiding a row (hide a row, hide row):
Rows(2).Hidden = True
'Rows(2).Hidden = False 'Show it again
Hiding several rows at once:
Range("A1:A3").EntireRow.Hidden = True 'Hide rows 1, 2, and 3
Hiding the rows of the currently selected cells:
Selection.EntireRow.Hidden = True
Looping over rows that are visible AKA shown AKA not hidden:
For RowNo = 1 To 10
  If Not Rows(RowNo).Hidden Then
    'Do something on the row
  End If
Next
Toggling the visibility of rows:
For RowNo = 1 To 10
  If Not Rows(RowNo).Hidden Then
    Rows(RowNo).Hidden = True
  Else
    Rows(RowNo).Hidden = False
  End If
Next
Hiding a column (hide a column, hide column):
Columns(2).Hidden = True
'Columns(2).Hidden = False 'Show it again
Hiding several columns at once:
Range("A1:C1").EntireColumn.Hidden = True 'Hide columns 1, 2, and 3
Hiding the columns of the currently selected cells:
Selection.EntireColumn.Hidden = True
Other tricks pertaining to visibility of columns work in a direct analogy to the examples for rows above.
Hyperlink[edit | edit source]
Opening or following a hyperlink (open a hyperlink, follow a hyperlink, open hyperlink, follow hyperlink):
ActiveWorkbook.FollowHyperlink "http://www.microsoft.com"
Opening the Wikipedia article for the article title found in the single active cell by opening a put-together URL:
ActiveWorkbook.FollowHyperlink "http://en.wikipedia.org/wiki/" & ActiveCell
Opening a Wikipedia article per article title in any of the currently selected cells:
For Each Cell In Selection
  ActiveWorkbook.FollowHyperlink "http://en.wikipedia.org/wiki/" & Cell
Next
Opening a local hyperlink, with a possible pop-up asking for confirmation for security reasons:
ActiveWorkbook.FollowHyperlink "file://C:UsersJoe HoeDesktopTest.txt"
Links:
- FollowHyperlink Method (Excel 2003 VBA Language Reference) at msdn
Temporary file[edit | edit source]
Getting a temporary file, with unclear robustness of the following method, which uses random numbers and tests for file existence:
Function GetTempFile(Prefix As String, Suffix As String) As String
  TempFolder = Environ$("tmp")
  Randomize
  While True
    TempFileName = TempFolder & "" & Prefix & CStr(Int(10000000 * Rnd)) & Suffix
    If Dir(TempFileName) = "" Then 'Then the file does not exist
      GetTempFile = TempFileName
      Exit Function
    End If
  Wend
End Function
Links:
- How To Use GetTempFileName API to Create a Unique Temporary File at Microsoft.com
Command Output[edit | edit source]
If you do not mind a popping up console window, here is a way of obtaining output of a command from Excel VBA:
Set MyShell = CreateObject("WScript.Shell")
Set ExecObject = MyShell.Exec("tasklist /v")
' AllText = ExecObject.StdOut.ReadAll
Do While Not ExecObject.StdOut.AtEndOfStream
  Line = ExecObject.StdOut.ReadLine()
  If InStr(Line, "AcroRd32.exe") > 0 Then
    'Do something
  End If
Loop
If having a console window popping up is not acceptable and you are okay with creating a temporary file, here is another way of obtaining output of a command from Excel VBA:
'Summary: Run "attrib" on the file in column A (1) of the row
'of the currently selected cell, writing the result into
'column B (2) of the row.

'Get temp file name
TempFolder = Environ$("tmp")
Randomize
TempFileName = ""
While TempFileName = ""
  TempFileNameCand = TempFolder & "" & "mytmp" & CStr(Int(10000000 * Rnd)) & ".tmp"
  If Dir(TempFileNameCand) = "" Then 'Then the file does not exist
    TempFileName = TempFileNameCand
  End If
Wend

'Run the command
Set MyShell = CreateObject("WScript.Shell")
MyCommand = "cmd /c attrib """ & Cells(Selection.Row, 1) & """ >" & TempFileName
MyShell.Run MyCommand, 0, True '0 = show no window
'Although attrib has an exe file, we need to use "cmd" for the
'redirection to work.

FileNo = FreeFile()
Open TempFileName For Input As #FileNo
While Not EOF(FileNo)
  Line Input #FileNo, MyLine
  Cells(Selection.Row, 2) = MyLine
Wend
Close #FileNo
Kill TempFileName 'Delete the file to clean up, although not strictly necessary
Using cmd /c, you can run chains of commands connected using & or | as well:
Set MyShell = CreateObject("WScript.Shell")
Set ExecObject = MyShell.Exec("cmd /c cd /d C:UsersJoe Hoe & findstr /s knowledge *.txt")
' AllText = ExecObject.StdOut.ReadAll
Do While Not ExecObject.StdOut.AtEndOfStream
  Line = ExecObject.StdOut.ReadLine()
  'Do something
Loop
Links:
- Capture output value from a shell command in VBA? at stackoverflow
Dimensions[edit | edit source]
Row height and column width:
Selection.RowHeight = 15
Cells(1,1).RowHeight = 15 'Can be applied to cells, not only to rows
Rows(4).AutoFit 'Automatically adjust row height
'Cells(4, 1).AutoFit 'Error
Cells(4, 1).EntireRow.AutoFit
Selection.EntireRow.AutoFit 'Auto fit the row height of the current selection
ActiveSheet.UsedRange.Rows.AutoFit 'Auto fit the row height of the entire sheet
Selection.RowHeight = ActiveSheet.StandardHeight

Columns(1).ColumnWidth = 70
Cells(1,1).ColumnWidth = 70 'Can be applied to cells, not only to columns
Columns(2).AutoFit 'Automatically adjust column width
Selection.EntireRow.AutoFit 'Auto fit the column width of the current selection
ActiveSheet.UsedRange.Columns.AutoFit 'Auto fit the column width of the entire sheet
Selection.ColumnWidth = ActiveSheet.StandardWidth
Links:
- RowHeight Property at Excel 2003 VBA Language Reference at msdn
- ColumnWidth Property at Excel 2003 VBA Language Reference at msdn
- StandardHeight Property at Excel 2003 VBA Language Reference at msdn
- StandardWidth Property at Excel 2003 VBA Language Reference at msdn
[edit | edit source]
Working with comment aka note:
If Cells(1,1).Comment Is Nothing Then
  Cells(1,1).AddComment Text:="Hey"
  'AddComment throws an error if the cell already has a comment
  'Range("A2:A3").AddComment Text:="Hey" 'Error
  'AddComment throws an error if applies to more than one cell at once.
End If
Cells(1,1).Comment.Text Text:=Selection.Comment.Text & " there"
Cells(1,1).Comment.Visible = True 'Prevent the comment from autohiding
Cells(1,1).Comment.Visible = False 'The default setting
Cells(1,1).Comment.Shape.Fill.ForeColor.RGB = RGB(220, 255, 160)
'The above is the fill color, that is, the background color
Cells(1,1).Comment.Shape.Height = 60
Cells(1,1).Comment.Shape.Width = 80
Cells(1,1).Comment.Shape.TextFrame.Characters.Font.Name = "Verdana"
Cells(1,1).Comment.Shape.TextFrame.Characters.Font.Size = 9
Cells(1,1).Comment.Shape.TextFrame.Characters(1, 3).Font.Bold = True
If False Then
  'Selection.Comment.Delete
  Cells(1,1).ClearComments
  Range("A1:A2").ClearComments 'Can apply to several cells at once
  Cells(1,1).PasteSpecial Paste:=xlPasteComments
End If
Collecting all comments of the sheet into a string:
CommentString = ""
For Each Comment in ActiveSheet.Comments
  CommentString = CommentString & " " & Comment.Text
Next
Links:
- Comment Object at Excel 2003 VBA Language Reference at msdn
- Shape Object at Excel 2003 VBA Language Reference at msdn
IsEmpty[edit | edit source]
Approximately speaking, tells whether a variable has been initialized and not yet written to.
Can be used to tell whether a cell is empty; the presence of a comment attached to the cell or formatting of the cell does not make a cell non-empty.
Examples:
Set MyCell = Cells(1, 1)
If IsEmpty(MyCell) Then
  MyCell.Value = "New value"
End If
'
MyCell.Value = ""
Result1 = IsEmpty(MyCell) 'True
'
Dim MyVar
Result2 = IsEmpty(MyVar) 'True
MyVar = ""
Result3 = IsEmpty(MyVar) 'False
MyVar = Empty
Result4 = IsEmpty(MyVar) 'True
Links:
- IsEmpty at Excel 2010 VBA Language Reference at msdn
IsNull[edit | edit source]
Tells whether an expression is Null, which is distinct from Empty.
Null can be assigned to variant variables; it cannot be assigned to variables dimensioned as strings or integers. Null cannot be assigned to objects, unlike Nothing.
Examples:
Result1 = IsNull(Null)   'True
Result2 = IsNull(Empty)  'False
'
Dim MyVar As Variant
MyVar = Null             'All right
Result3 = IsNull(MyVar)  'True
Dim MyColl As Collection
Set MyColl = Nothing     'All right
Set MyColl = Null        'Error
Dim MyStr As String
MyStr = Null             'Error
Dim MyInt As Integer
MyInt = Null             'Error
Links:
- IsNull at Excel 2013 VBA Language Reference at msdn
Add-Ins at Startup[edit | edit source]
Controlling what add-ins Excel opens at startup:
Microsoft Excel 2003: Configure loaded add-ins via Tools -> Add-ins. Their list is mirrored in the following Registry key, but there’s no advantage in editing the Registry:
HKCUSoftwareMicrosoftOffice11.0ExcelInit Commands
Microsoft Excel 2002 SP-2:When you start Excel, it may automatically load addins (i.e. those you added from Tools -> Add-Ins). The list of add-ins that get loaded come from the following registry key:
HKCUSoftwareMicrosoftOffice10.0ExcelOptions
Under this key you may find a list of string-variables:
- OPEN
- OPEN1
- OPEN2
- etc…
The values of these variables is the name of the add-in. Excel, on start-up, will attempt to load the add-in in string-variable OPEN first, then OPEN1 (if present), onward until it runs out of such string-variables. It seems like Excel will automatically renumber the keys if they are not consecutive (i.e. OPEN1, OPEN3, OPEN4 will become OPEN1, OPEN2, OPEN3).
Note also the list of add-ins presented when you do Tools -> Add-Ons is, in part, populated by the contents of the following key:
HKCUSoftwareMicrosoftOffice10.0ExcelAddin Manager
See also the following MS KB article: How to Remove Entries from Add-Ins Dialog Box.
Chart direct from VBA array data[edit | edit source]
Charts need not be based on the values in cells of a spreadsheet, but can also be made directly in VBA from an array. The following code makes a chart of the relative frequency of characters in a string, in percent of the total, or normalized to a maximum of unity. There is also an option to sort the display and the content can be changed by modifying the content or sequence of the vRef array. Procedures to remove charts and test the functions are included.
Sub TestChartOfStrFreq()
    'run this to make a chart

    Dim str As String, n As Long, c As Long

    'place user string here
    str = ""

    'if no user string use these random charas
    If str = "" Then
        Do
           DoEvents
           Randomize
           n = Int((127 - 0 + 1) * Rnd + 0)
            Select Case n
            'numbers, and upper and lower letters
            Case 48 To 57, 65 To 90, 97 To 122
               str = str & Chr(n)
               c = c + 1
            End Select
        Loop Until c = 1000
    End If

    If ChartOfStrFreq(str, 1, 1) Then MsgBox "Chart done..."

End Sub

Sub DeleteAllWorkbookCharts5()
'run this to delete all charts
    Dim oC
    Application.DisplayAlerts = False
        For Each oC In ThisWorkbook.Charts
           oC.Delete
        Next oC
    Application.DisplayAlerts = True

End Sub

Function ChartOfStrFreq(sIn As String, Optional bSort As Boolean = False, Optional bNormalize As Boolean = False) As Boolean
'makes Excel bar-graph chart for percentage incidence of vRef charas in string (or normalized to max value= 1)
'bSort = True for descending percent otherwise vRef sequence

'PREP
    Dim vRef As Variant, LBC As Long, UBC As Long, LBR As Long, UBR As Long
    Dim vW() As Variant, x() As Variant, y() As Variant
    Dim sUC As String, nC As Long, n As Long, sS As String, nS As Long
    Dim vR As Variant, bCond As Boolean, SortIndex As Long, temp As Variant
    Dim t As Variant, i As Long, j As Long, q As Long, max As Variant
    Dim bXValueLabels As Boolean, sT As String, sX As String, sY As String

    If sIn = "" Then
       MsgBox "Empty input string - closing"
       Exit Function
    End If

    'load the intended x-axis display set here...add to it and delete as required
    vRef = Array("A", "B", "C", "D", "E", "F", "G", "H", "I", "J", "K", "L", "M", _
                 "N", "O", "P", "Q", "R", "S", "T", "U", "V", "W", "X", "Y", "Z", _
                 "0", "1", "2", "3", "4", "5", "6", "7", "8", "9")

    'set axis labels etc...
    sT = "Selective Distribution from a " & Len(sIn) & "-Character String"
    sX = "Character Set of Interest"
    If bNormalize Then
       sY = "Count Divided by Maximum Value"
    Else
       sY = "Percentage of Original String"
    End If
    bXValueLabels = True


    LBC = LBound(vRef): UBC = UBound(vRef)
    ReDim vW(0 To 2, LBC To UBC)
    LBR = LBound(vW, 1): UBR = UBound(vW, 1)
    ReDim x(LBC To UBC)
    ReDim y(LBC To UBC)

'COUNT
    sUC = UCase(sIn)
    nC = Len(sIn)
    For n = LBC To UBC
       vW(0, n) = vRef(n) 'all charas to first row
       sS = vW(0, n)
       'count hits in string for each chara in ref set
       vW(1, n) = UBound(Split(sUC, sS)) - LBound(Split(sUC, sS)) 'count hits
       'calculate hits as percentages of total chara count
       vW(2, n) = Round(((vW(1, n)) * 100 / nC), 2)
    Next n

'NORMALIZE
    If bNormalize Then
        max = vW(1, FindMax(vW, 1))
        For n = LBC To UBC
           temp = vW(1, n)
           vW(2, n) = Round((temp / max), 2)
        Next n
    End If

'SORT
    If bSort Then
        SortIndex = 2
        'descending sort, on rows
        For i = LBC To UBC - 1
            For j = LBC To UBC - 1
                bCond = vW(SortIndex, j) < vW(SortIndex, j + 1)
                If bCond Then
                    For q = LBR To UBR
                        t = vW(q, j)
                        vW(q, j) = vW(q, j + 1)
                        vW(q, j + 1) = t
                    Next q
                End If
            Next
        Next
    End If

'CHART
    'transfer data to chart arrays
    For n = LBC To UBC
        x(n) = vW(0, n) 'x axis data
        y(n) = vW(2, n) 'y axis data
    Next n

    'make chart
    Charts.Add
    ActiveChart.ChartType = xlColumnClustered 'column chart

    'assign the data and labels to a series
    With ActiveChart.SeriesCollection
       If .count = 0 Then .NewSeries
          If bXValueLabels Then
             .Item(1).ApplyDataLabels Type:=xlDataLabelsShowValue
             .Item(1).DataLabels.Orientation = 60
          End If
       If Val(Application.Version) >= 12 Then
          .Item(1).Values = y
          .Item(1).XValues = x
       Else
          .Item(1).Select
          Names.Add "_", x
          ExecuteExcel4Macro "series.x(!_)"
          Names.Add "_", y
          ExecuteExcel4Macro "series.y(,!_)"
          Names("_").Delete
       End If
    End With

    'apply title string, x and y axis strings, and delete legend
    With ActiveChart
       .HasTitle = True
       .ChartTitle.Text = sT
       .SetElement (msoElementPrimaryCategoryAxisTitleAdjacentToAxis) 'X
       .Axes(xlCategory).AxisTitle.Text = sX
       .SetElement (msoElementPrimaryValueAxisTitleRotated) 'Y
       .Axes(xlValue).AxisTitle.Text = sY
       .Legend.Delete
    End With

    ActiveChart.ChartArea.Select

ChartOfStrFreq = True

End Function

Public Function FindMax(arr() As Variant, row As Long) As Long
  Dim myMax As Long
  Dim i As Long

  For i = LBound(arr, 2) To UBound(arr, 2)
    If arr(row, i) > myMax Then
      myMax = arr(row, i)
      FindMax = i
    End If
  Next i
End Function
Nuking Retained State[edit | edit source]
- Works on: Microsoft Excel 2002 SP-2
- OS: Windows XP
Nuking Excel’s Retained State: Excel remembers all sorts of things between runs: What addins to load, what buttons and menus to display, etc. Sometime you’ll want to clean all of this stuff up and bring Excel back to its factory state.
Nuking Excel Checklist:
- Make sure the following directories are empty:
- C:Program FilesMicrosoft OfficeOffice10xlstart
- C:appsxpapplication dataMicrosoftxlstart
- Nuke the auto-open keys from the registry(as shown below);
- Nuke all .xlbs – For example check here:
- C:appsxpapplication dataMicrosoftExcel
[edit | edit source]
- Visual Basic
External links[edit | edit source]
- The Mr. Excel Forum: This is a great super-active forum where Excel power-users can often be found.
- Woody’s Lounge
- J Rubin’s ExcelTip.com
- OzGrid
- Express
- Chip Pearson
- Ron de Bruin
- BygSoftware.com: This site has loads of practical examples showing Excel’s potential
- Aspose.Cells for .NET/Java : A component available for .NET and Java that can be used by developers to create and manipulate Excel files without the need for MS Office to be installed on the system.

Programming The VBA Editor
This page describes how to write code that modifies or reads other VBA code.

You can write code in VBA that reads or modifies other VBA projects, modules, or procedures. This is called
extensibility because extends the editor — you can use VBA code to create new VBA code.
You can use these features to write custom procedures that create, change, or delete VBA modules and code
procedures.
In order to use the code on this page in your projects, you must change two settings.
- First, you need to set an reference to the VBA Extensibility library. The library contains the definitions
of the objects that make up the VBProject. In the VBA editor, go the the Tools menu and choose References. In that
dialog, scroll down to and check the entry for Microsoft Visual Basic For Applications Extensibility 5.3. If you do
not set this reference, you will receive a User-defined type not defined compiler error. - Next, you need to enable programmatic access to the VBA Project. In Excel 2003 and earlier, go the Tools menu
(in Excel, not in the VBA editor), choose Macros and then the Security item. In that dialog, click on the
Trusted Publishers tab and check the Trust access to the Visual Basic Project setting.In Excel 2007, click the Developer item on the main Ribbon and then click the Macro Security item in
the Code panel. In that dialog, choose Macro Settings and check the Trust access to the VBA project
object model.
The VBA Project that you are going to change with these procedures must be unlocked. There is no programmatic way to
unlock a VBA project (other than using SendKeys). If the project is locked, you must manually
unlock. Otherwise, the procedures will not work.
CAUTION: Many VBA-based computer viruses propagate themselves by creating and/or modifying VBA code. Therefore, many virus
scanners may automatically and without warning or confirmation delete modules that reference the VBProject object, causing
a permanent and irretrievable loss of code. Consult the documentation for your anti-virus software for details.
For information about using creating custom menu items in the Visual Basic Editor, see Menus In The
VBA Editor.

Adding A Module To A Project
Adding A Procedure To A Module
Copy A Module From One Project To Another
Creating A New Procedure In A Code Module
Creating An Event Procedure
Deleting A Module From A Project
Deleting A Procedure From A Module
Deleting All VBA Code In A Project
Eliminating Screen Flicker When Working With The Visual Basic Editor
Exporting A VBComponent To A Text File
Listing All Procedures In A Module
Reading A Procedure Declaration
Renaming A Module
Searching A Module For Text
Testing If A VBCompoent Exists
Total Code Lines In A Component
Total Code Lines In A Project
Total Lines In A Project
Workbook Associated With A VBProject
The following is a list of the more common objects that are used in the VBA Extensibilty object model. This is not
a comprehensive list, but will be sufficient for the tasks at hand.
VBIDE
The VBIDE is the object library that defines all the objects and values that make up VBProject and the
Visual Basic Editor. You must reference this library to use the VBA Extensibility objects. To add this
reference, open the VBA editor, open your VBProject in the editor, and go to the Tools menu. There, choose References
. In the References dialog, scroll down to Microsoft Visual Basic for Applications Extensibility 5.3 and
check that item in the list. You can add the reference programmatically with code like:
    ThisWorkbook.VBProject.References.AddFromGuid _
        GUID:="{0002E157-0000-0000-C000-000000000046}", _
        Major:=5, Minor:=3
VBE
The VBE refers to the Visual Basic Editor, which includes all the windows and projects that make up the
editor.
VBProject
A VBProject contains all the code modules and components of a single workbook. One workbook has exactly one
VBProject. The VBProject is made up of 1 or more VBComponent objects.
VBComponent
A VBComponent is one object within the VBProject. A
VBComponent is a regular code module, a UserForm, a class module, any one of the Sheet modules, or the ThisWorkbook
module (together, the Sheet modules and the ThisWorkbook module are called
Document Type modules). A VBComponent is of one of the following types, identified by the Type
property. The following constants are used to identify the Type. The numeric value of each constant
is shown in parentheses.
- vbext_ct_ClassModule (2): A class module to create your own objects. See
Class Modules for details about classes and objects. - vbext_ct_Document (100): One of the Sheet modules or the ThisWorkbook
module. - vbext_ct_MSForm (3): A UserForm. The visual component of a UserForm in the VBA
Editor is called a Designer. - vbext_ct_StdModule (1): A regular code module. Most of the procedures on this
page will work with these types of components.
CodeModule
A CodeModule is the VBA source code of a VBComponent. You use the CodeModule
object to access the code associated with a VBComponent. A VBComponent has
exactly one CodeModule which contains all the code for that component.
CodePane
A CodePane is an open editing window of a CodeModule. When you are typing code,
you are entering code into the CodePane.
The code below illustrate various ways to reference Extensibility objects.
Dim VBAEditor As VBIDE.VBE
Dim VBProj As VBIDE.VBProject
Dim VBComp As VBIDE.VBComponent
Dim CodeMod As VBIDE.CodeModule

Set VBAEditor = Application.VBE

Set VBProj = VBAEditor.ActiveVBProject

Set VBProj = Application.Workbooks("Book1.xls").VBProject

Set VBComp = ActiveWorkbook.VBProject.VBComponents("Module1")

Set VBComp = VBProj.VBComponents("Module1")

Set CodeMod = ActiveWorkbook.VBProject.VBComponents("Module1").CodeModule

Set CodeMod = VBComp.CodeModule
In the code and descriptions on this page, the term Procedure means a Sub,
Function, Property Get, Property Let,
or Property Set procedure. The Extensibility library defines four procedures types, identified
by the following constants. The numeric value of each constant is shown within parentheses.
- vbext_pk_Get (3). A Property Get procedure.
- vbext_pk_Let (1). A Property Let procedure.
- vbext_pk_Set (2). A Property Set procedure.
- vbext_pk_Proc (0). A Sub or Function procedure.
The rest of this page describes various procedures that modify the various objects of a VBProject.
The VBA editor is said to be «in sync» if the ActiveVBProject is the same as the
VBProject that contains the ActiveCodePane. If you have two or more projects open
within the VBA editor, it is possible to have an active code pane open from Project1 and have a component of Project2
selected in the Project Explorer window. In this case, the Application.VBE.ActiveVBProject is the project
that is selected in the Project window, while Application.VBE.ActiveCodePane is a different project,
specifically the project referenced by Application.VBE.ActiveCodePane.CodeModule.Parent.Collection.Parent.
You can test whether the editor in in sync with code like the following.
Function IsEditorInSync() As Boolean

    With Application.VBE
    IsEditorInSync = .ActiveVBProject Is _
        .ActiveCodePane.CodeModule.Parent.Collection.Parent
    End With
End Function
You can force synchronization with code like the following. This will set the
ActiveVBProject to the project associated with the
ActiveCodePane.
Sub SyncVBAEditor()

With Application.VBE
If Not .ActiveCodePane Is Nothing Then
    Set .ActiveVBProject = .ActiveCodePane.CodeModule.Parent.Collection.Parent
End If
End With
End Sub
This code will add new code module named NewModule to the VBProject of the active workbook. The type of
VBComponent is specified by the value of the parameter passed to the Add method.
    Sub AddModuleToProject()
        Dim VBProj As VBIDE.VBProject
        Dim VBComp As VBIDE.VBComponent

        Set VBProj = ActiveWorkbook.VBProject
        Set VBComp = VBProj.VBComponents.Add(vbext_ct_StdModule)
        VBComp.Name = "NewModule"
    End Sub
Creating a procedure via VBA code is really quite simple. Build up a text string of the code, using vbCrLf to
create new lines, and then insert that text with the InsertLines method, passing to it the line number
and the text string. The following code will add a simple «Hello World» procedure named SayHello to the end of the module named
Module1.
    Sub AddProcedureToModule()
        Dim VBProj As VBIDE.VBProject
        Dim VBComp As VBIDE.VBComponent
        Dim CodeMod As VBIDE.CodeModule
        Dim LineNum As Long
        Const DQUOTE = """"

        Set VBProj = ActiveWorkbook.VBProject
        Set VBComp = VBProj.VBComponents("Module1")
        Set CodeMod = VBComp.CodeModule

        With CodeMod
            LineNum = .CountOfLines + 1
            .InsertLines LineNum, "Public Sub SayHello()"
            LineNum = LineNum + 1
            .InsertLines LineNum, "    MsgBox " & DQUOTE & "Hello World" & DQUOTE
            LineNum = LineNum + 1
            .InsertLines LineNum, "End Sub"
        End With
    End Sub
You can also build up a String variable with the content of the procedure and insert that string with one call to InsertLines. For example,
Dim CodePan As VBIDE.CodeModule
Dim S As String
Set CodePan = ThisWorkbook.VBProject.VBComponents("Module2").CodeModule
S = _
"Sub ABC()" & vbNewLine & _
"    MsgBox ""Hello World"",vbOkOnly" & vbNewLine & _
"End Sub" & vbNewLine
With CodePan
    .InsertLines .CountOfLines + 1, S
End With
There is no direct way to copy a module from one project to another. To accomplish this task, you must export the module from
the Source VBProject and then import that file into the Destination VBProject. The code below will do this. The function
declaration is:
Function CopyModule(ModuleName As String, _
    FromVBProject As VBIDE.VBProject, _
    ToVBProject As VBIDE.VBProject, _
    OverwriteExisting As Boolean) As Boolean
ModuleName is the name of the module you want to copy from one project to another.
FromVBProject is the VBProject that contains the module to be copied. This is the source VBProject.
ToVBProject is the VBProject in to which the module is to be copied. This is the destination VBProject.
OverwriteExisting indicates what to do if ModuleName already exists in the
ToVBProject. If this is True the existing VBComponent will be removed from
the ToVBProject. If this is False and the VBComponent already exists, the
function does nothing and returns False.
The function returns True if successful or False is an error occurs. The function
will return False if any of the following are true:
- FromVBProject is nothing.
- ToVBProject is nothing.
- ModuleName is blank.
- FromVBProject is locked.
- ToVBProject is locked.
- ModuleName does not exist in FromVBProject.
- ModuleName exists in ToVBProject
and OverwriteExisting is False.
The complete code is shown below:
Function CopyModule(ModuleName As String, _
    FromVBProject As VBIDE.VBProject, _
    ToVBProject As VBIDE.VBProject, _
    OverwriteExisting As Boolean) As Boolean


    Dim VBComp As VBIDE.VBComponent
    Dim FName As String
    Dim CompName As String
    Dim S As String
    Dim SlashPos As Long
    Dim ExtPos As Long
    Dim TempVBComp As VBIDE.VBComponent


    If FromVBProject Is Nothing Then
        CopyModule = False
        Exit Function
    End If

    If Trim(ModuleName) = vbNullString Then
        CopyModule = False
        Exit Function
    End If

    If ToVBProject Is Nothing Then
        CopyModule = False
        Exit Function
    End If

    If FromVBProject.Protection = vbext_pp_locked Then
        CopyModule = False
        Exit Function
    End If

    If ToVBProject.Protection = vbext_pp_locked Then
        CopyModule = False
        Exit Function
    End If

    On Error Resume Next
    Set VBComp = FromVBProject.VBComponents(ModuleName)
    If Err.Number <> 0 Then
        CopyModule = False
        Exit Function
    End If


    FName = Environ("Temp") & "" & ModuleName & ".bas"
    If OverwriteExisting = True Then

        If Dir(FName, vbNormal + vbHidden + vbSystem) <> vbNullString Then
            Err.Clear
            Kill FName
            If Err.Number <> 0 Then
                CopyModule = False
                Exit Function
            End If
        End If
        With ToVBProject.VBComponents
            .Remove .Item(ModuleName)
        End With
    Else

        Err.Clear
        Set VBComp = ToVBProject.VBComponents(ModuleName)
        If Err.Number <> 0 Then
            If Err.Number = 9 Then
                ' module doesn't exist. ignore error.
            Else
                ' other error. get out with return value of False
                CopyModule = False
                Exit Function
            End If
        End If
    End If


    FromVBProject.VBComponents(ModuleName).Export Filename:=FName


    SlashPos = InStrRev(FName, "")
    ExtPos = InStrRev(FName, ".")
    CompName = Mid(FName, SlashPos + 1, ExtPos - SlashPos - 1)


    Set VBComp = Nothing
    Set VBComp = ToVBProject.VBComponents(CompName)

    If VBComp Is Nothing Then
        ToVBProject.VBComponents.Import Filename:=FName
    Else
        If VBComp.Type = vbext_ct_Document Then
            ' VBComp is destination module
            Set TempVBComp = ToVBProject.VBComponents.Import(FName)
            ' TempVBComp is source module
            With VBComp.CodeModule
                .DeleteLines 1, .CountOfLines
                S = TempVBComp.CodeModule.Lines(1, TempVBComp.CodeModule.CountOfLines)
                .InsertLines 1, S
            End With
            On Error GoTo 0
            ToVBProject.VBComponents.Remove TempVBComp
        End If
    End If
    Kill FName
    CopyModule = True
End Function
This code will create a Workbook_Open event procedure. When creating an event procedure, you should use
the CreateEventProc method so that the correct procedure declaration and parameter list is used.
CreateEventProc will create the declaration line and the end of procedure line. It returns the line number
on which the event procedure begins.
    Sub CreateEventProcedure()
        Dim VBProj As VBIDE.VBProject
        Dim VBComp As VBIDE.VBComponent
        Dim CodeMod As VBIDE.CodeModule
        Dim LineNum As Long
        Const DQUOTE = """"
        Set VBProj = ActiveWorkbook.VBProject
        Set VBComp = VBProj.VBComponents("ThisWorkbook")
        Set CodeMod = VBComp.CodeModule

        With CodeMod
            LineNum = .CreateEventProc("Open", "Workbook")
            LineNum = LineNum + 1
            .InsertLines LineNum, "    MsgBox " & DQUOTE & "Hello World" & DQUOTE
        End With
    End Sub
You can use code to create code in a module. The code
below creates a simple «Hello World» Sub procedure. You can either create a new
VBComponent to hold the procedure or you can use an existing module. Comment out
the appropriate lines of code.
Sub CreateProcedure()
    Dim VBComp As VBIDE.VBComponent
    Dim CodeMod As VBIDE.CodeModule
    Dim S As String
    Dim LineNum As Long


    'Set VBComp = ThisWorkbook.VBProject.VBComponents.Add(vbext_ct_StdModule)
    'VBComp.Name = "NewModule"

    'Set VBComp = ThisWorkbook.VBProject.VBComponents("Module2")

    Set CodeMod = VBComp.CodeModule
    LineNum = CodeMod.CountOfLines + 1
    S = "Sub HelloWorld()" & vbCrLf & _
        "    MsgBox ""Hello, World""" & vbCrLf & _
        "End Sub"
    CodeMod.InsertLines LineNum, S
End Sub
This code creates the procedure:
    Sub HelloWorld()
        MsgBox "Hello, World"
    End Sub
This code will delete Module1 from the VBProject. Note that you cannot remove any of the Sheet modules or the
ThisWorkbook module. In general, you cannot delete a module whose Type is vbext_ct_Document.
    Sub DeleteModule()
        Dim VBProj As VBIDE.VBProject
        Dim VBComp As VBIDE.VBComponent

        Set VBProj = ActiveWorkbook.VBProject
        Set VBComp = VBProj.VBComponents("Module1")
        VBProj.VBComponents.Remove VBComp
    End Sub
You can manually rename a module by displaying the Properties window (press F4) for the module and changing the Name property. You can
do this programmatically with
ActiveWorkbook.VBProject.VBComponents("OldName").Name = "NewName"
This code will delete the procedure DeleteThisProc from the Module1. You must
specify the procedure type in order to differentiate between Property Get,
Property Let, and Property Set procedure, all of which have the same name.
    Sub DeleteProcedureFromModule()
        Dim VBProj As VBIDE.VBProject
        Dim VBComp As VBIDE.VBComponent
        Dim CodeMod As VBIDE.CodeModule
        Dim StartLine As Long
        Dim NumLines As Long
        Dim ProcName As String

        Set VBProj = ActiveWorkbook.VBProject
        Set VBComp = VBProj.VBComponents("Module1")
        Set CodeMod = VBComp.CodeModule

        ProcName = "DeleteThisProc"
        With CodeMod
            StartLine = .ProcStartLine(ProcName, vbext_pk_Proc)
            NumLines = .ProcCountLines(ProcName, vbext_pk_Proc)
            .DeleteLines StartLine:=StartLine, Count:=NumLines
        End With
    End Sub
This code will delete ALL VBA code in a VBProject.
    Sub DeleteAllVBACode()
        Dim VBProj As VBIDE.VBProject
        Dim VBComp As VBIDE.VBComponent
        Dim CodeMod As VBIDE.CodeModule

        Set VBProj = ActiveWorkbook.VBProject

        For Each VBComp In VBProj.VBComponents
            If VBComp.Type = vbext_ct_Document Then
                Set CodeMod = VBComp.CodeModule
                With CodeMod
                    .DeleteLines 1, .CountOfLines
                End With
            Else
                VBProj.VBComponents.Remove VBComp
            End If
        Next VBComp
    End Sub
When you used the Extensibility code, the VBA Editor window will flicker. This can be reduced with the code:
Application.VBE.MainWindow.Visible = False
This will hide the VBE window, but you may still see it flicker. To prevent this, you must use the LockWindowUpdate
Windows API function.
    Private Declare Function FindWindow Lib "user32" Alias "FindWindowA" _
        (ByVal ClassName As String, ByVal WindowName As String) As Long

    Private Declare Function LockWindowUpdate Lib "user32" _
        (ByVal hWndLock As Long) As Long


    Sub EliminateScreenFlicker()
        Dim VBEHwnd As Long

        On Error GoTo ErrH:

        Application.VBE.MainWindow.Visible = False

        VBEHwnd = FindWindow("wndclass_desked_gsk", _
            Application.VBE.MainWindow.Caption)

        If VBEHwnd Then
            LockWindowUpdate VBEHwnd
        End If

        '''''''''''''''''''''''''
        ' your code here
        '''''''''''''''''''''''''

        Application.VBE.MainWindow.Visible = False
    ErrH:
        LockWindowUpdate 0&
    End Sub
You can export an existing VBComponent CodeModule to a text file. This can be useful if you are archiving modules to
create a library of useful module to be used in other projects.
    Public Function ExportVBComponent(VBComp As VBIDE.VBComponent, _
                FolderName As String, _
                Optional FileName As String, _
                Optional OverwriteExisting As Boolean = True) As Boolean

    Dim Extension As String
    Dim FName As String
    Extension = GetFileExtension(VBComp:=VBComp)
    If Trim(FileName) = vbNullString Then
        FName = VBComp.Name & Extension
    Else
        FName = FileName
        If InStr(1, FName, ".", vbBinaryCompare) = 0 Then
            FName = FName & Extension
        End If
    End If

    If StrComp(Right(FolderName, 1), "", vbBinaryCompare) = 0 Then
        FName = FolderName & FName
    Else
        FName = FolderName & "" & FName
    End If

    If Dir(FName, vbNormal + vbHidden + vbSystem) <> vbNullString Then
        If OverwriteExisting = True Then
            Kill FName
        Else
            ExportVBComponent = False
            Exit Function
        End If
    End If

    VBComp.Export FileName:=FName
    ExportVBComponent = True

    End Function

    Public Function GetFileExtension(VBComp As VBIDE.VBComponent) As String

        Select Case VBComp.Type
            Case vbext_ct_ClassModule
                GetFileExtension = ".cls"
            Case vbext_ct_Document
                GetFileExtension = ".cls"
            Case vbext_ct_MSForm
                GetFileExtension = ".frm"
            Case vbext_ct_StdModule
                GetFileExtension = ".bas"
            Case Else
                GetFileExtension = ".bas"
        End Select

    End Function
This code will list all the modules and their types in the workbook, starting the listing in cell A1.
    Sub ListModules()
        Dim VBProj As VBIDE.VBProject
        Dim VBComp As VBIDE.VBComponent
        Dim WS As Worksheet
        Dim Rng As Range

        Set VBProj = ActiveWorkbook.VBProject
        Set WS = ActiveWorkbook.Worksheets("Sheet1")
        Set Rng = WS.Range("A1")

        For Each VBComp In VBProj.VBComponents
            Rng(1, 1).Value = VBComp.Name
            Rng(1, 2).Value = ComponentTypeToString(VBComp.Type)
            Set Rng = Rng(2, 1)
        Next VBComp
    End Sub


    Function ComponentTypeToString(ComponentType As VBIDE.vbext_ComponentType) As String
        Select Case ComponentType
            Case vbext_ct_ActiveXDesigner
                ComponentTypeToString = "ActiveX Designer"
            Case vbext_ct_ClassModule
                ComponentTypeToString = "Class Module"
            Case vbext_ct_Document
                ComponentTypeToString = "Document Module"
            Case vbext_ct_MSForm
                ComponentTypeToString = "UserForm"
            Case vbext_ct_StdModule
                ComponentTypeToString = "Code Module"
            Case Else
                ComponentTypeToString = "Unknown Type: " & CStr(ComponentType)
        End Select
    End Function
This code will list all the procedures in Module1, beginning the listing in cell A1.
    Sub ListProcedures()
        Dim VBProj As VBIDE.VBProject
        Dim VBComp As VBIDE.VBComponent
        Dim CodeMod As VBIDE.CodeModule
        Dim LineNum As Long
        Dim NumLines As Long
        Dim WS As Worksheet
        Dim Rng As Range
        Dim ProcName As String
        Dim ProcKind As VBIDE.vbext_ProcKind

        Set VBProj = ActiveWorkbook.VBProject
        Set VBComp = VBProj.VBComponents("Module1")
        Set CodeMod = VBComp.CodeModule

        Set WS = ActiveWorkbook.Worksheets("Sheet1")
        Set Rng = WS.Range("A1")
        With CodeMod
            LineNum = .CountOfDeclarationLines + 1
            Do Until LineNum >= .CountOfLines
                ProcName = .ProcOfLine(LineNum, ProcKind)
                Rng.Value = ProcName
                Rng(1, 2).Value = ProcKindString(ProcKind)
                LineNum = .ProcStartLine(ProcName, ProcKind) + _
                        .ProcCountLines(ProcName, ProcKind) + 1
                Set Rng = Rng(2, 1)
            Loop
        End With

    End Sub


    Function ProcKindString(ProcKind As VBIDE.vbext_ProcKind) As String
        Select Case ProcKind
            Case vbext_pk_Get
                ProcKindString = "Property Get"
            Case vbext_pk_Let
                ProcKindString = "Property Let"
            Case vbext_pk_Set
                ProcKindString = "Property Set"
            Case vbext_pk_Proc
                ProcKindString = "Sub Or Function"
            Case Else
                ProcKindString = "Unknown Type: " & CStr(ProcKind)
        End Select
    End Function
The code below returns the following information about a procedure in a module, loaded into the ProcInfo
Type. The function ProcedureInfo takes as input then name of the procedure, a
VBIDE.vbext_ProcKind procedure type, and a reference to the CodeModule object containing the procedure.
    Public Enum ProcScope
        ScopePrivate = 1
        ScopePublic = 2
        ScopeFriend = 3
        ScopeDefault = 4
    End Enum

    Public Enum LineSplits
        LineSplitRemove = 0
        LineSplitKeep = 1
        LineSplitConvert = 2
    End Enum

    Public Type ProcInfo
        ProcName As String
        ProcKind As VBIDE.vbext_ProcKind
        ProcStartLine As Long
        ProcBodyLine As Long
        ProcCountLines As Long
        ProcScope As ProcScope
        ProcDeclaration As String
    End Type

    Function ProcedureInfo(ProcName As String, ProcKind As VBIDE.vbext_ProcKind, _
        CodeMod As VBIDE.CodeModule) As ProcInfo

        Dim PInfo As ProcInfo
        Dim BodyLine As Long
        Dim Declaration As String
        Dim FirstLine As String


        BodyLine = CodeMod.ProcStartLine(ProcName, ProcKind)
        If BodyLine > 0 Then
            With CodeMod
                PInfo.ProcName = ProcName
                PInfo.ProcKind = ProcKind
                PInfo.ProcBodyLine = .ProcBodyLine(ProcName, ProcKind)
                PInfo.ProcCountLines = .ProcCountLines(ProcName, ProcKind)
                PInfo.ProcStartLine = .ProcStartLine(ProcName, ProcKind)

                FirstLine = .Lines(PInfo.ProcBodyLine, 1)
                If StrComp(Left(FirstLine, Len("Public")), "Public", vbBinaryCompare) = 0 Then
                    PInfo.ProcScope = ScopePublic
                ElseIf StrComp(Left(FirstLine, Len("Private")), "Private", vbBinaryCompare) = 0 Then
                    PInfo.ProcScope = ScopePrivate
                ElseIf StrComp(Left(FirstLine, Len("Friend")), "Friend", vbBinaryCompare) = 0 Then
                    PInfo.ProcScope = ScopeFriend
                Else
                    PInfo.ProcScope = ScopeDefault
                End If
                PInfo.ProcDeclaration = GetProcedureDeclaration(CodeMod, ProcName, ProcKind, LineSplitKeep)
            End With
        End If

        ProcedureInfo = PInfo

    End Function


    Public Function GetProcedureDeclaration(CodeMod As VBIDE.CodeModule, _
        ProcName As String, ProcKind As VBIDE.vbext_ProcKind, _
        Optional LineSplitBehavior As LineSplits = LineSplitRemove)

        Dim LineNum As Long
        Dim S As String
        Dim Declaration As String

        On Error Resume Next
        LineNum = CodeMod.ProcBodyLine(ProcName, ProcKind)
        If Err.Number <> 0 Then
            Exit Function
        End If
        S = CodeMod.Lines(LineNum, 1)
        Do While Right(S, 1) = "_"
            Select Case True
                Case LineSplitBehavior = LineSplitConvert
                    S = Left(S, Len(S) - 1) & vbNewLine
                Case LineSplitBehavior = LineSplitKeep
                    S = S & vbNewLine
                Case LineSplitBehavior = LineSplitRemove
                    S = Left(S, Len(S) - 1) & " "
            End Select
            Declaration = Declaration & S
            LineNum = LineNum + 1
            S = CodeMod.Lines(LineNum, 1)
        Loop
        Declaration = SingleSpace(Declaration & S)
        GetProcedureDeclaration = Declaration


    End Function

    Private Function SingleSpace(ByVal Text As String) As String
        Dim Pos As String
        Pos = InStr(1, Text, Space(2), vbBinaryCompare)
        Do Until Pos = 0
            Text = Replace(Text, Space(2), Space(1))
            Pos = InStr(1, Text, Space(2), vbBinaryCompare)
        Loop
        SingleSpace = Text
    End Function
You can call the ProcedureInfo function using code like the following:
    Sub ShowProcedureInfo()
        Dim VBProj As VBIDE.VBProject
        Dim VBComp As VBIDE.VBComponent
        Dim CodeMod As VBIDE.CodeModule
        Dim CompName As String
        Dim ProcName As String
        Dim ProcKind As VBIDE.vbext_ProcKind
        Dim PInfo As ProcInfo

        CompName = "modVBECode"
        ProcName = "ProcedureInfo"
        ProcKind = vbext_pk_Proc

        Set VBProj = ActiveWorkbook.VBProject
        Set VBComp = VBProj.VBComponents(CompName)
        Set CodeMod = VBComp.CodeModule

        PInfo = ProcedureInfo(ProcName, ProcKind, CodeMod)

        Debug.Print "ProcName: " & PInfo.ProcName
        Debug.Print "ProcKind: " & CStr(PInfo.ProcKind)
        Debug.Print "ProcStartLine: " & CStr(PInfo.ProcStartLine)
        Debug.Print "ProcBodyLine: " & CStr(PInfo.ProcBodyLine)
        Debug.Print "ProcCountLines: " & CStr(PInfo.ProcCountLines)
        Debug.Print "ProcScope: " & CStr(PInfo.ProcScope)
        Debug.Print "ProcDeclaration: " & PInfo.ProcDeclaration
    End Sub
The CodeModule object has a Find method that you can use to search for
text within the code module. The Find method accepts ByRef Long parameters. Upon
input, these parameters specify the range of lines and column to search. On output, these values will point to the found text. To find
the second and subsequent occurence of the text, you need to set the parameters to refer to the text following the found line and
column. The Find method returns True or False indicating
whether the text was found. The code below will search all of the code in Module1 and print a
Debug message for each found occurrence. Note the values set with the SL,
SC, EL, and EC variables. The code loops until
the Found variable is False.
    Sub SearchCodeModule()
        Dim VBProj As VBIDE.VBProject
        Dim VBComp As VBIDE.VBComponent
        Dim CodeMod As VBIDE.CodeModule
        Dim FindWhat As String
        Dim SL As Long
        Dim EL As Long
        Dim SC As Long
        Dim EC As Long
        Dim Found As Boolean

        Set VBProj = ActiveWorkbook.VBProject
        Set VBComp = VBProj.VBComponents("Module1")
        Set CodeMod = VBComp.CodeModule

        FindWhat = "findthis"

        With CodeMod
            SL = 1
            EL = .CountOfLines
            SC = 1
            EC = 255
            Found = .Find(target:=FindWhat, StartLine:=SL, StartColumn:=SC, _
                EndLine:=EL, EndColumn:=EC, _
                wholeword:=True, MatchCase:=False, patternsearch:=False)
            Do Until Found = False
                Debug.Print "Found at: Line: " & CStr(SL) & " Column: " & CStr(SC)
                EL = .CountOfLines
                SC = EC + 1
                EC = 255
                Found = .Find(target:=FindWhat, StartLine:=SL, StartColumn:=SC, _
                    EndLine:=EL, EndColumn:=EC, _
                    wholeword:=True, MatchCase:=False, patternsearch:=False)
            Loop
        End With
    End Sub
This code will return True or False indicating whether the VBComponent named by VBCompName exists in
the project referenced by VBProj. If VBProj is omitted, the
VBProject of the ActiveWorkbook is used.
    Public Function VBComponentExists(VBCompName As String, Optional VBProj As VBIDE.VBProject = Nothing) As Boolean

        Dim VBP As VBIDE.VBProject
        If VBProj Is Nothing Then
            Set VBP = ActiveWorkbook.VBProject
        Else
            Set VBP = VBProj
        End If
        On Error Resume Next
        VBComponentExists = CBool(Len(VBP.VBComponents(VBCompName).Name))

    End Function
This function will return the total code lines in a VBComponent. It ignores blank lines and comment lines. It will return
-1 if the project is locked.
    Public Function TotalCodeLinesInVBComponent(VBComp As VBIDE.VBComponent) As Long

        Dim N As Long
        Dim S As String
        Dim LineCount As Long

        If VBComp.Collection.Parent.Protection = vbext_pp_locked Then
            TotalCodeLinesInVBComponent = -1
            Exit Function
        End If

        With VBComp.CodeModule
            For N = 1 To .CountOfLines
                S = .Lines(N, 1)
                If Trim(S) = vbNullString Then
                    ' blank line, skip it
                ElseIf Left(Trim(S), 1) = "'" Then
                    ' comment line, skip it
                Else
                    LineCount = LineCount + 1
                End If
            Next N
        End With
        TotalCodeLinesInVBComponent = LineCount
    End Function
This code will return the count of lines in all components of the project referenced by VBProj. If
VBProj is omitted, the VBProject of the ActiveWorkbook is used. The function will return -1 if
the project is locked.
    Public Function TotalLinesInProject(Optional VBProj As VBIDE.VBProject = Nothing) As Long
    ''''''''''''''''''''''''''''''''''''''''''''''''''''''''''''''''''''''''''''''''''
    ' This returns the total number of lines in all components of the VBProject
    ' referenced by VBProj. If VBProj is missing, the VBProject of the ActiveWorkbook
    ' is used. Returns -1 if the VBProject is locked.
    ''''''''''''''''''''''''''''''''''''''''''''''''''''''''''''''''''''''''''''''''''

        Dim VBP As VBIDE.VBProject
        Dim VBComp As VBIDE.VBComponent
        Dim LineCount As Long

        If VBProj Is Nothing Then
            Set VBP = ActiveWorkbook.VBProject
        Else
            Set VBP = VBProj
        End If

        If VBP.Protection = vbext_pp_locked Then
            TotalLinesInProject = -1
            Exit Function
        End If

        For Each VBComp In VBP.VBComponents
            LineCount = LineCount + VBComp.CodeModule.CountOfLines
        Next VBComp

        TotalLinesInProject = LineCount
    End Function
This function will return the total number of code lines in a VBComponent. It ignores blank lines and comment lines. It will
return -1 if the project is locked.
    Public Function TotalCodeLinesInVBComponent(VBComp As VBIDE.VBComponent) As Long

        Dim N As Long
        Dim S As String
        Dim LineCount As Long

        If VBComp.Collection.Parent.Protection = vbext_pp_locked Then
            TotalCodeLinesInVBComponent = -1
            Exit Function
        End If

        With VBComp.CodeModule
            For N = 1 To .CountOfLines
                S = .Lines(N, 1)
                If Trim(S) = vbNullString Then
                    ' blank line, skip it
                ElseIf Left(Trim(S), 1) = "'" Then
                    ' comment line, skip it
                Else
                    LineCount = LineCount + 1
                End If
            Next N
        End With
        TotalCodeLinesInVBComponent = LineCount
    End Function
This function will return the total number of code lines in all the components of a VBProject. It ignores blank lines
and comment lines. It will return -1 if the project is locked.
    Public Function TotalCodeLinesInProject(VBProj As VBIDE.VBProject) As Long


        Dim VBComp As VBIDE.VBComponent
        Dim LineCount As Long
        If VBProj.Protection = vbext_pp_locked Then
            TotalCodeLinesInProject = -1
            Exit Function
        End If
        For Each VBComp In VBProj.VBComponents
            LineCount = LineCount + TotalCodeLinesInVBComponent(VBComp)
        Next VBComp

        TotalCodeLinesInProject = LineCount
    End Function
The Workbook object provides a property named VBProject that allows you to
reference to the VBProject associated with a workbook. However, the reverse is not true. There is
no direct way to get a reference to the workbook that contains a specific VBProject. However, it
can be done with some fairly simple code. The following function, WorkbookOfVBProject,
will return a reference to the Workbook object that contains the VBProject indicated by the
WhichVBP parameter. This parameter may be a VBIDE.VBProject
object, or a string containing the name of the VBProject (the project name, not the workbook name), or a
numeric index, indicating the ordinal index of the VBProject (its position in the list of VBProjects in
the Project Explorer window). If the
parameter is any object other than VBIDE.VBProject, the code raises an
error 13 (type mismatch). If the parameter does not name an existing VBProject, the code raises
an error 9 (subscript out of range). If you have more than one VBProject with the default name
VBAProject, the code will return the first VBProject with that name.
Dim WB As Workbook
Dim AI As AddIn
Dim VBP As VBIDE.VBProject

If IsObject(WhichVBP) = True Then

    On Error GoTo 0
    If TypeOf WhichVBP Is VBIDE.VBProject Then
        Set VBP = WhichVBP
    Else
        Err.Raise 13
    End If
Else
    On Error Resume Next
    Err.Clear

    Set VBP = Application.VBE.VBProjects(WhichVBP)
    On Error GoTo 0
    If VBP Is Nothing Then
        Err.Raise 9
    End If
End If

For Each WB In Workbooks
    If WB.VBProject Is VBP Then
        Set WorkbookOfVBProject = WB
        Exit Function
    End If
Next WB

For Each AI In Application.AddIns
    If AI.Installed = True Then
        If Workbooks(AI.Name).VBProject Is VBP Then
            Set WorkbookOfVBProject = Workbooks(AI.Name)
            Exit Function
        End If
    End If
Next AI

End Function
 |
This page last updated: 15-July-2010. |