
If you type --- in Word and hit Enter, it will be converted to a horizontal line. However, if you do it 3 times, then the spacing between them isn’t even.

Is there a way to make it even? One goaround way is to create a 4×1 table and draw only the top border. However I don’t want to use this since it has more space with the above text than the beneath text. (Usually the above text is to introduce what one should do with the lines, while the beneath text moves on to a different topic. So the space with the above text should be less than with the beneath one.)

asked Apr 22, 2021 at 17:49
![]()
3
- Select the lines.
- Go to the Design tab.
- Click on Paragraph Spacing.
- Select No Paragraph Space.

answered Apr 22, 2021 at 18:06
![]()
Reddy LutonadioReddy Lutonadio
15.9k4 gold badges14 silver badges34 bronze badges
3
This article describes the most common methods for creating ruling lines or blank lines in a Microsoft Word document. These are useful if you are creating a form that will be printed and filled out with pen or pencil.
The following six methods are described in this article:
-
Paragraph Border method
-
Table Border method
-
Blank Space method
-
Tab Leader method
-
Draw method
-
Compatibility Options method
Summary
To create lines in a Microsoft Word document, you may use any of the following methods:
Paragraph Border Method
To place a line (border) under each line that has a paragraph mark (¶), follow these steps.
NOTE: To show paragraph marks in your Word document, click Options on the Tools menu. On the View tab, click to select the Paragraph marks check box, and then click OK.
-
Select all the paragraphs to be underlined.
-
On the Format menu, click Borders and shading.
-
Click the Borders tab.
-
Under Style, click the line style you want to use for the border.
-
Under Preview, click on the diagram to select the center and bottom borders.
-
Click OK. Each line with a hard return will now have a border beneath it.
NOTE: Multiple blank paragraphs formatted in this way can be placed in text boxes and positioned underneath the normal text area to form lines that are not affected when you type text; lines created by using the Draw method are also not affected when you type text.
Table Border Method
To place a border on the bottom of the table cell, follow these steps. There will be a line under any text typed in the table cell. When text wraps to a second line, there will still be only a single border at the bottom of the cell.
-
Place the insertion point on a blank line where you want the underlined text to appear.
-
On the Table menu, point to Insert, and then click Table.
-
In the Number of columns box, type 1, in the Number of rows box, type 1, and then click OK.
NOTE: A one-column, one-row table now appears at the insertion point. You can specify the number of columns and rows you need.
-
On the Table menu, point to Select, and then click Table.
NOTE: You can also select just a particular cell, column, or row of your table to apply the bottom border to.
-
On the Format menu, click Borders and Shading, and then click the Borders tab.
-
On the Borders tab, under Setting, click None.
-
Under Style, click the line style you want to use for the border.
-
Under Preview, click on the diagram to select the bottom border, and then click OK.
Blank Space Method
To underline one space at a time, follow these steps. Word does not normally underline blank spaces. The following instructions explain how to create non-breaking spaces that Word will underline.
-
Place the insertion point where you want the ruling line (underlining).
-
On the Format menu, click Font. In the Underline style box, select the line style you want, and then click OK.
-
For every blank space you want to underline, press CTRL+SHIFT+SPACEBAR.
Tab Leader Method
-
Place the insertion point on the line where you want the underlining.
-
On the Format menu, click Tabs.
-
In the Tabs dialog box, click Clear All.
-
Under Tab stop position, type a number that corresponds to the number of inches you want the line to extend from the left margin. (For example, 6.0 inches goes from margin to margin in a document with 1.25-inch left and right margins.)
-
Under Alignment, click Right, and then under Leader, click 4 (the underline).
-
Click Set, and then click OK.
-
Press the TAB key. A line extends from the insertion point to the tab created in step 4.
-
Press ENTER to move to a blank line, and then press the TAB key again. Repeat this step as needed.
NOTE: Multiple blank paragraphs formatted in this way can be placed in text boxes and positioned underneath the normal text area to form lines that are not affected by typing text; lines created using the Draw method are also not affected by typing text.
Draw Method
-
Click the Drawing toolbar button on the Standard toolbar, or point to Toolbars on the View menu, and then click Drawing.
-
Click Line on the Drawing toolbar.
-
Place the pointer where you want the line to start. The mouse pointer is a crosshair (+).
-
Click and hold the mouse button, and drag the line to the length you want.
NOTES:
-
Holding down the SHIFT key while drawing a line produces straight horizontal or vertical lines.
-
Holding down the ALT key while drawing a line prevents the line from snapping to the grid and allows exact line placement. To turn off the snap-to-grid feature, click Draw on the Drawing toolbar, and then click Grid. Click to clear the Snap objects to grid check box, and then click OK.
-
-
Repeat steps 1 through 4 to add as many ruling lines as you want.
Compatibility Options Method
NOTE: Using this method will create an underlined character each time you press a key. Pressing the SPACEBAR will create an underlined space.
-
On the Tools menu, click Options.
-
Click the Compatibility tab.
-
Under Options, click to select the Draw underline on trailing spaces check box, and then click OK.
-
On the Format menu, click Font.
-
On the Font tab, click the underline style you want in the Underline style box, and then click OK.
More Information
For more information about using text boxes, click Microsoft Word Help on the Help menu, type text boxes in the Office Assistant or the Answer Wizard, and then click Search to view the topic.
References
Need more help?
![]()
Download Article
A user-friendly guide to making different types of lines in Microsoft Word
![]()
Download Article
- Using Shapes to Draw a Line
- Using Borders to Add a Line
- Using Keyboard Shortcuts
- Using the Mobile App
- Q&A
- Tips
|
|
|
|
|
Do you want to create a horizontal line in your resumé or other Microsoft Word document? If you want to customize the color and format of the line, you can use the Shapes tool. If you need to make a quick, basic line, you can use the keyboard shortcut. While you can use the keyboard shortcut on Windows and Mac, you cannot use it on the mobile app. This wikiHow will show you how to insert different lines in Microsoft Word on your Windows, Mac, iPhone, or Android device.
Things You Should Know
- On desktop, go to the Insert tab. Click Shapes, then select a line. Click and drag across the document to create a line.
- To customize the line, double-click it. Click Shape Outline to change the color.
- On mobile, click the three dots. Tap Home and select Insert. Tap Shapes to select a line. Tap and drag across the document to create a line.
-

1
Open Microsoft Word on your Windows or Mac computer. Click or double-click the Word app icon, which resembles a white «W» on a dark-blue background.
- If you want to draw a line in an existing Word document, double-click the Word document to open it and skip the next step.
- You’ll need a subscription to use Office 365.
-
2
Click Blank document. It’s in the upper-left side of the page.
Advertisement
-
3
Click the Insert tab. This tab is in the blue ribbon at the top of the Word window, between Home and Draw.
-
4
Click Shapes. It’s in the Insert toolbar, next to the icon of an overlapping circle and square.
- A drop-down menu will appear.
-
5
Select a line shape. In the «Lines» heading, click one of the line templates. You can choose a line, line arrow, double line arrow, and more.
-
6
Draw your line. Click and drag across the document to create your line.
- If you need to adjust the line’s length and orientation, click the left or right circle. Drag it left or right to adjust the length, or drag it up and down to adjust the orientation.
- To move the line, double-click and drag it to the desired position.


Advertisement
-
1
Open Microsoft Word on your Windows or Mac computer. Click or double-click the Word app icon, which resembles a white «W» on a dark-blue background.
- If you want to draw a line in an existing Word document, double-click the Word document to open it and skip the next step.
-
2
Click Blank document. It’s in the upper-left side of the page.
-
3
Click the Home tab. This tab is in the blue ribbon at the top of the Word window, between File and Insert.
- You may already be on this tab by default.
-
4
Click the «Borders» arrow. This is next to the icon of the dotted square with a solid bottom line.
- A drop-down menu will open.
-
5
Click Horizontal Line. This will be towards the bottom, above Draw Table.
- A horizontal line will be added.
-
6
Format your line. Double-click the line; a dialogue box will appear.
- To change the line thickness, use the up and down arrow below Height. The higher the number, the thicker the line will be.
- To change the color, click the color box underneath Color. Select your desired color.
- Click OK to save and apply your changes.
- To move the line, double-click and drag it to the desired position.


Advertisement
-
1
Open Microsoft Word on your Windows or Mac computer. Click or double-click the Word app icon, which resembles a white «W» on a dark-blue background.[1]
- If you want to draw a line in an existing Word document, double-click the Word document to open it and skip the next step.
-
2
Click Blank document. It’s in the upper-left side of the page.
-
3
Place your cursor where you want your line to appear. You’ll need to be on a blank line, as this won’t work if there is text before or after your cursor on the same line.
- You’ll be creating a horizontal line that spans from one edge of your page to the other. The line will stop at your set margins.
- If you want to make the line span the whole page, you’ll need to change your document margins.
-
4
Type three dashes in a row. Use your dash key on the number row at the top of your keyboard, or on the numeric pad.
-
5
Press ↵ Enter to convert the dashes into a line. AutoCorrect will automatically create a solid line that will situate itself directly beneath the previous line of text.
- Note that the line does not occupy the space of a line of text, but instead exists between lines of text.
- If you do not have AutoCorrect enabled, do so by clicking File → Options → Proofing → AutoCorrect Options…. This will open a new window.
- Make sure the Border Lines box is checked. This can be found underneath Apply as you type.
- If you want to turn off AutoCorrect, uncheck the boxes.
-
6
Use different characters for different line styles. There are a variety of different lines that you can create by using characters other than the dash:[2]
- Thin line: Three hyphens (-).
- Thick line: Three underscores (_).
- Double line: Three equal signs (=).
- Dotted line: Three asterisk (*).
- Triple line: Three pound signs (#).
- Squiggly line: Three tildes (~).
-
7
Move the line by entering text above it. You can prompt the line to move down by typing text above it and then pressing Enter.
- Deleting text above the line will prompt it to move upward.


Advertisement
-
1
Open a document in the Microsoft Word app. This looks like a blue notebook next to a W.
- Microsoft Word is available for iOS in the App Store and for Android in the Google Play Store.
- Tap Blank document to open a new document or tap a file to open an existing document.
-
2
Tap ••• . This can be found above the keyboard, to the right.
- If you don’t see your keyboard, tap the document to bring it up.
- A new menu will open.
-
3
Tap Home. This will be to the left of the formatting window.
- A drop-down menu will open.
-
4
Tap Insert. You’ll see a list of all objects you can insert.
-
5
Tap Shapes. This is next to the icon of an overlapping circle and square.
-
6
Select a line shape. In the «Lines» heading, tap one of the line templates. You can choose a line, line arrow, double line arrow, and more.
-
7
Draw your line. Tap and drag across the document to create your line.
- Use two fingers to pinch and zoom out to view the entire document.
- If you need to adjust the line’s length and orientation, tap the left or right circle. Drag it left or right to adjust the length, or drag it up and down to adjust the orientation.
- To move the line, tap and drag it to the desired position.


Advertisement
Add New Question
-
Question
How do I view all available symbols in Microsoft Word?

Click «Insert» and then click «Symbols» and you should be shown a box with all of the symbols in it.
-
Question
How do I add a line on the first page, and no lines on the second?
Click «Insert» and then click «Symbols» and you should be shown a box with all of the symbols in it.
-
Question
How do I change the color of the line?
In the paragraph section, open the drop-down menu on the «Borders» button. At the very bottom is a «Borders and Shading» option. In that option, change the color of the bottom border to your specified color. Click the «Borders» button.
See more answers
Ask a Question
200 characters left
Include your email address to get a message when this question is answered.
Submit
Advertisement
-
Looking for money-saving deals on Microsoft Office products? Check out our coupon site for tons of coupons and promo codes on your next subscription.
Thanks for submitting a tip for review!
Advertisement
About This Article
Article SummaryX
1. Click Insert.
2. Click Shapes.
3. Select a line template.
4. Click and drag across your Microsoft Word document to draw the line.
Did this summary help you?
Thanks to all authors for creating a page that has been read 2,043,531 times.
Is this article up to date?
Microsoft 365, Microsoft Office, Microsoft Office for Mac, Microsoft Powerpoint, Microsoft Word, Office 2007, Office 2010, Office 2013, Office 2016, Office 2019, Office 365 /
15 June 2020
If you want a list of numbered items using only odd or even numbers; how do you do that? Are you thinking of Word’s automatic numbering feature? The answer is “Yes” if you add little Word trickery.
What exactly you need to do is use the Numbering features but leave the even (or Odd) numbers blank and then camouflage them by changing using the Hidden attribute or change the unwanted lines white which blends with the background.
Let’s plunge into the steps:
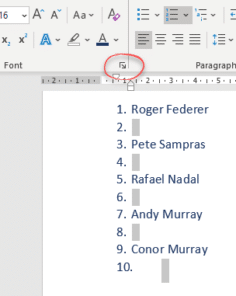
Firstly, create numbered list by adding text only next to the odd numbers and leaving the even numbers blank like below:

Or have even numbers filled with odd numbers blank. The same trick could be used for other unusual numbering choices.
You might think it is now easy simply hit the delete button to remove the even numbers. But Word does not understand what you are trying to hint at, and if you plan to delete the even numbers it starts reordering the list to add the numbers in a sequence again.
There are two ways to show odd or even numbers only.
Hidden Text
Make the unwanted Odd or Even numbers into Hidden text. That hides the unwanted number lines but retains the numbering.
Select the unwanted numbering lines using the Ctrl key to choose each line. Then open the full Font dialog box using the little arrow icon at bottom right of Home | Font.
Choose the Hidden attribute and the unwanted lines/numbering will disappear.

White Font Color
Another solution is to use the white font colour to hide the even numbers to match with the background. The Hidden text method is better but this solution has a place.
PowerPoint doesn’t support Hidden text, so this trick is the workaround for numbered lists in slides.
Select multiple lines by holding Ctrl key. Try moving the cursor towards the left margin to select the lines. When you have selected the lines to hide with white font this is how it appears:

Now, with the line selected Go to the Home Tab >Font Colour and select White colour from the Colour Palette.

Magic! The even lines become invisible from your word document.

Now what you get is a list of odd numbers, but with a lot of spacing in between. if you are fussy about the space between the odd numbers. Ms Word can help adjusting the spacing problem a bit.
Select the numbered list, Go to Home tab and click the Paragraph Settings button in the Paragraph section. From the Line and Page Breaks tab, go to Line spacing option and set the value to 0.75.

This will help in reducing the spacing between the numbered lists.
Much better lists with SmartArt
Word Numbered List tricks
Faster Numbered and Multi-Level Level changes
Make Word line spacing LESS than single
Text Spacing tricks for better PowerPoint slide titles
Six Word tricks to reduce space between lines
Table of Contents
- 1 How do I make lines even in Word?
- 2 How do you make a blank line?
- 3 How do I edit a Word document on my Android phone?
- 4 What is the Read-Only attribute?
- 5 What is a read-only location?
How do I make lines even in Word?
Draw Method
- Click the Drawing toolbar button on the Standard toolbar, or point to Toolbars on the View menu, and then click Drawing.
- Click Line on the Drawing toolbar.
- Place the pointer where you want the line to start.
- Click and hold the mouse button, and drag the line to the length you want.
How do you make a blank line?
Place the cursor where you want to start the blank line. Press the Tab key on your keyboard, and a dotted line be drawn on the page the insertion point to the point where you had set the right tab. Hit Enter and type the label for the second field entry (for e.g. Address:).
How do I edit a Word document on my Android phone?
- On your Android phone or tablet, open a document in the Google Docs app .
- Tap Edit .
- To select a word, double-tap it. Move the blue markers to select more text.
- Start editing.
- To undo or redo an action, click Undo or Redo .
How do I change a read only word document on my phone?
Replies (13)
- Open the Word document from the File Explorer of your Android tablet, right-click on it.
- Select Properties.
- Under General tab, check on Attributes.
- Uncheck the option for Read-only if it is checked.
- Click Apply then OK.
- Try to access the Word document again and see if you can now edit it.
What does read-only mean?
: capable of being viewed but not of being changed or deleted a read-only file/document.
What is the Read-Only attribute?
The readonly attribute is a boolean attribute. When present, it specifies that an input field is read-only. A read-only input field cannot be modified (however, a user can tab to it, highlight it, and copy the text from it).
What is a read-only location?
A read-only file or storage device contains data that cannot be modified or deleted. While data can be accessed or “read” from a read-only file or device, new data cannot be added or “written” to the device. You can click the Read-only checkbox (located in the General tab) to make a file read-only.