
| title | keywords | f1_keywords | ms.prod | api_name | ms.assetid | ms.date | ms.localizationpriority |
|---|---|---|---|---|---|---|---|
|
Range.EntireRow property (Excel) |
vbaxl10.chm144123 |
vbaxl10.chm144123 |
excel |
Excel.Range.EntireRow |
9e66da51-6cef-4109-ea4e-2acaad42aa1f |
05/10/2019 |
medium |
Range.EntireRow property (Excel)
Returns a Range object that represents the entire row (or rows) that contains the specified range. Read-only.
Syntax
expression.EntireRow
expression A variable that represents a Range object.
Example
This example sets the value of the first cell in the row that contains the active cell. The example must be run from a worksheet.
ActiveCell.EntireRow.Cells(1, 1).Value = 5
This example sorts all the rows on a worksheet, including hidden rows.
Sub SortAll()
    'Turn off screen updating, and define your variables.
    Application.ScreenUpdating = False
    Dim lngLastRow As Long, lngRow As Long
    Dim rngHidden As Range

    'Determine the number of rows in your sheet, and add the header row to the hidden range variable.
    lngLastRow = Cells(Rows.Count, 1).End(xlUp).Row
    Set rngHidden = Rows(1)

    'For each row in the list, if the row is hidden add that row to the hidden range variable.
    For lngRow = 1 To lngLastRow
        If Rows(lngRow).Hidden = True Then
            Set rngHidden = Union(rngHidden, Rows(lngRow))
        End If
    Next lngRow

    'Unhide everything in the hidden range variable.
    rngHidden.EntireRow.Hidden = False

    'Perform the sort on all the data.
    Range("A1").CurrentRegion.Sort _
        key1:=Range("A2"), _
        order1:=xlAscending, _
        header:=xlYes

    'Re-hide the rows that were originally hidden, but unhide the header.
    rngHidden.EntireRow.Hidden = True
    Rows(1).Hidden = False

    'Turn screen updating back on.
    Set rngHidden = Nothing
    Application.ScreenUpdating = True
End Sub
[!includeSupport and feedback]
In this Article
- Select Entire Rows or Columns
- Select Single Row
- Select Single Column
- Select Multiple Rows or Columns
- Select ActiveCell Row or Column
- Select Rows and Columns on Other Worksheets
- Is Selecting Rows and Columns Necessary?
- Methods and Properties of Rows & Columns
- Delete Entire Rows or Columns
- Insert Rows or Columns
- Copy & Paste Entire Rows or Columns
- Hide / Unhide Rows and Columns
- Group / UnGroup Rows and Columns
- Set Row Height or Column Width
- Autofit Row Height / Column Width
- Rows and Columns on Other Worksheets or Workbooks
- Get Active Row or Column
This tutorial will demonstrate how to select and work with entire rows or columns in VBA.
First we will cover how to select entire rows and columns, then we will demonstrate how to manipulate rows and columns.
Select Entire Rows or Columns
Select Single Row
You can select an entire row with the Rows Object like this:
Rows(5).SelectOr you can use EntireRow along with the Range or Cells Objects:
Range("B5").EntireRow.Selector
Cells(5,1).EntireRow.SelectYou can also use the Range Object to refer specifically to a Row:
Range("5:5").SelectSelect Single Column
Instead of the Rows Object, use the Columns Object to select columns. Here you can reference the column number 3:
Columns(3).Selector letter “C”, surrounded by quotations:
Columns("C").SelectInstead of EntireRow, use EntireColumn along with the Range or Cells Objects to select entire columns:
Range("C5").EntireColumn.Selector
Cells(5,3).EntireColumn.SelectYou can also use the Range Object to refer specifically to a column:
Range("B:B").SelectSelect Multiple Rows or Columns
Selecting multiple rows or columns works exactly the same when using EntireRow or EntireColumn:
Range("B5:D10").EntireRow.Selector
Range("B5:B10").EntireColumn.SelectHowever, when you use the Rows or Columns Objects, you must enter the row numbers or column letters in quotations:
Rows("1:3").Selector
Columns("B:C").SelectSelect ActiveCell Row or Column
To select the ActiveCell Row or Column, you can use one of these lines of code:
ActiveCell.EntireRow.Selector
ActiveCell.EntireColumn.SelectSelect Rows and Columns on Other Worksheets
In order to select Rows or Columns on other worksheets, you must first select the worksheet.
Sheets("Sheet2").Select
Rows(3).Select
The same goes for when selecting rows or columns in other workbooks.
Workbooks("Book6.xlsm").Activate
Sheets("Sheet2").Select
Rows(3).Select
Note: You must Activate the desired workbook. Unlike the Sheets Object, the Workbook Object does not have a Select Method.
VBA Coding Made Easy
Stop searching for VBA code online. Learn more about AutoMacro — A VBA Code Builder that allows beginners to code procedures from scratch with minimal coding knowledge and with many time-saving features for all users!

Learn More
Is Selecting Rows and Columns Necessary?
However, it’s (almost?) never necessary to actually select Rows or Columns. You don’t need to select a Row or Column in order to interact with them. Instead, you can apply Methods or Properties directly to the Rows or Columns. The next several sections will demonstrate different Methods and Properties that can be applied.
You can use any method listed above to refer to Rows or Columns.
Methods and Properties of Rows & Columns
Delete Entire Rows or Columns
To delete rows or columns, use the Delete Method:
Rows("1:4").Deleteor:
Columns("A:D").DeleteVBA Programming | Code Generator does work for you!
Insert Rows or Columns
Use the Insert Method to insert rows or columns:
Rows("1:4").Insertor:
Columns("A:D").InsertCopy & Paste Entire Rows or Columns
Paste Into Existing Row or Column
When copying and pasting entire rows or columns you need to decide if you want to paste over an existing row / column or if you want to insert a new row / column to paste your data.
These first examples will copy and paste over an existing row or column:
Range("1:1").Copy Range("5:5")or
Range("C:C").Copy Range("E:E")Insert & Paste
These next examples will paste into a newly inserted row or column.
This will copy row 1 and insert it into row 5, shifting the existing rows down:
Range("1:1").Copy
Range("5:5").Insert
This will copy column C and insert it into column E, shifting the existing columns to the right:
Range("C:C").Copy
Range("E:E").Insert
Hide / Unhide Rows and Columns
To hide rows or columns set their Hidden Properties to True. Use False to hide the rows or columns:
'Hide Rows
Rows("2:3").EntireRow.Hidden = True

'Unhide Rows
Rows("2:3").EntireRow.Hidden = False
or
'Hide Columns
Columns("B:C").EntireColumn.Hidden = True

'Unhide Columns
Columns("B:C").EntireColumn.Hidden = False
Group / UnGroup Rows and Columns
If you want to Group rows (or columns) use code like this:
'Group Rows
Rows("3:5").Group

'Group Columns
Columns("C:D").Group
To remove the grouping use this code:
'Ungroup Rows
Rows("3:5").Ungroup

'Ungroup Columns
Columns("C:D").Ungroup
This will expand all “grouped” outline levels:
ActiveSheet.Outline.ShowLevels RowLevels:=8, ColumnLevels:=8and this will collapse all outline levels:
ActiveSheet.Outline.ShowLevels RowLevels:=1, ColumnLevels:=1Set Row Height or Column Width
To set the column width use this line of code:
Columns("A:E").ColumnWidth = 30To set the row height use this line of code:
Rows("1:1").RowHeight = 30AutoMacro | Ultimate VBA Add-in | Click for Free Trial!
Autofit Row Height / Column Width
To Autofit a column:
Columns("A:B").AutofitTo Autofit a row:
Rows("1:2").AutofitRows and Columns on Other Worksheets or Workbooks
To interact with rows and columns on other worksheets, you must define the Sheets Object:
Sheets("Sheet2").Rows(3).InsertSimilarly, to interact with rows and columns in other workbooks, you must also define the Workbook Object:
Workbooks("book1.xlsm").Sheets("Sheet2").Rows(3).InsertGet Active Row or Column
To get the active row or column, you can use the Row and Column Properties of the ActiveCell Object.
MsgBox ActiveCell.Rowor
MsgBox ActiveCell.ColumnThis also works with the Range Object:
MsgBox Range("B3").ColumnI notice a typo in your code, as indicated in the comments you’re double-assigning to the rng1 variable, change the second to Set rng2 = ...
You have a loop For i = 2 to C but you have never assigned anything to the variable C, so that will not cause an error, but it will fail to do what you hope it will do.
Option Explicit 'use this to force variable declaration, avoids some errors/typos
Sub crossUpdate()
'Declare each variable separately, it is easier to read this way and won't raise problems
' in some cases if you need to pass to other subs/functions
Dim rng1 As Range
Dim rng2 As Range
Dim N As Long

'Add these declarations
Dim C As Long
Dim R as Long
'I deleted declarations for i (replaced with R), C, N which won't be needed. And also C1, C2

'I'm going to declare some additional range variables, these will be easier to work with
Dim rng1Row as Range
Dim rng2Row as Range
Dim cl as Range

N = Cells(Rows.Count, "A").End(xlUp).row
Set rng1 = Sheet1.Cells.Range("A2:A" & N)

Set rng2 = Sheet2.Cells.Range("A2:A" & N)  'This line was incorrect before


'Now to compare the cells in each row

For R = 2 to rng1.Rows.Count
    Set rng1Row = rng1.Cells(R,1).EntireRow
    Set rng2Row = rng2.Cells(R,1).EntireRow

    For C = 1 to rng1.Columns.Count
        If rng1Row.Cells(R,C).Value <> rng2Row.Cells(R,C).Value Then
            'Do something if they are NOT equal
        Else
            'Do something if they ARE equal
        End If
    Next

End Sub
There are actually some simpler ways to do this, probably, but for purpose of demonstration it is easier for me to explain by breaking it down like this. But for example, range’s aren’t limited by the number of cells they contain. Consider this:
Debug.Print Range("A1").Cells(,2).Address
Should this raise an error? After all, [A1] is a single cell. It won’t raise an error, and instead it will correctly print: $B$1.
So you could probably simplify to this, and avoid using the rng1Row and rng2Row variables:
For R = 2 to rng1.Rows.Count
    For C = 1 to rng1.Columns.Count
        If rng1.Cells(R,C).Value <> rng2.Cells(R,C).Value Then
            'Do something if they are NOT equal
        Else
            'Do something if they ARE equal
        End If
    Next
End Sub
Содержание
- VBA – Select (and work with) Entire Rows & Columns
- Select Entire Rows or Columns
- Select Single Row
- Select Single Column
- Select Multiple Rows or Columns
- Select ActiveCell Row or Column
- Select Rows and Columns on Other Worksheets
- VBA Coding Made Easy
- Is Selecting Rows and Columns Necessary?
- Methods and Properties of Rows & Columns
- Delete Entire Rows or Columns
- Insert Rows or Columns
- Copy & Paste Entire Rows or Columns
- Paste Into Existing Row or Column
- Insert & Paste
- Hide / Unhide Rows and Columns
- Group / UnGroup Rows and Columns
- Set Row Height or Column Width
- Autofit Row Height / Column Width
- Rows and Columns on Other Worksheets or Workbooks
- Get Active Row or Column
- VBA Code Examples Add-in
- Entirerow vba excel описание
- Примеры кода
- Скачать
- Типовые задачи
- Перебор ячеек диапазона (вариант 4)
- Работа с текущей областью
- Определение границ текущей области
- Выделение столбцов / строк текущей области
- Сброс форматирования диапазона
- Поиск последней строки столбца (вариант 1)
- Поиск последней строки столбца (вариант 2)
- Поиск «последней» ячейки листа
- Разбор клипо-генератора
- VBA Select, Row, Column
- VBA Select
- VBA Select CurrentRegion
- VBA ActiveCell
- VBA Selection
- Selection FillDown
- VBA EntireRow and EntireColumn
- VBA Rows and Columns
- VBA Row and Column
- Consolidating Your Learning
- FIRST STEPS
- FUNDAMENTALS
- RANGE
- USERFORM
- DEEPENING
- Report Error/Feedback
- Thank you!
VBA – Select (and work with) Entire Rows & Columns
In this Article
This tutorial will demonstrate how to select and work with entire rows or columns in VBA.
First we will cover how to select entire rows and columns, then we will demonstrate how to manipulate rows and columns.
Select Entire Rows or Columns
Select Single Row
You can select an entire row with the Rows Object like this:
Or you can use EntireRow along with the Range or Cells Objects:
You can also use the Range Object to refer specifically to a Row:
Select Single Column
Instead of the Rows Object, use the Columns Object to select columns. Here you can reference the column number 3:
or letter “C”, surrounded by quotations:
Instead of EntireRow, use EntireColumn along with the Range or Cells Objects to select entire columns:
You can also use the Range Object to refer specifically to a column:
Select Multiple Rows or Columns
Selecting multiple rows or columns works exactly the same when using EntireRow or EntireColumn:
However, when you use the Rows or Columns Objects, you must enter the row numbers or column letters in quotations:
Select ActiveCell Row or Column
To select the ActiveCell Row or Column, you can use one of these lines of code:
Select Rows and Columns on Other Worksheets
In order to select Rows or Columns on other worksheets, you must first select the worksheet.
The same goes for when selecting rows or columns in other workbooks.
Note: You must Activate the desired workbook. Unlike the Sheets Object, the Workbook Object does not have a Select Method.
VBA Coding Made Easy
Stop searching for VBA code online. Learn more about AutoMacro — A VBA Code Builder that allows beginners to code procedures from scratch with minimal coding knowledge and with many time-saving features for all users!
Is Selecting Rows and Columns Necessary?
However, it’s (almost?) never necessary to actually select Rows or Columns. You don’t need to select a Row or Column in order to interact with them. Instead, you can apply Methods or Properties directly to the Rows or Columns. The next several sections will demonstrate different Methods and Properties that can be applied.
You can use any method listed above to refer to Rows or Columns.
Methods and Properties of Rows & Columns
Delete Entire Rows or Columns
To delete rows or columns, use the Delete Method:
Insert Rows or Columns
Use the Insert Method to insert rows or columns:
Copy & Paste Entire Rows or Columns
Paste Into Existing Row or Column
When copying and pasting entire rows or columns you need to decide if you want to paste over an existing row / column or if you want to insert a new row / column to paste your data.
These first examples will copy and paste over an existing row or column:
Insert & Paste
These next examples will paste into a newly inserted row or column.
This will copy row 1 and insert it into row 5, shifting the existing rows down:
This will copy column C and insert it into column E, shifting the existing columns to the right:
Hide / Unhide Rows and Columns
To hide rows or columns set their Hidden Properties to True. Use False to hide the rows or columns:
Group / UnGroup Rows and Columns
If you want to Group rows (or columns) use code like this:
To remove the grouping use this code:
This will expand all “grouped” outline levels:
and this will collapse all outline levels:
Set Row Height or Column Width
To set the column width use this line of code:
To set the row height use this line of code:
Autofit Row Height / Column Width
To Autofit a row:
Rows and Columns on Other Worksheets or Workbooks
To interact with rows and columns on other worksheets, you must define the Sheets Object:
Similarly, to interact with rows and columns in other workbooks, you must also define the Workbook Object:
Get Active Row or Column
To get the active row or column, you can use the Row and Column Properties of the ActiveCell Object.
This also works with the Range Object:

VBA Code Examples Add-in
Easily access all of the code examples found on our site.
Simply navigate to the menu, click, and the code will be inserted directly into your module. .xlam add-in.
Источник
Entirerow vba excel описание
Продолжаем наш разговор про объект Excel Range , начатый в первой части. Разберём ещё несколько типовых задач и одну развлекательную. Кстати, в процессе написания второй части я дополнил и расширил первую, поэтому рекомендую её посмотреть ещё раз.
Примеры кода
Скачать
Типовые задачи
Перебор ячеек диапазона (вариант 4)
Для коллекции добавил четвёртый вариант перебора ячеек. Как видите, можно выбирать, как перебирается диапазон — по столбцам или по строкам. Обратите внимание на использование свойства коллекции Cells . Не путайте: свойство Cells рабочего листа содержит все ячейки листа, а свойство Cells диапазона ( Range ) содержит ячейки только этого диапазона. В данном случае мы получаем все ячейки столбца или строки.
Должен вас предупредить, что код, который вы видите в этом цикле статей — это код, написанный для целей демонстрации работы с объектной моделью Excel. Тут нет объявлений переменных, обработки ошибок и проверки условий, так как я специально минимизирую программы, пытаясь акцентировать ваше внимание целиком на обсуждаемом предмете — объекте Range .
Работа с текущей областью
Excel умеет автоматически определять текущую область вокруг активной ячейки. Соответствующая команда на листе вызывается через Ctrl + A . Через ActiveCell мы посредством свойства Worksheet легко выходим на лист текущей ячейки, а уже через него можем эксплуатировать свойство UsedRange , которое и является ссылкой на Range текущей области. Чтобы понять, какой диапазон мы получили, мы меняем цвет ячеек. Функция GetRandomColor не является стандартной, она определена в модуле файла примера.
Определение границ текущей области
Демонстрируем определение левого верхнего и правого нижнего углов диапазона текущей области. С левым верхним углом всё просто, так как координаты этой ячейки всегда доступны через свойства Row и Column объекта Range (не путать с коллекциями Rows и Columns !). А вот для определения второго угла приходится использовать конструкцию вида .Rows(.Rows.Count).Row , где .Rows.Count — количество строк в диапазоне UsedRange , .Rows(.Rows.Count) — это мы получили последнюю строку, и уже для этого диапазона забираем из свойства Row координату строки. Со столбцом — по аналогии. Также обратите внимание на использование оператора With . Как видите, оператор With , помимо сокращения кода, также позволяет отказаться от объявления отдельной объектной переменной через оператор Set , что очень удобно.
Выделение столбцов / строк текущей области
Тут нет ничего нового, мы всё это обсудили в предыдущем примере. Мы получаем ссылки на столбцы / строки, меняя их цвет для контроля результата работы кода.
Сброс форматирования диапазона
Для возвращения диапазона к каноническому стерильному состоянию очень просто и удобно использовать свойство Style , и присвоить ему имя стиля «Normal». Интересно, что все остальные стандартные стили в локализованном офисе имеют русские имена, а у этого стиля оставили англоязычное имя, что неплохо.
Поиск последней строки столбца (вариант 1)
Range имеет 2 свойства EntireColumn и EntireRow , возвращающие столбцы / строки, на которых расположился ваш диапазон, но возвращают их ЦЕЛИКОМ. То есть, если вы настроили диапазон на D5 , то Range(«D5»).EntireColumn вернёт вам ссылку на D:D , а EntireRow — на 5:5 .
Идём далее — свойство End возвращает вам ближайшую ячейку в определенном направлении, стоящую на границе непрерывного диапазона с данными. Как это работает вы можете увидеть, нажимая на листе комбинации клавиш Ctrl + стрелки . Кстати, это одна из самых полезных горячих клавиш в Excel. Направление задаётся стандартными константами xlUp , xlDown , xlToRight , xlToLeft .
Классическая задача у Excel программиста — определить, где кончается таблица или, в данном случае, конкретный столбец. Идея состоит в том, чтобы встать на последнюю ячейку столбца (строка 1048576) и, стоя в этой ячейке, перейти по Ctrl + стрелка вверх (что на языке VBA — End(xlUp) ).
Поиск последней строки столбца (вариант 2)
Ещё один вариант.
Поиск «последней» ячейки листа
Тут показывается, как найти на листе ячейку, ниже и правее которой находятся только пустые ячейки. Соответственно данные надо искать в диапазоне от A1 до этой ячейки. На эту ячейку можно перейти через Ctrl + End . Как этим воспользоваться в VBA показано ниже:
Разбор клипо-генератора
Ну, и в качестве развлечения и разрядки взгляните на код клипо-генератора, который генерирует цветные квадраты в заданных границах экрана. На некоторых это оказывает умиротворяющий эффект 🙂

По нашей теме в коде обращает на себя внимание использование свойства ReSize объекта Range . Как не трудно догадаться, свойство расширяет (усекает) текущий диапазон до указанных границ, при этом левый верхний угол диапазона сохраняет свои координаты. А также посмотрите на 2 последние строчки кода, реализующие очистку экрана. Там весьма показательно использован каскад свойств End и Offset .
Источник
VBA Select, Row, Column
VBA Select
It is very common to find the .Select methods in saved macro recorder code, next to a Range object.
.Select is used to select one or more elements of Excel (as can be done by using the mouse) allowing further manipulation of them.
Selecting cells with the mouse:
Selecting cells with VBA:
Each of the above lines select the range from «A1» to «E9».
VBA Select CurrentRegion
If a region is populated by data with no empty cells, an option for an automatic selection is the CurrentRegion property alongside the .Select method.
CurrentRegion.Select will select, starting from a Range , all the area populated with data.
Make sure there are no gaps between values, as CurrentRegion will map the region through adjoining cells (horizontal, vertical and diagonal).
With all the adjacent data
Not all adjacent data
«C4» is not selected because it is not immediately adjacent to any filled cells.
VBA ActiveCell
The ActiveCell property brings up the active cell of the worksheet.
In the case of a selection, it is the only cell that stays white.
A worksheet has only one active cell.
Usually the ActiveCell property is assigned to the first cell (top left) of a Range , although it can be different when the selection is made manually by the user (without macros).
The AtiveCell property can be used with other commands, such as Resize .
VBA Selection
After selecting the desired cells, we can use Selection to refer to it and thus make changes:
Selection also accepts methods and properties (which vary according to what was selected).
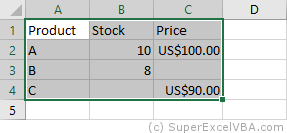
![]()
As in this case a cell range has been selected, the Selection will behave similarly to a Range . Therefore, Selection should also accept the .Interior.Color property.
RGB (Red Green Blue) is a color system used in a number of applications and languages. The input values for each color, in the example case, ranges from 0 to 255.
Selection FillDown
If there is a need to replicate a formula to an entire selection, you can use the .FillDown method
Before the FillDown
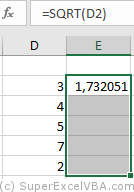
After the FillDown
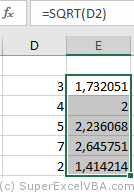
.FillDown is a method applicable to Range . Since the Selection was done in a range of cells (equivalent to a Range ), the method will be accepted.
.FillDown replicates the Range / Selection formula of the first line, regardless of which ActiveCell is selected.
.FillDown can be used at intervals greater than one column (E.g. Range(«B1:C2»).FillDown will replicate the formulas of B1 and C1 to B2 and C2 respectively).
VBA EntireRow and EntireColumn
You can select one or multiple rows or columns with VBA.
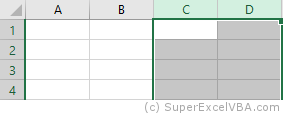
The selection will always refer to the last command executed with Select .
To insert a row use the Insert method.
To delete a row use the Delete method.
VBA Rows and Columns
Just like with the EntireRow and EntireColumn property, you can use Rows and Columns to select a row or column.
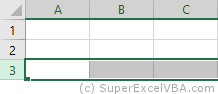
In the above example, rows 1 to 3 of the worksheet were hidden.
VBA Row and Column
Row and Column are properties that are often used to obtain the numerical address of the first row or first column of a selection or a specific cell.
The results of Row and Column are often used in loops or resizing.
Consolidating Your Learning
Suggested Exercise
FIRST STEPS
FUNDAMENTALS
RANGE
USERFORM
DEEPENING
SuperExcelVBA.com is learning website. Examples might be simplified to improve reading and basic understanding. Tutorials, references, and examples are constantly reviewed to avoid errors, but we cannot warrant full correctness of all content. All Rights Reserved.
Excel ® is a registered trademark of the Microsoft Corporation.
Report Error/Feedback
Thank you!
Thank you for contributing. A message was sent reporting your comment.
Источник
VBA Select
It is very common to find the .Select methods in saved macro recorder code, next to a Range object.
.Select is used to select one or more elements of Excel (as can be done by using the mouse) allowing further manipulation of them.
Selecting cells with the mouse:
Selecting cells with VBA:
    'Range([cell1],[cell2])
    Range(Cells(1, 1), Cells(9, 5)).Select
    Range("A1", "E9").Select
    Range("A1:E9").Select
Each of the above lines select the range from «A1» to «E9».
VBA Select CurrentRegion
If a region is populated by data with no empty cells, an option for an automatic selection is the CurrentRegion property alongside the .Select method.
CurrentRegion.Select will select, starting from a Range, all the area populated with data.
Range("A1").CurrentRegion.Select
Make sure there are no gaps between values, as CurrentRegion will map the region through adjoining cells (horizontal, vertical and diagonal).
Range("A1").CurrentRegion.SelectWith all the adjacent data

Not all adjacent data
«C4» is not selected because it is not immediately adjacent to any filled cells.
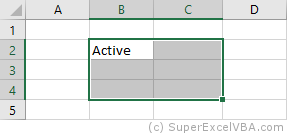
VBA ActiveCell
The ActiveCell property brings up the active cell of the worksheet.
In the case of a selection, it is the only cell that stays white.
A worksheet has only one active cell.
    Range("B2:C4").Select
    ActiveCell.Value = "Active"
Usually the ActiveCell property is assigned to the first cell (top left) of a Range, although it can be different when the selection is made manually by the user (without macros).
The AtiveCell property can be used with other commands, such as Resize.
VBA Selection
After selecting the desired cells, we can use Selection to refer to it and thus make changes:
    Range("A1:D7").Select
    Selection = 7
Selection also accepts methods and properties (which vary according to what was selected).
    Selection.ClearContents 'Deletes only the contents of the selection
    Selection.Interior.Color = RGB(255, 255, 0) 'Adds background color to the selection
As in this case a cell range has been selected, the Selection will behave similarly to a Range. Therefore, Selection should also accept the .Interior.Color property.
RGB (Red Green Blue) is a color system used in a number of applications and languages. The input values for each color, in the example case, ranges from 0 to 255.
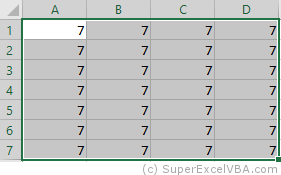
Selection FillDown
If there is a need to replicate a formula to an entire selection, you can use the .FillDown method
Selection.FillDown
Before the FillDown
After the FillDown
.FillDown is a method applicable to Range. Since the Selection was done in a range of cells (equivalent to a Range), the method will be accepted.
.FillDown replicates the Range/Selection formula of the first line, regardless of which ActiveCell is selected.
.FillDown can be used at intervals greater than one column (E.g. Range(«B1:C2»).FillDown will replicate the formulas of B1 and C1 to B2 and C2 respectively).
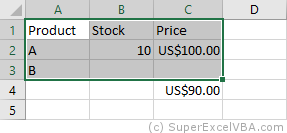
VBA EntireRow and EntireColumn
You can select one or multiple rows or columns with VBA.
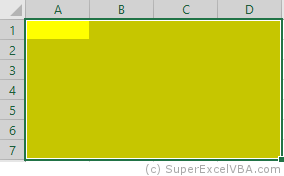
    Range("B2").EntireRow.Select
    Range("C3:D3").EntireColumn.Select
The selection will always refer to the last command executed with Select.
To insert a row use the Insert method.
    Range("A7").EntireRow.Insert
    'In this case, the content of the seventh row will be shifted downward
To delete a row use the Delete method.
    Range("A7").EntireRow.Delete
    'In this case, the content of the eighth row will be moved to the seventh
VBA Rows and Columns
Just like with the EntireRow and EntireColumn property, you can use Rows and Columns to select a row or column.
    Columns(5).Select
    Rows(3).Select
To hide rows:
Range("A1:C3").Rows.Hidden = True
In the above example, rows 1 to 3 of the worksheet were hidden.
VBA Row and Column
Row and Column are properties that are often used to obtain the numerical address of the first row or first column of a selection or a specific cell.
    Range("A3:H30").Row 'Referring to the row; returns 3
    Range("B3").Column  'Referring to the column; returns 2
The results of Row and Column are often used in loops or resizing.
Consolidating Your Learning
Suggested Exercise
SuperExcelVBA.com is learning website. Examples might be simplified to improve reading and basic understanding. Tutorials, references, and examples are constantly reviewed to avoid errors, but we cannot warrant full correctness of all content. All Rights Reserved.
Excel ® is a registered trademark of the Microsoft Corporation.
© 2023 SuperExcelVBA | ABOUT
![]()
 What is the first thing that comes to your mind when thinking about Excel?
In my case, it’s probably cells. After all, most of the time we spend working with Excel, we’re working with cells. Therefore, it makes sense that, when using Visual Basic for Applications for purposes of becoming more efficient users of Excel, one of the topics we must learn is how to work with cells within the VBA environment.
This VBA tutorial provides a basic explanation of how to work with cells using Visual Basic for Applications. More precisely, in this particular post I explain all the basic details you need to know to work with Excel’s VBA Range object. Range is the object that you use for purposes of referencing and working with cells within VBA.
However, the importance of Excel’s VBA Range object doesn’t end with the above. A substantial amount of the work you carry out with Excel involves the Range object. The Range object is one of the most commonly used objects in Excel VBA.
Despite the importance of Excel’s VBA Range, creating references to objects is generally one of the most confusing topics for users who are beginning to work with macros and Visual Basic for Applications. In the case of cell ranges, this is (to a certain extent) understandable, since VBA allows you to refer to ranges in many different ways.
The fact remains that, regardless of how confusing the topic of Excel’s VBA Range object may be, you must master it in order to become a macro and VBA expert. My main purpose with this VBA tutorial is to help you understand the basic matters surrounding this topic and illustrate the most common ways in which you can refer to Excel’s VBA Range object using Visual Basic for Applications.
More precisely, in this post you’ll learn about the following topics related to Excel’s VBA Range object:
Let’s start by taking a more detailed look at…
What Is Excel’s VBA Range Object
Excel’s VBA Range is an object. Objects are what is manipulated by Visual Basic for Applications.
More precisely, you can use the Range object to represent a range within a worksheet. This means that, by using Excel’s VBA Range object, you can refer to:
- A single cell.
- A row or a column of cells.
- A selection of cells, regardless of whether they’re contiguous or not.
- A 3-D range.
As you can see from the above, the size of Excel’s VBA Range objects can vary widely. At the most basic level, you can be making reference to a single (1) cell. On the other extreme, you have the possibility of referencing all of the cells in an Excel worksheet.
Despite this flexibility when referring to cells within a particular Excel worksheet, Excel’s VBA Range object does have some limitations. The most relevant is that you can only use it to refer to a single Excel worksheet at a time. Therefore, in order to refer to ranges of cells in different worksheets, you must use separate references for each of the worksheets.
How To Refer To Excel’s VBA Range Object
One of the first things you’ll have to learn in order to master Excel’s VBA Range object is how to refer to it. The following sections explain the most relevant rules you need to know in order to craft appropriate references.
The first few sections cover the most basic way of referring to Excel’s VBA Range object: the Range property. This is also how the macro recorder generally refers to the Range object.
However, further down, you’ll find some additional methods to create object references, such as using the Cells or Offset properties.
These are, however, not the only ways to refer to Excel’s VBA Range objects. There are a few more advanced methods, such as using the Application.Union method, which I don’t cover in this beginners VBA tutorial.
You may be wondering, which way is the best for purposes of referring to Excel’s VBA Range object?
Generally, the best method to use in order to craft a reference to Excel’s VBA Range object depends on the context and your specific needs.
Introduction To Referencing Excel’s VBA Range Object And The Object Qualifier
In order to be able to work appropriately with Range objects, you must understand how to work with the 2 main parts of a reference to Excel’s VBA Range object:
- The object qualifier. This makes reference, more generally, to the general rules to creating object references. I cover this topic thoroughly here.
- The relevant property or method that you’re using for purposes of returning a Range object. This makes reference, more generally, to the specific rules that apply to referring to Excel’s VBA Range object.
This VBA tutorial focuses on the second element above: the main properties you can use in order to refer to Excel’s VBA Range object.
Nonetheless, I explain a few key points regarding object referencing below. If you’re interested in learning more about the general rules that apply to object references, please refer to Excel VBA Object Model And Object References: The Essential Guide, which you can find in the Archives.
Introduction To Fully Qualified VBA Object References
Objects are capable of acting as containers for other objects.
At a basic level, when referencing a particular object, you tell Excel what the object is by referencing all of its parents. In other words, you go through Excel’s VBA object hierarchy.
You move through Excel’s object hierarchy by using the dot(.) operator to connect the objects at each of the different levels.
These types of specific references are known as fully qualified references.
How does a fully qualified reference look in the case of Excel’s VBA Range object?
The object at the top of the Excel VBA object hierarchy is Application. Application itself contains other objects.
Excel’s VBA Range object is contained within the Worksheet object. More precisely:
- The Worksheet object has a Range property (Worksheet.Range).
- The Worksheet.Range property returns a Range object.
The parent object of Worksheets is the Workbook object. Workbooks itself is contained within the Application object.
The hierarchical relationship between these different objects looks as follows:

Therefore, the basic structure you must use to refer to Excel’s VBA Range object is the following:
Application.Workbooks.Worksheets.RangeYou’ll notice that a few things within the basic structure described above are ambiguous. In particular, you’ll notice that this doesn’t specify the particular Excel workbook or worksheet that you’re referring to. In order to do this, you must understand…
How To Refer To An Object From A Collection
Within Visual Basic for Applications, an object collection is a group of related objects.
Both Workbooks and Worksheets, which are used to create a fully qualified reference to Excel’s VBA Range object, are examples of collections. There are 2 basic ways to refer to a particular object within a collection:
- Use the VBA object name. In this case, the syntax is “Collection_name(“Object_name”)”.
- Use an index number instead of the object name. If you choose this option, the basic syntax is “Collection_name(Index_number)”.
Notice how, in the first method you must use quotations (“”) within the parentheses. If you use the second method, you don’t have to surround the Index_number with quotes.
Let’s assume, then, that you want to work with the Worksheet named “Sheet1” within the Workbook “Book1.xlsm”. Depending on which of the 2 methods to refer to an object within a collection you use, the reference looks different.
If you create the reference using the VBA object name, the reference looks as follows:
Application.Workbooks("Book1.xlsm").Worksheets("Sheet1").RangeWhereas if you decide to use an index number, the reference is the following:
Application.Workbooks(1).Worksheets(1).RangeI usually use the first option when working with Visual Basic for Applications. Therefore, this is the method that I use in the examples throughout this VBA tutorial.
Simplifying Fully Qualified Object References
Excel’s VBA object model contains some default objects. These are assumed unless you enter something different.
You can simplify fully qualified object references by relying on these default VBA objects. I don’t generally suggest doing this blindly, as it involves some dangers.
There are 2 main types of default objects that you can use for purposes of simplifying fully qualified object references:
- The Application object.
- The active Workbook and Worksheet objects.
The Application object is always assumed. In other words, Visual Basic for Applications always assumes that you’re working with Excel itself. Therefore, you can simplify your fully qualified object references by omitting the Application. For example, in the cases that I use as an example above, the simplified references are as follows:
Workbooks("Book1.xlsm").Worksheets("Sheet1").Range Workbooks(1).Worksheets(1).RangeAdditionally, VBA assumes that you’re working with the current active workbook and active worksheet. This simplification is trickier than the previous one because it relies on you correctly identifying the active workbook and worksheet. As you’ll imagine, this is slightly more difficult than identifying the Excel application itself 😉 .
However, you can also use these 2 default objects for creating even simpler VBA object references. Continuing with the same examples above, these become:
RangeThis brings us to the end of the introduction to the general rules to creating VBA object references. This summary has explained how to create fully qualified references and simplify them for purposes of creating the object qualifier that you use when crafting references to Excel’s VBA Range object.
The following sections focus on the specific rules that you can apply for purposes of referring to Excel’s VBA Range object. These are the most commonly used properties for returning a Range object.
How To Refer To Excel’s VBA Range Object Using The Range Property
The sections above explain, to a certain extent, the basic rules that you can apply to refer to Excel’s VBA Range object. Let’s start by recalling the 2 methods you can use to create a fully qualified reference if you’re working with the worksheet called “Sheet1” within the workbook named “Book1.xlsm”.
Application.Workbooks("Book1.xlsm").Worksheets("Sheet1").Range Application.Workbooks(1).Worksheets(1).RangeYou need to specify the particular range you want to work with. In other words, just using “Range” as it still appears in the examples above, isn’t enough.
Perhaps the most basic way to refer to Excel’s VBA Range object is by using the Range property. When applied, this property returns a Range object which represents a cell or range of cells.
There are 2 versions of the Range property: the Worksheet.Range property and the Range.Range property. The logic behind both of them is the substantially the same. The main difference is to which object they’re applied:
- In the case of the Worksheet.Range property, the Range property is applied to a worksheet.
- When using the Range.Range property, Range is applied to a range.
In other words, the Range property can be applied to 2 different types of objects:
- Worksheet objects.
- Range objects.
In the sections above, I explain how to create fully qualified object references. You’ve probably noticed that, in all of the examples above, the parent of Excel’s VBA Range object is the Worksheet object. In other words, in these cases, the Range property is applied to a Worksheet object.
However, you can also apply the Range property to a Range object. If you do this, the object returned by the Range property changes.
The reason for this, as explained by Microsoft, is that the Range.Range property acts in relation to the object to which it is applied to. Therefore, if you apply the Range.Range property, the property acts relative to the Range object, not the worksheet.
This means that you can apply the Range.Range property for purposes of referencing a range in relation to another range. I provide examples of how such a reference works below.
Basic Syntax Of The Range Property
The basic syntax that you can use to refer to Excel’s VBA Range object is “expression.Range(“Cell_Range”)”. You’ll notice that this syntax follow the general rules that I explain above for other VBA objects such as Workbooks and Worksheets. In particular, you’ll notice that there are 4 basic elements:
- Element #1: The keyword “Range”.
- Element #2: Parentheses that follow the keyword.
- Element #3: The relevant cell range. I explain different ways in which you can define the range below.
- Element #4: Quotations. The Cell_Range to which you’re making reference is generally within quotations (“”).
In this particular case, “expression” is simply a variable representing a Worksheet object (in the case of the Worksheet.Range property) or a Range object (for the Range.Range object).
Perhaps the most interesting item in the syntax of the Range property is the Cell_Range.
Let’s take a look at some of its characteristics…
In very broad terms, you can usually make reference to Cell_Range in a similar way to the one you use when writing a regular Excel formula. This means using A1-style references. However, there are a few important particularities, which I introduce in this section.
Don’t worry if everything seems a little bit confusing at first. I show some sample references in the following sections in order to make everything clear.
You can use 2 different syntaxes to define the range you want to work with:
Syntax #1: (“Cell1”)
This is the minimum you must include for purposes of defining the relevant cell range. As a general rule, when you use this syntax, the argument (Cell1) must be either of the following:
- A string expressing the cell range address.
- The name of a named cell range.
When naming a range, you can use any of the following 3 operators:
- Colon (:): This is the operator you use to set up arrays. In the context of referring to cell ranges, you can use to refer to entire columns or rows, ranges of contiguous cells or ranges of noncontiguous cells.
- Space ( ): This is the intersection operator. As shown below, you can use the intersection operator for purposes of referring to cells that are common to 2 separate ranges.
- Comma (,): This is the union operator, which you can use to combine several ranges. As shown in the example below, you can use this operator when working with ranges of noncontiguous cells.
Syntax #2: “(Cell1, Cell2)”
If you choose to use this syntax, you’re basically delineating the relevant range by naming the cells in 2 of its corners:
- “Cell1” is the cell in the upper-left corner of the range.
- “Cell2” is the cell in the lower-right corner of the range.
However, this syntax isn’t as restrictive as it may seem at first glance. In this case, arguments can include:
- Range objects;
- Cell range addresses;
- Named cell range names; or
- A combination of the above items.
Let’s take a look at some specific applications of the Range property:
How To Refer To A Single Cell Using The Worksheet.Range Property
If the Excel VBA Range object you want to refer to is a single cell, the syntax is simply “Range(“Cell”)”. For example, if you want to make reference to a single cell, such as A1, type “Range(“A1″)”.

We can take it a step further and create a fully qualified reference for this single cell, assuming that we continue to work with Sheet1 within Book1.xlsm:
Application.Workbooks("Book1.xlsm").Worksheets("Sheet1").Range("A1")You’ve probably noticed something very important:
There is no such thing as a Cell object. Cell is not an object by itself. Cells are contained within the Range object.
Perhaps even more accurately, cells are a property. Properties are the characteristics that you can use to describe an object. I cover the topic of object properties here.
You can actually use this property (Cells) to refer to a range. I explain how you can do this below.
The example above applies the Range property to a Worksheet object. In other words, it is an example of the Worksheet.Range property.
Now let’s take a look at what happens if the Range property is applied to a Range object:
How To Refer To A Single Cell In Relation To Another Range Using The Range.Range Property
Let’s assume, that instead of specifying a fully qualified reference as above, you simply use the Selection object as follows:
Selection.Range("A1")Further, let’s assume that the current selection is the cell range between C3 and D5 (cells C3, C4, C5, D3, D4 and D5) of the active Excel worksheet. This selection is a Range object.
Since the Selection object represents the current selected area in the document, the reference above returns cell C3. It doesn’t return cell A1, as the previous fully qualified reference.
The reason for the different behavior of the 2 sample references above is because the Range property behaves relative to the object to which it is applied. In other words, when the Range property is applied to a Range object, it behaves relative to that Range (more precisely, its upper-left corner). When it is applied to a Worksheet object, it behaves relative to the Worksheet.
Creating references by applying the Range property to a Range object is not very straightforward. I personally find it a little confusing and counterintuitive.
However, the ability to refer to cells in relation to other range has several advantages. This allows you to (for example) refer to a cell without knowing its address beforehand.
Fortunately, there are alternatives for purposes of referring to a particular cell in relation to a range. The main one is the Range.Offset property, which I explain below.
How To Refer To An Entire Column Or Row Using The Worksheet.Range Property
Excel’s VBA Range objects can consist of complete rows or columns. You can refer to an entire row or column as follows:


- Row: “Range(“Row_Number:Row_Number”)”.
- Column: “Range(“Column_Letter:Column_Letter”)”.
For example, if you want to refer to the first row (Row 1) of a particular Excel worksheet, the syntax is “Range(“1:1″)”.

If, on the other hand, you want to refer to the first column (Column A), you type “Range(“A:A”).

Assuming that you’re working with Sheet 1 within Book1.xlsm, the fully qualified references are as follows:
Application.Workbooks("Book1.xlsm").Worksheets("Sheet1").Range("1:1") Application.Workbooks("Book1.xlsm").Worksheets("Sheet1").Range("A:A")How To Refer To A Range Of Contiguous Cells Using The Worksheet.Range Property
You can refer to a range of cells by using the following syntax: “Range(“Cell_Range”). I describe how you can use 2 different syntaxes for purposes of referring to these type of ranges above:
- By identifying the full range.
- By delineating the range, naming the cells in its upper-left and lower-right corners.
Let’s take a look at how both of these look like in practice:
If you want to make reference to a range of cells between cells A1 and B5 (A1, A2, A3, A4, A5, B1, B2, B3, B4 and B5), one appropriate syntax is “Range(“A1:B5″)”. Continuing to work with Sheet1 within Book1.xlsm, the fully qualified reference is as follows:
Application.Workbooks("Book1.xlsm").Worksheets("Sheet1").Range("A1:B5")
However, if you choose to apply the second syntax, where you delineate the relevant range, the appropriate syntax is “Range(“A1”, “B5″)”. In this case, the fully qualified reference looks as follows:
Application.Workbooks("Book1.xlsm").Worksheets("Sheet1").Range("A1", "B5")How To Refer To A Range Of NonContiguous Cells Using The Worksheet.Range Property
The syntax for purposes of referring to a range of noncontiguous cells in Excel is very similar to that used to refer to a range of contiguous cells. You simply separate the different areas by using a comma (,). Therefore, the basic syntax is “Range(“Cell_Range_1,Cell_Range_#,…”)”.
Let’s assume that you want to refer to the following ranges of noncontiguous cells:

- Cells A1 to B5 (A1, A2, A3, A4, A5, B1, B2, B3, B4 and B5).
- Cells D1 to D5 (D1, D2, D3, D4 and D5).
You refer to such range by typing “Range(“A1:B5,D1:D5″)”. In this case, the fully qualified reference looks as follows:
Application.Workbooks("Book1.xlsm").Worksheets("Sheet1").Range("A1:B5,D1:D5")

However, when working with ranges of noncontiguous cells, you may want to process each of the different areas separately. The reason for this is that some methods/properties have issues when working with such noncontiguous cell ranges.
You can handle the separate processing with a loop.
How To Refer To The Intersection Of 2 Ranges Using The Worksheet.Range Property
I describe how, when using the Range property, you can use 3 operators for purposes of identifying the relevant Range above. We’ve already gone through examples that use the colon (:) and comma (,) operators. These were used in the previous sections for purposes of referring to ranges of contiguous or noncontiguous cells.
The third operator, space ( ), is useful when you want to refer to the intersection of 2 ranges. The reason for this is clear:
The space ( ) operator is, precisely, the intersection operator.
Let’s assume that you want to refer to the intersection of the following 2 ranges:

- Cells B1 to B10 (B1, B2, B3, B4, B5, B6, B7, B8, B9 and B10).
- Cells A5 to C5 (A5, B5 and C5).

In this case, the appropriate syntax is “Range(“B1:B10 A5:C5″)”. When working with Sheet1 of Book1.xlsm, a fully qualified reference can be constructed as follows:
Application.Workbooks("Book1.xlsm").Worksheets("Sheet1").Range("B1:B10 A5:C5")Such a reference returns the cells that are common to the 2 ranges. In this particular case, the only cell that is common to both ranges is B5.
How To Refer To A Named VBA Range Using The Worksheet.Range Property
If you’re referring to a VBA Range that has a name, the syntax is very similar to the basic case of referring to a single cell. You simply replace the address that you use to refer to the range with the appropriate name.
For example, if you want to create a reference to a VBA Range named “Excel_Tutorial_Example”, the appropriate syntax is “Range(“Excel_Tutorial_Example”)”. In this case, a fully qualified reference looks as follows:
Application.Workbooks("Book1.xlsm").Worksheets("Sheet1").Range("Excel_Tutorial_Example")
Remember to use quotation marks (“”) around the name of the range. If you don’t use quotes, Visual Basic for Applications interprets it as a variable.
How To Refer To Merged Cells Using The Worksheet.Range Property
In general, working with merged cells isn’t that straightforward. In the case of macros this is no exception. The following are some of the (potential) challenges you may face when working with a range that contains merged cells:


- The macro behaving differently from what you expected.
- Issues with sorting.
I may cover the topic of working with merged cells in future tutorials. For the moment, I explain how to refer to merged cells using the Range property. This should help you avoid some of the most common pitfalls when working with merged cells.
The first thing to consider when referring to merged cells is that you can reference them in either of the following 2 ways:
- By referring to the entire merged cell range.
- By referring only to the upper-left cell of the merged range.
Let’s assume that you’re working on an Excel spreadsheet where the cell range from A1 to C5 is merged. This includes cells A1, A2, A3, A4, A5, B1, B2, B3, B4, B5, C1, C2, C3, C4 and C5. In this case, the appropriate syntax is either of the following:
- If you refer to the entire merged range, “Range(“A1:C5″)”. In this case, the fully qualified reference is “Application.Workbooks(“Book1.xlsm”).Worksheets(“Sheet1”).Range(“A1:C5″)”.
- If you refer only to the upper-left cell of the merged range, “Range(“A1″)”. The fully qualified reference under this method is “Application.Workbooks(“Book1.xlsm”).Worksheets(“Sheet1”).Range(“A1″)”.
In both cases, the result is the same.

You should be particularly careful when trying to assign values to merged cells. Generally, you can only carry this operation by assigning the value to the upper-left cell of the range (cell A1 in the example above). Otherwise, Excel VBA (usually) doesn’t:
- Carry out the value assignment; and
- Return an error.
How To Refer To A VBA Range Object Using Shortcuts For The Range Property
References to Excel’s VBA Range object using the Range property can be made shorter using square brackets ([ ]).
You can use this shortcut as follows:
- Don’t use the keyword “Range”.
- Surround the relevant property arguments with square brackets ([ ]) instead of using parentheses and double quotes (“”).
Let’s take a look at how this looks in practice by applying the shortcut to the different cases and examples shown and explained in the sections above.
Shortcut #1: Referring To A Single Cell
Instead of typing “Range(“Cell”)” as explained above, type “[Cell]”.
For example if you’re making reference to cell A1, use “[A1]”. The fully qualified reference for cell A1 in Sheet1 of Book1.xlsm looks as follows:
Application.Workbooks("Book1.xlsm").Worksheets("Sheet1").[A1]

Shortcut #2: Referring To An Entire Row Or Column
In this case, the usual syntax is either “Range(“Row_Number:Row_Number”)” or “Range(“Column_Letter:Column_Letter”)”. I explain this above.
By applying square brackets, you can shorten the references to the following:

- Row: “[Row_Number:Row_Number]”.
- Column: “[Column_Letter:Column_Letter]”.
For example, if you’re referring to the first row (Row 1) or the first column (Column A) of an Excel worksheet, the syntax is as follows:
And the fully qualified references, assuming you’re working with Sheet1 of Book1.xlsm are the following:
Application.Workbooks("Book1.xlsm").Worksheets("Sheet1").[1:1] Application.Workbooks("Book1.xlsm").Worksheets("Sheet1").[A:A]Shortcut #3: Referring To A Range Of Contiguous Cells
Generally, you refer to a range of cells by using the syntax “Range(“Cell_Range”)”. If you’re identifying the full range by using the colon (:) operator, as I explain above, you usually structure the reference as “Range(“Top_Left_Cell:Right_Bottom_Cell”)”.
You can shorten the reference to a range of contiguous cells by using square brackets as follows: “[Top_Left_Cell:Right_Bottom_Cell]”.
For example in order to refer to a range of cells between cells A1 and B5 (A1, A2, A3, A4, A5, B1, B2, B3, B4 and B5), you can type “[A1:B5]”. Alternatively, if you’re using a fully qualified reference and are working with Sheet1 of Book1.xlsm, the syntax is as follows:
Application.Workbooks("Book1.xlsm").Worksheets("Sheet1").[A1:B5]
Shortcut #4: Referring To A Range Of NonContiguous Cells
This case is fairly similar to the previous one, in which we made reference to a range of contiguous cells. However, in order to separate the different areas, you use the comma (,) operator, as explained previously. In other words, the basic syntax is usually “Range(“Cell_Range_1,Cell_Range_#,…”)”.
When using square brackets, you can simplify the reference above to “[Cell_Range_1,Cell_Range_#,…]”.
If you want to refer to the following ranges of noncontiguous cells:

- Cells A1 to B5 (A1, A2, A3, A4, A5, B1, B2, B3, B4 and B5).
- Cells D1 to D5 (D1, D2, D3, D4 and D5).
The syntax of a reference using square brackets is “[A1:B5,D1:D5]”. The fully qualified reference looks as follows:
Application.Workbooks("Book1.xlsm").Worksheets("Sheet1").[A1:B5,D1:D5]

Shortcut #5: Referring To The Intersection Of 2 Ranges
Generally, the syntax for referring to the intersection of 2 ranges uses the space operator and is “Range(“Cell_Range_1 Cell_Range_2″)”. When using square brackets, this becomes “[Cell_Range_1 Cell_Range_2]”.
Let’s go back to the example I use above and assume that you want to refer to the intersection of the following 2 ranges:

- Cells B1 to B10 (B1, B2, B3, B4, B5, B6, B7, B8, B9 and B10).
- Cells A5 to C5 (A5, B5 and C5).
You can create a reference using square brackets as follows: “[B1:B10 A5:C5]”. When working with Sheet1 of Book1.xlsm, the fully qualified reference is:
Application.Workbooks("Book1.xlsm").Worksheets("Sheet1").[B1:B10 A5:C5]And this returns the only cell common to both ranges: B5.
Shortcut #6: Referring To A Named VBA Range
As explained above, when referring to a VBA Range that has a name, you replace the address of the range with the relevant name. Therefore, the basic syntax is “Range(“Range_Name”)”.
When using square brackets, the logic is the same. Therefore, you can refer to a named range by typing “[Range_Name]”.
For example, when referring to a VBA Range named “Excel_Tutorial_Example”, the reference can be structures as “[Excel_Tutorial_Example]”. When using a fully qualified reference, it looks as follows:
Application.Workbooks("Book1.xlsm").Worksheets("Sheet1").[Excel_Tutorial_Example]
How To Refer To A VBA Range Object Using The Cells Property
There is no Cell object within Visual Basic for Applications. There is a Worksheet.Cells property and a Range.Cells property. You can use the Cells property to return a Range object representing the cells.
The main difference between both Cells properties is in connection with the object to which the property is applied to:


- When using the Worksheet.Cells property, you’re applying the property to a Worksheet object.
- When using the Range.Cells property, that property is applied to a Range object.
This is important because, depending on the context, the properties may return different cells. More precisely, when applying the Cells property to a Range object, you’re referring to a cell in relation to another range.
This probably sounds confusing, I agree. Don’t worry, as the explanation and examples below make this topic clear. The most important thing to remember is that the Cells property allows you to refer to a cell range.
Since the basic logic behind both properties (Worksheet.Cells and Range.Cells) is similar, I cover both at the same time.
There are several ways in which you can use the Cells property to refer to a Range object. I explain the main methods of doing this in the following sections.
Syntax Of The Cells Property
The basic syntax of the Cells property is “expression.Cells(Row_Number, Column_Number)”, where:
- “expression” is a variable representing a VBA object. This VBA object can be either a worksheet (in the case of the Worksheet.Cells property) or a range (for the Range.Cells property).
- “Row_Number” and “Column_Number” are the numbers of both the row and the column.
- Is common to use numbers in both cases.
- When using this syntax, you can also use a letter to refer to the column. In this case, wrap the letter in double quotes (“”). Other than the quotations (“”) (surrounding the letter), you don’t need to use other quotations in the same way as you do when using the Range property.
One of the main differences between the Range and the Cells properties is that the Cells property takes row and column numbers as arguments. You can see this reflected in the syntax described above.
There are additional possible ways to implement the Cells property. However, they’re secondary and I explain them below.
The Range object has a property called the Range.Item property, which I explain below. The reason why you can specify the Row_Number and Column_Number arguments immediately after the Cells keyword is that the Range.Item property is the default property of the Range object. This is the same reason why, as explained above, you can also use a letter wrapped in double quotes (“”) to refer to the column. If you’re interested in understanding the relationship between the Range.Item property and the Cells property, please refer to the relevant section below.
For the moment, let’s go back to some of the VBA Ranges that have appeared in previous examples and see how to refer to them using the Cells property.
How To Refer To A Single Cell Using The Worksheet.Cells Property
The most basic use case of the Cells property is referring to a single cell.
The fact that the Cells property can only be used (usually) for purposes of returning a range of 1 cell is one of the main characteristics that distinguishes the Cells from the Range property.
There is actually a way to use the Cells property for purposes of referring to larger cell ranges. However, this involves combining the Range and Cells properties. I explain this method below.
Referring to a single cell using the Cells property is relatively simple. For example, if you want to refer to cell A1 within Sheet1 of Book1.xlsm, the fully qualified reference is pretty much what you’d expect considering the basic syntax shown in the previous section:
Application.Workbooks("Book1.xlsm").Worksheets("Sheet1").Cells(1, 1)
Application.Workbooks("Book1.xlsm").Worksheets("Sheet1").Cells(1, "A")

There is, however, a second way to create references to a single cell when using the Worksheet.Cells property. Let’s take a look at this…
Alternative Syntax For Referring To A Single Cell Using The Worksheet.Cells Property
The syntax of the Cells property that I describe above is probably the one that you’ll use the most in practice.
The following alternative is substantially the same as the syntax that I have explained above. It also starts with “expression.Cells”. The difference lies in the arguments that appear within the parentheses.
This alternative syntax is “expression.Cells(Cell_Index)”. In this particular case, there is only 1 argument: the index of the relevant cell.
The main question, then, is how does Visual Basic for Applications determine the index of a cell?
For these purposes, each and every cell is assigned a number. Cells are numbered from left to right and from top to bottom. In other words:

- Numbering begins with the first row:
- Cell A1 is assigned the number 1.
- Cell B1 is assigned the number 2.
- Cell C1 is assigned the number 3.
- The process continues with each of the subsequence cells, until…
- Cell XFD1 (the last cell in the first row) is assigned the number 16,384.
- Once all the cells in the first row have been assigned a number, the process continues with the second row:
- Cell A2 is assigned the number 16,385.
- Cell B2 is assigned the number 16,386.
- Cell C2 is assigned the number 16,387.
- The number assignment continues until…
- Cell XFD2 (the last cell in the second row) is assigned the number 32,768.
- The process continues with the third row.
- Then the fourth row.
- And so on, until…
- It reaches row 1,048,576.
- And…
- The last cell in an Excel worksheet (cell XFD1048676) is assigned the number 17,179,869,184.
The following screenshot gives you an idea of how this number assignment goes:

For example, if you want to refer to cell A2 using this syntax, the appropriate reference is “Cells(16385)”. A fully qualified reference for cell A2 in Sheet1 of Book1.xlsm is as follows:
Application.Workbooks("Book1.xlsm").Worksheets("Sheet1").Cells(16385)
The initial 2 examples of the Cells property, show how it is applied to a Worksheet object. However, you can also use this syntax to apply the property to a Range object. This allows you to refer to a cell relative to another range.
How To Refer To A Single Cell In Relation To A Range Using The Range.Cells Property
Assume that the current selection is a range covering cells C3 through D5 (cells C3, C4, C5, D3, D4 and D5) of the active Excel worksheet. You already know that this is a Range object.
We can use the Selection property to create the following reference:
Selection.Cells(1, 1)This reference returns cell C3 itself.
This is different from what the previous example (a fully qualified reference) returned (cell A1).
The reason for the different behaviors seen in the examples above is that the Range property behaves relative to the object to which it is applied (a worksheet or a range). In the case of cell ranges (such as the example above), the Range property behaves in relation to the upper-left corner of the range. The logic is the same that explains the different behaviors when applying the Range property to a Worksheet object or a Range object.
Similarly, you can create references to a single cell in relation to a range using the alternative syntax of the Cells property that I described above. Let’s take a look at this case:
Alternative Syntax For Referring To A Single Cell In Relation To A Range Using The Range.Cells Property
To recall, the alternative syntax is “expression.Cells(Cell_Index)”.
In such case:


- Each of the cells within the range is assigned a number.
- The assignment is carried out following the same pattern described above for the whole worksheet. From left to right and from top to bottom.
For example, let’s assume that you are working with the cell range from A1 to B10 and want to select cell A5.

In this case, the reference is “Range(“A1:B10″).Cells(9)”. The following screenshot shows the way the Cell_Index numbers are assigned to the cells within the relevant range:

A fully qualified reference, when working with Sheet1 of Book1.xlsm is as follows:
Application.Workbooks("Book1.xlsm").Worksheets("Sheet1").Range("A1:B10").Cells(9)
An interesting aspect of applying this syntax of the Cells property to a Range object is that the argument for the Cells property is not limited by the number of cells in the referenced range. If you use a number that is larger than the amount of cells in the relevant range, Visual Basic for Applications continues counting as if the range was taller (extending to the bottom) than it’s in reality. In other words: The Range object returned by the Cells property doesn’t have to be inside the original/source cell range.
In the case of the range described in the example above (A1:B10), the Cell_Index assignment continues as shown in the following screenshot:
For example, the cell range from A1 to B10 contains 20 cells. Let’s assume that you type “21” as an argument for the Cells property. The resulting reference is “Range(“A1:B10″).Cells(21)”. The fully qualified reference is:
Application.Workbooks("Book1.xlsm").Worksheets("Sheet1").Range("A1:B10").Cells(21)This statement makes reference to cell A11 which is outside the originally referenced range (A1:B10).
How To Refer To A Cell Range Using The Range And Cells Properties
As anticipated above, you can combine the Range and Cells properties to refer to cell ranges. Perhaps the easiest way to do this is to use the Cells property as a parameter of the Range property.
For these purposes, use the following syntax: “Range(Cells(Row_Number_First_Cell, Column_Number_First_cell), Cells(Row_Number_Last_Cell, Column_Number_Last_Cell))”.
For example, if you want to refer to a range covering cells A1 to B5 (A1, A2, A3, A4, A5, B1, B2, B3, B4 and B5) in Sheet1 of Book1.xlsm using the Cells property, you’d type “Range(Cells(1, 1), Cells(5, 2)). The corresponding fully qualified reference is as follows:
Application.Workbooks("Book1.xlsm").Worksheets("Sheet1").Range(Cells(1, 1), Cells(5, 2))
This technique is useful (for example) when you use variables to specify the parameters of the Cells property. This can happen, for example, when looping.
How To Refer To All The Cells In A Worksheet Using The Worksheet.Cells Property
This is probably the simplest, but also most limited, way to implement the Cells property. The statement “expression.Cells” returns absolutely all of the cells in the relevant Excel worksheet.
For example, the following statement returns absolutely all of the cells of Sheet1 in Book1.xlsm:
Application.Workbooks("Book1.xlsm").Worksheets("Sheet1").CellsThis method doesn’t allow you to reference a single cell.
Why You Should Learn To Use The Cells Property To Refer To Excel’s VBA Range Object
Using the Cells property may seem like a slightly more complicated way to refer to Excel’s VBA Range object than using the Range property. However there are some scenarios where using the Cells property may be more appropriate.
Perhaps the most important scenario in which the Cells property shows its usefulness is when you’re using variables instead of the actual numbers as the arguments for the Cells property. In practice, you’re likely to find yourself in this situation (using variables instead of hardcoded numbers as arguments of the Cells property) often.
The Cells property and the ability to use variables as arguments is helpful when carrying out certain activities with Visual Basic for Applications. A common case of such an activity is looping (a topic I cover here).
How To Refer To A VBA Range Object Using The Range.Offset Property
Just as the previously explained properties, the Range.Offset property also returns a Range object.
However, in the case of the Range.Offset property, the Range object returned is that located a certain number of rows and columns from a specified range.
In other words, the returned Range object is determined by the following factors:


- A base range, which is going to be the base of the offset.
- The number of rows by which the base range is to be offset.
- The number of columns by which the base range is to be offset.
The syntax of the Range.Offset property reflects these 3 elements. This syntax is “expression.Offset(Row_Offset, Column_Offset)”, where:
- “expression” is a variable representing a VBA Range object.
- “Row_Offset” is the number of rows by which the range is to be offset. This value can be either positive (offset is done downwards) or negative (offset is done upwards).
- “Column_Offset” is the number of columns by which the range is to be offset. In the case of positive values, the offset is made to the right. When using negative values, the offset is made to the left.
Both the Row_Offset and the Column_Offset arguments carry the offset from the upper-left cell of the VBA Range object represented by “expression”.
The way the Offset property works means that it can only be applied to a Range object. In other words, there is no Worksheet.Offset property. This means that this property is a great alternative for purposes of referring to a particular cell in relation to a range without using the more complicated methods that I explain above, namely applying the Range or the Cells properties to a Range object.
Let’s look at a few examples of how to use the Range.Offset property to refer to a VBA Range object:
How To Refer To A Single Cell Using The Range.Offset Property
In the simplest case, you can use Range.Offset for referring to a single cell as follows:
Application.Workbooks("Book1.xlsm").Worksheets("Sheet1").Range("A1").Offset(RowOffset:=1, ColumnOffset:=1)You can simplify this statement by omitting the keywords “RowOffset” and “ColumnOffset”. The resulting reference is the following:
Application.Workbooks("Book1.xlsm").Worksheets("Sheet1").Range("A1").Offset(1, 1)In this particular case, Visual Basic for Applications returns a cell that is 1 row below and 1 column to the right of cell A1. In other words, the base range is cell A1.
And, from there, VBA moves 1 row down and 1 column to the right. Therefore, the above reference, refers to cell B2.
In certain cases, you may want to create a relative reference in which the Range.Offset property only needs to move a certain number of rows or columns (but not both) to find the cell it should return. In these cases, you can simply omit the irrelevant argument.
For example, the following statements refer to a cell one row below the cell A1. In other words, it refers to cell A2:
Application.Workbooks("Book1.xlsm").Worksheets("Sheet1").Range("A1").Offset(RowOffset:=1) Application.Workbooks("Book1.xlsm").Worksheets("Sheet1").Range("A1").Offset(1)
Similarly, the following statements refer to cell B1, which is one column to the right of cell A1:
Application.Workbooks("Book1.xlsm").Worksheets("Sheet1").Range("A1").Offset(ColumnOffset:=1) Application.Workbooks("Book1.xlsm").Worksheets("Sheet1").Range("A1").Offset(, 1)
Let’s take a look at a different way to refer to the base range. The following statement also refers to a single cell. However, notice the difference in the way the base cell for the offset is expressed.
ActiveCell.Offset(1, 1)In this case, instead of using “Range”, I use the Application.ActiveCell property. This property returns a Range object that represents the current active cell.
Therefore, Visual Basic for Applications returns a cell that is 1 row below and 1 column to the right of the current active cell. For example, if the current active cell is A1, the statement above returns cell B2.
The Range.Offset property generates an error if it is used for trying to return a cell that doesn’t exist. This may happen, for example, if the current active cell is A1 and you use the following reference:
ActiveCell.Offset(-1, -1)The statement above is asking Visual Basic for Applications to return the cell that is 1 row above and 1 column to the left of cell A1. Since no such cell exists, an error is generated.
How To Refer To A Range Of Cells Using The Range.Offset Property
You already know the different operators that you can use for purposes of referring to a range of cells using Visual Basic for Applications. Particularly important is the colon (:) operator, which you can use to set up arrays and create references to ranges of contiguous cells.
If you want to refer to a range of cells using the Range.Offset property, you can simply use the same colon operator in order to define the cell range that is the base of the offset.
The logic of the offset continues to be the same.
Take a look, for example, at the following VBA Range object reference:
Application.Workbooks("Book1.xlsm").Worksheets("Sheet1").Range("A1:B5").Offset(3, 3)This statement proceeds as follows:


- It sets as base range that containing cells A1 through B5 (A1, A2, A3, A4, A5, B1, B2, B3, B4 and B5).

- It moves the range 3 cells to the right and 3 cells down.

As a consequence of the above, the statement returns the range from cells D4 to E8 (D4, D5, D6, D7, D8, E4, E5, E6, E7 and E8).

Why You Should Learn To Use The Range.Offset Property To Refer To Excel’s VBA Range Object
The Range.Offset property is (usually) most useful when:
- You’re working with variables instead of actual numbers as arguments; and
- In looping procedures.
The Range.Offset property is also commonly used by the macro recorder when you use relative references while recording a macro. Therefore, you can expect to encounter this type of reference structure constantly when working with macros and Visual Basic for Applications.
How To Refer To A VBA Range Object Using The Range.Item Property
For reasons that I explain at the end of this section, you may not end up using the Range.Item property too much in your day-to-day Excel work. However, you may still need to use this property from time to time. Additionally, having a good understanding of the Range.Item property is helpful for purposes of becoming a better user of the Cells property which I describe above and understanding its syntax.
Just as some of the other properties discussed throughout this VBA tutorial, the Range.Item property returns an object. The object is a range.
In this particular case, the range is determined by starting with a particular specified range. The Range.Item property then accesses a particular cell in that range, based on the arguments you use.
The syntax of the Range.Item property is very similar to those of the other properties covered by this VBA tutorial: “expression.Item(Row_Index,Column_Index)”. In this case, “expression” is a variable representing a Range object.
Notice, however, that in the case of the Range.Item property, I refer to “Row_Index” and “Column_Index”. In the case of most of the other properties covered in this VBA tutorial, the arguments made reference to either numbers (for example “Row_Number”) or letters (such as “Column_Letter”).
The only other time I use the word index for purposes of describing a property’s arguments is when explaining an alternative syntax for purposes of referring to a single cell with the Cells property. The reason why the Range.Item property uses index in order to identify both the row and column is because the behavior of the Row_Index argument is very similar to that of the Cell_Index argument in that use case of the Cells property.
Let’s take a closer look at this Row_Index argument. The main characteristics of this argument are the following:
- It is required.
- It must be a number.
- It determines the cell that you access within the relevant range. For these purposes, there are 2 options.
- If the only argument you’re using is Row_Index, cells are numbered from left to right and from top to bottom. I explain, in detail, how this works above.
- If you’re using both Row_Index and Column_Index, Row_Index determines the row of the cell you access within the applicable range.
The other argument of the Range.Item property (Column_Index) behaves slightly different. The following are its main characteristics:
- It’s optional.
- It can be a number or a string. As a consequence of this characteristic you can use both the column number or the column letter (wrapped in quotations) to refer to a particular column. I show you how this works below.
- It determines the column of the cell you access within the relevant range.
Both arguments are relative offsets. Visual Basic for Applications uses those arguments to determine how many rows and columns to move away from the originally specified range.
I explain (above) how, when applied to a Range object, the Cells property is not limited by the number of cells in the specified range. In other words, you can use the Cells property to refer to cells outside that range. The same thing happens with the Range.Item property.
After reading about the other properties above, you probably have a good idea about what the Range.Item property does. Nonetheless, let’s take a look at a couple of examples.
For example, the following statements all return cell A1 of Sheet1 in Book1.xlsm:
Application.Workbooks("Book1.xlsm").Worksheets("Sheet1").Range("A1:D10").Cells.Item(1) Application.Workbooks("Book1.xlsm").Worksheets("Sheet1").Range("A1:D10").Cells.Item(1, 1) Application.Workbooks("Book1.xlsm").Worksheets("Sheet1").Range("A1:D10").Cells.Item(1, "A")
However, let’s assume that you want to refer to cell B8. For these purposes, you can use either of the following references:
Application.Workbooks("Book1.xlsm").Worksheets("Sheet1").Range("A1:D10").Cells.Item(30) Application.Workbooks("Book1.xlsm").Worksheets("Sheet1").Range("A1:D10").Cells.Item(8, 2) Application.Workbooks("Book1.xlsm").Worksheets("Sheet1").Range("A1:D10").Cells.Item(8, "B")
Part of the importance of the Range.Item property is that it allows you to refer to a specific cell in relation to a range.
However, perhaps even more important for purposes of this VBA tutorial, the Item property is the default property for the Range object. You can generally omit the Item keyword before specifying the Row_Index and Column_Index arguments. In the case of the last example above, this results in the following shortened references:
Application.Workbooks("Book1.xlsm").Worksheets("Sheet1").Range("A1:D10").Cells(30) Application.Workbooks("Book1.xlsm").Worksheets("Sheet1").Range("A1:D10").Cells(8, 2) Application.Workbooks("Book1.xlsm").Worksheets("Sheet1").Range("A1:D10").Cells(8, "B")The structure used in these references probably looks quite familiar by now. The reason for this is that this structure is substantially the same as that which I describe above when explaining the Cells property.
Due mainly to this reason, you’ll probably won’t use the Range.Item property too often. Instead, you’ll likely resort to the Cells property.
However, now you know that, if required for your purposes, you can use the Range.Item property for purposes of referring to Excel’s VBA Range objects.
Furthermore, having a good knowledge about the Range.Item property is helpful for, among others purposes:


- Having a better understanding of the Cells property.
- Crafting better references to Excel’s VBA Range objects with the Cells property.
Conclusion
The Range object is one of the most important and frequently used Excel VBA objects.
Unfortunately, the topic of Excel’s VBA Range object can sometimes be confusing for certain users. One of the main reasons for this is the fact that there are several different ways to refer to the Range object.
This VBA tutorial provides a brief introduction to the topic of Excel’s VBA Range object. Perhaps more importantly, this post explains and illustrates some of the most common methods for purposes of creating appropriate references to the Range object.
Now that you’ve read this post, you probably have a good understanding of Excel’s VBA Range object and won’t be confused by the different alternatives you can use to reference it. In particular, you’re probably now an expert when it comes to creating references to Range objects using any of the following properties:
- Range.
- Cells.
- Offset.
- Item.
There are still some other ways to refer to and manipulate Excel’s VBA Range objects. Some of these are the Application.Union method and the Range.Areas property.