
Use footnotes and endnotes to explain, comment on, or provide references to something in a document. Usually, footnotes appear at the bottom of the page, while endnotes come at the end of the document or section.
If you’re in Reading View, switch to Editing View by clicking Edit Document > Edit in Word for the web.

Add a footnote
-
Click where you want to add the footnote.
-
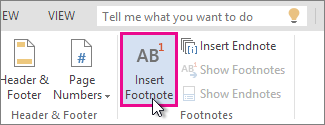
Click Insert > Insert Footnote.

Word inserts a reference mark in the text and adds the footnote mark at the bottom of the page.
-
Type the footnote text.
Add an endnote
-
Click where you want to add the endnote.
-
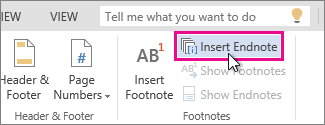
Click Insert > Insert Endnote.
Word inserts a reference mark in the text and adds the endnote mark at the end of the document.
-
Type the endnote text.
Customize your footnotes and endnotes
To customize a footnote or endnote:
-
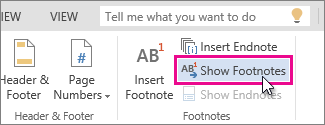
Click the reference number or mark in the body of the text or click Insert > Show Footnotes(for endnotes, click Insert > Show Endnotes).
-
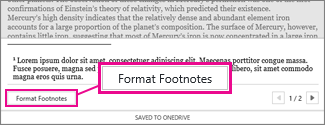
In the footnote/endnote view, click Format Footnotes or Format Endnotes to display the Format Options dialog, where you can change the size, font, and indentation of one or all of your footnotes or endnotes.

Note: If you want to convert footnotes to endnotes or the other way around, use the Open in Word command and convert them there. When you save the doc in Word, it’s saved where you opened it in Word for the web.
Need more help?
Want more options?
Explore subscription benefits, browse training courses, learn how to secure your device, and more.
Communities help you ask and answer questions, give feedback, and hear from experts with rich knowledge.
Insert footnotes and endnotes

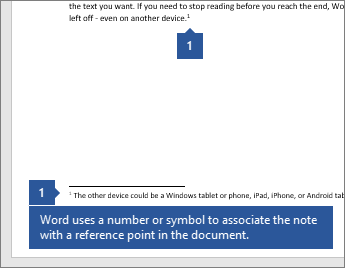
Footnotes appear at the bottom of the page and endnotes come at the end of the document. A number or symbol on the footnote or endnote matches up with a reference mark in the document.
-
Click where you want to reference to the footnote or endnote.
-
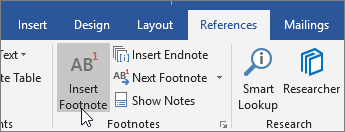
On the References tab, select Insert Footnote or Insert Endnote.
-
Enter what you want in the footnote or endnote.
-
Return to your place in the document by double-clicking the number or symbol at the beginning of the note.
Need more help?
Footnotes are short notes at the bottom of the page that provide explanations, additional comments, or an understanding of a particular word or phrase in the document content. Endnotes are the same as footnotes but appear at the end of an entire section or document.

Footnotes or endnotes in the document must be formatted according to the requirements accepted by your college, university, company, established on the project, etc.
The number or symbol inserted in the document content to refer to a footnote or endnote is called a reference mark. Footnotes appear on the same page as their reference marks, and endnotes appear at the end of the document or section (see more about their customization below). In most views, footnotes or endnotes are separated from the body text by a note separator line (see how to change a note separator line).
The numbering is always correct if you insert footnotes or endnotes using the Word’s Footnote and Endnote functionality. Even after changes are made to the document, Word automatically moves the footnotes to the correct page and renumbers them accordingly.
Note: You can use footnotes and endnotes in the same document.
Insert a Footnote or Endnote
Word offers several useful features to insert footnotes and endnotes. You can:
- Insert the Footnote with the default format using the Insert Footnote button
- Insert the Endnote with the default format using the Insert Endnote button
- Insert the Footnote and Endnote using shortcut keys
- Insert the Footnote and Endnote using the custom format
Note: To reference a single footnote or endnote multiple times in the document text with the automatic numbering, you can use cross-references.
Insert the Footnote using the Insert Footnote button
To insert the Footnote with the format used by default (Word’s default format or last saved format for the footnotes in the document), do the following:
1. Place the cursor where you want to insert the reference to the footnote.
2. On the References tab, in the Footnotes group, click the Insert Footnote button:

Word inserts the footnote at the bottom of the current page with the format used by default (superscript number of the 1, 2, 3, … numbered list). The cursor is positioned next to the inserted footnote. E.g.:
3. Enter what you need in the footnote. You can modify text style, size, color as you want using the same features as for the regular text:

Note: See how to format footnotes and endnotes for more details.
4. Double-click the number or symbol at the beginning of the footnote to return to the place in the document where you inserted a reference mark.
Insert the Endnote using the Insert Endnote button
To insert the Endnote with the format used by default (Word’s default format or last saved format for the endnotes in the document), do the following:
1. Place the cursor where you want to insert the reference to the endnote.
2. On the References tab, in the Footnotes group, click the Insert Endnote button:

Word inserts the endnote at the end of the document with the format used by default (superscript number of the i, ii, iii, … numbered list). The cursor is positioned next to the inserted endnote. E.g.:

3. Enter what you need in the endnote.
Note: See how to format footnotes and endnotes for more details.
4. Double-click the number or symbol at the beginning of the endnote to return to the place in the document where you inserted a reference mark.
Insert the Footnote and Endnote using shortcut keys
You can use the following keyboard shortcuts to insert footnotes and endnotes in a Microsoft Word document:
- Press Alt+Ctrl+F to insert a footnote.
- Press Alt+Ctrl+D to insert an endnote.
Insert the Footnote and Endnote with custom format
To insert the Footnote and Endnote in the document with the custom format, do the following:
1. Place the cursor where you want to insert the reference to the footnote or endnote.
2. On the References tab, in the Footnotes group, click the dialog box launcher:

3. In the Footnote and Endnote dialog box:

- In the Location section:
- Select Footnotes and the location:
- Bottom of page (used by default)
- Below text – if there is a space between text and a bottom margin on the page, it can be placed right after text. For example:

- Select Endnotes and the location:
- End of section
- End of document (used by default)
To insert endnotes at the end of each chapter or other parts in the document, add a section break (see how to work with breaks in Word) for each chapter or part and select the End of section option.
- Click the Convert… button to convert all footnotes to endnotes, or vice versa (see converting footnotes and endnotes below).
- Select Footnotes and the location:
- In the Footnote layout section (available only if the Footnote is selected in the Location section), select the layout from the Columns dropdown list.
As for the regular text, Word offers to create columns for the footnotes and endnotes.
- Match section layout – use the same number of columns as the document text
- 1 column
- 2 column
- 3 column
- 4 column
For example:
- Match section layout:

- 1 column:
- In the Format section:
- Choose the format you need from the Number format dropdown list:

- 1, 2, 3, … (used by default for footnotes)
- a, b, c, …
- A, B, C, …
- i, ii, iii, … (used by default for endnotes)
- I, II, III, …
- *, †, ‡, §, …
- Type the Custom mark or select it by clicking the Symbol… button to open the Symbol dialog box:

Select the symbol you need in the Symbol dialog box and click the OK button.
In English, a footnote or endnote is usually indicated by a superscript number immediately following the text or phrase to which the note refers. For some requirements, a superscript number should be placed between parentheses, for example: [1].
Note: We strongly recommend checking the requirements you need to follow. For example:
- The Chicago style allows using symbols, such as the asterisk (*) or the dagger (†), instead of numbers if there are a few footnotes in the document (see how to add different reference marks for more details).
- The American Psychological Association (APA) style and Modern Language Association (MLA) style don’t recommend using symbols as footnote identifiers.
- Optionally, select the number you need to start numbering in the Start at field.
For example, if you have several documents containing different chapters or parts of the voluminous project, you can start footnotes from a specific number in the current document.
- From the Numbering dropdown list, select one of the options:
- Continuous (used by default)
- Restart each section
- Restart each page
- Choose the format you need from the Number format dropdown list:
- In the Apply changes section, from the Apply changes to dropdown list, select one of the options:
- This section
- Whole document


4. Enter the text you need in the footnote or endnote:
5. Double-click the number or symbol at the beginning of the note to return to the document content.
Converting Footnotes and Endnotes
Word can convert footnotes to endnotes, and vice versa:
- To convert one footnote to an endnote, right-click the footnote, then click Convert to Endnote in the popup menu:

- To convert one endnote to a footnote, right-click the endnote, then click Convert to Footnote in the popup menu.
- To convert all footnotes to endnotes or convert all endnotes to footnotes, do the following:
1) Right-click any of the footnotes or endnotes, then select Note Options… in the popup menu:
2) In the Footnotes and Endnotes dialog box, click the Convert… button:

3) In the Convert Notes dialog box, choose the option you need:

- Convert all footnotes to endnotes (is active if there is at least one footnote in the document)
- Convert all endnotes to footnotes (is active if there is at least one endnote in the document)
- Swap footnotes and endnotes (is active if there are at least one footnote and one endnote in the document)


Select all footnotes in the document
To select all footnotes in the document, click inside any footnote, then press Ctrl+A.
To select all endnotes in the document, click inside any endnote, then press Ctrl+A:

Edit and move footnotes and endnotes
To edit a footnote or endnote, click inside the note and make corrections.
To move a footnote or endnote from one location in the document to another, do the following:
1. Select the reference mark in the document.
2. Do one of the following to cut the selection:
- On the Home tab, in the Clipboard group, click the Cut button:

- Right-click the selection and choose Cut in the popup menu.
- Press Ctrl+X.

3. Place the cursor in the new location.
4. Do one of the following to paste selection:
- On the Home tab, in the Clipboard group, click the Paste button.
- Right-click and choose Paste in the popup menu.
- Press Ctrl+V.
Word moves the reference mark and the note to the correct place; also, it renumbers footnotes and endnotes.
Move among footnotes and endnotes
To move among footnotes and endnotes, on the References tab, in the Footnotes group, click the Next Footnote button, then select one of the options:

- Next Footnote,
- Previous Footnote,
- Next Endnote,
- Previous Endnote.
Notes:
- To move to the next footnote, you can just click the Next Footnote button in the Footnotes group on the Reference tab.
- See more about navigating in the document.
Display footnotes or endnotes
To display the note’s content in the Word document, do one of the following:
- On the References tab, in the Footnotes group, click the Show Notes button to display the list of footnotes or endnotes:

If there are footnotes and endnotes in the document, Word asks which type of notes you want to see:

- Double-click a reference mark in the document’s body to display its corresponding footnote or endnote.


Note: If you hover the mouse over a reference mark in the document text, a tooltip appears with a full footnote or endnote text, so you don’t need to scroll up and down to check footnotes and endnotes as you read or write:

Remove the Footnote and Endnote
To delete the footnote or endnote in the Word document, select its reference mark (number or symbol that refers to the footnote or endnote), and press the Delete key.
Note: If you delete the text and the number from the footnote or endnote pane, it does not delete the number in the document text itself. Word still thinks the deleted footnote or endnote is still active. You need to delete the original reference mark in the document.
After removing any note, Microsoft Word automatically renumbers the footnotes and endnotes.
This tutorial shows how to insert footnotes and endnotes in Microsoft Word using the tools in the ribbon.
Manually inserting individual footnotes and endnotes in Word is relatively straightforward: type a superscript number in the main text and then scroll to the bottom of the page, section, or document to type your note.
But manually inserting notes can get tricky if your document is more than a couple of pages long or has a lot of notes because you also have to manually update number sequencing and text placement as notes are added or deleted.
That’s when Word’s footnote and endnote tools really come in handy. These tools automatically maintain sequential note numbers, create space for endnotes at the end of the document or section, and make sure that your footnotes stay with their associated text—even if that text moves to a different page. Best of all, the tools are easy to use.
The images below are from Word for Microsoft 365. The steps also apply to Word 2021, Word 2019, Word 2016, Word 2013, and Word 2010. However, your interface may look slightly different in those older versions.
This tutorial is available as a YouTube video showing all the steps in real time.
Watch more than 150 other writing-related software tutorials on my YouTube channel.
Don’t miss the three benefits of using Word’s footnote and endnote tools explained at the end of this tutorial.
1. Place your cursor where the superscript number for the first note should appear.

2. Select the References tab in the ribbon.

3. Select the dialog box launcher in the Footnotes group.

4. Select Footnotes or Endnotes in the Footnote and Endnote dialog box.

5. Select the note’s location from the drop-down menu.

You can also choose additional options in the Footnote and Endnote dialog box such as number formatting and whether the numbering applies to the whole document or to a specific section.
6. Select the Insert button to create the first note.

After Word creates the superscript number, your cursor will automatically move to the note location selected in the Footnote and Endnote dialog box.
7. Write your note.

8. Double-click on the number before the note to return to the location of the corresponding superscript number in the main text.

9. Place your cursor where the superscript number for the next note should appear in the text and then select Insert Footnote or Insert Endnote in the Footnotes group in the ribbon to insert the next note.

The options you selected in the Footnote and Endnote dialog box during step 5 will be maintained.
10. Save your document to save your new footnotes or endnotes.
Here are three benefits to keep in mind when working with footnotes and endnotes in Word:
1. You can use footnotes and endnotes in the same document. If you choose to use both, the first type inserted will be assigned superscript numbers and the second type inserted will be assigned superscript letters. However, these options can be changed in the Footnote and Endnote dialog box (see figures 4 and 5).
2. If you move the text connected to footnotes or endnotes, the sequencing of the superscript numbers (or letters) and the notes themselves will be automatically updated. Additionally, if you add or delete footnotes or endnotes between existing notes, the sequencing of the superscript numbers (or letters) and the notes themselves will be automatically updated.
3. You can modify the style of all the footnotes or all the endnotes, plus the reference numbers and the separator lines that appear above the notes.
Related Resources
How to Convert Individual Footnotes to Endnotes in Microsoft Word (and Convert Individual Endnotes to Footnotes)
Three Ways to Insert Superscripts and Subscripts in Microsoft Word
How to Insert Citations in Microsoft Word
Updated March 15, 2022
In your document, click where you want to insert the note reference mark. On the Insert menu, click Footnote. Under Location, click Footnotes or Endnotes, and then on the Footnotes or Endnotes pop-up menu, click the location that you want. Under Format, select the numbering options that you want, and then click Insert.
Contents
- 1 How do I format EndNote numbers in Word?
- 2 How do I change the format of EndNote?
- 3 Why is EndNote not formatting correctly?
- 4 What format should endnotes be in?
- 5 How do I manage endnotes in Word?
- 6 How do you fix endnotes in Word?
- 7 How do you write et al in EndNote?
- 8 How do I change reference type in EndNote?
- 9 How do you cite in endnotes?
- 10 How do you do endnotes in Chicago style on word?
- 11 Can you use endnotes in APA?
- 12 How do I move endnotes before references?
- 13 How do I put endnotes on separate pages?
- 14 How do I move endnotes to another page?
- 15 How do I update endnotes in Word?
- 16 How do I export references from EndNote to Word?
- 17 How do you abbreviate authors in EndNote?
- 18 How do I stop abbreviating author names in EndNote?
- 19 How do I change my reference style?
- 20 What is an EndNote in APA Style?
How do I format EndNote numbers in Word?
Default Numbering Format for Endnotes
- Display the References tab of the ribbon.
- Click the small icon at the lower-right corner of the Footnotes group.
- Select the Endnote radio button.
- Using the Number Format drop-down list, select the numbering format you want to use.
How do I change the format of EndNote?
To edit a style:
- In EndNote, go to the Tools menu.
- Go to Output Styles and select Open Style Manager.
- Locate the style you wish to edit and click to highlight it.
- Click on the Edit button.
- Select the part of the style you wish to edit from the menu on the left, such as:
- Edit as necessary in the right hand pane.
Why is EndNote not formatting correctly?
If EndNote is not formatting your citation correctly, first check that the correct ‘Reference Type’ for the record is selected in EndNote. If the citation is still incorrect, you will need to either edit it manually by converting to Plain text, or edit the output style.You can now edit citations as needed.
What format should endnotes be in?
One of the most common styles to include notes in a paper is in Chicago and Turabian style. Endnotes and a bibliography are included as part of the notes-biblio style. An endnotes page in Chicago Style follows the same basic format of an MLA or APA style but has the title “Notes.”
How do I manage endnotes in Word?
How to control where Word puts endnotes
- From the Insert menu, choose References and then select Footnote.
- In the resulting Footnote and Endnote dialog box, click the Endnotes option.
- Choose End of Section from the Endnotes dropdown list.
- Click Apply.
How do you fix endnotes in Word?
Follow these steps instead:
- Choose Reference from the Insert menu and then choose Footnote.
- Make sure the Endnotes radio button is selected.
- Change the Start At value to reflect where you want Word to start numbering.
- Change the selection in the Numbering area to reflect how you want Word to count your endnotes.
How do you write et al in EndNote?
Hints & Tips – making sure ‘et al’ appears in your citations
- Go to: Edit > Output styles > Edit “APA 6th” (or the citiation style you are using)
- then to Citations/Author Lists, and the default will be is currently ticked for:
- Amend as necessary.
How do I change reference type in EndNote?
Working with EndNote Reference Types
- Go to the Preferences option under the Edit menu.
- Click on the Reference Types option.
- click on the Modify Reference Types button.
- Choose the reference type to be modified from the drop-down menu.
How do you cite in endnotes?
Using footnotes or endnotes involves placing a superscript number at the end of a sentence with information (paraphrase, quotation or data) that you wish to cite. The superscript numbers should generally be placed at the end of the sentence to which they refer.
How do you do endnotes in Chicago style on word?
Here are the steps to take:
- Place your cursor in the body text where you want the footnote superscript to appear.
- Select the References tab in the ribbon toolbar.
- Click Insert Footnote.
- Type your footnote according to style.
- Repeat the process for every additional footnote.
Can you use endnotes in APA?
APA does not recommend the use of footnotes and endnotes because they are often expensive for publishers to reproduce. However, if explanatory notes still prove necessary to your document, APA details the use of two types of footnotes: content and copyright.
How do I move endnotes before references?
Click in the text of the Endnotes header, before the next-page section break.
- Click on References tab.
- In the footnotes pane, click on the little arrow in the bottom right corner.
- Under Location, choose Endnotes button and.
- Change the number format to Arabic (1, 2, 3).
- Apply changes to this section.
- Click Apply.
How do I put endnotes on separate pages?
a. To insert a Next Page section break, click on the Page Layout tab. On the Breaks dropdown menu, click Next Page. That will shift the endnotes from the end of the document to the main section ENDNOTES as shown on the next page.
How do I move endnotes to another page?
Add new page or text after endnotes in Word
- Open the document you will add new page or text after endnotes, press the Ctrl + End keys to move to the end of the document.
- Click Layout > Breaks > Next Page as below screenshot shown.
- Then go to the References tab, click the Footnote & Endnote launcher.
How do I update endnotes in Word?
– Click on the Tools menu of Word, then go to the EndNote menu and click “Update Citations and Bibliography”. Any version of Word for Mac and EndNote X4 and earlier: – Click on the Tools menu of Word, then go to the EndNote menu and click Format Bibliography, then OK.
How do I export references from EndNote to Word?
Create and Export a Bibliography from EndNote
- Drag and drop method: hold down the Ctrl key as you drag references from the EndNote Library directly onto the Word document.
- Copy Formatted: Click on Edit > Copy Formatted, and then click on Paste in your Word document.
Manually type the acronym in the Word doc before the year in brackets. The citation will be (EndNote element highlighted): (Author acronym, Year): choose Exclude Author in the Edit and Manage Citations window, then in the Prefix field, only type the acronym – remembering to also type a comma and space. Click OK.
How do I stop abbreviating author names in EndNote?
Use either the Edit & Manage Citation(s) function from the EndNote toolbar in Word, or right click, and select Edit Citation(s). Go to More to get the full options. Change the Format to Exclude Author.
How do I change my reference style?
In your Word document, click on the References tab in the Ribbon. In the Citations & Bibliography group, click the arrow next to Style. Click the style that you want to use for the citation and source.
What is an EndNote in APA Style?
Endnotes are collected together at the end of the main text of the paper. Although APA uses in-text parenthetical citations, notes can be used to supple- ment an APA paper with extra information.Notes can also refer readers to other pages or other sources of infor- mation regarding the topic.