
You can edit the contents of a cell directly in the cell. You can also edit the contents of a cell by typing in the formula bar.
When you edit the contents of a cell, Excel is operating in Edit mode. Some Excel features work differently or are unavailable in Edit mode.
When Excel is in Edit mode, the word Edit appears in the lower-left corner of the Excel program window, as shown in the following illustration.

How does Excel operate differently in Edit mode?
In Edit mode, many commands are unavailable. For example, when Excel is in Edit mode, you cannot apply conditional formatting or change the alignment of the contents of a cell.
Also, the arrow keys behave somewhat differently when Excel is in Edit mode. Instead of moving the cursor from cell to cell, in Edit mode, the arrow keys move the cursor around in the cell.
Enable or disable Edit mode
If you try to use Edit mode and nothing happens, it might be disabled. You can enable or disable Edit mode by changing an Excel option.
-
Click File > Options > Advanced.
-OR-
In Excel 2007 only: Click the Microsoft Office Button
 , click Excel Options, and then click the Advanced category.
 -
Under Editing options, do one of the following:
-
To enable Edit mode, select the Allow editing directly in cells check box.
-
To disable Edit mode, clear the Allow editing directly in cells check box.
-
 , click Excel Options, and then click the Advanced category.
Enter Edit mode
To start working in Edit mode, do one of the following:
-
Double-click the cell that contains the data that you want to edit.
This starts Edit mode and positions the cursor in the cell in the location that you double-clicked. The cell contents are also displayed in the formula bar.
-
Click the cell that contains the data that you want to edit, and then click anywhere in the formula bar.
This starts Edit mode and positions the cursor in the formula bar at the location that you clicked.
-
Click the cell that contains the data that you want to edit, and then press F2.
This starts Edit mode and positions the cursor at the end of the cell contents.
Insert, delete, or replace cell contents
-
To insert characters, click in the cell where you want to insert them, and then type the new characters.
-
To delete characters, click in the cell where you want to delete them, and then press BACKSPACE, or select the characters and then press DELETE.
-
To replace specific characters, select them and then type the new characters.
-
To turn on Overtype mode so that existing characters are replaced by new characters while you type, press INSERT.
Note: Overtype mode can be turned on or off only when you are in Edit mode. When Overtype mode is turned on, the character to the right of the insertion point is highlighted in the formula bar, and it will be overwritten when you type.
-
To start a new line of text at a specific point in a cell, click in the where you want to break the line, and then press ALT+ENTER.
Cancel or undo edits
Before you press ENTER or TAB, and before or after you press F2, you can press ESC to cancel any edits that you made to the cell contents.
After you press ENTER or TAB, you can undo your edits by pressing CTRL+Z, or by clicking Undo  on the Quick Access Toolbar.
Adjust the way cell contents are displayed
After you edit cell contents, you may want to adjust the way they are displayed.
-
At times, a cell might display #####. This can occur when the cell contains a number or a date and the width of its column cannot display all the characters that its format requires. For example, suppose a cell with the Date format «mm/dd/yyyy» contains 12/31/2007. However, the column is only wide enough to display six characters. The cell will display #####. To see the entire contents of the cell with its current format, you must increase the width of the column.
Change the width of a column
-
Click the cell for which you want to change the column width.
-
On the Home tab, in the Cells group, click Format.
-
Under Cell Size, do one of the following:
-
To fit all text in the cell, click AutoFit Column Width.
-
To specify a larger column width, click Column Width, and then type the width that you want in the Column width box.
Note: As an alternative to increasing the width of a column, you can change the format of that column or even an individual cell. For example, you could change the date format so that a date is displayed as only the month and day («mm/dd» format), such as 12/31, or represent a number in a Scientific (exponential) format, such as 4E+08.
-
-
-
If there are multiple lines of text in a cell, some of the text might not be displayed the way that you want. You can display multiple lines of text inside a cell by wrapping the text.
Note: When Excel is in Edit mode, you cannot change the way text wraps.
Wrap text in a cell
-
Click the cell in which you want to wrap the text.
-
On the Home tab, in the Alignment group, click Wrap Text.
Note: If the text is a single long word, the characters won’t wrap; you can widen the column or decrease the font size to see all the text. If not all text is visible in the cell after you wrap the text, you may need to adjust the height of the row.
On the Home tab, in the Cells group, click Format, and then under Cell Size click AutoFit Row.
-

Exit Edit mode
To stop working in Edit mode, do one of the following:
-
Press ENTER.
Excel exits Edit mode and selects the cell directly below the current cell.
You can also specify that pressing ENTER select a different adjacent cell.
-
Click File > Options > Advanced.
-OR-
In Excel 2007 only: Click the Microsoft Office Button
, click Excel Options, and then click the Advanced category. -
Under Editing options, do one of the following:
-
To make the selection remain in the cell that you were editing, clear the After pressing Enter, move selection check box.
-
To control the direction of the selection, select the After pressing Enter, move selection check box, click the arrow next to Direction, and then select a direction from the list.
-
-
-
Press TAB.
This stops Edit mode and selects the cell to the right of the current cell. Pressing SHIFT+TAB selects the cell to the left.
-
Click a different cell.
Excel exits Edit mode and selects the cell that you clicked.
-
Press F2.
Excel exits Edit mode and leaves the cursor where it is.
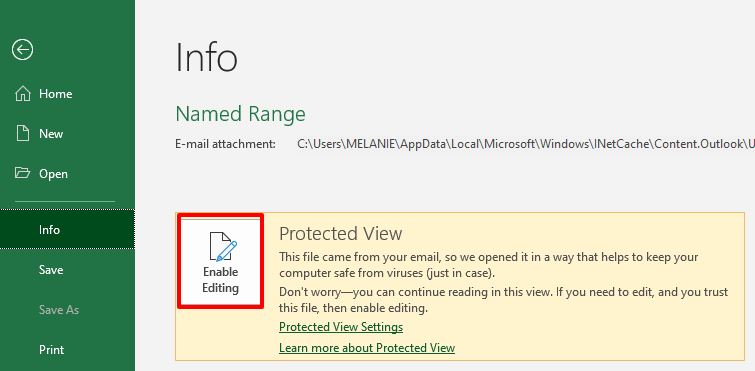
Microsoft has provided satisfactory features that ensure the safety and protection of your files from different viruses. One of them is “Protected View”, which makes sure that your file is safe and nobody else can make changes to it. Once in a lifetime, you probably would have encountered a Protected View Prompt after opening an Excel file.
This is a way that Excel tells you no virus can damage or delete the file. It usually happens when the source file is unknown. If you know the source file, you can simply press the Enable Editing button given on top of the file. Doing so will ensure editing the file whenever you need to.
Protected View at times can be the most annoying thing that appears on the screen when you want to make some changes to the file. To edit the file safely, you will have to disable the Protected View. You must be thinking about how to enable editing in Excel when the Protected View feature is active?
Why Cannot I Edit the Excel Spreadsheet?
Other than the Protected View feature, there are reasons that don’t let you edit the file. Let’s have a look at other reasons.
The Excel File is in Read Only Mode
As you open an Excel file, if you see a MARKED AS FINAL prompt right in front of the screen, it clearly tells you that this is the final document and is saved in read-only mode. No one can edit the file because it is un-editable.

The Excel Spreadsheet is Locked with Password
Another reason that leaves you unable to edit the Excel file is when the cell or Excel sheet is locked with a protection password. You will not be able to make changes to the file unless you disable the protection mode. Double-clicking the cell for editing purposes will pop a message “The cell or chart you are trying to change is on a protected sheet. To make a change, unprotect the sheet.”

How to Enable Editing in Excel
Here in this post, you will find some useful tricks to enable editing in Excel files.
Directly From Trust Center Settings
When the file is in read-only mode, you need to unprotect it, so that you can make further editing easily. You can do it directly through program settings. To disable the protected view, follow the steps given below:
Open Microsoft Excel and click on the File menu option.

Now, click on Options given on the left side menu.

Choose the Trust Center option given on the left side of the PowerPoint Options window.
Click on Trust Center Settings button.

Now, select Protected View given on the left side menu, from the Trust Center Settings window.
Uncheck these options: “Enable Protected View for files originating from the Internet”, “Enable Protected View for files located in potentially unsafe locations”, and “Enable Protected View for Outlook attachments”
Now, click OK in the Excel Options window.

This is how to enable editing in Excel using Trust Center Settings.
When the Excel File is Marked as Final
When you have downloaded a file from the internet, you may have to encounter with read-only mode issue. A yellow notification “Marked as Final” will appear on top of the Excel worksheet, when the file is in read-only mode.
To get yourself out of this situation, simply click the “Edit Anyway” button given right beside the MARKED AS FINAL notification on top of the sheet.

When the Excel File is Recommended as Read Only
If the file is in read-only mode when you open it, usually a message will appear asking you to open the file in read-only mode. If you select “Yes”, it will open as read-only and you cannot make editing into the file. On the other hand, if you want to disable the read-only mode, choose “No”.
If you need to do away with the read-only recommended feature, follow the steps:

Open the Excel file recommended as read-only and choose “No” from the pop-up window.
Open the Excel file recommended as read-only and choose “No”.
Move to the “File” option and click on “Save As” to open the file directory. At the bottom of the file explorer screen, hit the drop-down icon given besides “Tools” and choose “General Options”.
From the “General Options” menu, uncheck the “Read-only recommended” box. Press “OK” to enable editing in the Excel file.

When the Excel File is Protected with Modifying Password
You will see a pop-up message asking you to enter the password when your file is protected by modifying the password. You must be thinking about whether you can open the file or not when you don’t know the password.
Fortunately, you can easily enable the editing mode without knowing the correct password. If you don’t know the password, open the file in the read-only mode and press “CTRL+A” to select the whole worksheet. Now, press “CTRL+C” and “CTRL+V” to copy and paste the content to a new worksheet. Make as many changes as you want in the new worksheet. Changing the worksheet is as simple as that.

On the other hand, if you know the password, simply type it. Go to the “File” and click on “Save As”. Delete the password in the “Password to modify” field given in the “General Options” menu. Now, the file is without any protection. Whenever you will open this Excel file, it will not ask you to enter the password because it is not protected now.

To Sum Up
Now, you fully have an idea of how to enable editing in Excel. You can simply follow the methods given above to make any sort of changes in the Excel file whenever you need to. Each method is worthy enough to practice.
Use the methods provided in this article to edit your protected Excel file. Keep practicing new features and continue sharing useful information with others.
See all How-To Articles
This tutorial will demonstrate how to turn off Protected View and Enable Editing in Excel.
![]()
Files opened from potentially unsafe locations are opened in Protected View. Protected View is a read-only view where most editing functions are disabled until the user enables editing.
Why Does My File Open in Protected View?
Files that are downloaded from the Internet are usually opened in Protected View, because these files can contain malware or viruses. If you’re confident that the file is safe to edit, click Enable Editing in the message bar that appears.
Files that are sent as Outlook attachments are also usually opened in Protected View.

Files that are opened from an unsafe location will also display a Protected View message. An unsafe location can be the Temporary Internet Files folder, for example.
Files that you choose to open in Protected View will also show a message.

You can open a file in Protected View by selecting File > Open > Open in Protected View.

Enabling Edit Mode
Once you’re confident that the file will not damage your computer, you can enable editing in one of two ways.
1. Click on Enable Editing in the message box that pops up.
OR
2. In the Ribbon, click File > Info > Enable Editing.
Changing Protected View Settings
To switch off Protected View, change the settings in the Excel Trust Center.
1. In the Ribbon, select File > Options > Trust Center.
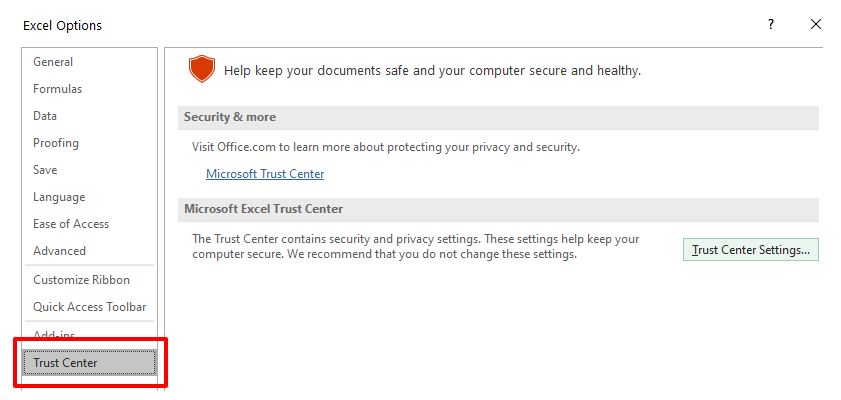
2. Select Trust Center Settings, and then select Protected View.
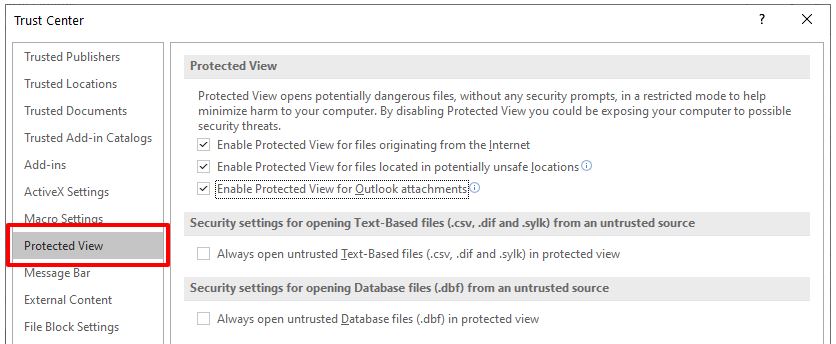
3. Remove the check marks from the three check boxes in Protected View.
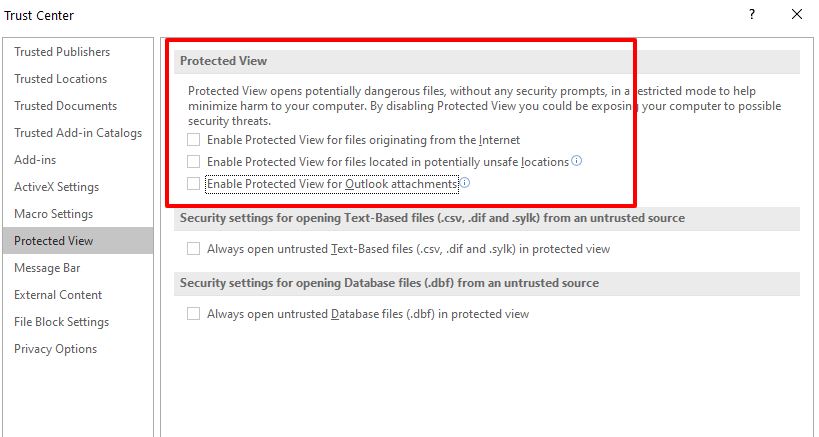
4. Click OK to save the changes.
Protected View messages will now no longer be displayed in Excel.
Enable or disable Edit mode Click File > Options > Advanced. , click Excel Options, and then click the Advanced category. Under Editing options, do one of the following: To enable Edit mode, select the Allow editing directly in cells check box.
Contents
- 1 How do I enable Editing?
- 2 How do you unlock Editing in Excel?
- 3 How do I enable editing in Excel using keyboard?
- 4 How do I unlock a document for editing?
- 5 Can’t edit anything in Excel?
- 6 How do you unlock a locked Excel spreadsheet?
- 7 How do I unlock an Excel spreadsheet for editing online?
- 8 How do I enable Editing in SharePoint Excel?
- 9 How do you enable read only Editing in Excel?
- 10 How do I enable multiple Editing in Excel?
- 11 Why is my Excel locked for editing?
- 12 Why can’t I edit my Word document?
- 13 How do I remove editing restrictions in Word?
- 14 How do you lock Excel cells from editing?
- 15 How do you unfreeze a column in Excel?
- 16 How do I unlock a protected Excel sheet for free?
- 17 Is locked for editing?
- 18 How do I unlock a shared Excel file for editing?
- 19 Why can’t I edit Excel in SharePoint?
- 20 Why can’t I edit in Onedrive?
Enable editing in your document
- Go to File > Info.
- Select Protect document.
- Select Enable Editing.
How do you unlock Editing in Excel?
If the worksheet is protected, do the following:
- On the Review tab, click Unprotect Sheet (in the Changes group). Click the Protect Sheet button to Unprotect Sheet when a worksheet is protected.
- If prompted, enter the password to unprotect the worksheet.
How do I enable editing in Excel using keyboard?
Note: This article originally appeared as an entry in our 10 Things blog. A comprehensive list of Excel shortcuts is available as a PDF download.
The shortcuts.
| Action | Shortcut |
|---|---|
| Enable editing within a cell | F2 |
| Fill selected cells with an entry you typed in one cell | Ctrl + Enter |
| Cancel an entry | Esc |
How do I unlock a document for editing?
Unlock a protected document
- On the Review tab, in the Protect group, click Restrict Editing.
- In the Restrict Formatting and Editing task pane, click Stop Protection.
- If you are prompted to provide a password, type the password.
Can’t edit anything in Excel?
a. Select File > Options > Select Advanced from the Excel menu bar. b. On Editing options, ensure that the check box Allow editing directly in cells is checked.
How do you unlock a locked Excel spreadsheet?
Just do any of the following:
- Right-click the sheet tab, and select Unprotect Sheet… from the context menu.
- On the Review tab, in the Changes group, click Unprotect Sheet.
- On the Home tab, in the Cells group, click Format, and select Unprotect Sheet from the drop-down menu.
How do I unlock an Excel spreadsheet for editing online?
Step 1: Open the worksheet you want to unprotect. Step 2: Click on File > Info > Unprotect Sheet. Step 3: Or go to Review Tab > Changes > Unprotect Sheet. Step 4: If the worksheet asked the password for opening, enter the password and click.
How do I enable Editing in SharePoint Excel?
Go to a document library on your SharePoint site, and then click the link associated with the Excel workbook. Click Edit in Browser.
How do you enable read only Editing in Excel?
Click File -> Save As, select one location where you will save this document. In the Save As dialog, click the drop-down arrow next to the Tools button, and then select General Options. In the General Options dialog, delete the password to modify and uncheck the box next to Read-only recommended, and then click OK.
How do I enable multiple Editing in Excel?
On the Tools menu, click Share Workbook, and then click the Editing tab. Click to select the Allow changes by more than one user at the same time check box, and then click OK. Save the workbook when you are prompted.
Why is my Excel locked for editing?
If you have locked the file yourself, it might be because the file is open on a different device, or the previous instance of the file didn’t close properly.Tip: Sometimes a file may get locked if everyone editing isn’t using a version that supports co-authoring.
Why can’t I edit my Word document?
If you cannot edit your Word document, it’s probably protected with password. In case you don’t want to enter the password every time you access the document, you’ll need to disable document protection, and delete the password.
How do I remove editing restrictions in Word?
When you try to edit the Word document, the Editing Restriction pane will appear on the right-side of the document. Click the Stop Protection button. To remove editing restriction in your Word document, enter your password and click OK.
How do you lock Excel cells from editing?
Lock cells to protect them
- Select the cells you want to lock.
- On the Home tab, in the Alignment group, click the small arrow to open the Format Cells popup window.
- On the Protection tab, select the Locked check box, and then click OK to close the popup.
How do you unfreeze a column in Excel?
To unfreeze panes, open your Excel spreadsheet. Select the View tab from the toolbar at the top of the screen and click on the Freeze Panes button in the Windows group. Then click on the Unfreeze Panes option in the popup menu. Now when you move around in your spreadsheet, columns and rows should display as normal.
How do I unlock a protected Excel sheet for free?
Unprotect Excel from any device: Windows, Mac, Linux, Android and iOS.
- Upload your Excel files to unlock.
- Enter the protection password.
- Press the “UNLOCK” button.
- Download the unlocked files instantly or send a download link to email.
Is locked for editing?
To resolve this issue, first confirm that another user on the network does not have the document open. If the document is in use, open the document as read-only. If it is not in use, quit all instances of Word, and then remove the owner file.Click Winword.exe, and then click End Process.
How do I unlock a shared Excel file for editing?
Go to Computer Management -> System Tools -> Shared Folders -> Open Files to find out who has a document locked. If the user can’t be contacted to disconnect themselves, you can forcefully do so by right clicking the locked file and selecting Close Open File (warning: the user might lose their changes).
Why can’t I edit Excel in SharePoint?
Why can’t I edit my document in SharePoint using Excel or Word online? Your browser may not be compatible.Your document library maybe set up to force documents to be checked out before editing.
Why can’t I edit in Onedrive?
If the issue persists, you may try the following steps: Open the Word client and go to File -> Options. Select Trust Center Settings in the Trust Center tab. Untick all the options in the Protected View tab.
How to Enable Editing in Excel: Tips and Tricks for Making Edits Easier
Do you need to make edits to an Excel spreadsheet but don’t know how to enable editing? Don’t worry, we’re here to help! In this blog post, we will show you how to enable editing in Excel so that you can make changes to your spreadsheets more easily. We will also provide some tips and tricks for making edits in Excel. Let’s get started! You will also learn about tips and tricks
Using Microsoft excel:
Microsoft Excel sheet is the most popular and widely used application for making edits. It is very user-friendly and easy to use. For exploring how to enable editing in excel, simply open the sheet that you want to edit and click on the ‘Enable Editing’ button. This will enable editing for the entire sheet.

Google Sheets:
Google sheets is another popular application that can be used for making edits. To enable editing in google sheets, simply open the sheet that you want to edit and click on the ‘Enable Editing’ button. This will enable editing for the entire sheet.

Online excel sheet editor:
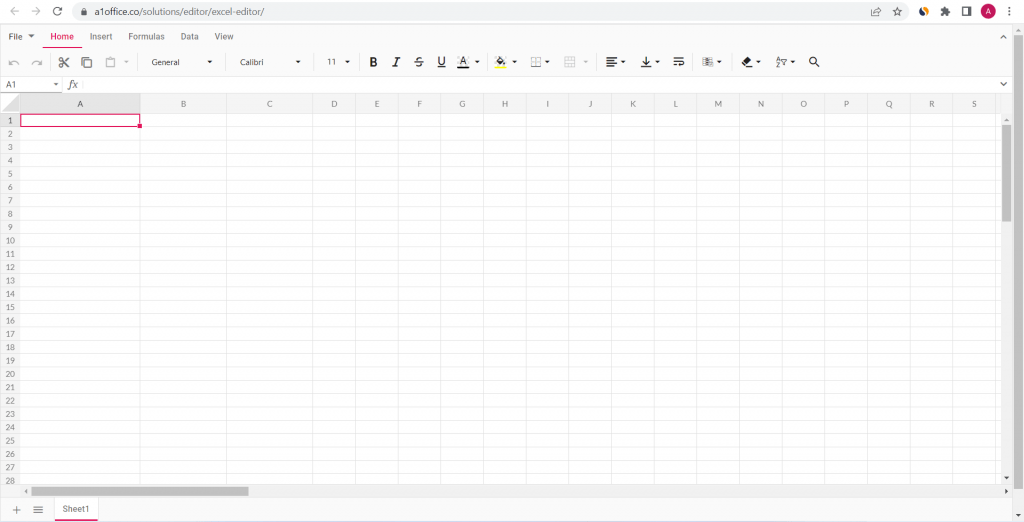
If you want to edit an excel sheet that is not stored on your computer, you can use an online excel sheet editor. To enable editing in an online excel sheet editor, simply open the sheet that you want to edit on an online xlsx editor or online excel editor such as A1Office Xls editor. A1Office also has an android app for viewing Xls files on mobile which can be downloaded from Google Playstore.
Steps on how to enable editing in excel
- Go to the A1office home page where you can see various editing tools present.
- Select Xls Editor from the editors’ panel.
- To start viewing and editing your excel file, click on the File tab and select Open.
- Upload the file you wish to edit from your local computer.
- The file then gets rendered to be viewed and edited as per your requirements.
- Edit, review, and download your file.
- You can save the edited file in .csv, .Xls, .xlsx and pdf formats.
Tips & tricks on how to edit excel sheet
Now that you know how to enable editing in Excel, let’s take a look at some tips and tricks on how to edit a CSV file or an excel sheet.
- When you are making changes to a large spreadsheet, it is helpful to use the ‘Find and Replace’ feature. This can be found under the ‘Edit’ menu. With this feature, you can search for a certain value or text and replace it with something else. This can be very helpful when you need to make a lot of changes to a large spreadsheet.
- If you need to insert new rows or columns, you can do so by selecting the row or column where you want to insert the new one and then clicking on the ‘Insert’ button. This can be found under the ‘Insert’ menu.
- You can also delete rows or columns by selecting them and then clicking on the ‘Delete’ button. This can also be found under the ‘Insert’ menu.
- If you want to move a row or column, simply click on the row or column that you want to move and then drag it to the new location.
- With A1Office online xlsx editor, you can also password protect your sheet so that only people with the password can view or edit it. To do this, simply click on the ‘Protect Sheet’ button and enter a password.
Conclusion:
For how to enable editing in excel, you can use Microsoft excel, google sheets, or an online xlsx editor. You can also follow the steps given above to enable editing in excel. An online excel sheet editor like A1Office can help in editing your excel sheets more easily. It is an easy-to-use editor which does not require any installations and is absolutely free to use.
For any file format, be it csv vs xlsx A1Office helps in editing with ease. The A1Office excel editor also provides various features like password protection, find and replace, insert and delete rows or columns, etc. which can be very helpful while making edits in excel. With other editors as well such as Docx editor, pdf editor, etc. A1Office is a one-place editing tool for helping professionals grow.
Try A1Office today and see how it can help you make edits in excel more easily! Check out our other blog on ‘How to make excel sheet in mobile‘.

Ankita Gupta
Ankita is an SEO executive at A1Office with more than 2 years of experience in creating passionate content around the field of technology and digital marketing. Her interest towards digital tech helps to offer professional how to articles for various tools and products.