
(Image credit: Windows Central )
Although you can style every part of a Microsoft Word document individually with unique fonts and colors, it is not a convenient approach since you have to repeat the steps many times, consuming more time and increasing the chances of mistakes, and this is when styles and themes can come in handy.
In the Office apps, styles are collections of fonts, text sizes, and colors that you can apply to different parts of the document (titles, subheadings, quotation, etc.). On the other hand, themes are collections of styles that you can use to format the entire document quickly.
When you use styles and themes, you will still be using a few steps, but it is a more organized way to format a document on Windows 10, and you will really see the benefit when you need to make changes since updating the format can be as easy as selecting a new theme or style.
In this Windows 10 guide, we will walk you through the steps to change the look and feel of Word documents using the style and themes settings whether you use Office from Microsoft 365 or Office 2019.
- How to use styles in Word
- How to use themes in Word
How to use styles in Word
To change the overall look of a Word document, use these steps:
- Open the Word app.
- Under the «New» section, click the Blank document option (or open an existing document).
- Create the document’s content.
- Select with the mouse the text you want to apply a different format – for example, the title.
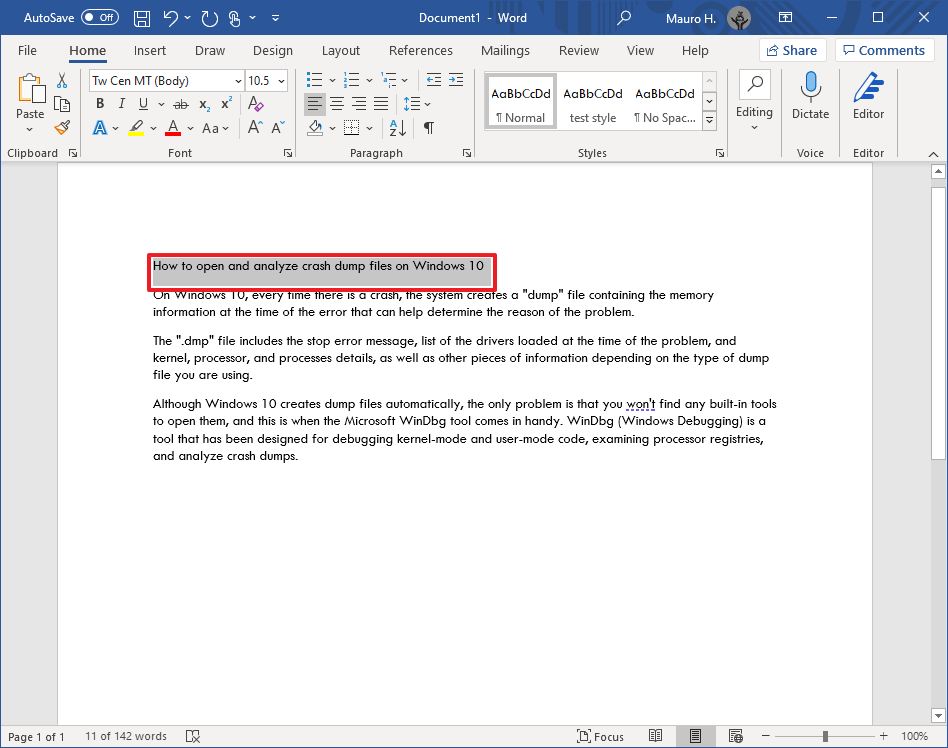
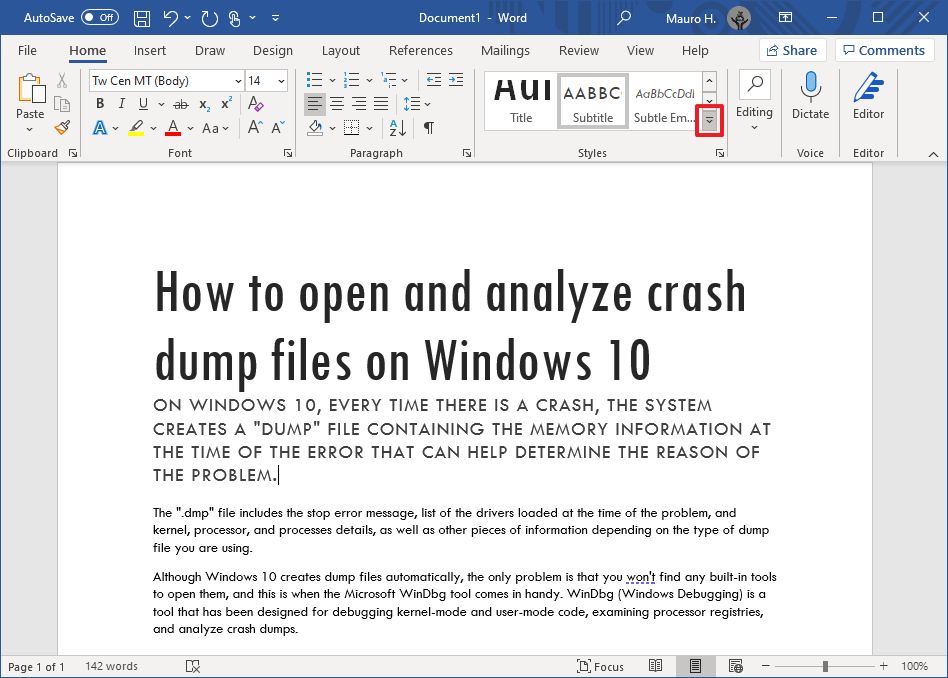
- In the «Home» tab, under the «Styles» section, select the content type to style.Quick note: When selecting a style, make sure to apply it to the correct formating. For example, if you choose the title, then the style should be «Title.» For the subtitle, select the «Subtitle» style and the rest of the headings using «Heading» 1 through 9 accordingly. And don’t worry about the colors. You will customize these when applying a theme. Also, to view all the available elements, click the More button in Styles’s bottom-right corner.

- Continue applying the styling for subtitles, headings, quotes, and anything else you want to format.Quick tip: You can always click and hold the Ctrl key and use the mouse pointer to select the same parts of the document, including the same stying, for instance, all the subtitles (headings).
Once you complete the steps, the document will be formatted with the styling you selected, and when you make changes to the style, the formatting will change automatically for all the same parts of the document.
In addition to selecting from the predefined settings, you can also create new or modify existing elements to style documents with custom settings.
Create new style element
To create a custom style element in Microsoft Word, use these steps:
- Open the Word app.
- Click the Open option.
- In the «Home» tab, under the «Styles» section, click the More (down-arrow button) menu.
- Click the Create a style option.
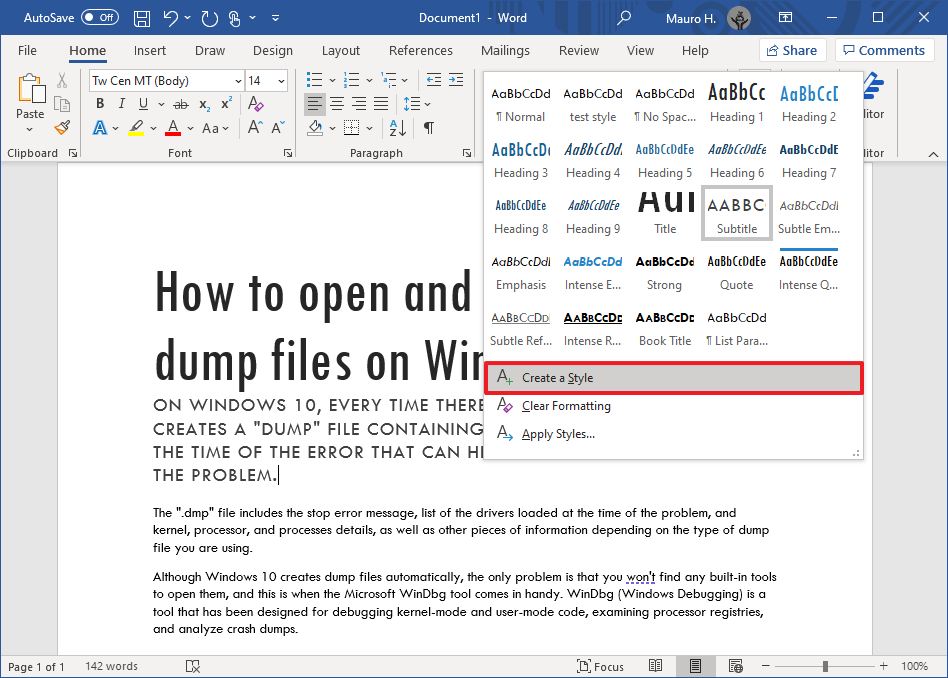
- Specify a name for the style.
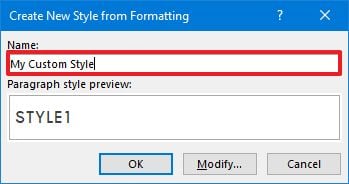
- Click OK button.
After you complete the steps, the new element will appear in the Styles menu.
Modify style elements
To modify a new or existing style element, use these steps:
- Open the Word app.
- Click the Open option.
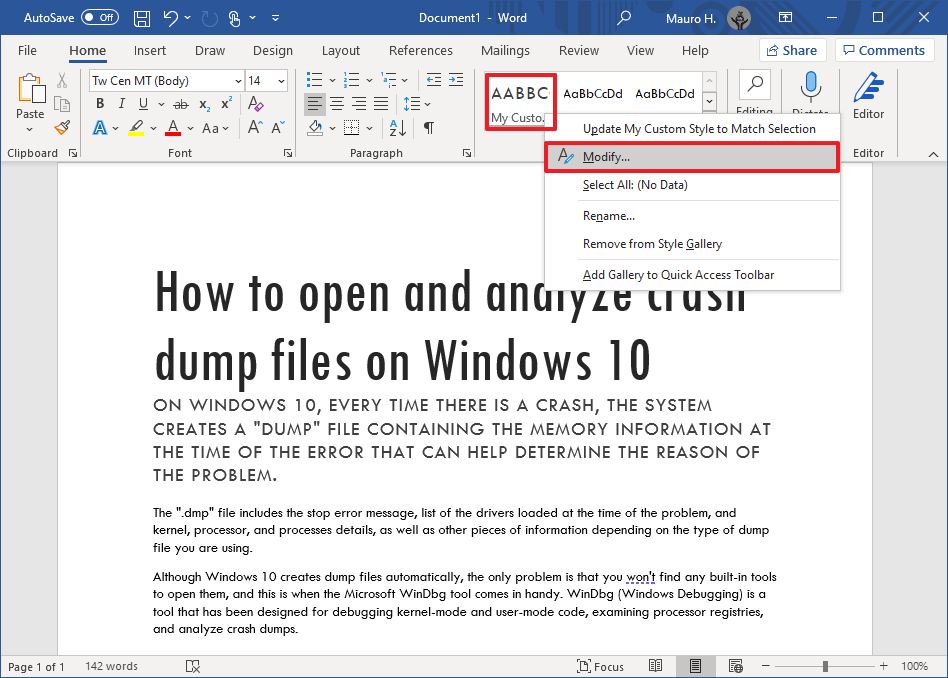
- In the «Home» tab, under the «Styles» section, right-click the style and select the Modify Option.
- Customize the style name and formatting settings (for example, font, size, color, aligment, etc.) as necessary.
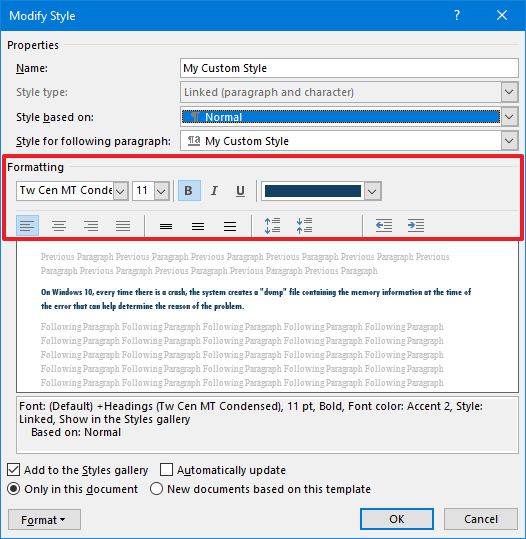
- Click the OK button.
Once you complete the steps, the new styling changes will apply to the element.
 Get subscribed
Microsoft 365 gives you full access to all the Office apps and perks, such as 1TB OneDrive storage and Skype minutes. You can also install Word, Excel, PowerPoint, Outlook, and other apps on up to five devices, and depending on the subscription, you can share the account with up to five people.
How to use themes in Word
After applying the style, you can use themes to give the document a different look and feel with colors and a combination of fonts.
To apply a theme to a Microsoft Word document, use these steps:
- Open the Word app.
- Click the Open option.
- Select the document you already styled to open it.
- Click the Design tab.
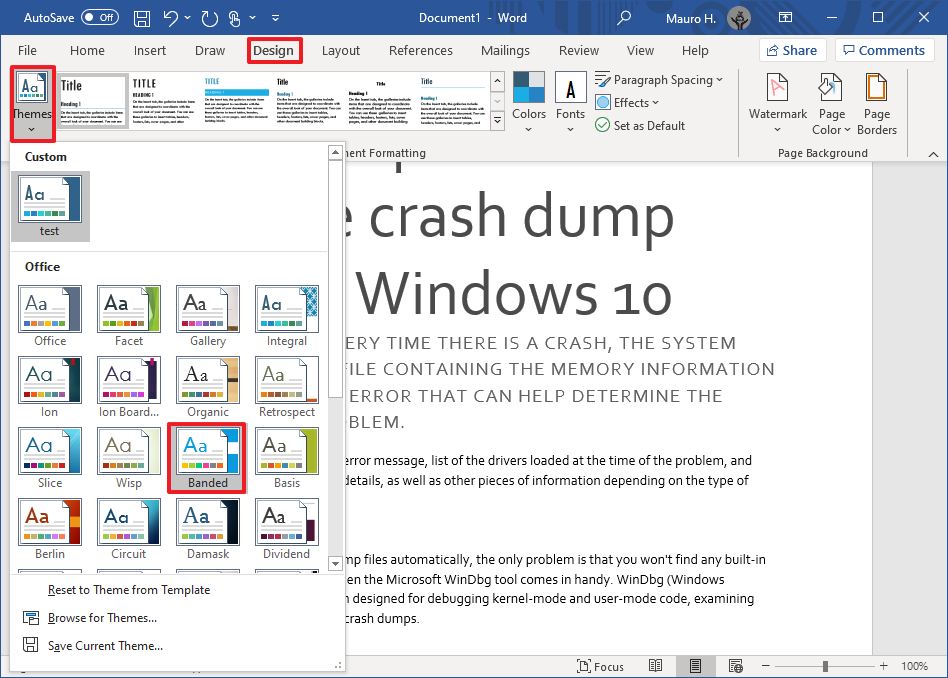
- Click the Themes button.
- Roll the mouse pointer over the themes to see a live preview of each available theme.
- Click the theme you want for the document.
- (Optional) Use the «Document Formatting» section to select another version of the theme with different combinations of fonts and colors.
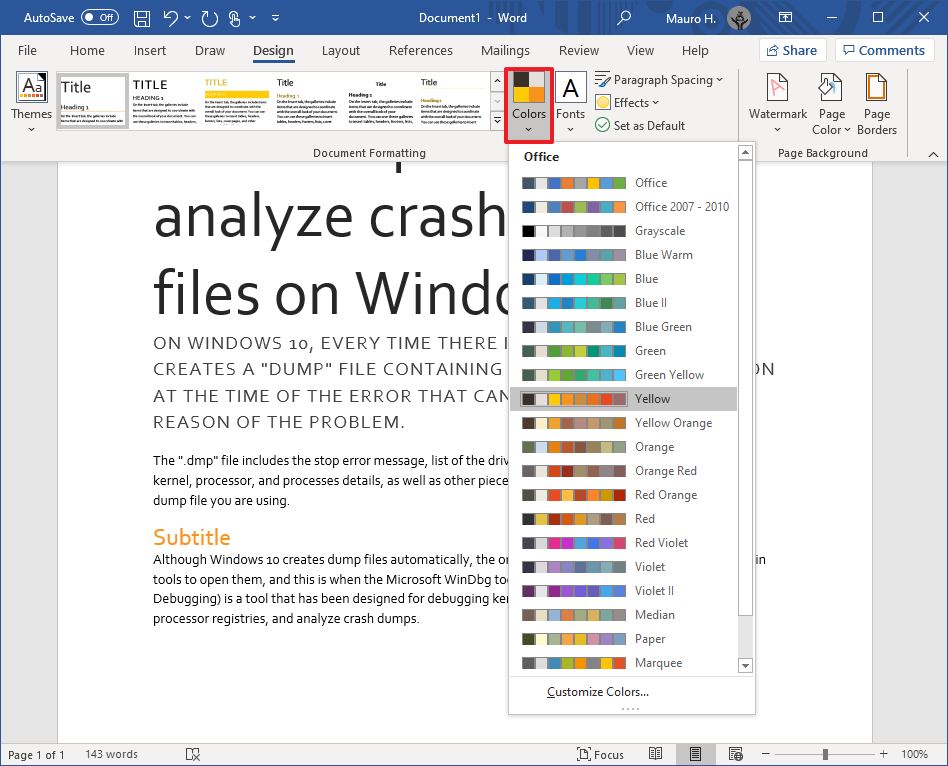
- (Optional) Click the «Colors» menu to select a different color scheme.
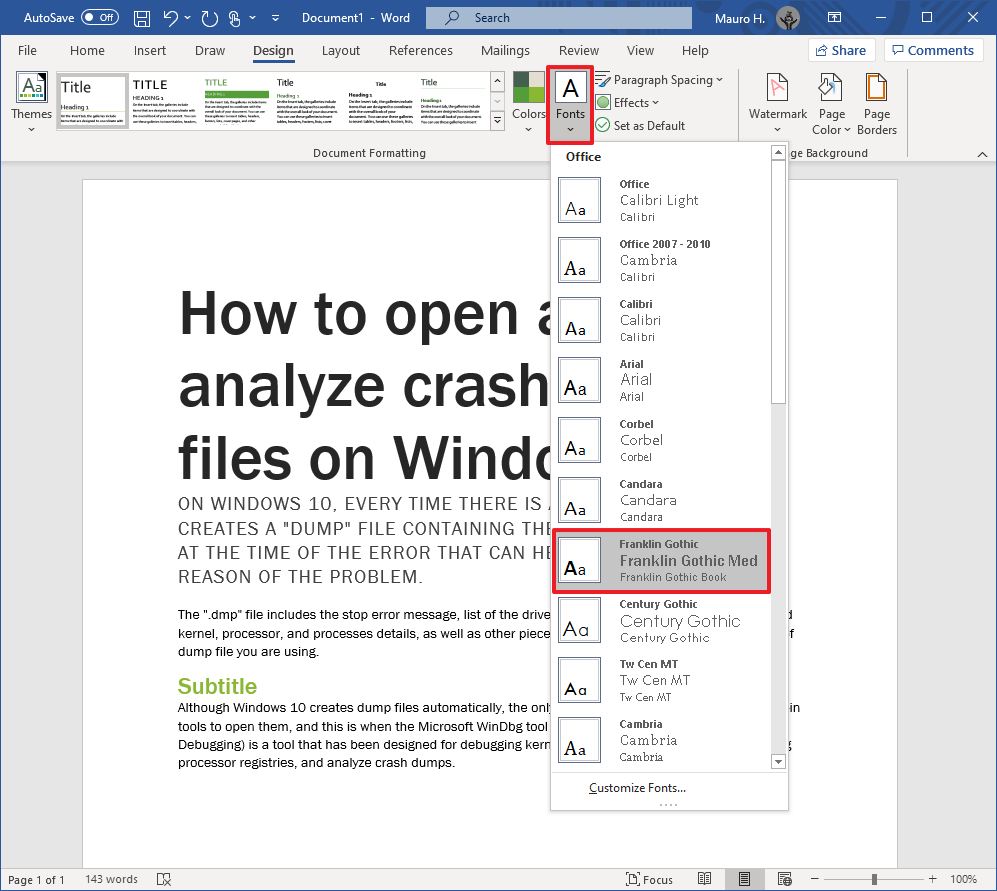
- (Optional) Click the «Fonts» menu to select a different combination of fonts.Quick note: As you open the menu, the top font is one for the title, the one in the middle is for the subheadings, and the one at the bottom is for the content.
After you complete the steps, the content will incorporate the new colors and fonts available through the theme you selected.
Set theme as the default
To set a theme as the default for Word, use these steps:
- Open the Word app.
- Click the Open option.
- Select the document you already styled to open it.
- Click the Design tab.
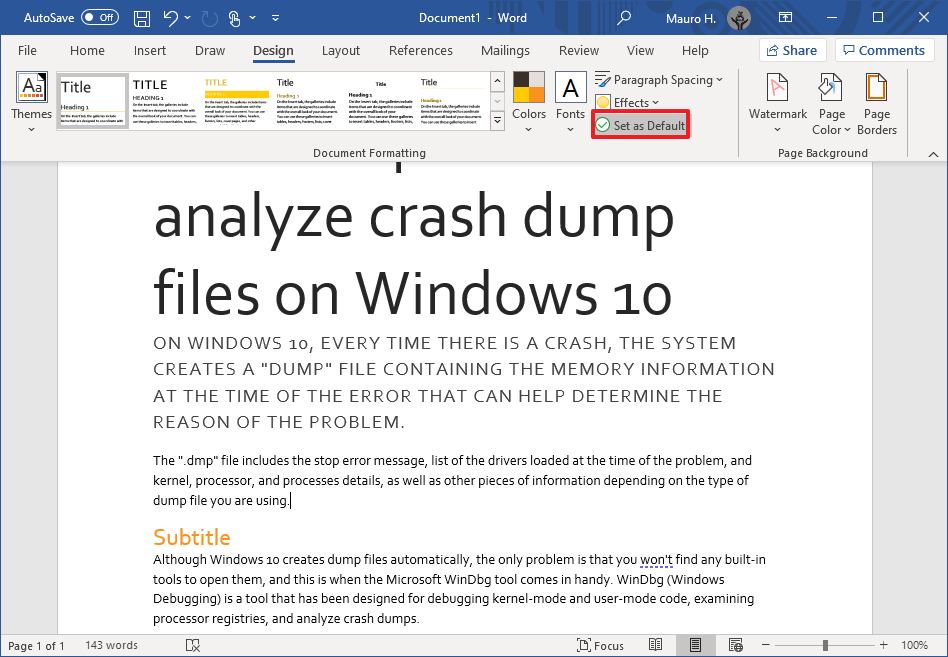
- Customize the formatting of the document with colors, fonts, spacing, and effects.
- Click the Set as Default button.
- Click the OK button.
Once you complete the steps, the theme will be available as the default for every new document. However, it won’t apply to the document automatically. Instead, it will be the default theme in the «Style» section, in the «Home» tab.
Create a new theme template
To create a new theme for Microsoft Word documents, use these steps:
- Open the Word app.
- Click the Open option.
- Select the document you already styled to open it.
- Click the Design tab.
- Use the «Document Formatting» section to select a format.
- Click the «Colors» menu to select a color scheme.
- Click the «Fonts» menu to select a combination of fonts.
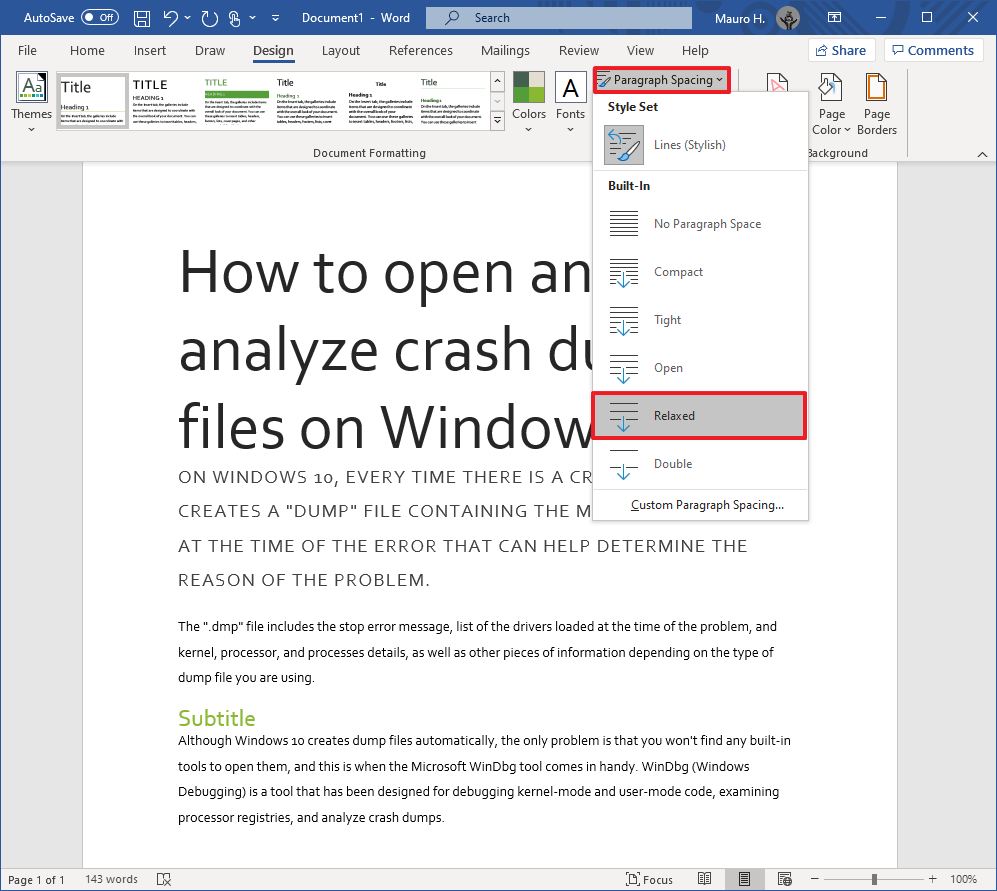
- Click the «Paragraph Spacing» menu and select one of the predefined options.Quick tip: You can also click the Custom Paragraph Spacing option to create a new style.
- (Optional) Click the «Effects» menu and select the effect you want to use when inserting objects.
- Click the «Themes» menu and choose the Save Current Theme option.
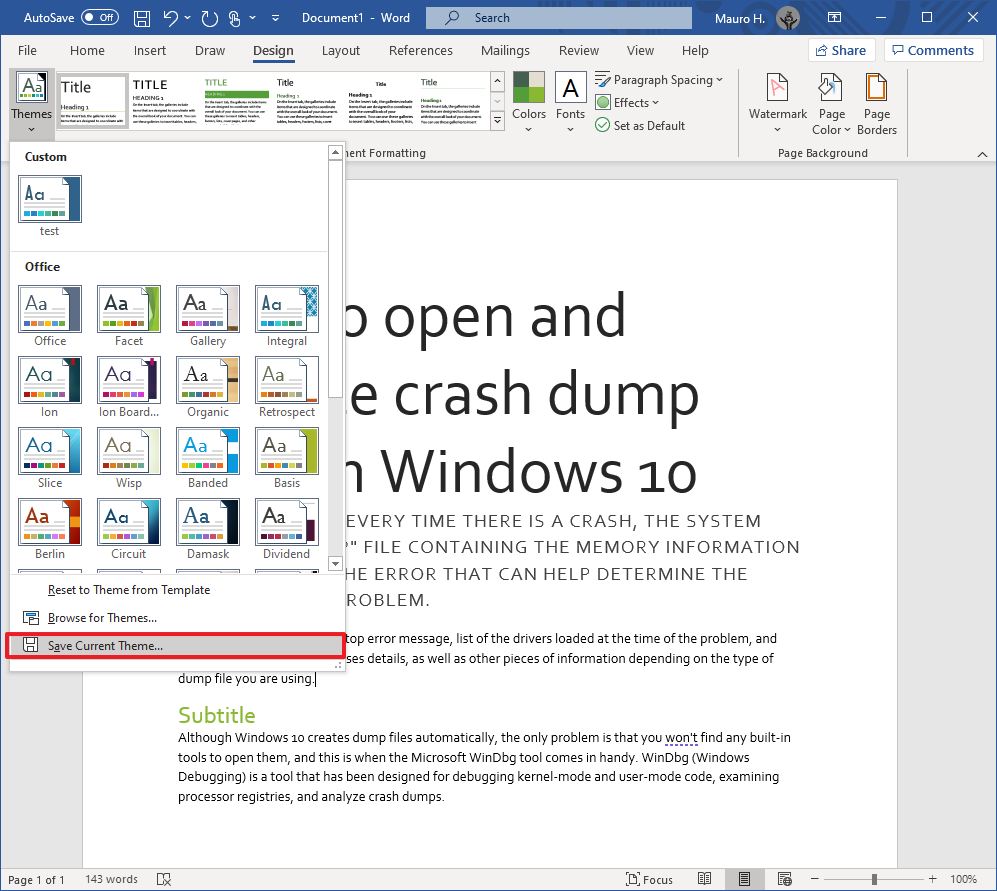
- Confirm a name for the theme.
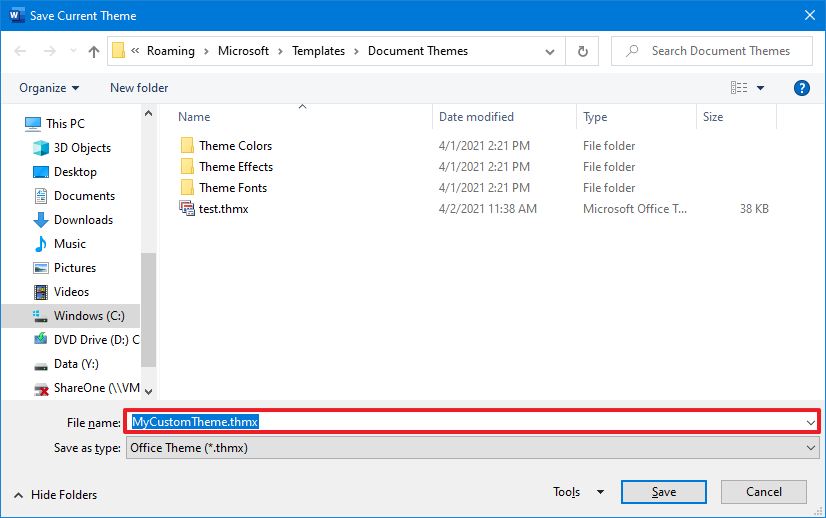
- Click the Save button.
After you complete the steps, the new theme will be available from the «Themes» menu in the «Custom» section.
More Windows 10 resources
For more helpful articles, coverage, and answers to common questions about Windows 10, visit the following resources:
- Windows 10 on Windows Central – All you need to know
- Windows 10 help, tips, and tricks
- Windows 10 forums on Windows Central
All the latest news, reviews, and guides for Windows and Xbox diehards.
Mauro Huculak is technical writer for WindowsCentral.com. His primary focus is to write comprehensive how-tos to help users get the most out of Windows 10 and its many related technologies. He has an IT background with professional certifications from Microsoft, Cisco, and CompTIA, and he’s a recognized member of the Microsoft MVP community.
Most Popular

For the last lesson in this Geek School series, we’re going to show you how to use Styles, Style Sets, and Themes to save a lot of time when formatting your documents by creating reusable settings that can be applied to all of your documents.
Up until now, you’ve been learning about how to create documents and implement formatting bit by bit. In other words, you create a document and changes you make are typically localized. In this lesson, we step back a bit and show you how styles can take the work out of creating a consistent look and feel that you can control from a central location rather than having to needlessly apply changes to each and every part.
Styles are very useful for generating a table of contents but that is but only one use for them.
The main function for styles is to allow you to quickly set titles, subheadings, section headings apart from one another by giving them unique fonts, font characteristics, and sizes. By grouping these characteristics into styles, you can create documents that have a consistent look without having to manually format each section header. Instead you set the style and you can control every heading set as that style from central location.
With styles you can:
- Apply a consistent look across the whole document instead of having to format each section individually.
- Automatically number section headers.
- Apply same font to the entire text body.
- Apply the same font to header sections.
- Use a consistent paragraph spacing.
- Pick a default color scheme for SmartArt, charts, and shapes.
- Pick from a number of pre-designed styles use them as your own and modify them.
Let’s go over some examples to give you a better idea of what some of these mean. First, note the “Styles” section on the “Home” tab.

It expands to reveal more:
Click on the small arrow in the lower right corner for a floating “Styles” panel.
This windows stays visible so you can use it as you work through your documents. You can move it outside the application window, and also dock it right or left side of it.
The style dialog box like format shape floats independent of Microsoft Word. That means you can move it outside the document to make more room or even more it to a second monitor if you are using dual monitors.
Click “options” and you can select how the styles pane is shown and sorted:
Each style can be applied differently and you can hover over the symbol to the right to see exactly how it is applied.
If you click on that symbol, you are presented with a dropdown options menu, which gives you further control over the styles in your current document.
You can modify a selected style, which will apply to all instances of that style throughout the document. In this case, there are 109 of them. Here you can also select or clear all instances of that style, and remove it completely from the “style gallery.”
Along the bottom of the pane are three buttons, which have some pretty important functions.
New Style
If you click “new style” the resulting dialog box will let you create a new style using existing formatting. As you apply new characteristics to the style, you can see how it will look in the preview.
You can dig into the nitty-gritty specifics of the style including the format, such as if you want it to have bullets, borders, fonts, text effects, and so on. From there, you can add the style to just that document, or you can add it to the template so every document has that style from there on.
Style Inspector
Use the style inspector to “inspect” styles throughout your document. This feature is useful for stripping formatting or further changing it.
You can also click each style for a drop-down options menu, allowing you to modify and build a new style, select all instances of that style in the document or completely clear them.
Click the bottom-left button to show the “reveal formatting” pane to see how your document is formatted. This is somewhat similar to or at least hearkens back to “Reveal Codes” in WordPerfect.
Manage Styles
The “manage styles” button allows you to quickly edit styles such as to modify their appearance, reorder their recommended order of appearance, restrict which ones are available, and set new defaults to current styles.
It’s useful to know how to take control of your styles because used well and wisely, they can give you a lot of power with your documents.
Style Sets
The “Design” tab brings all of the formatting options you can apply to a document in one place.
“Document Formatting” section shows you how the heading and text would look if you pick one of the combinations there. Each of these combinations is called a “Style Set.” If you briefly hover over each style set, the formatting of your document will change to preview how it would look. If you click on the style set, it will be applied to your current document. This is non-destructive, so if you don’t like the new style, you can just as easily change it.
Similar to other sections throughout Word, if you click the scrollbar on the right edge, it will expand to a full menu. Further options at the bottom allow you to reset your style set to the default or save your current style as a new set.
The right side of the document formatting section contains functions for changing your colors, fonts, paragraph spacing, add effects, and set your changes as the default style set.
Changing the colors simply means that shapes, SmartArt, charts, and text will affected.
There are plenty of built-in color schemes to choose from, however, if none these strike your fancy, or you have specific colors you want to use, you can click “Customize Color” at the bottom. Here you’ll have virtually limitless choices, and you can save your new custom color set and use it later.
The “Fonts” menu contains predefined schemes that you can select based on the old Office theme, or a font family.
Select “Customize Fonts” at the bottom of the menu to quickly create a new custom set based on your personal favorite font family. In the screenshot below, we see you can assign a “heading font” and “body font” and then give it a name, save it, and then apply it to your current and future documents (“set as default”).
If you choose a new font style, you can see it reflected in the font section of the “Home” tab.
“Paragraph Spacing” contains a variety of built-in styles, which should please all but the most picky. Again, to see how your document is affected by these, you can hover over each one and the changes will be previewed in your document.
Note the “Custom Paragraph Spacing” option at the bottom of this menu.
The effects menu allows you to quickly change the effect of design elements such as shapes, SmartArt, and charts.
If you want to preserve any changes to your style set permanently as the default, then you can click “set as default.” A dialog box will appear asking you to confirm.
Finally, if you want to use a custom style set in the future, but you do not want to apply it as the default. You can save it as a template file. Right-click on the style set and then “Save.”
Note, we’ll cover templates shortly. Here you should simply know that if you want to use your new custom template in the future, you would only need to double-click on the *.dotx file or open it from Word.
Note the option “Add Gallery to Quick Access Toolbar” simply means that if you want quick access to the document formatting gallery, it can be accessed from the QAT at the top of the Word window.
Modifying Styles
Suppose we only want to modify Heading 2.
For example, let’s say we want to center, bold, and italicize it. The quickest way to do this would be to change the selected style, then right-click on that style in the “Styles” section on the “Home” tab, in this case Heading 2, and select “Update Heading 2 to Match Selection.” All instances of Heading 2 will now reflect your changes throughout the document.
Themes
The style set you are greeted with when you click on the “Design” tab comprises the “Office” theme. Other themes can be accessed by clicking on the “Themes” button on the left of the “Design” tab.
A theme comprises a whole new bunch of style sets, each with its own fonts, color, spacing and anything else previously discussed.
Note at the bottom, there are further options to rest the theme to the template, browse for custom themes on your computer, as well as save the current theme, assuming you’ve altered or customized it, as a new theme. This is different from saving a style set. Remember, a style set saves as a template file (.dotx). A theme is saved as a theme file (.thmx) and each theme file:
Themes are remarkably simple and a very effective way to apply a complete look and feel to your documents in a matter of seconds.
Conclusion
And that’s it for the How-To Geek School’s Guide to Word Formatting. It’s been fun, we’ve learned a lot, and hope you did too! If you missed any part of this series, or simply want to review something again, you can easily do so by clicking any of the links in the table of contents at the beginning of the article.
READ NEXT
- › HoloLens Now Has Windows 11 and Incredible 3D Ink Features
- › Google Chrome Is Getting Faster
- › The New NVIDIA GeForce RTX 4070 Is Like an RTX 3080 for $599
- › This New Google TV Streaming Device Costs Just $20
- › BLUETTI Slashed Hundreds off Its Best Power Stations for Easter Sale
- › How to Adjust and Change Discord Fonts
In our last post we shared some basic formatting tips for your Word documents. This week, we’re going to go a bit more in-depth and look at styles.
Styles are sets of text formatting rules that make it quicker and easier to ensure consistency in your documents. If you apply the style Heading 2, for example, all headings throughout your document will be formatted identically. Already written half your document, but want to make some formatting changes? Instead of going back through and manually changing everything, just modify the style’s attributes and Word will automatically update all text based on that style.
Here’s a quick overview of Word’s different style types and how they can be applied in a document:
Character styles contain formatting rules for:
- Font
- Size
- Colour
- Bold/italics/underline
- Borders
- Shading
Paragraph styles contain formatting rules for:
- Text and paragraphs
- Tab stops
- Line spacing
- Text alignment
- Borders
Table styles contain formatting rules for:
- Table lines
- Cell shading
List styles contain formatting rules for:
- Multilevel lists (up to 9 levels)
- Indentation
- Numbering or bullet schemes
Linked styles can be used as both paragraph and character styles. If you apply a linked style to a paragraph, it will be applied as a paragraph style. A linked style applied only to words or phrases will be applied as a character style.
Another major plus point of styles – probably the biggest, actually – is the Table of Contents. Especially useful for longer documents, where doing it manually is simply unthinkable, Word automatically generates the Table of Contents as well as lists of tables and figures. And again, it’s so easy to make modifications.
Word offers a number of predefined styles, which can be found in the Styles gallery on the Home tab:
![]()
You can apply these to your text as-is, or modify them to your liking. To do this, click the small arrow under the bottom right corner of the Styles gallery to open a smaller, floating Styles pane. Hover your mouse over the style you want to change, click the drop-down arrow and select Modify.
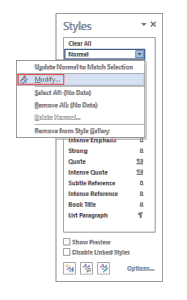
In this screenshot we have chosen the style called “Normal”, it is highly advisable to NOT modify this style, we have just used it for an example screenshot.
To create a new style, the simplest method is to format a block of text the way you want it, select all that text, and then click the New Style ![]() button at the bottom of the Styles pane.
button at the bottom of the Styles pane.
If you want to create a new style by defining formatting rules in a dialogue box, click the lower downward arrow ![]() to the right of the Styles gallery, select Create a Style, and click the Modify button. Or, click the aforementioned New Style button on the Styles pane. Either way, the Create New Style from Formatting dialogue box will open.
to the right of the Styles gallery, select Create a Style, and click the Modify button. Or, click the aforementioned New Style button on the Styles pane. Either way, the Create New Style from Formatting dialogue box will open.
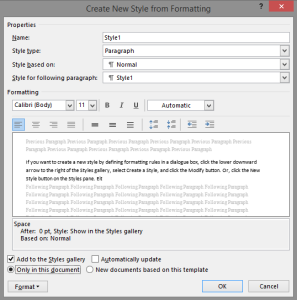
Start by entering a name for your style in the Name field. This makes it easier to find in the Styles gallery next time you want to use it. While we’re on the subject, make sure the Add to the Styles gallery box (at the bottom of the dialogue) is checked.
Now let’s define the style’s properties. In the first drop-down menu, select a Style type. This will determine which controls are available in the formatting dialogue box. Then select a parent style from the Style based on menu (not available for List styles). Any formatting left undefined in your new style will be copied from this style. Select a Style for Following Paragraph (only for Paragraph and Linked styles) to control the appearance of paragraphs after you press Enter.
In the Formatting section of the dialogue box, use the control buttons to define text formatting attributes such as font, size, alignment, and line spacing. If the formatting attribute you want to change isn’t available, click the Format drop-down menu in the bottom left corner to open other formatting categories.
Finally, you can define how your new style will be available: Only in this document or New documents based on this template. Click OK to save your new style in the Styles gallery.