
Word for Microsoft 365 Word for Microsoft 365 for Mac Word 2021 Word 2021 for Mac Word 2019 Word 2019 for Mac Word 2016 Word 2016 for Mac Word 2013 Word 2010 Word for Mac 2011 More…Less
To create a form in Word that others can fill out, start with a template or document and add content controls. Content controls include things like check boxes, text boxes, date pickers, and drop-down lists. If you’re familiar with databases, these content controls can even be linked to data.
Show the Developer tab
If the developer tab isn’t displayed in the ribbon, see Show the Developer tab.
Open a template or a blank document on which to base the form
To save time, start with a form template or start from scratch with a blank template.
-
Go to File > New.
-
In Search online templates, type Forms or the type of form you want and press ENTER.
-
Choose a form template, and then select Create or Download.
-
Go to File > New.
-
Select Blank document.
Add content to the form
Go to Developer, and then choose the controls that you want to add to the document or form. To remove a content control, select the control and press Delete. You can set properties on controls once inserted.
Note: You can print a form that was created using content controls, but the boxes around the content controls will not print.
In a rich text content control, users can format text as bold or italic, and they can type multiple paragraphs. If you want to limit what users add, insert the plain text content control.
-
Click or tap where you want to insert the control.
-
Select Developer > Rich Text Content Control
 or Plain Text Content Control .
 or Plain Text Content Control
  .
.To set specific properties on the control, see Set or change properties for content controls.
A picture control is often used for templates, but you can also add a picture control to a form.
-
Click or tap where you want to insert the control.
-
Select Developer > Picture Content Control
.
 .
.To set specific properties on the control, see Set or change properties for content controls.
Use building block controls when you want people to choose a specific block of text. For example, building block controls are helpful when you need to add different boilerplate text depending on the contract’s specific requirements. You can create rich text content controls for each version of the boilerplate text, and then you can use a building block control as the container for the rich text content controls.
-
Click or tap where you want to insert the control.
-
Go to DeveloperBuilding Block Gallery Content Control
(or Building Block Content Control). -
Select Developer and content controls for the building block.
 (or Building Block Content Control).
-
Click or tap where you want to insert the control.
To set specific properties on the control, see Set or change properties for content controls.
In a combo box, users can select from a list of choices that you provide or they can type in their own information. In a drop-down list, users can only select from the list of choices.
-
Go to Developer > Combo Box Content Control
or Drop-Down List Content Control . -
Select the content control, and then select Properties.
-
To create a list of choices, select Add under Drop-Down List Properties.
-
Type a choice in Display Name, such as Yes, No, or Maybe.
Repeat this step until all of the choices are in the drop-down list.
-
Fill in any other properties that you want.
Note: If you select the Contents cannot be edited check box, users won’t be able to click a choice.
 or Drop-Down List Content Control
  .
.-
Click or tap where you want to insert the date picker control.
-
Select Developer > Date Picker Content Control
.
 .
.To set specific properties on the control, see Set or change properties for content controls.
-
Click or tap where you want to insert the check box control.
-
Select Developer > Check Box Content Control
.
 .
.To set specific properties on the control, see Set or change properties for content controls.
Legacy form controls are for compatibility with older versions of Word and consist of legacy form and Active X controls.
-
Click or tap where you want to insert a legacy control.
-
Go to Developer > Legacy Forms
drop-down. -
Select the Legacy Form control or Active X Control that you want to include.
 drop-down.
Set or change properties for content controls
Each content control has properties that you can set or change. For example, the Date Picker control offers options for the format you want to use to display the date.
-
Select the content control that you want to change.
-
Go to Developer > Properties.
-
Change the properties that you want.

Add protection to a form
If you want to limit how much others can edit or format a form, use the Restrict Editing command:
-
Open the form that you want to lock or protect.
-
Select Developer > Restrict Editing.
-
After selecting restrictions, select Yes, Start Enforcing Protection.


Advanced Tip:
If you want to protect only parts of the document, separate the document into sections and only protect the sections you want.
To do this, choose Select Sections in the Restrict Editing panel. For more info on sections, see Insert a section break.

Show the Developer tab
If the developer tab isn’t displayed in the ribbon, see Show the Developer tab.
Open a template or use a blank document
To create a form in Word that others can fill out, start with a template or document and add content controls. Content controls include things like check boxes, text boxes, and drop-down lists. If you’re familiar with databases, these content controls can even be linked to data.
-
Go to File > New from Template.
-
In Search, type form.
-
Double-click the template you want to use.
-
Select File > Save As, and pick a location to save the form.
-
In Save As, type a file name and then select Save.

-
Go to File > New Document.
-
Go to File > Save As.
-
In Save As, type a file name and then select Save.

Add content to the form
Go to Developer, and then choose the controls that you want to add to the document or form. To remove a content control, select the control and press Delete. You can set Options on controls once inserted. From Options, you can add entry and exit macros to run when users interact with the controls, as well as list items for combo boxes, .
-
In the document, click or tap where you want to add a content control.
-
On Developer, select Text Box, Check Box, or Combo Box.
-
To set specific properties for the control, select Options, and set .
-
Repeat steps 1 through 3 for each control that you want to add.

Options let you set common settings, as well as control specific settings. Select a control and then select Options to set up or make changes.
-
Set common properties.
-
Select Macro to Run on lets you choose a recorded or custom macro to run on Entry or Exit from the field.
-
Bookmark Set a unique name or bookmark for each control.
-
Calculate on exit This forces Word to run or refresh any calculations, such as total price when the user exits the field.
-
Add Help Text Give hints or instructions for each field.
-
OK Saves settings and exits the panel.
-
Cancel Forgets changes and exits the panel.
-
-
Set specific properties for a Text box
-
Type Select form Regular text, Number, Date, Current Date, Current Time, or Calculation.
-
Default text sets optional instructional text that’s displayed in the text box before the user types in the field. Set Text box enabled to allow the user to enter text into the field.
-
Maximum length sets the length of text that a user can enter. The default is Unlimited.
-
Text format can set whether text automatically formats to Uppercase, Lowercase, First capital, or Title case.
-
Text box enabled Lets the user enter text into a field. If there is default text, user text replaces it.
-
-
Set specific properties for a Check box.
-
Default Value Choose between Not checked or checked as default.
-
Checkbox size Set a size Exactly or Auto to change size as needed.
-
Check box enabled Lets the user check or clear the text box.
-
-
Set specific properties for a Combo box
-
Drop-down item Type in strings for the list box items. Press + or Enter to add an item to the list.
-
Items in drop-down list Shows your current list. Select an item and use the up or down arrows to change the order, Press — to remove a selected item.
-
Drop-down enabled Lets the user open the combo box and make selections.
-
-
Go to Developer > Protect Form.
Note: To unprotect the form and continue editing, select Protect Form again.
-
Save and close the form.

If you want, you can test the form before you distribute it.
-
Protect the form.
-
Reopen the form, fill it out as the user would, and then save a copy.
Show the Developer tab
-
On the right side of the ribbon, select
, and then select Ribbon Preferences. -
Under Customize, select Developer .
 , and then select Ribbon Preferences.
Open a template or a document on which to base the form
You can start with a blank document and create your own form. Or, to save time, you can start with a form template.
-
Go to File > New from Template.
-
In the left pane, expand Online Templates, and then select Forms.
-
Double-click the form template that you want to use.
Add content controls to the form
-
In the document, click where you want to add the control.
-
On the Developer tab, under Form Controls, select Text Box, Check Box, or Combo Box.
-
To set specific properties for the control, select Options, and then configure the properties that you want.
Note: To create a list of drop-down items in a combo box, select the combo box placeholder, click Options, and then add the items that you want to appear in the drop-down list.
-
Repeat steps 1 through 3 for each control that you want to add.
Add instructional text (optional)
Instructional text (for example, «Type First Name») in a text box can make your form easier to use. By default, no text appears in a text box, but you can add it.
-
Select the text box control that you want to add instructional text to.
-
On the Developer tab, under Form Controls, select Options.
-
In Default Text, type the instructional text.
-
Make sure that Fill-in enabled is selected, and then select OK.
Protect the form
-
On the Developer tab, under Form Controls, select Protect Form.
Note: To unprotect the form and continue editing, click Protect Form again.
-
Save and close the form.
Test the form (optional)
If you want, you can test the form before you distribute it.
-
Protect the form.
-
Reopen the form, fill it out as the user would, and then save a copy.
Creating fillable forms isn’t available in Word for the web.
You can create the form with the desktop version of Word with the instructions in Create a fillable form.
When you save the document and reopen it in Word for the web, you’ll see the changes you made.
Need more help?
Start with a form template
- Go to File > New.
- In Search online templates, type Forms or the type of form you want and press ENTER.
- Choose a form template, and then select Create or Download.
Contents
- 1 How do I create an electronic fillable form in Word 2013?
- 2 How do I create an electronic fillable form?
- 3 Can you turn a Word document into a fillable form?
- 4 How do I save a Word document as a fillable template?
- 5 How do I create a fillable PDF from Word?
- 6 How do I create an online form in Word?
- 7 How do I create a form line in Word?
- 8 How do I create an order form in Word?
- 9 How do I create a fill in the blank line in Word 2013?
- 10 How do I make a fillable form in word and not editable?
- 11 How do I create a form in Word 2016?
- 12 How do I create a custom form?
- 13 How do I create a fillable form in Word for Mac?
Creating Fillable Forms Using Microsoft Word
- Enable Developer Tab. Open Microsoft Word, then go to the File Tab > Options > Customize Ribbon > check the Developer Tab in the right column > Click OK.
- Insert a Control.
- Edit Filler Text.
- Design Mode button again to exit the mode.
- Customize Content Controls.
How do I create an electronic fillable form?
How to create fillable PDF files:
- Open Acrobat: Click on the “Tools” tab and select “Prepare Form.”
- Select a file or scan a document: Acrobat will automatically analyze your document and add form fields.
- Add new form fields: Use the top toolbar and adjust the layout using tools in the right pane.
- Save your fillable PDF:
Can you turn a Word document into a fillable form?
You can create a fillable form in Word itself, so that other people can fill out the form without editing the underlying document. You can also use Adobe Acrobat and other PDF tools to convert a Word document to an editable form that anyone with PDF-compatible software can fill out.
How do I save a Word document as a fillable template?
Saving and Using a Form
- Press F12. Word displays the Save As dialog box.
- Using the Save As Type drop-down list, select Word Template.
- If necessary, change to the directory where the template is to be stored.
- In the File Name field, enter the name under which you want this template saved.
- Click on Save.
How do I create a fillable PDF from Word?
Create a Fillable PDF Form from a Word Document
- Open the Word document that you want to make into a PDF form.
- Go to File -> Print, make sure “Adobe PDF” is selected as your printer, and then click the Print button.
- Word will ask you where to save the PDF file you’re creating.
How do I create an online form in Word?
Go to File > New. In Search online templates, type Forms or the type of form you want and press ENTER. Choose a form template, and then select Create or Download.
How do I create a form line in Word?
Click the “Insert” tab, then click the “Shapes” button. Click the basic Line shape. When the cursor changes to a plus sign, hold down the “Ctrl” key to give you a straight drawing line, and drag the cursor to the right of the text you just typed, giving your form recipients a place to write.
How do I create an order form in Word?
- Open a new Word document and then click “File,” “Options” and then click the “Customize Ribbon” tab.
- Check the “Developer” box and then select “OK.” The Developer tab displays on Word’s ribbon interface.
- Enter the headings that you want to include on your order form as regular text.
How do I create a fill in the blank line in Word 2013?
Blank Space Method
- Place the insertion point where you want the ruling line (underlining).
- On the Format menu, click Font. In the Underline style box, select the line style you want, and then click OK.
- For every blank space you want to underline, press CTRL+SHIFT+SPACEBAR.
How do I make a fillable form in word and not editable?
To make a document un-editable, first, select all the text in the document by pressing Ctrl+A. Once all of the text is highlighted, click “Restrict Editing” in the “Protect” group on the “Developer” tab.
How do I create a form in Word 2016?
Creating a computerized form
- Press Ctrl+N to create a new document.
- On the File tab, choose Save As. You see the Save As window.
- Click the Browse button. The Save As dialog box opens.
- Open the Save As Type menu and choose Word Template.
- Enter a descriptive name for your template and click the Save button.
How do I create a custom form?
How To Create a Custom Form
- Log into your Create Account.
- Click “Content” from the top menu.
- Click “Add/Edit/Delete Forms” from the left hand menu.
- Click ”Create New Form”.
- Type the name of your form in the title box (this will appear above the form on your website page).
How do I create a fillable form in Word for Mac?
To do this, click on “File” tab > “Options” > “Customize Ribbon”. Then under the “Customize Ribbon”, select the “Developer” checkbox and click “OK”. Step 2: Open a Word document and you will be able to make the Word document fillable.
Processing paper forms is always challenging. Besides the time-consuming paperwork, you must also avoid making data entry errors. Even the slightest mistake could result in significant losses; what more with repeated blunders?
That’s not all. Since it takes more time to fill out printed forms, using them can be a major roadblock to productivity and customer satisfaction.
If you know how to create electronic forms, you can significantly minimize the risk of losing profit and missing deadlines. When it comes to making eforms, there are multiple ways to go about it.
Table of Contents
- How to Create Forms in Word
- How to Create Electronic Forms With Fill
- Examples of Electronic Forms You Can Create With Fill
- How to Add Signatures to Fill’s Electronic Forms
- Advantages of Using Electronic Forms

Creating electronic forms such as sales invoices and compliance checklists doesn’t require coding skills. You can either scan an existing document or create one from scratch. Another option is to use templates, which are basically preformatted forms that you can edit to suit your needs.
Of course, you can only do this with the help of an app or software. While the most popular choice would be MS Word, there’s no harm in exploring other options.
How to Create Forms in Word
The steps below will teach you how to create electronic forms using MS Word.
- Open MS Word. Under the File tab, go to More > Options and select Customize Ribbon. Scroll through the list of options displayed under Customize the Ribbon. Click the checkbox next to Developer and click OK.
- From the ribbon, go to the Developer tab and click Design Mode.
- Click a specific section in your document where you want a data field to appear. A data field is where users can enter or select data. Ideally, it should be right next to a question or label.
- Select and insert a content control option from the Controls group. Content control refers to a specific data field like rich text, drop-down list, checkbox, and more.
- To customize the data field’s appearance, right-click on the content control, then select Properties. Change the default settings and click OK.
- If you want to include placeholder texts, click on the data field and type a hint or sample response.
- Repeat steps 3 to 6 until you’ve achieved your desired outcome.
- To preview changes, click the Design Mode button again to disable it. Then, go back to the Developer tab and click Restrict Editing. Under Editing Restrictions, select Filling in forms. Click “Yes, Start Enforcing Protection” to proceed.
- Save your electronic form as you would a standard Word document. Go to File > Save As, and that’s it.
Now that you’ve created an electronic form, you can share it with clients directly. There’s no need to produce a hard copy.
How to Create Electronic Forms With Fill
Another way to create electronic forms is through Fill, a cloud-based esignature app with a built-in form builder.
Here’s how you can get it done:
- Go to app.fillhq.com and log in to your account.
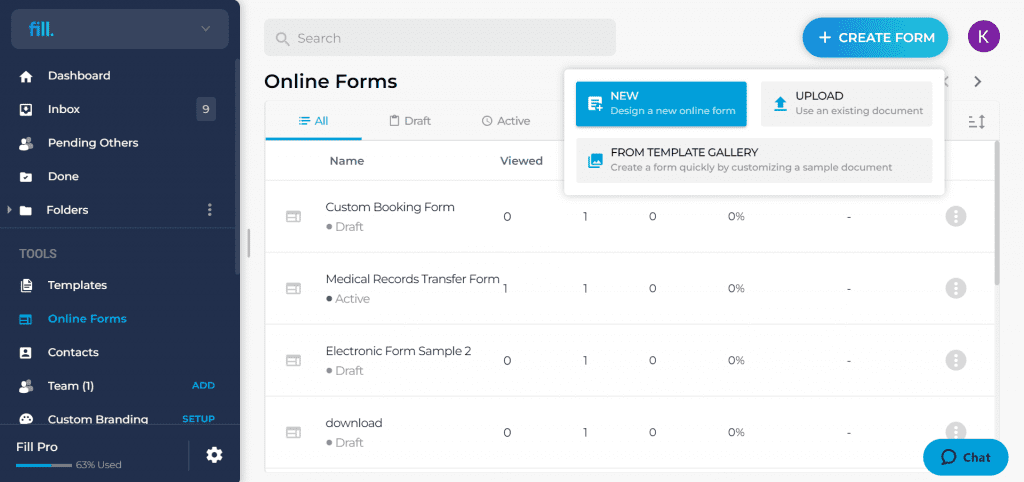
- From your web dashboard, click Tools > Online Forms.
- Click Create Form. From here, you have three options:
- New: Design one from scratch
- Upload: Create one from an existing document
- From Template Gallery: Use an existing template
Designing a blank form
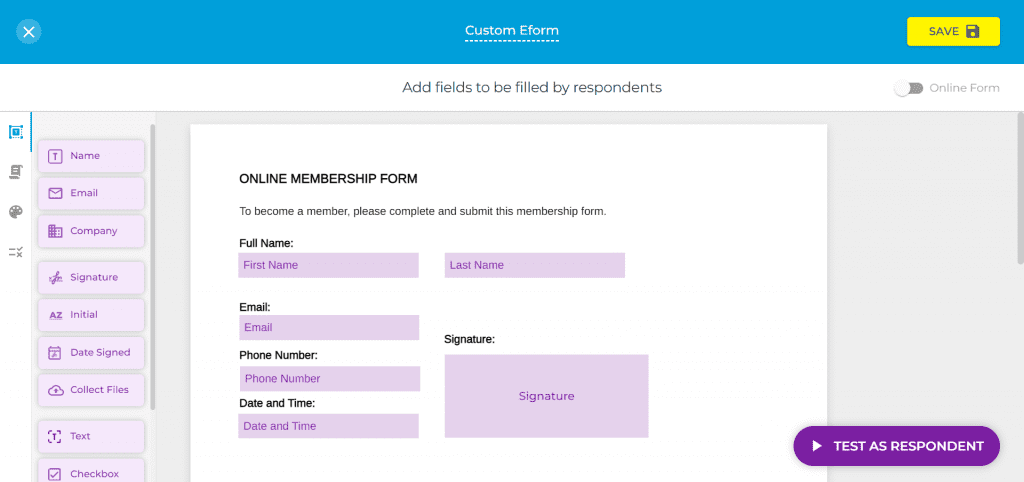
- From the Create Form options, select New.
- Name your blank document, then click Next.
- Drag any data field from the left menu and drop it into the blank page. Repeat this step until you’ve achieved your desired outcome.
- To apply the changes, click the toggle icon at the top-right to enable it. Clicking Save will only save the form as a draft.
That’s it.
Create a form out of an existing document
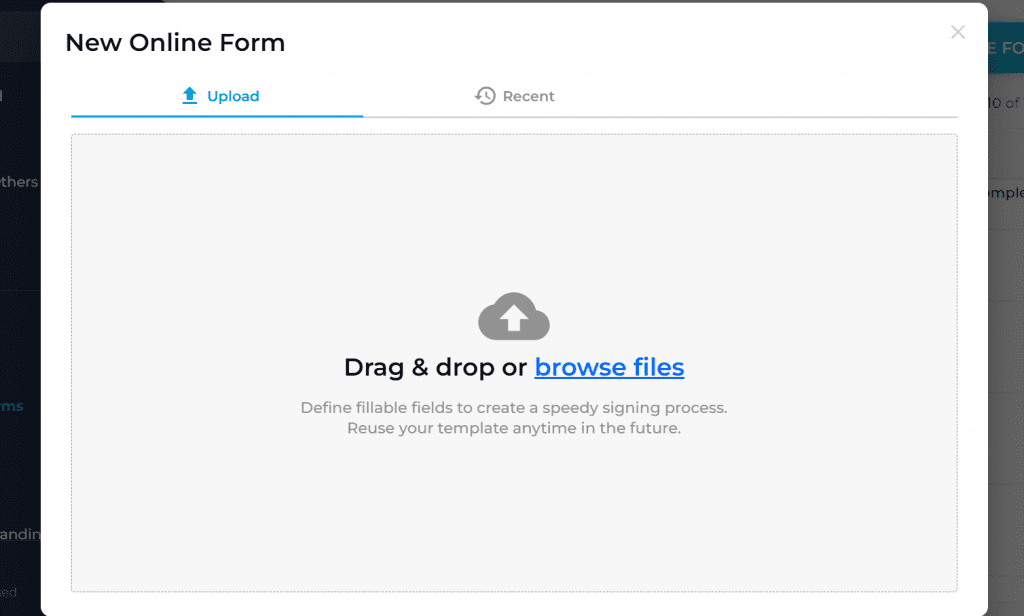
- Navigate to Create Form > Upload.
- Select and upload the file from your local folder.
- Drag any data field from the left menu and drop it into the existing document.
- Click the toggle icon to apply the changes.
Now, you’re all set to share your form with others.
Revise an existing template

- After clicking Create Form, select From Template Gallery.
- Select the template you want and click Use Template to edit it.
- To edit a data field, click on it and update the default settings.
- To add a text field, checkbox, etc., drag an element from the left menu, then drop it into the section you want.
- Click the toggle icon below the Save button to apply your changes.
Examples of Electronic Forms You Can Create With Fill
Here are some examples of eforms that you can create using Fill:
- Booking and event forms
- Staff satisfaction surveys
- Contest entry forms
- Membership forms
- Patient intakes
- Program registrations
- Leave requests
How to Add Signatures to Fill’s Electronic Forms
While other form builders don’t support adding signatures to forms, you can effortlessly do so with the help of our esignature app.
Here’s how:
- From your Fill web dashboard, go to Tools > Online Forms.
- Hover over any of the forms you’ve created.
- Click Copy Link, then view it in a new window or tab.
- Type in your email, first name, and last name. Click Continue.
- Click the empty signature field. You may then type, draw, or upload your esignature.
- Click Save and Done to complete the signing process.
5 Advantages of Using Electronic Forms
Using eforms for your online transactions offers plenty of advantages.
Here are some of them:
1. Hassle-free form creation
There’s no need to trouble yourself with complex layout processes. Just choose the fields you want to add and drag them to your form. You can quickly achieve your desired layout and save time by using templates. With just a few clicks of a button, you’ll be able to create a form according to your specific needs.
2. Secure data collection
Compared to paper forms, electronic forms are far more secure. You can encrypt responses to prevent unauthorized access and tampering. You can even restrict viewing and limit the submissions to people within your organization. This is especially important if you are collecting confidential information like financial, medical, or legal records.
3. Faster turnaround
Since electronic forms can be filled out online, respondents can send in their answers without meeting you in person. It’s also much faster to type than to handwrite answers. It only takes a few minutes to do it using their mobile phone or tablet. After receiving the submitted information, you can immediately check whether there are any lacking details. You can also import the responses automatically without manual data entry.
4. Real-time tracking
Upon sending the form, you can track whether they’ve been viewed, filled, and signed. There will be a detailed record of each activity. Plus, you can monitor any changes or updates in real time. This way, you can immediately detect and block any suspicious activity. You can also spot and follow up on late submissions.
5. Reach a global audience
You don’t have to go the extra mile to collect data from multiple recipients. All you need is to share a link or send the invite over email. There’s also less hassle since you don’t have to make printouts of each form or agreement. You can even ask respondents from other countries to fill out your document.
Safely Collect and Deliver Information With Fill
It’s time to say goodbye to the tedious process of gathering data and sorting responses manually. With Fill, creating electronic forms is a breeze. Consider it your gateway to conducting borderless surveys, applications, and memberships.
Through our easy-to-use form builder, you can create and share eforms for registrations, bookings, and more. It’s the perfect solution, especially if you want to skip the busy work and go straight into accepting responses and collecting payments.
Start with a free account or request a demo to see how it works.

on
March 30, 2011, 12:34 AM PDT
How to create an electronic form using Word 2010 content controls
Use Word 2010’s content controls to create easy-to-use electronic forms. They’re similar to Word 2003’s form fields, but better.
Word forms allow you to gather information in an easy way. They’re easy to create, easy to use, and have almost unlimited possibilities. I’ll show you how to create these useful forms by creating a simple evaluation form – the type you might fill out after attending a workshop or seminar.
Before you can create the form, you have to find the controls. To create a form in Word 2003, you must display the Form toolbar. You’ll use what we call form fields. (These aren’t the same as coded fields that you insert by choosing Field from the Insert menu; these are controls.) In Word 2007 and 2010, you’ll find form fields on the Developer toolbar in the Controls group. Click the Legacy option’s dropdown to see form fields ( Word 2003) and ActiveX controls.
If Word 2010’s Developer tab isn’t visible, do the following to display it:
- Click the Quick Access Toolbar dropdown (you’re not adding anything to the QAT, but this route gives you quick access to the ribbon options).
- Choose More Commands.
- In the left pane, click Customize Ribbon.
- In the list to the right under Main Tabs, check Developer and click OK.
In the Controls group (on the Developer tab), you’ll see a number of other controls – some seem to duplicate the Legacy option’s controls. These new controls are content controls. We’ll be working with content controls, but you can replicate some of their functionality in Word 2003 using form fields.
You can insert form controls directly into a document, but consider inserting them into a table instead. They’re a bit easier to corral that way. For instance, I’ve inserted a two-column, five-row table into the document shown below. In the left column, I’ve entered descriptive labels for the content controls. (Choose Table from the Insert menu/tab.) We’ll enter the appropriate content controls into the right column. Specifically, we’ll enter two text fields, one date field, and two lists.
First, let’s enter a text field for the class ID, as follows:
- Select the first cell in the right column (to the right of the label, Class).
- Click Plain Text Content Control in the Controls group (on the Developer tab). In Word 2003, click Text Form Field on the Forms toolbar.
That’s all there is to it, although you can click Properties (in the Control group) to better define the control. For now, the default options are fine. Enter a second Plain Text Content Control for the instructor’s name. Next, add a Date Picker Content Control as follows:
- Select the third cell in the right column and click Date Picker Content Control in the Controls group. (There’s no comparable field in Word 2003. Use a text field and set its type to Date.
- Click the Properties option in the Controls group, set the format to m/d/yy, and click OK.
At this point, you have three controls and you’ve not had to work very hard. You can add a title and flag a few settings, but there’s just not a lot that has to be done.
Now, add a control that lets users choose an item from a list. Specifically, add a list of ratings so the students can score the instructor on preparation and content. Specifically, create a list of five possible scores, from very poor to excellent, as follows:
- Select the fourth cell in the right column and click Drop Down List Content Control in the Controls group (Drop Down Form Field in Word 2003).
- Click Properties.
- Click Add.
- Enter Very poor in the Display Name control.
- Enter 1 in the Value control.
- Click OK.
- Repeat steps 3 through 6 to create the list shown below. When you’re done, click OK.
Repeat the above instructions to add another Drop Down List Content Control for the last cell in the right column. Or, simply copy it—yes, you can copy a control!
Once you’ve inserted all the content controls (or form fields), protect the document as follows:
- Press Ctrl+A to select the entire document (or select only the table if you’re working in a larger document).
- Choose Group from the Controls menu. (You’ll skip this in Word 2003.)
- Click Restrict Editing in the Protect group. (In Word 2003, choose Protect Document from the Tools menu).
- Check 2. Editing restrictions.
- From the dropdown, choose Filling In Forms.
- Save the form, close it, and reopen it.
To use the form, simply press tab to select the first content control. (When adding the content controls, you can change the default instructions.) Enter a class ID and press tab. Enter the instructor’s name and press tab. To enter a date, click the dropdown and click a date. Word will enter the date in the format you selected when you set the control’s properties. Press Tab to move to the next control.
The next two controls are list controls. Click the dropdown for each and select one of the list items.
Word content controls and form fields are an excellent way to implement a bit of control and consistency when gathering information.
-
Software
Electronic forms allow you to capture information easily. You can send people electronic forms via email, have them update the information, and then return the completed forms to you. The information provided by your users can then be filtered without having to scan through mounds of paper. Electronic forms help speed up your business processes and even protect the environment since no paper is used.
(Microsoft Office Word 2010: Comprehensive, Page 610)
Draft the Form
-
Determine the fields that your form will have and their placement in the form.
-
To set each field type, you must decide whether the field will collect data in text form, date form, or a check box.
-
A simple way to lay out a form is to draw a table and then insert your fields within the cells of the table. You can now design your form using this blueprint.
Enable Developer Tab
-
Click «File» and then choose «Options.»
-
Click «Customize Ribbon.»
-
Check «Developer» in the «Main Tabs» column and then click «OK.»
Create a Table
-
Click the «Insert» tab of the MS Word ribbon, and then click the «Table» drop-down button.
-
Click and drag your mouse vertically to select the number of rows in your table.
-
Click and drag your mouse horizontally to select the number of columns. You may want to include at least one cell for every field in your form.
-
Use one cell to enter field labels and then use the cell adjacent or below that cell to enter your fillable fields. Fillable fields allow form users to enter data.
Insert Form Fields
-
Select the cell in which you want to place a field.
-
Click the «Developer» tab.
-
Click a form control in the «Controls» group. For example, to insert a label field, click “Rich Text Control” or “Plain Text Control.”
-
Click «Properties» to format the field and add values to it.
-
Click «Add» and then enter a Display Name and Value.
-
Check the box next to your desired locking options. If your field will have several options, click «Add» to insert each option.
-
Click «OK» to save the field.
-
Continue entering fields in this fashion, changing the field properties accordingly.
-
Save the form as you would any MS Word document.