
| title | ms.prod | ms.assetid | ms.date | ms.localizationpriority |
|---|---|---|---|---|
|
Getting started with VBA in Office |
office |
7208a87a-a567-41d9-af5b-0df3884c58d9 |
08/14/2019 |
high |
Are you facing a repetitive clean up of fifty tables in Word? Do you want a particular document to prompt the user for input when it opens? Are you having difficulty figuring out how to get your contacts from Microsoft Outlook into a Microsoft Excel spreadsheet efficiently?
You can perform these tasks and accomplish a great deal more by using Visual Basic for Applications (VBA) for Office—a simple, but powerful programming language that you can use to extend Office applications.
This article is for experienced Office users who want to learn about VBA and who want some insight into how programming can help them to customize Office.
The Office suite of applications has a rich set of features. There are many different ways to author, format, and manipulate documents, email, databases, forms, spreadsheets, and presentations. The great power of VBA programming in Office is that nearly every operation that you can perform with a mouse, keyboard, or a dialog box can also be done by using VBA. Further, if it can be done once with VBA, it can be done just as easily a hundred times. (In fact, the automation of repetitive tasks is one of the most common uses of VBA in Office.)
Beyond the power of scripting VBA to accelerate every-day tasks, you can use VBA to add new functionality to Office applications or to prompt and interact with the user of your documents in ways that are specific to your business needs. For example, you could write some VBA code that displays a pop up message that reminds users to save a document to a particular network drive the first time they try to save it.
This article explores some of the primary reasons to leverage the power of VBA programming. It explores the VBA language and the out-of-the-box tools that you can use to work with your solutions. Finally, it includes some tips and ways to avoid some common programming frustrations and missteps.
[!includeAdd-ins note]
When to use VBA and why
There are several principal reasons to consider VBA programming in Office.
Automation and repetition
VBA is effective and efficient when it comes to repetitive solutions to formatting or correction problems. For example, have you ever changed the style of the paragraph at the top of each page in Word? Have you ever had to reformat multiple tables that were pasted from Excel into a Word document or an Outlook email? Have you ever had to make the same change in multiple Outlook contacts?
If you have a change that you have to make more than ten or twenty times, it may be worth automating it with VBA. If it is a change that you have to do hundreds of times, it certainly is worth considering. Almost any formatting or editing change that you can do by hand, can be done in VBA.
Extensions to user interaction
There are times when you want to encourage or compel users to interact with the Office application or document in a particular way that is not part of the standard application. For example, you might want to prompt users to take some particular action when they open, save, or print a document.
Interaction between Office applications
Do you need to copy all of your contacts from Outlook to Word and then format them in some particular way? Or, do you need to move data from Excel to a set of PowerPoint slides? Sometimes simple copy and paste does not do what you want it to do, or it is too slow. Use VBA programming to interact with the details of two or more Office applications at the same time and then modify the content in one application based on the content in another.
Doing things another way
VBA programming is a powerful solution, but it is not always the optimal approach. Sometimes it makes sense to use other ways to achieve your aims.
The critical question to ask is whether there is an easier way. Before you begin a VBA project, consider the built-in tools and standard functionalities. For example, if you have a time-consuming editing or layout task, consider using styles or accelerator keys to solve the problem. Can you perform the task once and then use CTRL+Y (Redo) to repeat it? Can you create a new document with the correct format or template, and then copy the content into that new document?
Office applications are powerful; the solution that you need may already be there. Take some time to learn more about Office before you jump into programming.
Before you begin a VBA project, ensure that you have the time to work with VBA. Programming requires focus and can be unpredictable. Especially as a beginner, never turn to programming unless you have time to work carefully. Trying to write a «quick script» to solve a problem when a deadline looms can result in a very stressful situation. If you are in a rush, you might want to use conventional methods, even if they are monotonous and repetitive.
VBA Programming 101
Using code to make applications do things
You might think that writing code is mysterious or difficult, but the basic principles use every-day reasoning and are quite accessible. Microsoft Office applications are created in such a way that they expose things called objects that can receive instructions, in much the same way that a phone is designed with buttons that you use to interact with the phone. When you press a button, the phone recognizes the instruction and includes the corresponding number in the sequence that you are dialing. In programming, you interact with the application by sending instructions to various objects in the application. These objects are expansive, but they have their limits. They can only do what they are designed to do, and they will only do what you instruct them to do.
For example, consider the user who opens a document in Word, makes a few changes, saves the document, and then closes it. In the world of VBA programming, Word exposes a Document object. By using VBA code, you can instruct the Document object to do things such as Open, Save, or Close.
The following section discusses how objects are organized and described.
The Object Model
Developers organize programming objects in a hierarchy, and that hierarchy is called the object model of the application. Word, for example, has a top-level Application object that contains a Document object. The Document object contains Paragraph objects and so on. Object models roughly mirror what you see in the user interface. They are a conceptual map of the application and its capabilities.
The definition of an object is called a class, so you might see these two terms used interchangeably. Technically, a class is the description or template that is used to create, or instantiate, an object.
Once an object exists, you can manipulate it by setting its properties and calling its methods. If you think of the object as a noun, the properties are the adjectives that describe the noun and the methods are the verbs that animate the noun. Changing a property changes some quality of appearance or behavior of the object. Calling one of the object methods causes the object to perform some action.
The VBA code in this article runs against an open Office application where many of the objects that the code manipulates are already up and running; for example, the Application itself, the Worksheet in Excel, the Document in Word, the Presentation in PowerPoint, the Explorer and Folder objects in Outlook. Once you know the basic layout of the object model and some key properties of the Application that give access to its current state, you can start to extend and manipulate that Office application with VBA in Office.
Methods
In Word, for example, you can change the properties and invoke the methods of the current Word document by using the ActiveDocument property of the Application object. This ActiveDocument property returns a reference to the Document object that is currently active in the Word application. «Returns a reference to» means «gives you access to.»
The following code does exactly what it says; that is, it saves the active document in the application.
Application.ActiveDocument.Save
Read the code from left to right, «In this Application, with the Document referenced by ActiveDocument, invoke the Save method.» Be aware that Save is the simplest form of method; it does not require any detailed instructions from you. You instruct a Document object to Save and it does not require any more input from you.
If a method requires more information, those details are called parameters. The following code runs the SaveAs method, which requires a new name for the file.
Application.ActiveDocument.SaveAs ("New Document Name.docx")
Values listed in parentheses after a method name are the parameters. Here, the new name for the file is a parameter for the SaveAs method.
Properties
You use the same syntax to set a property that you use to read a property. The following code executes a method to select cell A1 in Excel and then to set a property to put something in that cell.
    Application.ActiveSheet.Range("A1").Select
    Application.Selection.Value = "Hello World"
The first challenge in VBA programming is to get a feeling for the object model of each Office application and to read the object, method, and property syntax. The object models are similar in all Office applications, but each is specific to the kind of documents and objects that it manipulates.
In the first line of the code snippet, there is the Application object, Excel this time, and then the ActiveSheet, which provides access to the active worksheet. After that is a term not as familiar, Range, which means «define a range of cells in this way.» The code instructs Range to create itself with just A1 as its defined set of cells. In other words, the first line of code defines an object, the Range, and runs a method against it to select it. The result is automatically stored in another property of the Application called Selection.
The second line of code sets the Value property of Selection to the text «Hello World», and that value appears in cell A1.
The simplest VBA code that you write might simply gain access to objects in the Office application that you are working with and set properties. For example, you could get access to the rows in a table in Word and change their formatting in your VBA script.
That sounds simple, but it can be incredibly useful; once you can write that code, you can harness all of the power of programming to make those same changes in several tables or documents, or make them according to some logic or condition. For a computer, making 1000 changes is no different from making 10, so there is an economy of scale here with larger documents and problems, and that is where VBA can really shine and save you time.
Macros and the Visual Basic Editor
Now that you know something about how Office applications expose their object models, you are probably eager to try calling object methods, setting object properties, and responding to object events. To do so, you must write your code in a place and in a way that Office can understand; typically, by using the Visual Basic Editor. Although it is installed by default, many users don’t know that it is even available until it is enabled on the ribbon.
All Office applications use the ribbon. One tab on the ribbon is the Developer tab, where you access the Visual Basic Editor and other developer tools. Because Office does not display the Developer tab by default, you must enable it by using the following procedure:
To enable the Developer tab
-
On the File tab, choose Options to open the Options dialog box.
-
Choose Customize Ribbon on the left side of the dialog box.
-
Under Choose commands from on the left side of the dialog box, select Popular Commands.
-
Under Customize the Ribbon on the right side of the dialog box, select Main Tabs in the drop down list box, and then select the Developer checkbox.
-
Choose OK.
[!NOTE]
In Office 2007, you displayed the Developer tab by choosing the Office button, choosing Options, and then selecting the Show Developer tab in Ribbon check box in the Popular category of the Options dialog box.
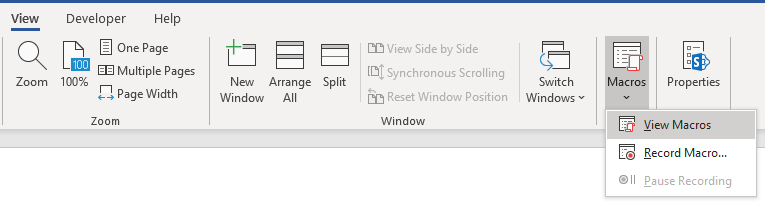
After you enable the Developer tab, it is easy to find the Visual Basic and Macros buttons.
Figure 1. Buttons on the Developer tab

Security issues
To protect Office users against viruses and dangerous macro code, you cannot save macro code in a standard Office document that uses a standard file extension. Instead, you must save the code in a file with a special extension. For example you cannot save macros in a standard Word document with a .docx extension; instead, you must use a special Word Macro-Enabled Document with a .docm extension.
When you open a .docm file, Office security might still prevent the macros in the document from running, with or without telling you. Examine the settings and options in the Trust Center on all Office applications. The default setting disables macro from running, but warns you that macros have been disabled and gives you the option to turn them back on for that document.
You can designate specific folders where macros can run by creating Trusted Locations, Trusted Documents, or Trusted Publishers. The most portable option is to use Trusted Publishers, which works with digitally signed documents that you distribute. For more information about the security settings in a particular Office application, open the Options dialog box, choose Trust Center, and then choose Trust Center Settings.
[!NOTE]
Some Office applications, like Outlook, save macros by default in a master template on your local computer. Although that strategy reduces the local security issues on your own computer when you run your own macros, it requires a deployment strategy if you want to distribute your macro.
Recording a macro
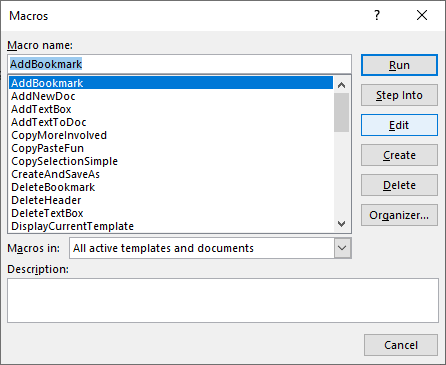
When you choose the Macro button on the Developer tab, it opens the Macros dialog box, which gives you access to VBA subroutines or macros that you can access from a particular document or application. The Visual Basic button opens the Visual Basic Editor, where you create and edit VBA code.
Another button on the Developer tab in Word and Excel is the Record Macro button, which automatically generates VBA code that can reproduce the actions that you perform in the application. Record Macro is a terrific tool that you can use to learn more about VBA. Reading the generated code can give you insight into VBA and provide a stable bridge between your knowledge of Office as a user and your knowledge as a programmer. The only caveat is that the generated code can be confusing because the Macro editor must make some assumptions about your intentions, and those assumptions are not necessarily accurate.
To record a macro
-
Open Excel to a new Workbook and choose the Developer tab in the ribbon. Choose Record Macro and accept all of the default settings in the Record Macro dialog box, including Macro1 as the name of the macro and This Workbook as the location.
-
Choose OK to begin recording the macro. Note how the button text changes to Stop Recording. Choose that button the instant you complete the actions that you want to record.
-
Choose cell B1 and type the programmer’s classic first string: Hello World. Stop typing and look at the Stop Recording button; it is grayed out because Excel is waiting for you to finish typing the value in the cell.
-
Choose cell B2 to complete the action in cell B1, and then choose Stop Recording.
-
Choose Macros on the Developer tab, select Macro1 if it is not selected, and then choose Edit to view the code from Macro1 in the Visual Basic Editor.
Figure 2. Macro code in Visual Basic Editor

Looking at the code
The macro that you created should look similar to the following code.
Sub Macro1()
'
' Macro1 Macro
'
'
    Range("B1").Select
    ActiveCell.FormulaR1C1 = "Hello World"
    Range("B2").Select
End Sub
Be aware of the similarities to the earlier code snippet that selected text in cell A1, and the differences. In this code, cell B1 is selected, and then the string «Hello World» is applied to the cell that has been made active. The quotes around the text specify a string value as opposed to a numeric value.
Remember how you chose cell B2 to display the Stop Recording button again? That action shows up as a line of code as well. The macro recorder records every keystroke.
The lines of code that start with an apostrophe and colored green by the editor are comments that explain the code or remind you and other programmers the purpose of the code. VBA ignores any line, or portion of a line, that begins with a single quote. Writing clear and appropriate comments in your code is an important topic, but that discussion is out of the scope of this article. Subsequent references to this code in the article don’t include those four comment lines.
When the macro recorder generates the code, it uses a complex algorithm to determine the methods and the properties that you intended. If you don’t recognize a given property, there are many resources available to help you. For example, in the macro that you recorded, the macro recorder generated code that refers to the FormulaR1C1 property. Not sure what that means?
[!NOTE]
Be aware that Application object is implied in all VBA macros. The code that you recorded works with Application. at the beginning of each line.
Using Developer Help
Select FormulaR1C1 in the recorded macro and press F1. The Help system runs a quick search, determines that the appropriate subjects are in the Excel Developer section of the Excel Help, and lists the FormulaR1C1 property. You can choose the link to read more about the property, but before you do, be aware of the Excel Object Model Reference link near the bottom of the window. Choose the link to view a long list of objects that Excel uses in its object model to describe the Worksheets and their components.
Choose any one of those to see the properties and methods that apply to that particular object, along with cross references to different related options. Many Help entries also have brief code examples that can help you. For example, you can follow the links in the Borders object to see how to set a border in VBA.
Worksheets(1).Range("A1").Borders.LineStyle = xlDouble
Editing the code
The Borders code looks different from the recorded macro. One thing that can be confusing with an object model is that there is more than one way to address any given object, cell A1 in this example.
Sometimes the best way to learn programming is to make minor changes to some working code and see what happens as a result. Try it now. Open Macro1 in the Visual Basic Editor and change the code to the following.
Sub Macro1()
    Worksheets(1).Range("A1").Value = "Wow!"
    Worksheets(1).Range("A1").Borders.LineStyle = xlDouble
End Sub
[!TIP]
Use Copy and Paste as much as possible when working with code to avoid typing errors.
You don’t need to save the code to try it out, so return to the Excel document, choose Macros on the Developer tab, choose Macro1, and then choose Run. Cell A1 now contains the text Wow! and has a double-line border around it.
Figure 3. Results of your first macro

You just combined macro recording, reading the object model documentation, and simple programming to make a VBA program that does something. Congratulations!
Did not work? Read on for debugging suggestions in VBA.
Programming tips and tricks
Start with examples
The VBA community is very large; a search on the Web can almost always yield an example of VBA code that does something similar to what you want to do. If you cannot find a good example, try to break the task down into smaller units and search on each of those, or try to think of a more common, but similar problem. Starting with an example can save you hours of time.
That does not mean that free and well-thought-out code is on the Web waiting for you to come along. In fact, some of the code that you find might have bugs or mistakes. The idea is that the examples you find online or in VBA documentation give you a head start. Remember that learning programming requires time and thought. Before you get in a big rush to use another solution to solve your problem, ask yourself whether VBA is the right choice for this problem.
Make a simpler problem
Programming can get complex quickly. It’s critical, especially as a beginner, that you break the problem down to the smallest possible logical units, then write and test each piece in isolation. If you have too much code in front of you and you get confused or muddled, stop and set the problem aside. When you come back to the problem, copy out a small piece of the problem into a new module, solve that piece, get the code working, and test it to ensure that it works. Then move on to the next part.
Bugs and debugging
There are two main types of programming errors: syntax errors, which violate the grammatical rules of the programming language, and run-time errors, which look syntactically correct, but fail when VBA attempts to execute the code.
Although they can be frustrating to fix, syntax errors are easy to catch; the Visual Basic Editor beeps and flashes at you if you type a syntax error in your code.
For example, string values must be surrounded by double quotes in VBA. To find out what happens when you use single quotes instead, return to the Visual Basic Editor and replace the «Wow!» string in the code example with ‘Wow!’ (that is, the word Wow enclosed in single quotes). If you choose the next line, the Visual Basic Editor reacts. The error «Compile error: Expected: expression» is not that helpful, but the line that generates the error turns red to tell you that you have a syntax error in that line and as a result, this program will not run.
Choose OK and change the text back to»Wow!».
Runtime errors are harder to catch because the programming syntax looks correct, but the code fails when VBA tries to execute it.
For example, open the Visual Basic Editor and change the Value property name to ValueX in your Macro, deliberately introducing a runtime error since the Range object does not have a property called ValueX. Go back to the Excel document, open the Macros dialog box and run Macro1 again. You should see a Visual Basic message box that explains the run-time error with the text, «Object doesn’t support this property of method.» Although that text is clear, choose Debug to find out more.
When you return to the Visual Basic Editor, it is in a special debug mode that uses a yellow highlight to show you the line of code that failed. As expected, the line that includes the ValueX property is highlighted.
You can make changes to VBA code that is running, so change ValueX back to Value and choose the little green play button underneath the Debug menu. The program should run normally again.
It’s a good idea to learn how to use the debugger more deliberately for longer, more complex programs. At a minimum, learn a how to set break-points to stop execution at a point where you want to take a look at the code, how to add watches to see the values of different variables and properties as the code runs, and how to step through the code line by line. These options are all available in the Debug menu and serious debugger users typically memorize the accompanying keyboard shortcuts.
Using reference materials well
To open the Developer Reference that is built into Office Help, open the Help reference from any Office application by choosing the question mark in the ribbon or by pressing F1. Then, to the right of the Search button, choose the dropdown arrow to filter the contents. Choose Developer Reference. If you don’t see the table of contents in the left panel, choose the little book icon to open it, and then expand the Object Model Reference from there.
Figure 5. Filtering on developer Help applies to all Office applications

Time spent browsing the Object Model reference pays off. After you understand the basics of VBA syntax and the object model for the Office application that you are working with, you advance from guesswork to methodical programming.
Of course the Microsoft Office Developer Center is an excellent portal for articles, tips, and community information.
Searching forums and groups
All programmers get stuck sometimes, even after reading every reference article they can find and losing sleep at night thinking about different ways to solve a problem. Fortunately, the Internet has fostered a community of developers who help each other solve programming problems.
Any search on the Web for «office developer forum» reveals several discussion groups. You can search on «office development» or a description of your problem to discover forums, blog posts, and articles as well.
If you have done everything that you can to solve a problem, don’t be afraid to post your question to a developers forum. These forums welcome posts from newer programmers and many of the experienced developers are glad to help.
The following are a few points of etiquette to follow when you post to a developer forum:
-
Before you post, look on the site for an FAQ or for guidelines that members want you to follow. Ensure that you post content that is consistent with those guidelines and in the correct section of the forum.
-
Include a clear and complete code sample, and consider editing your code to clarify it for others if it is part of a longer section of code.
-
Describe your problem clearly and concisely, and summarize any steps that you have taken to solve the problem. Take the time to write your post as well as you can, especially if you are flustered or in a hurry. Present the situation in a way that will make sense to readers the first time that they read the problem statement.
-
Be polite and express your appreciation.
Going further with programming
Although this article is short and only scratches the surface of VBA and programming, it is hopefully enough to get you started.
This section briefly discusses a few more key topics.
Variables
In the simple examples in this article you manipulated objects that the application had already created. You might want to create your own objects to store values or references to other objects for temporary use in your application. These are called variables.
To use a variable in VBA, must tell VBA which type of object the variable represents by using the Dim statement. You then set its value and use it to set other variables or properties.
    Dim MyStringVariable As String
    MyStringVariable = "Wow!"
    Worksheets(1).Range("A1").Value = MyStringVariable
Branching and looping
The simple programs in this article execute one line at a time, from the top down. The real power in programming comes from the options that you have to determine which lines of code to execute, based on one or more conditions that you specify. You can extend those capabilities even further when you can repeat an operation many times. For example, the following code extends Macro1.
Sub Macro1()
    If Worksheets(1).Range("A1").Value = "Yes!" Then
        Dim i As Integer
        For i = 2 To 10
            Worksheets(1).Range("A" & i).Value = "OK! " & i
        Next i
    Else
        MsgBox "Put Yes! in cell A1"
    End If
End Sub
Type or paste the code into the Visual Basic Editor and then run it. Follow the directions in the message box that appears and change the text in cell A1 from Wow! to Yes! and run it again to see the power of looping. This code snippet demonstrates variables, branching and looping. Read it carefully after you see it in action and try to determine what happens as each line executes.
All of my Office applications: example code
Here are a few scripts to try; each solves a real-world Office problem.
Create an email in Outlook
Sub MakeMessage()
    Dim OutlookMessage As Outlook.MailItem
    Set OutlookMessage = Application.CreateItem(olMailItem)
    OutlookMessage.Subject = "Hello World!"
    OutlookMessage.Display
    Set OutlookMessage = Nothing
End Sub
Be aware that there are situations in which you might want to automate email in Outlook; you can use templates as well.
Delete empty rows in an Excel worksheet
Sub DeleteEmptyRows()
    SelectedRange = Selection.Rows.Count
    ActiveCell.Offset(0, 0).Select
    For i = 1 To SelectedRange
        If ActiveCell.Value = "" Then
            Selection.EntireRow.Delete
        Else
            ActiveCell.Offset(1, 0).Select
        End If
    Next i
End Sub
Be aware that you can select a column of cells and run this macro to delete all rows in the selected column that have a blank cell.
Delete empty text boxes in PowerPoint
Sub RemoveEmptyTextBoxes()
    Dim SlideObj As Slide
    Dim ShapeObj As Shape
    Dim ShapeIndex As Integer
    For Each SlideObj In ActivePresentation.Slides
        For ShapeIndex = SlideObj.Shapes.Count To 1 Step -1
            Set ShapeObj = SlideObj.Shapes(ShapeIndex)
            If ShapeObj.Type = msoTextBox Then
                If Trim(ShapeObj.TextFrame.TextRange.Text) = "" Then
                    ShapeObj.Delete
                End If
            End If
        Next ShapeIndex
    Next SlideObj
End Sub
Be aware that this code loops through all of the slides and deletes all text boxes that don’t have any text. The count variable decrements instead of increments because each time the code deletes an object, it removes that object from the collection, which reduces the count.
Copy a contact from Outlook to Word
Sub CopyCurrentContact()
   Dim OutlookObj As Object
   Dim InspectorObj As Object
   Dim ItemObj As Object
   Set OutlookObj = CreateObject("Outlook.Application")
   Set InspectorObj = OutlookObj.ActiveInspector
   Set ItemObj = InspectorObj.CurrentItem
   Application.ActiveDocument.Range.InsertAfter (ItemObj.FullName & " from " & ItemObj.CompanyName)
End Sub
Be aware that this code copies the currently open contact in Outlook into the open Word document. This code only works if there is a contact currently open for inspection in Outlook.
[!includeSupport and feedback]
In this Article
- VBA PDF (Free Downloads)
- Word VBA Examples “CheatSheet”
- Select / Go To
- Bookmarks
- Document
- Columns
- Font
- Insert
- Loops
- Paragraph
- Word VBA Macro Tutorial
- Simple Word Macro Example
- Word Macro Basics
- Word Document Object
- Application
- Documents
- Document Methods
- Range, Selection, Paragraphs
- Range
- Selection
- Paragraphs
- Word VBA Tutorial Conclusion
- Word Macro Examples
- Word VBA FAQs
Welcome to our Word VBA / Macros Mega-Guide!
This page contains:
-
- Word VBA Tutorial PDF (Free Download)
- Word VBA “Cheat Sheet” containing a list of the most commonly used Word VBA code snippets
- Full Word VBA / Macro tutorial.
- Searchable list of all of our Word VBA Macro Tutorials
You might also be interested in our Interactive VBA Tutorial for Excel. While some of the examples / exercises are specific to Excel VBA, much of the content is generic to all VBA and you may find it useful to learn concepts like If Statements, Loops, MessageBoxes, and more.
VBA PDF (Free Downloads)
Download our free Microsoft Word VBA Tutorial! Or VBA Tutorials for other Office Programs!

Download
Word VBA Examples “CheatSheet”
Below you will find simple VBA code examples for working with Microsoft Word.
Select / Go To
Backspace
Selection.TypeBackspace
Select Entire Document
Selection.HomeKey Unit:=wdStory
Selection.Extend
Delete
Selection.Delete Unit:=wdCharacter, Count:=1
Insert After
Selection.InsertAfter “text”
Beginning of Line
Selection.HomeKey Unit:=wdLine
End of Line
Selection.EndKey Unit:=wdLine
Select All
Selection.WholeStory
Select Entire Line
Selection.EndKey Unit:=wdLine, Extend:=wdExtend
Move Up Paragraph
Selection.MoveUp Unit:=wdParagraph, Count:=1
Move Right One Character
Selection.MoveRight Unit:=wdCharacter, Count:=1
Move Right One Cell in Table
Selection.MoveRight Unit:=wdCell
Go To Start of Doc
Selection.HomeKey Unit:=wdStory
Go To End of Doc
Selection.EndKey Unit:=wdStory
Go To Page 1
Selection.GoTo What:=wdGoToPage, Which:=wdGoToNext, Name:=”1″
Go To Top of Page
Selection.GoTo What:=wdGoToBookmark, Name:=”Page”
Selection.MoveLeft Unit:=wdCharacter, Count:=1
Return to Top
Bookmarks
Add
With ActiveDocument.Bookmarks
.Add Range:=Selection.Range, Name:=”Name”
.DefaultSorting = wdSortByName
.ShowHidden = False
End With
Count
Dim n as Integer
n = ActiveDocument.Bookmarks.Count
Delete
ActiveDocument.Bookmarks(“BookmarkName”).Delete
Exists?
If ActiveDocument.Bookmarks.Exists(“BookmarkName”) = True then
‘Do something
End If
Go To
Selection.GoTo What:=wdGoToBookmark, Name:=”BookmarkName”
Select
ActiveDocument.Bookmarks(“BookmarkName”).Select
Replace Text
Selection.GoTo What:=wdGoToBookmark, Name:=”BookmarkName”
Selection.Delete Unit:=wdCharacter, Count:=1
Selection.InsertAfter “New Text”
ActiveDocument.Bookmarks.Add Range:=Selection.Range, _
Name:=”BookmarkName”
Return to Top
Document
Activate
Documents(“Example.doc”).Activate
Add to Variable
Dim doc As Document
Set doc = Documents.Add
Add (From Another Doc)
Documents.Add Template:=”C:FormsFormDoc.doc”, _
NewTemplate:=False
Close
Documents(“Example.doc”).Close
Close – Save Changes
Documents(“Example.doc”).Close SaveChanges:=wdSaveChanges
Close – Do Not Save
Documents(“Example.doc”).Close SaveChanges:=wdDoNotSaveChanges
Close – Prompt to Save
Documents(“Example.doc”).Close SaveChanges:=wdPromptToSaveChanges
Return to Top
Columns
Save As
Documents(“Example.doc”).SaveAs (“C:ExampleExample.doc”)
Save
Documents(“Example.doc”).Save
Protect
Documents(“Example.doc”).Protect Password:=”password”
Unprotect
Documents(“Example.doc”).UnProtect Password:=”password”
Number of Pages
Dim varNumberPages as Variant
varNumberPages = _
ActiveDocument.Content.Information(wdActiveEndAdjustedPageNumber)
Documents(“Example.doc”).Print
Return to Top
VBA Coding Made Easy
Stop searching for VBA code online. Learn more about AutoMacro — A VBA Code Builder that allows beginners to code procedures from scratch with minimal coding knowledge and with many time-saving features for all users!

Learn More
Font
Size
Selection.Font.Size = 12
Bold
Selection.Font.Bold = True
Italics
Selection.Font.Italic = True
Underline
Selection.Font.Underline = wdUnderlineSingle
All Caps
Selection.Font.AllCaps = True
Color
Selection.Font.TextColor = vbRed
Name
Selection.Font.Name = “Abadi”
Subscript
Selection.Font.Subscript = True
SuperScript
Selection.Font.Superscript = True
Highlight Color
Selection.Range.HighlightColorIndex = wdYellow
Style
Selection.Style = ActiveDocument.Styles(“Normal”)
Return to Top
Insert
Insert AutoText
Selection.TypeText Text:=”a3″
Selection.Range.InsertAutoText
Insert File
Selection.InsertFile (“C:DocsSomething.doc”)
Insert Page Break
Selection.InsertBreak Type:=wdPageBreak
Insert Paragraph Symbol
Selection.TypeText Text:=Chr$(182)
Insert Tab
Selection.TypeText Text:=vbTab
Insert Text
Selection.TypeText Text:=”Any Text”
Insert Type Paragraph
Selection.TypeParagraph
Insert Paragraph
Selection.InsertParagraph
Return to Top
Loops
Do Until End of Doc
Do Until ActiveDocument.Bookmarks(“Sel”) = ActiveDocument.Bookmarks(“EndOfDoc”)
‘Do Something
Sub
For Each Doc in Docs
Dim doc As Document
ForEach doc In Documents
‘Do Something
Next doc
Loop Through Paragraphs
Sub through Paragraphs
Dim i As Long, iParCount As Long
iParCount = ActiveDocument.Paragraphs.CountFori = 1 To iParCount
ActiveDocument.Paragraphs(i).Alignment = wdAlignParagraphLeft
Next i
Return to Top
VBA Programming | Code Generator does work for you!
Paragraph
KeepLinesTogether
Selection.ParagraphFormat.KeepTogether = True
KeepWithNext
Selection.ParagraphFormat.KeepWithNext = True
Space After
Selection.ParagraphFormat.SpaceAfter = 12
Space Before
Selection.ParagraphFormat.SpaceBefore = 0
Align Center
Selection.ParagraphFormat.Alignment = wdAlignParagraphCenter
Align Right
Selection.ParagraphFormat.Alignment = wdAlignParagraphRight
Align Left
Selection.ParagraphFormat.Alignment = wdAlignParagraphLeft
Left Indent
Selection.ParagraphFormat.LeftIndent = InchesToPoints(3.75)
Right Indent
Selection.ParagraphFormat.RightIndent = InchesToPoints(1)
Line Spacing
With Selection.ParagraphFormat
.LineSpacingRule = wdLineSpaceExactly
.LineSpacing = 12
End With
Loop Through All Paragraphs
Sub through Paragraphs
Dim i As Long, iParCount As Long
iParCount = ActiveDocument.Paragraphs.CountFori = 1 To iParCount
ActiveDocument.Paragraphs(i).Alignment = wdAlignParagraphLeft
Next i
Return to Top
Word VBA Macro Tutorial
This is a tutorial for using VBA with Microsoft Word. This tutorial will teach you how to write a simple Macro and interact with Documents, Ranges, Selections, and Paragraphs.
Note: If you’re brand new to Macros / VBA you might also find this article useful: How to write VBA Macros from Scratch.
VBA is the programming language used to automate Microsoft Office programs including Word, Excel, Outlook, PowerPoint, and Access.
Macros are blocks of VBA code that perform specific tasks.
When you Record a Macro, Word will write VBA code into a Macro, allowing you to repeat your actions. You can see a list of all available Macros from View > Macros.
After recording a Macro, you will be able to edit the Macro from the Macro List:
When you click Edit, you open the VBA Editor. Using the VBA Editor you can edit recorded Macros or write a Word Macro from scratch. To access the VBA Editor use the shortcut ALT + F11 or click Visual Basic from the Developer Ribbon.

Simple Word Macro Example
This is a simple example of a Word VBA Macro. It performs the following tasks:
- Opens a Word Document
- Writes to Document
- Closes and Saves the Word Document.
Sub WordMacroExample()

    'Open Doc & Assign to Variable
    Dim oDoc As Document
    Set oDoc = Documents.Open("c:UserssomeoneNewDocument.docx")

    'Write To Doc
    Selection.TypeText "www.automateexcel.com"
    Selection.TypeParagraph

    'Save and Close Doc
    oDoc.Save
    oDoc.Close

End Sub
Word Macro Basics
All VBA code must be stored within procedures like this. To create a procedure in VBA type “Sub WordMacroExample” (Where “WordMacroExample” is your desired Macro name) and press ENTER. VBA will automatically add the parenthesis and End Sub.
Word Document Object
When interacting with Microsoft Word in VBA, you will frequently reference Word “Objects”. The most common objects are:
Application Object – Microsoft Word itself
Document Object – A Word document
Range Object – A part of a Word document
Selection Object – A selected range or cursor location.
AutoMacro | Ultimate VBA Add-in | Click for Free Trial!
Application
Application is the “top-level” object. All other objects in Word can be reached through it.
In addition to accessing other Word objects, there are “application-level” settings that can be applied:
Application.Options.AllowDragAndDrop = TrueThis is an example of accessing the “Selection” of “Windows(1)” with in the Application:
Application.Windows(1).Selection.Characters.CountHowever, the most common Word objects can be accessed directly, without typing the full hierarchy. So instead, you can (and should) just type:
Selection.Characters.CountDocuments
ActiveDocument
Often, you will have two or more documents opened in Word and you will need specify which specific Word Document to interact with. One way to specify which document is to use ActiveDocument. For example:
ActiveDocument.PrintOut…would print the ActiveDocument. The ActiveDocument is the document in Word which “has focus”
To switch the ActiveDocument, use the Activate command:
Documents("Example.docx").ActivateThisDocument
Instead of using ActiveDocument to reference the active document, you can use ThisDocument to reference the document where the macro is stored. ThisDocument will never change.
ThisDocument.PrintOutDocument Variables
However, for more complicated macros, it can be hard to keep track of the Active Document. It can also be frustrating to switch back and forth between documents.
Instead, you can use Document variables.
This macro will assign the ActiveDocument to a variable and then print the document using the variable:
Sub VarExample()
    Dim oDoc As Document
    Set oDoc = ActiveDocument
    oDoc.PrintOut
End Sub
Document Methods
Open Document
To Open a Word Document:
Documents.Open "c:UsersSomeOneDesktopTest PM.docx"We recommend always assigning a Document to a variable upon opening it:
Dim oDoc as Document
Set oDoc = Documents.Open("c:UsersSomeOneDesktopTest PM.docx")
Create New Document
To create a new Word Document:
Documents.AddWe can instruct Word to create a new doc based on some template:
Documents.Add Template:="C:Program FilesMicrosoft OfficeTemplatesMyTemplate.dotx"As always, it is useful and huge problem saver to assign document to variable upon creating or opening:
Dim oDoc as Document
Set oDoc = Documents.Add (Template:="C:Program FilesMicrosoft OfficeTemplatesMyTemplate.dotx")
Save Document
To save a document:
ActiveDocument.Saveor SaveAs:
ActiveDocument.SaveAs FileName:= c:UsersSomeOneDesktoptest2.docx", FileFormat:=wdFormatDocumentClose Document
To close a Document and save changes:
ActiveDocument.Close wdSaveChangesor without saving changes:
ActiveDocument.Close wdDoNotSaveChangesPrint Document
This will print the active Document:
ActiveDocument.PrintOutRange, Selection, Paragraphs
Range and Selection are probably the most important objects in Word VBA, certainly the most used.
Range refers to some portion of document, usually, but not necessarily, text.
Selection refers to selected text (or other object like pictures) or, if nothing is selected, an insertion point.
Paragraphs represent paragraphs in document. Its less important than it sounds, because you can’t directly access paragraph text (you need to access particular paragraph range to make modifications).
AutoMacro | Ultimate VBA Add-in | Click for Free Trial!
Range
Range can be any part of document, including entire document:
Dim oRange As Range
Set oRange = ActiveDocument.Content
or it can be small as one character.
Another example, this range would refer to first word in document:
Dim oRange As Range
Set oRange = ActiveDocument.Range.Words(1)
Usually, you would want to get range which refers to specific part of document and then modify it.
In the following example we will make the first word of second paragraph bold:
Dim oRange As Range
Set oRange = ActiveDocument.Paragraphs(2).Range.Words(1)
oRange.Bold = True
Set Range Text
To set the text value of a Range:
Dim oRange As Range
Set oRange = ActiveDocument.Paragraphs(2).Range.Words(1)
oRange.Text = “Hello ”
(Tip: Note the space after “Hello”. Because word object includes space after word, with just “hello” we would get “Hellonext word”)
There are hundreds of things which you can do with ranges. Just a few examples (these assume you are already made object variable oRange referring to range of interest):
Change font
oRange.Font.Name = "Arial"Display in message box number of characters in particular range
MsgBox oRange.Characters.CountInsert some text before it
oRange.InsertBefore "this is inserted text "Add a footnote to range
ActiveDocument.Footnotes.Add Range:=oRange, _
Text:="Read more at automateexcel.com."
Copy it to clipboard
oRange.Copy
Often you need to change to what is particular range referring. So you can start it’s start and end
oRange.Start = 5
oRange.End = 50
After above code, oRange would refer to text starting with fifth and ending with 50th character in document.
Selection
Selection is even more widely used than Range, because it is easier to work with Selections than Ranges, IF your macro ONLY interacts with the ActiveDocument.
First select the desired part of your document. For example select the second paragraph in active document:
ActiveDocument.Paragraphs(2).Range.SelectThen you can use the Selection Object to type some text:
Selection.TypeText "Some text"We can type some paragraphs bellow “Some text”:
Selection.TypeText "Some text"
Selection.TypeParagraph
Often, it’s necessary to know if some text is selected or we have just a insertion point:
If Selection.Type <> wdSelectionIP Then
    Selection.Font.Bold = True
Else
    MsgBox "You need to select some text."
End If
When working with Selection object we want to place insertion point to particular place, and issue commands starting from this point.
Beginning of document:
Selection.HomeKey Unit:=wdStory, Extend:=wdMoveBeginning of current line:
Selection.HomeKey Unit:=wdLine, Extend:=wdMoveThe Extend parameter wdMove moves the insertion point. Instead, you could use wdExtend which will select all text between the current insertion point.
Selection.HomeKey Unit:=wdLine, Extend:=wdExtendMove Selection
The most useful method for changing position of insertion point is Move. To move Selection two characters forward:
Selection.Move Unit:=wdCharacter, Count:=2to move it backwards, use negative number for Count parameter:
Selection.Move Unit:=wdCharacter, Count:=-2Unit parameter can be wdCharacter, wdWord, wdLine, or more (use Word VBA help to see others).
To move words instead:
Selection.Move unit:=wdWord, Count:=2Selection is easier to work with (compared to ranges) because it is like a robot using Word, mimicking human user. Where Insertion point is – some action would take place. But, this means that you must take care where insertion point is! This is not easy after many steps in code. Otherwise, Word would change text in not desired place.
In the case you need some property or method not available in Selection object you can always easily obtain range associated with selection:
Set oRange = Selection.RangeTIP: Using Selection is often easier than using ranges, but also it’s way slower (important when you deal with big documents)
Paragraphs
You can’t directly use Paragraphs object to change text:
ActiveDocument.Paragraphs(1).Text = "No, it wouldn't work"Above wouldn’t work (actually it will throw an error). You need to first obtain range associated with particular paragraph:
ActiveDocument.Paragraphs(1).Range.Text = "It works now :)"But you can directly change its style:
ActiveDocument.Paragraphs(1).Style = "Normal"or change its paragraph level formatting:
ActiveDocument.Paragraphs(1).LeftIndent = 10or maybe you want to keep this paragraph on the same line with next paragraph:
ActiveDocument.Paragraphs(1).KeepWithNext = TrueMake paragraph centered:
ActiveDocument.Paragraphs(1).Alignment = wdAlignParagraphCenterIt is VERY useful to assign a particular paragraph to object variable. If we assign particular paragraph to variable we don’t have to worry if the first paragraph becomes the second because we inserted one paragraph before it:
dim oPara as Paragraph
Set oPara = Selection.Paragraphs(1) ‘here we assign first paragraph of current selection to variable
Here is an example where we insert a paragraph above the first paragraph, but we can still reference the old first paragraph because it was assigned to a variable:
Sub ParagraphExample()
    Dim oPara As Paragraph
    Set oPara = ActiveDocument.Paragraphs(1)
    MsgBox oPara.Range.Text
    oPara.Range.InsertParagraphBefore 'Insert Paragraph
    MsgBox oPara.Range.Text
End Sub
Paragraph object is very frequently used in loops:
Sub LoopThroughParagraphs()

    Dim oPara As Paragraph
    For Each oPara In ActiveDocument.Paragraphs
        'do something with it. We will just display
        'paragraph text if its style is "Heading 4"
        If oPara.Style = "Heading 4" Then
            MsgBox oPara.Range.Text
        End If
    Next oPara

End Sub
Word VBA Tutorial Conclusion
This tutorial covered the basics of Word VBA. If you’re new to VBA, you should also review our general VBA Tutorial to learn more about Variables, Loops, MessageBoxes, Settings, Conditional Logic and much more.
AutoMacro | Ultimate VBA Add-in | Click for Free Trial!
Word Macro Examples
Word VBA FAQs
What is a Word Macro?
A Macro is a general term that refers to a set of programming instructions that automates tasks. Word Macros automate tasks in Word using the VBA programming language.
Does word have VBA?
Yes, Microsoft Word has the VBA Editor. It can be accessed with by pressing ALT + F11 or by navigating to Developer > Visual Basic.
How do I use VBA in Word?
1. Open the VBA Editor (ALT + F11 or Developer > Visual Basic)
2. Go to Insert > Module to create a Code Module
3. Type ‘Sub HelloWorld’ and press Enter
4. In between the lines ‘Sub HelloWorld’ and ‘End Sub’, type ‘MsgBox “Hello World!’
5. You’ve created a Macro!
6. Now press ‘F5’ to run the Macro
Аннотация: Немалая часть работы VBA-программиста проводится в так называемом визуальном режиме.
Здесь не требуется знания особенностей написания команд на VBA или управляющих структур языка.
Вы работаете с командами меню, создаёте формы, настраиваете элементы управления, создаете обработчики событий.
Эта лекция посвящена VBA-редактору и особенностям работы с ним.
3.1. Особенности главного меню VBA-редактора
Окно редактора Visual Basic выглядит одинаково во всех приложениях Microsoft Office. Давайте рассмотрим главное меню этого окна, описав назначение наиболее часто используемых пунктов.
- File (Файл) — служит для работы с файлами.
- File • Save — сохраняет файл.
- File • Import File — позволяет импортировать внешний файл в редактор. Например, таким образом можно добавить в свой проект модуль (то есть — программный код) или форму.
- File • Export File — экспортирует данные из редактора во внешний файл. Например, этой командой можно сохранить редактируемую форму и передать ее другому разработчику.
- File • Close and Return To Microsoft Word — закрывает VBA-редактор и возвращается в Microsoft Word (аналогичная команда есть и для MS Excel). Вы можете просто переключаться между редактором и основным приложением в Панели задач Windows, не закрывая редактор.
- Edit (Правка) — содержит команды для правки. Помимо стандартных команд отмены и возврата последнего действия ( Undo, Redo ), вырезания, копирования, вставки ( Cut, Copy, Insert ), поиска ( Find ), это меню содержит несколько особенных команд. В частности, это List Properties/Methods (Список Свойств/Методов) и другие.
- View (Вид) — cодержит команды для отображения различных окон редактора. Названия команд соответствуют названиям окон.
- Insert (Вставка) — служит для вставки в проект форм ( Insert • User Form ), модулей ( Insert • Module ), процедур ( Insert • Procedure ), файлов ( Insert • File ) и модулей класса ( Insert • Class Module ). Чаще всего вам придется вставлять в проект формы. Эти команды продублированы на панели инструментов редактора.
- Format (Форматирование) — служит для управления расположением элементов управления на формах.
- Debug (Отладка) — содержит команды, позволяющие отлаживать программы.
- Run (Запуск) — содержит команды для управления выполнением программ. В частности, команда Run • Sub/User Form (Запуск • Процедура/Форма) запускает на выполнение активную процедуру или форму (рядом с этой командой стоит характерный зеленый треугольник). Команда Run • Break (Запуск • Приостановить) — приостанавливает выполнение программы, команда Run • Reset (Запуск • Перезапуск) – останавливает выполнение программы. Эти команды продублированы на панели инструментов редактора в виде кнопок с соответствующими пиктограммами.
- Tools (Инструменты) — содержит средства для настройки свойств редактора, подключения дополнительных библиотек объектов.
- Add-Ins (Дополнения) — позволяет управлять дополнениями. По умолчанию это меню содержит лишь одну команду, запускающую менеджер дополнений.
- Window (Окно) — стандартные команды для работы с окнами.
- Help (Помощь) — помощь по VBA.
В дальшейнем мы подробно рассмотрим многие из команд главного меню. А сейчас давайте поговорим об окне Project — вам постоянно придется пользоваться им.
3.2. Подробности об окне Project
Окно Project служит для навигации по проекту (рис. 3.1.).

Рис.
3.1.
Окно Project
Каждый открытый документ представляет собой отдельный проект. На рис. 3.1. вы можете видеть окно Project для только что созданного документа MS Word. В проект добавлена форма.
Проект имеет иерархическую структуру. Так, в разделе Microsoft Word Objects (Объекты Microsoft Word) мы можем видеть объект ThisDocument (Этот документ), то есть документ, который мы создали. В разделе Forms (Формы) мы можем видеть объект UserForm1 — только что вставленную в проект форму.
Чтобы отобразить объект, достаточно сделать по нему двойной щелчок или нажать на кнопку View Object (вторая слева в верхней части окна Project ). Чтобы просмотреть код объекта надо нажать на кнопку View Code (крайняя левая кнопка).
Щелкнув правой кнопкой мыши по названию проекта, можно увидеть его контекстное меню. Это меню содержит наиболее часто используемые команды для работы с проектами. В частности, особый интерес представляет команда Project Properties (Свойства проекта).
В окне Project Properties обратите внимание на вкладку Protection (Защита). Она позволяет защитить проект от просмотра и закрыть его паролем.
Для защиты проекта от просмотра установите галочку в поле Lock project for viewing (Закрыть проект от просмотра), для закрытия проекта паролем, введите в поля Password (Пароль) и Confirm password (Подтвердить пароль) пароль.
Существует специальное ПО, которое позволяет восстанавливать забытые пароли к VBA-проектам. Как вы понимаете, оно может помочь получить доступ в проект не только законным владельцам, но и злоумышленникам. Поэтому если вы, например, передаете кому-то ценный VBA-проект по слабо защищенным каналам связи — лучше зашифруйте весь файл с помощью какой-нибудь программы шифрования.
Еще одна полезная возможность, связанная с управлением проектами – подписывание проектов.
Прежде чем подписать проект, нужно создать цифровой сертификат для проектов VBA. Чтобы создать его, пройдите по пути Пуск • Все программы • Microsoft Office • Microsoft Office Tools • Digital Certificate for VBA Projects. Введите в появившемся окне имя для сертификата.
Чтобы теперь подписать проект, выделите его в окне Project и воспользуйтесь командой Tools • Digital Signature. В появившемся окне нажмите на кнопку Выбрать — появится окно для выбора сертификата. Выберите из этого окна интересующий вас сертификат. В нашем случае здесь присутствует лишь один, заранее созданный, сертификат. Вот как выглядит окно цифровой подписи после завершения выбора (рис. 3.2.)
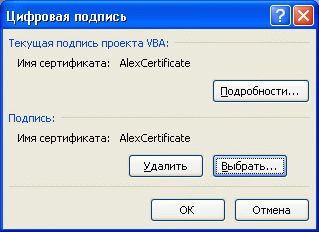
Рис.
3.2.
Цифровая подпись проектов
Учтите, что автоматически создаваемый сертификат считается надежным лишь на том компьютере, в хранилище сертификатов которого он находится. Если вы подпишите свои проекты, вы сможете один раз разрешить их использование, выбрав соответствующий пункт в окне настройки безопасности макросов.
Это позволит, с одной стороны, не отвлекаться на постоянные запросы системы безопасности, а с другой — не понижать безопасность системы, разрешая выполнение всех макросов.
Теперь займемся работой с формами и элементами управления
3.3. Формы и элементы управления
03-01-Формы и элементы управления.docm — пример п. 3.3. — 3.6
Создайте новый документ Microsoft Word и откройте редактор VBA. Вставьте в проект новую форму командой Insert • User Form (Вставка • Форма). Вот что должно получиться (рис. 3.3.).
Как видите, форма — это пустая заготовка будущего диалогового окна вашего приложения.
По краям новой формы вы можете видеть маркеры выделения. С их помощью можно настраивать ее размеры.
Обратите внимание на окно Properties (Свойства). Как вы уже знаете, оно содержит свойства объектов. Для выбора объекта, свойства которого будут отображены в этом окне, нужно либо выделить объект, либо указать его в списке, который находится в верхней части окна Properties.
Окно Toolbox (Элементы управления) содержит элементы управления, которые можно добавлять на форму. Элементы управления — это все то, что служит для управления работой программ. Например: кнопки, поля ввода, полосы прокрутки и так далее.
Для того, чтобы добавить элемент управления на форму, нажмите в окне Toolbox кнопку с изображением этого элемента и выделите мышью ту область на форме, которую он должен занять
Нажмем на кнопку Toolbox’а с изображением кнопки и добавим новую кнопку на форму. Вот, что у нас получилось (рис. 3.4.).
Вокруг кнопки вы можете видеть маркеры выделения, которые служат для изменения ее размера. «Схватив» элемент управления мышью, вы можете перемещать его по форме.