
3. Make Corrections to the Picture
- Click the picture to reveal the “Format” tab.
- Press the “Corrections” option to reveal the dropdown. This will reveal to you how to edit image text in word.
- Apply the required correction to complete the process in full. This will also let you know how to edit a picture in word 2007.
Contents
- 1 How do I edit text in a picture in Word?
- 2 How can I edit text in a picture?
- 3 How do I edit or remove text from a picture in Word?
- 4 How do I edit text in a picture in Word Online?
- 5 How do you change the text of a screenshot?
- 6 How do you edit text in a JPEG?
- 7 How do I edit text in a picture without changing the background?
- 8 How do I edit text in a jpeg in paint?
- 9 How can I remove text from a picture?
- 10 How do I remove unwanted parts of a photo?
- 11 Can I erase part of a picture in word?
- 12 How do I put text on a picture in word?
- 13 How do I edit a screenshot?
- 14 How do I edit a screenshot in Windows 10?
- 15 How do I find my edited screenshots?
- 16 How do I edit text in a picture without Photoshop?
- 17 Can we edit an image?
- 18 How do I edit a Word document in paint?
- 19 Which tool is used for typing text in paint?
- 20 How do I remove text from a JPEG?
How do I edit text in a picture in Word?
On the Insert tab, in the Text group, click Text Box, click anywhere near the picture, and then type your text. To change the font or style of the text, highlight the text, right-click it, and then select the text formatting you want on the shortcut menu.
How can I edit text in a picture?
Add Text to Photos on Android Using Google Photos
- Open a photo in Google Photos.
- At the bottom of the photo, tap Edit (three horizontal lines).
- Tap the Markup icon (squiggly line). You can also select the color of text from this screen.
- Tap the Text tool and enter your desired text.
- Select Done when you’ve finished.
How do I edit or remove text from a picture in Word?
Open the app, tap “Albums” and select the photo that you want to process. Go to the toolbar and choose “Quick Repair”, then “Quick Brush” at the bottom of the screen. Highlight the text that you want to erase and tap “Remove”.
How do I edit text in a picture in Word Online?
How to convert Image to Text, Word, or Excel free online:
- Upload your image to our free online OCR tool.
- Choose an option to convert your Image to Text, Word, or Excel.
- Click on the “Convert Image” button in order to start the conversion.
- Wait for the conversion to finish & then download your file.
How do you change the text of a screenshot?
Ways to Edit Screenshots on Android
- Take a screenshot on your stock Android phone using the shortcut: pressing the power button and volume down button simultaneously.
- When it is captured, you will see three options- Edit, Delete and Share.
- Tap on Edit and it will take you to Google Photos editor.
How do you edit text in a JPEG?
You can not “edit” a text in a JPG file. A Jpg file has no editable text. It is just a bunch of pixels of some colors diferent that the other pixels that you percive as a background. What you do is smudge, paint or copy some other pixels above thoose to “errase them”.
How do I edit text in a picture without changing the background?
How to Remove Text in Photoshop
- Check if the Text Has a Separate Layer. The first thing you should is to check the Layers panel to see if the text has a separate layer.
- Create a Selection.
- Expand the Selection.
- Restore the Background.
- Adjust the Selection Fill.
- Deselect.
- Done!
How do I edit text in a jpeg in paint?
Select the “Text” tool and click to place a text box. As long as the text box is open, you’re free to edit the text. If you’re wondering how to change the color of text in paint, in addition to typing or deleting text, use the settings on the menu bar to edit the text’s formatting, such as font, size and color.
How can I remove text from a picture?
Remove text from JPEG with ScanWritr eraser tool
To remove text from image you can use ScanWritr’s eraser tool. Just go to the ScanWritr web and upload the file you want to edit. Erase unwanted text or background, then fill document, sign it, preview it, export it and that’s it.
How do I remove unwanted parts of a photo?
5 Free Android Apps to Remove Unwanted Objects from Photos:
- Adobe Photoshop Fix. This app is widely used by Android users to remove unwanted objects from images.
- Remove Object.
- PixelRetouch.
- YouCam Perfect.
- TouchRemove.
Can I erase part of a picture in word?
Select the image. Go to the Picture Format tab and select Remove Background. In Word 2016 and older, go to the Format tab.To highlight a section of the image that should be deleted, select Mark Areas to Remove, then select the parts of the image that should be removed.
How do I put text on a picture in word?
Extract text from a single picture
- Right-click the picture, and click Copy Text from Picture.
- Click where you’d like to paste the copied text, and then press Ctrl+V.
How do I edit a screenshot?
After you take the screenshot, you’ll see a preview of the image in the bottom-left corner. From here you can tap “Edit.” This will take you to a basic photo editing screen. First, you can grab the corners to crop the screenshot.
How do I edit a screenshot in Windows 10?
How to screenshot on Windows 10: Edit screenshots with Snipping Tool
- Open the Start Menu.
- Type “Snipping tool.”
- Select Snipping Tool.
- Select what type of screenshot you want from the Mode menu.
- Click new.
- Edit image.
- Click File, then Save As.
How do I find my edited screenshots?
The screenshot is an edited image. You would have to contact the person who made the screenshot and altered it and ask them to tell you what the original image said before they edited it or if you are lucky they would still have the original version. They probably don’t have it.
How do I edit text in a picture without Photoshop?
Tools to edit photos without Photoshop
- GIMP: Free, open-source photo editor similar to Photoshop.
- Pixlr E: Free Photoshop tool that doesn’t need a download.
- PicMonkey: Powerful image editor easier than Photoshop (starts at $8/mo, $12/mo for background removal tool).
Can we edit an image?
On a computer, go to photos.google.com. Open the photo you want to edit. . Tip: While you edit, click and hold the photo to compare your edits to the original.
How do I edit a Word document in paint?
Go to the Start menu and open Microsoft Paint. In the Edit menu, select “Paste.” The copied portion of the Word document appears in the Paint file. Use the Crop tool to remove any unwanted sections of the document. Select “Save As” in the File menu and name the file.
Which tool is used for typing text in paint?
T. This tool allows text to be typed onto the current layer using the Primary color. The Text Controls in the Tool Bar can be used to change the font, the size of the font, formatting, text rendering mode, justification, antialiasing and blend mode.
How do I remove text from a JPEG?
Erase Text from JPEG Using ScanWritr [Online]
- Step 1: Visit the website ScanWritr.com.
- Step 2: Click on the ScanWritr’s eraser tool option to remove text.
- Step 3: Select the size of the eraser and enlarge the image for better editing.
- Step 4: Click on the Save option to preview the result.
Как вставить текст в картинку в Ворде
Что обычный пользователь делает, когда в документе Word нужно поместить текст на изображении? Правильно, применяет разные графические редакторы от стандартного Paint до мощного PhotoShop, а на это тратится время и результат может не порадовать. Но существует несколько вариантов вставки в картинку текста в ворде, который будет смотреться оригинально, в самом Word не прибегая к применению других программ.
Приведенная инструкция познакомит с приемами создания любых надписей на изображении.
Способ №1: текстовый блок
Итак, предположим, что в документе уже присутствует нужный рисунок и на нем осталось лишь разместить несколько предложений или список. Как это сделать? Для каждого релиза текстового редактора схема отличается, но незначительно.
После этого развернется меню с набором готовых шаблонов. Тут нажмите «Простая надпись» (это будет первый пример в окне). В результате на листе отобразится рамка с образцом текста.
Далее, перетащите полученный объект на картинку. Для этого наведите курсор на обрамление, стрелка поменяет вид на черный крестик. Зажмите левую кнопку и, не отпуская ее, передвиньте блок в требуемое место на рисунке.

Пока вы получите белое поле, обрамленное черной рамкой. Напечатайте вместо примера текста нужный фрагмент и отформатируйте его согласно своим требованиям (величину шрифта, цвет, стиль и прочее). Размеры блока тоже изменяются. Его можно расширить или уменьшить.
Теперь надо убрать белый фон и обрамление. Для этого просто кликните по надписи и перейдите во вкладку «Формат». Отыщите и щелкните в группе «Стили» по кнопке «Заливка фигуры». Выпадет меню, где выберите пункт «Нет заливки», и фон отключится.
Осталось убрать рамку. В этой же группе кликните «Контур фигуры», а в списке нажмите «Нет контура». Команда отключает обрамление.

Стандартными средствами Word можно создать хорошо оформленную подпись, любого цвета, стиля, размера. Это гораздо удобней и быстрей, чем пользоваться графическими редакторами.
Способ №2: объект Вордарт
Есть еще один интересный прием создания надписи — вставка объекта WordArt. По сути, это такое же текстовое поле, только имеющее более интересную стилизацию шрифта (с тенью, отражением, объемом и так далее).
Во вкладке «Вставка» щелкните кнопку «Добавить объект WordArt» в виде голубой повернутой буквы А. Отобразятся наглядные примеры. Выберите, что подходит к изображению и просто кликните по образцу.

Теперь введите нужную информацию в блоке и перетащите полученное на картинку.
Способ №3: обтекание текстом
Метод хорош в том случае, когда рисунок используется в качестве подложки страницы целиком.
На вставленной картинке щелкните правой кнопкой и выберите в контекстном меню строку «Обтекание текстом». Далее, нажмите пункт «За текстом».

Теперь наполняйте документ как обычно. Только фоном будет служить рисунок, а не стандартный белый цвет.
С помощью приведенных приемов вы легко сделаете отлично оформленный текст на картинке. При этом надобность в использовании графических редакторов отпадает.
Как наложить текст на картинку в Word
При оформлении текстовых документов в редакторе Word не редко возникает необходимость вставить картинку и наложить на нее текст. Со вставкой картинки у большинства пользователей не возникает проблем, для этого достаточно скопировать нужное изображение и вставить его в документ, а вот с наложением текста бывают сложности. В этом статье мы попробуем решить эту проблему рассмотрев сразу два способа, как наложить текст на картинку в Word. Статья будет актуальной для Word 2007, 2010, 2013, 2016 и 2019.
Наложение текста на картинку с помощью элемента «Надпись»
Пожалуй, самый простой способ наложить текст на картинку в Word это воспользоваться элементом «Надпись». Такой элемент можно вставить документ и потом разместить его в любом удобном месте, вне зависимости от форматирования текста или размещения картинок.
Для того чтобы воспользоваться данным способом вставьте на страницу нужную картинку и перейдите на вкладку «Вставка». Здесь нужно нажать на кнопку «Надпись» и выбрать вариант «Простая надпись».

Нужно отметить, что в последних версиях Word кнопка «Надпись» была переименована в «Текстовое поле», но она выполняет ту же функцию.

После вставки элемента «Простая надпись» на странице появится рамка с текстом. Такую рамку можно свободно перемещать по документу, что позволяет наложить текст на картинку или другой элемент документа Word.

Естественно, текст, который расположен в элементе «Надпись» можно отредактировать. Для этого просто кликаем внутрь рамки и вводим собственный текст.

В принципе на этом можно закончить, мы наложили текст на картинку. Но, если нужно добиться более красивого результата, то можно поиграться с настройками элемента. Например, можно убрать белый фон под текстом и рамку. Для этого выделите данный элемент и перейдите на вкладку «Формат». Здесь нужно воспользоваться функцией «Заливка фигуры» и выбрать вариант «Нет заливки».

Дальше используем функцию «Контур фигуры» и убираем рамку вокруг текста.

В результате у вас должно получиться примерно вот такое наложение текста на картинку.

Если есть желание сделать текст более красочным, то на вкладке «Формат» есть несколько стандартных стилей текста.

Выбрав один из этих стилей, мы получим результат схожий с тем, что можно получить в профессиональном графическом редакторе.

Также есть возможность ручной настройки стиля текста. Для этого нужно воспользоваться функциями «Заливка текста», «Контур текста» и «Текстовые эффекты».
Наложение текста на картинку с помощью обтекания
Альтернативным способом наложения текста на картинку является использование функции «Обтекание текстом». Для того чтобы воспользоваться данным способом кликните правой кнопкой мышки по картинке и включите опцию «Обтекание текстом – За текстом».

После включения данной опции вы сможете перемещать картинку по документу Word и при этом она не будет влиять на форматирование документа, она как-бы будет располагаться на нижнем слое, под текстом. Это позволит наложить нужный текст на картинку.

Этот способ будет особенно удобен если вам нужно наложить текст на большую картинку, которая занимает всю страницу документа Word.
Как в офисе.

Помимо работы с текстом, программа MS Word также позволяет работать и с графическими файлами, которые в ней можно изменять (хоть и по минимуму). Так, нередко добавленную в документ картинку требуется как-нибудь подписать или дополнить, причем, сделать это необходимо так, чтобы сам текст находился поверх изображения. Именно о том, как наложить текст на картинку в Ворде, мы и расскажем ниже.
Существует два метода, с помощью которых можно наложить текст поверх картинки — это использование стилей WordArt и добавление текстового поля. В первом случае надпись будет красивая, но шаблонная, во втором — вы имеете свободу выбора шрифтов, типа написания и форматирования.
Урок: Как в Word изменить шрифт
Добавление поверх рисунка надписи в стиле WordArt
1. Откройте вкладку «Вставка» и в группе «Текст» нажмите на пункт «WordArt».

2. Из развернувшегося меню выберите подходящий стиль для надписи.

3. После того, как вы кликните по выбранному стилю, он будет добавлен на страницу документа. Введите необходимую надпись.

Примечание: После добавления надписи WordArt появится вкладка «Формат», в которой можно выполнить дополнительные настройки. Кроме того, вы можете изменить размер надписи, потянув за границы поля, в котором она находится.

4. Добавьте в документ изображение, воспользовавшись инструкцией по ссылке ниже.

Урок: Как в Word вставить картинку
5. Переместите надпись WordArt, расположив ее поверх изображения так, как вам это необходимо. Кроме того, вы можете выровнять положение текста, воспользовавшись нашей инструкцией.

Урок: Как в Ворде выровнять текст
6. Готово, вы наложили надпись в стиле WordArt поверх изображения.
Добавление поверх рисунка обычного текста

1. Откройте вкладку «Вставка» и в разделе «Текстовое поле» выберите пункт «Простая надпись».

2. Введите необходимый текст в появившееся текстовое поле. Выровняйте размеры поля, если это необходимо.

3. Во вкладке «Формат», которая появляется после добавления текстового поля, выполните необходимые настройки. Также, вы можете изменить внешний вид текста в поле стандартным способом (вкладка «Главная», группа «Шрифт»).

Урок: Как в Word повернуть текст
4. Добавьте изображение в документ.

5. Переместите текстовое поле на картинку, если это необходимо, выровняйте положение объектов, воспользовавшись инструментами в группе «Абзац» (вкладка «Главная»).


Добавление подписи к рисунку
Кроме наложения надписи поверх изображения, вы также можете добавить к нему подпись (название).
1. Добавьте изображение в документ Word и кликните по нему правой кнопкой мышки.

2. Выберите пункт «Вставить название».

3. В открывшемся окне введите необходимый текст после слова «Рисунок 1» (остается неизменным в этом окне). Если это необходимо, выберите положение подписи (над или под изображением), развернув меню соответствующего раздела. Нажмите кнопку «ОК».

4. Подпись будет добавлена к графическому файлу, надпись «Рисунок 1» можно будет удалить, оставив только введенный вами текст.


На этом все, теперь вы знаете, как сделать надпись на картинке в Ворде, а также о том, как подписывать рисунки в этой программе. Желаем вам успехов в дальнейшем освоении этого офисного продукта.

on
August 31, 2022, 8:30 AM PDT
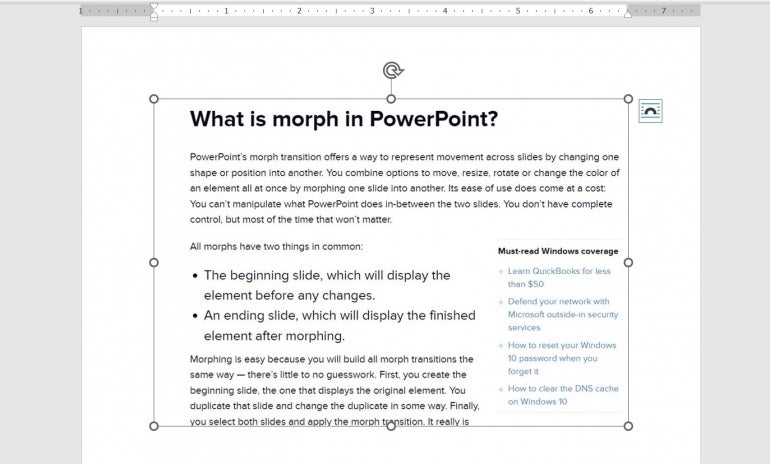
How to convert an image into editable text in Microsoft Word
If you receive a picture of data, don’t panic: You don’t have to enter it by hand. Microsoft Word can convert the image into text for you.
We may be compensated by vendors who appear on this page through methods such as affiliate links or sponsored partnerships. This may influence how and where their products appear on our site, but vendors cannot pay to influence the content of our reviews. For more info, visit our Terms of Use page.

If you’re putting together a Microsoft Office document and receive textual content in the form of an image file, you might panic, especially if you’re staring down a fast-approaching deadline. Manually entering all that data eats into your time and opens the document up to typos and other errors. The good news is that you don’t have to do this. Instead, you can use Microsoft Word to convert the image into text. The results won’t be perfect, but it will be better than working from scratch.
In this tutorial, I’ll show you how to convert an image file into text that you can then use in Word or copy into Microsoft Excel or Microsoft PowerPoint. Word for the web will let you copy an image into a document and then download the file as a .pdf file, so you’ll still need the desktop version to complete the technique.
SEE: Google Workspace vs. Microsoft 365: A side-by-side analysis w/checklist (TechRepublic Premium)
I’m using Microsoft 365 on a Windows 10 64-bit system, but you can use earlier versions of Word.
How to copy an image into Word
You can’t open an image file in Word, but you can copy it into a Word document. Let’s suppose that you took a screenshot of a web page at TechRepublic.com and saved it to your local system. To copy that image into a Word document, you’d do the following:
- Use File Explorer to locate the image.
- Select the image and press Ctrl + C to copy the image to the Clipboard. If the image is available online, in an email or PowerPoint presentation file, right-click it and choose Copy Image.
- Open a blank Word document and press Ctrl + V to copy the image into the document (Figure A). With the image selected, you can clearly see that it’s an image and not text.
Figure A
If you’re working with an older version of Word and you can control the image format, save the image as a .png file. Doing so will eliminate many conversion issues in older versions of Word.
Once the image is inside Word, you’re ready to start converting it to text.
How to convert an image in Word
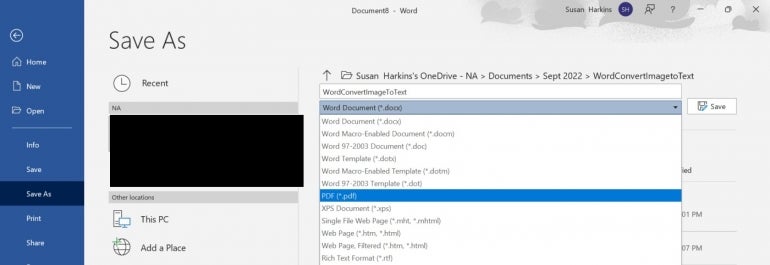
There’s no conversion feature or option in Word, but that isn’t a problem. By saving the .docx file as a .pdf file and then opening the .pdf file in Word, Word converts the image into text. To begin, save the Word file with the copied image by clicking the File tab, choosing Save As or Save a Copy (OneDrive), and then doing the following:
- Enter a name for the file, ImageWordSaveAsPDF.
- Choose PDF (*.pdf) from the Save dropdown (Figure B).
- Click Save.
Figure B
By default, your Adobe viewing app should open the new .pdf file. The content is still an image. Save the .pdf file by clicking the File menu and choosing Save As, as shown in Figure C. You can change the name, or not, but note the location of the saved .pdf.
Figure C

Return to Word. Click the File tab and choose Open. Locate the .pdf file, as shown in Figure D, and click Open. When Word prompts you to convert the file to text, as shown in Figure E, click OK.
Figure D

Figure E

Figure F

As you can see in Figure F, the converted image is now editable text. As I mentioned earlier, the results won’t always be perfect. You might lose formatting and the file might contain text that you don’t want to keep.
In the example file, you might want to do the following:
- Straighten up the right margin a bit by removing unnecessary hard returns.
- Apply the style Normal or some other style, so everything is the same.
- Run the Editor just in case: Interestingly, the conversion turned the y in the word “you” into a v.
- Delete the marketing text at the bottom.
I think most would agree that tweaking the converted text is much easier than entering it manually from the keyboard. Once the text is in shape, you can save it as a Word document or copy the text to an Excel sheet or PowerPoint slide.
Also See
-
Windows 11 cheat sheet: Everything you need to know
(TechRepublic) -
Windows PowerToys: A cheat sheet
(TechRepublic) -
Microsoft 365 Services Usage Policy
(TechRepublic Premium) -
Best software for businesses and end users
(TechRepublic on Flipboard)
-
Microsoft
-
Software
![]()
Download Article
![]()
Download Article
This wikiHow will show you how to use Microsoft Word to add text to an image on your computer, phone, or tablet. The Microsoft Word app is freely available for Androids, iPhones, and iPads, but you’ll need to purchase the app from Microsoft if you’re using a Windows or macOS.
Things You Should Know
- If you’re using a computer, use a text box with no fill and no outline to overlay text on an image.
- If you’re using the mobile Word app, insert a text box with no fill and no outline. Move the text box onto the image and edit the text.
- Make sure to tap the checkmark on mobile app Word documents to save your work!
-

1
Open your project in Word. You can do this by clicking Open from the File tab, or by right-clicking the file icon in your file browser and choosing Word from the «Open with…» dialog.
-
2
Click the Insert tab. You’ll find this above the document in the menu toolbar or along the top of your screen.
Advertisement
-
3
Click Text Box. You’ll find this in the Text group. A menu will dropdown.
-
4
Click Draw Text Box. You’ll see this at the bottom of the menu that drops down.
-
5
Enter your text. You’ll see your text entered into a moveable object.
- You can highlight your text and change the font size, color, and style before continuing.
-
6
Drag and drop your text box over the picture. Don’t deselect the text box yet.
-
7
Click the Format tab. You’ll find this above the document in the menu toolbar or along the top of your screen.
-
8
Format your text box in «Shape Styles.» You’ll want to make sure your text is not hidden by other elements.
- Click Shape Fill and select No fill.
- Click Shape Outline and select No outline.
-
9
Group the picture and text box. You can do this by clicking the picture to select it, then pressing and holding Ctrl (PC) or ⌘ Cmd (Mac) and clicking the text box to select it as well. Under the Format tab, click Group.[1]


Advertisement
-
1
Open your project in Word. This app icon looks like a blue page with white writing on it, and you can find this app on your home screen, in the app drawer, or by searching. To open your project in Word, you’ll need to tap Open from the File tab.[2]
-
2
Tap the pencil icon (optional). If you don’t see the pencil icon above the document, you may already be in editing mode.
-
3
Tap the upwards-pointing arrow
. You’ll see this on the right of the options menu.
-
4
Tap Home. You’ll open up a list of toolbar options.
-
5
Tap Insert. You’ll see the Insert menu options.
-
6
Tap Text Box. You might have to scroll down to see this option.
- After you tap this, you’ll see a text box with dummy text inserted on your page.
-
7
Format your text box. After you’ve inserted your text box, you’ll notice the main menu shifts to Shape. You’ll want to edit this text box from this menu.
- From Fill, choose ‘No fill.
- From Outline, choose No outline.
-
8
Tap inside the text box. A menu will pop up.
-
9
Tap Edit Text. Your cursor will appear in the text box. You’ll first need to delete what’s already in the text box.[3]
-
10
Tap the checkmark when you’re done to save your work. You’ll see this in the upper left corner of the app.


Advertisement
Ask a Question
200 characters left
Include your email address to get a message when this question is answered.
Submit
Advertisement
Thanks for submitting a tip for review!
References
About This Article
Article SummaryX
1. Open the picture in Word.
2. Insert a new text box from the Insert tab.
3. Type in your text.
4. Drag and drop the new text box over the picture.
5. Group the picture and text box.
Did this summary help you?
Thanks to all authors for creating a page that has been read 54,628 times.
Is this article up to date?

- Using a Text Wrapping Style
- Inserting a Text Box
- Inserting a WordArt
Method 1: Place Text Over Image Using Text Wrapping Style
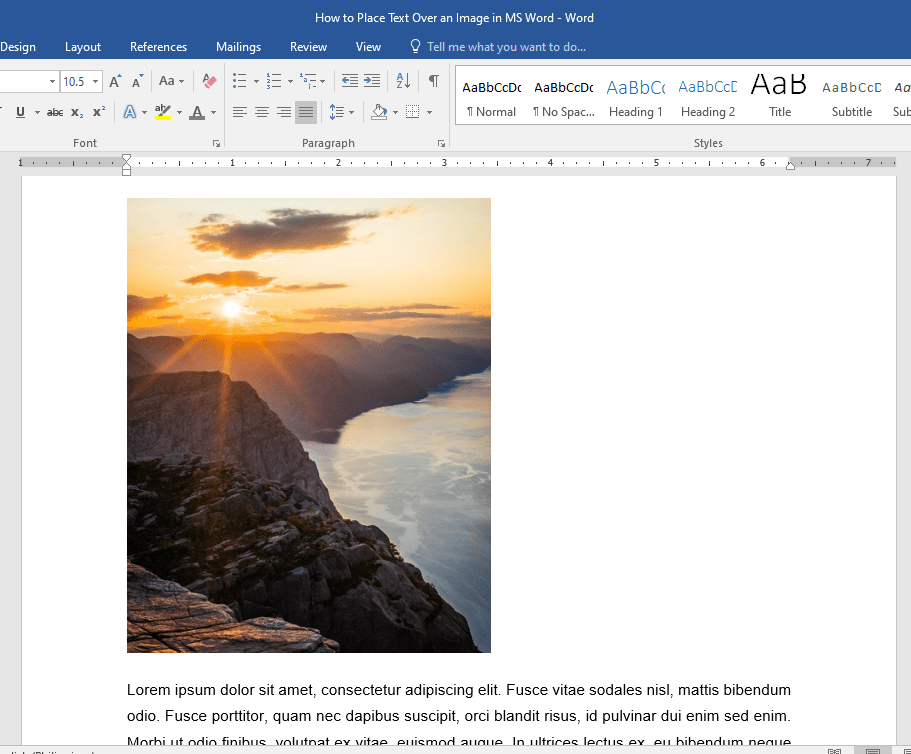
If you have a long chunk of text and you just want to put a background image or a watermark on a document, then this method is best for you.
Step 1: Open up a Word document.

Step 2: Set the image as background.
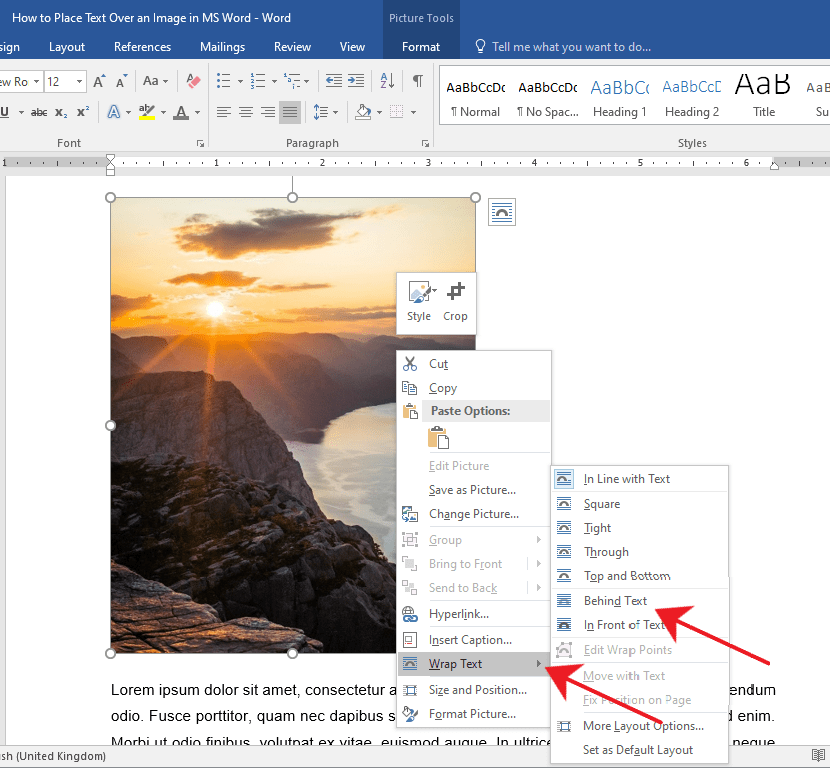
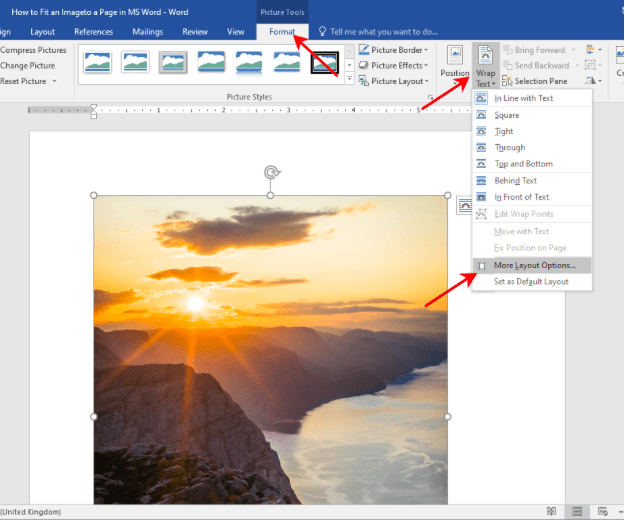
Right-click on the image and select the Wrap Text option.
This will display a horizontal drop-down menu on the right. Once you see the drop-down menu, select Behind Text.
You’ll notice the images and text will rearrange automatically as you hover over the text wrapping options.
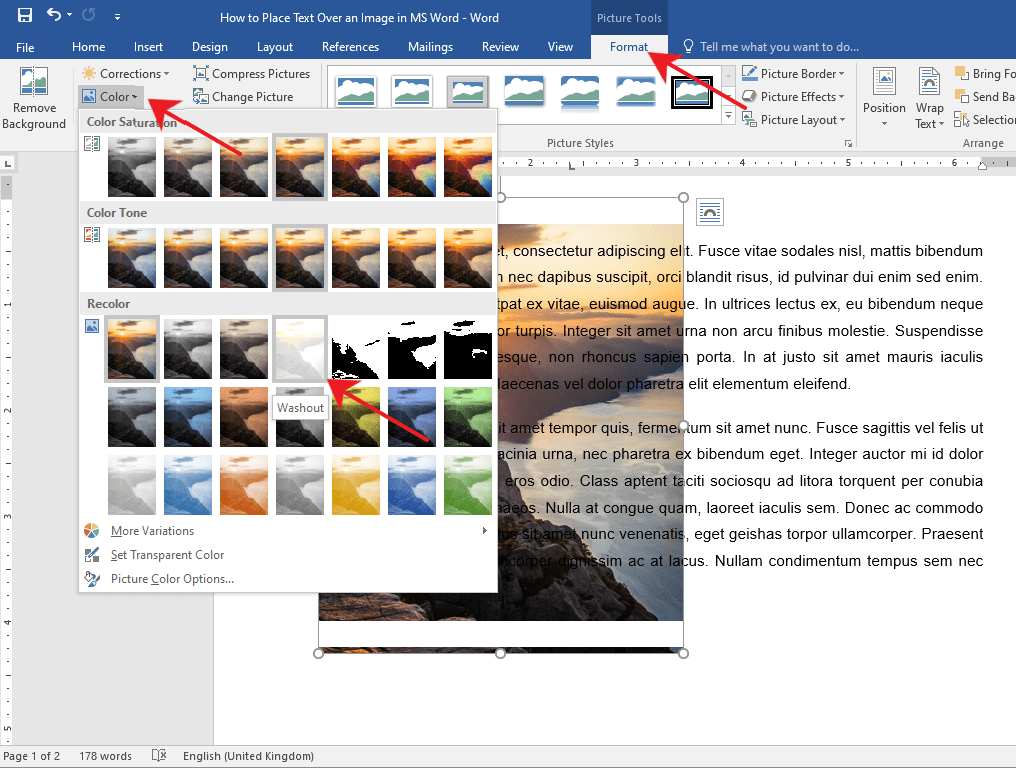
If after you’ve inserted a background image and the text becomes unreadable, you can change the image’s opacity or color.
Simply double-click on the image to activate the Format tab in the Ribbon.
After that, click on the Color drop-down menu and select Washout under the Recolor group.
You can also get creative and explore other options to suit your needs.
Method 2: Place Text Over Image Using a Text Box
Step 1: Open up a Word document.
Step 2: Insert a text box.
Go to the Insert tab on the Ribbon.
Now, navigate to the right side of the Ribbon and click on the Text Box drop-down menu.
Then, select a text box style of your preference. For this example, we’ll use the Simple Text Box.
Step 3: Type in the text.
Type in the text that you want to put on top of your image.

Step 4: Set the text wrapping style of the text box.
Select the text box and click the Layout button found at the upper right-hand corner of the text box.
Then, select the In Front of Text option.
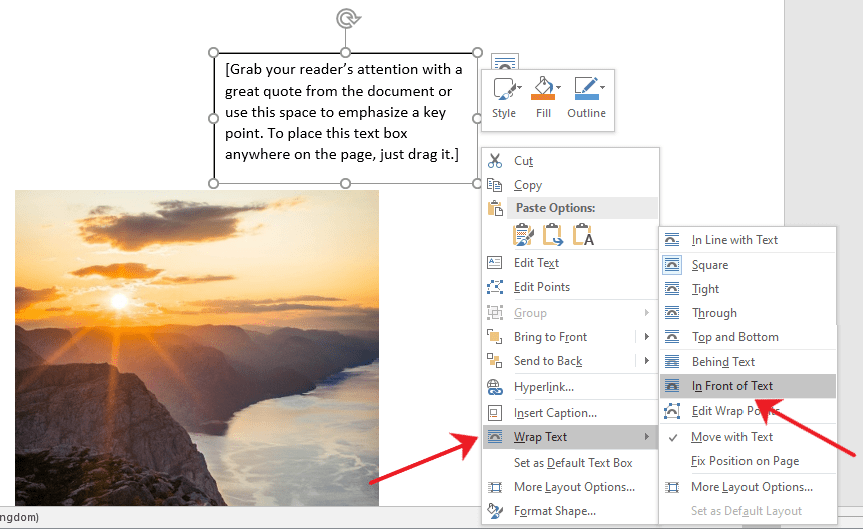
Step 5: Place the text box over the image.
Click and drag the text box to place it over your image. You’ll notice that your text box has a background color by default and is covering a part of the image.

You can change your text box’s background and border color by accessing the Format tab.
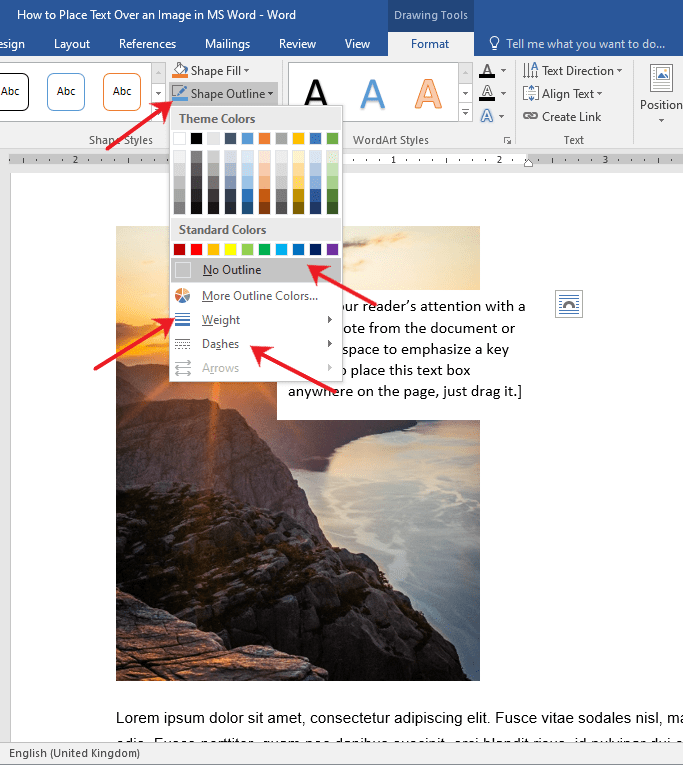
This way, only the text will be visible on top of your image. Now, Double-click the text box and go to the Format tab.
From there, click on the Shape Fill drop-down menu and choose No Fill.
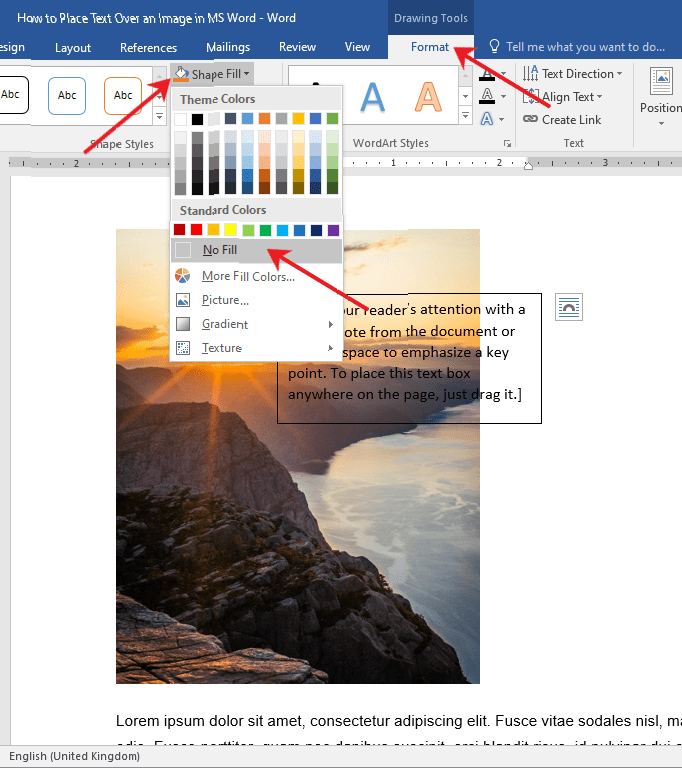
To change the border color, select the Shape Outline drop-down menu and choose No Outline.
You can also change the border’s weight and design by exploring the Dashes and Weight options.
Method 3: Place Text Over Image Using Word Art
If you find yourself needing to put a title, a name, or a couple of words over an image, then this method has got you covered.
Step 1: Open up a Word file.

Step 2: Insert the WordArt
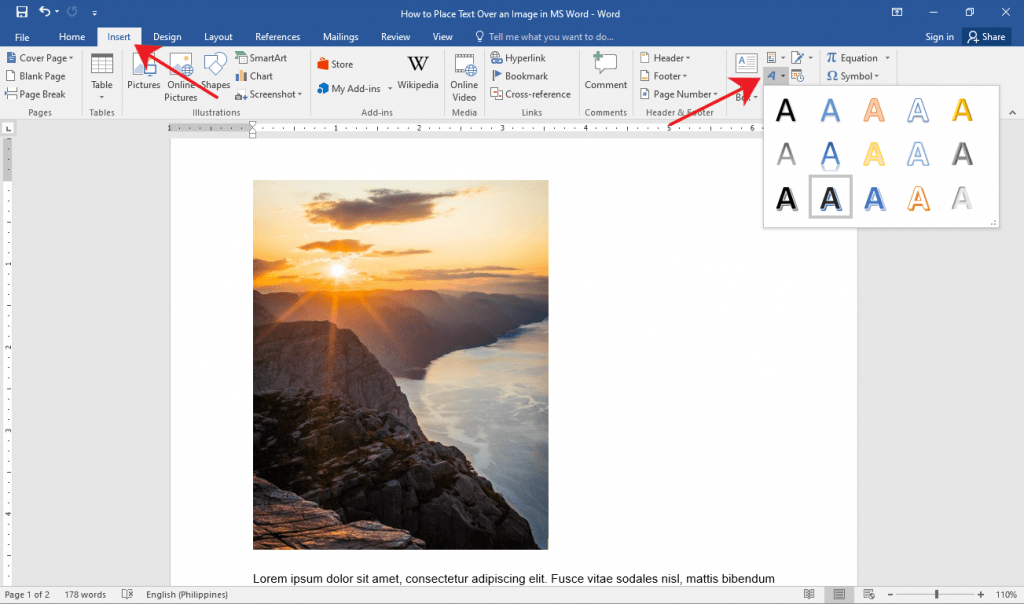
Click the Insert tab on the Ribbon.
Now, click the WordArt button found at the right side of your screen.
It’s the slanted letter A icon under the Text group. After that, choose a WordArt that suits the style of your document.
Step 3: Place the WordArt over the image.
Click on the WordArt and type in the text you want.
From there, select and drag the WordArt to easily move it around to the perfect location on your document.
You can also resize the WordArt like any other text box by grabbing either one of its corners.

Tip: If you’re using a pen or touch-enabled computer, you can directly write text over an image using the Draw option.
Editing and Deleting Text Over an Image
If you used Method 1, simply select the erroneous text and edit or delete it just as you would with any other text.
For Methods 2 and 3, click on the inside of the text box or the WordArt and start editing.
If you want to delete the entire text box or WordArt, click on any of the borders of the text box or WordArt and hit the Delete button on your keyboard.
Conclusion
That’s the rest of it. We hope you’ve found this article helpful!