Редактирование рисунков
После добавления фотографии, рисунка или рисунка на слайд у вас есть множество способов его улучшения, таких как графические эффекты (размытие, свечение и т. д.); предустановка стилей , включающее границу и заливку; а также корректировки цвета, яркости и контрастности.

65 секунд
Настройка яркости, контрастности и резкости
1. Выделите изображение.
2. Выберите формат рисунка и нажмите кнопку «Исправления».
3. Наводите указатель мыши на различные варианты, чтобы увидеть результат их применения, а затем выберите понравившийся.
Дополнительные сведения см. в статье Настройка яркости, контрастности и резкости рисунка
Применение творческих эффектов
1. Выделите изображение.
2. Выберите формат рисунка и выберите «Творческие эффекты».
3. Наведите указатель мыши на параметры, чтобы просмотреть их, а затем выберите нужный вариант.
Примечание: Одновременно к рисунку можно применить только один художественный эффект. Для применения к рисунку другого художественного эффекта необходимо удалить предыдущий художественный эффект.
Изменение цвета
1. Выделите изображение.
2. Выберите формат рисунка и выберите «Цвет».
3. Наведите указатель мыши на параметры, чтобы просмотреть их, а затем выберите нужный вариант.
Применение эффектов рисунка
1. Выделите изображение.
2. Выберите формат рисунка и нажмите кнопку «Эффекты рисунка».
3. Выберите нужный вариант: Тень, Отражение, Подсветка, Сглаживание, Рельеф или Поворот объемной фигуры.
Дополнительные сведения см. в разделе «Добавление или изменение эффекта для рисунка».
Добавление границы
1. Выделите изображение.
2. Выберите формат рисунка >рамку рисунка, а затем выберите границу.
Дополнительные сведения см. в разделе «Добавление и удаление границ рисунков».
Удаление фона
Дополнительные сведения см. в разделе «Удаление фона рисунка».
Сжатие рисунка
1. Выделите изображение.
2. Выберите формат рисунка и нажмите кнопку «Сжать рисунки».
3. Выберите нужные параметры и нажмите кнопку «ОК».
Дополнительные сведения см. в статье Уменьшение размера файла рисунка.
Нужна дополнительная помощь?
![]()
Загрузить PDF
![]()
Загрузить PDF
Вы когда-нибудь раздражались, пытаясь сделать брошюру или листовку в Microsoft Word? Эта статья предусматривает 4 простых шага, которые помогут сделать вашу работу намного легче. Чтобы создать привлекательные рекламные материалы используя Microsoft Word и Publisher начните с шаблона, чтобы дать себе фору. В разделе «Ссылки» вы найдете несколько сайтов, где можно найти хорошие шаблоны.
Шаги
-

1
Разгруппируйте объекты – текст и графика могут быть сгруппированы.
- Чтобы разгруппировать объекты:
- Word:
- Выберите объект. На панели инструментов нажмите на кнопку «Рисование», а затем нажмите «Разгруппировать».
- Publisher:
- Выберите объект. В меню «Организовать», нажмите «Разгруппировать» или нажмите «Ctrl + Shift + G».
- Word:
- Чтобы сгруппировать объекты:
- Word:
- Выберите объекты, которые требуется сгруппировать. Используйте «Shift + клик мышкой» для выбора нескольких объектов. На панели инструментов нажмите на кнопку «Рисование», а затем нажмите «Сгруппировать».
- Publisher:
- Выделите объекты. В меню «Организовать» нажмите на «Группа» или нажмите «Ctrl + Shift + G».
- Word:
- Чтобы разгруппировать объекты:
-
2
Измените размер изображения
- Выберите фотографию, размер которой нужно изменить.
- Наведите курсор на любой из элементов размера.
- Перетаскивайте точку, пока объект не примет форму и размер, которые вы хотите. Для сохранения пропорций объекта, перетаскивайте одну из угловых точек.
-
3
Обрежьте снимок
- Выберите фотографию, которую нужно обрезать.
- На панели инструментов нажмите «Обрезать».
- Расположите инструмент обрезки над одной из точек и перетащите точку отсечения внутрь, пока не отсечете то, что вы хотите.
-
4
Отредактируйте изображения или графический объект. Вы можете изменить размер, обрезать и регулировать яркость и контрастность, сделать изображение черно-белое или придать ему оттенки серого. Чтобы изменить определенные цвета, вам нужна программа рисования или редактирования изображений. Нарисованные объекты могут быть изменены, вы можете вращать их, перевернут и изменить цвет. Вы также можете добавить границы, шаблоны и другие эффекты. Параметры форматирования изменяются в зависимости от типа редактируемого изображения.
- Выберите изображение или графический объект, который вы хотите редактировать.
- Выберите опцию редактирования, которую вы хотели бы использовать на панели инструментов «Изображения» или на панели инструментов «Рисование».
- Установите точный размер или расположение объекта: В меню «Формат» выберите команду «Рисунок» или «Фигуры». Затем введите параметры в диалоговом окне.
Реклама


Об этой статье
Эту страницу просматривали 5903 раза.
Была ли эта статья полезной?
Microsoft Word позволяет добавить в документ различные мультимедиа-объекты:
- рисунки;
- фигуры;
- SmartArt;
- видео;
- значки;
- трехмерные модели.
Для того, чтобы вставить один из таких объектов, необходимо на вкладке Вставка выбрать один из пунктов, расположенных в разделе Иллюстрации или Мультимедиа:

Изображения
При вставке фото в Word вы можете выбрать как картинку, расположенную на вашем компьютере, так и осуществить поиск необходимого изображения в интернете.
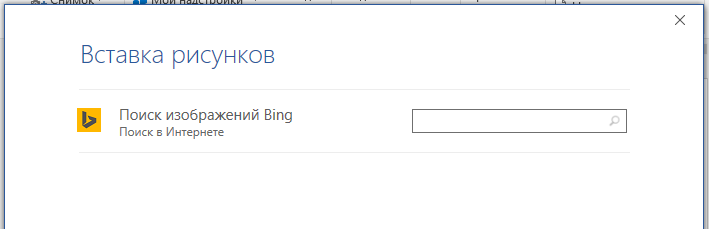
Для пользователей Office 365 доступен поиск стоковых изображений.
Редактирование изображений в Word
После вставки изображения в Word вы можете отредактировать его. Для этого необходимо кликнуть по изображению, после чего в меню Word появится новая вкладка Формат.

Благодаря данной вкладке вы можете:
- откорректировать цвет и стиль изображения;
- установить для рисунка границы и дополнительные эффекты;
- настроить положение рисунка на странице и обтекание его текстом;
- обрезать рисунок до нужных размеров;
- задать размеры рисунка.
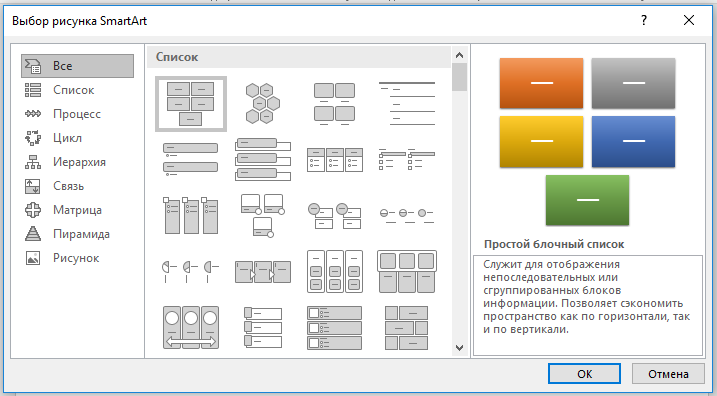
SmatrArt
SmartArt позволяет создавать различные схемы:
Видео
При вставке видео в Word вы можете использовать как видео, найденные в интернете (Bing/Youtube), так и использовать специальный код, предлагаемый другим сайтом.

Фигуры
Коллекция фигур позволяет выбрать подходящую:

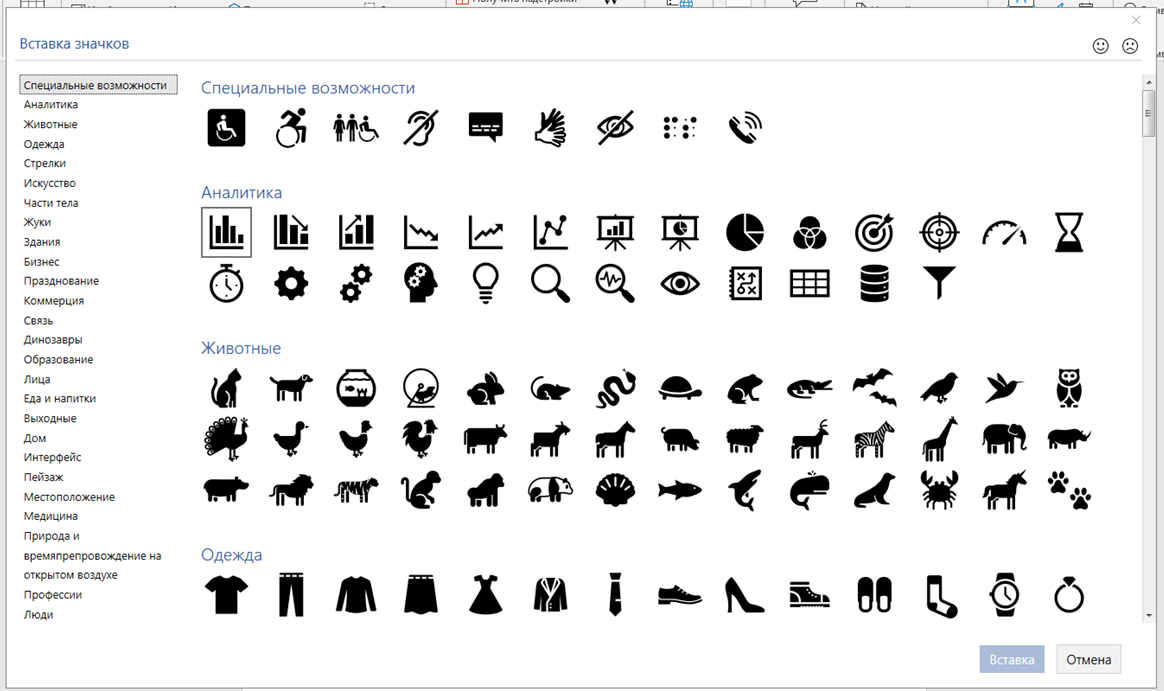
Значки
Добавление значков происходит, как и добавление рисунков, с помощью вкладки Вставка:
При нажатии на кнопку Значки откроется окошко выбора значков, которое содержит множество пиктограмм, разделенных на различные группы:
Текстовые блоки, WordArt, формулы, специальные символы
Трехмерные модели
В офисном пакете Microsoft доступны для использования 3D-модели.
Они позволяют добавить в документ не просто картинку, а целый трехмерный объект и рассмотреть его со всех сторон.

Для добавления 3D-модели необходимо перейти на вкладку Вид – Трехмерные модели – Из интернета. На следующем шаге вам будет предложено выбрать одну из существующих трехмерных моделей, разбитых на категории, или осуществить поиск в интернете.
После добавления Трехмерной модели на картинке появится значок, потянув за который в разные стороны вы сможете вращать выбранную модель.
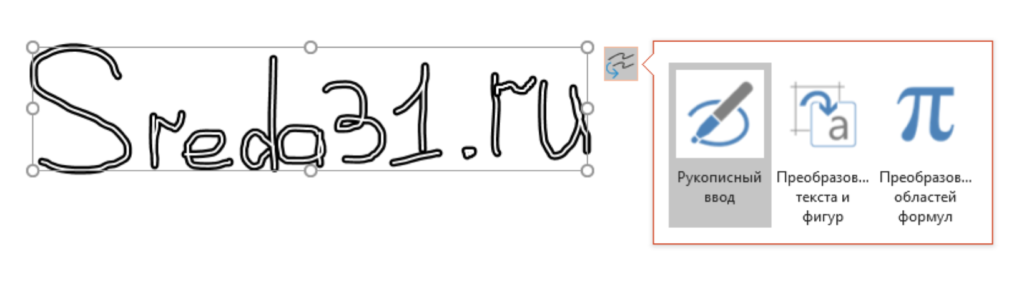
Рисование в Word
У пользователей последних версий Word, работающих с приложениями с планшетов, телефонов, а также ноутбуков с тачпадом на ленте появилась вкладка Рисование.
С помощью инструментов, расположенных на вкладке Рисование, можно делать записи и рисунки прямо поверх текстов, таблиц и презентаций.
Набор инструментов вкладки Рисование немного отличается в зависимости от приложения:

Довольно удобно, что с помощью инструментов рисования можно записать текст от руки, а затем распознать его и превратить в печатный. Соответствующий инструмент появится слева от написанного вручную текста:
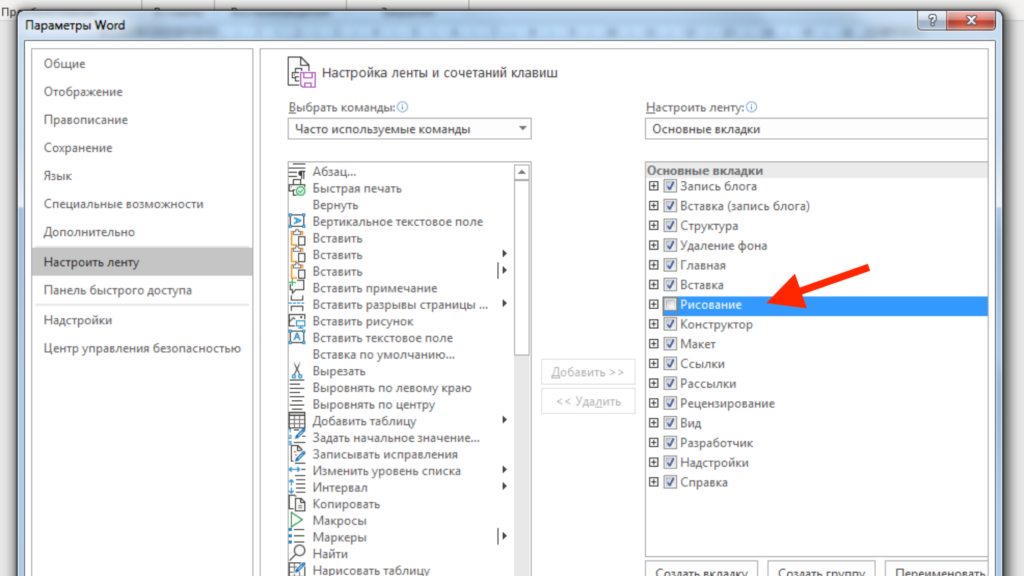
Те, у кого вкладка Рисование не появилась автоматически тоже могут сделать ее доступной. Для этого необходимо перейти в меню Файл – Параметры, выбрать раздел Настроить ленту и поставить галочку Рисование в правой части окна:
Расписание ближайших групп:
Загружаю…


Microsoft Word includes several image editing tools that allow you to make changes to images in your documents. Here’s how to use them.
You don’t need expensive photo editing software like Photoshop to edit photos and other images for Microsoft Word documents. Although the Microsoft Office Picture Manager has been retired, there are still plenty of built-in tools to edit images in Word.
Microsoft Word allows you to format colors and brightness, add borders, crop image sizes, add special effects, and more, so here’s how to do it. While the instructions may vary, these instructions should work for Word 2016 and higher, including Microsoft 365 (formerly O365) and Online.
There are a few ways to crop an image in Microsoft Word. Start by inserting the image into your Word document (Insert > Pictures) and selecting the image.

To begin formatting your selected image, click Format > Crop (or Format > Crop > Crop). You can also enter the image cropping mode by right-clicking the image and selecting Crop.
This will change the outline around your image from resizing to cropping.

Move the crop outline tools around your image to reduce the image area to its final size. Grayed-out areas will be removed from the final image once the crop edit has been confirmed.
Once you’re happy, click once outside of the image or press Enter on your keyboard.

Formatting Image Colors
Word allows you to format the colors used in your image without exporting it to a photo editor first. You can customize the image sharpness, brightness, saturation, tone, and contrast levels, either manually or using one of several preset filters.
To access the image formatting tools, right-click on your image and press Format Picture at the bottom.

This will bring up the Format Picture menu on the right-hand side. Click the Picture icon (furthest right) to access the image color editing tools.
Under Picture Corrections, move the sliders for each category to sharpen or soften an image or increase or decrease the brightness and contrast levels. You can also click Presets for each category, selecting one of the thumbnails to apply those changes to your image instead.

Under Picture Color, you can change the tone and saturation levels for your selected image. Move the sliders for each option left or right to increase or decrease each level.
Click Presets to set these levels using one of the provided preset options.

If you’re unhappy with any of the color changes you’ve made, click the Reset button underneath each category to return your image to its original state.
Adding Special Effects to Images
Microsoft Word also includes several special effects that can be easily applied to images. These include image shadow, glow and reflection, soft edges, and a 3D bevel effect.
To add these special effects, enter the Format Picture menu (right-click > Format Picture) and click the Effects icon (second from the left). Click on each sub-category to access each setting.
To add a shadow to your image, click Shadow and move the sliders to set transparency, size, angle, color, etc. You can also click Preset to preview and add a Word-defined drop shadow instead.

Click Reflection and follow the same instructions to add a custom or preset image reflection to your image. Do the same to Glow to add an image glow and Soft Edges to soften the edges around your image.
To add a 3D bevel effect to your image, click 3-D Format. Select the effect you want for both the top and bottom sections of your image by clicking Top Bevel and Bottom Bevel, selecting one of the pre-defined options.
You can also customize the depth, contour, material effect, and lighting levels for your 3D bevel effect using the drop-down menus and option boxes.

You can also add one of several preset artistic effects to your image. These combine several effects into one to change your image design.
To do this, click the Artistic Effects sub-category, then click the Artistic Effects icon. Select one of the preset options using your mouse to apply it to your image.

Compressing Images in Microsoft Word
Adding images to a Word document can vastly increase its size. By compressing the images, you can reduce the file size of your document as a whole.
To format a single picture, click Format > Compress Images and ensure that the Apply only to this picture checkbox is enabled. If you want to compress all of your attached images, click to uncheck this checkbox.
Compressing images will reduce the quality on a sliding scale from HD quality (330 pixels per inch) to basic email quality (96 pixels per inch).
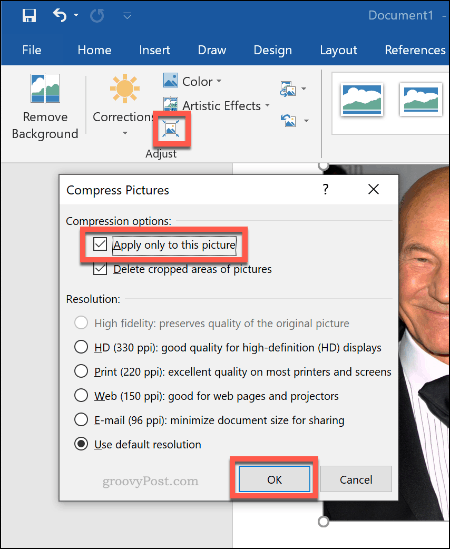
The higher the quality, the bigger the Word file, so choose your preferred quality, then click OK to compress your images.
Basic Image Editing Made Easy
These editing tools make it easy to make basic changes to images in Microsoft Word. You can also resize images in Windows 10 without needing an image editor too.
If you need to make bigger changes to your images, you can try some of these free Photoshop alternatives instead.
![]()
We’ll talk about how to use graphics in Word 2019 in this chapter. You can make your Microsoft Word documents look nicer by adding different kinds of graphics. This section will show you two ways to add pictures.
Table of contents
- What are graphics in Word?
- What is graphics used for?
- How to add Picture in Document
- How to Add WordArt in Document
- Summary
What are graphics in Word?
Graphics refers to hardware or software that allows a computer to show and change pictures. The word can also mean the pictures themselves. For example, laser printers and plotters are graphics devices because they let the computer print pictures.
You can add more information and make your spreadsheets, documents, and presentations more interesting by using graphics. In Office 2010, the commands and tools used to add and change images, shapes, SmartArt graphics, and clip art are used in all of the programs in the suite.
What is graphics used for?
Graphics are used for everything from making Web pages look better to be the presentation and user interaction layer for full-fledged Web applications. Graphics can be used in many different ways, so there are many different technologies to choose from.
Images and Multimedia
You don’t have to think of Word as just a program for making and editing text. It has the tools you need to make some pretty cool page layouts. Even though it doesn’t have as many features or be as strong as a professional page layout program like Adobe InDesign. You can still make things look very professional if you know what you have and how to use it.
Online Pictures and Pictures
The same thing is done by both “Pictures” and “Online Pictures.” The only difference is that when you choose “Pictures,” you can insert images from your computer. Still, when you choose “Online Pictures,” you can add images from the internet, such as clip art from Office.com, Bing, or OneDrive.
Drawing Tools
Shapes, diagrams, flowcharts, curves, lines, and WordArt are all drawing tools. These things are part of the Word file you are working on. You can use colors, patterns, borders, and other effects to change and improve these objects.
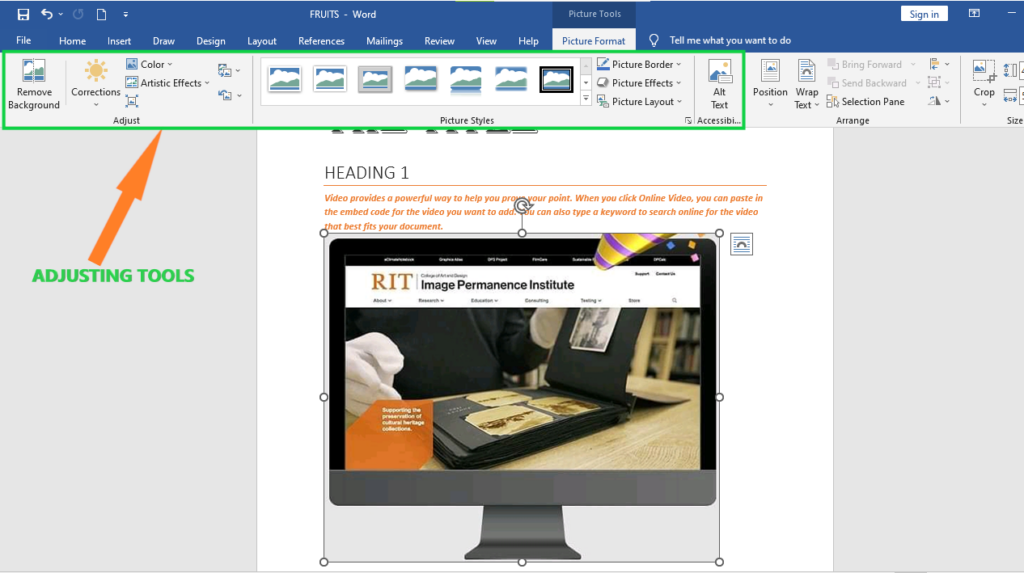
Picture Tools
If you want to change a picture or anything else in a Word document, you can always click on it, and the right tab will show up on the Ribbon.
“Picture Tools” is the name of the tab for pictures. Here, we can see that you can make changes to the picture as you go. For instance, you can change the brightness, contrast, color, and add a border.
Your choice of where to put text and how to wrap it will also have a big impact on how your documents look.
These controls are shown here. We don’t worry as much about how words wrap or where they go in our documents because Word isn’t the last step before publishing online. But if you’re making something WYSIWYG (What You See Is What You Get), like for a PDF or print publication, these things will matter.
Also, you can change your pictures inline in a few ways, such as by resizing, rotating, or moving them. In the next picture, you can see these controls, many of which you may already know.
Shapes
You can use the built-in shapes in Microsoft Word 2013 to make callouts, boxes, stars, and other shapes.
When you click the shape, all you have to do is draw it on a blank spot on the page. You can change it as much as you want once it’s in your document, so it doesn’t matter if it’s perfect or just the way you want it.
At the bottom of the “Shapes” menu, there is an option to make a “new drawing canvas.” This will open a box for shapes that works like a text box. You can use these shapes to make drawings on this drawing canvas. This lets you make things like diagrams and flowcharts.
SmartArt and WordArt
SmartArt and WordArt are similar in some ways, especially if you use WordArt to make something and then change the text. You can use one or the other, but not both. However, we’ll discuss them in the same section because one often leads to the other.
Think of SmartArt as pre-made drawing canvases that you can add to your document and then change as you like. Just pick a way to put things together, like a list, a process, or a cycle.
As you can see, we used a “Continuous Block Process” to make a picture. We can change what is in the text boxes when we click them. There are also the usual grab handles for resizing the image and “Layout Options” that let you wrap text however you like.
Format Text Effects
Let’s look at this more closely because it has a pretty big number of features. We’ll talk about the basics so you know more about them. The “Format Text Effects” pane slides out from the right side of the screen.
It can be detached, just like any other pane in Word 2013. You can then move it out of the way to save screen space or keep it close, so it is easy to use.
This dialog box will make it easy to work quickly with text, so you won’t have to keep going to the ribbon to make changes. Note that the “Text Fill and Outline” and “Text Effects” buttons are separated in the dialog box. “Text Fill and Outline” is easy to understand and is used to improve the way text looks.
Chart
Charts are fun for everyone. Charts are a great way to show data sets visually, and Word 2013 comes with a huge variety of charts to choose from, such as columns, pie, bars, and many more. Take a look at the screenshot to see how many choices you have:
It’s easy to change and format charts. When you click on a chart in your document, you’ll see “Chart Tools,” which, as you might have guessed, is the Ribbon tab for charts only.
Text Box
In Word, text boxes are like little islands. When you add a “Text Box” to a document, it can’t be changed no matter what you do to the rest of the document. It’s like putting a document inside another document.
This is helpful if you want to show something “as is” in your work but still be able to change the formatting of the document as a whole. Something you’ve pasted will stay the same.
Text boxes are usually painful for editors because they don’t work well with styles. You may find them very useful, which is fine, but if you want something that fits the style and format of your document but still goes in a box or has a border around it, we suggest just adding a border.
Drop Cap
Drop caps just mean that the first letter of a chapter or book is bigger than the rest:
You can set your drop cap to “Dropped” or “In Margin.” If you choose “Dropped,” the text below will move under it. Check out the “Drop Cap” options to have more control over how your drop caps work.
How to add Picture in Document
Follow these steps to add an already-made picture to your Word file. It is assumed that before you add this picture to your Word document, you already have a picture on your computer.
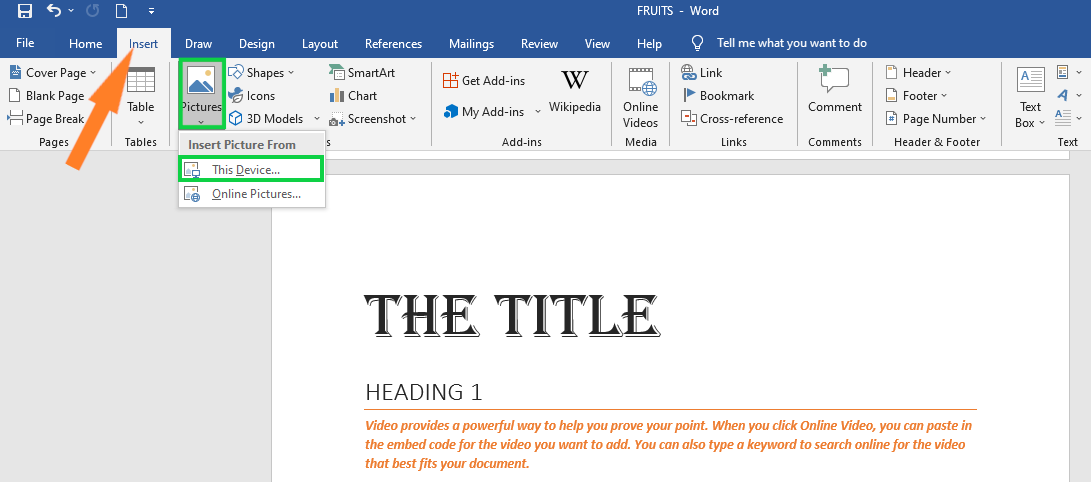
- Step 1 − Click on your document where you want to add a picture.
- Step 2 −Click the Insert tab and then click the Picture button in the Illustrations group, the Insert Picture dialog box will appear.

- Step 3 − The Insert Picture dialog box lets you choose the picture you want to use.
 When you click “Insert,” the picture you chose will be added to your document.
You can play around with your inserted picture in different ways. For example, you can give it quick styles, change its size, or change its color.To try it out, just click on the image you inserted, and Word will give you a lot of options for how to format it under the Format tab.

- You can try to add other graphics, such as Clipart, different shapes, charts, SmartArt, or screenshots, if you want to.
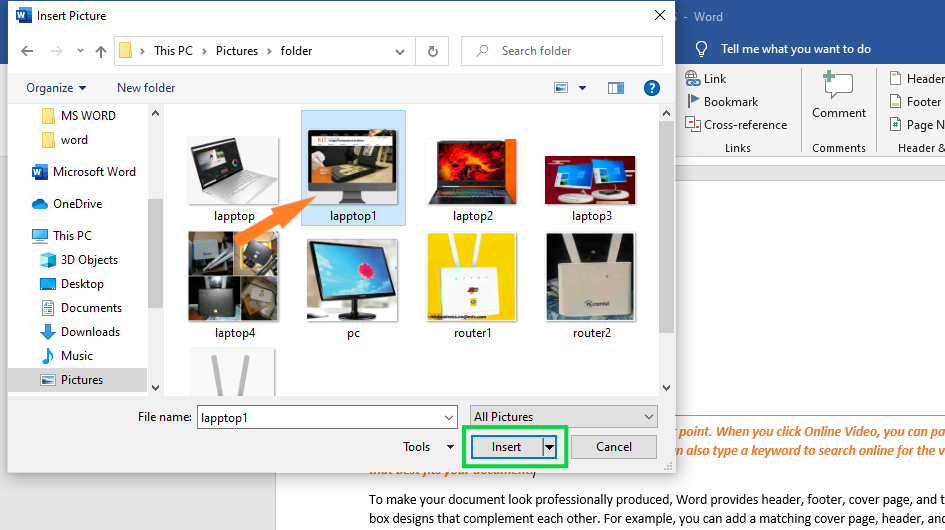 When you click “Insert,” the picture you chose will be added to your document.
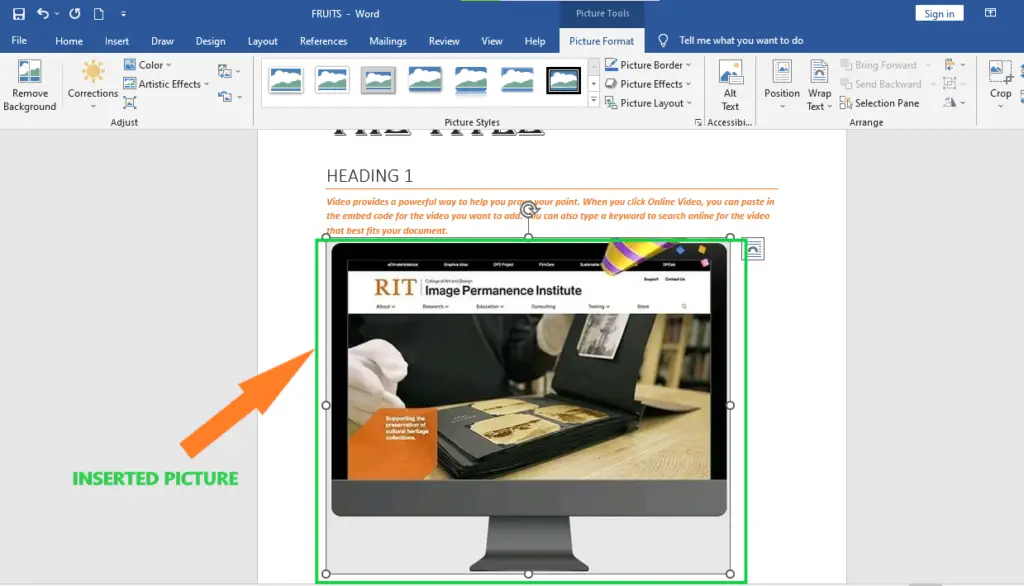
How to Add WordArt in Document
With WordArt, you can add fancy words to a Word document. There are many ways to back up your text. Follow these steps to put WordArt into your document.
- Step 1 − Click in your document where you want to add WordArt.
- Step 2 − Click the Insert tab and then click the WordArt option available in the Text group; this will display a gallery of WordArt.
- Step 3 − You can click on any of the WordArt styles shown in the gallery to choose it. Now you can change the text you’ve added to fit your needs, and you can use the different options to make it look even better. To try it, just double-click the WordArt you’ve added, and Word will give you many options for how to format your image on the Format tab. Shape Styles and WordArt Styles are the options that are used most often.
You can change the shape styles, colors, WordArt Styles, etc. of the inserted WordArt to try out different options.
Summary
In the end, we’ve learned how to use graphics in Word and what those terms mean. We also know that there are available graphics that can be used, which we can use in our document to make it look more professional and presentable.
Meanwhile, if you want to learn more about working on tables, see the previous tutorial on how to resize tables and how to merge and split table in Microsoft Word. You can browse those guides if you are having a hard time working with your tables in a document
We hope this tutorial helps you as you format your documents in MS Word.
PREVIOUS
NEXT