
Design and edit in Word
Use Styles
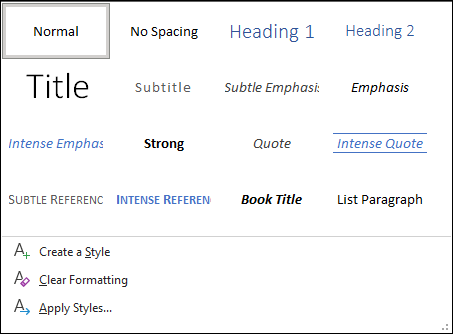
Styles templates apply a consistent font, font size, font color, and spacing to headings, paragraphs, and titling throughout your document.
-
Select the words, paragraph, list or table to edit.
-
On the Home tab, select a style.
If you don’t see the style you want, click the More button
 to expand the gallery.
 to expand the gallery.

Apply Themes
Themes add a professional look to your document.
-
Select Design > Themes.
-
Point to a theme to preview how it will look.
-
Select the theme you want.

Check spelling and grammar
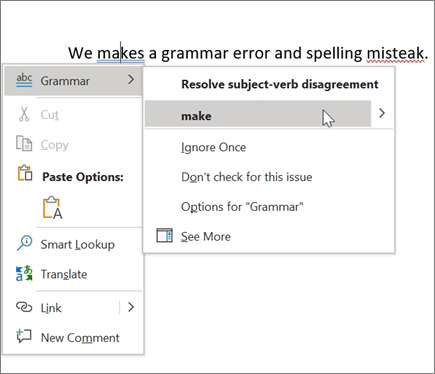
Word marks misspelled words with a red squiggly underline and grammar mistakes with a blue double underline.
-
Right-click the word.
-
Select a correction, or select Ignore.
Note: Spelling and grammar check work a little differently in newer versions of Word and Microsoft 365. For more, see Editor — your writing assistant.
Find and replace text
-
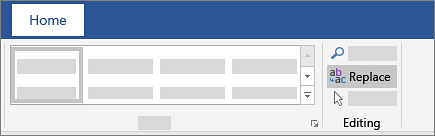
Select Home > Replace.
-
For Find what, enter a word or phrase to search. For Replace with, enter the new text.
-
Select Find next, and then select:
-
Replace to replace the first instance, or
-
Replace all to replace all instances.
-
Next:
Collaborate in Word
Need more help?
![]()
Download Article
![]()
Download Article
This wikiHow teaches you how to edit a Microsoft Word document’s page layout, change its design theme, and make basic style edits on the text, using a computer.
-
1
Open the Word document you want to edit. Find the document you want to edit, and double-click on its name to open the text file.
-
2
Click the Layout tab at the top. This button is located above the toolbar ribbon in the upper-left corner of your document. It will open your layout tools on the toolbar ribbon.
Advertisement
-
3
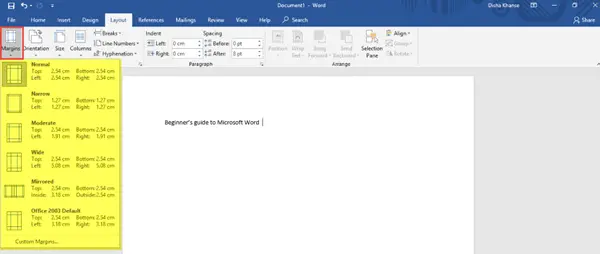
Click the Margins menu on the top-left. This is the first option on the Layout ribbon. It will open your document’s margin options on a drop-down menu.
-
4
Select the document margin you want to use. You can use Normal, Narrow, Moderate, Wide, or Mirrored margins.
- Click a margin option to see what it looks like.
- You can see the exact margin indent values below each option.
- If you don’t like any of the options here, click Custom Margins at the bottom, and manually enter the margin indent values you want to use.
-
5
Select a paragraph or section to customize margin and spacing. You can manually customize the margin indent and spacing options of a paragraph or section in your text without affecting the overall margins of your document.
-
6
Fill out the Indent and Spacing values on the toolbar. You can find these sections in the middle of the Layout ribbon.
- Indent will allow you to customize the selected region’s margins from left and right.
- Spacing will allow you to make the space above or below the selected region larger or smaller.
-
7
Click the Orientation menu next to Margins. This will open your document’s page orientation options on a drop-down menu.
-
8
Select Portrait or Landscape on the menu. Click one of the options here to change your document’s page orientation.
-
9
Click the Size menu next to Orientation. This will open a list of available paper size configurations you can use for your document.
-
10
Find and select the paper size you want to use. This will help you accurately preview your document’s print output on the paper size you’re planning to use.
-
11
Click the Columns next to Size. This option allow you to create multiple text columns in your text document.
- You can select a paragraph or section in your document and apply your columns here if you want to use different numbers of columns in different parts of your text.
-
12
Select the number of columns you want to use. Click a column option on the drop-down menu to apply it to the selected part of your text.
- Two and Three will create multiple, equal-sized columns.
- Left and Right will create two columns, and make one of them wider than the other one.
- If you want to manually customize your column number, size, and spacing, click More Columns at the bottom.


Advertisement
-
1
Click the Design tab at the top. You can find it between Insert and Layout above the toolbar ribbon in the upper-left corner. It will open your design tools on the ribbon.
-
2
Click the Themes button. This is the first option on the Design toolbar in the upper-left corner. It will open your document theme options on a drop-down menu.
-
3
Select a theme on the drop-down menu. Click on a theme to see different design variations of it.
- When you select a theme, related design variations will be listed next to it on the Design ribbon.
-
4
Click the Colors button. This button is located towards the right-hand side of the toolbar ribbon. It will open a drop-down menu of different color palettes you can use.
-
5
Select a color palette. Click the color palette you want to use. This will filter the themes on the toolbar ribbon, and restrict the selection to the selected color palette.
-
6
Click the Fonts button. This will open a list of all the available fonts you can use for your text.
-
7
Select the font you want to use in your document. This will filter the themes on the ribbon, and only show themes with your selected font.
-
8
Click a design theme on the toolbar ribbon. Find an interesting design and click on it to apply the theme to your document.
- Some themes will change all the heading and spacing stylings in your document whereas some other will do as little as only changing your font.


Advertisement
-
1
Click the Home tab on the top-left. This button is in the upper-left corner of your document. It will open your text styling tools on the toolbar ribbon.
-
2
Select the text you want to format. You can select a word, sentence, paragraph or section in your document.
- If you want to select the entire document, press Control+A on Windows, or ⌘ Command+A on Mac.
-
3
Click the
icon next to the Font field. This will open a list of all your available font options.
-
4
Select a font on the menu to apply it. Clicking a font here will change the selected text to this font.
-
5
Enter a number into the Font Size field. This field shows the current size of your text next to the Font field.
- You can manually enter a size here, or click the
icon and select a size on the menu.
- You can manually enter a size here, or click the
-
6
Select an alignment position for your text. The alignment buttons look like aligned, centered, and justified paragraph icons in the middle of the Home toolbar.
- You can align your text left, center it, align it right, or justify it.
-
7
Click the Line and Paragraph Spacing button. This button looks like a paragraph icon with two blue arrows next to it. It will open your spacing options on a drop-down menu.
-
8
Select the spacing option you want to use. You can set your spacing at different common values like 1.0, 1.5, or 2.0.
- If you want to double-space your text, select 2.0 here.


Advertisement
Ask a Question
200 characters left
Include your email address to get a message when this question is answered.
Submit
Advertisement
Thanks for submitting a tip for review!
About This Article
Thanks to all authors for creating a page that has been read 21,267 times.
Is this article up to date?
Adding a Break to Your Document
Want to modify the way your text flows between pages in a document? Word allows you to insert several types of breaks that control the flow for you.
Adding an Optional Break
The no-width optional break is primarily used for Asian languages in Word. It can have value for English-speakers, as described in this tip.
Adding Half Spaces to Punctuation
Want a little more space just before some of your punctuation characters? You can add that spacing in a variety of ways, as recounted in this tip.
Adding Hyphens to Phrases
Editing text to turn regular words into hyphenated phrases can be a real bother. The chore can become a breeze if you apply the ideas in this tip.
Adding Parentheses
Need to add parentheses around some word or phrase? Here’s a quick macro that makes this simple edit in one step.
Adding Quotes
Adding quote marks is normally as simple as typing them from the keyboard. However, if you want to add quote marks around both ends of a text selection in a single step, you’ll love this tip and the macro it describes.
Adding Serial Commas in a Sentence
Part of the job of an editor is to apply standards of grammar to text written by someone else. One standard that may need to be applied is the inclusion of a serial comma in an in-line list. Here’s a way you can make adding these commas easy.
An Automatic Two Spaces after a Period
Should you put two spaces after a sentence or just one? Ask different people and you will get different answers. To Word the answer isn’t really important; it can help you enforce either type of spacing you want. This tip explains how.
Arranging Paragraphs
Need to move a few paragraphs around in your document? Word provides a couple of handy shortcuts that make it very easy to move them in any direction you want.
Asking for Delete Confirmation
When you select some text and then press the Del key, the text should immediately be removed from your document. If you see a message on the status bar asking if you are sure you want to make the deletion, this is an artifact of the WordPerfect support built into Word. This tip explains how to get rid of this prompt so you can get on with deleting.
Automatic Non-breaking Spaces in Dates
It drives some people crazy to have a date break across two lines. If you find yourself in this mindset, then you’ll appreciate the ideas presented in this tip for easily making sure that a date stays all on the same line.
Calculating Expressions
Word can do some simple calculations for you, if you add a little-known tool to your toolbar. Here’s how to add and use this handy tool.
Capitalizing the First Letter after a Colon
There are many rules in English grammar (and many exceptions to those rules.) One common rule of grammar is to capitalize the first letter appearing after a colon, provided that what follows the colon could stand on its own as a sentence. Word does not include a way to do this capitalization automatically (too many grammatical exceptions to make a hard-and-fast rule), but you can create your own macro that will take care of the capitalization for you.
Capitalizing the Word «I»
The first-person, singular pronoun «I» should always be capitalized, unless you are exercising poetic license. Word may not always make sure it is capitalized, however, as discussed in this tip.
Capitals After Colons
Do you want Word to always capitalize the first letter appearing after a colon? The program won’t do it by default, but there are a couple of things you can try to get the capitalization you want.
Changing AutoComplete Words
AutoComplete allows you to easily complete words you are typing in your document. If AutoComplete is presenting you with the wrong suggestions, you need the information in this tip.
Changing Many Link Locations
Word makes it easy to establish links between documents. If you need to change the locations for a lot of links at once, you can apply the technique outlined in this tip.
Checking for Matching Parentheses
There are lots of little «gottchas» that can make the difference between a finished document and a polished document. One such thing is making sure that you have matching parentheses�»a closing parenthesis for every opening one. This tip presents a macro that can make quick work of this check and notify you if there is a potential problem.
Checking for Words and Phrases
You may want to determine if a document contains a certain set of words or phrases. There are a couple of ways you can make this determination, as illustrated in this tip.
Clearing All Tabs in a Document
Need to get rid of all the tab stops in a particular document? It’s easy to do when you apply the technique outlined in this tip.
Collecting Highlighted Text Selections
Got a document with text passages marked with the highlighter tool? You can collect all those highlighted selections and move them to a new document by applying the techniques in this tip.
Comparing Documents Top and Bottom
Word has a feature that allows you to compare two documents side-by-side. What if you actually want to compare the documents one above the other (top and bottom)? You can make this change in orientation rather easily, as described in this tip.
Compound Page Numbering
Simple page numbering is easy to add to your documents. More complex numbering (such as two numbering schemes in the same document) are a different story. This tip provides some guidance on how you can approach your more complex numbering needs.
Controlling Overtype Mode
Some people like to have Word replace previous information as they type; this is called «overtype mode.» You can control overtype mode by following the steps outlined in this tip.
Copying and Pasting Field Codes
Want to copy a field code and paste it in some other Windows program? This can be trickier than it sounds. Here’s the lowdown on why this is, and a macro you can use to make copying and pasting field codes easier.
Creating a Quick Letter
Word provides a handy wizard that is helpful in creating basic letters quickly and easily. This tip discusses the Letter Wizard and how you can use it.
Creating Compound Characters
Word provides access to a wide variety of characters either from the keyboard or from the Symbol dialog box. Up and above that, you can also use a field to create your own special compound characters, if desired.
Creating Custom Document Properties
Word allows you to keep track of any number of custom properties about a document. Here’s how to create those properties and later use them in a document.
Creating New Windows
A great way to work on different parts of the same document at the same time is to create windows. These function as different views of the document.
Creating the ‘Mils’ Symbol
Different industries use their own terminologies and symbols. In the military, one symbol is referred to as the «mils» symbol. This tip explains what it is and how to create it.
Dealing with Run-On Sentences
A common task when editing documents is to break up run-on sentences. You can make this task a little easier by using the editing macro described in this tip.
Default Click and Type Paragraph Style
When you use the Click and Type feature, Word uses applies the Normal style to the paragraph created. You can specify a different style of paragraph by using the steps in this tip.
Deleting a Page
Want to delete the current page? There is no automatic command to perform this task in Word, but you can create your own command with the single-line macro described in this tip.
Deleting a Range of Pages
Need to delete a range of pages out of the middle of your document? It’s easy to do using editing techniques you already know about.
Deleting Freezes Computer
Sometimes a strange object or text may appear in your document, as happened to Sharon. To complicate the situation, her computer freezes when she tries to delete the object. Here are some things to try out if you have the same issue.
Deleting Words
Tired of pressing the Delete or Backspace key for every character you want to delete? Here’s a way you can make your editing much faster, with just a simple change to your deleting keypress.
Deletions Don’t Work as Expected
We all get into habits, including in how we use Word. If you are used to deleting text in a particular way, and all of a sudden that way doesn’t work any more, it can be bothersome. Here’s a look at why the way you delete text could change in Word.
Differences between Deleting, Clearing, and Cutting
When getting rid of text from your document, Word allows you to delete, clear, or cut. Here are the differences between these actions.
Displaying Nonprinting Characters
Nonprinting characters are a great boon when you are editing a document. Turn them on and you can easily see what characters make up your text. Here’s how you can control which of the nonprinting characters Word displays.
Editing an AutoText Entry
Once you’ve created an AutoText entry, you may believe that it is «set in stone» and cannot be changed. Not so! You can redefine it very easily using the steps in this tip.
Editing While Spell-Checking
When you run a spell-check on a document, you may end up seeing other things that need to be edited. Never fear; you can do the edits without jumping out of the in-process spell-check.
Ensuring Consistent References with AutoText
You’ll often need to make sure that references within a document are consistent with each other. In this tip you discover how you can use AutoText to help enforce the consistency you need.
Entering a «Slashed Zero» in Your Document
Need to add the occasional zero with a slash through it? There are a couple of ways you can accomplish this task.
Entering a Degree Sign
One of the more common symbols that people need to use in their writing is the degree symbol, typically used after a numeric temperature. If you need to add this symbol, you’ll appreciate the shortcuts presented in this tip.
Entering a Page Break from the Keyboard
Need to force Word to move text to the top of the next page? It’s easy when you use the keyboard shortcut for a page break.
Extra Space after Quotation Mark when Pasting
Have you ever noticed how Word can decide to add extra spaces when you paste information into your document? This is part of Word’s helpful approach to editing, but you may not want Word to be that helpful. Here’s how to make Word behave the way you want it to.
Finding the Previous Occurrence
Using Word’s Object Browser, it is very easy to move among different instances of what you want to search in your document. This tip explains how this tool can be used effectively to enhance your searching efforts.
Generating a List of Dates
When creating tracking documents in Word, you may need to come up with a series of dates in the document. You can type these by hand, or you can use the macros described in this tip to enter the dates very easily.
Getting Rid of Automatic Page-Break Lines
A little trick to get rid of pagination marks when you have background pagination turned off.
Getting Rid of the Paste Options Box
Paste something in a Word document, and you may notice a dynamic little set of options appear right next to what you pasted. If you find these «paste options» distracting, you can configure Word so that they aren’t displayed.
Getting the Proper Type of Ellipses
Type three periods in a row, and the AutoCorrect feature in Word kicks in to exchange that sequence for a special ellipses character. If you don’t like the ellipses that Word uses, you can define your own using any number of methods.
Highlighting Duplicate Words
One way to help improve your writing is to minimize the number of duplicated words you use in your prose. Depending on the way you want to approach the task, Word has a few different ways you can find those words.
Hyperlinks Not Found
When creating hyperlinks in a document, it is important to remember the difference between absolute and relative referencing. If you use the latter, you could end up with hyperlinks that are broken if the target of those links becomes unavailable for some reason.
Inserting a Bullet
Need to place a bullet in the middle of a sentence? There are a couple of easy ways you can do this, as described in this tip.
Inserting a Copyright Mark
One of the most common symbols that can be added to a document is the copyright mark. This tip examines several ways you can easily add this symbol to your writing.
Inserting a Non-Breaking Hyphen
Non-breaking hyphens can come in helpful for some types of writing. They force the words (or characters) on both sides of the hyphen to stay on the same line. There are two ways to add such hyphens to your document, as described in this tip.
Inserting a Non-Breaking Space
In Word a non-breaking space will help you keep two words together on the same line. Here’s two different ways that you can insert that special kind of space.
Inserting a Section Mark
Section marks are used regularly in the writings of some industries, such as in legal documents. If you need a way to easily add section marks to your documents, consider using the AutoCorrect feature to do the adding for you.
Inserting a Special Symbol
The vast majority of what you enter into a document can be accomplished through the use of the regular keyboard. However, some characters don’t appear on the keyboard. For these special symbols you’ll want to note the technique in this tip.
Inserting Different Dashes
Dashes have a lot of different uses in writing. Word supports three types of dashes, as discussed in this tip.
Inserting Foreign Characters
It is not unusual to need to insert foreign characters (often called diacritical marks) as part of your typing. Word provides several different ways you can easily insert the characters you need.
Inserting Special Spaces
Do you need to frequently add en spaces and em spaces to your documents? You can add special tools to Word that make inserting these characters a snap.
Inserting Text with a Shortcut Key
The AutoText capabilities of Word are quite powerful, allowing you to insert all sorts of «boilerplate» information in your document. Expanding an AutoText entry is easy when you use the F3 key, but there are ways you can create special shortcut keys for individual AutoText entries.
Inserting the Edit Time
One of the things that Word keeps track of is how long, in minutes, you’ve been editing your current document. This information can be inserted into the document using the EditTime field.
Inserting Today’s Date
When writing letters, reports, or other date-dependent documents, you need to regularly insert the current date in the document. Here is how to easily insert the date in the format you want.
Line Breaks After a Slash
Some writers use the slash to combine words and as shorthand to signify «or» or «and.» This, of course, makes for some very long words that may not break from line to line in your document as you desire. This tip discusses ways you can use the slash so that line breaks will occur after it.
Meaningless Text
The quick brown fox jumps over the lazy dog, or so the story goes. Here’s how to put this type of meaningless text into a document.
Messed-up Typing
It is not uncommon for newcomers to Word to overwrite their existing document text as they are editing. There is a reason for that—and a fix. Here’s the information you need.
Moving Breaks Quickly
Breaks in a document can be easily moved from one place to another using familiar editing techniques. The trick is to make sure that you are viewing your document in Normal view.
Moving Section Breaks
Section breaks are used to divide a document into two or more sections that can be independently formatting. If you want to move a section break, it’s easy to do using the same techniques you use to edit your document text.
Moving Text Using the Mouse
Many people use the keyboard to do their primary editing tasks. Word doesn’t limit you to the keyboard, however. You can also use the mouse to do your editing, as described in this tip.
Moving Text without Affecting the Clipboard
Want a quick and easy way to move text (or other document elements) from one place to another in your document? Check out this little-known editing method.
Non-breaking Em Dashes
Need an em dash to be «sticky» on both ends of the dash? Word doesn’t provide such formatting, but there are a few workarounds you can use to get the stickiness you need.
Noting Changes at the Left of the Text
The Track Changes feature allows you to easily see where changes have been made in a document. Resolve those changes, and you can no longer see where the changes were. If you want to still note where changes once existed, you may be in for a lot of manual work.
Overcoming Automatic Word Selection
When you select text with the mouse, Word usually selects entire words for you. If you don’t want to do this, you can use the technique described in this tip to select just the text you want.
Pasting a Hyperlink
When you paste information into a document, you can specify that it be inserted as a hyperlink rather than as normal text. Doing so allows you to establish a link between the text and the original source of that text.
Pasting Clean Text
One of the most helpful tools in Word is the ability to paste straight text into a document. This is used so much on my machines that I created a small macro that saves me time in using the tool.
Pasting Text with Track Changes
Track Changes is a great tool for developing documents. If you want to copy text from one document to another, with tracked changes intact, you’ll need the info in this tip.
Picking Up in the Last Document Edited
Sometimes it seems that we focus on getting a particular document hammered out to the exclusion of other documents we could be working with. Here’s how you can speed up the process of loading the last document you worked on and jumping to the proper place in that file.
Picking Up Where You Left Off
Need a quick way to get back to a where you previously edited? Here’s a shortcut that will serve you well.
Placeholders for Stamps
Got a reply envelope you want to create? Why not put a placeholder for the stamp on the envelope? It’s easy to do if you know how.
Plain Text Pasting as the Default
Pasting ‘plain text» into a document is one of the most common ways of pasting information. Wouldn’t it be great if this could be the default method of pasting text?
Problems Pasting Large Pictures
If you insert a large picture in your document and your text jumps all around and the picture seems to disappear, don’t worry. The information in this tip will help you get matters back to normal in record time.
Processing Information Pasted from a PDF File
When pasting information copied from a PDF file, you can end up with a paragraph for each line of the original document. It would be much better to process the information to remove the extra paragraph breaks prior to pasting. This tip provides a macro you can use to do just that.
Putting a Bullet in the Middle of a Sentence
Need a special character (such as a bullet) in the middle of your text? Here are two quick ways to enter the character you need.
Putting Character Codes to Work
If you know the character codes for some characters of interest, you can use those codes to do lots of tasks. This tip explains some of the ways you can use those codes.
Quickly Finding Synonyms
If you need to find some synonyms for a specific word in your document, here’s how you can do it. (Hint: All you need to do is right-click.)
Quickly Moving Text with the Mouse
Drag-and-drop editing is a handy feature when you love to use the mouse. There are two ways you can move text using the mouse, both of which are described in this tip.
Removing Breaks
Word allows you to add several types of «breaks» into your document. If you later want to remove any of them, you can use editing techniques you are already familiar with.
Removing Entire Paragraphs from Your Document
If you need to get rid of a lot of paragraphs in a document, it’s easy to do as long as the document relies on styles for those paragraphs. You use the Find and Replace feature of Word to do the cutting, as described in this tip.
Repeating Actions
Need to repeat an action a whole bunch of times? You can do it a time or two using keyboard shortcuts, but you’ll need a macro (like the handy one in this tip) to make repeating a lot of times possible.
Repeating Your Typing
Want a quick way to repeat a word or phrase you just typed? Here’s the shortcut you need.
Replacing Random Text with Your Own Text
Word includes a little-known function that allows you to put «filler text» into your document. If you want this function to insert your own special text instead, you may be out of luck. There are ways around the problem, however.
Replacing the Last Comma
When you need to perform certain editing tasks over and over again, you start to look for ways to make your work faster and more automatic. This tip presents a macro you can use to automatically perform one of those repetitive tasks—replacing the last comma in a sentence.
Selective Undo
Ever wonder why you can’t undo just a single edit you made a few minutes earlier? The short answer is that it could make your document unstable or unusable, as described in this tip.
Sharing Headings with Others
Headings form the outline of your document and hopefully give it an easy-to-follow organization. If you want to share those headings with others, there are a couple of approaches you can take.
Single-Character Fractions
Some fractions Word automatically converts to single characters, some it doesn’t. Here’s why that happens and what you can do about it.
Slowing Down Mouse Selection
We’ve all experienced the problem: You start selecting a large block of text using the mouse, and before you know it the screen is zipping by at incredible speeds. This tip discusses techniques you can use to get text selection under better control.
Spacing After Sentences
Word can check to see if you have a consistent number of spaces at the end of your sentences.
Specific Capitalization
How to get around Word’s AutoCorrect feature for having uncapitalized words at the start of a sentence.
Strip Trailing Spaces
If you get tired of documents that always seem to have extra spaces at the end of lines, here’s a quick way to get rid of them. Just use the quick macro provided in this tip.
Symbols for Non-Printing Characters
Displaying non-printing characters can help you better understand the formatting and contents of your documents. What do all the different symbols displayed by Word really mean, though?
Talking to Yourself
Need to keep notes about a document, but you don’t want others to see those notes either on-screen or on-paper? Here’s an easy way to add helpful notes throughout your document.
Transposing Letters
My fat fingers sometimes result in typing letters in the wrong order. Here’s a quick tool that allows you to easily transpose two adjacent letters.
Transposing Two Characters
If you have two characters in the wrong order, you might be interested in a shortcut you can use to switch their order. There is no such tool built into Word, but with a handy (and simple) macro, you can create your own shortcut.
Transposing Two Paragraphs
Need to swap two adjacent paragraphs? Your editing arsenal can include a command to do this is you use the macro in this tip.
Transposing Two Words
A common editing task is to transpose two adjacent words, so that their order is changed. While the task is common, there is no command within Word to take care of the task. Here’s a simple macro you can use to do the transposition for you.
Turning Off Paste Options
Paste information into a document and you’ll immediately see a small icon next to the pasted information. This icon allows you to access options that affect the pasting operation. Don’t like the icon? Here’s how to get rid of it.
Turning Off Word’s Second Guessing with Quote Marks
When you type quote marks in a document, Word normally changes them to Smart Quotes. They look better on a printout, but Word can sometimes mess up and make changes to the quotes that it shouldn’t. Here’s some things you can try when you get tired of Word making mistakes.
Typing Pronunciations of Words
Take a look in a dictionary at the way that words are phonetically spelled. Those special characters used to type those pronunciations can be added to your documents, if you know where to look for them.
Unable to Edit Document with Embedded Fonts
What are you to do if you embed fonts in a document and then someone else cannot make changes to that document? Chances are good that this scenario has to do with the characteristics of the fonts you are embedding. Here are some things to check out.
Understanding Click and Type
The Click and Type feature of Word allows you to use the mouse to click somewhere on a blank page, and then begin typing. Understanding how the feature works can mean better results when using it.
Understanding Hard and Soft Returns
Did you know that there are different types of returns in Word? Here’s the inside scoop.
Understanding Hyphens and Dashes
Word provides you with three types of hyphens and two types of dashes that you can use in your documents. Understanding the differences between them all can help you make better decisions about which you should use (and when).
Understanding Nonprinting Characters
Even characters that print nothing still take space in your document. Characters such as tabs, spaces, breaks, and the like all are accounted for and tracked by Word. It is a good idea to display these special characters on the screen so that you can track them, too.
Understanding Smart Cut and Paste
Editing is generally made easier by a feature that Word calls smart cut and paste. If you prefer, you can turn the feature off by making a change on the Edit tab of the Options dialog box.
Understanding the Big Three Autos in Word
Three of the tools provided in Word are AutoText, AutoCorrect, and AutoComplete. It is easy to confuse what these tools do, unless you know the information in this tip.
Understanding the Clipboard
You can use the Windows Clipboard to move information around in Word. To make the most of the Clipboard, it is helpful to understand how it works.
Understanding the No-Width Characters
Search through the Symbol dialog box, and you may see some special characters whose names seem odd. These are the no-width characters, and here’s an explanation of what they are for.
Understanding Views
Want to see how your document will look before it’s printed? Or, do you want to see what things will look like if you put your document on the web? Word allows you to easily view your document in a few different ways. Here’s how.
Using ASCII and ANSI Characters
Word natively supports several types of character sets. The most common characters sets are known as ASCII and ANSI characters. This tip explains what these are and how to use them in Word.
Using Consistent References
Some text references need to be consistent in many places throughout a document. Learn different ways you can ensure that your references are consistent.
Using Document Properties to Ensure Consistent References
If you need to refer to the same information over and over in a document, you may be interested in using custom document properties to implement those references. Defining the properties is easy and you can use the DOCPROPERTY field to later recall the information.
Using Extend Mode
One of the most overlooked shortcut keys in Word has to be the extend key. Yet, learning how to use this simple key can save your hours in your editing efforts. Here’s how to use extend mode to make your editing more productive.
Using Manual Line Breaks with Justified Paragraphs
If you use justified paragraphs, you know that if you press Shift+Enter, it can lead to some odd spacing between words and characters in the paragraph. You can avoid this problem by using one little character: the lowly tab.
Using Optional Hyphens
Adding hyphens to your document can affect the way in which Word wraps text from one line to the next. Optional hyphens, described in this tip, can make hyphenation even more powerful and flexible.
Using Overtype Mode
When you type information into a document, what you type normally is inserted just the left of the insertion point. Word includes another editing mode that replaces existing text with whatever you type. This tip describes what overtype mode is and how it works.
Using the Copy or Move Text Keys
Most people use the Clipboard to copy and move text in Word. Before the Clipboard, Word used F2 to move text and Shift+F2 to copy it.
Using the Spike to Edit
Most Word users are proficient in cutting and pasting text using the Clipboard. One of the lesser-known editing tools, however, is the Spike. This tool, described in this tip, can be very handy and perform tasks that the Clipboard cannot.
Viewing More of the Left Margin Area
When working in Draft or Normal view, you may want to view the area just to the left of the document’s left margin. Here’s a quick way to display that area.
Viewing Your Entire Document Width
The Zoom tool is very useful to help you see all of your document information. Here’s how to make sure you can see all the document information horizontally.
Wrapping Spaces
Add more than one space after the end of a sentence, and you may find that the extra spaces wrap to the start of new lines. Here’s how to get Word to treat those extra spaces as you expect.
- Free Courses
- Microsoft Word
- How to Edit a Word Document

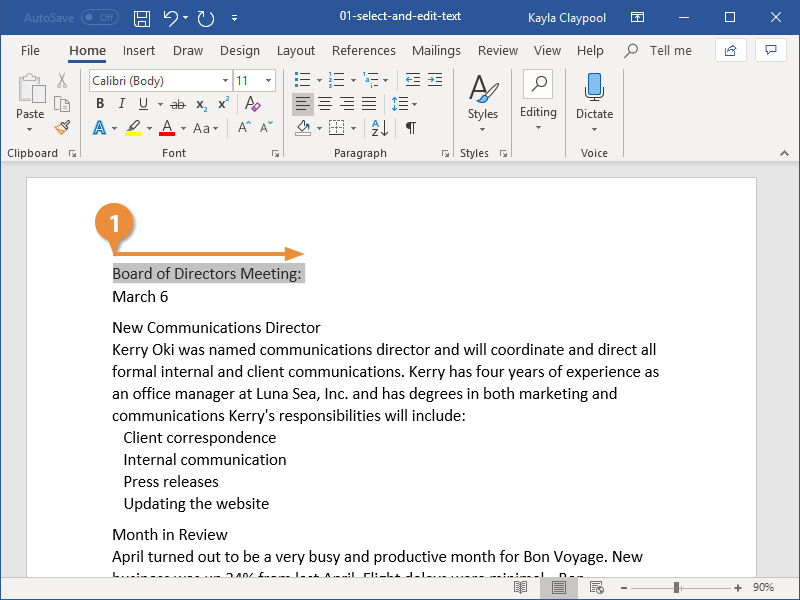
How to Select and Edit Text in Word
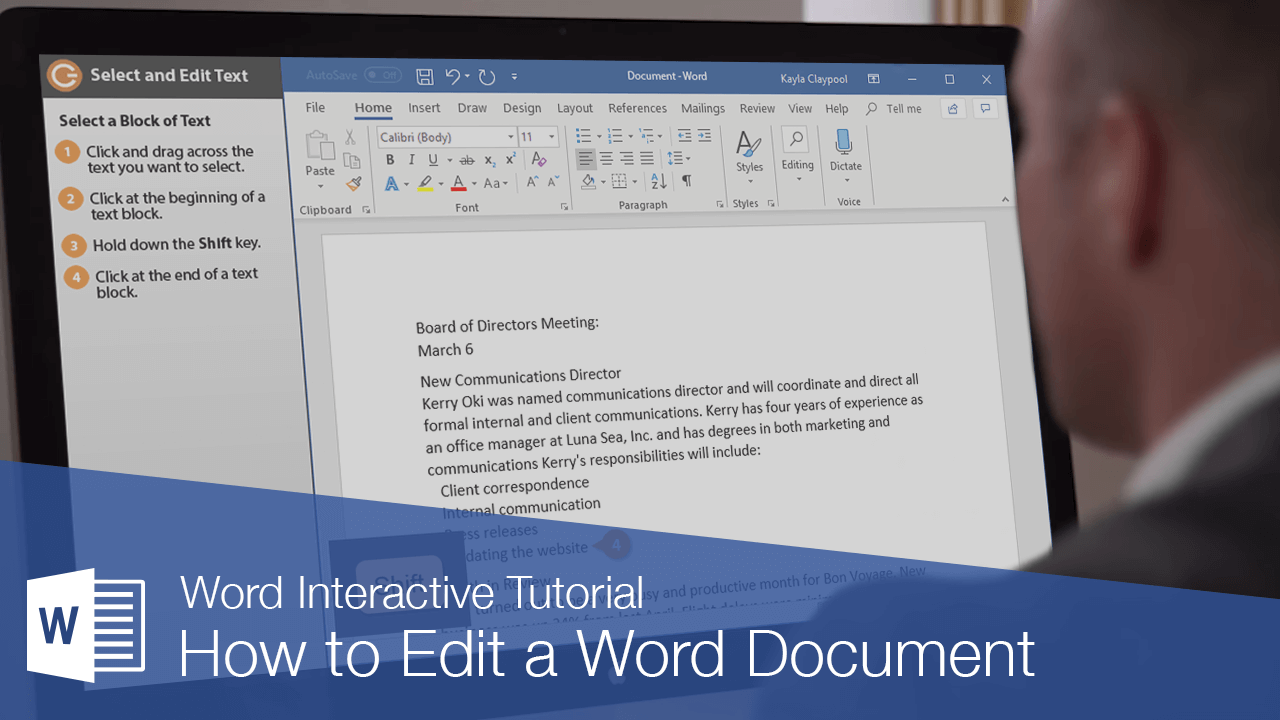
The greatest advantage of using a word processor is how easy it is to edit text throughout a document. One quick and easy way to edit text is by selecting it and then typing over it to replace it.
Select Text
Selecting text is a very important skill in Word. Whenever you want to edit or format text, you first need to select it. There are multiple ways to select text, letting you select a small amount to entire paragraphs at once.
- Click and drag across the text you want to select.
You can select any amount of text with this method, from a single character to your entire document.
Here are some other ways to select text you’ll find useful:
- Press and hold down the Shift key, and move the insertion point either with your mouse or the arrow keys to select text.
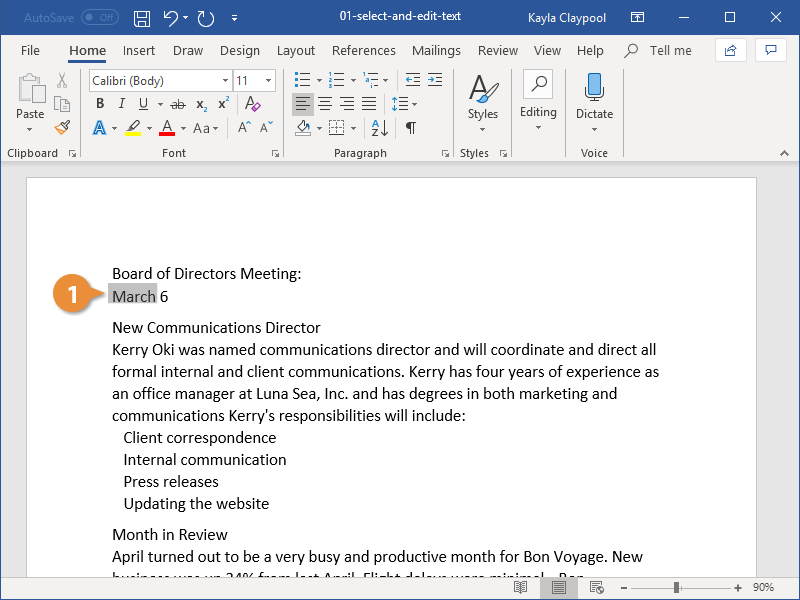
- Double-click a single word to select it.
- Press the Ctrl key and click in a sentence to select it.
- Triple-click in a paragraph, or double-click in the left margin next to a paragraph, to select it.
- Click in the left margin to select an entire line, or click and drag in the left margin to select multiple lines.
- Press Ctrl + A to select everything in the document.

Edit Text
- Select the text you want to replace, then start typing the new text.

FREE Quick Reference
Click to Download
Free to distribute with our compliments; we hope you will consider our paid training.
This Microsoft Word beginner guide provides free & basic lessons, tutorials & fundamentals for learning MS Office Word software. Microsoft Word is everyone’s favorite text editor. With so many features, it can meet all your requirements. It may look complicated to use initially, but once you get the hang of it, things start falling in place. This blog post is for those who want to learn the basic functions and features and know more about Microsoft Word.
To start the Microsoft Word application, click on the START button > Microsoft Office > Word or simply search for ‘Word’ in the search box and then click on the result. Once it is opened, select New document.
This is how the opened blank Microsoft Word document will look like.

Now let us take a look at the features that it has to offer.
1] Title and the Quick Access Toolbar
At the top, you have the Title of the document, the Quick Access Toolbar and a few other functions such as Minimize, Restore Down / Maximize, Close and Ribbon Display Options.
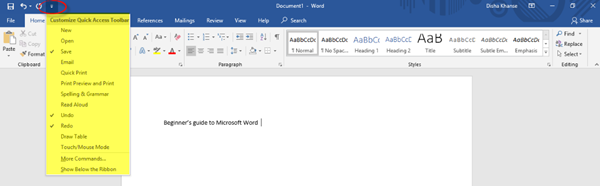
In the Quick Access Toolbar to the left of the Title Bar, you will find the Save button (Ctrl+S), wherein you can save the document in the desired folder; the Undo Typing button (Ctrl+Z); the Repeat Typing button (Ctrl+Y); and the Customize Quick Access Toolbar, wherein you have the various commands as shown in the image below.
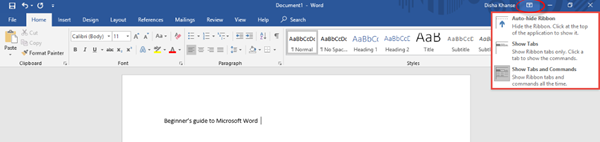
In the Ribbon Display Options, it is possible to Auto-hide the ribbon, show the ribbon tabs only or show the tabs and commands all the time. Refer to the image below.
Below the Title Bar, you will see what is called the Ribbon which consists of various tabs such as File, Home, Insert, Design, Layout, References, Mailings, Review, View, Help, Search. Now let us go through every Tab and its commands.
2] Home
The Home tab is the default tab in Microsoft Word. This tab comprises of features related to the clipboard, font, paragraph, styles, and editing.
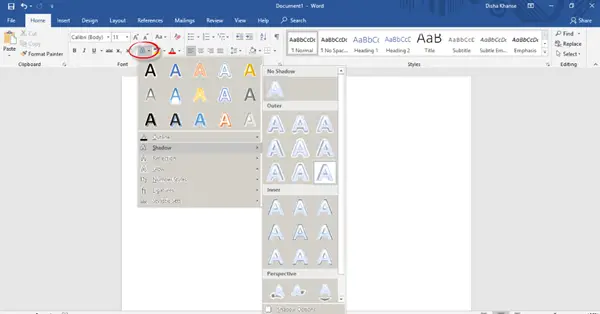
In the Clipboard section, you will find commands such as copy, cut and paste. Next, we have the Font section. Here you can change the font and the font size for your text, change the case, apply bold or italic formatting, underline, change the font color and highlight text and also add various text effects and typography. Go ahead and explore all the different options to make your text look great and innovative!

The Paragraph section includes the alignment options where you can choose to align your text in the center, left, right or justify it (that is, evenly distribute the text between the margins).
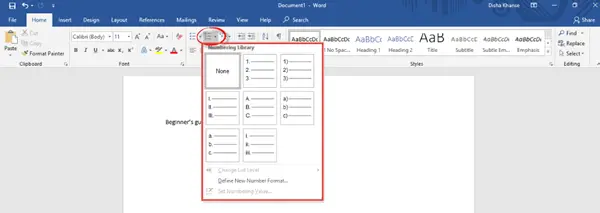
You can add or remove borders, increase or decrease indent, adjust the line and paragraph spacing, and also add bullets and numbers from the bullets and numbering libraries.
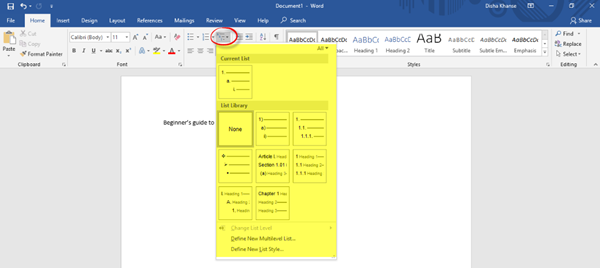
You can also create a multilevel list to organize items or create an outline.
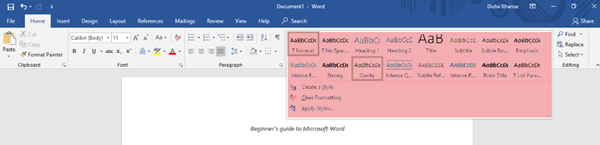
From the Styles section, you can select any style of your choice to change the way your document looks. In the Editing section, you can find text or any content in the document and also replace a specific word or text with something else.
3] Insert
The next tab is the Insert tab.

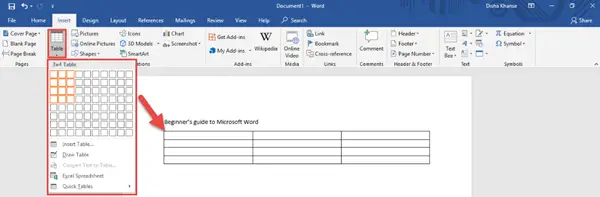
You can add a stylish cover page from the numerous styles available to make your document look more professional and also add a blank page from the Pages section. Another important feature is inserting a table, a picture from your picture gallery, an online picture from the web, shapes, 3D models, charts, SmartArt and screenshots from the Tables and the Illustrations section. Refer to the images below for guidance.
You can insert Tables.
You can insert Shapes.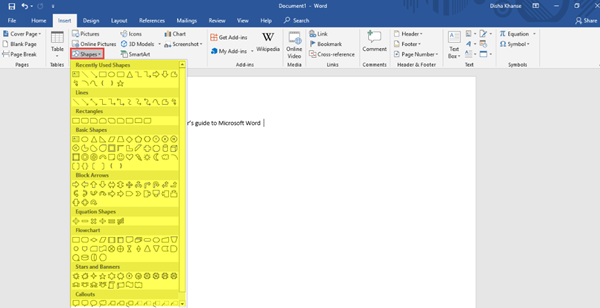
You can insert SmartArt – and more!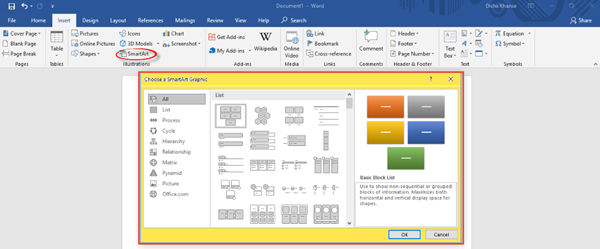
In the Header & Footer section, you can add a built-in header and a footer or from online sources. You can also add page numbers to your document.
Similarly, there are a lot of other features and commands in the Add-ins, Media, Links, Comments, Text and Symbols sections.
4] Design
The Design tab comprises of commands related to Document Formatting and Page Background. To make your document look more consistent and classy, choose the right theme of your liking from the various options available. Additional features include colors, fonts, effects, and paragraph spacing.
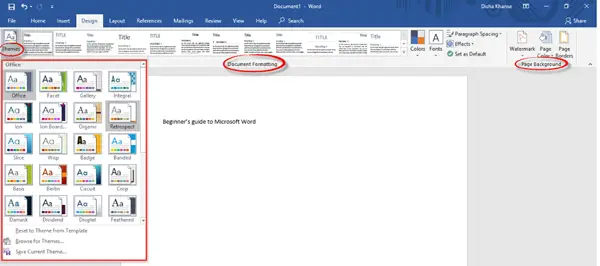
If you wish to go for a splash of color for the document background, you can change the page color as well, add Watermark and page borders.
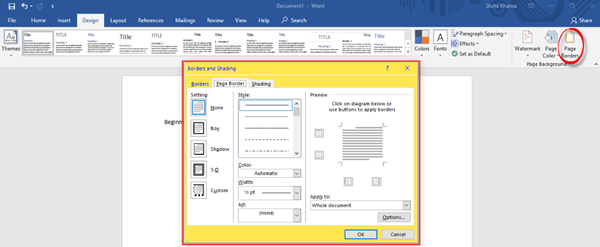
5] Layout
In this tab, in the Page Setup section, you can adjust margins for the entire document or for a particular section; and also customize it. You can change the Page Orientation to Landscape or Portrait; choose the page size for your document, and add or remove columns.
You can also decide the Size for the document.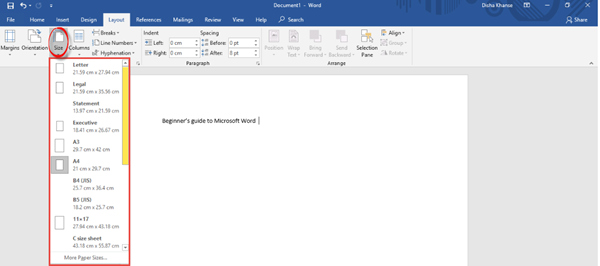
Find the settings to increase or decrease the Indent and Spacing in the Paragraph section.
Other features related to the placement of text and pictures, grouping multiple images and rotation options will be found in the Arrange section.
6] References
In the References tab, you will find different commands related to the table of contents, footnotes, research, citations and bibliography, captions, index and table of authorities.

7] Mailings
Here, you will find settings that will help you to create envelopes and labels, start the mail merge wherein you can send it to multiple recipients, write and insert fields, preview results and finish mail merge.

8] Review
The Review tab includes various functions related to proofing, speech, accessibility, language, comments, tracking, changes, compare, protect and ink. Out of all these, the Spelling and Grammar function (F7) is of utmost importance. Do check for spelling and grammatical errors after you are done writing your document.

9] View
In the View tab, you can change the views such as Read Mode, Print Layout, Web Layout, etc. Feel free to explore the additional features from the immersive, page movement, show, zoom, window, macros, and SharePoint sections.

10] Help
In the Help tab, you can contact an office support agent and give feedback.

11] Search
In the Search tab, you can type any feature that you are looking for and get help.
12] File
In the File tab, you can save the document, print and share the document, and also publish it.

In this post, I have tried to cover all the basic and useful features and functions of Microsoft Word.
This is my first blog post and I hope it was helpful to you. Your suggestions are most welcome.
Do try out all these features in order to make your MS Word document absolutely presentable and perfect!
Next, you might want to take a look at our Microsoft Word Tips And Tricks post.