
If you have to edit a picture in Word, there’s no need to download any third-party photo editor on your PC. Microsoft Word offers an interesting photo editor that lets you perform many photo editing tasks. You can crop the image, resize, flip, and add effects and filters to it. You can even remove the background or compress a picture right inside your Word document. We have already covered how to crop a picture in Word in our dedicated post. Let’s check other tips to edit a picture or screenshot in Word.
1. Resize Picture in Word
There are three ways to resize your images in Word. In the first method, click on the picture once to select it. Then, drag the image in or out using the round icons at the corner edges.
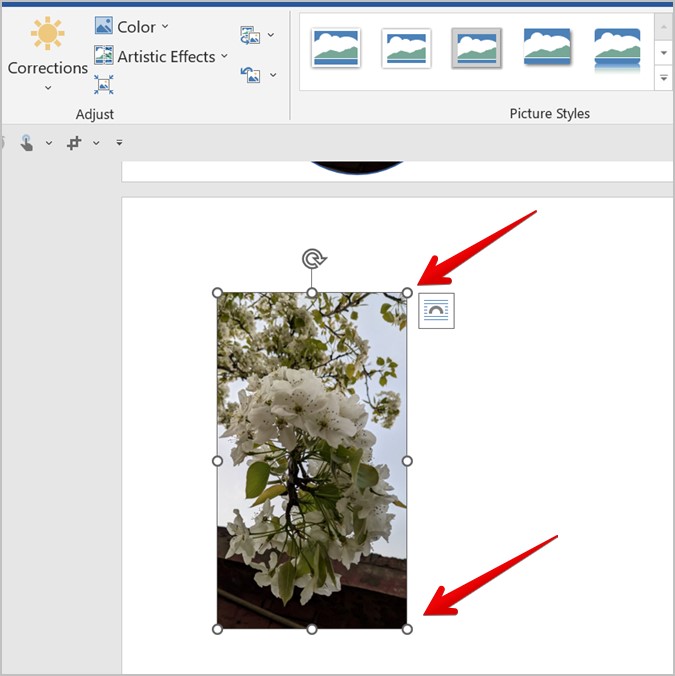
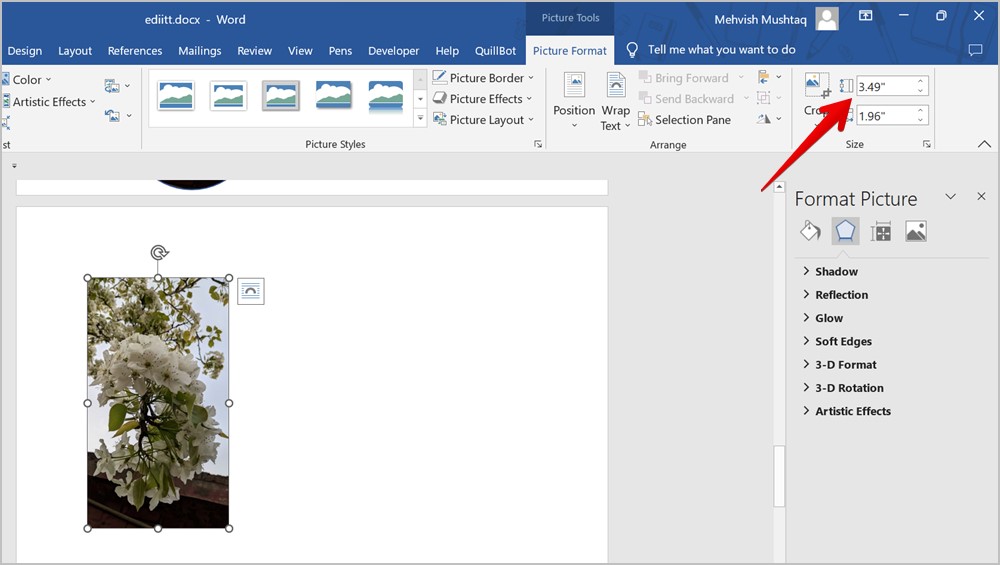
Another way to change the size of a picture in Microsoft Word is to double-click on the image. That will open the Picture Format toolbar at the top. Here you need to manually enter the required width and height for the image in the available boxes in the Size section.
Alternatively, you can even right-click on the image and select the Size and Position option.
Tip: Check out other ways to resize a picture on Windows PC.
2. Flip the Image
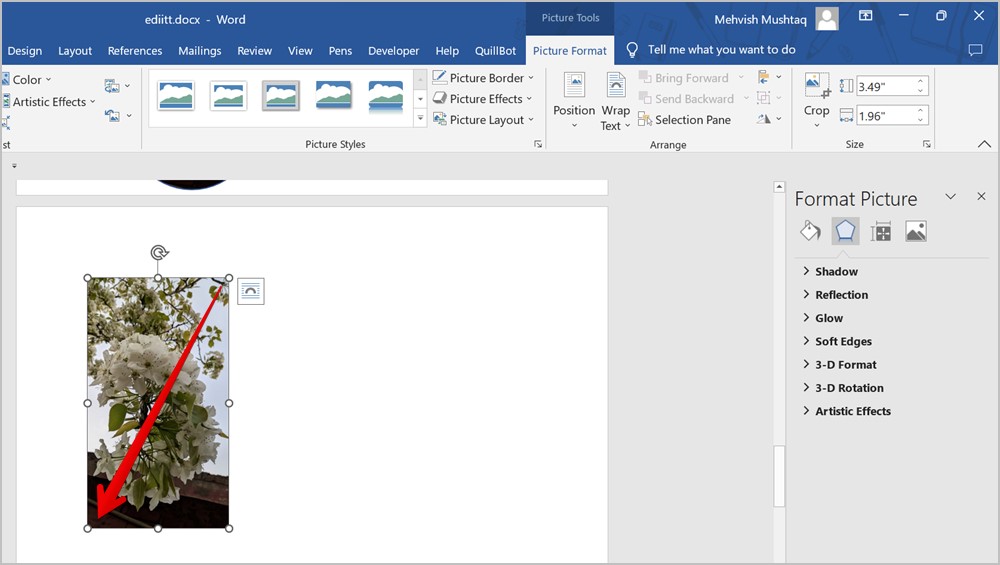
To flip an image quickly in Word, click on it once to select it. Then, hold and drag any one of the four corner edges to the opposite end.
To flip an image horizontally, you need to drag it from the right to the left corner or vice versa. Similarly, to flip it vertically, drag it from top to bottom or vice versa.
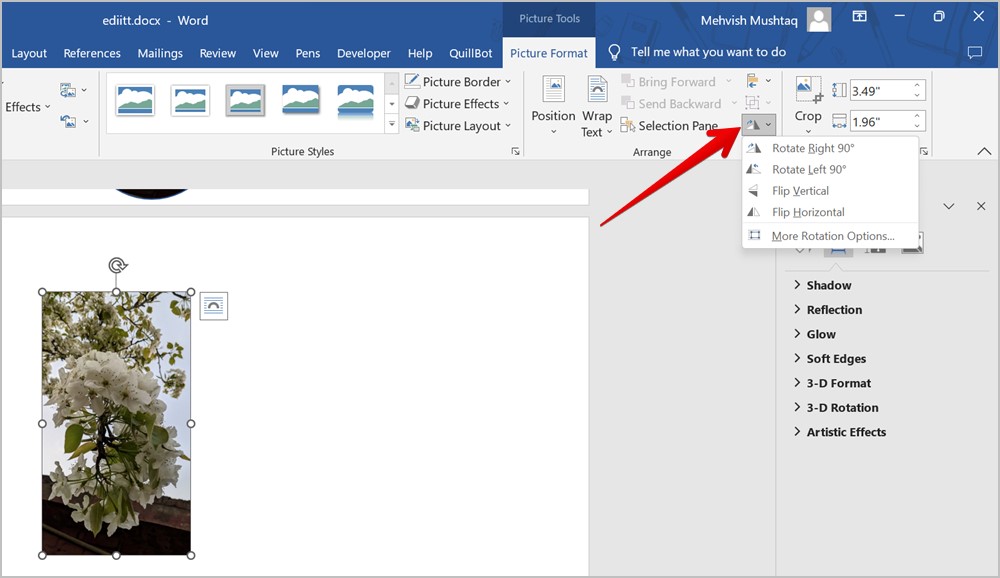
3. Rotate the Image
You can rotate a picture at any angle in Microsoft Word. Simply, select the image first. You will see the Rotation icon at the top of the image. Hold it using your mouse and move it in the direction that you want to rotate the image.
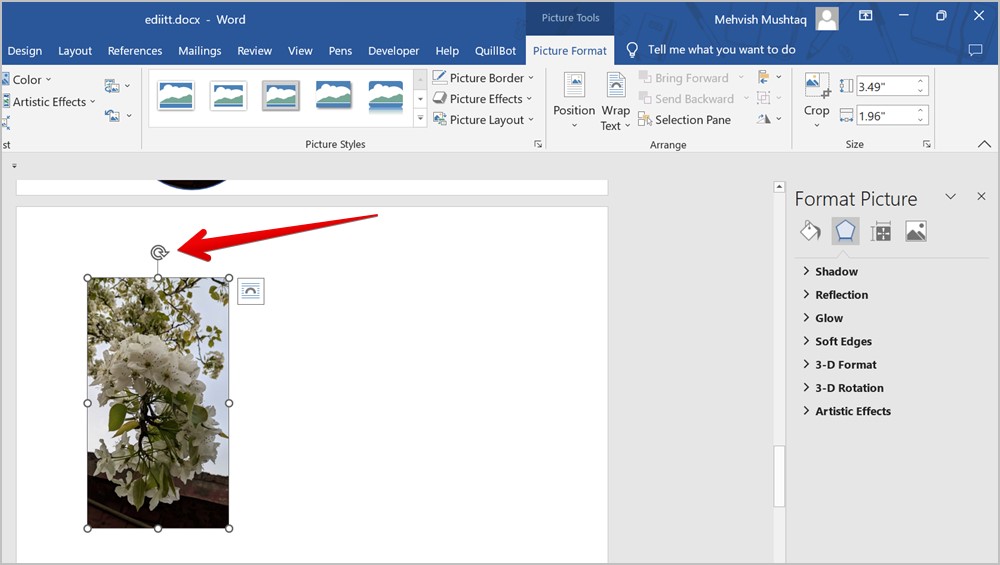
Alternatively, you can rotate and flip an image using the Rotation feature in the toolbar as well. Double-click on the image to open the Picture format toolbar. Click on the Rotate icon and select the rotation angle or flip mode.
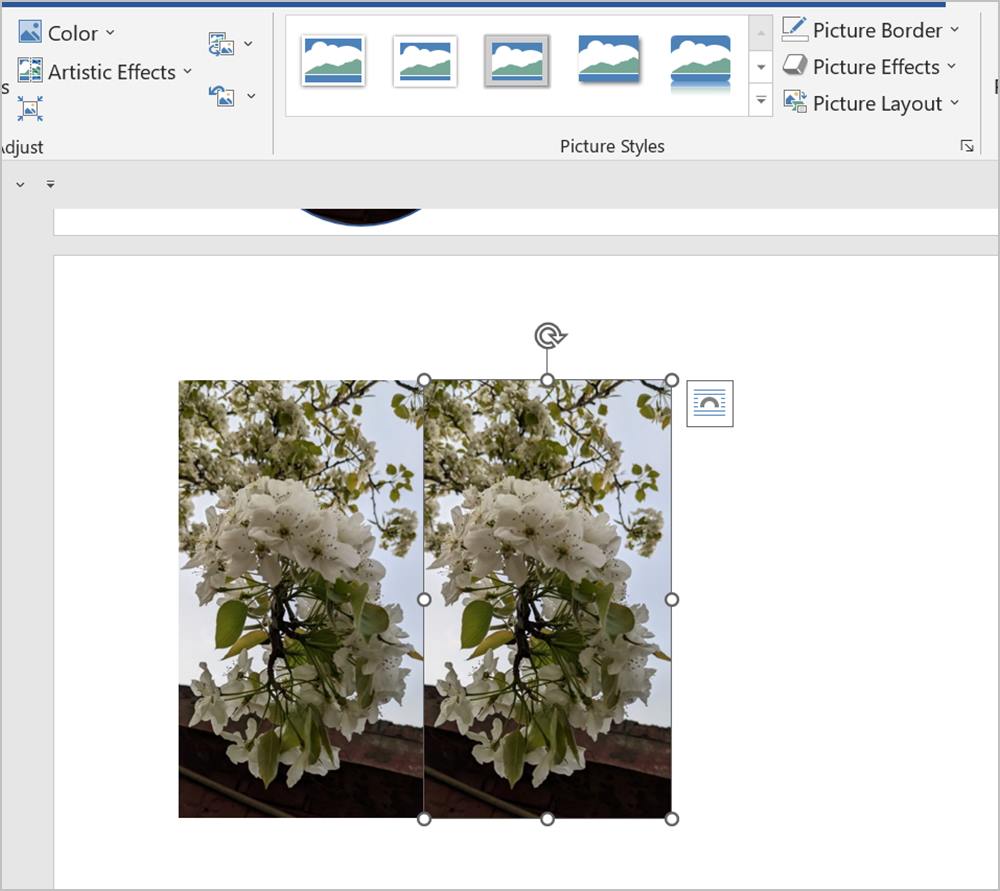
4. Create Copies of a Picture
The regular way to create copies of an image is to use the Ctrl + C and Ctrl + V keyboard shortcuts. But Word offers another way to duplicate your image.
For that, select the image by clicking on it, then hold the Ctrl key and drag the selected image to its right side. A duplicate copy will be created. Similarly, repeat the process to create multiple copies of your picture.
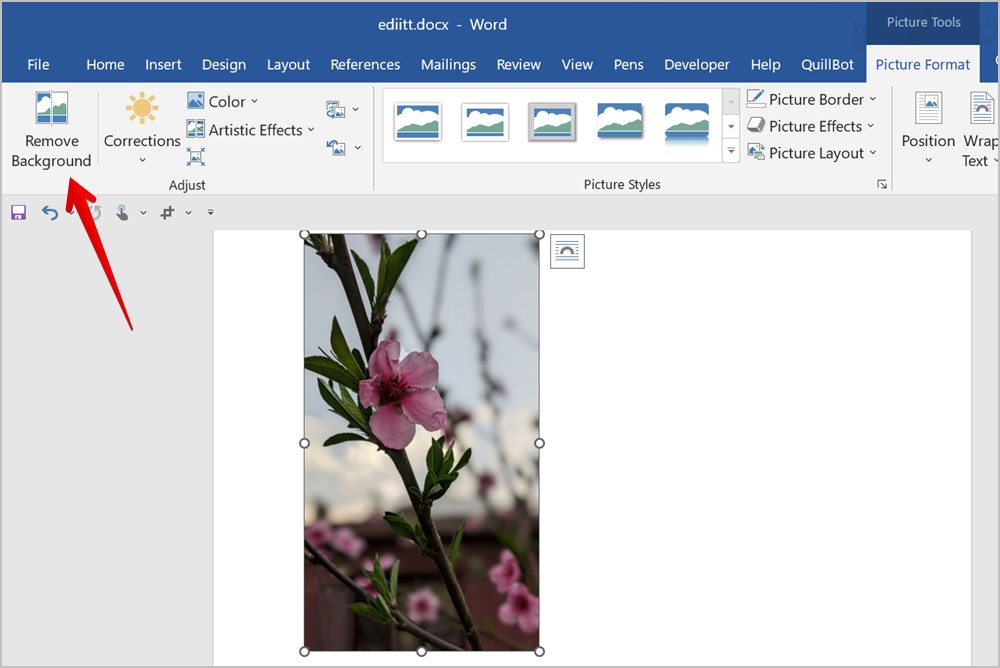
5. Remove Background from a Picture
The next tip to edit a picture or screenshot in Word is to remove the background from an image. Interestingly, Microsoft Word offers a native feature to remove the background from your pictures. Follow these steps:
1. Insert the picture in your Word document.
2. Double-click on the picture to open the Picture Format menu at the top.
3. Click on Remove Background.
4. Word will automatically detect the background and the same will show up in magenta color. Basically, the area in magenta color will be removed. If you want to make changes to the selection, use the Mark areas to keep and Mark areas to remove tools to add or remove areas from your selection manually. After you select the tool, mark the areas on the image.
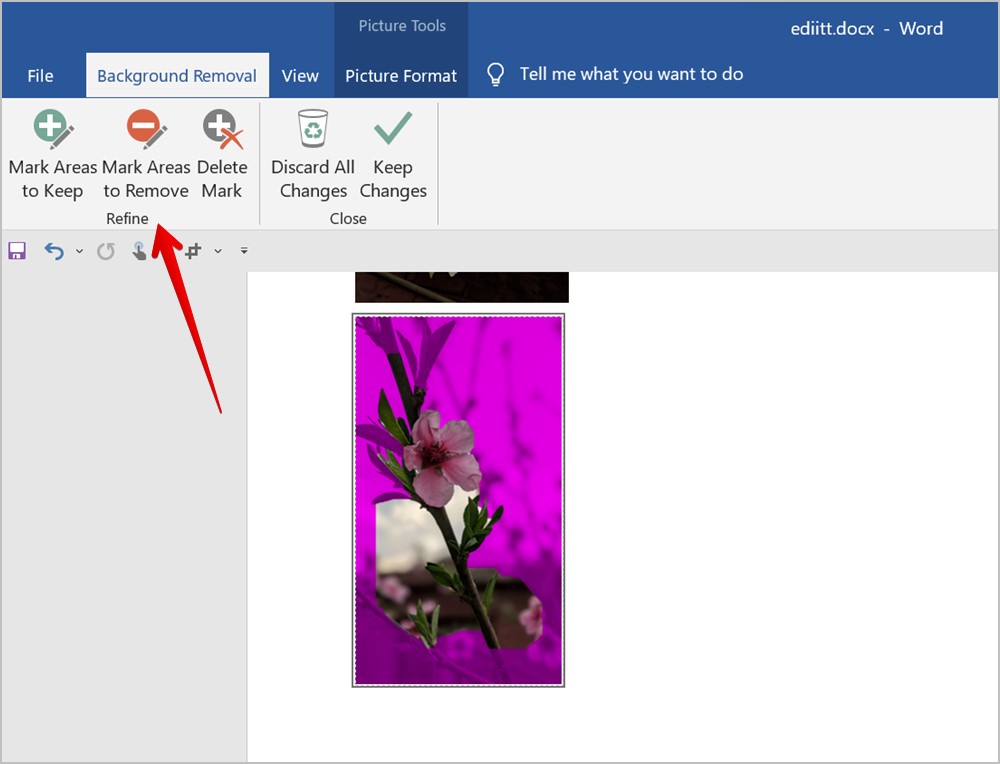
5. Once you are satisfied with the selection, click on Keep Changes or press the Enter key to remove the background from your picture.
Tip: Check out other ways to remove the background from any picture.
6. Add Frame to Picture
To make your picture or screenshot stand out, you can add a frame to the picture as shown below:
1. Double-click on the picture in your Word document.
2. Click on the desired frame in the Picture Styles section to add it to your image.
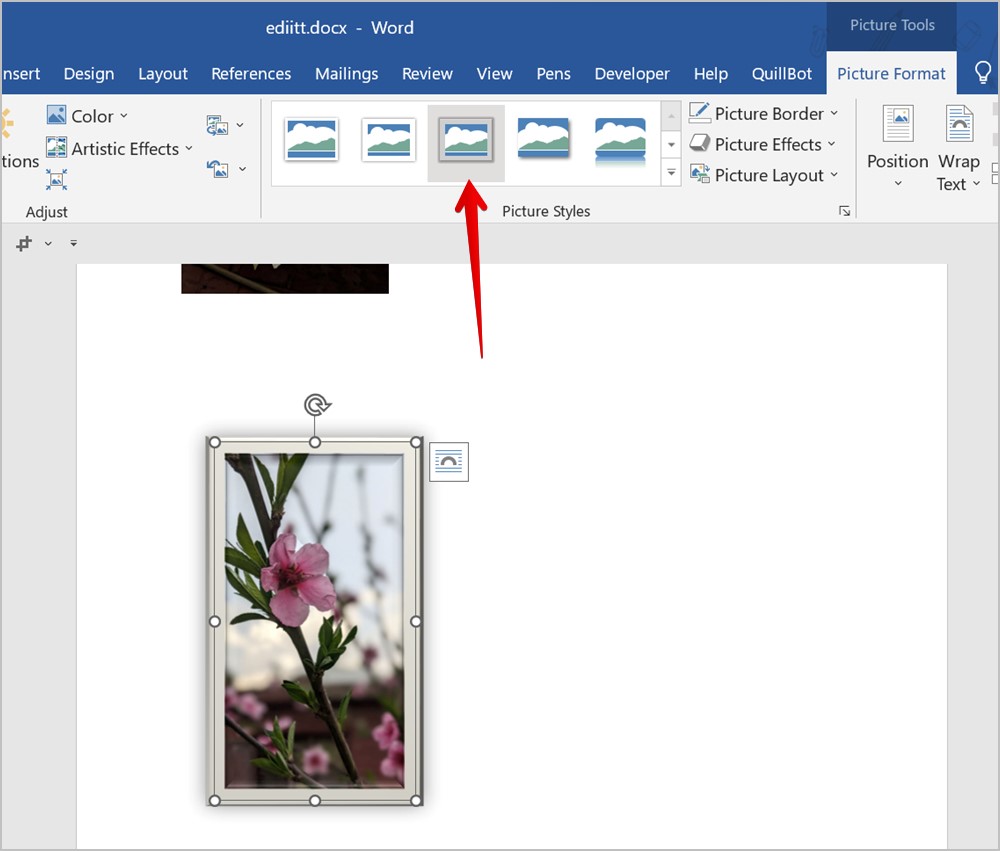
Pro Tip: Click on the More arrow to view all the available frames.
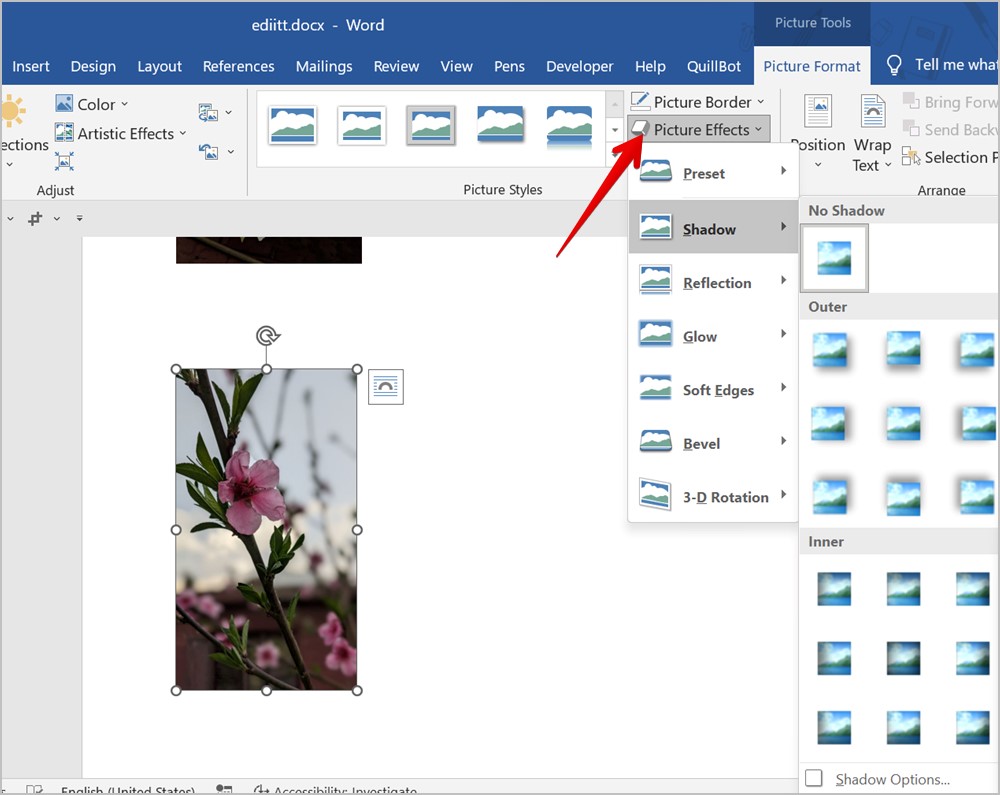
7. Add Effect to Picture
Another way to enhance the look of your picture is to add an effect to it. You can add effects like shadow, reflection, glow, etc.
Double-click your picture and then click on Picture Effects in the Picture Format toolbar. Select the desired effect from the list.
8. Add Border to Picture
If you want to keep it simple and just add a regular border to your picture instead of a proper frame, you can do that too.
1. Double-click on the picture and select Picture Border from the Picture Format toolbar.
2. Choose the border color from the available options. Or, click on Weight or Dash in the menu to customize border size and style.
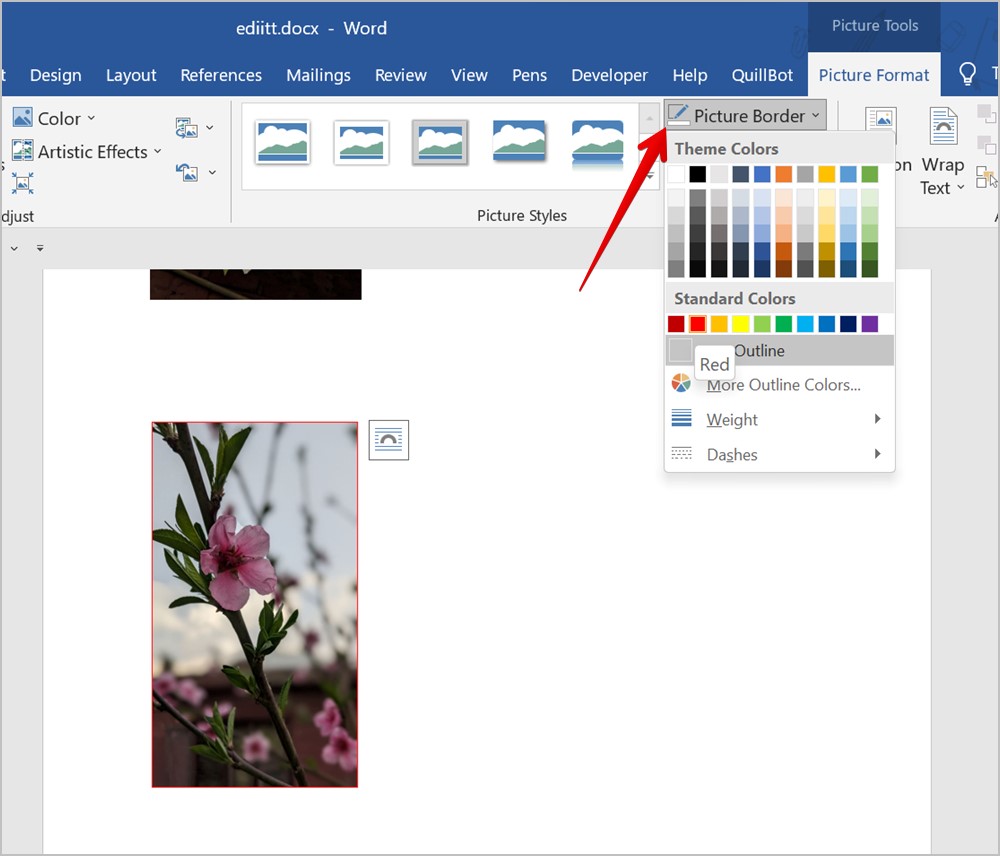
Pro Tip: To use a custom color or to add a hex color code for the border, click on Picture Border followed by More outline colors in the menu. Then, click on Custom.
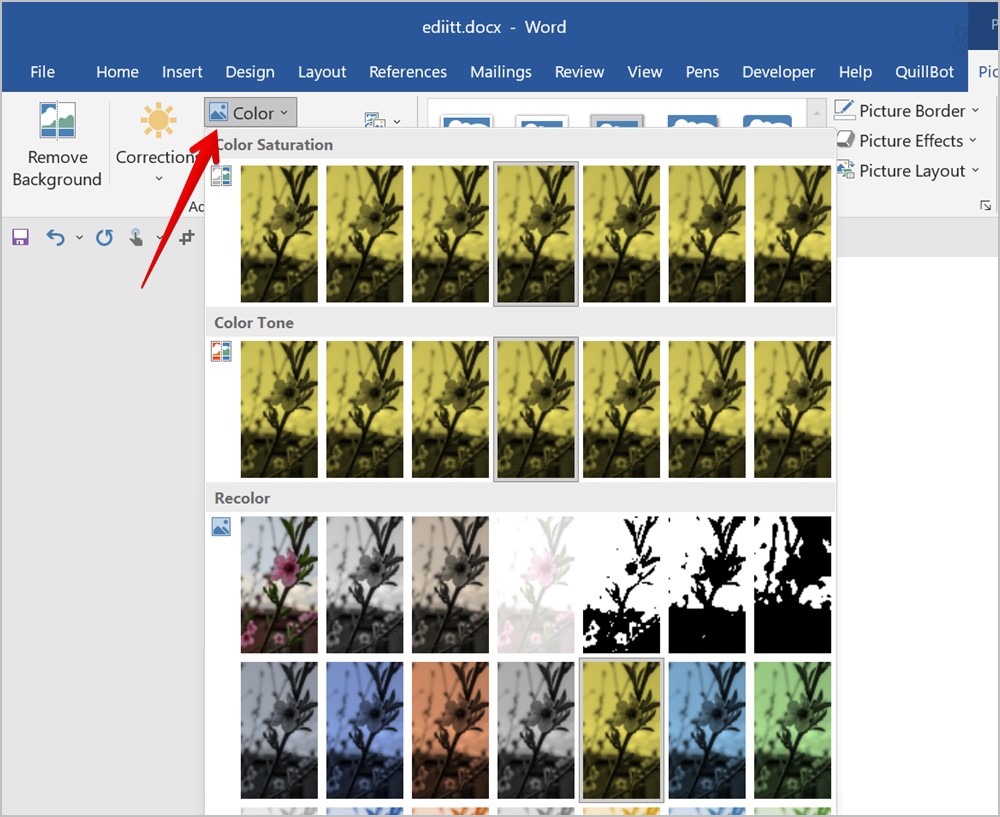
9. Change the Color of a Picture
Want to add a filter or change the colors of your picture? You can do that too in Microsoft Word.
Double-click on the image and then click on the Colors option in the Picture Format toolbar. Select the preferred color from the list.
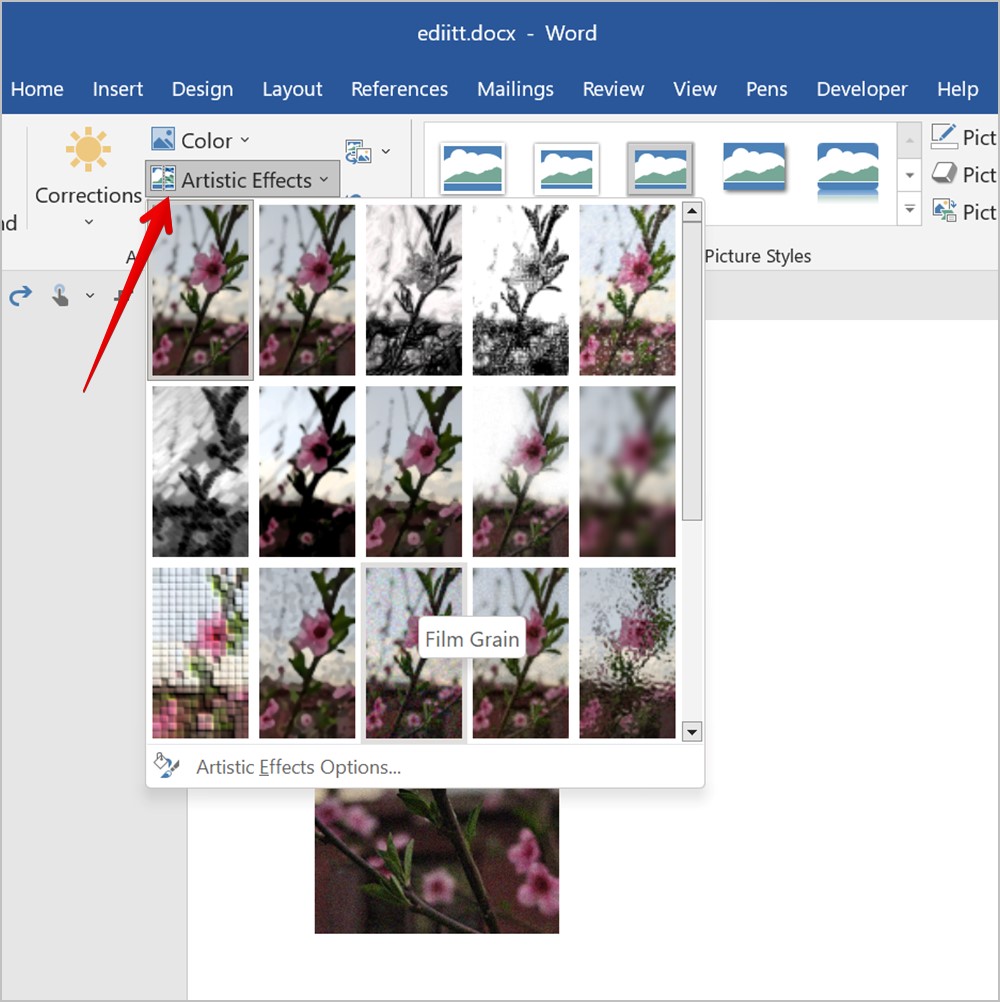
10. Add Artistic Effect to Picture
Next, you can add artistic effects like a pencil sketch, paint strokes, paintbrush, etc. to your image in Word.
For that, double-click the picture and select Artistic Effects from the Picture Format toolbar. Choose an effect to add to your image.
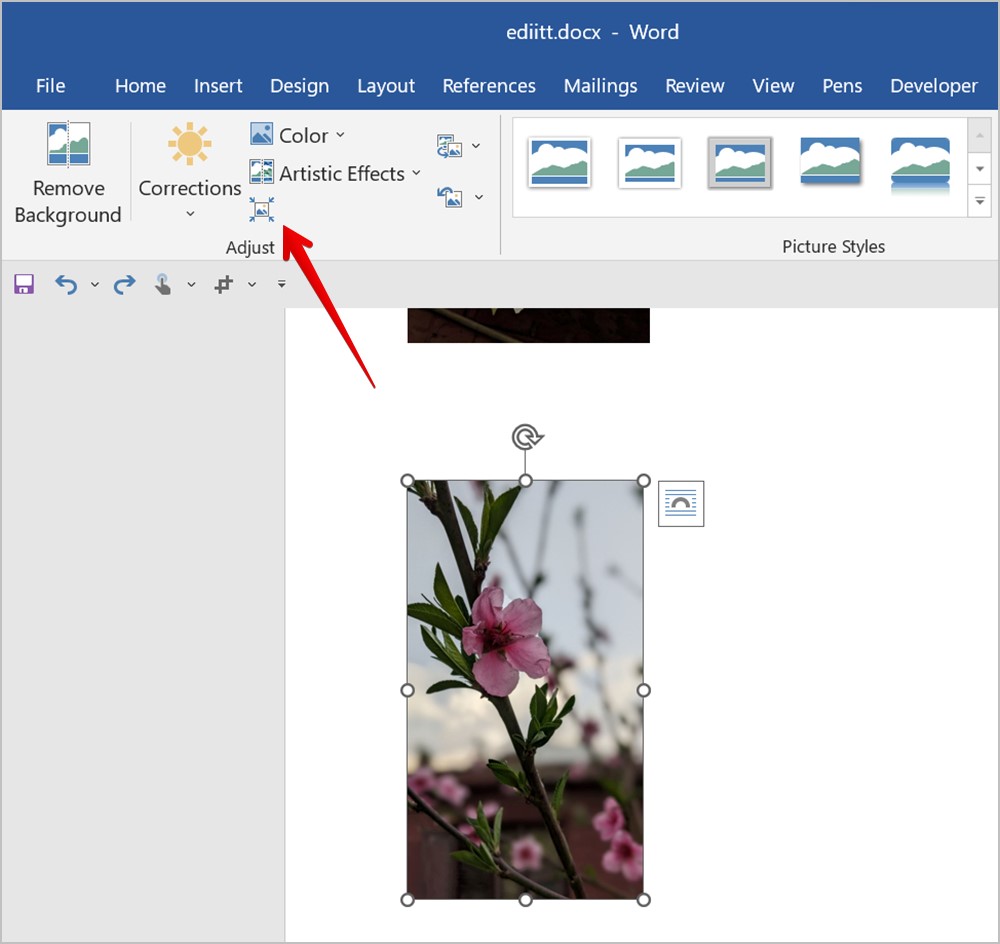
11. Change Brightness, Contrast, and Other Lighting Conditions
To customize various lighting conditions of your picture, follow these steps:
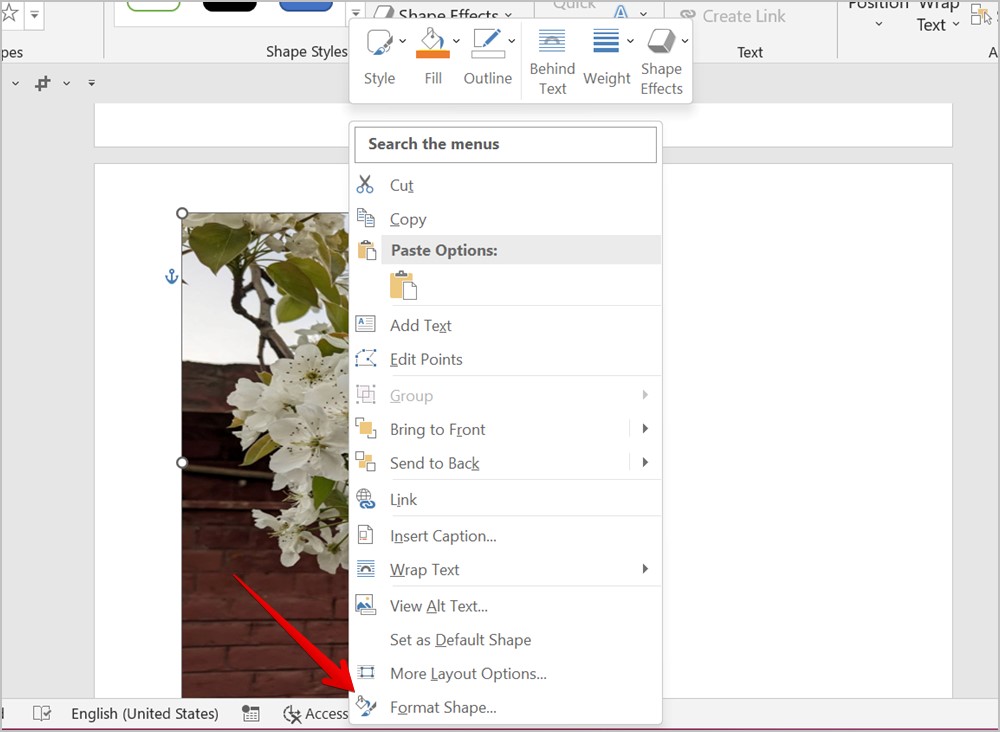
1. Right-click on your picture and select Format Picture from the menu.
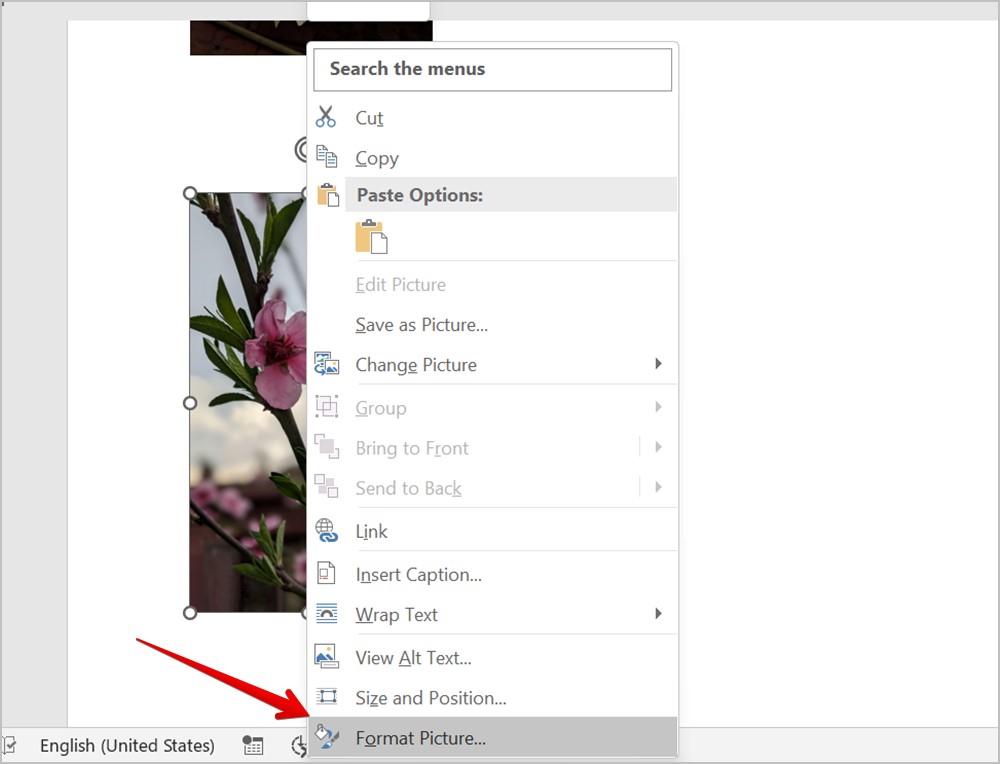
2. Click on the Gallery icon in the right sidebar and expand the Picture Corrections section.
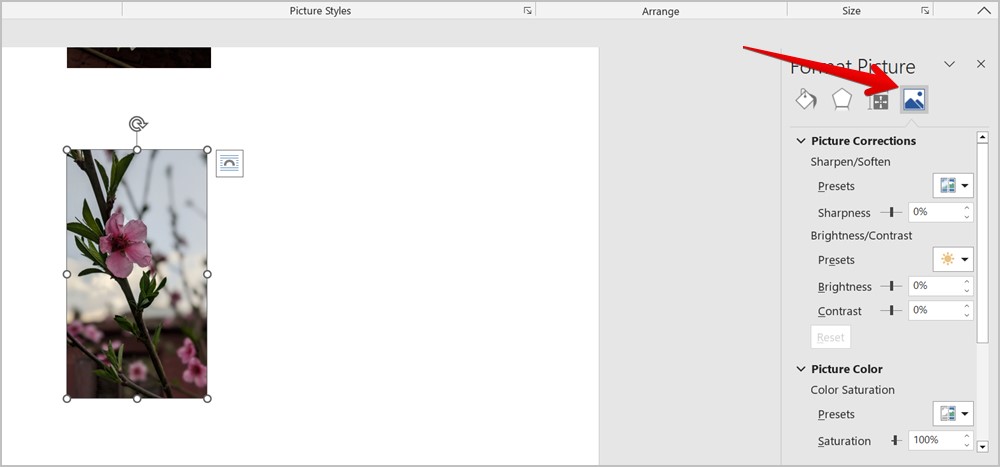
3. Change the available parameters.
Pro Tip: You can also double-click the image and select Correction in the Picture Format toolbar at the top to adjust the brightness and contrast of your picture.
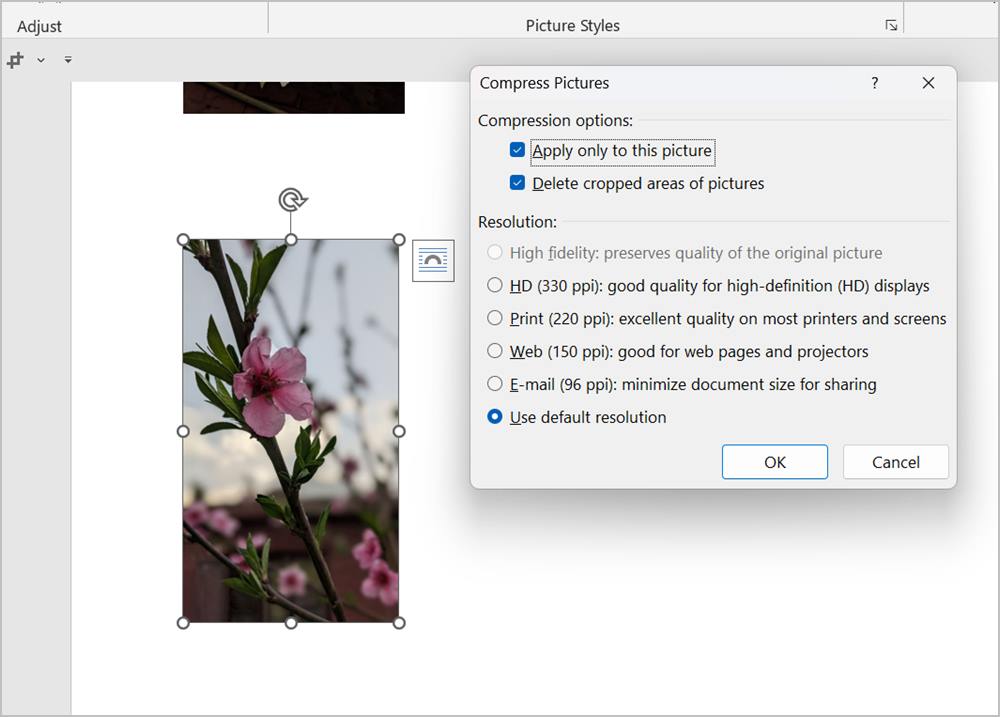
13. Compress Picture
Is your Word document quite big? You can reduce its size by compressing the pictures in it. You can change the resolution of one picture or all pictures and delete the cropped part of a picture and that will also compress the picture.
1. To compress a picture, double-click on it and click the Compress Picture icon in the Picture Format toolbar.
2. Choose the preferred resolution and select whether you want to compress the selected picture only or all pictures. Click on Ok to confirm.
14. Change the Transparency of a Picture
To make your image transparent, follow these steps:
1. In your Word document, click on the Insert followed by Shapes. Select the shape where your image will fit perfectly.
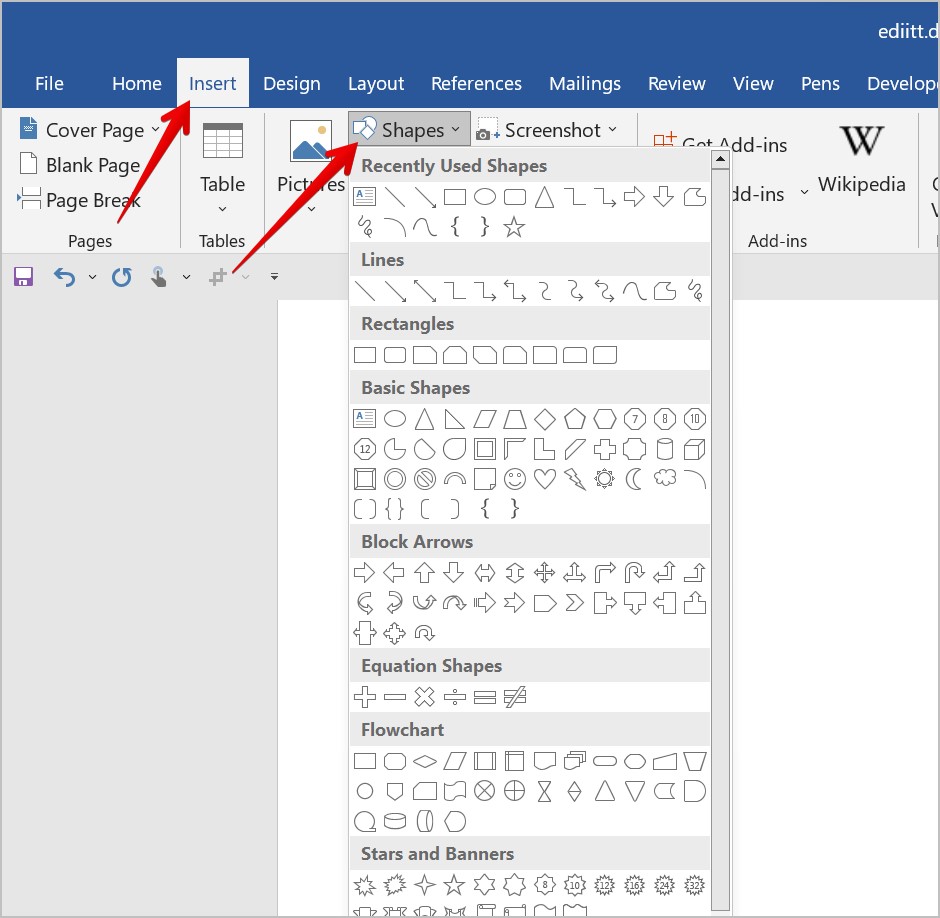
2. Draw the desired shape in your document.
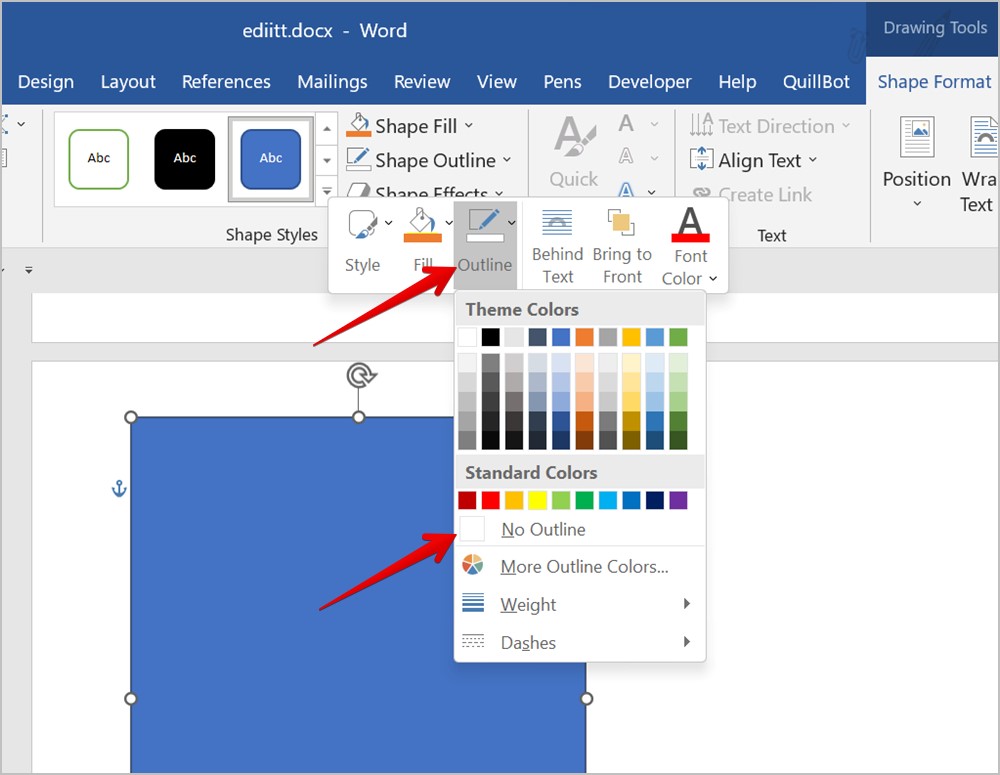
3. Right-click on the shape and click on Outline. Select No outline from the menu.
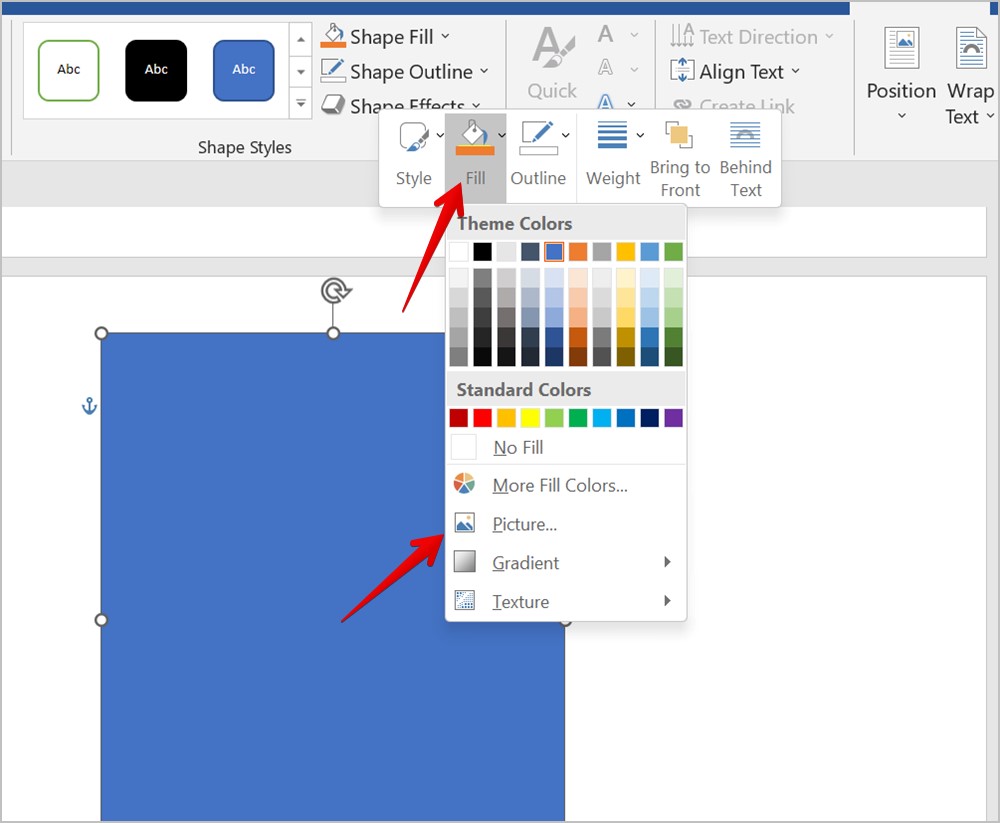
4. Right-click again on the shape and select Fill followed by Picture. Select the picture whose transparency you want to change.
5. With the picture added in the shape, right-click on the picture and select Format Picture.
6. The Format Picture panel will open on the right side. Click on the Fill tab (Bucket icon) and expand the Fill section.
7. Use the slider next to the Transparency to change the transparency of your picture.
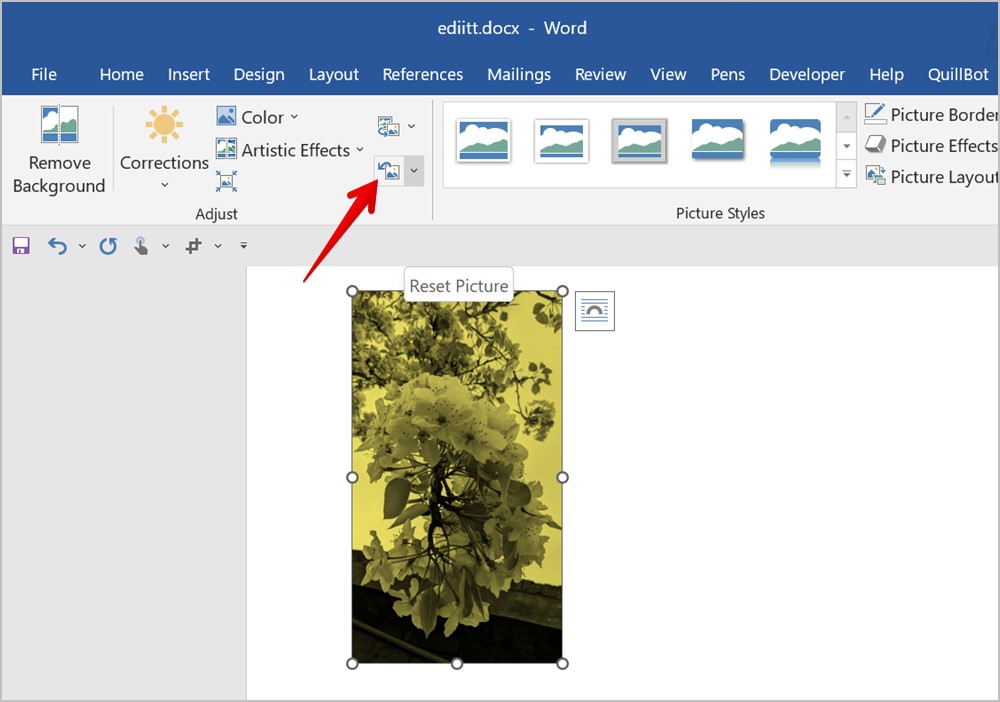
15. Reset Changes Made to a Picture
If you don’t like the edited picture in Word, you can reset the changes and restore the original image. For that, double-click the edited image and click on the Reset Picture icon in the Picture Format toolbar.
Make an Amazing Word Document
Hope the above tips to edit a screenshot or picture in Word were helpful. Once you have edited the pictures, know how to put two pictures side by side in Word. Also, know how to create a watermark template in Word.
Mehvish
Mehvish is a tech lover from Kashmir. With a degree in computer engineering, she’s always been happy to help anyone who finds technology challenging. She’s been writing about technology for over six years, and her favorite topics include how-to guides, explainers, tips and tricks for Android, iOS/iPadOS, Windows, social media, and web apps. You can also find her work on Make Tech Easier, Guiding Tech, and Nerds Chalk
Contents
- 1 How do I edit text in a screenshot in Word?
- 2 How do I edit a screenshot document?
- 3 How can I edit a picture in Word?
- 4 How do I edit a screenshot in Windows 10?
- 5 Can I edit screenshot?
- 6 How do I edit a screenshot on my laptop?
- 7 How do I edit screenshot text online?
- 8 Can we edit text in image?
- 9 How do I edit photos?
- 10 How do I take part of a screenshot?
- 11 How do I cut part of a screen in Windows?
- 12 How do you mark up a screenshot on Windows?
- 13 How do I find my edited screenshots?
- 14 How do I change my screenshot settings?
- 15 How do you edit a screenshot on HP laptop?
- 16 Can you crop a screenshot?
- 17 How do I mark a screenshot?
- 18 Where can I edit text online?
- 19 How do you cut an image and paste it on another?
- 20 How do I add text to a screenshot on my computer?
How do I edit text in a screenshot in Word?
Click the picture to reveal the “Format” tab. Press the “Corrections” option to reveal the dropdown. This will reveal to you how to edit image text in word. Apply the required correction to complete the process in full.
How do I edit a screenshot document?
1. Using the in-built editor
- Take a screenshot on your stock Android phone using the shortcut: pressing the power button and volume down button simultaneously.
- When it is captured, you will see three options- Edit, Delete and Share.
- Tap on Edit and it will take you to Google Photos editor.
How can I edit a picture in Word?
Go to the online photo editor – Fotor and click “Edit a Photo” and upload your image. Then click “Text” and insert the text pane into your images and type the words you want to add. After a few clicks, you can give your photo something honest to give it context.
How do I edit a screenshot in Windows 10?
How to screenshot on Windows 10: Edit screenshots with Snipping Tool
- Open the Start Menu.
- Type “Snipping tool.”
- Select Snipping Tool.
- Select what type of screenshot you want from the Mode menu.
- Click new.
- Edit image.
- Click File, then Save As.
Screenshots are useful for a variety of reasons, such as requesting support or simply showing off what you have on your screen. Since screenshots are images, the data on them cannot be edited through any standard means, but you can edit a screenshot in many ways using a simple and free image editor.
How do I edit a screenshot on my laptop?
Windows. Among multiple options for capturing the screen on Windows, you can press Win+Shift+S to bring up the Snip & Sketch toolbar at the top of the display. Once you’ve used it to capture a window or the entire screen, click the thumbnail that appears down in the lower right corner to make changes to the screenshot.
How do I edit screenshot text online?
Free Online Photo Editor Tutorial
- Step 1: Open the free online image editor. Img2Go offers a versatile and easy to use photo editor.
- Step 2: Upload your photo. Upload the image you want to edit.
- Step 3: Edit images fast and easily.
- Step 4: Save your edited image.
Can we edit text in image?
Edit text in an image
Edit the style and content of any Type layer. To edit text on a type layer, select the type layer in the Layers panel and select the Horizontal or Vertical Type tool in the Tools panel. Make a change to any of the settings in the options bar, such as font or text color.
How do I edit photos?
- Open the photo you want to edit.
- Tap Edit. Tools.
- Select the tools you want to use with your photo and make changes.
- When you finish, tap Done.
- To undo an effect, deselect the option or tap Cancel.
How do I take part of a screenshot?
Press “Windows + Shift + S”. Your screen will appear grayed out and your mouse cursor will change. Click and drag on your screen to select the part of your screen you want to capture. A screenshot of the screen region you selected will be copied to your clipboard.
How do I cut part of a screen in Windows?
Open Snipping Tool and take a screenshot
- Press Windows logo key + Shift + S. The desktop will darken while you select an area for your screenshot.
- Rectangular mode is selected by default.
- The screenshot is automatically copied to your clipboard.
How do you mark up a screenshot on Windows?
Click on the ballpoint pen icon at the top to use a pen to write or scribble on the screenshot. Select the ballpoint pen icon again to open its menu to change the color of the annotation stroke. Also, you can adjust the slider to increase or decrease the stroke’s thickness.
How do I find my edited screenshots?
The screenshot is an edited image. You would have to contact the person who made the screenshot and altered it and ask them to tell you what the original image said before they edited it or if you are lucky they would still have the original version. They probably don’t have it.
How do I change my screenshot settings?
With the beta installed, tap the menu icon in the top right corner then go to Settings > Accounts & Privacy. Near the bottom of the page is a button labeled Edit and share screenshots. Turn it on. You might see a prompt the next time you take a screenshot, which will ask if you want to turn on the new feature.
How do you edit a screenshot on HP laptop?
The alternative default way for partial screen
- Press the Windows key + Shift + S at the same time.
- Select the portion of your screen that you wish to grab.
- Open an image editing program.
- Open a new image and tap CTRL + V to paste the screenshot.
Can you crop a screenshot?
If you use a commercial screen-capture program to snap a screen shot, you can use the program’s crop tool to extract the section of the image that you need. There’s no need for a commercial tool, though; you can use Microsoft Paint, included with all versions of Windows, to crop your screen shots.
How do I mark a screenshot?
Take an Android screenshot of what you want to highlight, then tap Edit. Along the bottom, scroll to the right until you find Spotlight, then tap on it. Find a shape that you’d like to use for highlighting at the bottom and tap it. Then, drag your finger around what you want to highlight to draw that shape.
Where can I edit text online?
MockoFun is an online text editor with fonts (over 800 free fonts to choose from). You can create a text design online quick and easy!
How do you cut an image and paste it on another?
Paste one selection into or outside another
- Cut or copy the part of the image you want to paste.
- In the same image or another, select the area you want to paste into or outside.
- Do either of the following:
- Select the Move tool , or hold down the Ctrl (Win) or Command (Mac) key to activate the Move tool.
How do I add text to a screenshot on my computer?
Best thing you can do is this:
- Take a screen shot using the Snip n Sketch tool.
- Click on the […]
- Select Paint on the menu that will show up (you can try another photo editor app if you have another one)
- On the Paint window, you’ll see your screen shot.
- Click on the place you want to add the text and just type it in.
Answer
- To edit a screenshot in Word, first open the screenshot in Word.
- Then, use the editing tools to make the changes you want. When you’re done, save the document.
How To Use Screen Shot In Ms-Word (CHETNA SETHI)
How do I edit a screenshot document?
To edit a screenshot document, you can use a photo editor like Photoshop or GIMP. Open the photo editor and then open the screenshot file. Select the area of the screenshot that you want to edit and then make the changes. When you are finished, save the file and then close the photo editor.
Can a screenshot be edited?
Yes, screenshots can be edited. In fact, many people use screenshots as a way to edit photos or other images. There are a number of different ways to edit screenshots, including using a photo editing program or online tools.
Can I edit text in a screenshot?
Yes, you can edit text in a screenshot. Just use an image editor like Photoshop or GIMP to edit the text and save the file as a JPEG or PNG.
How do I edit a picture in Word?
To edit a picture in Word, first open the document containing the picture. Then, select the picture and click on the “Picture Tools” tab on the ribbon.
In the “Format” section, you’ll see a number of options for editing the picture. For example, you can adjust the brightness, contrast, and saturation; crop and rotate the picture; or add effects like shadows and reflections.
How do I delete part of a screenshot?
You can use a screenshot editing tool to delete part of a screenshot. Some common tools are Microsoft Paint and Adobe Photoshop.
How do I edit a screenshot in Windows 10?
To edit a screenshot in Windows 10, open the screenshot in Paint and make your changes. Alternatively, you can use a third-party screenshot editor like Snipping Tool or Greenshot.
How do I remove text from a picture in Word?
There are a few ways to do this. One way is to use the “Remove Background” tool in Word. To do this, open the picture in Word and go to the “Picture Tools” tab. Then, click on the “Remove Background” button and drag the cursor over the part of the picture you want to remove.
How do I edit screenshot text online?
There are a few ways to do this. One way is to use a website like imgur.com. Once you have uploaded your screenshot, you can edit the text directly on the website. Another way is to use a software program like Photoshop or GIMP. This will give you more options for editing your text.
How do you add text to a screenshot?
There are a few ways to add text to a screenshot. One way is to use a photo editing program, such as Photoshop or GIMP. Another way is to use a web-based program, such as Snipping Tool or Jing.
Why can’t I edit picture in Word?
There are a few reasons why you might not be able to edit pictures in Word. One possibility is that you don’t have the correct software installed on your computer. Another possibility is that you don’t have the correct permissions to edit the picture.
How can you modify an image?
There are a few ways to modify an image. One way is to use an image editor, such as Photoshop or GIMP. Another way is to use a website that allows you to edit images online, such as Pixlr.
How do I cut part of a picture in Word?
To cut part of a picture in Word, first select the picture. Then use the mouse to draw a selection around the part of the picture that you want to cut. Once you have drawn the selection, press the delete key on your keyboard to cut the picture.
How do I edit a screenshot in Windows 7?
To edit a screenshot in Windows 7, first open the screenshot in Paint. You can do this by right-clicking on the screenshot and selecting “Open With” > “Paint”.
Once the screenshot is open in Paint, you can make any necessary edits. For example, you can crop the image, add text, or change the color of the text.
How do I edit text in a screenshot in Paint?
To edit text in a screenshot in Paint, simply select the text with your mouse and start typing.
How do I cut part of a screen in Windows?
You can use the Snipping Tool to capture a screenshot of part of your screen. To open the Snipping Tool, type snippingtool in the search bar and press Enter.
Работа за компьютером, в частности, с программой Microsoft Word, иногда сопряжена с медиафайлами — например, с созданием скриншотов:
…если мы хотим добавить в документ изображение (иллюстрацию какой-либо области экрана), то нам потребуется сначала сделать сам скриншот требуемой области, а уж затем добавить этот скрин в документ, либо, коли возникло желание, банально поделиться со своим коллегой…
Создание скриншота возможно непосредственно из Word, к тому же, если нужно, с последующей вставкой в документ автоматически! Опция работы со скриншотами в Word имеет множество встроенных инструментов для коррекции изображения.
Итак — узнаем каким образом создать снимок экрана или его области при помощи встроенного инструмента для создания скриншотов в Word:
-
инструменты для создания скриншотов в Microsoft Word
-
как вставить картинку или скриншот в документ Word
Для уверенной работы с картинками нам всего-то нужно изучить инструментарий программы Microsoft Word. Рассмотрим примеры работы Word 2013 (в иных версиях несущественные различия в работе…).
инструменты для создания скриншотов в Microsoft Word
Открываем программу Word… Оглядимся… присмотримся к верхнему меню и отыщем вкладку «Вставка» (зелёный овал), вот там-то и обретается набор инструментов для работы с картинками и, конечно же, с создаваемыми скриншотами.
По теме сегодняшней статьи нам требуется инструмент Word по созданию скриншота — «Снимок».

Как видите, выше — опций для работы с медиафайлами документа Word великое множество… Я специально разметила свою картинку стрелками разных цветов (изучите эти опции у себя подробнее).
Зелёная стрелка: «Снимок экрана». Если кликнуть… то откроется вспомогательное окно, в котором будут даны 1 — «возможные окна доступных экранов для съёмки» (рабочий стол и пр.) и 2 — непосредственная «Вырезка области экрана» —
если же кликаем вариант 1, то будет сделан полный снимок экрана; если же 2, то возможен выбор конкретной части экрана, которую нужно обозначить — принцип работы похож на любую другую программу «скриншотов»…
Коричневая стрелка… …это работа с готовыми картинками, сохранёнными на компьютере…
вернуться к оглавлению ↑
как вставить картинку или скриншот в документ Word
На картинке ниже показан вариант:
я сделала снимок области экрана… скриншот автоматически добавился в документ. Как понимаете, картинка вставляется на место расположения курсора!
…далее эту картинку возможно отредактировать на свой вкус: размер, цвет, тени, обтекание текста (справа/лева/низу/сверху и прочее и прочее полезное оригинальное…

Я не буду рассказывать о работах с каждым конкретным инструментом… это ни к чему: вы и сами замечательно попрактикуете без меня.
Главное в этом деле что!?
Правильно!
Главное, об этих инструментах узнать, и воспользоваться (а то ведь многие пользователи, работая с Word, об этих полезных функциях и не подозревают)…
…вот мы нынче и разузнали тайны — научились создавать скриншоты в Microsoft Word…
Однако, если возникли какие-то вопросы, милости прошу к комментариям…
Я Диск: настройка расположения папки файлов — освободим системный диск С
Видео: продлить антивирус Аваст ещё на год — бесплатно!..
все статьи:  Александра Брик
автор, соавтор сайта Комплитра ру — менеджер, веб разработчик студии ATs media — запросто с Вордпресс
мой сайт
При взаимодействии со снимком экрана его создание выступает лишь первым звеном в цепочке манипуляций над изображением. Рассмотрим основные методы работы со скринами в различных редакторах.
Оглавление
- 1 Способы обработки скриншота
- 2 Как обрезать скрин в Ворде?
- 2.1 Как вставить скриншот в документ
- 2.2 Инструкция
- 3 Как обрезать скрин в Paint
- 3.1 Как найти Paint на компьютере
- 3.2 Как вставить скриншот в редактор
- 3.3 Инструкция
Способы обработки скриншота

Для создания качественного снимка требуется внести некоторые изменения, помогающие получателю сфокусировать внимание на определенном фрагменте изображения или обрезать заинтересовавший объект.
Алгоритм действий зависит от используемого приложения, потому следует заранее его установить (выбор довольно разнообразен: Word, Paint.NET, Microsoft Paint, Abobe Photoshop, графические редакторы, скриншотеры и прочие программы).
Обработка скриншота происходит в процессе нанесения меток (основные – геометрические фигуры, указательные линии, кисть, текст): они помогают скрыть конфиденциальные данные, вставить картинки-иллюстрации или изменить конфигурацию изображения.
Как обрезать скрин в Ворде?

Текстовый процессор Microsoft Word также имеет рассматриваемую функцию. Чтобы воспользоваться ею, следует выполнить несколько простых шагов:
- Если скриншот экрана отсутствует, создать его (клавишей «Print Screen»).
- В нужном участке текста нажать правой кнопкой мыши (ПКМ), затем «Вставить» (другой вариант – использование сочетания Ctrl + V).
- Щелкнуть по скриншоту, в появившейся панели с заголовком «Настройка изображения» выбрать элемент «Обрезка».
- Перемещая границы мышью, оставить требуемый фрагмент.
Как вставить скриншот в документ

Картинку можно поместить способами, поддерживающимися используемой программой. Классические варианты приведены ниже:
Способ №1:
- Открыть редактируемый Word-файл на компьютере.
- Скопировать картинку в буфер обмена (обычно скриншотеры делают это автоматически, как и клавиша Print Screen).
- Щелкнуть ПКМ по нужному фрагменту, нажать «Вставить».
- Готово: теперь можно обрезать скриншот или оставить его без изменений.
Способ №2:
- В окне документа Microsoft Word поставить курсор в интересующем месте.
- Перейти во вкладку «Вставка», расположенную вверху слева, около опции «Дизайн».
- Выбрать элемент «Рисунки», в предложенных вариантах указать тип «из файла» (упрощенный метод – «Поиск», тогда Ворд сам найдет изображения).
- Найти сохраненный скриншот в проводнике, щелкнуть «Вставить».
- Картинка будет помещена в заранее указанном курсором месте.
Инструкция

Ниже описан подробный порядок действий, который поможет вставить скриншот в Ворд и затем обрезать его:
- Сделать снимок, нажав Print Screen (клавиша расположена на клавиатуре вверху справа, около Delete и Insert) – скрин скопируется в буфер обмена.
- Запустить Microsoft Word, открыв приложение или файл сохраненного документа.
- Указать подходящее место в тексте, щелкнуть ПКМ по нему и выбрать функцию «Вставить». В новых версиях программы доступны 3 опции – использовать можно любую. Для получения дополнительных сведений нужно навести курсор на необходимый вариант.
- Вставка завершена, теперь можно обрезать изображение. Для этого нажимают на скриншот левой кнопкой мыши (ЛКМ) и щелкают по элементу «Обрезка».
- Перетаскивая границы указателем (удерживать ЛКМ на углу картинки и перемещать курсор в нужную сторону), оставить нужный фрагмент.

В интегрированном графическом редакторе имеется рассматриваемый функционал на панели быстрых инструментов. Чтобы воспользоваться им, нужно:
- Вставить скриншот в Microsoft Paint, используя описанные в предыдущих разделах методы.
- Во вкладке «Главная» (обычно открыта по умолчанию) выбрать инструмент «Выделить» (иконка с прямоугольником или произвольной фигурой и границами в виде штрихов).
- Указать нужную область, удерживая и перемещая курсор ЛКМ. После этого можно изменять размер изображения, расширяя или уменьшая его, путем перетаскивания курсора в нужную сторону.
- Щелкнуть по опции «Обрезать», находящейся выше справа от активного инструмента. (Хоткей для быстрой работы: Ctrl + Shift + X).
Как найти Paint на компьютере

Для работы с утилитой ее необходимо открыть, используя любой из перечисленных ниже методов.
Способ № 1:
- Зайти в Меню Пуск, нажав на кнопку «Win» или щелкнув по значку, расположенному в нижней части экрана слева.
- Выбрать элемент «Все приложения» (папка «Стандартные»).
- Запустить программу, выбрав ярлык со значком цветной палитры и кисточки.
Способ № 2:
- Воспользоваться интерфейсом вызова программ, выполнив комбинацию «Win+ R».
- В строке «Открыть» ввести «mspaint.exe».
- Запуститься окно Paint с открытой безымянной картинкой.
Способ № 3:
- Войти в «Мой компьютер» или любую папку.
- Нажать на поисковую строку левой кнопкой мыши и стереть вписанный текст.
- Написать «mspaint.exe» или строку «c:windowssystem32mspaint.exe», затем нажать Enter.
Как вставить скриншот в редактор

Чтобы обрезать и редактировать скриншот, его необходимо поместить в программу. Для этого используют следующие алгоритмы:
Способ № 1:
- Запустить Microsoft Paint.
- На ленте инструментов выбрать пункт «Файл» (подсвеченный синим оттенком) -> «Открыть».
- В появившемся окне найти созданное изображение. Процесс можно ускорить, задав тип файлов, отображаемых в интерфейсе.
Способ № 2:
- Запустить Paint.
- В открытое окно перенести файл скриншота, затем нанести различные метки или обрезать изображение, используя ранее описанный метод.
- Снимок готов к дальнейшим взаимодействиям.
Картинку можно вставить, используя комбинацию Ctrl + V в открытом окне редактора (при условии нахождения ее в буфере обмена).
Инструкция

Зная, как обрезать скриншот в Paint, можно обработать изображение на свое усмотрение. Ниже приведен примерный порядок действий:
- Создать снимок, нажав «Prnt Scr» на клавиатуре.
- Открыть редактор любым из описанных методов.
- Вставить скриншот, выполнив комбинацию «Ctrl + V» или «Shift + Insert».
- Выбрать инструмент «Выделить» и указать нужные границы, затем щелкнуть «Обрезать» (Ctrl + Shift + X).
- Сохранить снимок, нажав Ctrl + S или щелкнув по дискете на панели быстрого доступа (вверху слева).
Графические и текстовые редакторы предоставляют множество возможностей, одной из которых является обрезка изображения. Путем выполнения несложных алгоритмов удается обрезать скриншот и добиться того, что он примет наиболее приемлемый для пользователя вид.