
Whether you’re starting from a built-in template or updating one of your own, Word’s built-in tools help you update templates to suit your needs. To update your template, open the file, make the changes you want, and then save the template.
-
Click File > Open.
-
Double-click This PC. (In Word 2013, double-click Computer).
-
Browse to the Custom Office Templates folder that’s under My Documents.
-
Click your template, and click Open.
-
Make the changes you want, then save and close the template.
Building templates
-
Add building blocks to a template
-
Add content controls to a template
-
Add content controls
-
Insert a text control where users can enter text
-
Insert a picture control
-
Insert a combo box or a drop-down list
-
Insert a date picker
-
Insert a check box
-
Insert a building block gallery control
-
-
Set or change the properties for content controls
-
-
Add instructional text to a template
-
Add protection to a template
-
Add protection to parts of a template
-
Assign a password to a template
-
Add building blocks to a template
Building blocks are reusable pieces of content or other document parts that are stored in galleries to be accessed and reused at any time. You can also save building blocks and distribute them with templates.
For example, you may create a report template that provides your template users with two cover letter types to choose from when they create their own report based on your template.
Add content controls to a template
Make your templates flexible by adding and configuring content controls, such as rich text controls, pictures, drop-down lists, or date pickers.
For example, you might create a template that includes a drop-down list. If you allow editing to the drop-down list, other people can change the list options to meet their needs.
Note: If content controls are not available, you may have opened a document or a template that was created in an earlier version of Word. To use content controls, you must convert the document to the Word 2013 file format by clicking File > Info > Convert, and then clicking OK. After you convert the document or template, save it.
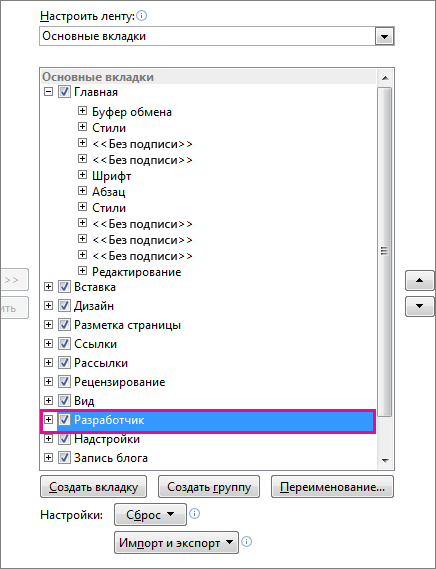
Before you can add content controls, you need to show the Developer tab.
-
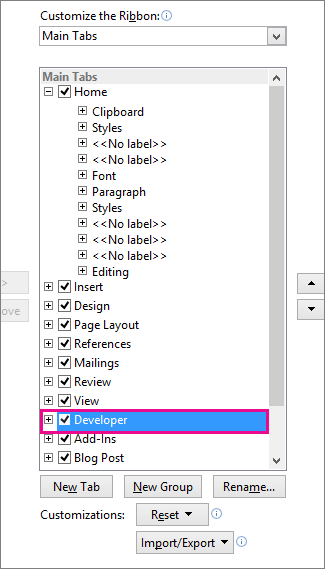
Click File > Options > Customize Ribbon.
-
Under Customize the Ribbon, select Main Tabs.
-
In the list, select the Developer check box, and then click OK.
Add content controls
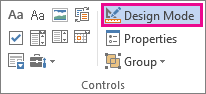
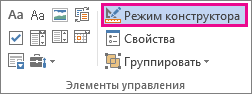
On the Developer tab, in the Controls group, click Design Mode, and then insert the controls that you want.
Insert a text control where users can enter text
In a rich text content control, users can format text as bold or italic, and they can type multiple paragraphs. If you want to limit what users add, insert the plain text content control.
-
In the document, click where you want to insert the control.
-
On the Developer tab, in the Controls group, click Rich Text Content Control
 or the Plain Text Content Control .
 or the Plain Text Content Control
  .
.Insert a picture control
-
Click where you want to insert the control.
-
On the Developer tab, in the Controls group, click Picture Control
.
 .
.Insert a combo box or a drop-down list
In a combo box, users can select from a list of choices that you provide or they can type in their own information. In a drop-down list, users can only select from the list of choices.
-
On the Developer tab, in the Controls group, click the Combo Box Content Control
or Drop-Down List Content Control . -
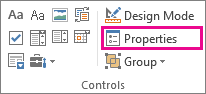
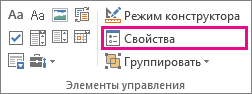
Select the content control, and then on the Developer tab, in the Controls group, click Properties.
-
To create a list of choices, click Add under Combo Box Properties or Drop-Down List Properties.
-
Type a choice in the Display Name box, such as Yes, No, or Maybe. Repeat this step until all of the choices are in the drop-down list.
-
Fill in any other properties that you want.
 or Drop-Down List Content Control
  .
.
Note: If you select the Contents cannot be edited check box, users won’t be able to click a choice..
Insert a date picker
-
Click where you want to insert the date picker control.
-
On the Developer tab, in the Controls group, click the Date Picker Content Control
.
 .
.Insert a check box
-
Click where you want to insert the check box control.
-
On the Developer tab, in the Controls group, click the Check Box Content Control
.
 .
.Insert a building block gallery control
You can use building block controls when you want people to choose a specific block of text.
For example, building block controls are helpful if you’re setting up a contract template, and you need to add different boilerplate text depending on the contract’s specific requirements. You can create rich text content controls for each version of the boilerplate text, and then you can use a building block gallery control as the container for the rich text content controls.
You can also use a building block control in a form.
-
Click where you want to insert the control.
-
On the Developer tab, in the Controls group, click Building Block Gallery Content Control
. -
Click the content control to select it.
-
On the Developer tab, in the Controls group, click Properties.
-
Click the Gallery and the Category for the building blocks that you want to make available in the building block control.
 .
.Set or change the properties for content controls
-
Select the content control, and click Properties in the Controls group.
-
In the Content Control Properties dialog box, choose whether the content control can be deleted or edited when someone uses your template.
-
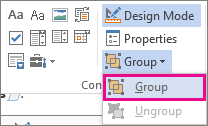
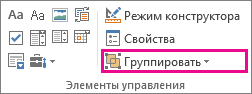
To keep several content controls or even a few paragraphs of text together, select the controls or the text, and then click Group in the Controls group.
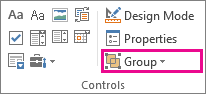
For example, perhaps you have a three-paragraph disclaimer. If you use the Group command to group the three paragraphs, the three-paragraph disclaimer cannot be edited and can be deleted only as a group.
Add instructional text to a template
Instructional text can enhance the usability of the template that you create. You can change the default instructional text in content controls.
To customize the default instructional text for your template users, do the following:
-
On the Developer tab, in the Controls group, click Design Mode.
-
Click the content control where you want to revise the placeholder instructional text.
-
Edit the placeholder text and format it any way you want.
-
On the Developer tab, in the Controls group, click Design Mode to turn off the design feature and save the instructional text.
Add protection to a template
You can add protection to individual content controls in a template to help prevent someone from deleting or editing a particular content control or group of controls, or you can help protect all of the template content with a password.
Add protection to parts of a template
-
Open the template that you want to add protection to.
-
Select the content controls to which you want to restrict changes.
Tip: Select multiple controls by holding down the CTRL key while you click the controls.
-
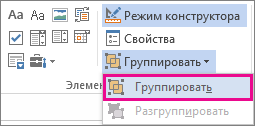
On the Developer tab, in the Controls group, click Group, and then click Group again.
-
On the Developer tab, in the Controls group, click Properties.
-
In the Content Control Properties dialog box, under Locking, do any of the following:
-
Select the Content control cannot be deleted check box, which allows the content of the control to be edited but the control itself cannot be deleted from the template or a document that is based on the template.
-
Select the Contents cannot be edited check box, which allows you to delete the control but does not allow you to edit the content in the control.
-
Use this setting when you want to protect text if it is included. For example, if you often include a disclaimer, you can help ensure that the text stays the same, and you can delete the disclaimer for documents that don’t require it.
Assign a password to a template
To assign a password to the document so that only reviewers who know the password can remove the protection, do the following:
-
Open the template that you want to assign a password to.
-
On the Review tab, in the Protect group, click Restrict Editing.
-
Under Start enforcement, click Yes, Start Enforcing Protection.
-
Type a password in the Enter new password (optional) box, and then confirm the password.
Important: If you choose not to use a password, anyone can change your editing restrictions.
Use strong passwords that combine uppercase and lowercase letters, numbers, and symbols. Weak passwords don’t mix these elements. Strong password: Y6dh!et5. Weak password: House27. Passwords should be at least 8 characters long. In general, longer a password is, the more secure it is.
It is critical that you remember your password. If you forget your password, Microsoft cannot retrieve it. Store the passwords that you write down in a secure place away from the information that they help protect.
Если вы используете встроенный шаблон или обновляете один из собственных, встроенные средства Word помогут изменить шаблоны в соответствии с вашими потребностями. Чтобы обновить свой шаблон, откройте файл, внесите необходимые изменения и сохраните его.
-
Нажмите Файл > Открыть.
-
Дважды щелкните этот компьютер. (В Word 2013 дважды щелкните компьютер).
-
Перейдите в папку Пользовательские шаблоны Office, которая находится в папке Документы.
-
Щелкните шаблон и нажмите кнопку Открыть.
-
Внесите необходимые изменения, а затем сохраните и закройте шаблон.
Создание шаблонов
-
Добавление стандартных блоков в шаблон
-
Добавление элементов управления содержимым в шаблон
-
Добавление элементов управления содержимым
-
Вставка элемента управления, куда пользователи могут вводить текст
-
Вставка элемента управления «Рисунок»
-
Вставка поля со списком или раскрывающегося списка
-
Вставка элемента управления «Выбор даты»
-
Вставка флажка
-
Вставка элемента управления коллекцией стандартных блоков
-
-
Установка или изменение свойств элементов управления содержимым
-
-
Добавление пояснительного текста в шаблон
-
Защита шаблона
-
Защита элементов шаблона
-
Назначение пароля для шаблона
-
Добавление стандартных блоков в шаблон
Стандартные блоки — это многократно используемые элементы содержимого или другие части документа, которые хранятся в коллекциях и в любое время доступны для повторного использования. Стандартные блоки также можно хранить и распространять с помощью шаблонов.
Например, можно создать шаблон отчета, содержащий два типа сопроводительных писем, которые пользователи смогут выбрать при создании отчета на основе данного шаблона.
Добавление элементов управления содержимым в шаблон
Сделайте свои шаблоны гибкими, добавив и настроив элементы управления содержимым, такие как «форматированный текст», «рисунок», «раскрывающийся список» или «выбор даты».
Например, вы можете создать шаблон, который содержит раскрывающийся список. Если вы разрешите редактирование раскрывающегося списка, другие люди смогут изменять его параметры в соответствии со своими потребностями.
Примечание: Если элементы управления содержимым недоступны, возможно, вы открыли документ или шаблон, созданный в более ранней версии Word. Чтобы использовать элементы управления содержимым, необходимо преобразовать документ в формат файла Word 2013, щелкнув Файл > Сведения > Преобразоватьи нажав кнопку ОК. После преобразования документа или шаблона сохраните его.
Чтобы можно было добавлять элементы управления содержимым, отобразите вкладку Разработчик.
-
Выберите команды Файл > Параметры > Настроить ленту.
-
В раскрывающемся списке Настроить ленту выберите Основные вкладки.
-
Установите в списке флажок для вкладки Разработчик и нажмите кнопку ОК.
Добавление элементов управления содержимым
На вкладке Разработчик в группе Элементы управления нажмите кнопку Режим конструктора и добавьте необходимые элементы управления.
Добавление элемента управления текстом, в который пользователи могут вводить текст
В элементе управления содержимым «форматированный текст» пользователи могут выделять текст полужирным шрифтом или курсивом, а также вводить несколько абзацев текста. Чтобы ограничить возможности пользователей, вставьте элемент управления содержимым «обычный текст».
-
В документе щелкните место, куда нужно добавить элемент управления.
-
На вкладке Разработчик в группе Элементы управления нажмите кнопку Элемент управления содержимым
или Элемент управления содержимым .
 или Элемент управления содержимым
  .
.Добавление элемента управления «рисунок»
-
Щелкните место, куда нужно добавить элемент управления.
-
На вкладке Разработчик в группе Элементы управления нажмите кнопку Рисунок
.
 .
.Вставка поля со списком или раскрывающегося списка
В поле со списком пользователи могут выбрать один из предложенных вами пунктов или ввести собственный вариант. В раскрывающемся списке пользователи могут только выбрать один из имеющихся пунктов.
-
На вкладке Разработчик в группе Элементы управления щелкните элемент управления содержимым
или элемент управления содержимым . -
Выделите элемент управления содержимым, а затем на вкладке Разработчик в группе Элементы управления нажмите кнопку Свойства.
-
Чтобы создать список вариантов выбора, нажмите Добавить в разделе Свойства поля со списком или Свойства раскрывающегося списка.
-
Введите значение в поле Отображаемое имя, например Да, Нет или Возможно. Повторяйте этот шаг до тех пор, пока все нужные вам значения не окажутся в раскрывающемся списке.
-
При необходимости задайте остальные свойства.
 или элемент управления содержимым
  .
.
Примечание: Если установить флажок Содержимое нельзя редактировать, пользователи не смогут изменять выбранные пункты.
Вставка элемента управления «выбор даты»
-
Щелкните в том месте, где нужно вставить элемент управления «выбор даты».
-
На вкладке Разработчик в группе Элементы управления щелкните элемент управления содержимым «выбор даты»
.
 .
.Вставка флажка
-
Щелкните в том месте, где нужно вставить элемент управления «флажок».
-
На вкладке Разработчик в группе Элементы управления щелкните элемент управления содержимым
.
 .
.Добавление элемента управления коллекцией стандартных блоков
Элементы управления стандартными блоками используются, когда необходимо предоставить пользователям возможность выбрать определенный блок текста.
Например, элементы управления стандартными блоками полезны, когда необходимо настроить шаблон контракта и добавлять различный стандартный текст в зависимости от конкретных требований контракта. Для каждой версии стандартного текста можно создать элементы управления содержимым форматированного текста, а затем использовать элемент управления коллекцией стандартных блоков как контейнер элементов управления содержимым форматированного текста.
Элементы управления стандартными блоками также можно использовать в формах.
-
Щелкните место, куда нужно добавить элемент управления.
-
На вкладке Разработчик в группе Элементы управления нажмите кнопку Элемент управления содержимым коллекции
. -
Щелкните элемент управления содержимым, чтобы выделить его.
-
На вкладке Разработчик в группе Элементы управления нажмите кнопку Свойства.
-
Выберите значения в списках Коллекция и Категория для стандартных блоков, которые необходимо сделать доступными в элементе управления стандартным блоком.
 .
.Установка или изменение свойств элементов управления содержимым
-
Выберите элемент управления содержимым и нажмите кнопку Свойства в группе Элементы управления.
-
В диалоговом окне Свойства элемента управления содержимым укажите, может ли элемент управления содержимым быть удален или изменен другим пользователем, использующим шаблон.
-
Чтобы работать с несколькими элементами управления содержимым или несколькими абзацами текста как с одним объектом, выберите эти элементы управления или текст, а затем в группе Элементы управления нажмите кнопку Группировать.
Возьмем для примера документ «Отказ от ответственности», состоящий из трех абзацев. После группирования этих абзацев с помощью команды «Группировать» соответствующий текст невозможно будет изменить, а удалить его можно будет только как группу.
Добавление пояснительного текста в шаблон
Чтобы сделать шаблон более удобным в использовании, можно добавить пояснительный текст. Вы можете изменить пояснительный текст по умолчанию в элементе управления содержимым.
Вот как вы можете настроить пояснительный текст по умолчанию для пользователей шаблона.
-
На вкладке Разработчик в группе Элементы управления нажмите Режим конструктора.
-
Щелкните элемент управления содержимым, у которого вы хотите изменить замещающий пояснительный текст.
-
Отредактируйте и отформатируйте замещающий текст.
-
На вкладке Разработчик в группе Элементы управления нажмите кнопку Режим конструктора, чтобы отключить возможность конструирования и сохранить пояснительный текст.
Защита шаблона
К отдельным элементам управления содержимым в шаблоне можно добавить защиту, чтобы запретить удаление или редактирование определенных элементов управления содержимым или группы элементов управления. Можно также защитить все содержимое шаблона паролем.
Защита элементов шаблона
-
Откройте шаблон, к которому нужно добавить защиту.
-
Выделите элемент управления содержимым, изменения которого необходимо ограничить.
Совет: Чтобы выбрать несколько элементов управления, щелкните их, удерживая нажатой клавишу CTRL.
-
На вкладке Разработчик в группе Элементы управления нажмите кнопку Группировать и выберите команду Группировать.
-
На вкладке Разработчик в группе Элементы управления нажмите кнопку Свойства.
-
В диалоговом окне Свойства элемента управления содержимым в разделе Блокировка сделайте следующее.
-
Установите флажок Элемент управления содержимым нельзя удалить. Это позволит изменять содержимое элемента управления, но сам элемент управления нельзя будет удалить из шаблона или созданного с его помощью документа.
-
Установите флажок Содержимое нельзя редактировать. Это позволит удалить элемент управления, но редактировать содержимое в элементе управления будет запрещено.
-
Эти параметры можно использовать для защиты текста, если он включен в шаблон. Например, если часто добавляется отказ от ответственности, защита гарантирует неизменность текста и в то же время позволяет удалить отказ от ответственности в документах, где он не нужен.
Назначение пароля для шаблона
Вот как вы можете назначить документу пароль, разрешающий удалять защиту только знающим его пользователям.
-
Откройте шаблон, которому нужно назначить пароль.
-
На вкладке Рецензирование в группе Защитить выберите команду Ограничить редактирование.
-
В разделе Включение защиты нажмите кнопку Да, включить защиту.
-
Введите пароль в поле Новый пароль (необязательно), а затем подтвердите его.
Важно: Если вы решили не использовать пароль, любой пользователь может изменить ограничения на редактирование.
Используйте надежные пароли, состоящие из букв в верхнем и нижнем регистре, цифр и символов. Пароли, не содержащие набор таких элементов, являются ненадежными. Надежный пароль: Y6dh!et5. Пример ненадежного пароля: House27. Пароль должен содержать не менее 8 символов. Чем длиннее пароль, тем он надежнее.
Очень важно запомнить свой пароль. Если вы забудете пароль, корпорация Майкрософт не сможет его восстановить. Все записанные пароли следует хранить в надежном месте отдельно от сведений, для защиты которых они предназначены.
Create, Save, Edit and Use Templates in Microsoft Word
by Avantix Learning Team | Updated February 14, 2021
Applies to: Microsoft® Word® 2013, 2016, 2019 or 365 (Windows)
You can create, save, use and edit templates in Microsoft Word for frequently-used documents such as letters, reports, proposals and manuals. Templates include basic character, paragraph and page formatting and may include text, custom styles, tables, images, macros, sections, headers and footers. If you save a document as a custom template, you can create a new document based on that template.
Recommended article: How to Check Word Count in Microsoft Word (4 Ways)
Do you want to learn more about Microsoft Word? Check out our virtual classroom or live classroom Word courses >
A document can be saved as a Word Template (dotx file) or a Word Macro-Enabled Template (dotm file).
In this article, we’ll take a look at 3 types of templates in Microsoft Word:
- Normal template (the default global template)
- Custom user templates
- Microsoft ready-made templates
Understanding the Normal template
Unless you select a different template, Word bases new documents on the Normal template by default. The Normal template is named Normal.dotm and its default style is the Normal style. It also includes built-in heading styles such as Heading 1, Heading 2 and so on.
Specifying a location for custom user templates
In Word 2013 and later versions, if you want to create your own custom user templates, you will need to specify a location for the templates so you can easily access them.
Custom user templates are typically stored in the following location (in 2013 and later versions):
C:Users[UserName]DocumentsCustom Office Templates
You will need to specify a path to the Custom Office Templates folder (which should be created automatically when you install Microsoft Office) in your Documents folder as the default storage location. If you want, you can select a different folder but this folder is easy to find and use.
To specify the default storage location for your custom user templates in Word 2013 and later versions:
- Create a folder in your Documents folder called Custom Office Templates if it does not already exist (assuming you are going to use this folder as the default personal templates location).
- In Word, click the File tab in the Ribbon.
- Click Options.
- In the left panel, click Save.
- Enter a path for the Default Personal Templates location (see the Options dialog box below).
- Click OK.
For example,
C:UsersNancyDocumentsCustom Office Templates
Note the path for the Default Personal Templates in the Options dialog box:

Some users may prefer to set the default personal templates location as the Templates or User Templates folder in the Appdata folder.
Creating a custom user template in Word
You can create your own custom user template by creating a document and then saving it as a template. If you have created a document based on an existing template, you can modify it and save it as a new template.
To save an existing document as a custom user template in the Custom Office Templates folder:
- In Word, click the File tab in the Ribbon.
- Select Save As.
- Enter a name for the template.
- Double-click This PC or Computer and then navigate to the Custom Office Templates folder (or the folder you specified as the default personal templates location).
- Select Word Template in the Save as type list. You can select Word Macro-Enabled Template if you have created macros in the file.
- Click Save.
Creating a new document based on a custom user template
If you have saved a template in the Custom Office Templates folder, you can easily create a new document based on that template.
To create a new document based on a custom user template you have created and saved in the Custom Office Templates folder:
- In Word, click the File tab in the Ribbon and then click New.
- In Word 2013 and later versions, click Personal. You must have set the file path in the Options dialog box first.
- If necessary double-click the Custom Office Templates folder.
- Double-click the desired template. Word creates a new document based on the template that you can modify.
Understanding the relationship between a Word document and its template
Every Microsoft Word document is based on a template. If you create a new, blank document, Word uses the Normal template.
When a Word document is created, it includes three elements from its template:
- Styles such as Normal, Heading 1, Heading 2 and so on
- Content such as text, tables and images
- Page settings such as margins, page breaks, section breaks, headers and footers
Once a document is created, it is no longer connected to its template so the styles, content and page settings can be modified or deleted.
A template also makes the following available in the document:
- Building Blocks such as QuickParts
- User interface customizations (including Ribbon customizations)
- Keyboard shortcuts
- Macros (if created) and the template was saved as a Macro-Enabled Template
Editing a custom user template
To edit a custom user template:
- In Word, click the File tab in the Ribbon and then click Open.
- Double-click This PC or Computer and navigate to the Custom Office Templates folder.
- Double-click the template you want to edit.
- Make changes to the template.
- Close and save the template.
Creating a document based on a Microsoft ready-made template
You can create new documents based on hundreds of Microsoft ready-made templates. These templates are normally accessed online so you must be connected to the internet to use them. There are templates for all kinds of documents including letters, brochures, flyers, reports and proposals. Templates may differ depending on your version of Microsoft Word.
To create a new document based on one of Microsoft’s ready-made templates:
- In Word, click the File tab in the Ribbon and click New.
- In the Office area, click the suggested searches or enter search criteria in the Search box and press Enter.
- Scroll through the templates.
- Double-click the template you want to use. Word creates a new document based on the template that you can modify.
In the following example, we selected New and then Business in the suggested searches (using Word 365):

Templates can be a huge timesaver, particularly if you are working on long documents like reports and proposals.
Subscribe to get more articles like this one
Did you find this article helpful? If you would like to receive new articles, join our email list.
More resources
How to Insert a Check Mark in Word (5 Ways)
How to View Word Count in Microsoft Word (4 Ways)
How to Keep a Microsoft Word Table Together on One Page
How to Insert or Type an Em Dash in Word (4 Ways with Shortcuts)
10+ Great Microsoft Word Navigation Shortcuts for Moving Around Quickly in Your Documents
Related courses
Microsoft Word: Intermediate / Advanced
Microsoft Excel: Intermediate / Advanced
Microsoft PowerPoint: Intermediate / Advanced
Microsoft Word: Long Documents Master Class
Microsoft Word: Styles, Templates and Tables of Contents
Microsoft Word: Designing Dynamic Word Documents Using Fields
VIEW MORE COURSES >
Our instructor-led courses are delivered in virtual classroom format or at our downtown Toronto location at 18 King Street East, Suite 1400, Toronto, Ontario, Canada (some in-person classroom courses may also be delivered at an alternate downtown Toronto location). Contact us at info@avantixlearning.ca if you’d like to arrange custom instructor-led virtual classroom or onsite training on a date that’s convenient for you.
Copyright 2023 Avantix® Learning
Microsoft, the Microsoft logo, Microsoft Office and related Microsoft applications and logos are registered trademarks of Microsoft Corporation in Canada, US and other countries. All other trademarks are the property of the registered owners.
Avantix Learning |18 King Street East, Suite 1400, Toronto, Ontario, Canada M5C 1C4 | Contact us at info@avantixlearning.ca
Работа приложения Microsoft Word с настройками по умолчанию начинается с чистого листа – как в прямом, так и в переносном смысле. Начать работу с текстовым редактором не с чистого листа при желании можно, взяв за основу шаблон Word – готовый документ с примененным форматированием, определенными параметрами листа и содержимым. Для приложений пакета Microsoft Office предусмотрен огромнейший перечень шаблонов из различных сфер: производственные и учебные бланки, образцы деловой переписки, объявления, резюме, календари, буклеты, брошюры, плакаты, листовки и т.п. Шаблоны призваны облегчить работу пользователей, сориентировать или вдохновить их, а также наглядно продемонстрировать возможности самого текстового редактора. Шаблоны для Word можно посмотреть и скачать на специальном сайте Microsoft. Но более удобным местом презентации и получения шаблонов является само приложение Microsoft Word, в него интегрирован доступ к базе шаблонов в Интернете. Открыв меню «Файл» — «Создать», можем просмотреть шаблоны в имеющихся тематических подборках или поискать образцы на другие тематики при помощи внутрибазового поисковика.

При нажатии кнопки создания документа с выбранным шаблоном он тотчас же будет скачан с Интернета и открыт в окне Word.
Образцы в Интернете – это хорошо, но как создать свои шаблоны, хоть на базе предлагаемых Microsoft, хоть сформированных самостоятельно, и упростить работу с ними в приложении Word? Ниже рассмотрим, как изменить шаблон по умолчанию, запускаемый вместе с Word, а также сформировать коллекцию личных шаблонов.
1. Изменение шаблона по умолчанию Normal.dotm
Шаблон, запускаемый вместе с Microsoft Word – это файл Normal.dotm. С настройками по умолчанию он являет собой обычный чистый лист А4 с определенным шрифтом, интервалом и предустановленной коллекцией стилей форматирования. Любые изменения, проделанные с документом на базе шаблона по умолчанию, будут сохранены только для конкретного документа – файла с расширением «.docx» (или «.doc»). Чтобы каждый раз при запуске Microsoft Word появлялся не чистый лист, а лист с данными (например, бланк предприятия) или тот же чистый лист, но с другими предустановками инструментов документа, необходимо изменить содержимое шаблона Normal.dotm. В версиях Microsoft Word 2007, 2010, 2013 и 2016 это делается следующим образом.
В первую очередь подготавливаем шаблон: берем любой из имеющихся документов Word или создаем новый. Настраиваем его под себя – выбираем макет листа, шрифт, интервал, добавляем подложку, колонтитулы, текст или таблицу, формируем свою коллекцию стилей и т.п.

По итогу сохраняем документ под именем «Normal», а в качестве типа файла указываем «Шаблон Word с поддержкой макросов». Сохраняем в любом удобном месте на диске.

Закрываем приложение Microsoft Word. Только что созданный файл Normal.dotm открываем в окне проводника, вырезаем или копируем его.

Далее жмем клавиши Win+R и запускаем команду:
appdata

Откроется системная папка «AppData». Здесь проходим путь:
Roaming — Microsoft — Templates (или Шаблоны)
Удаляем исходный файл Normal.dotm, а вместо него вставляем из буфера отредактированный Normal.dotm.

2. Создание коллекции личных шаблонов
Кроме редактирования основного шаблона Normal.dotm, упростить работу с большим документопотоком можно, создав коллекцию личных шаблонов. Тогда как Normal.dotm будет шаблоном для документов, с которыми работа проводится преимущественно, в коллекцию личных шаблонов могут войти образцы документов, используемых реже. Для хранения коллекции личных шаблонов пользователей приложения Microsoft Office при установке создают специальную папку «Настраиваемые шаблоны Office» внутри папки «Документы» пользовательского профиля. Изначально она пустая, заполнить ее можно, сохранив в эту папку любой отредактированный документ Word в формате шаблона. Для этого при сохранении документа необходимо выбрать тип файла «Шаблон Word» или «Шаблон Word с поддержкой макросов».

Коллекция личных шаблонов доступна внутри приложения Microsoft Word. Чтобы задействовать любой из своих шаблонов, при создании нового документа необходимо переключиться на вкладку «Личные».

3. Как не потерять свои шаблоны при сбое работы Windows
Шаблоны – и Normal.dotm, и коллекция личных – хранятся на диске системы С, не самом надежном месте компьютера. При критическом сбое работы Windows и, как следствие, ее переустановки, со всеми своими наработками можно распрощаться навсегда. Чтобы не потерять свои шаблоны, необходимо обеспечить хранение их копий на несистемном разделе, съемном носителе или в «облаке». Хранение копии – это единственный вариант уберечь шаблон Normal.dotm, поскольку его местонахождением должен быть рассмотренный выше путь внутри папки «AppData». А вот коллекцию личных шаблонов на несистемном диске можно хранить постоянно, указав приложению Microsoft Word новый путь хранения. Как это сделать?
Перемещаем папку «Настраиваемые шаблоны Office» из папки «Документы» на другой диск, в нашем случае D. Запускаем приложение Word, жмем «Файл» — «Параметры». В окне параметров переключаемся на вкладку «Сохранение» и ищем графу «Расположение личных шаблонов по умолчанию». В этой графе нужно указать новый путь хранения личных шаблонов. Поскольку кнопка обзора для этой настройки не предусмотрена, новый путь прописываем вручную (или копируем его в проводнике и вставляем).

Отличного Вам дня!
Templates are the super tool of regular Microsoft Word users. Templates establish a set of style rules and visual guidelines so that your documents have a unified look and feel.
Templates are a great starting point for elements such as letterhead other documents.
Here, we’ll look at how to open, edit, and use templates in Microsoft Word. The whole process is really simple, and can open up a whole new level of flexibility for how you work with Word.
Word Template Basics

Microsoft Word comes with a few templates that are ready to use as soon as you launch the software. (You probably can spot these in use.)
There are also a variety of premium templates available from marketplaces that you can download, install, and use. (You can find some of our favorites here.)
Understanding how they work can make your design life a lot easier. Templates can control everything from the size of the page in a document, fonts and sizing, color palette, and static design elements.
Templates can be used to design great letterhead, calendar templates, simple brochures, or resumes.
How to Open Templates in Word
Most users like to start with a document template when working in Microsoft Word. You can open a template when you start a document – and even add customizable templates to this screen.
Select “New” in the left menu to see available templates that you can apply to a new document. Selecting a document type from this list will open with all of the settings and styles applied to that template.
If you are looking for a custom document template that’s not in the list, use the “Open” option and navigate to it.
The template will open and you are ready to start working on the document. (Don’t forget to save!)
How to Use a Word Template
The great thing about Word templates is that as soon as you open the file, it is ready to use. There’s no need to insert a template into a Word file because it is already there.
Note that some Word templates may be set as read-only by your system administrator. If that is the case, you’ll have to use the “Save As” option to save the file and make changes. This is a common practice with company templates such as letterhead, so that the original is not alerted inadvertently.
From there, you use a Word template just like you would with any other document. Edit, save, print, track changes, and more.
How to Edit a Template in Word
Once you know how Word templates work, you’re ready to edit an existing template or create your own and save it for your team or clients.
When it comes to basic editing, start with an open document. Make your changes and edits. Save and close. That’s it.
When it comes to editing a template and resaving it as a new template, there are a few more steps. Note that you can do this on desktop versions of Microsoft Word, but not the web app.
Microsoft has pretty extensive documentation. Here are the basics to get started:
- Start with building blocks if you need reusable pieces of content, such as a header or footer.
- Add content controls and customize the main tabs and toolbars. This requires accessing the “Developer” features. (It’s not as intimidating as it might appear.)
- Using the Developer tools, set “Rich Text Content Controls” that allow users to insert text or images in certain areas of the template. You can also set instructions as well to help make the template for user-friendly.
- Design the template using normal design tools, such as font choices, colors, and static elements.
- When you are ready to save, you need to select “Save As Template” from the file menu (“Save As,” then select file type “Word Template” on Windows).
- You’ll be prompted to choose a file location for the template. The common location for template files is under Custom Office Templates in My Documents, but you can save the template anywhere that makes sense to you.
- If you save and finish and want to continue to make adjustments later, you can do so by opening the template, making changes, and saving again.
Where are Word Templates Stored?

While there are standard locations for template files on Windows and Mac devices, you can save a template file anywhere you like. The best practice would be to save your template files in common system default areas so they are easy to find later.
- Windows Template File Location: My Documents/Custom Office Templates
- Mac Template File Location: /Users/username/Library/Group Containers/UBF8T346G9.Office/User Content/Templates
How to Add a Template to Word
Whether you create or download a template from a third-party source, the last step is to add the template to Word so that it is usable on that computer.
If the template is stored in the location with all the system default templates, it will be available to use when you create a new document. Otherwise, go to File > Open and browse for the template name. Then you can open it and get started. Don’t forget to “Save As” for a new file.
The final option is to save the template document as a read-only file so that when someone tries to open and edit it, the only option is to create a copy and work on it from there. This can work best for some teams.
Conclusion
Designing a Microsoft Word template might not seem like the most interesting design project. But it is a highly practical challenge. You are tasked with creating a usable design that others will work with on a daily basis.
A solid template makes it easy for your internal team or client team to create and work on documents in standard software in a way that represents their brand well.