
Word for Microsoft 365 Outlook for Microsoft 365 Word 2021 Outlook 2021 Word 2019 Outlook 2019 Word 2016 Outlook 2016 Word 2013 Outlook 2013 Word 2010 Word 2007 More…Less
You can use styles to quickly apply a set of formatting choices consistently throughout your document. If you want formatting choices that are not available from the built-in styles and themes available in Word, you can modify an existing style and customize it to suit your needs. You can change the formatting (such as font size, color, and text indentation) in styles applied to titles, headings, paragraphs, lists, and so on. You can also select formatted text in your document to create a new style in the Styles gallery.
The styles covered in this article are located in the Styles gallery, a visual menu located on the Home tab. To apply a style, simply select the text you want to format, and then click the style you want in the Styles gallery. To learn more, see Apply a style to text in Word.

Modify an existing style
You can modify an existing style in the Styles gallery in two ways:
-
Modify a style by updating it to match formatting in your document
-
Modify a style manually in the Modify Style dialog box
Modify a style by updating it to match formatting in your document
If you have text in your document that already has a style applied, you can change the formatting of that text and apply it to the style in the Styles gallery.
-
Select text in your document that has the style applied, such as Heading 1.
When you select text that has a style applied, that style is highlighted in the Styles gallery.

-
Format the selected text with the new attributes that you want.
For example, you might want to change the point size for the Heading 1 style from 16 points to 14 points.
-
On the Home tab, in the Styles group, right-click the style that you want to change, and then click Update [Style Name] to Match Selection.
Note: All text with the style that you changed will automatically change to match the new style that you defined.
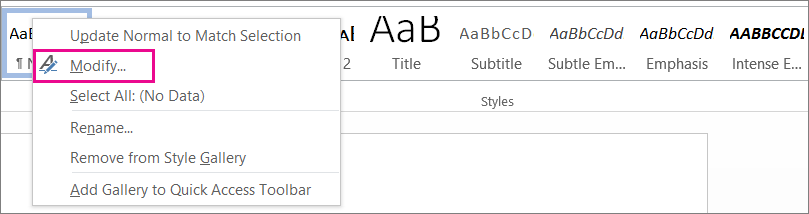
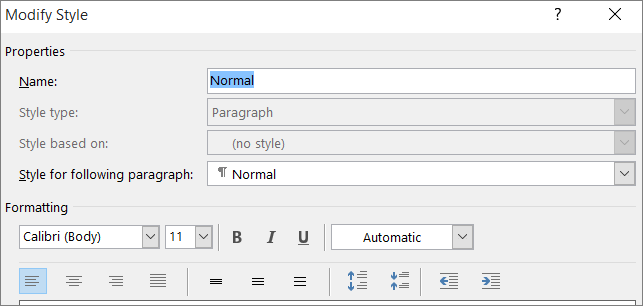
Modify a style manually in the Modify Style dialog box
You can modify a style directly in the Styles gallery, without using the text in your document.
-
On the Home tab, right-click any style in the Styles gallery and click Modify.
-
In the Formatting section, make any formatting changes you want, such as font style, size, or color, alignment, line spacing, or indentation.
-
Choose whether the style change applies to the current document or to all future documents.

Create a new style based on document formatting
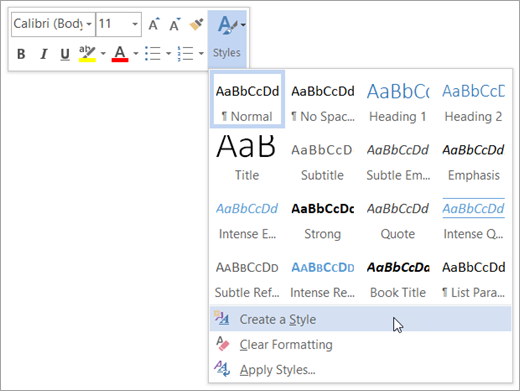
You can select formatted text in your document to create a new style that you add to the Styles gallery.
-
Right-click the text on which you want to base a new style.
-
In the mini toolbar that appears, click Styles, and then click Create a Style.
-
In the Create New Style from Formatting dialog box, give your style a name and click OK.
Your new style will now appear in the Styles gallery.
Note: If you want your new style to appear in all new Word documents, right-click it in the Styles gallery, click Modify, and then select New documents based on this template at the bottom of the dialog box.
-
Right-click the text on which you want to base a new style, point to Styles, and then click Save Selection as a New Quick Style.
-
In the Create New Style from Formatting dialog box, give your style a name and click OK.
Your new style will now appear in the Styles gallery.
Note: If you want your new style to appear in all new Word documents, right-click it in the Styles gallery, click Modify, and then select New documents based on this template at the bottom of the dialog box.
See also
Apply a style to text in Word
Need more help?
Word для Microsoft 365 Outlook для Microsoft 365 Word 2021 Outlook 2021 Word 2019 Outlook 2019 Word 2016 Outlook 2016 Word 2013 Outlook 2013 Word 2010 Word 2007 Еще…Меньше
С помощью стилей можно быстро применить набор вариантов форматирования во всем документе. Если вам нужны параметры форматирования, недоступные из встроенных стилей и тем, доступных в Word, вы можете изменить существующий стиль и настроить его в соответствии со своими потребностями. Вы можете изменить форматирование (например, размер шрифта, цвет и отступ текста) в стилях, примененных к заголовкам, заголовкам, абзацам, спискам и так далее. Вы также можете выбрать форматированный текст в документе, чтобы создать новый стиль в коллекции «Стили».
Стили, описанные в этой статье, находятся в коллекции «Стили» на вкладке Главная. Чтобы применить стиль, просто выделите текст, который вы хотите отформатировать, и выберите нужный стиль в коллекции «Стили». Дополнительные сведения см. в статье Применение стиля к тексту в Word.

Изменение существующего стиля
Изменить стиль из коллекции «Стили» можно двумя способами:
-
Обновление стиля в соответствии с форматированием в документе
-
Изменение стиля вручную в диалоговом окне »Изменение стиля»
Обновление стиля в соответствии с форматированием в документе
Если в документе есть текст с нужным стилем, вы можете изменить его форматирование и применить изменения к стилю в коллекции «Стили».
-
Выделите в документе текст, к которому применен стиль, например «Заголовок 1».
При выборе текста, к которому применен стиль, стиль выделяется в коллекции «Стили».
-
Отформатируйте выбранный текст так, как хотите.
Например, вы можете изменить размер шрифта для стиля «Заголовок 1» с 16 до 14 пунктов.
-
На вкладке Главная в группе Стили щелкните правой кнопкой мыши стиль, который вы хотите изменить, и выберите команду Обновить [название стиля] в соответствии с выделенным фрагментом.
Примечание: Весь текст, к которому применен этот стиль, автоматически изменится.
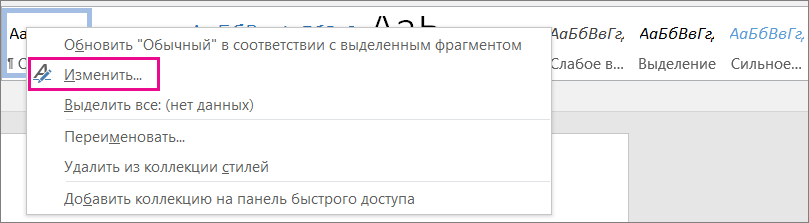
Изменение стиля вручную в диалоговом окне »Изменение стиля»
Вы можете изменить стиль напрямую в коллекции «Стили», не настраивая текст в документе.
-
На вкладке Главная щелкните правой кнопкой мыши стиль в коллекции «Стили» и выберите команду Изменить.
-
В разделе Форматирование измените форматирование, например начертание, размер или цвет шрифта, выравнивание, междустрочный интервал и отступы.
-
Выберите, должен ли стиль применяться к текущему документу или же ко всем новым документам.

Создание стиля на основе форматирования документа
Вы можете выбрать отформатированный текст в документе, чтобы создать новый стиль и добавить его в коллекцию «Стили».
-
Щелкните правой кнопкой мыши текст, на основе которого вы хотите создать стиль.
-
На мини-панели инструментов нажмите кнопку Стили и щелкните Создать стиль.
-
В диалоговом окне Создание стиля введите имя стиля и нажмите кнопку ОК.
Новый стиль появится в коллекции «Стили».
Примечание: Если вы хотите, чтобы новый стиль появился во всех новых Word документах, щелкните его правой кнопкой мыши в коллекции «Стили», выберите изменить ,а затем в нижней части диалогового окна выберите новые документы, основанные на этом шаблоне.
-
Щелкните правой кнопкой мыши текст, выберите Стили и щелкните Сохранить выделенный фрагмент как новый экспресс-стиль.
-
В диалоговом окне Создание стиля введите имя стиля и нажмите кнопку ОК.
Новый стиль появится в коллекции «Стили».
Примечание: Если вы хотите, чтобы новый стиль появился во всех новых Word документах, щелкните его правой кнопкой мыши в коллекции «Стили», выберите изменить ,а затем в нижней части диалогового окна выберите новые документы, основанные на этом шаблоне.
Дополнительные сведения
Применение стиля к тексту в Word
Нужна дополнительная помощь?
Стили в ворде
Просмотров 9.5к. Обновлено 4 сентября 2020
Стиль Word является предопределенным сочетанием шрифтов стиля, цвета и размера , которые могут быть применены к любому тексту в документе. Стили могут помочь вашим документам получить более профессиональный вид. Вы также можете использовать стили, чтобы быстро изменить несколько вещей в документе одновременно.
Содержание
- Как применяются стили в ворде
- Применить набор стилей
- Как создать стиль в ворд
- Изменить существующий стиль
Как применяются стили в ворде
Существующие стили в Word доступны в меню «Стили» на вкладке «Главная». Чтобы применить стиль, просто выделите текст и нажмите на выбранный шаблон. Используемая модель вставляется в рамку с выделенными краями.
Чтобы увидеть больше стилей Word, используйте стрелку в правой части меню «Стили» или откройте меню, нажав на стрелку меню.
Применить набор стилей
Наборы стилей включают комбинацию стилей заголовка и абзаца. Наборы стилей позволяют форматировать все элементы в документе одновременно, а не изменять каждый элемент отдельно.
На вкладке «Дизайн» щелкните стрелку раскрывающегося списка в группе «Форматирование документа».
Выберите нужный набор стилей из выпадающего меню.
Выбранный набор стилей будет применен ко всему документу.
Как создать стиль в ворд
Если вы хотите, применить параметры форматирования, которые недоступны в стилях Word, вы можете без проблем создать их и вставить в галерею стилей:
- Нажмите на меню «Главная» в разделе «Стили» на стрелке в правом нижнем углу.
- Выберите значок «Создать стиль» в «Стилях».
Дайте стилю имя и нажмите изменить.
Определите тип стиля. Вы можете выбрать между «Абзац», «Знак», «Связанный» (абзац и символ), «Таблица» и «Список».
- Если стиль основан на существующем, вы можете установить его в разделе «Стиль на основе».
- Вы также можете выбрать стиль для следующего абзаца в разделе «Стиль для следующего абзаца».
- Определитесь с типом шрифта, размером и другими типами форматирования.
- После подтверждения нажатием «OK» найдите свой новый стиль в меню «Стили».
Изменить существующий стиль
В Word вы также можете изменить уже существующие стили в коллекции стилей.
В группе «Стили» на вкладке «Главная» щелкните правой кнопкой мыши стиль, который хотите изменить, и выберите «Изменить» в раскрывающемся меню.
Появится диалоговое окно. Сделайте необходимые изменения форматирования, такие как стиль шрифта, размер и цвет. Если вы хотите, вы также можете изменить название стиля. Нажмите кнопку ОК, чтобы сохранить изменения.
Когда вы изменяете стиль, вы изменяете каждый экземпляр этого стиля в документе. Если в вашем документе где-то использовался этот стиль и вы поменяли, например, размер шрифта, то он автоматически обновится.
(Image credit: Windows Central )
Although you can style every part of a Microsoft Word document individually with unique fonts and colors, it is not a convenient approach since you have to repeat the steps many times, consuming more time and increasing the chances of mistakes, and this is when styles and themes can come in handy.
In the Office apps, styles are collections of fonts, text sizes, and colors that you can apply to different parts of the document (titles, subheadings, quotation, etc.). On the other hand, themes are collections of styles that you can use to format the entire document quickly.
When you use styles and themes, you will still be using a few steps, but it is a more organized way to format a document on Windows 10, and you will really see the benefit when you need to make changes since updating the format can be as easy as selecting a new theme or style.
In this Windows 10 guide, we will walk you through the steps to change the look and feel of Word documents using the style and themes settings whether you use Office from Microsoft 365 or Office 2019.
- How to use styles in Word
- How to use themes in Word
How to use styles in Word
To change the overall look of a Word document, use these steps:
- Open the Word app.
- Under the «New» section, click the Blank document option (or open an existing document).
- Create the document’s content.
- Select with the mouse the text you want to apply a different format – for example, the title.
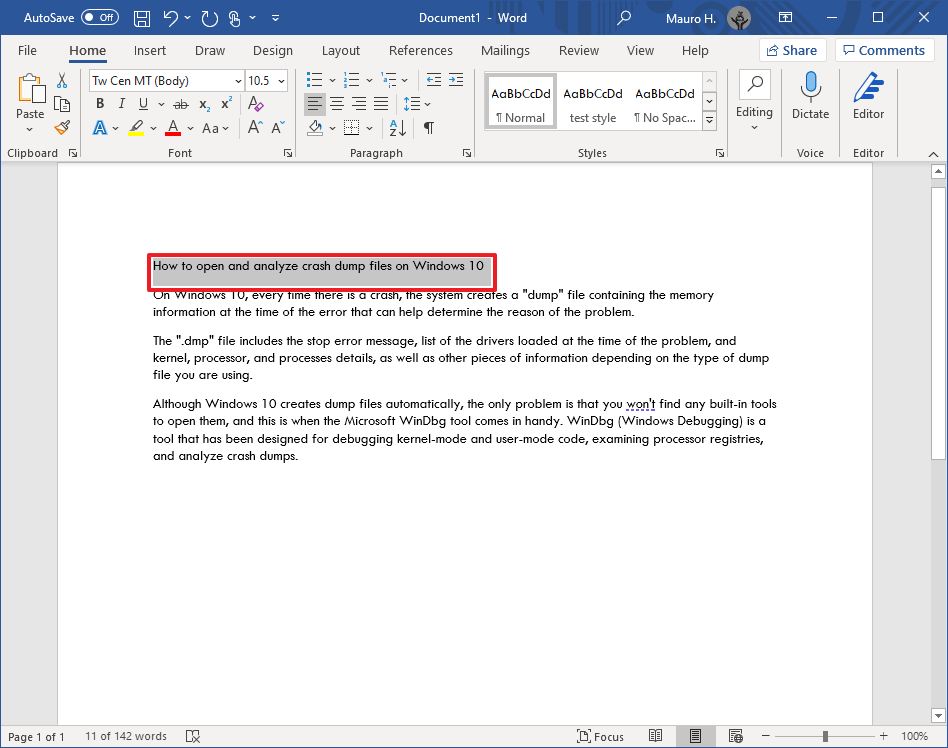
- In the «Home» tab, under the «Styles» section, select the content type to style.Quick note: When selecting a style, make sure to apply it to the correct formating. For example, if you choose the title, then the style should be «Title.» For the subtitle, select the «Subtitle» style and the rest of the headings using «Heading» 1 through 9 accordingly. And don’t worry about the colors. You will customize these when applying a theme. Also, to view all the available elements, click the More button in Styles’s bottom-right corner.

- Continue applying the styling for subtitles, headings, quotes, and anything else you want to format.Quick tip: You can always click and hold the Ctrl key and use the mouse pointer to select the same parts of the document, including the same stying, for instance, all the subtitles (headings).
Once you complete the steps, the document will be formatted with the styling you selected, and when you make changes to the style, the formatting will change automatically for all the same parts of the document.
In addition to selecting from the predefined settings, you can also create new or modify existing elements to style documents with custom settings.
Create new style element
To create a custom style element in Microsoft Word, use these steps:
- Open the Word app.
- Click the Open option.
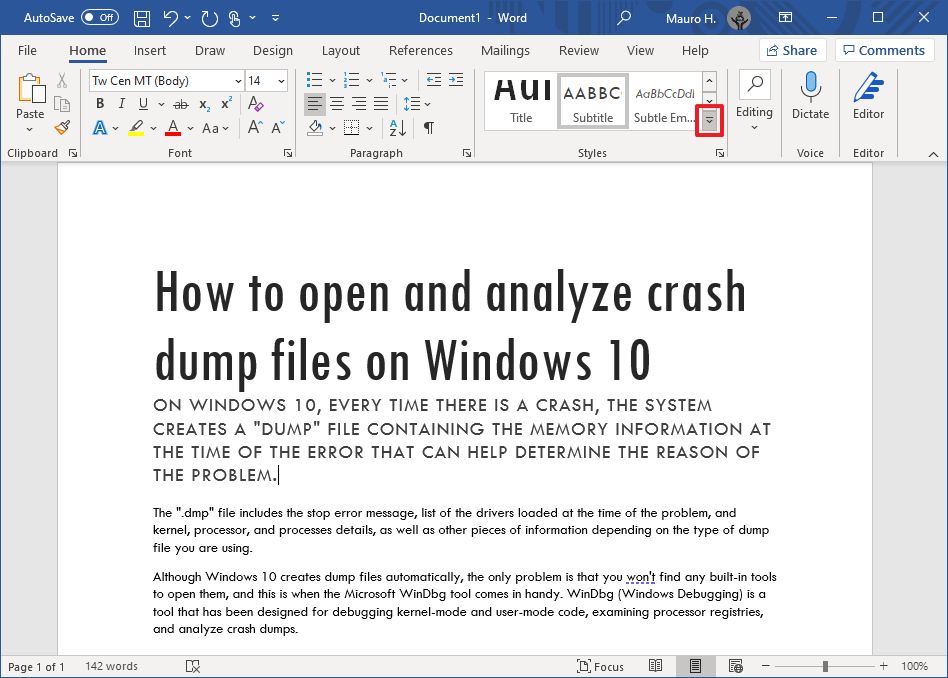
- In the «Home» tab, under the «Styles» section, click the More (down-arrow button) menu.
- Click the Create a style option.
- Specify a name for the style.
- Click OK button.
After you complete the steps, the new element will appear in the Styles menu.
Modify style elements
To modify a new or existing style element, use these steps:
- Open the Word app.
- Click the Open option.
- In the «Home» tab, under the «Styles» section, right-click the style and select the Modify Option.
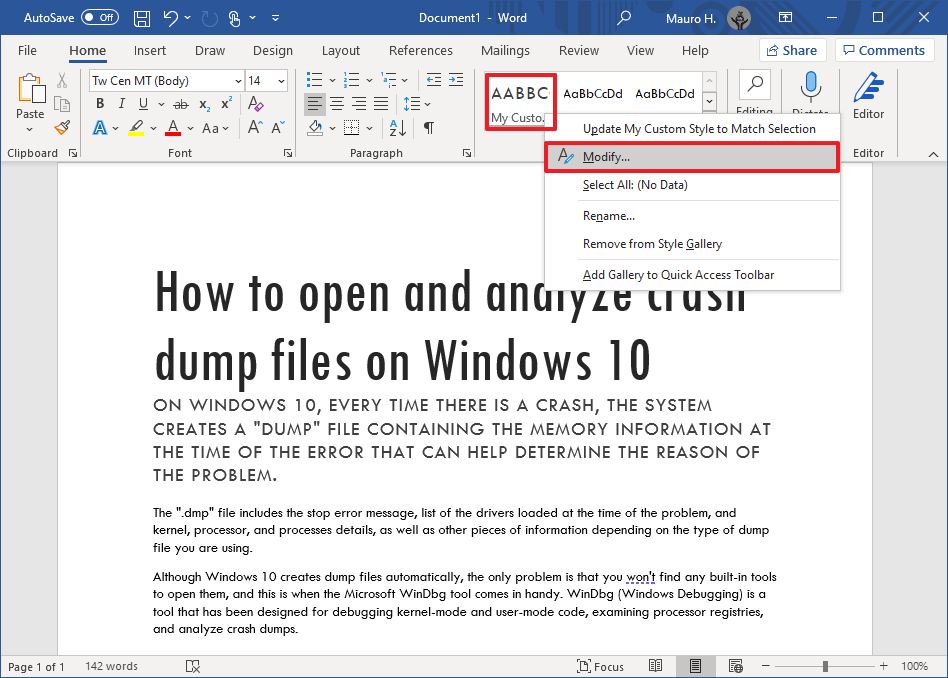
- Customize the style name and formatting settings (for example, font, size, color, aligment, etc.) as necessary.
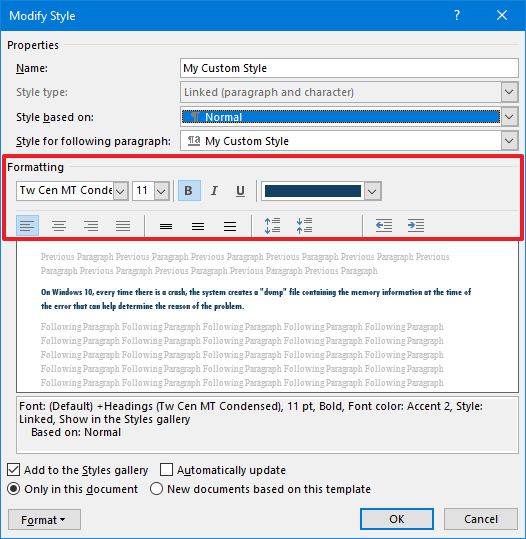
- Click the OK button.
Once you complete the steps, the new styling changes will apply to the element.
 Get subscribed
Microsoft 365 gives you full access to all the Office apps and perks, such as 1TB OneDrive storage and Skype minutes. You can also install Word, Excel, PowerPoint, Outlook, and other apps on up to five devices, and depending on the subscription, you can share the account with up to five people.
How to use themes in Word
After applying the style, you can use themes to give the document a different look and feel with colors and a combination of fonts.
To apply a theme to a Microsoft Word document, use these steps:
- Open the Word app.
- Click the Open option.
- Select the document you already styled to open it.
- Click the Design tab.
- Click the Themes button.
- Roll the mouse pointer over the themes to see a live preview of each available theme.
- Click the theme you want for the document.
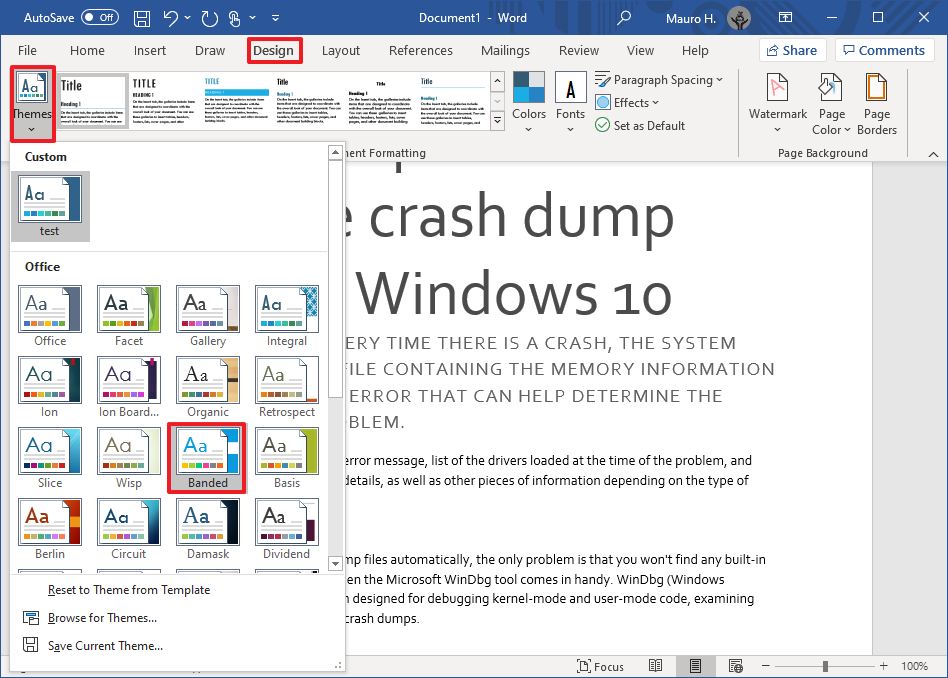
- (Optional) Use the «Document Formatting» section to select another version of the theme with different combinations of fonts and colors.
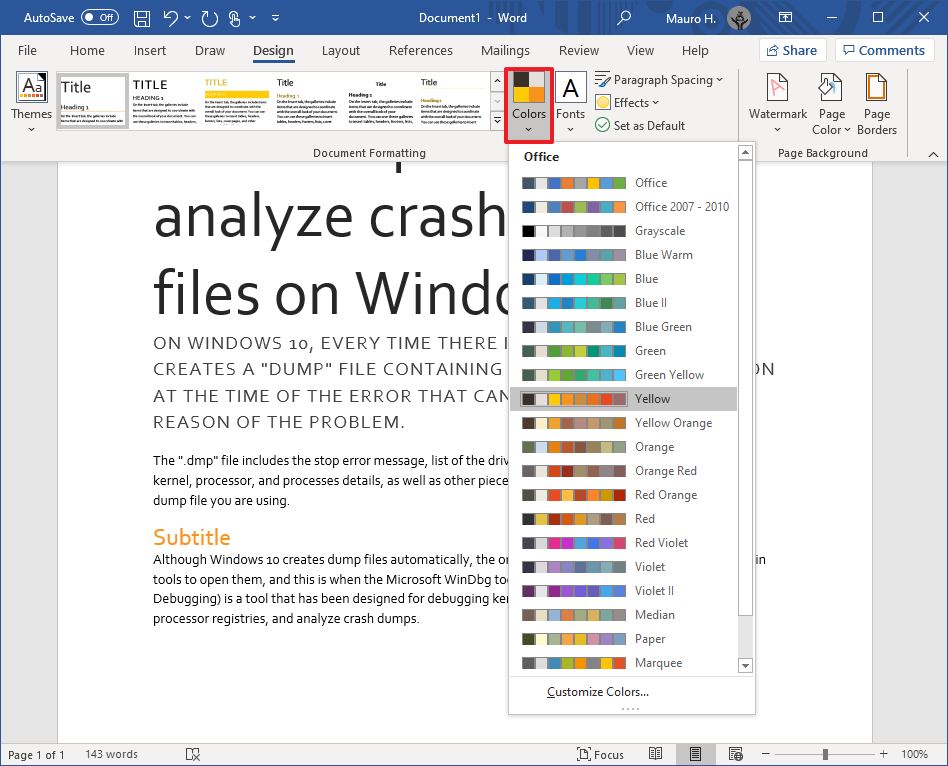
- (Optional) Click the «Colors» menu to select a different color scheme.
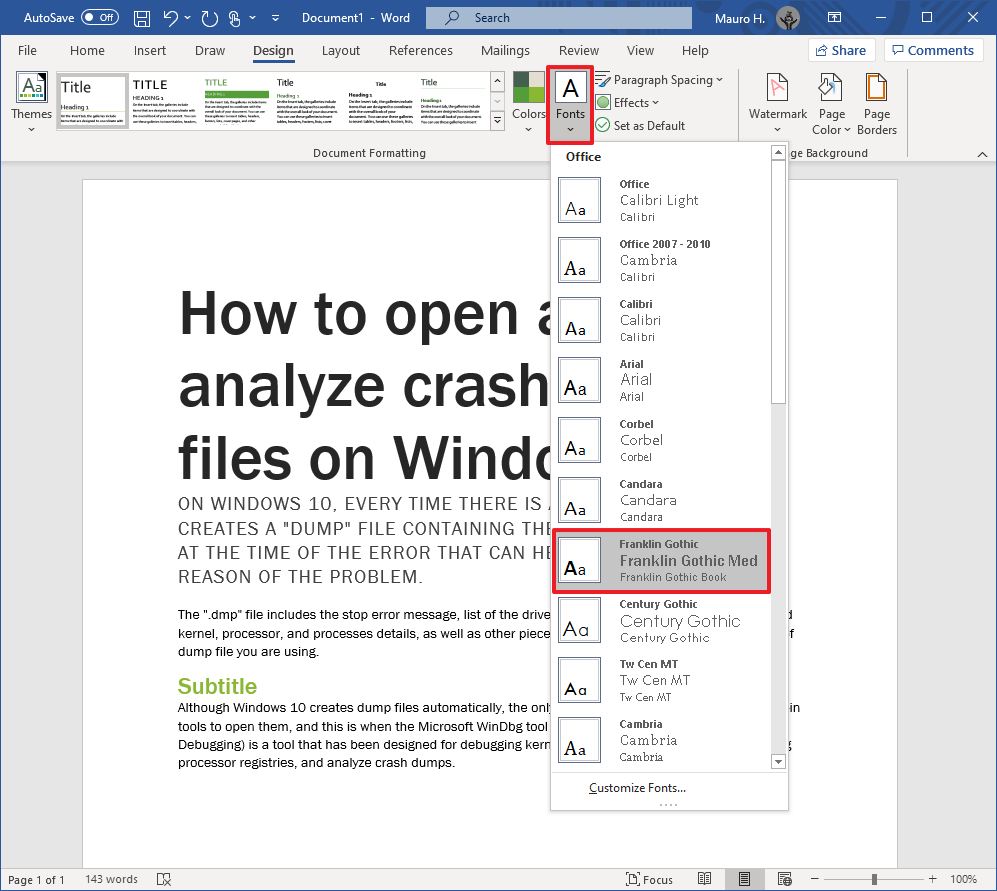
- (Optional) Click the «Fonts» menu to select a different combination of fonts.Quick note: As you open the menu, the top font is one for the title, the one in the middle is for the subheadings, and the one at the bottom is for the content.
After you complete the steps, the content will incorporate the new colors and fonts available through the theme you selected.
Set theme as the default
To set a theme as the default for Word, use these steps:
- Open the Word app.
- Click the Open option.
- Select the document you already styled to open it.
- Click the Design tab.
- Customize the formatting of the document with colors, fonts, spacing, and effects.
- Click the Set as Default button.
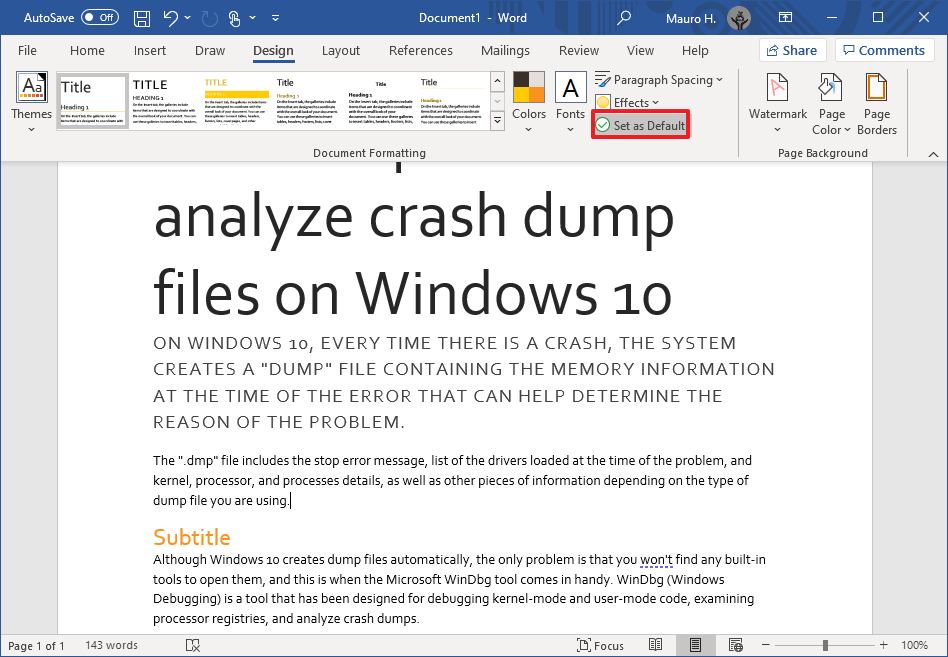
- Click the OK button.
Once you complete the steps, the theme will be available as the default for every new document. However, it won’t apply to the document automatically. Instead, it will be the default theme in the «Style» section, in the «Home» tab.
Create a new theme template
To create a new theme for Microsoft Word documents, use these steps:
- Open the Word app.
- Click the Open option.
- Select the document you already styled to open it.
- Click the Design tab.
- Use the «Document Formatting» section to select a format.
- Click the «Colors» menu to select a color scheme.
- Click the «Fonts» menu to select a combination of fonts.
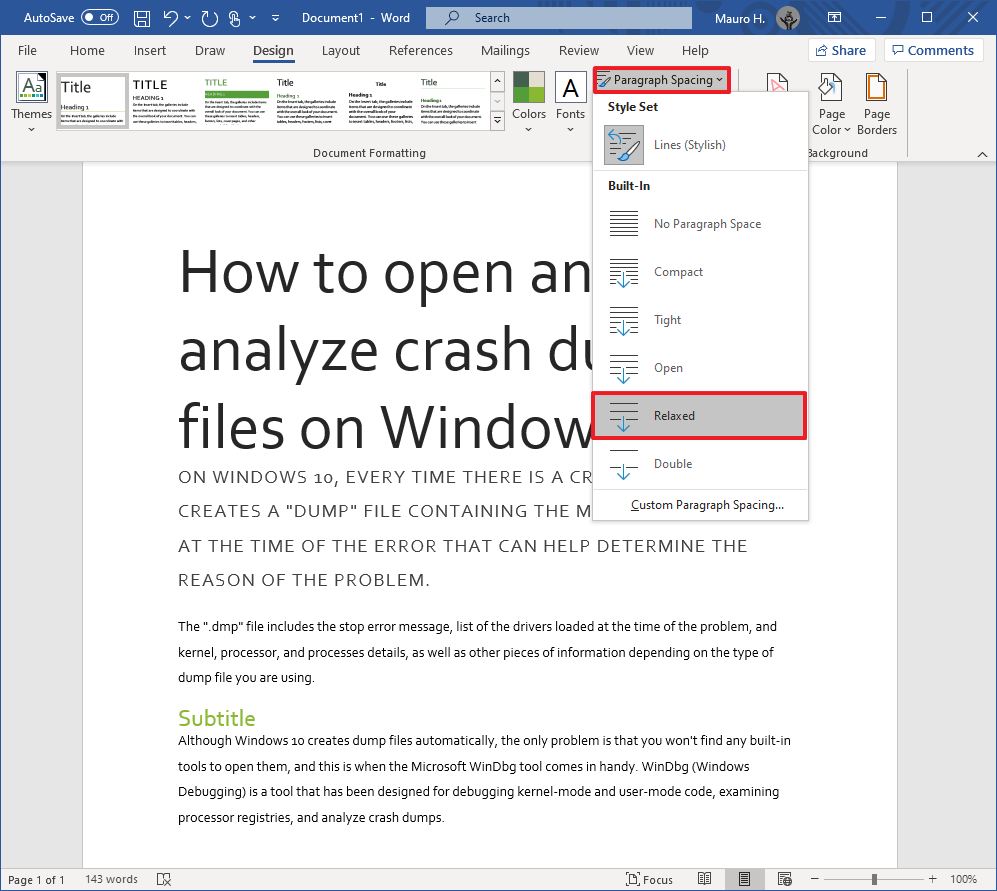
- Click the «Paragraph Spacing» menu and select one of the predefined options.Quick tip: You can also click the Custom Paragraph Spacing option to create a new style.
- (Optional) Click the «Effects» menu and select the effect you want to use when inserting objects.
- Click the «Themes» menu and choose the Save Current Theme option.
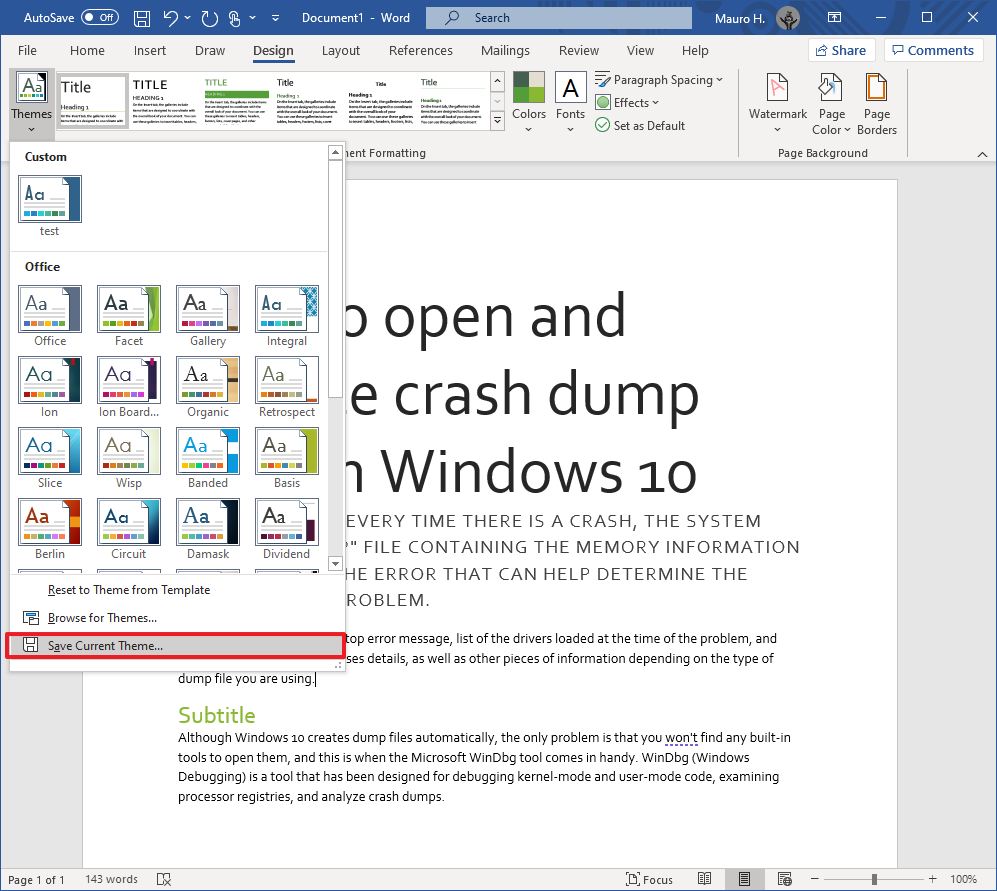
- Confirm a name for the theme.
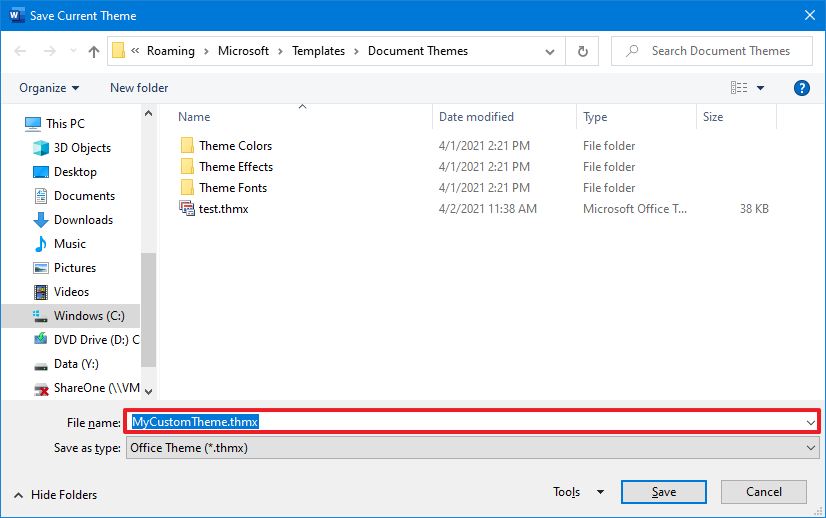
- Click the Save button.
After you complete the steps, the new theme will be available from the «Themes» menu in the «Custom» section.
More Windows 10 resources
For more helpful articles, coverage, and answers to common questions about Windows 10, visit the following resources:
- Windows 10 on Windows Central – All you need to know
- Windows 10 help, tips, and tricks
- Windows 10 forums on Windows Central
All the latest news, reviews, and guides for Windows and Xbox diehards.
Mauro Huculak is technical writer for WindowsCentral.com. His primary focus is to write comprehensive how-tos to help users get the most out of Windows 10 and its many related technologies. He has an IT background with professional certifications from Microsoft, Cisco, and CompTIA, and he’s a recognized member of the Microsoft MVP community.
Most Popular

Для большего удобства использования Microsoft Word, разработчики этого текстового редактора предусмотрели большой набор встроенных шаблонов документов и набор стилей для их оформления. Пользователи, которым обилия средств по умолчанию будет недостаточно, могут с легкостью создать не только свой шаблон, но и собственный стиль. Как раз о последнем мы и поговорим в данной статье.
Урок: Как в Ворде сделать шаблон
Все доступные стили, представленные в Word, можно просмотреть на вкладке «Главная», в группе инструментов с лаконичным названием «Стили». Здесь можно выбрать различные стили оформления заголовков, подзаголовков и обычного текста. Здесь же можно создать и новый стиль, используя в качестве его основы уже имеющийся или же, начиная с нуля.
Урок: Как в Ворде сделать заголовок
Создание стиля вручную
Это хорошая возможность настроить абсолютно все параметры написания и оформления текста под себя или под требования, которые перед вами выдвигают.
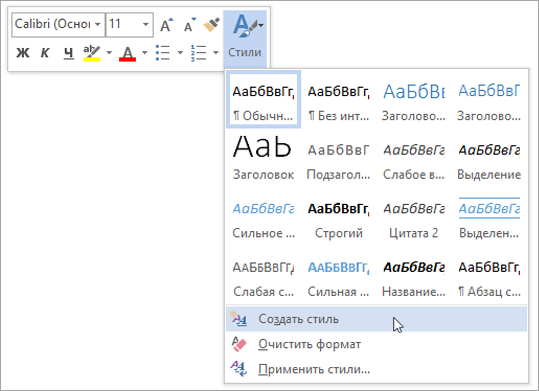
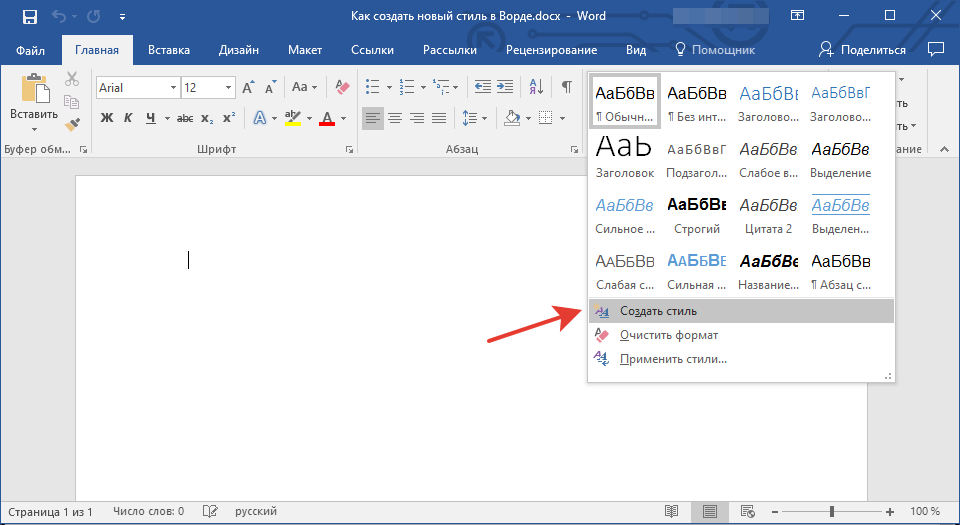
1. Откройте Word, во вкладке «Главная» в группе инструментов «Стили», непосредственно в окне с доступными стилями, нажмите кнопку «Больше», чтобы отобразить весь список.

2. Выберите в открывшемся окне пункт «Создать стиль».
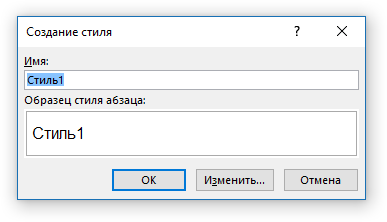
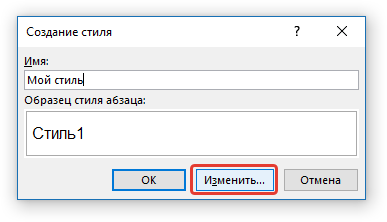
3. В окне «Создание стиля» придумайте название для вашего стиля.
4. На окно «Образец стиля и абзаца» пока можно не обращать внимание, так как нам только предстоит приступить к созданию стиля. Нажмите кнопку «Изменить».
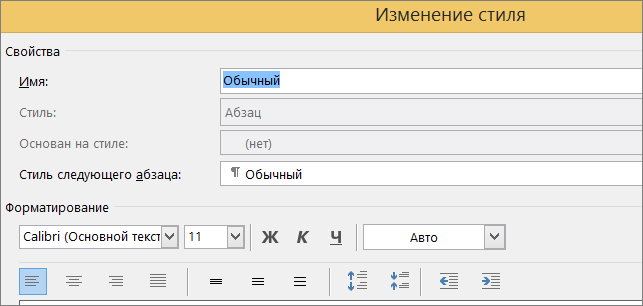
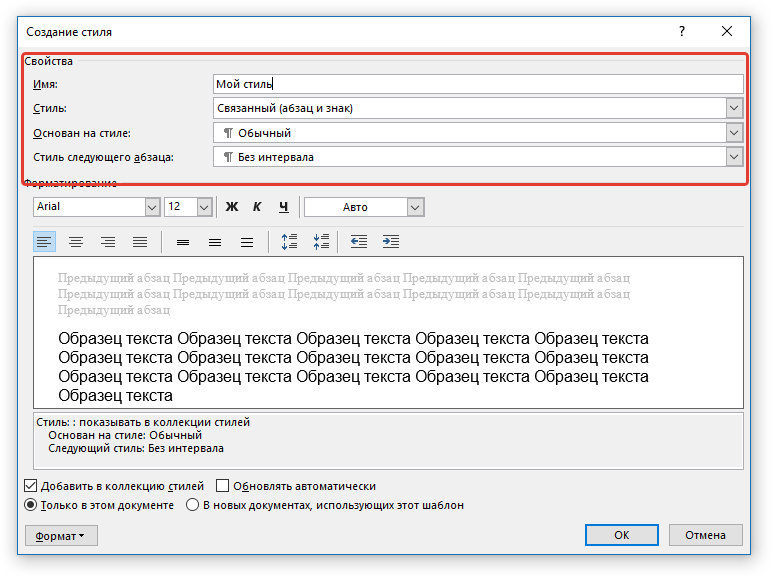
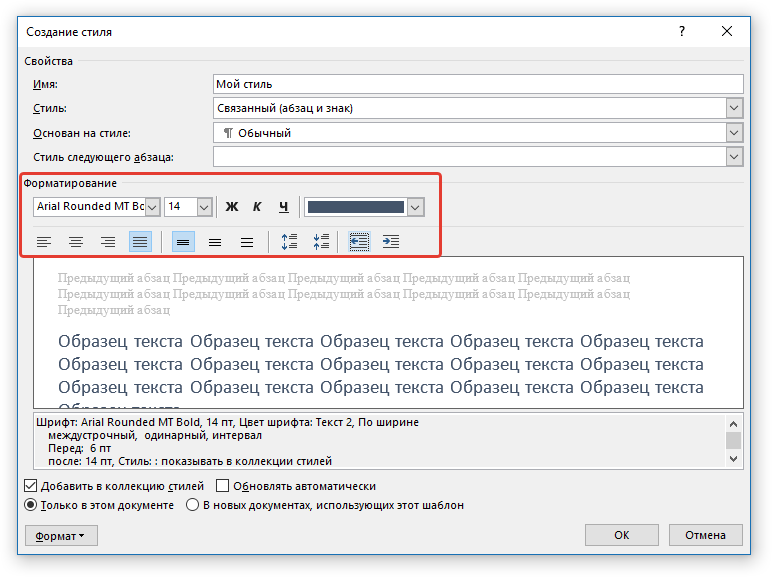
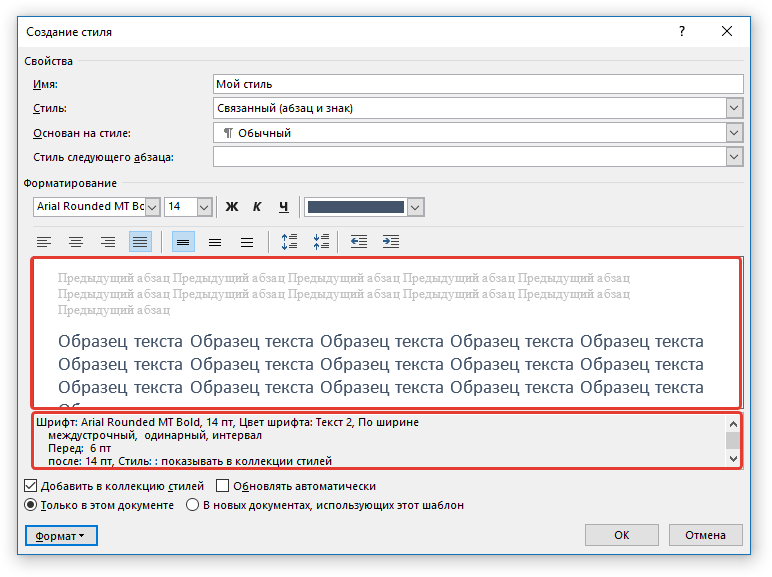
5. Откроется окно, в котором как раз-таки и можно выполнить все необходимые настройки свойств и форматирования стиля.


В разделе «Свойства» можно изменить следующие параметры:
- Имя;
- Стиль (для какого элемента он будет применен) — Абзац, Знак, Связанный (абзац и знак), Таблица, Список;
- Основан на стиле — здесь можно выбрать один из стилей, который будет лежать в основе вашего стиля;
- Стиль следующего абзаца — название параметра вполне лаконично говорит о том, за что он отвечает.
Полезные уроки по работе в Ворд:
Создание абзацев
Создание списков
Создание таблиц
В разделе «Форматирование» можно настроить следующие параметры:
- Выбрать шрифт;
- Указать его размер;
- Установить тип написания (жирный, курсив, подчеркнутый);
- Задать цвет текста;
- Выбрать тип выравнивания текста (по левому краю, по центру, по правому краю, по всей ширине);
- Задать шаблонный интервал между строк;
- Указать интервал перед или после абзаца, уменьшив или увеличив его на необходимое число единиц;
- Установить параметры табуляции.
Полезные уроки по работе в Word
Изменение шрифта
Изменение интервалов
Параметры табуляции
Форматирование текста
Примечание: Все изменения, которые вы вносите, отображаются в окне с надписью «Образец текста». Непосредственно под этим окном указаны все параметры шрифта, которые вы задали.
6. После того, как вы внесете необходимые изменения, выберите, для каких документов будет применяться этот стиль, установив маркер напротив необходимого параметра:
- Только в этом документе;
- В новых документах, использующих этот шаблон.
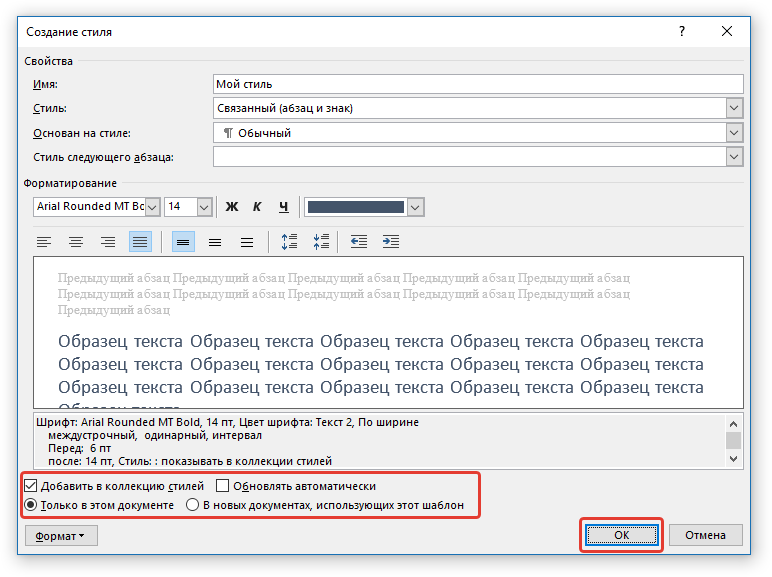
7. Нажмите «ОК» для того, чтобы сохранить созданный вами стиль и добавить его в коллекцию стилей, которая отображается на панели быстрого доступа.
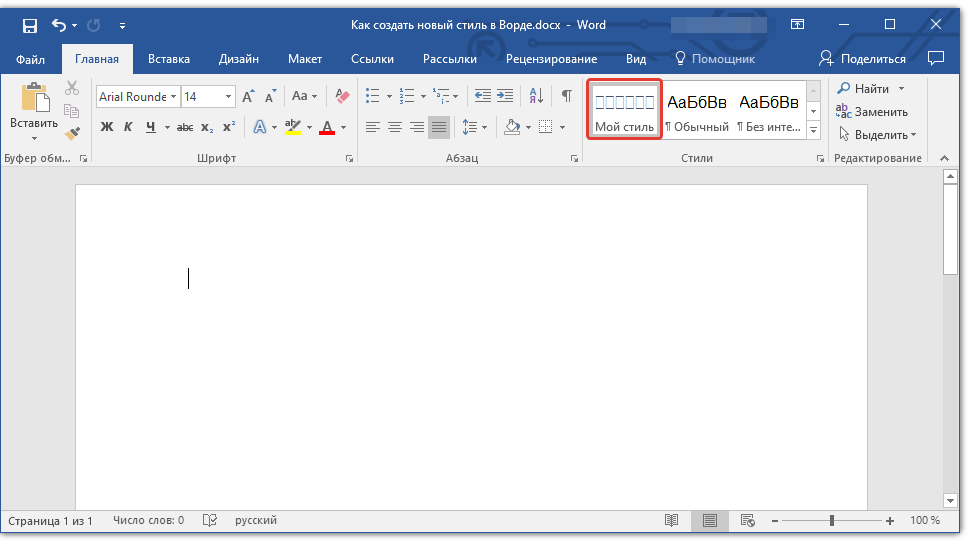
На этом все, как видите, создать собственный стиль в Ворде, который можно будет использовать для оформления своих текстов, совсем несложно. Желаем вам успехов в дальнейшем изучении возможностей этого текстового процессора.
Еще статьи по данной теме: