
Word 2016 is designed to help you create professional-quality documents. Word can also help you organize and write documents more efficiently.
When you create a document in Word, you can choose to start from a blank document or let a template do much of the work for you. From then on, the basic steps in creating and sharing documents are the same. And Word’s powerful editing and reviewing tools can help you work with others to make your document great.
Start a document
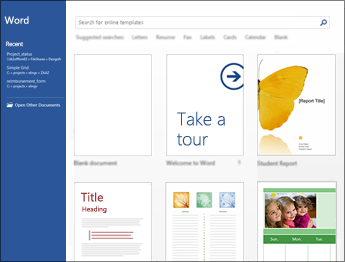
It’s often easier to create a new document using a template instead of starting with a blank page. Word templates come ready-to-use with pre-set themes and styles. All you need to do is add your content.
Each time you start Word, you can choose a template from the gallery, click a category to see more templates, or search for more templates online.
For a closer look at any template, click it to open a large preview.
If you’d rather not use a template, click Blank document.
Open a document
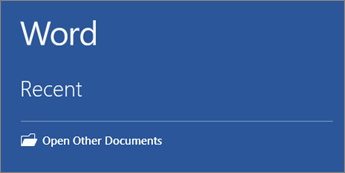
Every time you start Word, you’ll see a list of your most recently used documents in the left column. If the document you’re looking for isn’t there, click Open Other Documents.
If you’re already in Word, click File > Open and then browse to the file’s location.
When you open a document that was created in earlier versions of Word, you see Compatibility Mode in the title bar of the document window. You can work in compatibility more or you can upgrade the document to use Word 2016.
Save a document
To save a document for the first time, do the following:
-
On the File tab, click Save As.
-
Browse to the location where you’d like to save your document.
Note: To save the document on your computer, choose a folder under This PC or click Browse. To save your document online, choose an online location under Save As or click Add a Place. When your files are online, you can share, give feedback and work together on them in real time.
-
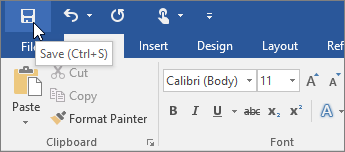
Click Save.
Note: Word automatically saves files in the .docx file format. To save your document in a format other than .docx, click the Save as type list, and then select the file format that you want.
To save your document as you continue to work on it, click Save in the Quick Access Toolbar.
Read documents
Open your document in Read Mode to hide most of the buttons and tools so you can get absorbed in your reading without distractions.
-
Open the document you want to read.
Note: Some documents open in Read Mode automatically, such as protected documents or attachments.
-
Click View > Read Mode.
-
To move from page to page in a document, do one of the following:
-
Click the arrows on the left and right sides of the pages.
-
Press page down and page up or the spacebar and backspace on the keyboard. You can also use the arrow keys or the scroll wheel on your mouse.
-
If you’re on a touch device, swipe left or right with your finger.
Tip: Click View > Edit Document to edit the document again.
-
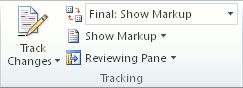
Track changes
When you’re working on a document with other people or editing a document yourself, turn on Track Changes to see every change. Word marks all additions, deletions, moves, and formatting changes.
-
Open the document to be reviewed.
-
Click Review and then on the Track Changes button, select Track Changes.

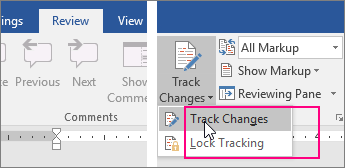
Read Track changes to learn more.
Print your document
All in one place, you can see how your document will look when printed, set your print options, and print the file.
-
On the File tab, click Print.
-
Do the following:
-
Under Print, in the Copies box, enter the number of copies you want.
-
Under Printer, make sure the printer you want is selected.
-
Under Settings, the default print settings for your printer are selected for you. If you want to change a setting, just click the setting you want to change and then select a new setting.
-
-
When you’re satisfied with the settings, click Print.
For details, see Print a document.
Beyond the basics
For more on the fundamentals of using Word, see What’s new in Word 2016.
Top of Page
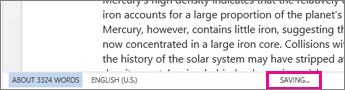
With Word for the web, you use your web browser to create, view, and edit the personal documents that you store on OneDrive. If your organization or college has a Microsoft 365 plan or SharePoint site, start using Word for the web by creating or storing documents in libraries on your site.Save changes
Word saves your changes automatically. Look on the status bar at the bottom left corner of Word for the web. It will either show Saved or Saving.
Share documents online
Because your document is online, you can share it by sending a link instead of an email attachment. People can read it in their web browser or mobile device.
Click File > Share > Share with People.

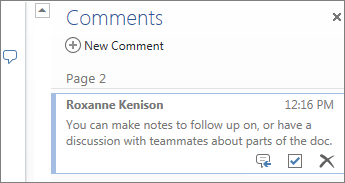
Comment in the browser
A comment balloon shows where comments have been made in the doc.

Reply to comments, and check off items you’ve addressed.
Edit in the browser
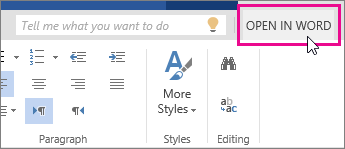
If you try to type in the document and nothing happens, you’re probably in Reading view. Switch to Editing view: click Edit Document > Edit in Word for the web.

Type and format text, add pictures, adjust the layout of the page, and more. For more advanced editing, click Open in Word.
Work together on the same doc
To work together in Word for the web, you edit a document as you normally would. If others are also editing it, Word for the web alerts you to their presence. You can see everyone who is currently working in the document by clicking in the ribbon.

Clicking on an author’s name jumps you to where they’re working in the doc. And you’ll see the changes they make as they’re happening. They can be working in Word for the web, Word 2010 or later, or Word for Mac 2011.
Add a header or footer
Go to Insert > Header & Footer to add headers and footers to your document.
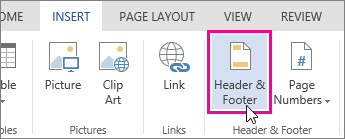
Click Options to choose how you’d like them to appear.

Add page numbers
Click Insert > Page Numbers and then choose from the gallery where you’d like the page numbers to appear.
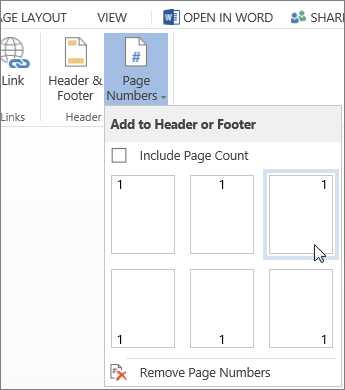
Select Include Page Count to show the current page number along with the total number of pages (page X of Y).
Find and replace text
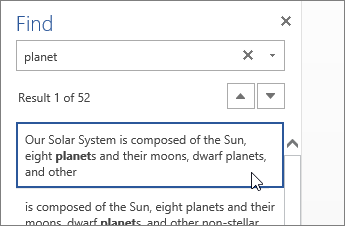
Quickly search for every occurrence of a specific word or phrase in your document by clicking Home > Find (or type Ctrl+F). Results appear next to your document so you can see the term in context. Clicking on a search result jumps you to that occurrence.
Click Replace (or type Ctrl+H) to find and replace text.
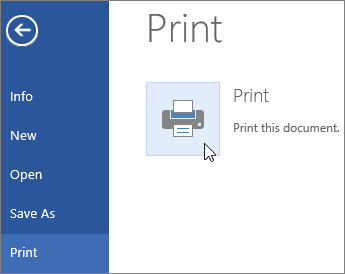
Print in Word for the web
Go to File > Print. Word for the web creates a PDF preview of your document that keeps all the layout and formatting of your document. Send the PDF to your printer and it will print the way you expect.
Microsoft Word 2013 is a word-processing program designed to help you create professional-quality documents. Word helps you organize and write your documents more efficiently.
Your first step in creating a document in Word 2013 is to choose whether to start from a blank document or to let a template do much of the work for you. From then on, the basic steps in creating and sharing documents are the same. Powerful editing and reviewing tools help you work with others to make your document perfect.
Choose a template
It’s often easier to create a new document using a template instead of starting with a blank page. Word templates are ready to use with themes and styles. All you need to do is add your content.
Each time you start Word 2013, you can choose a template from the gallery, click a category to see the templates it contains, or search for more templates online. (If you’d rather not use a template, just click the Blank document.)
For a closer look at any template, just click it to open a large preview.
Top of Page
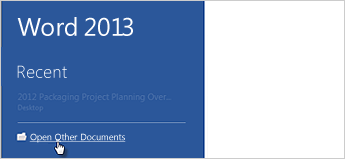
Open a document
Every time you start Word, you’ll see a list of your most recently used documents in the left column. If the document you’re looking for isn’t there, click Open Other Documents.
If you’re already in Word, click File > Open and then browse to the file’s location.
When you open a document that was created in earlier versions of Word, you see Compatibility Mode in the title bar of the document window. You can work in compatibility more or you can upgrade the document to use features that are new or enhanced in Word 2013.
Top of Page
Save a document
To save a document for the first time, do the following:
-
Click the File tab.
-
Click Save As.
-
Browse to the location where you’d like to save your document.
Note: To save the document on your computer, choose a folder under Computer or click Browse. To save your document online, choose a location under Places or Add a Location. When your files are online, you can share, give feedback and work together on them in real time.
-
Click Save.
Note: Word automatically saves files in the .docx file format. To save your document in a format other than .docx, click the Save as type list, and then select the file format that you want.
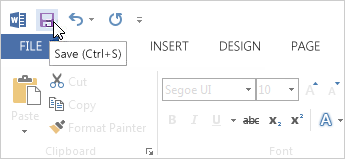
To save your document as you continue to work on it, click Save in the Quick Access Toolbar.
Top of Page
Read documents
Open your document in Read Mode to hide most of the buttons and tools so you can get absorbed in your reading without distractions.
-
Open the document you want to read.
Note: Some documents open in Read Mode automatically, such as protected documents or attachments.
-
Click View > Read Mode.
-
To move from page to page in a document, do one of the following:
-
Click the arrows on the left and right sides of the pages.
-
Press page down and page up or the spacebar and backspace on the keyboard. You can also use the arrow keys or the scroll wheel on your mouse.
-
If you’re on a touch device, swipe left or right with your finger.
Tip: Click View > Edit Document to edit the document again.
-
Top of Page
Track changes
When you’re working on a document with other people or editing a document yourself, turn on Track Changes to see every change. Word marks all additions, deletions, moves, and formatting changes.
-
Open the document to be reviewed.
-
Click Review and then on the Track Changes button, select Track Changes.

Read Track changes to learn more.
Top of Page
Print your document
All in one place, you can see how your document will look when printed, set your print options, and print the file.
-
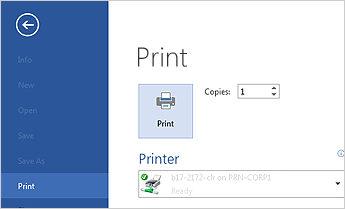
Click the File tab and then click Print.
-
Do the following:
-
Under Print, in the Copies box, enter the number of copies you want.
-
Under Printer, make sure the printer you want is selected.
-
Under Settings, the default print settings for your printer are selected for you. If you want to change a setting, just click the setting you want to change and then select a new setting.
-
-
When you’re satisfied with the settings, click Print.
For details, see Print and preview documents.
Beyond the basics
Go beyond the basics with your documents by creating a table of contents or saving a document as a template.
Top of Page
Important:
Office 2010 is no longer supported. Upgrade to Microsoft 365 to work anywhere from any device and continue to receive support.
Upgrade now
In this article
-
What is Word?
-
Find and apply a template
-
Create a new document
-
Open a document
-
Save a document
-
Read documents
-
Track changes and insert comments
-
Print your document
What is Word?
Microsoft Word 2010 is a word-processing program, designed to help you create professional-quality documents. With the finest document-formatting tools, Word helps you organize and write your documents more efficiently. Word also includes powerful editing and revising tools so that you can collaborate with others easily.
Top of Page
Find and apply a template
Word 2010 allows you to apply built-in templates, to apply your own custom templates, and to search from a variety of templates available on the web.
To find and apply a template in Word, do the following:
-
On the File tab, click New.
-
Under Available Templates, do one of the following:
-
To use one of the built-in templates, click Sample Templates, click the template that you want, and then click Create.
-
To reuse a template that you’ve recently used, click Recent Templates, click the template that you want, and then click Create.
-
To use your own template that you previously created, click My Templates, click the template that you want, and then click OK.
-
To find a template on Office.com, under Office.com Templates, click the template category that you want, click the template that you want, and click Download to download the template from Office.com to your computer.
-
Note: You can also search for templates on Office.com from within Word. In the Search Office.com for templates box, type one or more search terms, and then click the arrow button to search.
Top of Page
Create a new document
-
Click the File tab and then click New.
-
Under Available Templates, click Blank Document.
-
Click Create.
For more information about how to create a new document, see Create a document.
Top of Page
Open a document
-
Click the File tab, and then click Open.
-
In the left pane of the Open dialog box, click the drive or folder that contains the document.
-
In the right pane of the Open dialog box, open the folder that contains the drawing that you want.
-
Click the document and then click Open.
Top of Page
Save a document
To save a document in the format used by Word 2010 and Word 2007, do the following:
-
Click the File tab.
-
Click Save As.
-
In the File name box, enter a name for your document.
-
Click Save.
To save a document so that it is compatible with Word 2003 or earlier, do the following:
-
Open the document that you want to be used in Word 2003 or earlier.
-
Click the File tab.
-
Click Save As.
-
In the Save as type list, click Word 97-2003 Document. This changes the file format to .doc.
-
In the File name box, type a name for the document.
-
Click Save.
For more information about how to create a document that is compatible with Word 2003 or earlier versions, see Create a document to be used by previous versions of Word.
Top of Page
Read documents
-
Open the document that you want to read.
-
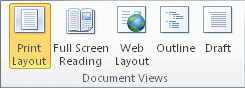
On the View tab, in the Document Views group, click Full Screen Reading
-
To move from page to page in a document, do one of the following:
-
Click the arrows in the lower corners of the pages.
-
Press PAGE DOWN and PAGE UP or SPACEBAR and BACKSPACE on the keyboard.
-
Click the navigation arrows at the top center of the screen.
Tip: Click View Options, and then click Show Two Pages
to view two pages, or screens, at a time.
-
 to view two pages, or screens, at a time.
For more information about how to view documents, see Read documents in Word.
Top of Page
Track changes and insert comments
-
To turn on change tracking, on the Review tab, in the Tracking group, click Track Changes.
-
To insert a comment, on the Review tab, in the Comments group, click New Comment.
For more information about how to track changes made while revising, see Track changes and insert comments.
Top of Page
Print your document
-
Click the File tab and then click Print.
-
Do the following:
-
Under Print, in the Copies box, enter the number of copies that you want to print.
-
Under Printer, make sure that the printer that you want is selected.
-
Under Settings, the default print settings for your printer are selected for you. If you want to change a setting, click the setting you want to change and then select the setting that you want.
-
-
When you are satisfied with the settings, click Print.
For more information about how to print a file, see Preview and print a file.
Top of Page
![]()
Download Article
![]()
Download Article
This wikiHow teaches you how to edit a Microsoft Word document’s page layout, change its design theme, and make basic style edits on the text, using a computer.
-
1
Open the Word document you want to edit. Find the document you want to edit, and double-click on its name to open the text file.
-
2
Click the Layout tab at the top. This button is located above the toolbar ribbon in the upper-left corner of your document. It will open your layout tools on the toolbar ribbon.
Advertisement
-
3
Click the Margins menu on the top-left. This is the first option on the Layout ribbon. It will open your document’s margin options on a drop-down menu.
-
4
Select the document margin you want to use. You can use Normal, Narrow, Moderate, Wide, or Mirrored margins.
- Click a margin option to see what it looks like.
- You can see the exact margin indent values below each option.
- If you don’t like any of the options here, click Custom Margins at the bottom, and manually enter the margin indent values you want to use.
-
5
Select a paragraph or section to customize margin and spacing. You can manually customize the margin indent and spacing options of a paragraph or section in your text without affecting the overall margins of your document.
-
6
Fill out the Indent and Spacing values on the toolbar. You can find these sections in the middle of the Layout ribbon.
- Indent will allow you to customize the selected region’s margins from left and right.
- Spacing will allow you to make the space above or below the selected region larger or smaller.
-
7
Click the Orientation menu next to Margins. This will open your document’s page orientation options on a drop-down menu.
-
8
Select Portrait or Landscape on the menu. Click one of the options here to change your document’s page orientation.
-
9
Click the Size menu next to Orientation. This will open a list of available paper size configurations you can use for your document.
-
10
Find and select the paper size you want to use. This will help you accurately preview your document’s print output on the paper size you’re planning to use.
-
11
Click the Columns next to Size. This option allow you to create multiple text columns in your text document.
- You can select a paragraph or section in your document and apply your columns here if you want to use different numbers of columns in different parts of your text.
-
12
Select the number of columns you want to use. Click a column option on the drop-down menu to apply it to the selected part of your text.
- Two and Three will create multiple, equal-sized columns.
- Left and Right will create two columns, and make one of them wider than the other one.
- If you want to manually customize your column number, size, and spacing, click More Columns at the bottom.


Advertisement
-
1
Click the Design tab at the top. You can find it between Insert and Layout above the toolbar ribbon in the upper-left corner. It will open your design tools on the ribbon.
-
2
Click the Themes button. This is the first option on the Design toolbar in the upper-left corner. It will open your document theme options on a drop-down menu.
-
3
Select a theme on the drop-down menu. Click on a theme to see different design variations of it.
- When you select a theme, related design variations will be listed next to it on the Design ribbon.
-
4
Click the Colors button. This button is located towards the right-hand side of the toolbar ribbon. It will open a drop-down menu of different color palettes you can use.
-
5
Select a color palette. Click the color palette you want to use. This will filter the themes on the toolbar ribbon, and restrict the selection to the selected color palette.
-
6
Click the Fonts button. This will open a list of all the available fonts you can use for your text.
-
7
Select the font you want to use in your document. This will filter the themes on the ribbon, and only show themes with your selected font.
-
8
Click a design theme on the toolbar ribbon. Find an interesting design and click on it to apply the theme to your document.
- Some themes will change all the heading and spacing stylings in your document whereas some other will do as little as only changing your font.


Advertisement
-
1
Click the Home tab on the top-left. This button is in the upper-left corner of your document. It will open your text styling tools on the toolbar ribbon.
-
2
Select the text you want to format. You can select a word, sentence, paragraph or section in your document.
- If you want to select the entire document, press Control+A on Windows, or ⌘ Command+A on Mac.
-
3
Click the
icon next to the Font field. This will open a list of all your available font options.
-
4
Select a font on the menu to apply it. Clicking a font here will change the selected text to this font.
-
5
Enter a number into the Font Size field. This field shows the current size of your text next to the Font field.
- You can manually enter a size here, or click the
icon and select a size on the menu.
- You can manually enter a size here, or click the
-
6
Select an alignment position for your text. The alignment buttons look like aligned, centered, and justified paragraph icons in the middle of the Home toolbar.
- You can align your text left, center it, align it right, or justify it.
-
7
Click the Line and Paragraph Spacing button. This button looks like a paragraph icon with two blue arrows next to it. It will open your spacing options on a drop-down menu.
-
8
Select the spacing option you want to use. You can set your spacing at different common values like 1.0, 1.5, or 2.0.
- If you want to double-space your text, select 2.0 here.


Advertisement
Ask a Question
200 characters left
Include your email address to get a message when this question is answered.
Submit
Advertisement
Thanks for submitting a tip for review!
About This Article
Thanks to all authors for creating a page that has been read 21,267 times.
Is this article up to date?
On the View tab, click Arrange, and then click Split. If the window is wide enough, Word displays Split directly on the View tab. To adjust the relative sizes of the panes, move the mouse pointer to the dividing line, and when you see the split pointer, click and drag the dividing line to a new position.
Contents
- 1 How do I divide a page into sections?
- 2 How do I split a page in Word 2020?
- 3 How do I divide my Word document into 4 sections?
- 4 How do I split a Word document into 3 sections?
- 5 How do I make 2 pages into 1 page in Word?
- 6 How do I make 4 page invites in Word?
- 7 How do I split a Word document into 8 sections?
- 8 How do I make 4 columns in Word?
- 9 What are the 4 types of section breaks?
- 10 How do I split a Word document into two?
- 11 Is there a fit to page option in Word?
- 12 How do I fit to one page in Word?
- 13 How do I make 1/4 size in Word?
- 14 How do you Print quarter page flyers?
- 15 How do I Print 4 flyers on one page PDF?
- 16 How do I split a page into 6 sections in Word?
- 17 How do I fix columns in Word?
- 18 How do I type in different columns in Word?
- 19 How do I edit sections in Word?
- 20 What’s a section break on word?
How do I divide a page into sections?
Insert a section break
- Select where you want a new section to begin.
- Go to Page Layout > Breaks.
- Section break that you want to add: A Next Page section break starts the new section on the next page. A Continuous section break starts the new section on the same page.
How do I split a page in Word 2020?
Go to Layout > Breaks > Page.
- Click or tap in the document where you want a page break.
- Go to Insert > Page Break.
How do I divide my Word document into 4 sections?
To split a page to 4 parts, you can insert a table to deal with the job.
- Place the cursor at left-top of the page, then click Insert > Table, select 2×2 Table.
- The table has been inserted, then drag right-corner of the table to resize it as you need.
- Insert texts into the columns and rows separately.
How do I split a Word document into 3 sections?
Follow the steps outlined in this tutorial.
- Highlight the text you wish to split into columns.
- Select the “Page Layout” tab.
- Choose “Columns” then select the type of columns you wish to apply. One. Two. Three. Left. Right.
How do I make 2 pages into 1 page in Word?
Click the “1 Page Per Sheet” button to open a drop-down menu with more options. Click “2 Pages Per Sheet.”
How do I make 4 page invites in Word?
the following may answer your question: if you have a Word document with more than 4 pages, click File > Print and then in the lower right corner of the print dialog, under “Zoom,” select 4 pages per sheet.
How do I split a Word document into 8 sections?
Divide a Document into Sections
- Place the insertion point where you want the section break.
- Choose the Page Layout tab.
- Click the down-arrow next to the Breaks button. A menu appears.
- Click the type of section break you want. Word inserts the section break.
How do I make 4 columns in Word?
On the Layout tab, click Columns, then click the layout you want.
- To apply columns to only part of your document, with your cursor, select the text that you want to format.
- On the Layout tab, click Columns, then click More Columns.
- Click Selected text from the Apply to box.
What are the 4 types of section breaks?
The different kinds of section breaks include next page, continuous, even page, and odd page breaks.
How do I split a Word document into two?
How to Split a Word Document Into Two Columns
- Open a Word document that you want to format into columns. Video of the Day.
- Click the “Page Layout” tab.
- Select “Two.”
- Click “Columns” again, then “More Columns” to customize the columns further.
- Click the “Microsoft Office Button” or “File” tab.
Is there a fit to page option in Word?
“Shrink to Fit” changes the font size and margins to make the document fit on one page. In Microsoft Word 2007 and 2010, go to “Print,” “Print Preview” and then “Shrink to Fit” under the “Preview” option.
How do I fit to one page in Word?
How to Make a Word Document Fit on One Page
- Click the top, left “Office” button, point to “Print” and select “Print Preview.”
- Click “Shrink One Page” in the Preview group.
- Click the “Close Print Preview” button in the Preview group to exit print preview and retain your changes.
How do I make 1/4 size in Word?
Firstly open up a new Word document, go into Mailings on the ribbon and click on Labels in the Create section… This opens up a new dialogue box – click on Options… Select Microsoft as the Label vendor, and scroll down to 1/4 Letter, then click OK.
How do you Print quarter page flyers?
Click the “Properties” button when the Print dialog box pops up on your screen. Select “4 pages” from the “Pages per Sheet” drop-down box. Click the “OK” button. The printer produces a sheet with four copies of your party flyer.
How do I Print 4 flyers on one page PDF?
Choose File > Print. From the Page Scaling pop-up menu, select Multiple Pages Per Sheet. From the Pages Per Sheet pop-up menu, select a value. Click OK or Print.
How do I split a page into 6 sections in Word?
Follow these general steps:
- Open a new document and set the paper orientation and margins the way you want.
- Insert a three-column, single-row table in your document.
- Remove the borders around the table, if desired.
- Format the second (center) column to be rather narrow.
- Adjust the width of the other columns as desired.
How do I fix columns in Word?
To fit the columns to the text (or page margins if cells are empty), click [AutoFit] > select “AutoFit Contents.” To fit the table to the text, click [AutoFit] > select “AutoFit Window.” To keep Word from automatically adjusting your column size, click [AutoFit] > select “Fixed Column Width.”
How do I type in different columns in Word?
To add columns to a document:
- Select the text you want to format.
- Click the Page Layout tab.
- Click the Columns command. A drop-down menu will appear. Adding columns.
- Select the number of columns you want to insert. The text will then format into columns.
How do I edit sections in Word?
Change a section break
- Click or tap in the section break you want to change.
- Go to Layout and select the Page Setup launcher button .
- Select the Layout tab.
- Select a new section type from the Section Start drop down list.
- Select OK.
What’s a section break on word?
Section breaks are used to divide the document into sections. Once section breaks are inserted, you can format each section separately. For example, format a section as a single column for the introduction of a report, and then format the next section as two columns for the report’s body text.
Formatting Microsoft Word can get funky. Here are ways to delete a page in Word, including how to delete a page in Word Mac to manage invisible page breaks.
Microsoft Word is the most popular word-processing application for Windows and Mac systems. It allows you to write content professionally with advanced features to aid your work process.
But blank pages in a Word document can make an unprofessional impression on editors or potential employers. Yet, Microsoft Word sometimes create blank pages in a document. So, you should ensure to delete the these blank pages in Word whenever possible before sharing the document with anyone else.
In this article, we’ll discuss several basic solutions about how to delete a page in Word with step-by-step instructions regardless of your Office skills. This article applies to Word for Microsoft 365, Microsoft Word for Windows, Word for Mac, and Microsoft Word 2021.
If you want to delete a page containing text, graphics, or other content in a Microsoft Word document, or if you’re wanting to get rid of blank pages at the end of your report that won’t appear to go away, here’s how.
Let’s roll our sleeves and get started.
Jump To:
- Summary: Delete a page in Word
- Why you Can’t Delete a Page in Microsoft Word?
- How To Delete a Page in Word with Content (for Windows and Mac)
- Method 1. Hold the Backspace or Delete Key
- Method 2. Select the Page Content and Delete It
- Method 3. Remove a Page From the Navigation Pane
- Method 4. How to delete a page in Word — Delete Extra Paragraph Mark
- Word for Windows
- In Word for Mac
- Method 5. How To Delete Page Breaks in Word
- Method 5. How To Delete Page Breaks in Word
- Method 6. Use an Online Page Removal Tool
- How to delete a blank page in Word
- Convert Word to PDF
- Final Thoughts
Summary: Delete a page in Word
- To delete a page in MS Word that contains text, graphics, or empty paragraphs, you can select the content to delete and press Delete.
- You can also do this:
- Click/tap anywhere on the page you want to delete > press Ctrl+G.
- In the Enter page number box, type page.
- On your Keyboard, Press Enter > then select Close.
- Verify that a page of content is selected > then press Delete on your keyboard.
- Voila! You’ve deleted a page!
- If you’re using macOS or Word for Mac, here’s how to delete a page in Word Mac:
- Click/tap anywhere on the page you wish to delete > then press Option+⌘+G.
- In the Enter page number box, type page.
- Next, press Enter on the keyboard > then select Close.
- Verify that a page of content is selected > then press the Delete button on the keyboard.
Why you Can’t Delete a Page in Microsoft Word?
Word users sometimes struggle to delete pages, often ones that appear empty. At first, this may seem like an error in the application itself. In reality, the problem has simple solutions depending on its cause.
While formatting, you might’ve inserted a page break, which may be hidden from you until you enable visibility for special symbols. This creates a seemingly blank page or whitespace in Word. A similar thing happens if the text color matches your page’s color — for example, white text on a white background. The page will appear blank despite having content on it.
Some users also found text written in a formatted font barely visible. For example, a 1pt font size is incredibly hard to notice on the default zoom setting. If you simply can’t remove a page with content on it, our methods below will help you sort the issue out.
How To Delete a Page in Word with Content (for Windows and Mac)
Don’t give your mouse a workout trying to delete a persistently blank page. Follow our steps to eliminate unwanted pages, blank pages, or whitespace in a Word document.
Method 1. Hold the Backspace or Delete Key
An easy way to delete an entire page in Word is by holding the backspace or delete key to erase every character on the page. This can be tedious for documents with lots of content, but it works.
This method might also work for empty pages, as you might have spaces or other filler characters you can’t see but can delete. Simply move your blinking cursor to the end of the Word document, then press and hold the backspace key or delete key until the page is removed.
Method 2. Select the Page Content and Delete It
A quick way to remove a page in Word is using the Go To function. This is available on all platforms, making it an accessible solution that you can memorize for future use in all environments. Here are the instructions on how to remove a page in Word using the Go-To feature.
- Open the Find and Replace window using the Ctrl + G keyboard shortcut on Windows or ⌘ + option + G on Mac.
- Switch to the Go To tab. In the Enter page number input box, type in “/page” without quotation marks.

- Hit the Enter key on your keyboard, then click Close. This will select all the content on your page. Press the backspace key or the delete key once to erase everything.

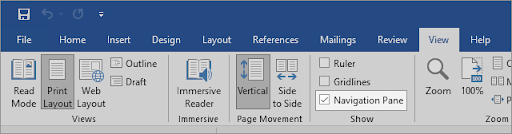
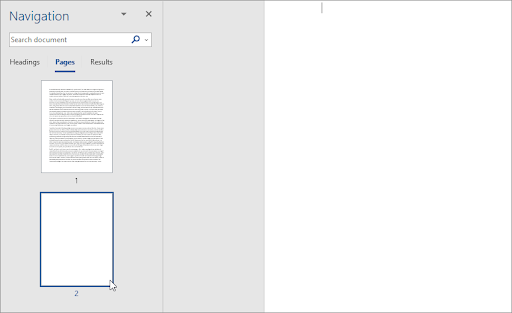
Method 3. Remove a Page From the Navigation Pane
The Navigation pane shows a document preview and allows you to jump to specific pages quickly. However, you can also use it to delete blank pages in Word as well. You can easily spot a blank page and complete the steps below to erase them from your document.
- Go to the View tab in the ribbon displayed on top of your window, and then place a check next to the Navigation Pane option. If you’re using Windows, use the Ctrl + H keyboard shortcut to quickly toggle the pane.

- Switch to the Pages tab in the left panel, and click on the blank page thumbnail preview to instantly jump to the beginning of the page. If you’re deleting a page with content, locate it.

- Scroll to the bottom of the page and click once while holding the Shift key on your keyboard. This will select everything on the page.
- Press the backspace key or the delete key once to remove all contents and delete the page. This should help you remove the page from your document.
Method 4. How to delete a page in Word — Delete Extra Paragraph Mark
In some cases, invisible characters you can’t see by default stop you from deleting a blank page. Pilcrow symbols, displayed with the ¶ character, are used to mark where you begin a new paragraph. They’re not visible by default until you change some of your settings.
Here are the steps to make the paragraph symbol visible in a Word document, then delete it to remove a seemingly blank page or whitespace in your document.
- In most versions of Word, you can toggle the visibility of the paragraph mark from the Home tab in the Ribbon. Simply click on the button which displays the ¶ symbol until you start seeing the marks in your document.

- Erase extra paragraphs where you see the ¶ symbol using the backspace key or the delete key on your keyboard. After removing the last paragraph marker, the page should be deleted.
- If the Show/Hide toggle didn’t work, try these alternative steps to make the paragraph mark visible in Word.

Word for Windows
To delete a blank page in Windows, by making the paragraph mark visible;
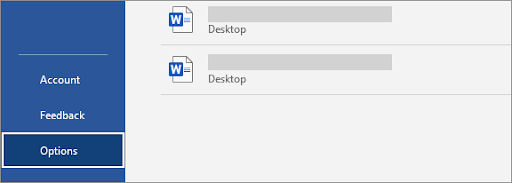
- Go to the File tab and select Options. This is going to open the Word Options dialog box.

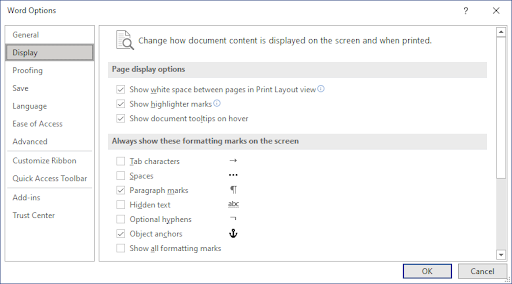
- Switch to the Display tab in the left panel.
- Click on the Paragraph marks check box in the Always show these formatting marks on the screen section. You can also turn every mark visible by checking the Show all formatting marks option to reveal more symbols.

- Change how document content is displayed on the screen and when printed
In Word for Mac
- Click on Word from the menu bar on top of your screen and select Preferences. You can also use the ⌘ +, (comma) keyboard shortcut to open the dialog box.
- Select View from the Authoring and Proofing Tools section.
- Place a checkmark next to Paragraph marks in the Show non-printing Characters section. You can also turn every marker visible by selecting the All option.


Method 5. How To Delete Page Breaks in Word
A manual page break you inserted may be stopping you from being able to delete a page in Word. Page breaks usually serve to create separate pages on demand, which may be left in while you alter and delete parts of a Word document.
Below are the steps to learn how to remove a page in Word when you have one or more page breaks in your document.
- Find the ———— Page Break ———— in your document and place your cursor at the end of it.
- Press the backspace key or the delete key to remove the page break. This should also delete the page it was on if the page was empty.

Method 6. Use an Online Page Removal Tool
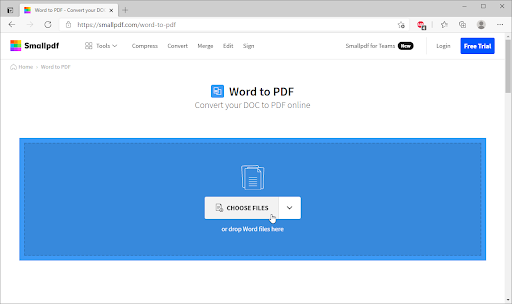
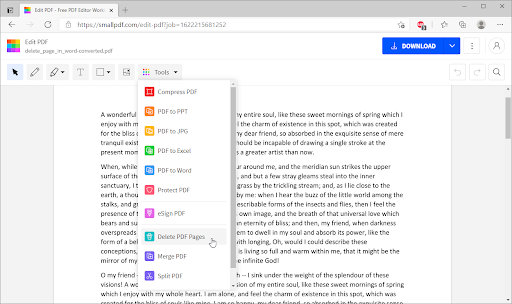
No luck deleting the unwanted page in Word? Your last solution could be an online tool. Smallpdf offers a way to convert your Word documents into a PDF file and then lets you make edits to the converted file. This includes a way to delete any unwanted pages, white pages, and empty pages.
Here’s how you can use the Smallpdf Word to PDF tool and the Delete Pages tool to remove a page in Word.
- Navigate to smallpdf.com/word-to-pdf using any web browser on your device.
- Click on the Choose Files button, or simply drag your Word document into the converter and wait for it to turn into a PDF. The process will automatically begin.

- Once the conversion is complete, click on the Edit PDF button. You’ll be redirected to a new tool, which allows you to remove pages from a Word document.
- Click on Tools from the page toolbar, and then select Delete PDF Pages.
- Hover over the page you want to delete, and then click on the Delete icon displayed by a garbage bin. After deleting every unwanted page, click Apply changes.
- Click the Download button to save the edited file on your computer. If you want to convert the file back to a Word document, use the PDF to Word converter to change your file back to its original format.


How to delete a blank page in Word
Word includes a non-deletable end-paragraph that sometimes gets pushed out to a new, blank page at the end of a document. Wondering how to delete a page in Word — the blank page?
To delete blank pages in a word document, you must make the end-paragraph fit onto the preceding page. The most sure-fire way is to make the end paragraph very small (1 point).
Now, to delete a blank page in Word (including delete a blank page in Word for Mac:Word for Microsoft 365 for Mac, Word 2021 for Mac, Word 2019 for Mac, Word 2016 for Mac, Word 2013, Word 2010):
- Press Ctrl+Shift+8 (⌘+8 on a Mac) to show paragraph marks.
- Select the paragraph mark.
- Select inside the Font size box, type 01, and then press Enter. If you do this, the paragraph now fits on the preceding page, removing the unwanted blank page.
- Press Ctrl+Shift+8 again to hide the paragraph marks (⌘+8 on a Mac).
If that paragraph unfortunately still doesn’t fit on the preceding page, you can make the bottom margin smaller (Layout tab > Margins > Custom Margins, and set the bottom margin to something small, like 0.3 inches). This should work.
Convert word to PDF
Another way to delete blank pages is to convert word to PDF. Here are the steps to help you convert word to pdf.
- Go to File > Save As
- Pick a place to save the file > then choose PDF for the Save as type.
- Select Options in the Save As dialog box.
- Under Page range, choose Page(s) > then specify your non-blank pages. For instance, if page 5 of your document is the blank page you can’t get rid of, specify pages from 1 to 4.
- Select OK, and then select Save.
Recap: How to Delete a page in Microsoft Word
- Click or tap anywhere in the page you want to delete, press Ctrl+G.
- In the Enter page number box, type page.
- Press Enter on your keyboard, and then select Close.
- Verify that a page of content is selected, and then press Delete on your keyboard.
Final Thoughts
We hope you learned how to delete a page in Word. It’s not difficult, right? Now that the pesky page is gone, you can continue working on your projects.
Our Help Center offers hundreds of guides to assist you if you require further help. Return to us for more informative articles, or contact our experts for immediate assistance.
One More Thing
Would you like to receive promotions, deals, and discounts to get our products for the best price? Don’t forget to subscribe to our newsletter by entering your email address below! Be the first to receive the latest news in your inbox.
You May Also Like
» How do I insert or delete a page break in Word?
» How to Unfreeze Word on Mac Without Losing Work
» How to Install Fonts to Word on Mac
Lesson 9: Page Layout
/en/word2013/formatting-text/content/
Introduction
One formatting aspect you’ll need to consider as you create your document is whether to make adjustments to the layout of the page. The page layout affects how content appears and includes the page’s orientation, margins, and size.
Optional: Download our practice document.
Page orientation
Word offers two page orientation options: landscape and portrait. Landscape means the page is oriented horizontally, while portrait means the page is oriented vertically. Compare our example below to see how orientation can affect the appearance and spacing of text and images.
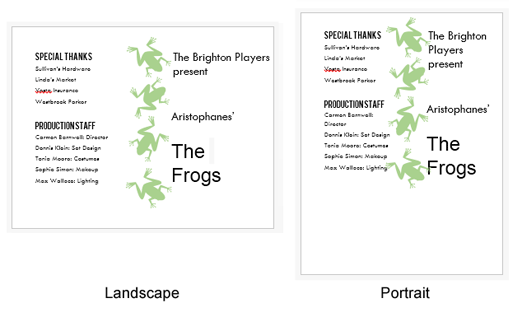 Landscape and portrait orientation
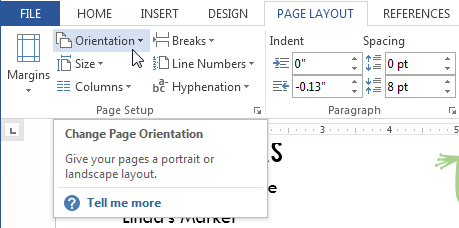
To change page orientation:
- Select the Page Layout tab.
- Click the Orientation command in the Page Setup group.
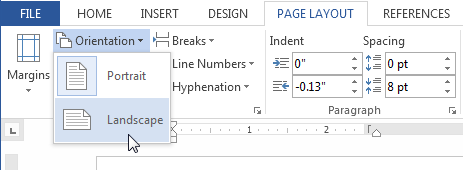
 Clicking the Orientation command
 - A drop-down menu will appear. Click either Portrait or Landscape to change the page orientation.
 Changing the page orientation
 - The page orientation of the document will be changed.
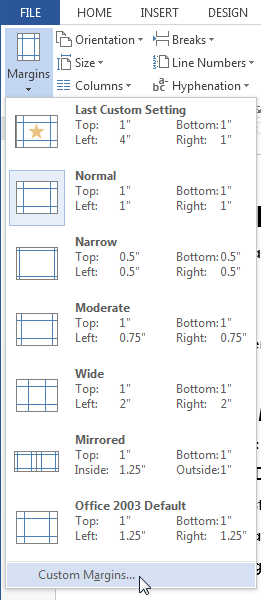
Page margins
A margin is the space between the text and the edge of your document. By default, a new document’s margins are set to Normal, which means it has a one-inch space between the text and each edge. Depending on your needs, Word allows you to change your document’s margin size.
To format page margins:
Word has a variety of predefined margin sizes to choose from.
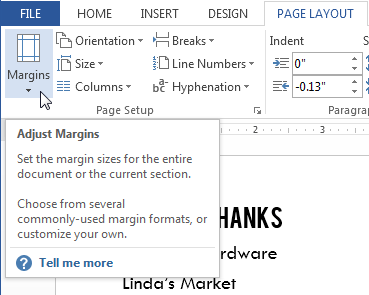
- Select the Page Layout tab, then click the Margins command.
 Clicking the Margins command
 - A drop-down menu will appear. Click the predefined margin size you want.
 Changing the page margins
 - The margins of the document will be changed.

To use custom margins:
Word also allows you to customize the size of your margins in the Page Setup dialog box.
- From the Page Layout tab, click Margins. Select Custom Margins… from the drop-down menu.
 Selecting Custom Margins…
 - The Page Setup dialog box will appear.
- Adjust the values for each margin, then click OK.
 The Page Setup dialog box
 - The margins of the document will be changed.

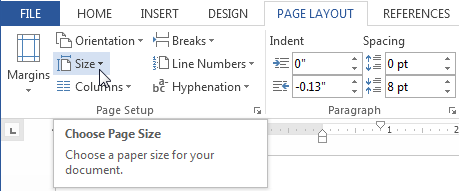
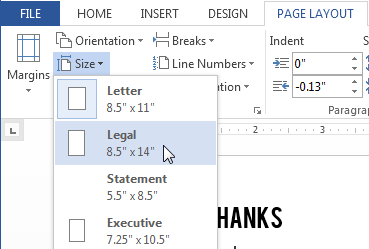
Page size
By default, the page size of a new document is 8.5 inches by 11 inches. Depending on your project, you may need to adjust your document’s page size. It’s important to note that before modifying the default page size, you should check to see which page sizes your printer can accommodate.
To change the page size:
Word has a variety of predefined page sizes to choose from.
- Select the Page Layout tab, then click the Size command.
 Clicking the Size command
 - A drop-down menu will appear. The current page size is highlighted. Click the desired predefined page size.
 Changing the page size
 - The page size of the document will be changed.
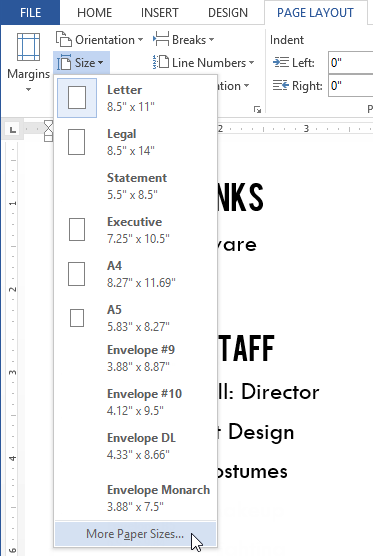
To use a custom page size:
Word also allows you to customize the page size in the Page Setup dialog box.
- From the Page Layout tab, click Size. Select More Paper Sizes… from the drop-down menu.
 Selecting More Paper Sizes…
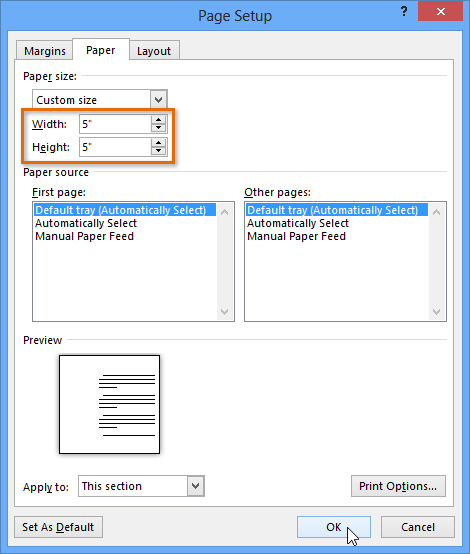
 - The Page Setup dialog box will appear.
- Adjust the values for Width and Height, then click OK.
 Adjusting page size
 - The page size of the document will be changed.
Alternatively, you can open the Page Setup dialog box by navigating to the Page Layout tab and clicking the small arrow in the bottom-right corner of the Page Setup group.
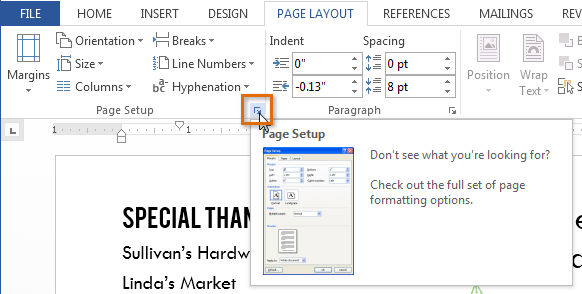 Opening the Page Setup dialog box
You can use Word’s convenient Set as Default feature to save all of the formatting changes you’ve made and automatically apply them to new documents. To learn how to do this, read our article on Changing Your Default Settings in Word.
Challenge!
- Open an existing Word document. If you want, you can use our practice document.
- Change the page orientation. If you are using the example, change the orientation to Landscape.
- Change the margins. If you are using the example, change the margins to Narrow.
- Try adjusting the margins using Custom Margins.
- Change the paper size. If you are using the example, try changing the paper size to Legal.
- Try customizing the page size.
/en/word2013/printing-documents/content/