
You can edit the contents of a cell directly in the cell. You can also edit the contents of a cell by typing in the formula bar.
When you edit the contents of a cell, Excel is operating in Edit mode. Some Excel features work differently or are unavailable in Edit mode.
When Excel is in Edit mode, the word Edit appears in the lower-left corner of the Excel program window, as shown in the following illustration.

How does Excel operate differently in Edit mode?
In Edit mode, many commands are unavailable. For example, when Excel is in Edit mode, you cannot apply conditional formatting or change the alignment of the contents of a cell.
Also, the arrow keys behave somewhat differently when Excel is in Edit mode. Instead of moving the cursor from cell to cell, in Edit mode, the arrow keys move the cursor around in the cell.
Enable or disable Edit mode
If you try to use Edit mode and nothing happens, it might be disabled. You can enable or disable Edit mode by changing an Excel option.
-
Click File > Options > Advanced.
-OR-
In Excel 2007 only: Click the Microsoft Office Button
 , click Excel Options, and then click the Advanced category.
 -
Under Editing options, do one of the following:
-
To enable Edit mode, select the Allow editing directly in cells check box.
-
To disable Edit mode, clear the Allow editing directly in cells check box.
-
Enter Edit mode
To start working in Edit mode, do one of the following:
-
Double-click the cell that contains the data that you want to edit.
This starts Edit mode and positions the cursor in the cell in the location that you double-clicked. The cell contents are also displayed in the formula bar.
-
Click the cell that contains the data that you want to edit, and then click anywhere in the formula bar.
This starts Edit mode and positions the cursor in the formula bar at the location that you clicked.
-
Click the cell that contains the data that you want to edit, and then press F2.
This starts Edit mode and positions the cursor at the end of the cell contents.
Insert, delete, or replace cell contents
-
To insert characters, click in the cell where you want to insert them, and then type the new characters.
-
To delete characters, click in the cell where you want to delete them, and then press BACKSPACE, or select the characters and then press DELETE.
-
To replace specific characters, select them and then type the new characters.
-
To turn on Overtype mode so that existing characters are replaced by new characters while you type, press INSERT.
Note: Overtype mode can be turned on or off only when you are in Edit mode. When Overtype mode is turned on, the character to the right of the insertion point is highlighted in the formula bar, and it will be overwritten when you type.
-
To start a new line of text at a specific point in a cell, click in the where you want to break the line, and then press ALT+ENTER.
Cancel or undo edits
Before you press ENTER or TAB, and before or after you press F2, you can press ESC to cancel any edits that you made to the cell contents.
After you press ENTER or TAB, you can undo your edits by pressing CTRL+Z, or by clicking Undo  on the Quick Access Toolbar.
Adjust the way cell contents are displayed
After you edit cell contents, you may want to adjust the way they are displayed.
-
At times, a cell might display #####. This can occur when the cell contains a number or a date and the width of its column cannot display all the characters that its format requires. For example, suppose a cell with the Date format «mm/dd/yyyy» contains 12/31/2007. However, the column is only wide enough to display six characters. The cell will display #####. To see the entire contents of the cell with its current format, you must increase the width of the column.
Change the width of a column
-
Click the cell for which you want to change the column width.
-
On the Home tab, in the Cells group, click Format.
-
Under Cell Size, do one of the following:
-
To fit all text in the cell, click AutoFit Column Width.
-
To specify a larger column width, click Column Width, and then type the width that you want in the Column width box.
Note: As an alternative to increasing the width of a column, you can change the format of that column or even an individual cell. For example, you could change the date format so that a date is displayed as only the month and day («mm/dd» format), such as 12/31, or represent a number in a Scientific (exponential) format, such as 4E+08.
-
-
-
If there are multiple lines of text in a cell, some of the text might not be displayed the way that you want. You can display multiple lines of text inside a cell by wrapping the text.
Note: When Excel is in Edit mode, you cannot change the way text wraps.
Wrap text in a cell
-
Click the cell in which you want to wrap the text.
-
On the Home tab, in the Alignment group, click Wrap Text.
Note: If the text is a single long word, the characters won’t wrap; you can widen the column or decrease the font size to see all the text. If not all text is visible in the cell after you wrap the text, you may need to adjust the height of the row.
On the Home tab, in the Cells group, click Format, and then under Cell Size click AutoFit Row.
-
Exit Edit mode
To stop working in Edit mode, do one of the following:
-
Press ENTER.
Excel exits Edit mode and selects the cell directly below the current cell.
You can also specify that pressing ENTER select a different adjacent cell.
-
Click File > Options > Advanced.
-OR-
In Excel 2007 only: Click the Microsoft Office Button
, click Excel Options, and then click the Advanced category. -
Under Editing options, do one of the following:
-
To make the selection remain in the cell that you were editing, clear the After pressing Enter, move selection check box.
-
To control the direction of the selection, select the After pressing Enter, move selection check box, click the arrow next to Direction, and then select a direction from the list.
-
-
-
Press TAB.
This stops Edit mode and selects the cell to the right of the current cell. Pressing SHIFT+TAB selects the cell to the left.
-
Click a different cell.
Excel exits Edit mode and selects the cell that you clicked.
-
Press F2.
Excel exits Edit mode and leaves the cursor where it is.
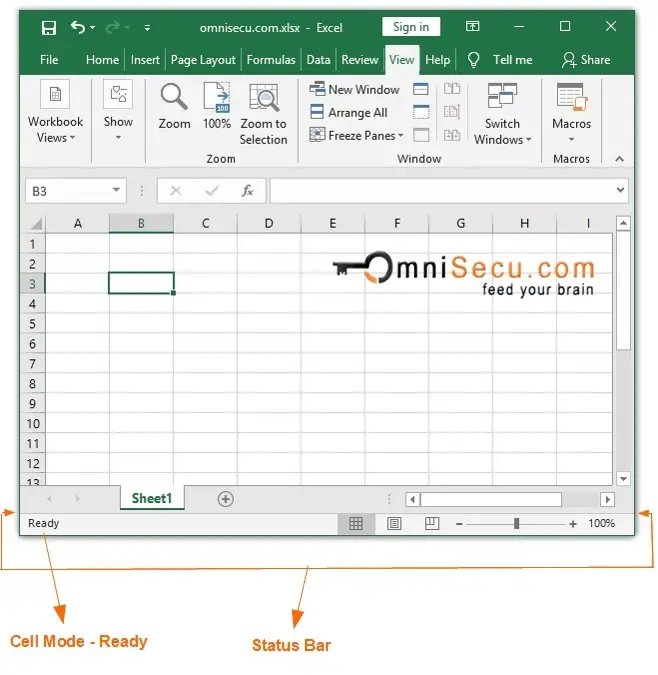
There are four types of Cell editing modes in Excel worksheet. Those four types of Cell modes are «Ready», «Edit» and «Enter» and «Point». The default mode of an Excel cell is «Ready». In Ready mode, Excel is ready to accept the data in any of its worksheet Cells. Pressing the function key «F2» once will change the default «Ready» mode of its Active Cell to «Edit» mode. At «Edit» mode, if you press the function key «F2» again, the Cell mode will change to «Enter». «Point» cell mode is the fourth Cell mode. «Point» cell mode allows to navigate a big Excel worksheet to pick the desired cells while creating or editing formula.
While you are working in «Edit», «Enter» or «Point» Cell mode of Excel worksheet, most of the buttons in Excel Ribbon are disabled.
Cell Mode Indicator in Excel Status bar displays the current cell editing mode of its Active Cell. It is located on the left-most side of the status bar as shown in below images.
Four Cell Modes of Excel worksheet are explained below.
1) Ready Mode: The «Ready» mode shows that Excel worksheet is ready to accept an input from the user.
Excel Cell Mode status will become «Ready» when
• Excel user is not editing any cell or user is not inserting any data
• Excel user is not editing any defined name
• Excel user is not editing any conditional formatting formula
• Excel user is not editing any chart.
When at «Ready» mode, Excel is waiting for the user input.
Next three modes are Excel input modes. When the user is editing data in a cell, a defined name, a conditional formatting formula, or a chart, the Cell Mode status will become any of the three following modes. 1) Edit mode 2) Enter mode or 3) Point mode
2) Edit Mode: If you type function key «F2» at any Excel cell, the Cell mode will change to «Edit» mode. If you double click on a non-blank (where data is already filled) Excel Cell with mouse pointer, the Cell mode will become «Edit» mode.
While you are in «Edit» Cell mode, pressing the arrow navigation keys won’t change the Active Cell to the next cell. At «Edit» mode, typing left or right Arrow keys will make text cursor move left or right within the data of the Cell, in the direction of Arrow key. Up and down arrows have no effect in «Edit» mode.

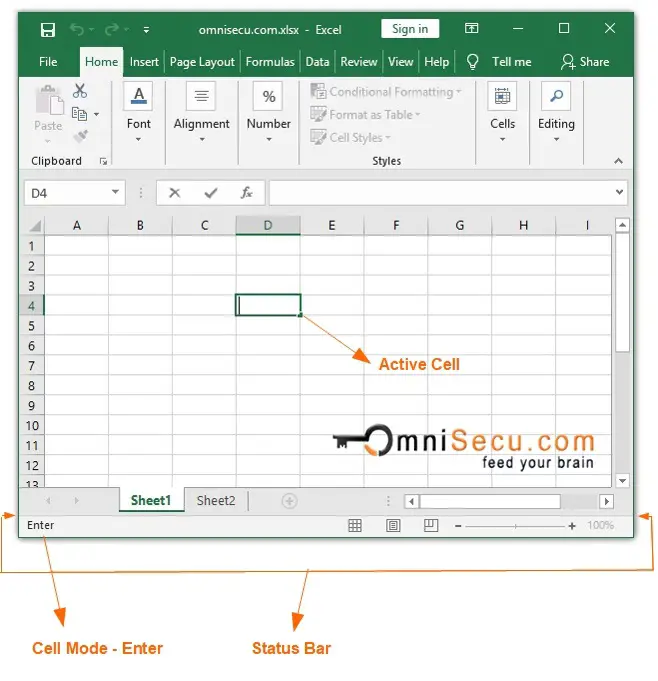
3) Enter Mode: When a user is entering data into a cell, the Cell Mode will become «Enter» mode. By default, Cell Mode will become «Enter» mode, when you double click on a blank (empty) Excel cell with mouse pointer. A single mouse click when at «Enter» mode will change the Cell mode to «Edit» mode.
When at «Enter» mode, you can change to «Edit» mode by typing the function key «F2». You may toggle between «Enter» mode and «Edit» mode by typing the function key «F2».
At «Enter» mode, typing any Arrow key will make the current cell lose its focus as Active Cell. Next cell will become the Active Cell in the direction of the typed Arrow key.
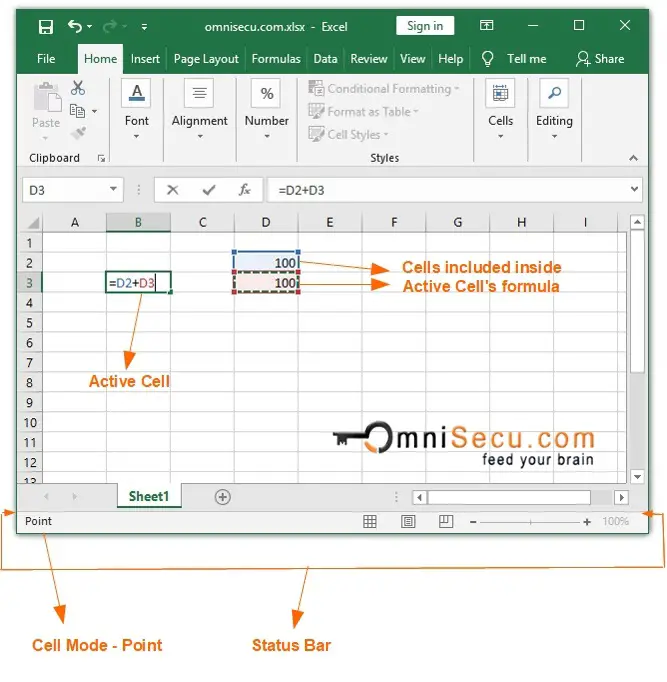
4) Point Mode : Point Mode is also called as formula cell selection mode. The Cell mode status will become Point, when you start typing a formula inside a cell (begining with «=», «+», or «-«) and then select the cells that you want to include in that formula.
When you edit the contents of a cell, Excel is operating in Edit mode. Some Excel features work differently or are unavailable in Edit mode. When Excel is in Edit mode, the word Edit appears in the lower-left corner of the Excel program window, as shown in the following illustration.
Contents
- 1 How do I get Excel to open in edit mode?
- 2 Where is EDIT group Excel?
- 3 What is the Editing tab in Excel?
- 4 Can’t edit anything in Excel?
- 5 How do you edit a spreadsheet?
- 6 How do I enable editing in SharePoint Excel?
- 7 What is the shortcut key to edit a cell in Excel?
- 8 How do you edit a group in Excel?
- 9 How do I edit text in multiple cells in Excel?
- 10 How do I edit text in Excel without a mouse?
- 11 Where is the Edit menu?
- 12 How do you edit a button in Excel?
- 13 How do you enable editing in Excel on a Mac?
- 14 Why is Excel locked for editing?
- 15 How do you edit a table in Excel?
- 16 How do I make all Excel sheets editable?
- 17 How do I change text in Excel?
- 18 What is Edit mode?
- 19 How do I open Excel in Edit mode online?
- 20 Which function key is used to edit the cell content?
How do I get Excel to open in edit mode?
Replies (11)
- Open Excel program, Click the File tab.
- Click on ‘Options’; the Options dialog box appears.
- Click Trust Center and then click Trust Center Settings.
- In the Trust Center, click File Block Settings.
- Select Open selected file types in Protected View and allow editing.
“Editing” should appear at the end of the list of groups under Home on the right side.
What is the Editing tab in Excel?
Click the Home tab; Go to the Editing group; Click the Find & Select button; In Find & Select drop down menus, you will view the Find, Replace, and Go to commands.
Can’t edit anything in Excel?
a. Select File > Options > Select Advanced from the Excel menu bar. b. On Editing options, ensure that the check box Allow editing directly in cells is checked.
How do you edit a spreadsheet?
Edit data in a cell
- Open a spreadsheet in the Google Sheets app.
- In your spreadsheet, double-tap the cell you want to edit.
- Enter your data.
- Optional: To format text, touch and hold the text, then choose an option.
- When done, tap Done .
How do I enable editing in SharePoint Excel?
Go to a document library on your SharePoint site, and then click the link associated with the Excel workbook. Click Edit in Browser.
What is the shortcut key to edit a cell in Excel?
F2
First, the keyboard shortcut for editing a cell is F2 on Windows, and Control + U on a Mac. With Excel’s default settings, this will put your cursor directly in the cell, ready to edit.
How do you edit a group in Excel?
Steps To Change Collapse Direction
- Select the Data Tab.
- Within the Outline group, click the dialog launcher button.
- The two checkboxes within the Direction section of the Settings Dialog box will allow you to control which direction your outline groups expand/collapse.
- Click the OK button.
How do I edit text in multiple cells in Excel?
You can drag an area with your mouse, hold down SHIFT and click in two cells to select all the ones between them, or hold down CTRL and click to add individual cells. Then type in your selected text. Finally, hit CTRL+ENTER (instead of enter) and it’ll be entered into all the selected cells.
How do I edit text in Excel without a mouse?
You can press the F2 key to get into the editing mode of a cell without double clicking it. It is easy to operate, you just need to select the cell you want to edit and press the F2 key, and the cursor will be located at the end of the cell value, then you can edit the cell immediately.
The Edit menu is a menu-type graphical control element found in most computer programs that handle files, text or images. It is often the second menu in the menu bar, next to the file menu.
How do you edit a button in Excel?
Edit the text in a Form control
- Select the Form control. For more information, see Select or deselect controls on a worksheet.
- Right-click the selection, and then click Edit Text.
- Edit the text for the control.
- After you have finished editing the text, right-click the selection, and then click Exit Edit Text.
How do you enable editing in Excel on a Mac?
Enable editing in your document
- Go to File > Info.
- Select Protect document.
- Select Enable Editing.
Why is Excel locked for editing?
If you have locked the file yourself, it might be because the file is open on a different device, or the previous instance of the file didn’t close properly. Tip: Sometimes a file may get locked if everyone editing isn’t using a version that supports co-authoring.
How do you edit a table in Excel?
Modifying tables
- Select any cell in your table. The Design tab will appear on the Ribbon.
- From the Design tab, click the Resize Table command. Resize Table command.
- Directly on your spreadsheet, select the new range of cells you want your table to cover. You must select your original table cells as well.
- Click OK.
How do I make all Excel sheets editable?
On the Tools menu, click Share Workbook, and then click the Editing tab. Click to select the Allow changes by more than one user at the same time check box, and then click OK. Save the workbook when you are prompted.
How do I change text in Excel?
To replace text or numbers, press Ctrl+H, or go to Home > Find & Select > Replace. In the Find what box, type the text or numbers you want to find. In the Replace with box, enter the text or numbers you want to use to replace the search text. Click Replace or Replace All.
What is Edit mode?
Alternatively referred to as edit, edit mode is a feature within software that allows the modification of files.Most programs with edit mode toggle between “view” and “edit.” When in the “view mode,” the user can only look at the file; however, in “edit mode,” the user can view and change its contents.
How do I open Excel in Edit mode online?
Edit a spreadsheet in the browser
- Click on the workbook to open it in Excel for the web. Excel for the web opens in Editing view.
- Update the data, add formulas, insert charts, or apply formatting.
- If you want to make changes beyond what you can do in the browser, click Open in Excel.
Which function key is used to edit the cell content?
F2 function key
The correct answer is F2. F2 function key is used to edit the content of a cell in MS-Excel.
Содержание
- How to Enable Editing in Excel 2021/2019/2017/2016/2013/2010/2007
- Part 1: Directly Disable Protected View to Enable Editing in Excel
- Part 2: Other 4 Ways to Enable Editing in Excel Read Only
- Case 1. Excel File is Marked as Final
- Case 2. Excel File is Recommended as Read Only
- Case 3. Excel File is Protected with Modifying Password
- Case 4. Excel Worksheet is Protected with Password
- Conclusion
- Edit cell contents
- How does Excel operate differently in Edit mode?
- Enable or disable Edit mode
- Enter Edit mode
- Insert, delete, or replace cell contents
- Cancel or undo edits
- Adjust the way cell contents are displayed
- Exit Edit mode
How to Enable Editing in Excel 2021/2019/2017/2016/2013/2010/2007
Are you stuck looking for how to enable editing in Excel read-only? Have you tried multiple options and still found yourself in the same loop? Worry no more because we have good news for you. To access the file in an editable mode, you need to perform some operations on the Excel file. These processes vary depending on the type of protection in question as discussed in detail in this article.
Part 1: Directly Disable Protected View to Enable Editing in Excel
When you try to open a downloaded file in Excel, the worksheet will automatically open in a read-only mode meaning you can only view but you cannot edit or apply other commands. In this case, there are plenty of ways to disable protected view in order to enable editing on your Excel file. One of the most straightforward options is to do it directly via program settings. This method will open the Excel file in editable mode and prevent it from displaying protected notification every time you open the file. This helps to save the time required to disable the protected view every time you open the Excel file. To disable the protected view directly, follow the steps below.
Step 1: Double-click the Microsoft Excel icon on your desktop to access the primary interface. Once opened, navigate to «File» and choose «Options» from the subsequent list.
Step 2: From the displayed «Excel Options» window, choose «Trust Center» > «Trust Center Settings» on the bottom left pane.
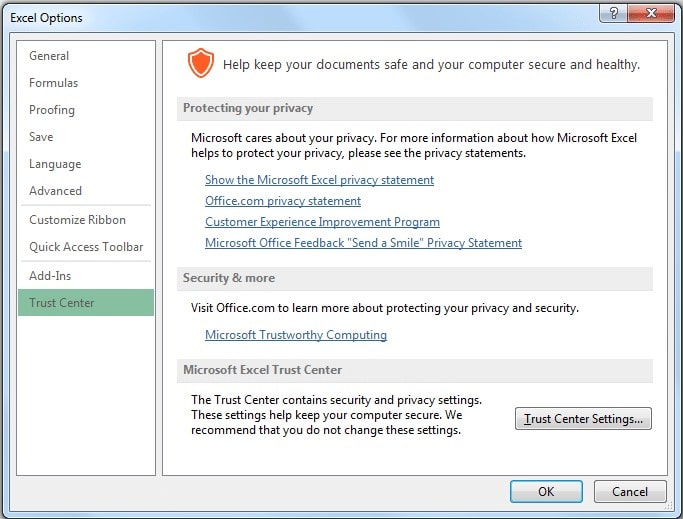
Step 3: Click on the «Protected View» and then uncheck any or all of the protected view options given. Once satisfied, click «OK» to directly apply the settings.
Part 2: Other 4 Ways to Enable Editing in Excel Read Only
Protected View is one of the most common situations you will meet if you download files from the Internet. Of course, you will also encounter some other cases where you need to enable editing in read-only Excel file. In this section, we will list 4 common cases and solutions as well.
Case 1. Excel File is Marked as Final
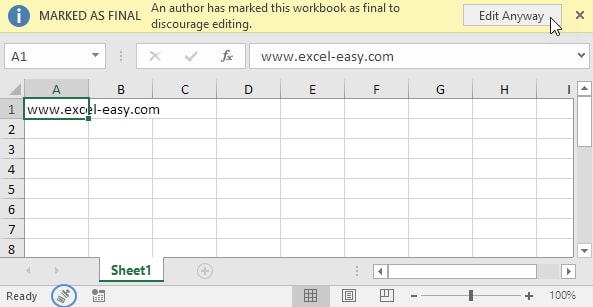
How to know that your Excel file is Marked as Final? When you open a read-only Excel file Marked as Final, there is a yellow notification on top of the Excel worksheet. This notification is a warning that the author of the Excel file has denied you to edit the Excel sheet. This means you can only read the contents of the workbook but not perform operations like typing, editing, and engage proofing marks and commands.
In order to edit the Excel file Marked as Final, you need to get rid of the read-only feature. This is simple as you can simply click the «Edit Anyway» button within the «MARKED AS FINAL» notification at the top of the worksheet.
Case 2. Excel File is Recommended as Read Only
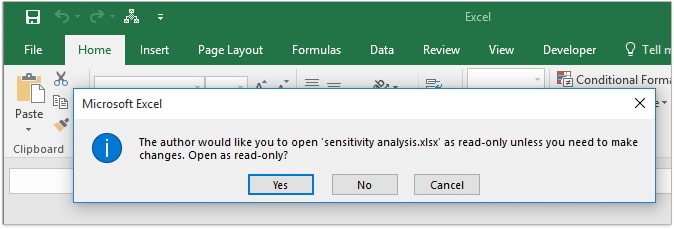
In the case where you open an Excel file recommended as a read-only, it is usual to get a pop-up window asking you to open the file in read-only mode. Selecting «Yes» will open the file in read-only mode and you cannot apply any changes. However, if you want to make any changes to this file, choose «No» instead.
Now if you want to remove read-only recommended feature for good, then do the following.
Step 1: Open the Excel file recommended as read-only and select «No» from the pop-up window.
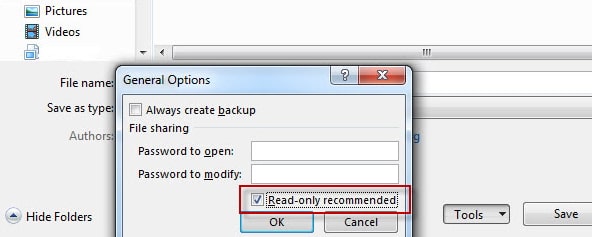
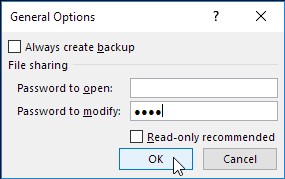
Step 2: Navigate to «File» then choose «Save As» to open the file directory. Click the drop-down icon beside «Tools» at the bottom of the file explorer window and select «General Options».
Step 3: The «General Options» window will open. Locate and uncheck the «Read-only recommended» box. Click «Ok» to complete the removal of the read-only recommended mode on your Excel file.
Case 3. Excel File is Protected with Modifying Password
If you try to open an Excel file that is protected with a modifying password, a pop-up window asking you to enter the password will appear. In this case, it is really easy to enable the editing mode whether you know the correct password or not.
If you know the correct password, just type it within the prompt. Then go to the «File» option and select «Save As» from the subsequent list. Delete the password in the «Password to modify» field in the «General Options» dialogue box. Now, you will receive a Excel file without protection.
If you don’t know the correct password, then the only option for you is to open this Excel file in the read-only mode. After opening, press «Ctrl+A» to select the whole worksheet and then press «Ctrl+C» and «Ctrl+V» to copy the content to a new worksheet. You can edit the new worksheet as you wish now!
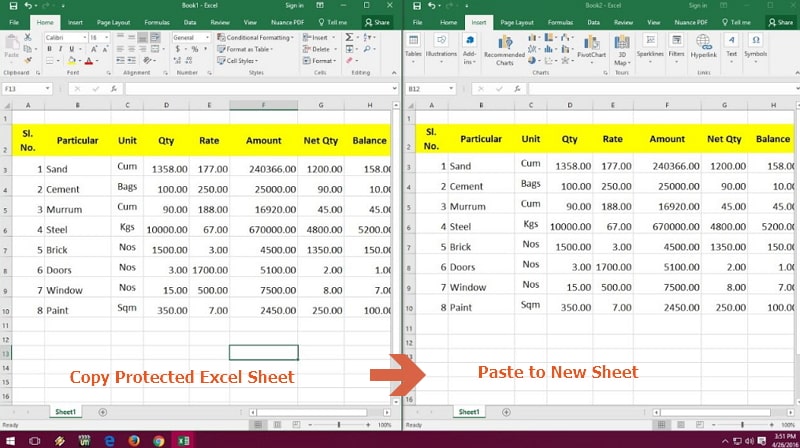

This method only works when you can select the content. Sometimes, you are not allowed to select the cells if the «Select Locked Cells» and «Select Unlocked Cells» options are forbidden by the owner. If this is the situation, you can try the solution in Case 4.
Case 4. Excel Worksheet is Protected with Password
In this case, you won’t know that the worksheet is password protected until you want to select or edit some cells. An «Unprotect Sheet» dialog box will pop up requiring you to enter a password. Different from the above 3 cases, an Excel worksheet protected with a password can only allow you to open the file in editable mode if you know the password. The only way that is easy to use and 100% workable is by using a password remover tool.
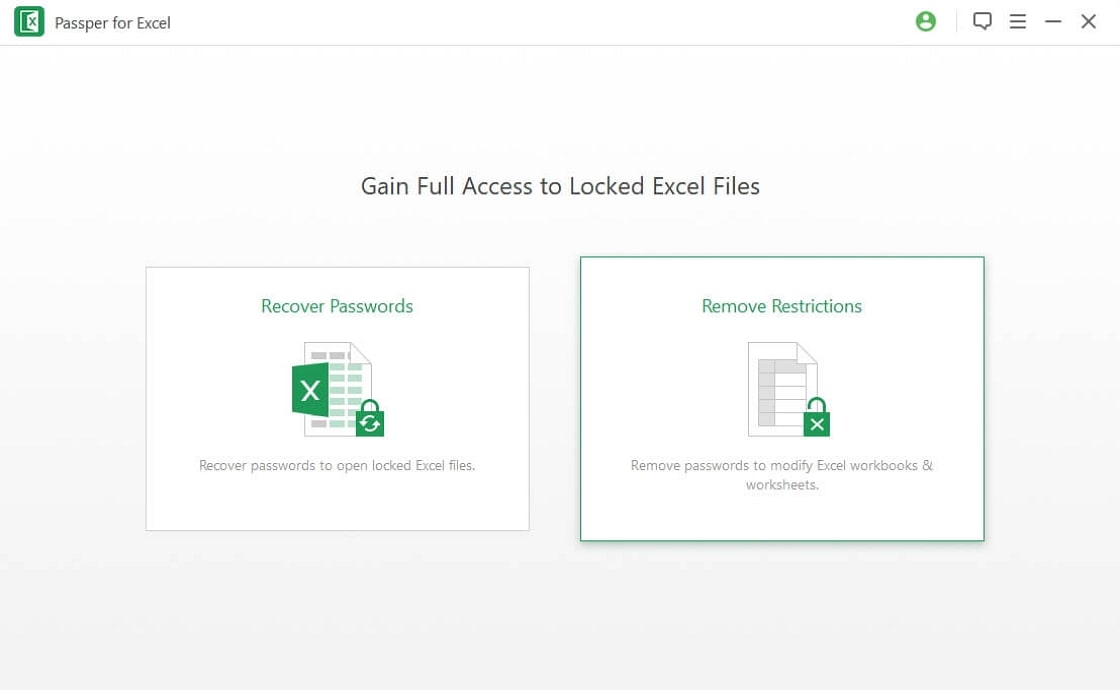
Passper for Excel is the best password remover tool for Excel worksheets or workbooks. By using Passper for Excel, you do not have to be a tech-savvy since it is really easy to use. With one simple click, all restrictions can be removed with 100% success rate. Additionally, Passper for Excel is helpful to recover opening password for all types of Excel file.
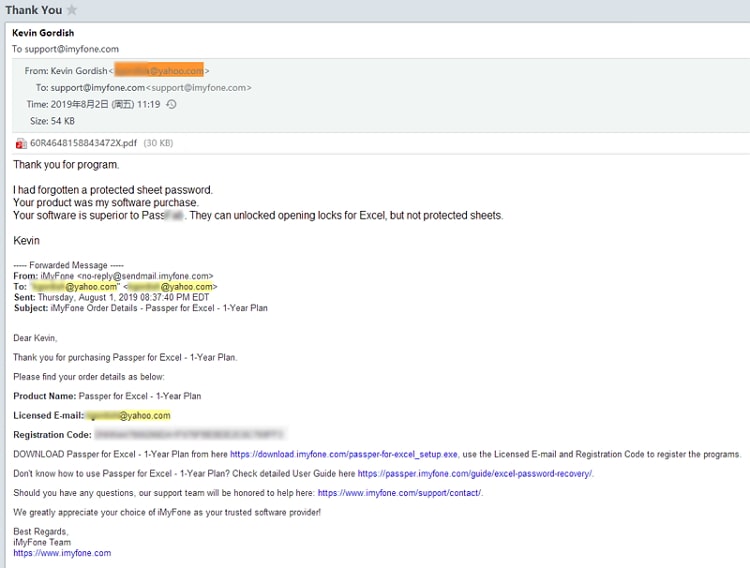
Passper is a sub-brand of the hi-tech corporation iMyFone, which has been trusted and recommended by many professional websites like Cnet, Cult of Mac, etc. Before you decide to use this program, you can also check the user’s feedback below.

Now follow the simple steps below to enable editing in your Excel file. Start by downloading and installing the program on your computer or laptop.
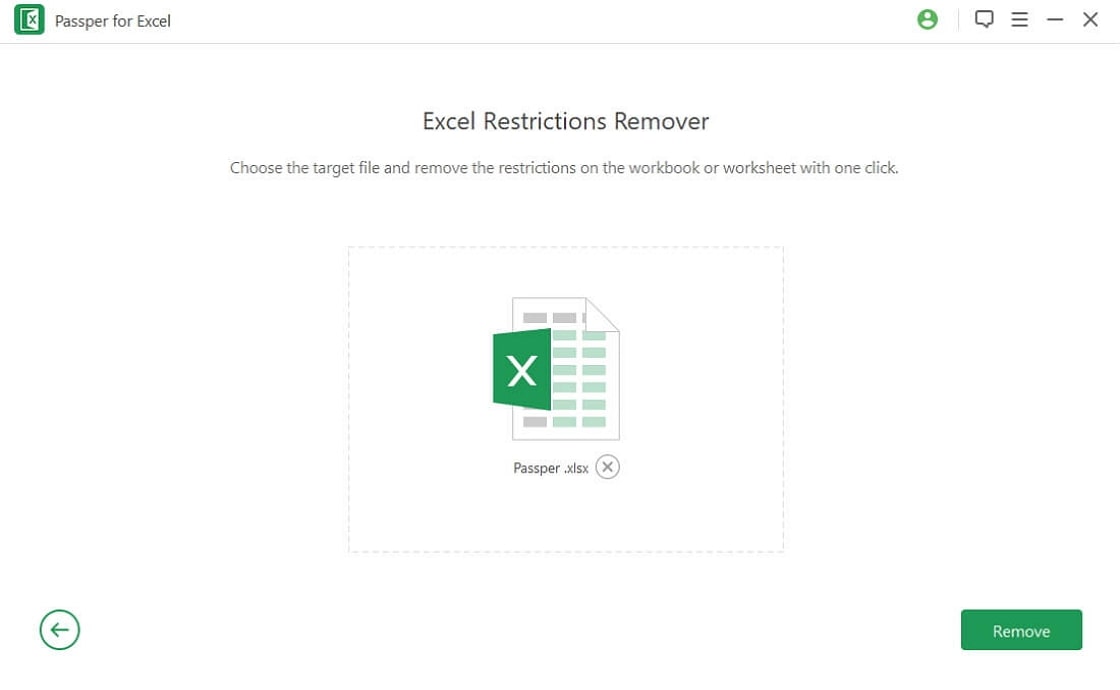
Step 1 Open Passper for Excel on your PC to access the main interface. Choose «Remove Restrictions» option.
Step 2 Click on the «Select a File» button to upload your password protected Excel file. Once the restricted Excel file has been successfully uploaded onto the program, simply hit the «Remove» button to activate the removal process.
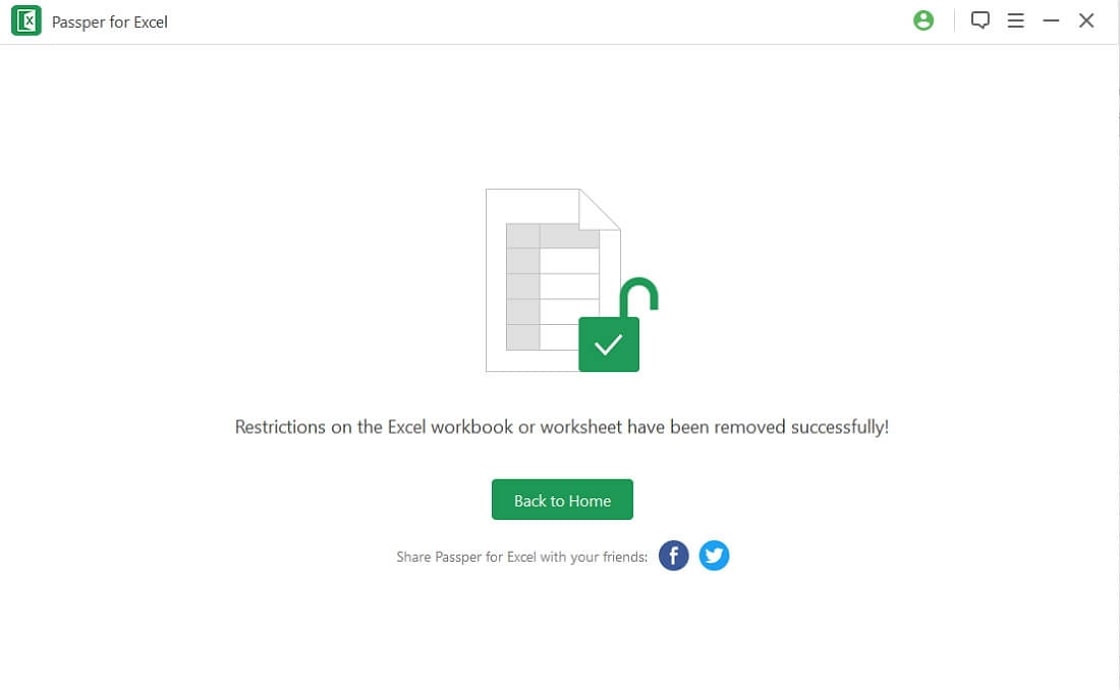
Step 3 The process is super-fast and will take about 2 seconds to complete. When it is successfully completed, the program will display a success notification. Your Excel file is now restrictions-free and you can freely edit it.
Conclusion
As you have seen from the information above, it is clear that there are several options for enabling editing on read-only Excel worksheets or workbooks. After reading this article, you can easily edit your protected Excel file no matter what the case is. If you have any doubt about the above solutions, you can turn to the comment section below and leave us a comment. We will try our best to help you!

By William Wilson to Excel
Posted on Mar 15, 2023 ( Updated: Mar 15, 2023)
William Wilson, a blogger who is interested in MS Office software. In the past three years, William has been trying to write articles to help people better understand MS Office software.
Источник
Edit cell contents
You can edit the contents of a cell directly in the cell. You can also edit the contents of a cell by typing in the formula bar.
When you edit the contents of a cell, Excel is operating in Edit mode. Some Excel features work differently or are unavailable in Edit mode.
When Excel is in Edit mode, the word Edit appears in the lower-left corner of the Excel program window, as shown in the following illustration.
How does Excel operate differently in Edit mode?
In Edit mode, many commands are unavailable. For example, when Excel is in Edit mode, you cannot apply conditional formatting or change the alignment of the contents of a cell.
Also, the arrow keys behave somewhat differently when Excel is in Edit mode. Instead of moving the cursor from cell to cell, in Edit mode, the arrow keys move the cursor around in the cell.
Enable or disable Edit mode
If you try to use Edit mode and nothing happens, it might be disabled. You can enable or disable Edit mode by changing an Excel option.
Click File > Options > Advanced.
In Excel 2007 only: Click the Microsoft Office Button  , click Excel Options, and then click the Advanced category.
Under Editing options, do one of the following:
To enable Edit mode, select the Allow editing directly in cells check box.
To disable Edit mode, clear the Allow editing directly in cells check box.
Enter Edit mode
To start working in Edit mode, do one of the following:
Double-click the cell that contains the data that you want to edit.
This starts Edit mode and positions the cursor in the cell in the location that you double-clicked. The cell contents are also displayed in the formula bar.
Click the cell that contains the data that you want to edit, and then click anywhere in the formula bar.
This starts Edit mode and positions the cursor in the formula bar at the location that you clicked.
Click the cell that contains the data that you want to edit, and then press F2.
This starts Edit mode and positions the cursor at the end of the cell contents.
Insert, delete, or replace cell contents
To insert characters, click in the cell where you want to insert them, and then type the new characters.
To delete characters, click in the cell where you want to delete them, and then press BACKSPACE, or select the characters and then press DELETE.
To replace specific characters, select them and then type the new characters.
To turn on Overtype mode so that existing characters are replaced by new characters while you type, press INSERT.
Note: Overtype mode can be turned on or off only when you are in Edit mode. When Overtype mode is turned on, the character to the right of the insertion point is highlighted in the formula bar, and it will be overwritten when you type.
To start a new line of text at a specific point in a cell, click in the where you want to break the line, and then press ALT+ENTER.
Cancel or undo edits
Before you press ENTER or TAB, and before or after you press F2, you can press ESC to cancel any edits that you made to the cell contents.
After you press ENTER or TAB, you can undo your edits by pressing CTRL+Z, or by clicking Undo on the Quick Access Toolbar.
Adjust the way cell contents are displayed
After you edit cell contents, you may want to adjust the way they are displayed.
At times, a cell might display #####. This can occur when the cell contains a number or a date and the width of its column cannot display all the characters that its format requires. For example, suppose a cell with the Date format «mm/dd/yyyy» contains 12/31/2007. However, the column is only wide enough to display six characters. The cell will display #####. To see the entire contents of the cell with its current format, you must increase the width of the column.
Change the width of a column
Click the cell for which you want to change the column width.
On the Home tab, in the Cells group, click Format.

Under Cell Size, do one of the following:
To fit all text in the cell, click AutoFit Column Width.
To specify a larger column width, click Column Width, and then type the width that you want in the Column width box.
Note: As an alternative to increasing the width of a column, you can change the format of that column or even an individual cell. For example, you could change the date format so that a date is displayed as only the month and day («mm/dd» format), such as 12/31, or represent a number in a Scientific (exponential) format, such as 4E+08.
If there are multiple lines of text in a cell, some of the text might not be displayed the way that you want. You can display multiple lines of text inside a cell by wrapping the text.
Note: When Excel is in Edit mode, you cannot change the way text wraps.
Wrap text in a cell
Click the cell in which you want to wrap the text.
On the Home tab, in the Alignment group, click Wrap Text.
Note: If the text is a single long word, the characters won’t wrap; you can widen the column or decrease the font size to see all the text. If not all text is visible in the cell after you wrap the text, you may need to adjust the height of the row.
On the Home tab, in the Cells group, click Format, and then under Cell Size click AutoFit Row.
Exit Edit mode
To stop working in Edit mode, do one of the following:
Excel exits Edit mode and selects the cell directly below the current cell.
You can also specify that pressing ENTER select a different adjacent cell.
Click File > Options > Advanced.
In Excel 2007 only: Click the Microsoft Office Button , click Excel Options, and then click the Advanced category.
Under Editing options, do one of the following:
To make the selection remain in the cell that you were editing, clear the After pressing Enter, move selection check box.
To control the direction of the selection, select the After pressing Enter, move selection check box, click the arrow next to Direction, and then select a direction from the list.
This stops Edit mode and selects the cell to the right of the current cell. Pressing SHIFT+TAB selects the cell to the left.
Click a different cell.
Excel exits Edit mode and selects the cell that you clicked.
Excel exits Edit mode and leaves the cursor where it is.
Источник

When opening Excel spreadsheets from unknown sources, a feature in Excel called Protected View shields you from potential risks. This is great, but to work on the document, you will need to switch to editing mode.
Protected View is switched on by default. So whenever you open a file that originated from a website or that you received via email, you are taken to Protected View.
The message bar will appear along the top of the document and offer you the chance to enable editing. Click the “Enable Editing” button.

The document is now opened as read-only with some content disabled.
Save the document to another location to be able to work on it effectively.
Why Use the Protected View?
Protected View protects you from malware, viruses, and threats that you can be exposed to when opening Excel files from unknown sources. These sources include a website, email attachments, and other unsafe locations such as shared drives.
If you are just viewing the spreadsheet, you will not need editing mode and can happily work with the document while in Protected View.
Can I Disable Protected View?
Yes, but you should check with your IT team or network administrator before doing this as it does expose you to outside threats.
To disable protected view, Click “File” from the taskbar and then select “Options.” Next, choose the “Trust Center” category and then click the “Trust Center Settings” button.
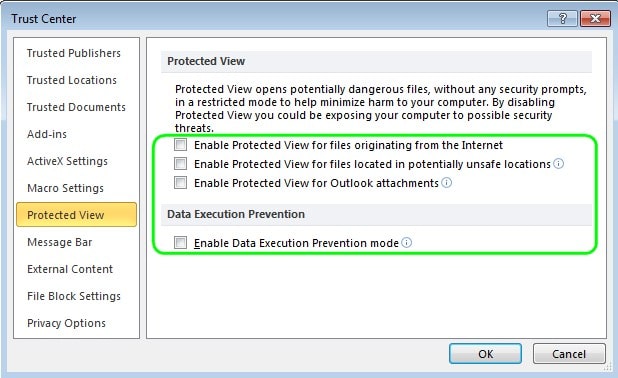
Select the “Protected View” category.
There are three settings here that you could disable: files originating from the Internet, unsafe locations, or Outlook attachments. You can disable all three if you do not want Protected View to intervene at all in the future.
Protected View is a useful feature to help protect users from potential threats when opening documents from unknown sources. This is very common when working with Excel on mobile devices and accessing documents when in public locations.
However, most of the time, these spreadsheets are safe. Fortunately, Microsoft makes it relatively easy to switch into Editing Mode.
READ NEXT
- › BLUETTI Slashed Hundreds off Its Best Power Stations for Easter Sale
- › Google Chrome Is Getting Faster
- › How to Adjust and Change Discord Fonts
- › This New Google TV Streaming Device Costs Just $20
- › HoloLens Now Has Windows 11 and Incredible 3D Ink Features
- › The New NVIDIA GeForce RTX 4070 Is Like an RTX 3080 for $599
How-To Geek is where you turn when you want experts to explain technology. Since we launched in 2006, our articles have been read billions of times. Want to know more?