

В программе MS Word есть специальный режим работы, который позволяет вносить правки и редактировать документы, не изменяя при этом их содержания. Грубо говоря, это хорошая возможность указать на ошибки, не исправляя их при этом.
Урок: Как в Ворде добавлять и изменять сноски
В режиме правки можно сделать исправления, добавить комментарии, пояснения, примечания и т.д. Именно о том, как активировать этот режим работы, и пойдет речь ниже.
1. Откройте документ, в котором нужно включить режим правки, и перейдите во вкладку “Рецензирование”.

Примечание: В Microsoft Word 2003 для включения режима правки необходимо открыть вкладку “Сервис” и там выбрать пункт “Исправления”.
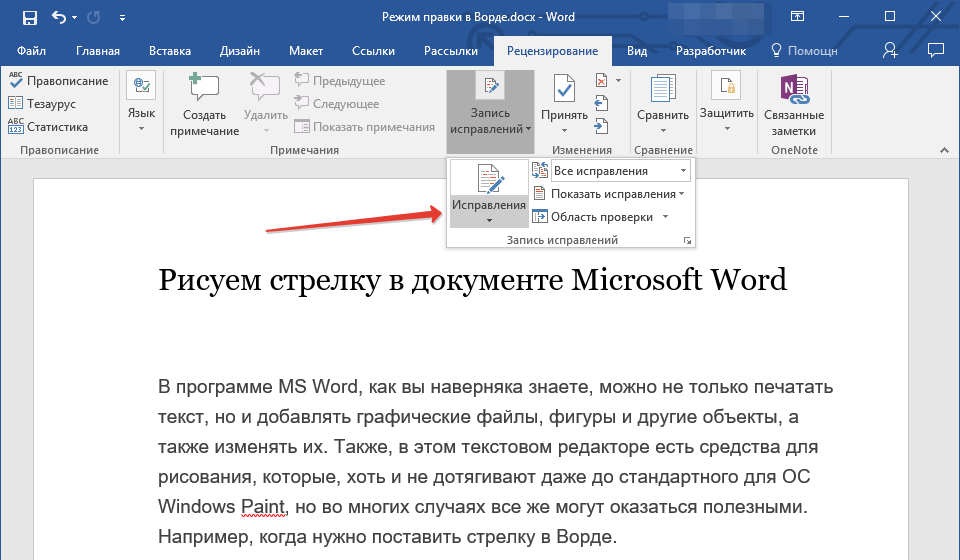
2. Нажмите на кнопку “Исправления”, расположенную в группе “Запись исправлений”.
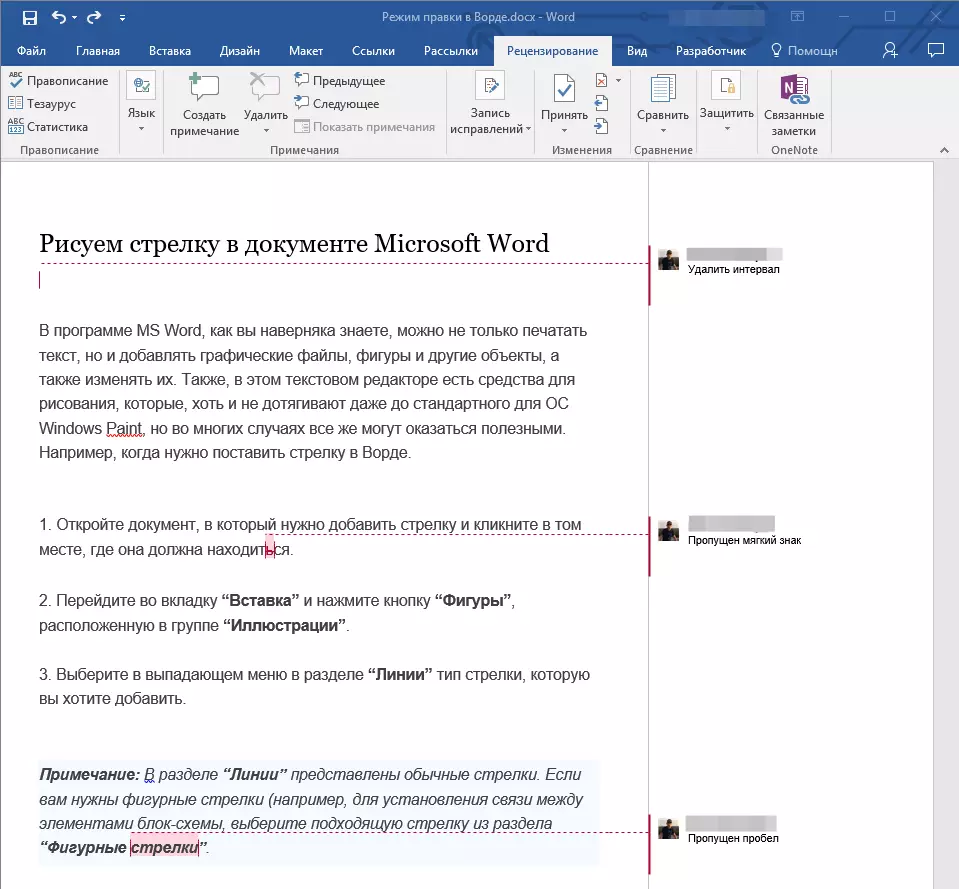
3. Теперь можно приступить к редактированию (исправлению) текста в документе. Все внесенные изменения будут фиксироваться, а тип правки с так называемыми пояснениями будет отображаться справа от рабочей области.

Помимо кнопок на панели управления, активировать режим правки в Ворде можно и с помощью комбинации клавиш. Для этого просто нажмите “CTRL+SHIFT+E”.
Урок: Горячие клавиши в Word
Если это необходимо, вы всегда можете добавить примечание, чтобы пользователю, который в дальнейшем будет работать с данным документом, было проще понять, где он допустил ошибку, что требуется изменить, исправить, убрать вовсе.


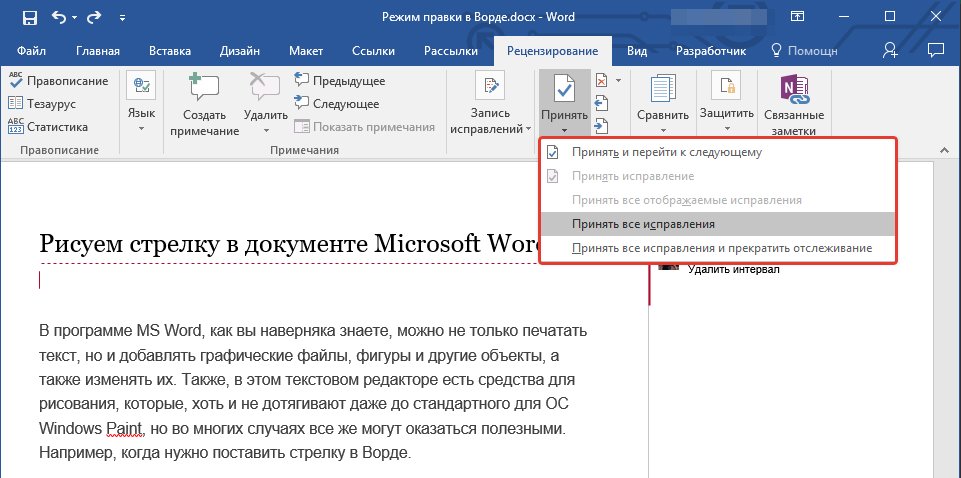
Внесенные в режиме правки изменения невозможно удалить, их можно принять или отклонить. Более подробно об этом вы можете прочесть в нашей статье.
Урок: Как в Ворде убрать исправления
Вот, собственно, и все, теперь вы знаете, как в Word включить режим правки. Во многих случаях, особенно, при совместной работе с документами, эта функция программы может оказаться крайне полезной.
Еще статьи по данной теме:
Помогла ли Вам статья?
If you often come across a testvordov documents, then you just need to know how to enable the editing mode in Word and how to use it. This program tool is simply irreplaceable if you want to point out to a person for his mistakes, without making any corrections to his text.

In this article we will just talk about howthe editing mode works in Word. We’ll tell you about all its features, and eventually you can use the named mode yourself without resorting to instructions.
The first step: entering edit mode
First of all, you must first enter the modeedits in Word. This is done in different versions of the program in different ways. For example, in the «Word 2003» you will need to open the «Tools» tab and in it to find the «Corrections» item and click on it. In later versions, all this is done through the «Review» tab. In it, find the tool group «Record fixes» and click on the «Fixes» button. It is also advised to select «All fixes» in the drop-down list that is located next to it.

By the way, this mode can be turned on much faster by using the hot keys Ctrl + Shift + E for this.
After all the manipulations done, the editing mode in Word will be turned on, and you can safely start editing the text without fear that the source will suffer.
The second step: making corrections
In fact, this item could have beenskip, since it all boils down to the fact that you are correcting the document, and instead of editing it completely, just make corrections, without changing the source. But it is worthwhile to tell how exactly this happens.
Let’s say you saw that some word in the textsuperfluous. In this case, it will be reasonable to remove it. So do it, but it will not disappear at the same time, but just cross out, which will let another user know what you mean. Also, the fix will be highlighted in red to attract attention.
The same will happen if you enter some other word — it will stand out, so that the author of the text can understand what exactly he missed.
Editing mode in Word is very helpful if you are working with a person at a remote distance. In this case, instead of claim words, you just need to send him a document with corrections.
The third step: adding notes
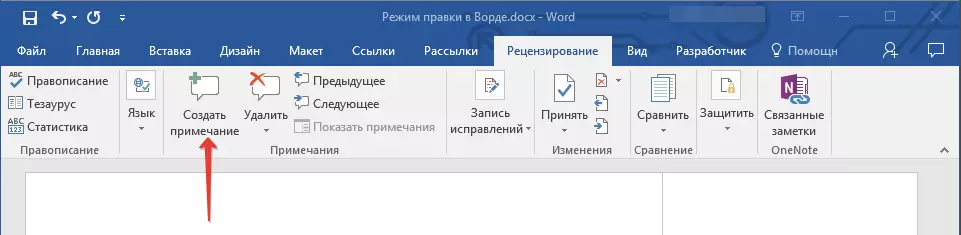
Sometimes the allocation of corrections is not enough toAnother user understood what his mistake was. In this case, it would be good to write down the reason. This is why the program has a «Create a note» tool, which can be used only when the editing mode is enabled.
It’s very easy to use. You need to initially click on your fix, and then click on the «Create note» button, which is located on the toolbar, near the «Fixes» button. You can see the exact location on the picture below.

After that, the right side of the document appearsAn additional area where you can enter an explanation. So you can do with all the changes, but you can not create a note that is not tied to them.
If we talk about how to remove the editing mode in Word, then it’s quite simple. You just need to click the «Fix» button again.
Track changes in Word
Note: If a document has been shared with you for review, you may not be able to turn off Track Changes. If you want to edit the document without tracking changes, you’ll need to either save a copy or ask the person who sent it to you to share it again with review mode turned off.

Turn Track Changes on and off
On the Review tab, select Track Changes.
-
When Track Changes is on, the section is highlighted. Deletions are marked with a strikethrough, and additions are marked with an underline. Different authors’ changes are indicated with different colors.
-
When Track Changes is off, the section is not highlighted. Word stops marking changes, but the colored underlines and strikethroughs are still in the document.
Tip: You also can add a Track Changes indicator to the status bar. Right-click the status bar and select Track Changes.
View tracked changes
Note: When a document is in Editing or Reviewing mode, you can select a tracked change to view a collaborator’s full, suggested change in a card that displays. Hover over the Accept or Reject button to see a preview of what that action would do to your final document.
Choose whose changes to track
You can choose to track only your own changes or everyone’s changes.
-
To track only your own changes — On the Review tab, select Track Changes > Just Mine.
-
To track everyone’s changes — On the Review tab, select Track Changes > For Everyone.
Tip: to use a password to keep others from turning off Track Changes — On the Review tab, select Track Changes > Lock Tracking.
Choose how you would like to see the changes in the document
You can choose the type of markup you want to see.
-
On the Review tab, select Tracking.
-
Select All Markup for the drop-down list to display.
-
Select one of the following options.
-
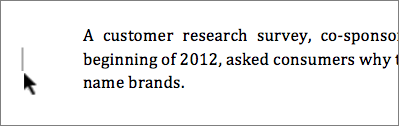
Simple Markup displays tracked changes with a red line in the margin.
-
All Markup displays tracked changes with different colors of text and lines for each reviewer
-
No Markup hides the markup to show the document with changes incorporated
-
Original displays the original document without tracked changes and comments showing. However, any tracked changes or comments in the document that have not been accepted, rejected, or deleted remain in the document.
Choose the way track changes display
You can choose the types of revisions that display and the way they display. If you choose to show revisions as balloons, they display in the margins of the document. If you choose to display them directly within the document in line. In line revisions display all deletions with strikethroughs instead of inside balloons.
-
On the Review tab, select Track > Show Markup.
-
Select Balloons and then select the type of display you want.
-
Show Revisions in Balloons
-
Show All Revisions Inline
-
Show Only Formatting in Balloons
Note: If you want to see tracked changes in balloons, you must be in Print Layout view or Web Layout view.
Display changes by type of edit
-
On the Review tab, select Track Changes > Show Markup.
-
Select the type of edit.
-
Insertions and Deletions
-
Formatting
The check mark next to the item indicates that it’s selected.
Note: Even if you hide a type of markup by clearing it on the Show Markup menu, the markup automatically displays each time the document is opened by you or a reviewer.
Display changes by reviewer(s)
-
In Review > Tracking, select Show Markup.
-
Select Specific People.
-
Select to clear all check boxes except the ones next to the names of the reviewers whose changes you want to show.
Note: To select or clear all check boxes for all reviewers in the list, select All Reviewers.
Navigate tracked changes in Changes menu section
You can navigate from one tracked change to another.
-
In Review > Changes, select Next to view the next tracked change.
-
In Review > Changes, select Previous to view the previous tracked change.
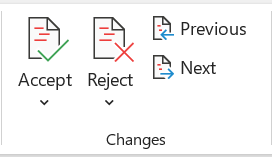
Accept or Reject tracked changes
There are multiple ways to address tracked changes. The most proficient method is to identify the commentor and respond to the tracked change is through the card display when you click the marked change. The card displays the commentor name and the option to accept or reject the suggestion.

Accept or reject tracked changes in sequence using the main menu
You can resolve teach tracked change from the beginning of the document to the end of the document in sequence.
-
Select Review > Changes > Next.
-
Select Accept or Reject. The next sequential tracked change is highlighted for your review and action.
Note: You can also accept or reject individual tracked changes using the main menus’ drop-down menus. This method is often used as a methodical approach to reviewing tracked changes.
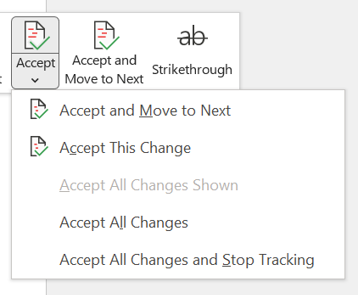
Accept changes using the main menu
-
In Review > Changes, select Accept.
-
Select one of the options.
-
Accept and Move to Next
-
Accept This Change
-
Accept All Changes
-
Accept All Changes and Stop Tracking
Reject changes using the main menu
-
In Review > Changes, select > Reject.
-
Select one of the options.
-
Reject and Move to Next
-
Reject This Change
-
Reject All Changes
-
Reject All Changes and Stop Tracking
Accept or reject changes within a document with a right click
Working within a document, you can right-click on a tracked change to accept or reject the change. Using the right-click method displays a banner menu option and a drop-down menu option.
Accept changes in-line with the right-click banner option
-
Right-click a tracked change in the document to review a single suggestion.
-
On the banner, select one of the following.
-
Accept > Accept and Move to Next
-
Accept > Accept This Change
-
Accept > Accept All Changes
-
Accept > Accept All Changes and Stop Tracking
-
Accept and Move to Next
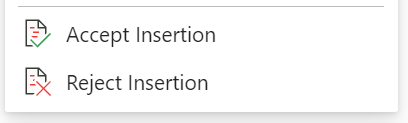
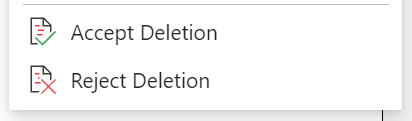
Accept changes in-line with the right-click drop-down menu option
-
Right-click a tracked change in the document to review a single suggestion.
-
In the drop-down menu, select one of the following.
-
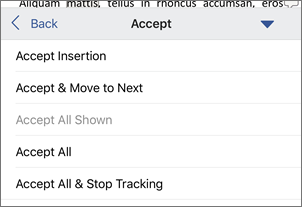
Accept Insertion (or Accept Deletion)
-
Reject Insertion (or Reject Deletion)
Accept or reject all tracked changes at once on the main menu
Accept all tracked changes
-
In Review > Changes, select Accept.
-
Select one of the options.
-
Accept All Changes Shown
-
Accept All Changes
-
Accept All Changes and Stop Tracking
Reject all tracked changes
-
In Review > Changes, select Reject.
-
Select one of the options.
-
Reject All Changes Shown
-
Reject All Changes
-
Reject All Changes and Stop Tracking
Note: When Review>Tracking>Show Markup>Specific People>All Reviewers is selected, the Accept All Changes Shown and Reject All Changes Shown options do not display.
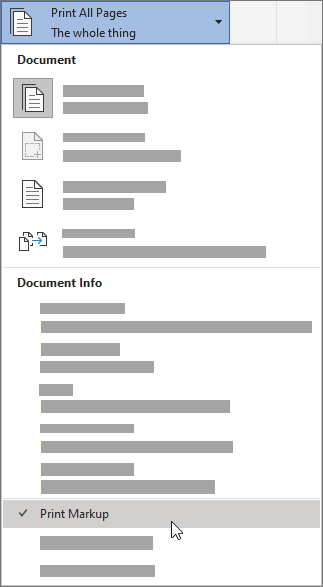
Hide tracked changes and comments when printing
Hiding changes doesn’t remove them from the document. You must use the Accept and Reject commands in the Changes group to remove markup from your document.
-
Go to File > Print > Settings > Print All Pages.
-
Under Document Info, select Print Markup to clear the check mark.

View all your changes in a summary list on the Reviewing Pane
-
In Review > Tracking, select Reviewing Pane.
-
Choose if you want to see the Reviewing Pane next to or below your document.
-
Select Reviewing Pane Vertical to see a list of all changes next to your document.
-
Select Reviewing Pane Horizontal to see a list of all changes below your document.
You can use the Reviewing Pane as a handy tool for to check that all tracked changes have been removed from your document so that they show up to others who might view your document. The summary section at the top of the Reviewing Pane displays the exact number of visible tracked changes and comments that remain in your document.
The Reviewing Pane also allows you to review long comments that don’t fit within a comment bubble.
Note: The Reviewing Pane, unlike the document or the comment balloons, is not the best tool for making changes to your document. Instead of deleting text or comments or making other changes in the Reviewing Pane, make all editorial changes in the document. The changes will then be visible in the Reviewing Pane.
Important: Comments are no longer part of the Track Changes function.
Turn on Track Changes
You can set Word for the Web to track changes for all users who are collaborating on the document or to track only your changes.
-
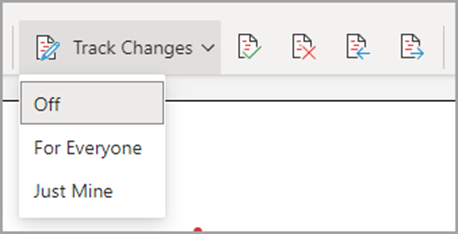
On the Review tab, select Track Changes.
-
In the Track Changes drop-down list, select one of the following:
-
To track only the changes that you make to the document, select Just Mine.
-
To track changes to the document made by all users, select For Everyone.
-
Turn off Track Changes
-
On the Review tab, select Track Changes.
-
In the Track Changes drop-down list, select Off.
Select the Markup view
-
On the Review tab, select Markup view.
-
Select one of the markup options.
-
Markup in margin (Simple Markup) — See suggestions in the margin
-
Markup on page (All Markup) — See suggestions on the page
Review, accept, or reject changes
Accept or reject tracked changes in sequence
You can review each tracked change in sequence and decide whether to accept or reject the change.
-
Click or tap at the beginning of the document.
-
On the Review tab, select Track Changes.
-
Select Accept or Reject. As you accept or reject changes, Word will move to the next change.
Tip: To move through changes in the document without accepting or rejecting them, select Next or Previous.
-
Repeat until you’ve reviewed all of the changes in your document.
Accept or reject a single change
Rather than move through changes in sequence, you can accept or reject a single change. When you accept or reject the change, Word will not move to the next change in the document.
-
Click the change.
-
Select the option to accept or reject it.
When tracked changes are turned on, Word marks any changes made by any authors of the document. This is useful when you’re collaborating with other authors because you can see which authors made a particular change.
Turn Track Changes on
-
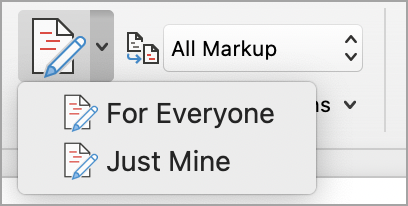
On the Review tab, select Track Changes.
-
Select to track only your own changes or everyone’s change.
-
To track only your own changes — On the Review tab, select Track Changes > Just Mine.
-
To track everyone’s changes — On the Review tab, select Track Changes > For Everyone.
Note: To turn Track Changes off, select Track Changes again.
Accept or reject all tracked changes at once on the main menu
Accept all tracked changes
-
Select Reviewing > Accept.
-
Select one of the options.
-
Accept All Changes Shown
-
Accept All Changes
-
Accept All Changes and Stop Tracking
Reject all tracked changes
-
Select Reviewing > Reject.
-
Select one of the options.
-
Reject All Changes Shown
-
Reject All Changes
-
Reject All Changes and Stop Tracking
Word shows changes in the document by displaying a line in the margin. If you switch to All Markup view, you’ll see changes inline and in balloons.
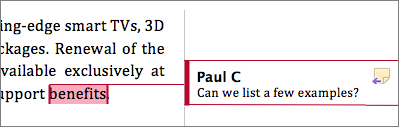
Anytime someone adds a comment, it’ll show up in a balloon.
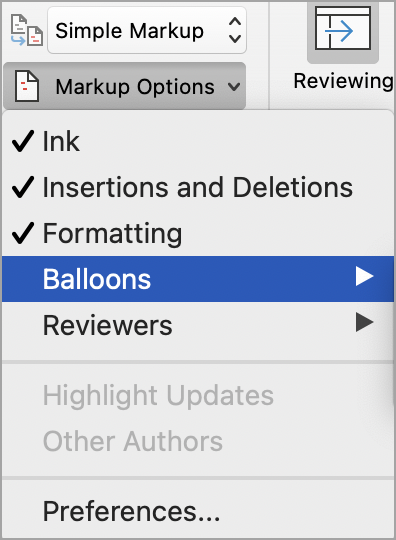
Review changes inline
To see changes inline instead of in balloons, do the following:
-
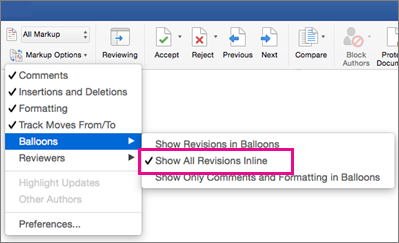
On the Review Tab, select Markup Options
-
Point to Balloons and select Show All Revisions Inline.
Keep Track Changes on
To prevent others from turning off Track Changes, lock Track Changes on with a password.
Important: Be sure to remember the password so you can turn Track Changes off when you’re ready to accept or reject the changes.
Lock Track Changes with a password
-
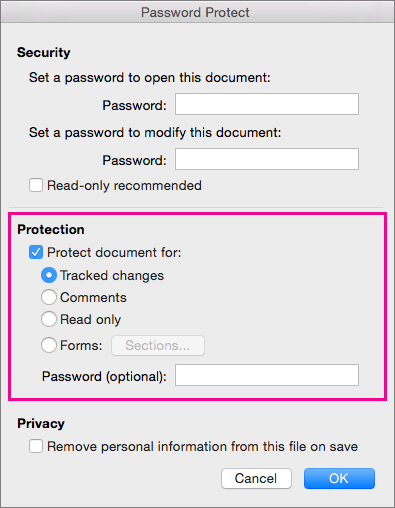
On the Review tab, select Protect > Protect Document.
-
In the Password box, enter a password.
-
Re-enter your password and select OK.
While tracked changes are locked, you can’t turn off change tracking, and you can’t accept or reject changes.
Unlock Track Changes
-
On the Review tab, select Protect > Protect Document.
-
Under Protection, uncheck Protect document for.
-
Enter your password and select OK.
For more info, see
remove the tracked changes and comments.
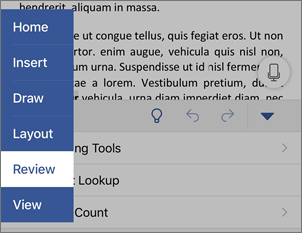
Turn Track Changes on or off (Word for iPad)
-
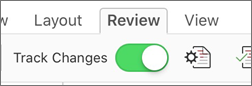
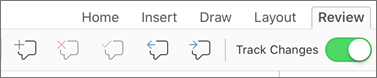
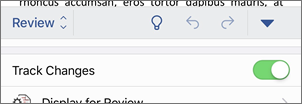
Tap the Review tab.
-
Tap the control next to Track Changes to turn Track Changes on or off.
Show or hide markup (Word for iPad)
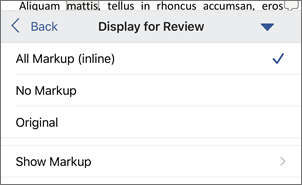
-
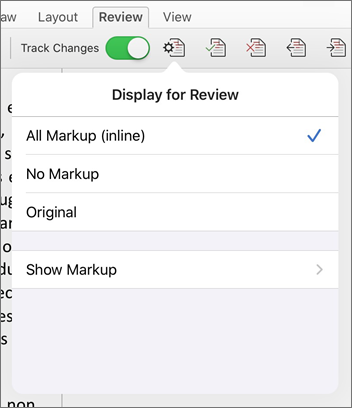
On the Review tab, tap the Display for Review icon.
-
In the Display for Review list, tap the option you want:
-
All Markup (inline) shows the final document with tracked changes visible inline
-
No markup shows the final document without tracked changed
-
Original shows the original document with no tracked changes
-
Show tracked changes by type (Word for iPad)
-
On the Review tab, tap the Display for Review icon.
-
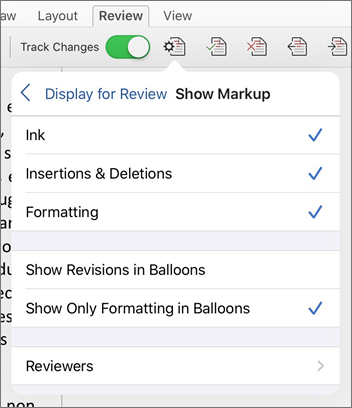
In the Display for Review list, tap Show Markup.
-
In the Show Markup list, tap the option you want:
-
Ink shows or hides any marks made by digital inking in the document.
-
Insertions & Deletions shows or hides inserted or deleted text.
-
Formatting shows or hides formatting changes.
-
Show Revisions in Balloons shows changes in balloons in the right margin.
-
Show Only Formatting in Balloons shows only formatting changes in balloons and keeps the other changes as inline tracking.
-
Show tracked changes by reviewer (Word for iPad)
If there are multiple reviewers for the document, Word will show all changes by default. However, you can choose to show only changes made by specific viewers.
-
On the Review tab, tap the Display for Review icon.
-
In the Display for Review list, tap Show Markup.
-
In the Show Markup list, tap Reviewers.
-
In the Other Authors list, tap the names of the reviewers whose changes you want to see or tap All Reviewers.
Accept changes (Word for iPad)
-
Tap twice on a change in the document to select it.
-
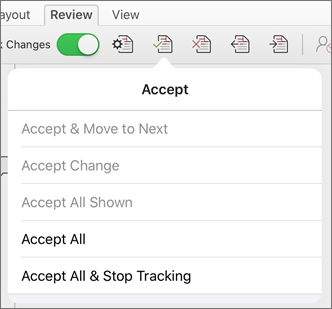
On the Review tab, tap the Accept icon.
-
Do one of the following:
-
Tap Accept & Move to Next to accept the change and move to the next change in the document.
-
Tap Accept Deletion, Accept Insertion, or Accept Change to accept the selected change, identified contextually by type, and not move to the next change in the document.
-
Tap Accept All Shown to accept all changes that are visible, but not changes that are hidden. For example, if you’re viewing only changes made by a specific reviewer, tapping Accept All Shown accepts only the changes made by that reviewer.
-
Tap Accept All to accept all changes in the document.
-
Tap Accept All & Stop Tracking to accept all changes in the document and turn off Track Changes.
-
-
To move to another change without accepting or rejecting it, tap the Previous or Next icon.
Reject changes (Word for iPad)
-
Tap twice on a change in the document to select it.
-
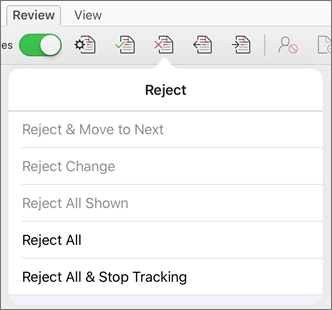
On the Review tab, tap the Reject icon.
-
Do one of the following:
-
Tap Reject & Move to Next to reject the change and move to the next change in the document.
-
Tap Reject Deletion, Reject Insertion, or Reject Change to reject the selected change, identified contextually by type, and not move to the next change in the document.
-
Tap Reject All Shown to reject all changes that are visible, but not changes that are hidden. For example, if you’re viewing only changes made by a specific reviewer, tapping Reject All Shown rejects only the changes made by that reviewer.
-
Tap Reject All to reject all changes in the document.
-
Tap Rejects All & Stop Tracking to reject all changes in the document and turn off Track Changes.
-
-
To move to another change without accepting or rejecting it, tap the Previous or Next icon.
Delete comments (Word for iPad)
-
Tap twice on a comment in the document to select it.
-
Tap the Review tab.
-
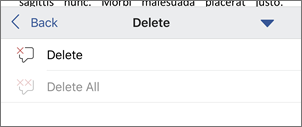
Tap the Delete icon to delete the comment or press and hold the Delete icon until the Delete list appears, and then do one of the following:
-
Tap Delete to delete only the selected comment.
-
Tap Delete All to delete all comments in the document.
-
-
To move to another comment without deleting it, tap the Previous or Next icon.
Turn Track Changes on or off (Word for iPhone)
-
Tap the pen icon at the top to open the ribbon.
-
Tap the Review tab.
-
Tap the control next to Track Changes to turn Track Changes on or off.
Show or hide markup (Word for iPhone)
-
On the Review tab, tap Display for Review.
-
Tap the option you want:
-
All Markup (inline) shows the final document with tracked changes visible inline
-
No markup shows the final document without tracked changed
-
Original shows the original document with no tracked changes
-
Show tracked changes by type (Word for iPhone)
-
On the Review tab, tap Display for Review.
-
Tap Show Markup.
-
In the Show Markup list, tap the option you want:
-
Ink shows or hides any marks made by digital inking in the document.
-
Insertions & Deletions shows or hides inserted or deleted text.
-
Formatting shows or hides formatting changes.
-
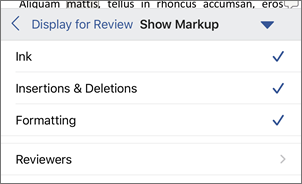
Show tracked changes by reviewer (Word for iPhone)
If there are multiple reviewers for the document, Word will show all changes by default. However, you can choose to show only changes made by specific viewers.
-
On the Review tab, tap Display for Review.
-
Tap Show Markup.
-
Tap Reviewers.
-
In the Other Authors list, tap the names of the reviewers whose changes you want to see or tap All Reviewers.
Accept changes (Word for iPhone)
-
Tap twice on a change in the document to select it.
-
On the Review tab, tap Accept.
-
Do one of the following:
-
Tap Accept & Move to Next to accept the change and move to the next change in the document.
-
Tap Accept Deletion, Accept Insertion, or Accept Change to accept the selected change, identified contextually by type, and not move to the next change in the document.
-
Tap Accept All Shown to accept all changes that are visible, but not changes that are hidden. For example, if you’re viewing only changes made by a specific reviewer, tapping Accept All Shown accepts only the changes made by that reviewer.
-
Tap Accept All to accept all changes in the document.
-
Tap Accept All & Stop Tracking to accept all changes in the document and turn off Track Changes.
-
Reject changes (Word for iPhone)
-
Tap twice on a change in the document to select it.
-
On the Review tab, tap Reject.
-
Do one of the following:
-
Tap Reject & Move to Next to reject the change and move to the next change in the document.
-
Tap Reject Deletion, Reject Insertion, or Reject Change to reject the selected change, identified contextually by type, and not move to the next change in the document.
-
Tap Reject All Shown to reject all changes that are visible, but not changes that are hidden. For example, if you’re viewing only changes made by a specific reviewer, tapping Reject All Shown rejects only the changes made by that reviewer.
-
Tap Reject All to reject all changes in the document.
-
Tap Reject All & Stop Tracking to reject all changes in the document and turn off Track Changes.
-

Delete comments (Word for iPhone)
-
Tap twice on a comment in the document to select it.
-
One the Review tab, tap Delete, and then do one of the following:
-
Tap Delete to delete only the selected comment.
-
Tap Delete All to delete all comments in the document.
-
-
To move to another comment without deleting it, tap the Previous or Next icon
Need more help?
Author:
Joan Hall
Date Of Creation:
1 July 2021
Update Date:
6 April 2023


MS Word has a special operating mode that allows you to make edits and edit documents without changing their content. Roughly speaking, this is a good opportunity to point out mistakes without correcting them.
Lesson: How to add and change footnotes in Word
In edit mode, you can make corrections, add comments, explanations, notes, etc. It is about how to activate this mode of operation that will be discussed below.
1. Open the document in which you want to turn on the editing mode, and go to the tab «Review».

Note: In Microsoft Word 2003, to enable edit mode, you must open the tab «Service» and select the item there «Fixes».
2. Click the button «Fixes»located in the group «Recording corrections».

3. Now you can start editing (correcting) the text in the document. All changes made will be recorded, and the type of revision with the so-called explanations will be displayed to the right of the work area.

In addition to the buttons on the control panel, you can activate the editing mode in Word using a combination of keys. To do this, just press «CTRL + SHIFT + E».
Lesson: Keyboard shortcuts in Word
If necessary, you can always add a note to make it easier for the user who will later work with this document to understand where he made a mistake, what needs to be changed, corrected, removed altogether.

Changes made in edit mode cannot be deleted, you can accept or reject them. You can read more about this in our article.

Lesson: How to remove corrections in Word
That’s all, now you know how to enable edit mode in Word. In many cases, especially when working with documents, this function of the program can be extremely useful.

The MS Word program has a special mode of operation that allows you to make edits and edit documents without changing their content. Roughly speaking, this is a good opportunity to point out mistakes without correcting them.
Lesson: How to add and modify footnotes in the Word
In edit mode, you can make corrections, add comments, explanations, notes, etc. It is on how to activate this mode of operation, and will be discussed below.
1. Open the document in which you want to enable edit mode and go to the tab. «Review.

Note: In Microsoft Word 2003, to turn on the edit mode, you must open the tab. «Service» And there choose the item «Corrections».
2. Click on the button «Corrections» located in the group «Record fix».

3. Now you can proceed to edit the text in the document. All changes made will be recorded, and the type of editing with the so-called explanations will be displayed to the right of the workspace.
In addition to the buttons on the control panel, activate the edit mode in the Word can be used using the key combination. To do this, just click «Ctrl + SHIFT + E».
Lesson: Hot keys in Word
If necessary, you can always add a note that the user who will continue to work with this document to be easier to understand where he made a mistake that it is necessary to change, fix, remove at all.
Unable to remove changes in edit mode, they can be accepted or deflected. You can read this in more detail in our article.

Lesson: How to remove corrections in the Word
Here, in fact, all, now you know how to turn on the edit mode in WORD. In many cases, especially when working with documents, this program function may be extremely useful.