
Excel 2016 Word 2016 Outlook 2016 PowerPoint 2016 Excel 2013 Word 2013 Outlook 2013 PowerPoint 2013 Excel 2010 Word 2010 Outlook 2010 PowerPoint 2010 Excel 2007 Word 2007 Outlook 2007 PowerPoint 2007 Еще…Меньше
Редактор уравнений (Microsoft Equation 3,0) был добавлен в более ранние версии Word, но был удален из всех версий, указанных в общедоступном обновлении для 2018 января (ОБЩЕДОСТУПНОЕ обновление за), и заменен новым редактором уравнений.
Содержимое здесь описывает эту функцию для пользователей, которые установили это обновление.
Важно: Редактор уравнений 3,0 она была удалена из-за проблем с безопасностью в ее реализации. Пользователи, которые пытаются изменить формулу, созданную в редакторе уравнений 3,0, получат сообщение об ошибке «Microsoft Equation недоступен». Если вы установили шрифт «MT Extra» (если у вас нет шрифта, вы можете скачать его), вы увидите, что они будут отображаться в 3,0 редакторе уравнений в обычном режиме. Тем не менее, пользователи могут редактировать эти уравнения только путем загрузки программных средств Мастипе, предоставленных ВИРИС. Посмотрите, как мастипе классическое приложение для пользователей «редактор уравнений».
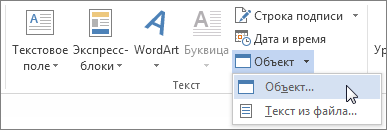
Вставка уравнения с помощью редактора формул
-
На вкладке Вставка в группе Текст нажмите кнопку Объект.

-
В диалоговом окне Объект откройте вкладку Создание.
-
В поле Тип объекта выберите значение Microsoft Equation 3.0 и нажмите кнопку ОК.
-
Измените уравнение с помощью символов, шаблонов и структур на панели инструментов Формула.
-
Чтобы вернуться к документу, в Word, Excel или Outlook щелкните в любом месте документа.
Чтобы вернуться к презентации в PowerPoint, в меню Файлредактора формул щелкните Выход и возврат к презентации.
Изменение уравнения с помощью редактора формул
Если вы использовали редактор формул для вставки уравнения, изменить его также можно с помощью этого редактора.
-
Дважды щелкните уравнение, которое вы хотите изменить.
-
Измените уравнение с помощью символов, шаблонов и структур на панели инструментов Формула.
-
Чтобы вернуться к документу, в Word, Excel или Outlook щелкните в любом месте документа.
Чтобы вернуться к презентации в PowerPoint, в меню Файлредактора формул щелкните Выход и возврат к презентации.
Вставка уравнения с помощью редактора формул
-
На вкладке Вставка в группе Текст нажмите кнопку Объект.
-
В диалоговом окне Объект откройте вкладку Создание.
-
В поле Тип объекта выберите значение Microsoft Equation 3.0.
Если редактор уравнений недоступен, возможно, потребуется установить его.
Установка редактора формул
-
Закройте все программы.
-
На панели управления щелкните Установка и удаление программ.
-
В поле Установленные программы выберите Microsoft Office <выпуск> 2007 и нажмите кнопку Изменить.
-
На странице Изменение установленного пакета Microsoft Office <suite> 2007. выберите команду Добавить или удалить компонентыи нажмите кнопку продолжить.
-
На вкладке Параметры установки щелкните индикатор развертывания (+) рядом с компонентом Средства Office.
-
Щелкните стрелку рядом с названием Редактор формул и выберите Запускать с моего компьютера.
-
Нажмите кнопку Продолжить.
-
После того как вы закончите установку редактора формул, перезапустите приложение Office, которое вы используете.
-
-
В диалоговом окне Объект нажмите кнопку ОК.
-
Измените уравнение с помощью символов, шаблонов и структур на панели инструментов Формула.
-
Чтобы вернуться к документу, в Word, Excel или Outlook щелкните в любом месте документа.
Чтобы вернуться к презентации в PowerPoint, в меню Файлредактора формул щелкните Выход и возврат к презентации.
Изменение уравнения с помощью редактора формул
Если вы использовали редактор формул для вставки уравнения, изменить его также можно с помощью этого редактора.
-
Дважды щелкните уравнение, которое вы хотите изменить.
-
Измените уравнение с помощью символов, шаблонов и структур на панели инструментов Формула.
-
Чтобы вернуться к документу, в Word, Excel или Outlook щелкните в любом месте документа.
Чтобы вернуться к презентации в PowerPoint, в меню Файлредактора формул щелкните Выход и возврат к презентации.
Сведения о том, как использовать встроенные уравнения с помощью кнопки » уравнение «, можно узнать в статье написание формулы или формулы.
См. также
Формулы в линейном формате и функция автозамены математическими символами в Word
Создание уравнений и формул
Нужна дополнительная помощь?

В программе MS Word есть специальный режим работы, который позволяет вносить правки и редактировать документы, не изменяя при этом их содержания. Грубо говоря, это хорошая возможность указать на ошибки, не исправляя их при этом.
Урок: Как в Ворде добавлять и изменять сноски
В режиме правки можно сделать исправления, добавить комментарии, пояснения, примечания и т.д. Именно о том, как активировать этот режим работы, и пойдет речь ниже.
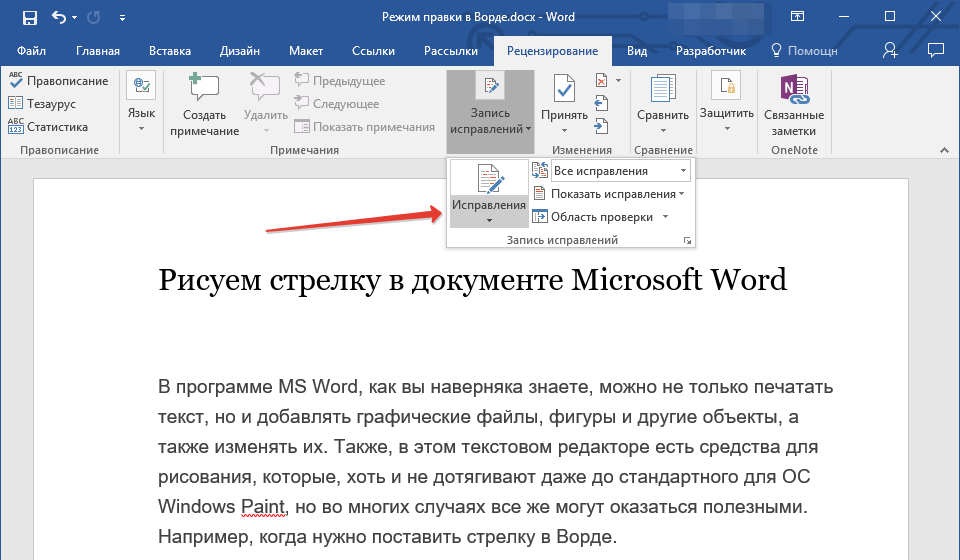
1. Откройте документ, в котором нужно включить режим правки, и перейдите во вкладку “Рецензирование”.

Примечание: В Microsoft Word 2003 для включения режима правки необходимо открыть вкладку “Сервис” и там выбрать пункт “Исправления”.
2. Нажмите на кнопку “Исправления”, расположенную в группе “Запись исправлений”.
3. Теперь можно приступить к редактированию (исправлению) текста в документе. Все внесенные изменения будут фиксироваться, а тип правки с так называемыми пояснениями будет отображаться справа от рабочей области.

Помимо кнопок на панели управления, активировать режим правки в Ворде можно и с помощью комбинации клавиш. Для этого просто нажмите “CTRL+SHIFT+E”.
Урок: Горячие клавиши в Word
Если это необходимо, вы всегда можете добавить примечание, чтобы пользователю, который в дальнейшем будет работать с данным документом, было проще понять, где он допустил ошибку, что требуется изменить, исправить, убрать вовсе.


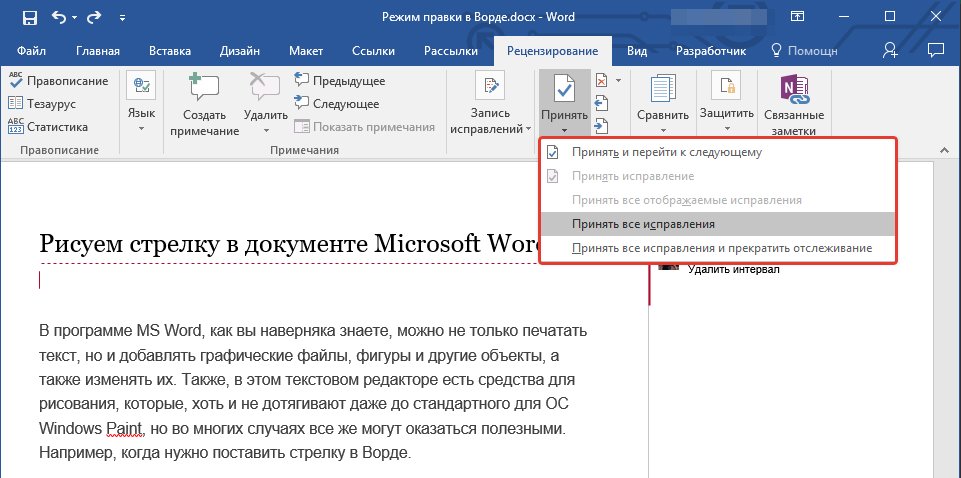
Внесенные в режиме правки изменения невозможно удалить, их можно принять или отклонить. Более подробно об этом вы можете прочесть в нашей статье.
Урок: Как в Ворде убрать исправления
Вот, собственно, и все, теперь вы знаете, как в Word включить режим правки. Во многих случаях, особенно, при совместной работе с документами, эта функция программы может оказаться крайне полезной.
Еще статьи по данной теме:
Помогла ли Вам статья?
Adding a Break to Your Document
Want to modify the way your text flows between pages in a document? Word allows you to insert several types of breaks that control the flow for you.
Adding an Optional Break
The no-width optional break is primarily used for Asian languages in Word. It can have value for English-speakers, as described in this tip.
Adding Half Spaces to Punctuation
Want a little more space just before some of your punctuation characters? You can add that spacing in a variety of ways, as recounted in this tip.
Adding Hyphens to Phrases
Editing text to turn regular words into hyphenated phrases can be a real bother. The chore can become a breeze if you apply the ideas in this tip.
Adding Parentheses
Need to add parentheses around some word or phrase? Here’s a quick macro that makes this simple edit in one step.
Adding Quotes
Adding quote marks is normally as simple as typing them from the keyboard. However, if you want to add quote marks around both ends of a text selection in a single step, you’ll love this tip and the macro it describes.
Adding Serial Commas in a Sentence
Part of the job of an editor is to apply standards of grammar to text written by someone else. One standard that may need to be applied is the inclusion of a serial comma in an in-line list. Here’s a way you can make adding these commas easy.
An Automatic Two Spaces after a Period
Should you put two spaces after a sentence or just one? Ask different people and you will get different answers. To Word the answer isn’t really important; it can help you enforce either type of spacing you want. This tip explains how.
Arranging Paragraphs
Need to move a few paragraphs around in your document? Word provides a couple of handy shortcuts that make it very easy to move them in any direction you want.
Asking for Delete Confirmation
When you select some text and then press the Del key, the text should immediately be removed from your document. If you see a message on the status bar asking if you are sure you want to make the deletion, this is an artifact of the WordPerfect support built into Word. This tip explains how to get rid of this prompt so you can get on with deleting.
Automatic Non-breaking Spaces in Dates
It drives some people crazy to have a date break across two lines. If you find yourself in this mindset, then you’ll appreciate the ideas presented in this tip for easily making sure that a date stays all on the same line.
Calculating Expressions
Word can do some simple calculations for you, if you add a little-known tool to your toolbar. Here’s how to add and use this handy tool.
Capitalizing the First Letter after a Colon
There are many rules in English grammar (and many exceptions to those rules.) One common rule of grammar is to capitalize the first letter appearing after a colon, provided that what follows the colon could stand on its own as a sentence. Word does not include a way to do this capitalization automatically (too many grammatical exceptions to make a hard-and-fast rule), but you can create your own macro that will take care of the capitalization for you.
Capitalizing the Word «I»
The first-person, singular pronoun «I» should always be capitalized, unless you are exercising poetic license. Word may not always make sure it is capitalized, however, as discussed in this tip.
Capitals After Colons
Do you want Word to always capitalize the first letter appearing after a colon? The program won’t do it by default, but there are a couple of things you can try to get the capitalization you want.
Changing AutoComplete Words
AutoComplete allows you to easily complete words you are typing in your document. If AutoComplete is presenting you with the wrong suggestions, you need the information in this tip.
Changing Many Link Locations
Word makes it easy to establish links between documents. If you need to change the locations for a lot of links at once, you can apply the technique outlined in this tip.
Checking for Matching Parentheses
There are lots of little «gottchas» that can make the difference between a finished document and a polished document. One such thing is making sure that you have matching parentheses�»a closing parenthesis for every opening one. This tip presents a macro that can make quick work of this check and notify you if there is a potential problem.
Checking for Words and Phrases
You may want to determine if a document contains a certain set of words or phrases. There are a couple of ways you can make this determination, as illustrated in this tip.
Clearing All Tabs in a Document
Need to get rid of all the tab stops in a particular document? It’s easy to do when you apply the technique outlined in this tip.
Collecting Highlighted Text Selections
Got a document with text passages marked with the highlighter tool? You can collect all those highlighted selections and move them to a new document by applying the techniques in this tip.
Comparing Documents Top and Bottom
Word has a feature that allows you to compare two documents side-by-side. What if you actually want to compare the documents one above the other (top and bottom)? You can make this change in orientation rather easily, as described in this tip.
Compound Page Numbering
Simple page numbering is easy to add to your documents. More complex numbering (such as two numbering schemes in the same document) are a different story. This tip provides some guidance on how you can approach your more complex numbering needs.
Controlling Overtype Mode
Some people like to have Word replace previous information as they type; this is called «overtype mode.» You can control overtype mode by following the steps outlined in this tip.
Copying and Pasting Field Codes
Want to copy a field code and paste it in some other Windows program? This can be trickier than it sounds. Here’s the lowdown on why this is, and a macro you can use to make copying and pasting field codes easier.
Creating a Quick Letter
Word provides a handy wizard that is helpful in creating basic letters quickly and easily. This tip discusses the Letter Wizard and how you can use it.
Creating Compound Characters
Word provides access to a wide variety of characters either from the keyboard or from the Symbol dialog box. Up and above that, you can also use a field to create your own special compound characters, if desired.
Creating Custom Document Properties
Word allows you to keep track of any number of custom properties about a document. Here’s how to create those properties and later use them in a document.
Creating New Windows
A great way to work on different parts of the same document at the same time is to create windows. These function as different views of the document.
Creating the ‘Mils’ Symbol
Different industries use their own terminologies and symbols. In the military, one symbol is referred to as the «mils» symbol. This tip explains what it is and how to create it.
Dealing with Run-On Sentences
A common task when editing documents is to break up run-on sentences. You can make this task a little easier by using the editing macro described in this tip.
Default Click and Type Paragraph Style
When you use the Click and Type feature, Word uses applies the Normal style to the paragraph created. You can specify a different style of paragraph by using the steps in this tip.
Deleting a Page
Want to delete the current page? There is no automatic command to perform this task in Word, but you can create your own command with the single-line macro described in this tip.
Deleting a Range of Pages
Need to delete a range of pages out of the middle of your document? It’s easy to do using editing techniques you already know about.
Deleting Freezes Computer
Sometimes a strange object or text may appear in your document, as happened to Sharon. To complicate the situation, her computer freezes when she tries to delete the object. Here are some things to try out if you have the same issue.
Deleting Words
Tired of pressing the Delete or Backspace key for every character you want to delete? Here’s a way you can make your editing much faster, with just a simple change to your deleting keypress.
Deletions Don’t Work as Expected
We all get into habits, including in how we use Word. If you are used to deleting text in a particular way, and all of a sudden that way doesn’t work any more, it can be bothersome. Here’s a look at why the way you delete text could change in Word.
Differences between Deleting, Clearing, and Cutting
When getting rid of text from your document, Word allows you to delete, clear, or cut. Here are the differences between these actions.
Displaying Nonprinting Characters
Nonprinting characters are a great boon when you are editing a document. Turn them on and you can easily see what characters make up your text. Here’s how you can control which of the nonprinting characters Word displays.
Editing an AutoText Entry
Once you’ve created an AutoText entry, you may believe that it is «set in stone» and cannot be changed. Not so! You can redefine it very easily using the steps in this tip.
Editing While Spell-Checking
When you run a spell-check on a document, you may end up seeing other things that need to be edited. Never fear; you can do the edits without jumping out of the in-process spell-check.
Ensuring Consistent References with AutoText
You’ll often need to make sure that references within a document are consistent with each other. In this tip you discover how you can use AutoText to help enforce the consistency you need.
Entering a «Slashed Zero» in Your Document
Need to add the occasional zero with a slash through it? There are a couple of ways you can accomplish this task.
Entering a Degree Sign
One of the more common symbols that people need to use in their writing is the degree symbol, typically used after a numeric temperature. If you need to add this symbol, you’ll appreciate the shortcuts presented in this tip.
Entering a Page Break from the Keyboard
Need to force Word to move text to the top of the next page? It’s easy when you use the keyboard shortcut for a page break.
Extra Space after Quotation Mark when Pasting
Have you ever noticed how Word can decide to add extra spaces when you paste information into your document? This is part of Word’s helpful approach to editing, but you may not want Word to be that helpful. Here’s how to make Word behave the way you want it to.
Finding the Previous Occurrence
Using Word’s Object Browser, it is very easy to move among different instances of what you want to search in your document. This tip explains how this tool can be used effectively to enhance your searching efforts.
Generating a List of Dates
When creating tracking documents in Word, you may need to come up with a series of dates in the document. You can type these by hand, or you can use the macros described in this tip to enter the dates very easily.
Getting Rid of Automatic Page-Break Lines
A little trick to get rid of pagination marks when you have background pagination turned off.
Getting Rid of the Paste Options Box
Paste something in a Word document, and you may notice a dynamic little set of options appear right next to what you pasted. If you find these «paste options» distracting, you can configure Word so that they aren’t displayed.
Getting the Proper Type of Ellipses
Type three periods in a row, and the AutoCorrect feature in Word kicks in to exchange that sequence for a special ellipses character. If you don’t like the ellipses that Word uses, you can define your own using any number of methods.
Highlighting Duplicate Words
One way to help improve your writing is to minimize the number of duplicated words you use in your prose. Depending on the way you want to approach the task, Word has a few different ways you can find those words.
Hyperlinks Not Found
When creating hyperlinks in a document, it is important to remember the difference between absolute and relative referencing. If you use the latter, you could end up with hyperlinks that are broken if the target of those links becomes unavailable for some reason.
Inserting a Bullet
Need to place a bullet in the middle of a sentence? There are a couple of easy ways you can do this, as described in this tip.
Inserting a Copyright Mark
One of the most common symbols that can be added to a document is the copyright mark. This tip examines several ways you can easily add this symbol to your writing.
Inserting a Non-Breaking Hyphen
Non-breaking hyphens can come in helpful for some types of writing. They force the words (or characters) on both sides of the hyphen to stay on the same line. There are two ways to add such hyphens to your document, as described in this tip.
Inserting a Non-Breaking Space
In Word a non-breaking space will help you keep two words together on the same line. Here’s two different ways that you can insert that special kind of space.
Inserting a Section Mark
Section marks are used regularly in the writings of some industries, such as in legal documents. If you need a way to easily add section marks to your documents, consider using the AutoCorrect feature to do the adding for you.
Inserting a Special Symbol
The vast majority of what you enter into a document can be accomplished through the use of the regular keyboard. However, some characters don’t appear on the keyboard. For these special symbols you’ll want to note the technique in this tip.
Inserting Different Dashes
Dashes have a lot of different uses in writing. Word supports three types of dashes, as discussed in this tip.
Inserting Foreign Characters
It is not unusual to need to insert foreign characters (often called diacritical marks) as part of your typing. Word provides several different ways you can easily insert the characters you need.
Inserting Special Spaces
Do you need to frequently add en spaces and em spaces to your documents? You can add special tools to Word that make inserting these characters a snap.
Inserting Text with a Shortcut Key
The AutoText capabilities of Word are quite powerful, allowing you to insert all sorts of «boilerplate» information in your document. Expanding an AutoText entry is easy when you use the F3 key, but there are ways you can create special shortcut keys for individual AutoText entries.
Inserting the Edit Time
One of the things that Word keeps track of is how long, in minutes, you’ve been editing your current document. This information can be inserted into the document using the EditTime field.
Inserting Today’s Date
When writing letters, reports, or other date-dependent documents, you need to regularly insert the current date in the document. Here is how to easily insert the date in the format you want.
Line Breaks After a Slash
Some writers use the slash to combine words and as shorthand to signify «or» or «and.» This, of course, makes for some very long words that may not break from line to line in your document as you desire. This tip discusses ways you can use the slash so that line breaks will occur after it.
Meaningless Text
The quick brown fox jumps over the lazy dog, or so the story goes. Here’s how to put this type of meaningless text into a document.
Messed-up Typing
It is not uncommon for newcomers to Word to overwrite their existing document text as they are editing. There is a reason for that—and a fix. Here’s the information you need.
Moving Breaks Quickly
Breaks in a document can be easily moved from one place to another using familiar editing techniques. The trick is to make sure that you are viewing your document in Normal view.
Moving Section Breaks
Section breaks are used to divide a document into two or more sections that can be independently formatting. If you want to move a section break, it’s easy to do using the same techniques you use to edit your document text.
Moving Text Using the Mouse
Many people use the keyboard to do their primary editing tasks. Word doesn’t limit you to the keyboard, however. You can also use the mouse to do your editing, as described in this tip.
Moving Text without Affecting the Clipboard
Want a quick and easy way to move text (or other document elements) from one place to another in your document? Check out this little-known editing method.
Non-breaking Em Dashes
Need an em dash to be «sticky» on both ends of the dash? Word doesn’t provide such formatting, but there are a few workarounds you can use to get the stickiness you need.
Noting Changes at the Left of the Text
The Track Changes feature allows you to easily see where changes have been made in a document. Resolve those changes, and you can no longer see where the changes were. If you want to still note where changes once existed, you may be in for a lot of manual work.
Overcoming Automatic Word Selection
When you select text with the mouse, Word usually selects entire words for you. If you don’t want to do this, you can use the technique described in this tip to select just the text you want.
Pasting a Hyperlink
When you paste information into a document, you can specify that it be inserted as a hyperlink rather than as normal text. Doing so allows you to establish a link between the text and the original source of that text.
Pasting Clean Text
One of the most helpful tools in Word is the ability to paste straight text into a document. This is used so much on my machines that I created a small macro that saves me time in using the tool.
Pasting Text with Track Changes
Track Changes is a great tool for developing documents. If you want to copy text from one document to another, with tracked changes intact, you’ll need the info in this tip.
Picking Up in the Last Document Edited
Sometimes it seems that we focus on getting a particular document hammered out to the exclusion of other documents we could be working with. Here’s how you can speed up the process of loading the last document you worked on and jumping to the proper place in that file.
Picking Up Where You Left Off
Need a quick way to get back to a where you previously edited? Here’s a shortcut that will serve you well.
Placeholders for Stamps
Got a reply envelope you want to create? Why not put a placeholder for the stamp on the envelope? It’s easy to do if you know how.
Plain Text Pasting as the Default
Pasting ‘plain text» into a document is one of the most common ways of pasting information. Wouldn’t it be great if this could be the default method of pasting text?
Problems Pasting Large Pictures
If you insert a large picture in your document and your text jumps all around and the picture seems to disappear, don’t worry. The information in this tip will help you get matters back to normal in record time.
Processing Information Pasted from a PDF File
When pasting information copied from a PDF file, you can end up with a paragraph for each line of the original document. It would be much better to process the information to remove the extra paragraph breaks prior to pasting. This tip provides a macro you can use to do just that.
Putting a Bullet in the Middle of a Sentence
Need a special character (such as a bullet) in the middle of your text? Here are two quick ways to enter the character you need.
Putting Character Codes to Work
If you know the character codes for some characters of interest, you can use those codes to do lots of tasks. This tip explains some of the ways you can use those codes.
Quickly Finding Synonyms
If you need to find some synonyms for a specific word in your document, here’s how you can do it. (Hint: All you need to do is right-click.)
Quickly Moving Text with the Mouse
Drag-and-drop editing is a handy feature when you love to use the mouse. There are two ways you can move text using the mouse, both of which are described in this tip.
Removing Breaks
Word allows you to add several types of «breaks» into your document. If you later want to remove any of them, you can use editing techniques you are already familiar with.
Removing Entire Paragraphs from Your Document
If you need to get rid of a lot of paragraphs in a document, it’s easy to do as long as the document relies on styles for those paragraphs. You use the Find and Replace feature of Word to do the cutting, as described in this tip.
Repeating Actions
Need to repeat an action a whole bunch of times? You can do it a time or two using keyboard shortcuts, but you’ll need a macro (like the handy one in this tip) to make repeating a lot of times possible.
Repeating Your Typing
Want a quick way to repeat a word or phrase you just typed? Here’s the shortcut you need.
Replacing Random Text with Your Own Text
Word includes a little-known function that allows you to put «filler text» into your document. If you want this function to insert your own special text instead, you may be out of luck. There are ways around the problem, however.
Replacing the Last Comma
When you need to perform certain editing tasks over and over again, you start to look for ways to make your work faster and more automatic. This tip presents a macro you can use to automatically perform one of those repetitive tasks—replacing the last comma in a sentence.
Selective Undo
Ever wonder why you can’t undo just a single edit you made a few minutes earlier? The short answer is that it could make your document unstable or unusable, as described in this tip.
Sharing Headings with Others
Headings form the outline of your document and hopefully give it an easy-to-follow organization. If you want to share those headings with others, there are a couple of approaches you can take.
Single-Character Fractions
Some fractions Word automatically converts to single characters, some it doesn’t. Here’s why that happens and what you can do about it.
Slowing Down Mouse Selection
We’ve all experienced the problem: You start selecting a large block of text using the mouse, and before you know it the screen is zipping by at incredible speeds. This tip discusses techniques you can use to get text selection under better control.
Spacing After Sentences
Word can check to see if you have a consistent number of spaces at the end of your sentences.
Specific Capitalization
How to get around Word’s AutoCorrect feature for having uncapitalized words at the start of a sentence.
Strip Trailing Spaces
If you get tired of documents that always seem to have extra spaces at the end of lines, here’s a quick way to get rid of them. Just use the quick macro provided in this tip.
Symbols for Non-Printing Characters
Displaying non-printing characters can help you better understand the formatting and contents of your documents. What do all the different symbols displayed by Word really mean, though?
Talking to Yourself
Need to keep notes about a document, but you don’t want others to see those notes either on-screen or on-paper? Here’s an easy way to add helpful notes throughout your document.
Transposing Letters
My fat fingers sometimes result in typing letters in the wrong order. Here’s a quick tool that allows you to easily transpose two adjacent letters.
Transposing Two Characters
If you have two characters in the wrong order, you might be interested in a shortcut you can use to switch their order. There is no such tool built into Word, but with a handy (and simple) macro, you can create your own shortcut.
Transposing Two Paragraphs
Need to swap two adjacent paragraphs? Your editing arsenal can include a command to do this is you use the macro in this tip.
Transposing Two Words
A common editing task is to transpose two adjacent words, so that their order is changed. While the task is common, there is no command within Word to take care of the task. Here’s a simple macro you can use to do the transposition for you.
Turning Off Paste Options
Paste information into a document and you’ll immediately see a small icon next to the pasted information. This icon allows you to access options that affect the pasting operation. Don’t like the icon? Here’s how to get rid of it.
Turning Off Word’s Second Guessing with Quote Marks
When you type quote marks in a document, Word normally changes them to Smart Quotes. They look better on a printout, but Word can sometimes mess up and make changes to the quotes that it shouldn’t. Here’s some things you can try when you get tired of Word making mistakes.
Typing Pronunciations of Words
Take a look in a dictionary at the way that words are phonetically spelled. Those special characters used to type those pronunciations can be added to your documents, if you know where to look for them.
Unable to Edit Document with Embedded Fonts
What are you to do if you embed fonts in a document and then someone else cannot make changes to that document? Chances are good that this scenario has to do with the characteristics of the fonts you are embedding. Here are some things to check out.
Understanding Click and Type
The Click and Type feature of Word allows you to use the mouse to click somewhere on a blank page, and then begin typing. Understanding how the feature works can mean better results when using it.
Understanding Hard and Soft Returns
Did you know that there are different types of returns in Word? Here’s the inside scoop.
Understanding Hyphens and Dashes
Word provides you with three types of hyphens and two types of dashes that you can use in your documents. Understanding the differences between them all can help you make better decisions about which you should use (and when).
Understanding Nonprinting Characters
Even characters that print nothing still take space in your document. Characters such as tabs, spaces, breaks, and the like all are accounted for and tracked by Word. It is a good idea to display these special characters on the screen so that you can track them, too.
Understanding Smart Cut and Paste
Editing is generally made easier by a feature that Word calls smart cut and paste. If you prefer, you can turn the feature off by making a change on the Edit tab of the Options dialog box.
Understanding the Big Three Autos in Word
Three of the tools provided in Word are AutoText, AutoCorrect, and AutoComplete. It is easy to confuse what these tools do, unless you know the information in this tip.
Understanding the Clipboard
You can use the Windows Clipboard to move information around in Word. To make the most of the Clipboard, it is helpful to understand how it works.
Understanding the No-Width Characters
Search through the Symbol dialog box, and you may see some special characters whose names seem odd. These are the no-width characters, and here’s an explanation of what they are for.
Understanding Views
Want to see how your document will look before it’s printed? Or, do you want to see what things will look like if you put your document on the web? Word allows you to easily view your document in a few different ways. Here’s how.
Using ASCII and ANSI Characters
Word natively supports several types of character sets. The most common characters sets are known as ASCII and ANSI characters. This tip explains what these are and how to use them in Word.
Using Consistent References
Some text references need to be consistent in many places throughout a document. Learn different ways you can ensure that your references are consistent.
Using Document Properties to Ensure Consistent References
If you need to refer to the same information over and over in a document, you may be interested in using custom document properties to implement those references. Defining the properties is easy and you can use the DOCPROPERTY field to later recall the information.
Using Extend Mode
One of the most overlooked shortcut keys in Word has to be the extend key. Yet, learning how to use this simple key can save your hours in your editing efforts. Here’s how to use extend mode to make your editing more productive.
Using Manual Line Breaks with Justified Paragraphs
If you use justified paragraphs, you know that if you press Shift+Enter, it can lead to some odd spacing between words and characters in the paragraph. You can avoid this problem by using one little character: the lowly tab.
Using Optional Hyphens
Adding hyphens to your document can affect the way in which Word wraps text from one line to the next. Optional hyphens, described in this tip, can make hyphenation even more powerful and flexible.
Using Overtype Mode
When you type information into a document, what you type normally is inserted just the left of the insertion point. Word includes another editing mode that replaces existing text with whatever you type. This tip describes what overtype mode is and how it works.
Using the Copy or Move Text Keys
Most people use the Clipboard to copy and move text in Word. Before the Clipboard, Word used F2 to move text and Shift+F2 to copy it.
Using the Spike to Edit
Most Word users are proficient in cutting and pasting text using the Clipboard. One of the lesser-known editing tools, however, is the Spike. This tool, described in this tip, can be very handy and perform tasks that the Clipboard cannot.
Viewing More of the Left Margin Area
When working in Draft or Normal view, you may want to view the area just to the left of the document’s left margin. Here’s a quick way to display that area.
Viewing Your Entire Document Width
The Zoom tool is very useful to help you see all of your document information. Here’s how to make sure you can see all the document information horizontally.
Wrapping Spaces
Add more than one space after the end of a sentence, and you may find that the extra spaces wrap to the start of new lines. Here’s how to get Word to treat those extra spaces as you expect.
![]()
| Word processing | |
|---|---|
| Working with text | Introduction | Character formatting | Paragraph formatting | Editing features | Working with tabs | Key points | Assessment |
Contents
- 1 Editing
- 2 Spell Check a whole document
- 3 Activity
- 3.1 Spell check exercise
- 4 Activity
- 4.1 Editing exercise 1
- 5 Activity
- 5.1 Editing exercise 2
- 6 Activity
- 6.1 Moving and copying blocks of text
- 7 Activity
- 7.1 Moving paragraphs exercise
- 8 Activity
- 8.1 Find and Replace Text
- 8.1.1 Extra resources
- 8.1.2 Replace text automatically
- 8.1.3 Replace standard text with formatted text
- 8.1.4 Find and replace exercise
- 8.1 Find and Replace Text
- 9 Activity
- 9.1 Corrections
- 10 Activity
Editing
To edit a document is to change the way it appears: this can be by moving and inserting text, deleting text or creating and removing paragraphs.
The following functions are used when editing an existing document or text you have entered. The procedure column outlines the commands you will need to carry out in order to apply the editing feature.
| Editing Function | Procedure to use |
|---|---|
| Inserting | Click the I-Beam cursor at the point to insert, and type in the text to be inserted. |
| Overtyping | Double click OVR on the Status Bar at the bottom of the screen. Type text. Double click OVR to end overtyping or press Insert on the keyboard to begin overtyping, press Insert again to end overtyping. |
| New Paragraph | Press the Enter key twice after the end of the previous text. |
| Join Paragraphs | Place cursor at the end of the first paragraph and press Delete twice or place cursor at the beginning of the second paragraph and press Backspace twice. Press the Spacebar. |
| Delete to right of cursor | Press the Delete key. (Ctrl + Delete deletes a word to the right). |
| Delete to left of cursor | Press the Backspace key. (Ctrl + Backspace deletes a word to the left). |
| Delete a blank line | Place the cursor on the blank line and press Delete. |
| Insert a blank line | Place the cursor where you want the new line and press Enter. |
| Undo last action | Click the Undo button or click the Edit menu then select Undo. |
| Redo last “Undo” | Click the Redo button to redo the last “Undo” or click the Edit menu then select Redo. |
| Typing Replaces Selection | Select (highlight) text and type in new text. |
| Transpose text (swap) | Select the second part of the text to be swapped. Click the Edit menu, then click Cut. Click the cursor where you want the text to be placed. Click the Edit menu, then click Paste. |
Spell Check a whole document
The Spell checker is great for picking up errors but don’t rely on it entirely. A word may be spelt correctly but still not be correct e.g. here/hear, went/want, their/there. It is still very important to proofread (check) your document before printing.
![]()
Activity
Please note: the following tutorial will open in a new window/tab. When you have finished the tutorial, simply close the window/tab and you’ll return to this page.
Before you go on, please work through the following tutorial:
- Proofing Features
Don’t forget to watch the 3-minute video on page 2!
- Click on Customize Quick Access Toolbar and add Spelling & Grammar
- Click on
 .
.
The Spelling and Grammar dialog box will appear and the cursor will move to the first incorrect word and highlight the word.

- The spell check feature automatically gives you some options down the right hand side of the dialog box.
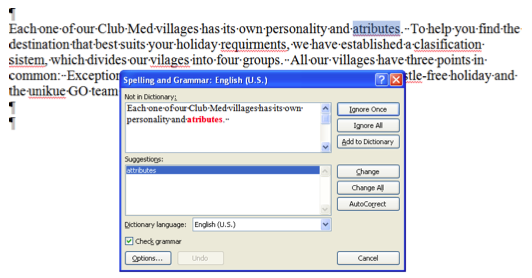
This is what each option means:
- Change
- When the word is spelt incorrectly click on the correct spelling from the list of suggestions, then click on Change.
- Ignore Once
- Click on Ignore Once when you know the word is spelt correctly but is not in the dictionary and you are not likely to use it again e.g. an odd place name
- Add to Dictionary
- When you know the word is spelt correctly and you are likely to use it again e.g. your name, highlight the “incorrect” word and click on Add to Dictionary. The highlighted word will be added to your own Custom Dictionary rather than the main Word dictionary.
Spell check exercise
![]()
Activity
- Open the page called Words. Follow the instructions there.
- Create a new Word document and paste in the text you copied from the Words page. Save the document as Words.
- Use either of the two methods outlined on the previous pages for checking the Spelling and Grammar of the document.
- Change the line spacing of the paragraph to double (2.0)
- Print Preview your document to see hot i looks, then close Print Preview
- Turn the Show / Hide Feature on
- Justify the document (alignment)
- Close the document saving the changes you made
Editing exercise 1
![]()
Activity
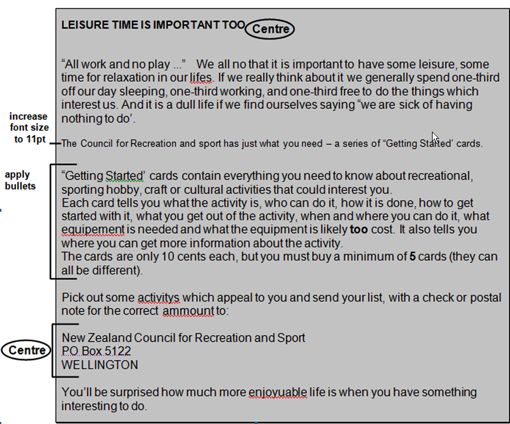
- Open the page called Leisure. Follow the instructions there.
- Create a new Word document and paste in the text you copied from the Leisure page. Save the document as Leisure Time.
- Follow the instructions as indicated below to change the document:

- Check the spelling and grammar of the document.
- Save and close the document
Editing exercise 2
![]()
Activity
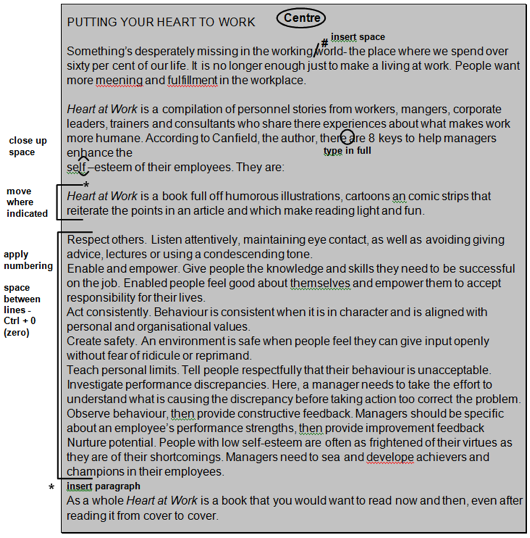
- Open the page called Heart at work. Follow the instructions there.
- Create a new Word document and paste in the text you copied from the Heart at work page. Save the document as Heart at work.
- Follow the instructions as indicated below to change the document:

- Check the spelling and grammar of the document.
- Save and close the document
Moving and copying blocks of text
You can change the order of words, sentences and paragraphs to improve the structure of your document. When moving or copying text, the text (plus any space required) must be selected.
When you copy or move text, the text retains the character formatting e.g. bold, font style. If the copied or moved text includes the paragraph mark ¶, the text retains the paragraph formatting e.g. line spacing, alignment.
- To move text
- Cut the text from one place in the document and paste it into another.
- To copy text
- Copy it from one place in the document and paste a copy of it into another.
![]()
Activity
Please note: the following tutorial will open in a new window/tab. When you have finished the tutorial, simply close the window/tab and you’ll return to this page.
This online tutorial includes a useful guide to moving and copying text:
- Text Basics
Moving paragraphs exercise
![]()
Activity
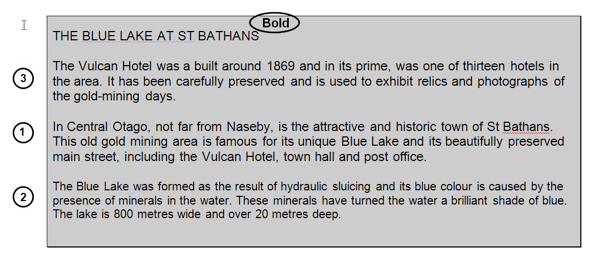
- Open the page called Blue Lake. Follow the instructions there
- Create a new Word document and paste in the text you copied from the Blue Lake page. Save the document as Blue Lake.
- Move the paragraphs as indicated below and ensure that only one space is left between each paragraph:

- Save the changes and close the document.
Find and Replace Text
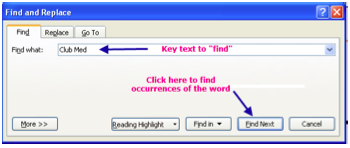
The Find facility allows you to quickly find text and/or formats when editing a document. For example, say you find a mistake in a printed document, instead of scrolling through the document yourself; you can use Find and go straight to the mistake.
Find Text
- Go to Home Tab ⇒ Editing group
- Click on Find. (The keyboard shortcut key is Ctrl F)
- The Find dialog box will appear:

- Key the text to be found in the Find what field
- Click Find Next
Replace Text
The Replace facility allows you to replace existing text with other text and/or formats. For example, say you keyed in Club Med throughout a document and you wanted to replace it with Holiday Club, you tell Word to do this once and it happens throughout the document.
- Go to Home Tab ⇒ Editing group
- Click on Replace
- The Find and Replace dialog box will appear:

- Key the text to be found and the text you would like it to be replaced with
- Click on Find Next — the first occurrence will be highlighted
- Click on Replace
- Repeat until all occurrences have been replaced and this appears: Click on OK
- Click on Close in dialog box
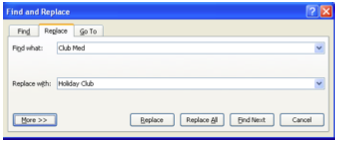
Both Find and Replace save lots of time!
Replace text automatically
This time we will replace all occurrences automatically
- Press Ctrl + H to open dialog box.
- Next to Find what, enter the text to find : our.
- Next to Replace with, enter the new text: the
- Fill in options – whole word only, search all
- Close options — click on Less
- Click on Replace All
- When this appears, click on OK or press Enter
- Click on Close to close the dialog box
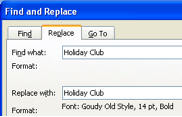
Replace standard text with formatted text
- Press Ctrl + H
- Key text to find: Holiday Club. Key text to replace with: Holiday Club
- Click on More
- Choose Format ⇒ Font

- The Font dialog box will appear: choose the Font, Font style and Size, then click on OK
- Click on Less and the dialog box will close up
- Check that the format is under the Replace with text, not the Find what text:

- Note: If formatting appears under Find what, this is a mistake:

- To fix this, click on No Formatting and redo making sure you are in Replace with:

- Note: If formatting appears under Find what, this is a mistake:
- Click on Replace all
- When replacement has finished, a dialog box will appear. Press Enter or click on OK.
- Print preview – Oh!!! the font size was too small with this font. So Press Ctrl + H again, click on Replace with text Holiday Club
- Change the Replace with font format to 18
- Replace all, check your Preview, then close the Preview.
- Save the changes to the document and close it
Find and replace exercise
![]()
Activity
- Locate and open the file Words you created earlier
- Use the Find and Replace tool to change the following words:
- Change France ⇒ Germany
- Change deep red ⇒ scarlet
- Change limpid ⇒ lifeless
- Save the document as Words V2.
Corrections
Note: When you have finished with this section, you can use your browser’s Back button to return to the page you were viewing.
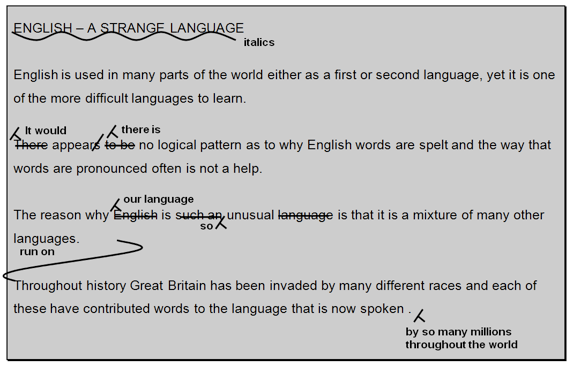
The following correction signs are commonly used to indicate alterations in a document:
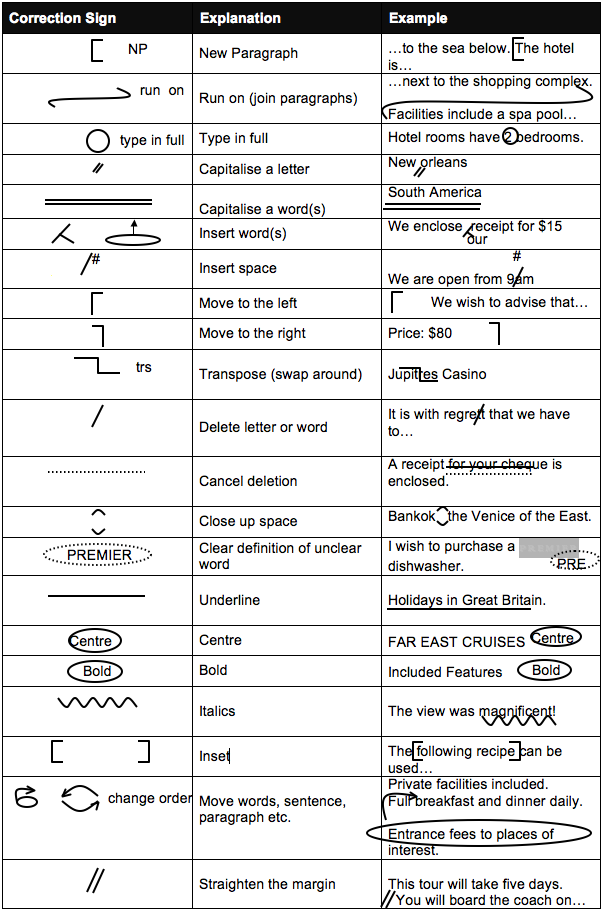
![]()
Activity
In a new document, enter the following text:
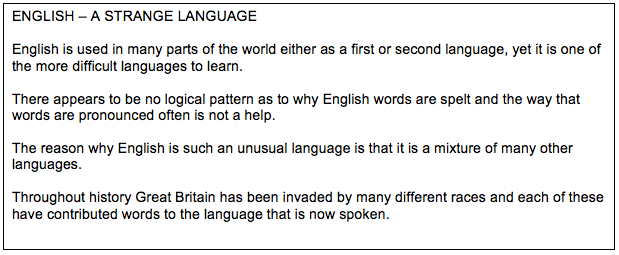
Now, referring to the correction signs above, edit the document and make the following corrections:
![]() |
| ![]()

No word processor would be complete without a way to format text, and Microsoft Word has a full set of tools that let you stylize text in your document files. Instead of having only standard fonts, you can change text to represent styles such as sub-titles, titles, section headers and other non-standard content.
Text Editing Functions
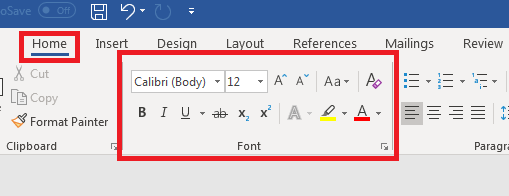
All basic text editing functions are found in the «Home» ribbon tab.
(Word text editing controls)
Notice that Word offers several stylizing features in the «Font» category in the «Home» tab. As you type content into a document, you’ll use these features and controls heavily.
The top row of font styles is the font type and the size of the characters. By default, Word opens a blank document using Calibri as the font for the body of a document. The default size is 11, but you can change this style with a simple click of the dropdown control. Alternatively, you can highlight text in your document, and then hover your mouse over the text and a list of standard font style choices will display.
When it comes to fonts in a Word document, only the fonts installed on your computer will show in the dropdown control. This is different from having fonts display in a web browser where developers pull fonts from a cloud location, so if content is meant for a website, you’ll need a way to implement the font using code or the browser will be unable to display the same font that you’ve used in your Word document.
You aren’t limited to one font size and style. If you have no content highlighted in the document, then the font changes will only take effect on new content typed into Word. If you have any content highlighted when you make these changes, Word will change the font and size of the highlighted content.

(Font style changes)
In the image above, the first line of text is the default font and size. The second line of text is a much larger size with a different style. This shows you that you can have several different font styles in a document without any restrictions. The dropdown control in the «Home» ribbon tab will show you all fonts available on your computer. Some third-party programs have their own fonts installed when you add the software to your computer. These fonts will then show in the Word font dropdown control.
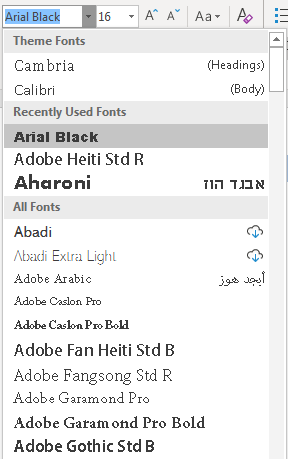
(Word dropdown font control with selection options)
Adobe Reader was installed on the computer in the image above, so several Adobe fonts are available in the Word dropdown. Not every application prefaces font names with the brand, so after you install some programs, you might just notice new fonts available. You can also download fonts from the Internet or purchase them from designers to add more fonts to your computer and Word availability.
Basic Font Styles
There are three basic font styles common with every text editing program: bold, underline and italics. Word offers other styles, but these three are the most common with standard content. All three buttons are under the font dropdown control.

(Bold, Italics and Underline controls)
The first «B» button sets any text to a bold style. The second «I» button sets text to italics, and then the «U» button sets an underline style. You can highlight any text and click one of these buttons to change to the style that you want. You can also click multiple buttons and have all three styles applied to text.
When you click one of these buttons and start typing, the style takes effect until you want to go back to the original style. Click the button again to stop the style from being applied to future text. Should you change your mind and want to remove a style, highlight the text and click the button to remove the style.
Alternatively, you can use the Ctrl+B keyboard shortcut for bold. Ctrl+I will apply italics style to selected text, and Ctrl+U will underline selected content.
Subscript and Superscript
Word supports subscript and superscript styles. These styles are used mainly for either math equations or referencing content within your documentation. The two controls are to the right of the font styles explained in the previous section (bold, italics and underline).

(Subscript and superscript controls)
The two font styles can be applied the same way as the others. Highlight the text that you want to stylize and click the button. You can remove the style by clicking the button again with the text highlighted.
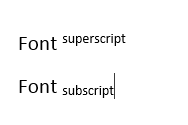
(Example subscript and superscript styles)
In the image above, notice that the superscript text is slightly above the «Font» text, and then the subscript text is slightly below. These two styles help you create math equations in a document or reference text similar to an academic paper references sources.
Adding a Hyperlink
When you create web pages, it’s not uncommon to add a link to another page on a website. You can do the same with Microsoft Word, except clicking a link will open the user’s browser and bring them to the linked web page.
To add a hyperlink, you can right click the text that should have a hyperlink applied and a context menu will display.
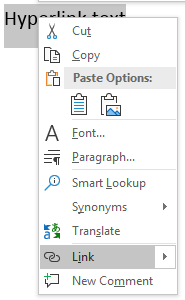
(Font style context menu)
In the image above, notice that the «Link» selection is highlighted. Click this link option and a window opens asking for the link location.
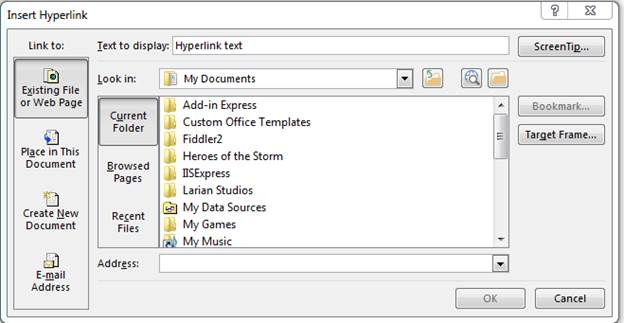
(Hyperlink configuration window)
The «Address» input text box is where you type the URL. You can also copy and paste a URL from your browser. Notice that the window also displays local directories from your computer. You aren’t limited to just URLs on the Internet. You can also link to files on your local computer or on a network drive. If this document is sent to another user, remember that any links to external documents on your computer won’t be accessible to a third party.
Highlighting and Font Color
Microsoft Word has a highlighter function that imitates when you run a physical highlighter over text on a sheet of paper. You have your choice of several different colors and using a highlighter will make specific sentences and words stand out.

(Highlighter and font color controls)
The first button is the highlighter control. Click the arrow icon next to this button and a list of color options appear. After you choose a color, click the highlighter button. Your cursor changes its icon and displays a highlighter icon indicating that any actions that you take will highlight text rather than prompt you to start typing.
Text highlighted with the tool will display a different background than the one in the document.
(Highlighted text)
The image above shows what text looks like when the highlighter tool has been used.
The default font color is black. Whenever you create a blank Word document, font color is black until you change it. Just like any other text in your document, you can change parts of it to be a different color. Any text selected can have its color changed using the font color tool.
Just like the highlighter tool, click the arrow to the right of the button and several color options are displayed. These color choices aren’t the only ones available. Click the «More Colors» option and another window opens where you can choose a custom color based on a more granular color palette.
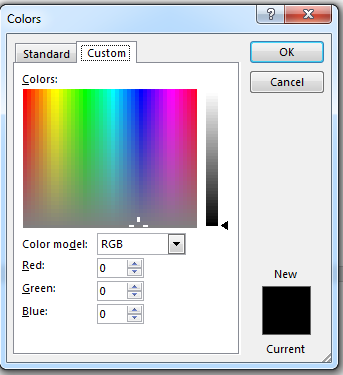
(Custom color choices)
The above image shows the color palette range. Just click somewhere on the palette and the color code will be automatically filled. Click «OK» when you choose your color, and any text highlighted will have its color changed. If you change the color with no text selected, the new color will take effect as you type your text.
These text changes are common when you create long documents. Even with small documents and notes, you’ll use these text edits to customize the way it displays on your screen or when you print it to hardcopy. Text editing tools are one of the most common features available in Word.
Selecting Text
Now that we’ve gone over the more exciting features of what word 2019 can do to enhance your text, let’s buckle down and get to the actual basics of how to enter and edit text.
The first step in editing text that appears on the screen in Word is to learn how to select it for editing. You can always click within a document to move the cursor to change text, or use Backspace and Delete to remove text. However, this can be time consuming. What if you want to remove a whole chunk of text? Or what if you want to move one paragraph to another location? Well, by selecting text, you can delete or move entire paragraphs or pages. You can also format your document. You can change the font size, color, style, or any number of other things. Being able to select text in Word is mandatory, even for the absolute beginner.
Whenever you select text in Word, the text appears highlighted, as shown below.

Selecting text is easy and done in three easy steps.
- Move the cursor to the beginning of the text that you want to select.
- Click and hold in the left button on your mouse.
- Drag it over the text you want to select. It will highlight the selected text, as shown above. Simply release the mouse button when you are finished selecting text.
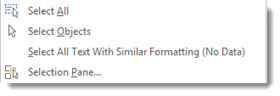
If you want to select the entire document, simply click on the Home tab and click Select on the far right in the Editing group.

Click the downward arrow beside Select and choose Select All.
This will highlight all your text for formatting. Also note that you can select objects or text with similar formatting as your selected text when clicking on ‘Select.’
Cutting Text
Once you’ve selected text, there are several things that you can do with it. Naturally, you can select text to format it. Perhaps you want to change the font type or size. We’ll cover how to do that later.
However, you can also cut selected text from a document as a way to either delete it from one location, then paste it elsewhere in the same or different document.
If you’d like to remove text from one location in the document to paste into another location, use the Cut command.
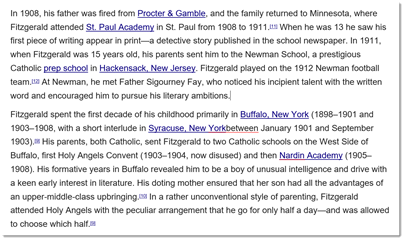
For example, below is an excerpt of the biography of F. Scott Fitzgerald.
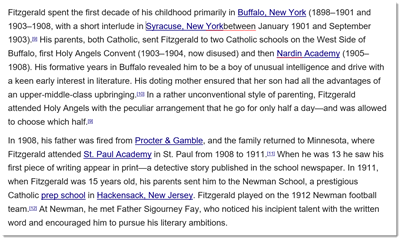
Let’s say we want to reverse the two paragraphs. In other words, we want the second paragraph to be the first paragraph.
We will use the Cut feature in Word to accomplish this.
1. Select the text or object to be cut and copied. We’ve selected the second paragraph.
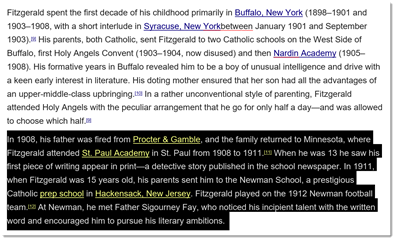
2. Click the Cut icon  in the Clipboard group under the Home tab. As you can see below, the paragraph is now cut from the document.

3. Now, click on the area in the document where you want to «paste» the text that you just cut. Using our example, it’s before the first paragraph. Once you see the cursor, go to the Ribbon. Under the Home tab, click Paste in the Clipboard group.
Delete and Cut should not be used interchangeably. When you cut an object, it is copied to the Clipboard. When you delete an object, it is simply removed from the document and the only way to restore it is by clicking the Undo Typing button. To delete text, select the text, then click Delete on your keyboard.
Copying Text
Once you select text, you can also copy it. Copying text means you copy the text you’ve selected, then you can paste it somewhere else in the document – or in another document. When you copy text, the text you’ve copied remains in the document.
There are three ways to copy text and objects to the clipboard.
1. Select the text or object to be copied and click the copy icon  in the Clipboard group under the Home tab.
2. Select the text or object to be copied, position the mouse pointer over it and right click. Then select Copy from the menu.
3. Select text or object to be copied and hit CTRL + C.
The Clipboard
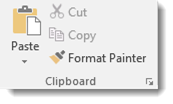
Whenever you copy anything in Word, it is automatically sent to the Clipboard. The Clipboard does just as its name implies. It holds the text that you copy and paste for you to use. The Clipboard and its associated tools can be found on the Home tab at the far left end of the ribbon. The Clipboard group looks like this:
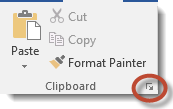
Click the arrow at the bottom of the Clipboard group to see its contents.
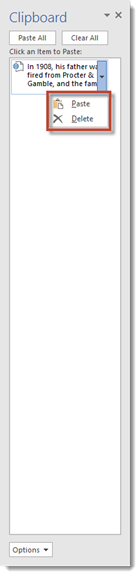
The clipboard will open as a long window to the left of your document. It can only hold 24 objects. When a 25th object is added, the first copied item is removed. To empty the Clipboard, click the Clear All button at the top of the Clipboard menu.

You can remove individual items from the clipboard by moving the mouse pointer over the item, then clicking the arrow button that appears to the right of the object. In the dropdown menu, select Delete.
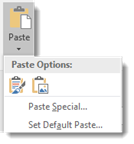
Paste
The Paste command allows you to copy an object from one location in the document to another, or from another Office Program into Word. You can use the Cut or Copy feature to move an item to the clipboard, then use Paste to place it elsewhere into a document. We’ve already covered Paste briefly earlier in this course.
There are three ways to Paste text or an object into a document:
1. Move the cursor to the point in your document where you want to place the item and click the Paste icon. It looks like this:

2. Move the mouse pointer to the place you wish to insert the item and click the right mouse button. Select one of the paste options from the dropdown menu. We’ll discuss the options in just a minute.
3. Move the cursor to the point in your document where you wish to place the item and press CTRL + V.
Ordinarily, Word pastes the most recently copied item. To paste an object that was copied earlier, position the cursor at the point in your document you wish to paste the item, then open the clipboard and click the item you wish to paste. You can also move the mouse pointer over the item to be pasted, and click the arrow that appears to the right of that item. Then select a paste option.
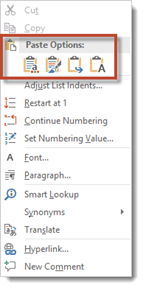
Paste Options is what you see when you right click your mouse to paste into a document. See below.
You also see Paste Options when you click the downward arrow below Paste on the Ribbon.

Paste Options allows you to specify the method of pasting that you want to use. This will be important if you want to keep or remove formatting for the selected text.
Let’s explain what we mean. This course is typed using Calibri font. Let’s say for example, that we want to paste a paragraph of this lesson into another lesson with a different font size, or into another document with a different font. Word gives us the option of preserving formatting, making the formatting match the area of the document where we paste our text, or pasting text only and not any images that we cut or copied.
Again, Paste Options only appears when you right click your mouse to paste – unless you select your Paste option from the Ribbon. Once you’ve copied or cut selected text, then right click, you’ll see this:
These are your paste options:
 Paste using original formatting of pasted text.
 Merge formatting. Paste using the formatting of the majority of the text in the document.
 Allows you paste text only. Any graphics or images will not be pasted, only text.
 Paste using the formatting of the destination text, or the text where you paste into.
 Paste a Picture.
Inserting Text
You can insert text anywhere in a document simply by moving the cursor to the desired location and typing.
Word automatically moves all text to the right of the cursor over as you type. However, if you’d rather replace the text as you type, Word gives you two options:
- Select the text you’d like to replace and start typing. This deletes the highlighted text and positions the cursor in its place.
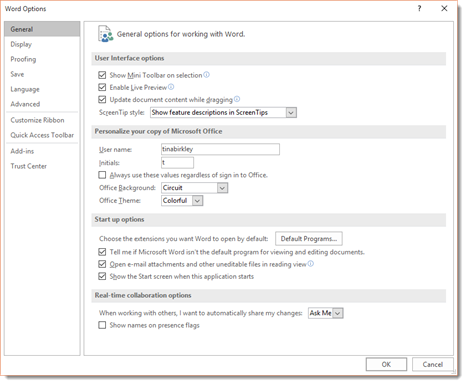
- Use Overtype Mode. To turn on overtype mode, click on the File tab, then select Options.
You will then see this dialogue box.
Click on Advanced in the left column.
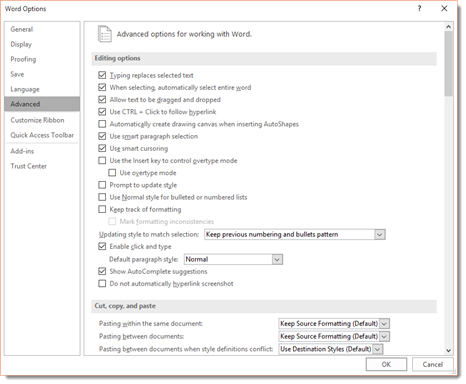
Put a Checkmark beside «Use the Insert key to control overtype mode» or the «Use overtype mode» box.

If you select the «Use the Insert key to control overtype mode» box, you can toggle overtype mode on or off by pressing the Insert key.
If you select only «Use overtype mode» you must manually turn it off by deselecting it.
AutoCorrect
AutoCorrect automatically corrects some errors you make. For example, by default, Microsoft Word will start the first letter of every new paragraph with a capital letter. It also may recognize certain words and make corrections for you without ever having to use Spell. However, you can customize AutoCorrect to find and correct certain errors — or to leave certain «errors» alone.
To customize AutoCorrect, click on the File tab, then click Options on the left.
Click Proofing in the column on the left.
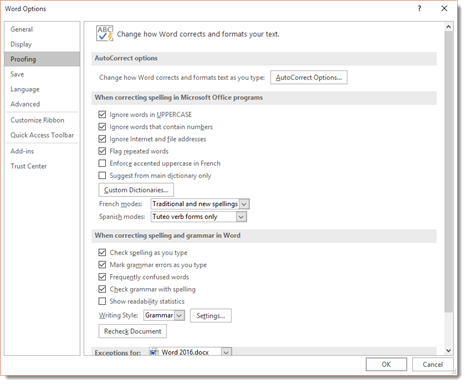
Next, click the AutoCorrect Options button. The screen you will see will look like the one below.
Click on the AutoCorrect options button, and you can specify words or even math that you want Word to correct as you type.
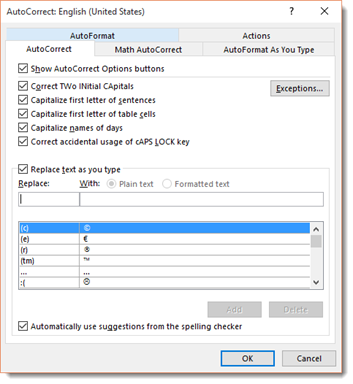
As you can see, by default, Word will automatically turn: (into a smiley face emoticon: J. It will also create a trademark symbol ™. These are default corrections that Word makes for you. You can add your own too.
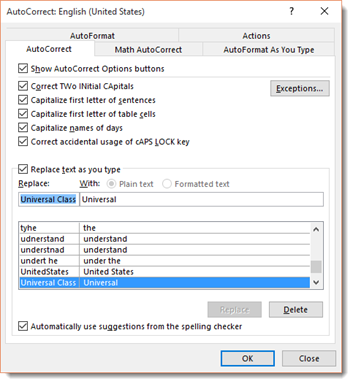
To add your own, type in what word or symbols you will enter in that you want Word to automatically correct. We’re going to type «Universal Class» and have it replaced by «Universal.» We’re doing this to have uniformity in our documents. Click the Add button when you’re finished.
Now, let’s click the Math AutoCorrect tab in the dialogue box.
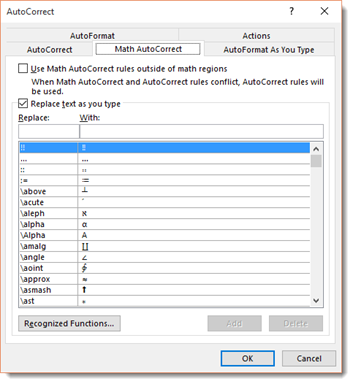
We’ll talk about mathematics later in this course. However, you can set AutoCorrect for mathematics just as you would with text.
Undo and Redo
But let’s say you accidently delete something or deleted it and then decided that you want it back. You grit your teeth and start to grumble, trying to remember the exact wording. It’s a lost cause, right? Wrong. The makers of Word anticipated this problem and supplied an easy solution. The Undo button!
The Undo button is on the Quick Access Toolbar. It looks like this:  . You can click the downward arrow beside the Undo button to determine how many steps backward you want to take with your undo.
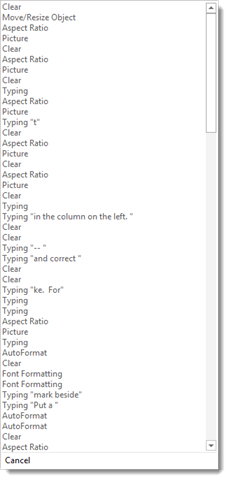
If you scroll down the list above to the bottom to AutoFormat, everything above AutoFormat will be undone too. You can undo up to 100 actions.
The Redo button is to the right of the Undo button. It looks like this:  . The redo button allows you redo an action that you just undid or to repeat the last action. If Word cannot redo the last action, the button will be faded.
Hyphenation
Word can hyphenate words at the end of lines for you, or you can choose to do it yourself. By default, hyphenation is turned off, which means Word won’t hyphenate words that are at the end of a line. Instead, it will just move the word to the next line.
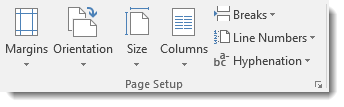
To use the hyphenation feature in Word, click on the Layout tab, then go to the Page Setup group on the ribbon. You’ll see Hyphenation, as shown below.
If you click the downward arrow beside Hyphenation, you’ll see that None is selected. This means no hyphenation (default.)
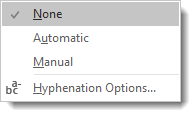
If you want Word to hyphenate words for you, select Automatic. This means that Word will hyphenate words that appear at the end of a line rather than moving it down to the next line to keep your text within the margins. Word will use its settings to decide how to hyphenate words. Just keep in mind, it does NOT mean Word will hyphenate words such as ‘how-to.’ It won’t.
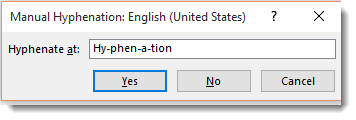
You can also select Manual. This box will pop up and ask you to specify how you want words hyphenated. Word will search your text for words that can be hyphenated and ask you how you wanted hyphenated. See the snapshot below:
You can also set options to tell Word the maximum amount of space to allow between the word and the right margin. This is called the Hyphenation Zone. To set the amount of space yourself, go to Hyphenation, click the downward arrow, then click on Hyphenation Options.
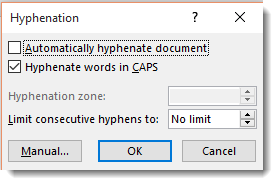
In this window, you can also select to automatically hyphenate the entire document, hyphenate words that are in CAPS, and manually set hyphens as we just learned to do.