
Word for Microsoft 365 Word 2021 Word 2019 Word 2016 Word 2013 More…Less
Sometimes you need to manually trigger an update of the information in fields like those used in a table of contents, headers and footers, cross-references, bookmarks, and formulas in tables. You can update fields one by one, or you can update all the fields in your document at once.
In this article
-
Update a field
-
Update all fields in a document
Update a field
-
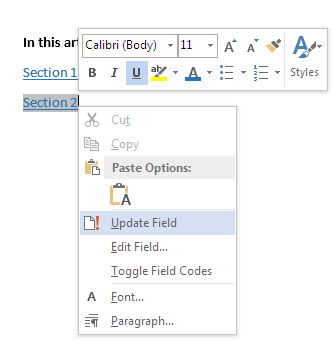
In a document you have open, right-click a field, such as a table of contents, a page number, or a cross-reference, and click Update Field.

Notes:
-
If you’re updating a table of contents, in the Update Table of Contents dialog box, select whether you want to update page numbers only or the entire table. Updating page numbers only simply updates the page numbers for the existing sections. It doesn’t add new sections to your table of contents. To update your table of contents with new sections from your document, select Update entire table.
-
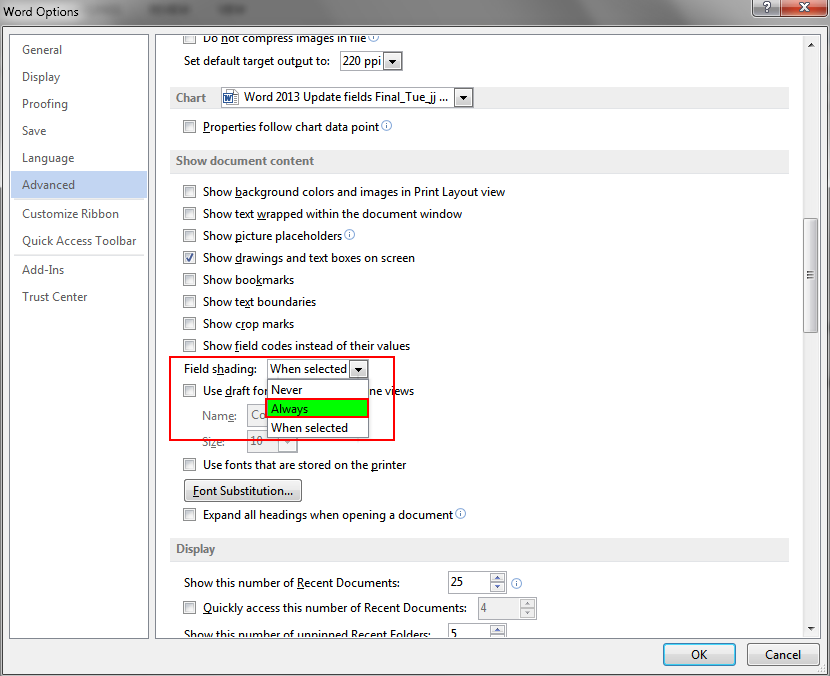
If you’re having trouble distinguishing which parts of your text are fields, you can set all fields to show up with grey background. To do this, click FILE > Options > Advanced, and under Show document content, from the Field shading drop-down menu, select Always.
-

Top of Page
Update all fields in a document
-
Press Ctrl + A.
-
Press F9.
-
If your document has tables with fields or formulas, you might need to select each table separately and press F9.
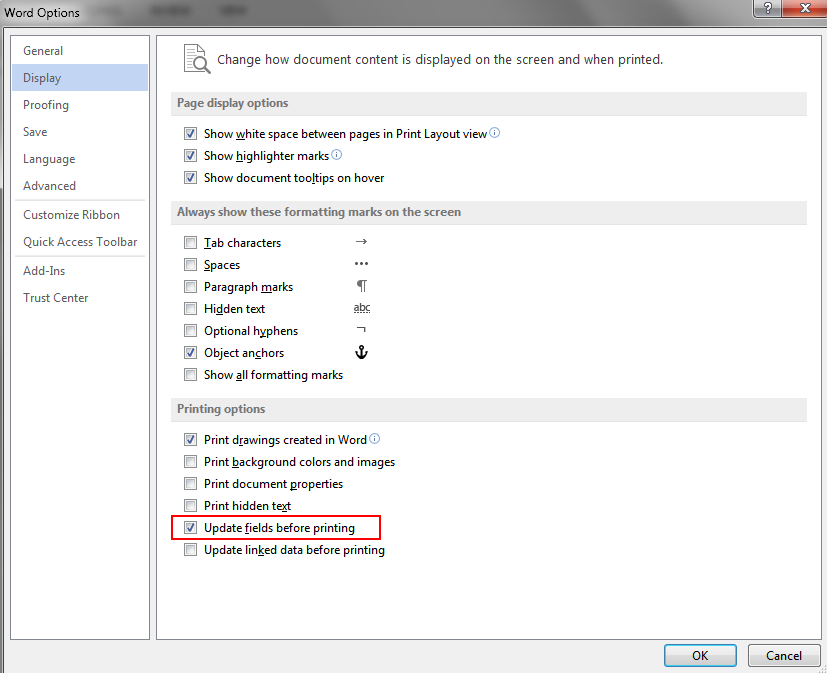
Tip: To make sure that you don’t forget to update your table of contents before you print the document, set Word to update fields automatically before printing. Click FILE > Options > Display, and under Printing options, select the check box for Update fields before printing.
Note: Sometimes a field is not updated because the item the field refers to no longer exists. The link or bookmark might also be broken. For more information, see Troubleshoot bookmarks.
Top of Page
See Also
Insert fields
Field codes in Word
Create or update a cross-reference
Update a table of contents
Use a formula in a Word or Outlook table
Create a table of contents
Need more help?
Want more options?
Explore subscription benefits, browse training courses, learn how to secure your device, and more.
Communities help you ask and answer questions, give feedback, and hear from experts with rich knowledge.
Inserting fields can give you precise control over dynamic text in your document. Fields are an important part of Word, but it’s good to know that many fields are inserted for you through built-in commands and features. For example, fields are at work when you insert page numbers or create a table of contents. In these cases, it’s probably simpler to let Word automatically add them for you. Fields are most useful when you need placeholders for data that might change in your document and for creating form letters or labels in mail-merge documents.
These steps work for inserting any field code in Word. For a list of all field codes with detailed information about each, see List of field codes in Word.
Insert a field
-
Click where you want to insert a field.
Tip: If you know the field code for the field that you want to insert, you can type it directly in your document. First press CTRL+F9, and then type the code within the brackets.
-
Click Insert > Quick Parts > Field.
-
In the Field names list, select a field name.
Tip: You can filter the list by clicking the down arrow in the Categories list.
-
Under Field properties, select any properties or options you want, and click OK.

Notes:
-
To see the codes for a particular field in the Field box, click Field Codes. For some fields, this button is clicked by default.
-
To nest a field within another field, first insert the outer, or container, field (steps 1-4 above). Then place the insertion point inside the field code where you want to insert the inner field, and repeat steps 2-4 above.
-
If you want to see the codes for a particular field in the Field dialog box, click Field Codes.
-
To nest a field within another field, first insert the outer, or container, field, by using the Field dialog box. In your document, place the insertion point inside the field code where you want to insert the inner field. Then use the Field dialog box to insert the inner field.
If you know the field code for the field that you want to insert, you can also type it directly in your document. First press CTRL+F9, and then type the code within the brackets.
About field codes and syntax
You can insert a field if you want to:
-
Add, subtract, or perform other calculations. To do so, use the = (Formula) field.
-
Work with documents in a mail merge. For example, insert ASK and FILLIN fields to display a prompt as Word merges each data record with the main document.
In other cases, it is simpler to use the commands and options that are provided in Word to add the information that you want. For example, you can insert a hyperlink by using the HYPERLINK field, but it is easier to use the Hyperlink command in the Links group on the Insert tab.
Important: You cannot insert field code brackets by typing the brace characters on the keyboard. To insert field code brackets, press CTRL+F9.
Field code syntax
Field codes appear between curly brackets ( { } ). Fields behave like formulas in Microsoft Office Excel — the field code is like the formula, and the field result is like the value that the formula produces. You can switch between displaying field codes and results in your document by pressing ALT+F9.
When you view a field code in your document, the syntax looks like this:
{ FIELD NAME Properties Optional switches }
-
FIELD NAME This is the name that appears in the list of field names in the Field dialog box.
-
Properties These are any instructions or variables that are used in a particular field. Not all fields have parameters, and in some fields, parameters are optional instead of required.
-
Optional switches These are any optional settings that are available for a particular field. Not all fields have switches available, other than those that govern the formatting of the field results.
For example, you can place the file name and path of your document in the header or footer by inserting the FILENAME field.
The syntax for the FILENAME field code with the path included looks like this:
{ FILENAME p }
Edit a field
-
Right-click in the field, and then click Edit Field.
-
Change the field properties and options. For information about the properties and options available for a particular field, see List of field codes in Word or search on the field name in Help.
Notes:
-
For some fields, you must display the field code to edit the field. To display all the field codes in the document, press ALT+F9.
-
Some fields are edited in their own dialog boxes instead of in the Field dialog box. For example, if you right-click a hyperlink and then click Edit Hyperlink, the Edit Hyperlink dialog box opens
-
Display the field results
By default, Word displays the field results seamlessly with the content of your document so that someone reading the document is unaware that part of the content is in a field. However, fields can also be displayed with a shaded background, to make them more visible in the document.
You can make the field results blend into the content of the document by turning off the option to display fields with a shaded background and by formatting the field results, or you can call attention to fields by displaying them with a shaded background, either all the time or only when the field is selected.
You can format the field results by applying text formatting to the field or by adding formatting switches to the field code.
Change the shaded background of fields
-
Click the File > Options. (In Word 2007, click Microsoft Office Button
, and then click Word Options.) -
Click Advanced.
-
Under Show document content, in the Field shading list, do one of the following:
-
To make fields stand out from the rest of the document content, select Always.
-
To make fields blend in seamlessly with the document content, select Never.
-
To make users of Word aware that they have clicked in a field, select When selected.
When the field shading option is set to When selected, the field displays a gray background when you click within the field. However, the gray shading does not indicate that the field is selected. When you select the field by double-clicking or dragging the mouse, highlighting that indicates selection is added to the gray shading.
-
 , and then click Word Options.)
Apply text formatting to a field
-
Select the field that you want to format, and then apply the formatting by using the commands in the Font group on the Home tab.
For example, to underline the name that is inserted by an AUTHOR field, select the entire field code, including brackets (or select the entire field result), and then click Underline in the Font group on the Home tab.
If you update a field, any formatting that you applied to the field results may be lost. To retain the formatting, include the * MERGEFORMAT switch in the field code. When you insert fields by using the Field dialog box, the * MERGEFORMAT switch is included by default.
Add a formatting switch to a field code
-
Right-click the field, and then click Edit Field.
-
Do one of the following:
-
If Field properties and Field options are displayed, select the formatting options that you want.
-
If only the field code is displayed, click Options, and then select the formatting options that you want.
If the Options button appears dimmed, additional formatting options may not be available.
-
You can use three formatting switches to format field results:
-
Format switch (*)
-
Numeric format switch (#)
-
Date-Time format switch (@)
Format switch(*)
The Format field switch (*) defines how to display field results. The format instructions determine the following:
-
The use of uppercase and lowercase letters
-
Number formats — for example, whether 9 is displayed as ix (roman numerals) or ninth (ordinal text)
-
character formats
Format switches also retain a field result’s formatting when the field is updated.
Capitalization formats:
The following is a list of switches and the items that they capitalize:
-
* Caps This switch capitalizes the first letter of each word. For example, { FILLIN «Type your name:» * Caps } displays Luis Alverca even if the name is typed in lowercase letters.
To select this option in the Field Options dialog box, click Title case.
-
* FirstCap This switch capitalizes the first letter of the first word. For example, { COMMENTS * FirstCap } displays Weekly report on sales.
To select this option in the Field Options dialog box, click First capital.
-
* Upper This switch capitalizes all letters. For example, { QUOTE «word» * Upper } displays WORD.
To select this option in the Field Options dialog box, click Uppercase.
-
* Lower This switch capitalizes none of the result; all letters are lowercase. For example, { FILENAME * Lower } displays weekly sales report.doc.
This switch has no effect if the entire field that contains the switch is formatted as small capital letters.
To select this option in the Field Options dialog box, click Lowercase.
Number formats:
The following is a list of number switches and their results:
-
*alphabetic This switch displays results as alphabetic characters. The result has the same case as the word «alphabetic» in the field code. For example, { SEQ appendix * ALPHABETIC } displays B (instead of 2), and { SEQ appendix * alphabetic } displays b.
To select this option in the Field Options dialog box, click a, b, c,.
-
*Arabic This switch displays results as Arabic cardinal numerals. For example, { PAGE * Arabic } displays 31.
Notes:
-
If the Number format setting in the Page Number Format dialog box is not Arabic, this switch overrides the Number format setting.
-
For page numbers only, there is also an ArabicDash format, which displays results as Arabic cardinal numbers surrounded by hyphen characters. For example, { PAGE * ArabicDash } displays — 31 —.
To select this option in the Field Options dialog box, click 1, 2, ,3, ….
-
-
*CardText This switch displays results as cardinal text. The result is formatted in lowercase letters unless you add a format switch to specify a different capitalization. For example, { = SUM(A1:B2) * CardText } displays seven hundred ninety, and { = SUM(A1:B2) * CardText * Caps } displays Seven Hundred Ninety.
To select this option in the Field Options dialog box, click One, Two, Three.
-
*DollarText This switch displays results as cardinal text. Word inserts and at the decimal place and displays the first two decimals (rounded) as Arabic numerators over 100. The result is formatted in lowercase letters unless you add a format switch to specify a different capitalization. For example, { = 9.20 + 5.35 * DollarText * Upper } displays FOURTEEN AND 55/100.
To select this option in the Field Options dialog box, click Dollar Text.
-
*Hex This switch displays results as hexadecimal numbers. For example, { QUOTE «458» * Hex } displays 1CA.
To select this option in the Field Options dialog box, click hex ….
-
*OrdText This switch displays results as ordinal text. The result is formatted in lowercase letters unless you add a format switch to specify a different capitalization. For example, { DATE @ «d» * OrdText } displays twenty-first, and { DATE @ «d» * OrdText * FirstCap } displays Twenty-first.
To select this option in the Field Options dialog box, click First, Second, Third, ….
-
*Ordinal This switch displays results as ordinal Arabic numerals. For example, { DATE @ «d» * Ordinal } displays 30th.
To select this option in the Field Options dialog box, click 1st, 2nd, 3rd.
-
*roman This switch displays results as Roman numerals. The result has the same case as the word «roman» in the field code. For example, { SEQ CHAPTER * roman } displays xi, and { SEQ CHAPTER * ROMAN } displays XI.
To select this option in the Field Options dialog box, click I, II, III,.
Character formats and protecting previously applied formats:
The following are character formatting switches and their results:
-
*Charformat This switch applies the formatting of the first letter of the field name to the entire result. The result of the following example has bold formatting because the R in REF is bold.
{ REF chapter2_title * Charformat } displays Whales of the Pacific in bold text.
To add this switch, type it in the field code or in the Field codes box in the Field dialog box.
-
*MERGEFORMAT This switch applies the formatting of the previous result to the new result. For example, if you select the name displayed by the field { AUTHOR * MERGEFORMAT } and apply bold formatting, Word retains the bold formatting when the field is updated to display a new author name.
When you insert fields by using the Field dialog box , the *MERGEFORMAT switch is included by default. You can turn this option off by clearing the Preserve formatting during updates check box in the Field dialog box.
Back to formatting switches
Numeric format switch (#)
The Numeric format switch (#) specifies the display of a numeric result.
For example, the switch # $#,##0.00 in { = SUM(ABOVE) # $#,##0.00 } displays a result such as «$4,455.70.» If the result of a field is not a number, this switch has no effect.
Note: Quotation marks are not required around simple numeric formats that do not include spaces — for example, { MarchSales # $#,##0.00 }. For more complex numeric formats and those that include text or spaces, enclose the numeric format in quotation marks, as shown in the following examples. Word adds quotation marks to numeric format switches if you insert a field by using the Field dialog box or the Formula command in the Data group of the Layout tab (Table Tools contextual tab).
Combine the following format items to build a numeric format switch:
-
0 (zero) This format item specifies the requisite numeric places to display in the result. If the result does not include a digit in that place, Word displays a 0 (zero). For example, { = 4 + 5 # 00.00 } displays 09.00.
-
# This format item specifies the requisite numeric places to display in the result. If the result does not include a digit in that place, Word displays a space. For example, { = 9 + 6 # $### } displays $ 15.
-
x This format item drops digits to the left of the «x» placeholder. If the placeholder is to the right of the decimal point, Word rounds the result to that place. For example:
{ = 111053 + 111439 # x## } displays 492.
{ = 1/8 # 0.00x } displays 0.125.
{ = 3/4 # .x } displays .8. -
. (decimal point) This format item determines the decimal point position. For example, { = SUM(ABOVE) # $###.00 } displays $495.47.
Use the decimal symbol that is specified as part of the regional settings in Control Panel.
-
, (digit grouping symbol) This format item separates a series of three digits. For example, { = NetProfit # $#,###,### } displays $2,456,800.
Use the digit grouping symbol that is specified as part of the regional settings in Control Panel.
-
— (minus sign) This format item adds a minus sign to a negative result or adds a space if the result is positive or 0 (zero). For example, { = 10 — 90 # -## } displays -80.
-
+ (plus sign) This format item adds a plus sign to a positive result, a minus sign to a negative result, or a space if the result is 0 (zero). For example, { = 100 — 90 # +## } displays +10, and { = 90 — 100 # +## } displays -10.
-
%, $, *, and so on This format item includes the specified character in the result. For example, { = netprofit # «##%» } displays 33%.
-
«example formatting for positive; negative» This format item specifies different number formats for positive and negative results, separated by a semicolon. For example, if the bookmark Sales95 is a positive value, the field { Sales95 # «$#,##0.00;-$#,##0.00» } displays the value with regular formatting — for example, «$1,245.65». A negative value is displayed with bold formatting and a minus sign — for example, -$ 345.56.
-
«example formatting for positive; negative; zero» This format item specifies different number formats for a positive result, a negative result, and a 0 (zero) result, separated by semicolons. For example, depending on the value of the Sales95 bookmark, { Sales95 # «$#,##0.00;($#,##0.00);$0» } displays positive, negative, and 0 (zero) values as follows: $1,245.65, ($ 345.56), $0.
-
‘text’ This format item adds text to the result. Enclose the text in single quotation marks. For example, { = { Price } *8.1% # «$##0.00 ‘is sales tax’ » } displays $347.44 is sales tax.
-
`numbereditem` This format item displays the number of the preceding item that you numbered by using the Caption command (References tab, Captions group) or by inserting a SEQ field. Enclose the item identifier, such as «table» or «figure,» in grave accents (`). The sequential number is displayed in Arabic numerals. For example, { = SUM(A1:D4) # «##0.00 ‘is the total of Table’ `table`» } displays 456.34 is the total of Table 2.
Back to formatting switches
Date-Time format switch (@)
The Date-Time format switch (@) specifies the display of a date or time.
For example, the switch @ «dddd, MMMM d, yyyy» in the field { DATE @ «dddd, MMMM d, yyyy» } displays «Friday, November 23, 2007.» Combine the following date and time instructions — day (d), month (M), and year (y); hours (h) and minutes (m) — to build a date-time format. You can also include text, punctuation, and spaces.
Date instructions:
Month (M)
The letter M must be uppercase to distinguish months from minutes.
-
M This format item displays the month as a number without a leading 0 (zero) for single-digit months. For example, July is 7.
-
MM This format item displays the month as a number with a leading 0 (zero) for single-digit months. For example, July is 07.
-
MMM This format item displays the month as a three-letter abbreviation. For example, July is Jul.
-
MMMM This format item displays the month as its full name.
Day (d)
The letter d displays the day of the month or the day of the week. The letter d can be either uppercase or lowercase.
-
d This format item displays the day of the week or month as a number without a leading 0 (zero) for single-digit days. For example, the sixth day of the month is displayed as 6.
-
dd This format item displays the day of the week or month as a number with a leading 0 (zero) for single-digit days. For example, the sixth day of the month is displayed as 06.
-
ddd This format item displays the day of the week or month as a three-letter abbreviation. For example, Tuesday is displayed as Tue.
-
dddd This format item displays the day of the week as its full name.
Year (y)
The letter y displays the year as two or four digits. The letter y can be either uppercase or lowercase.
-
yy This format item displays the year as two digits with a leading 0 (zero) for years 01 through 09. For example, 1999 is displayed as 99, and 2006 is displayed as 06.
-
yyyy This format item displays the year as four digits.
Time instructions:
Hours (h)
A lowercase h bases time on the 12-hour clock. An uppercase H bases time on the 24-hour, or military, clock; for example, 5 P.M. is displayed as 17.
-
h or H This format item displays the hour without a leading 0 (zero) for single-digit hours. For example, the hour of 9 A.M. is displayed as 9.
-
hh or HH This format item displays the hour with a leading 0 (zero) for single-digit hours. For example, the hour of 9 A.M. is displayed as 09.
Minutes (m)
The letter m must be lowercase to distinguish minutes from months.
-
m This format item displays minutes without a leading 0 (zero) for single-digit minutes. For example, { TIME @ «m» } displays 2.
-
mm This format item displays minutes with a leading 0 (zero) for single-digit minutes. For example, { TIME @ «mm» } displays 02.
Seconds (s)
-
s This format item displays seconds without a leading 0 (zero) for single-digit seconds. For example { TIME @ «s» displays 5.
-
ss This format item displays seconds with a leading 0 (zero) for single-digit seconds For example { TIME @ «ss» displays 05.
A.M. and P.M. (AM/PM)
This displays A.M. and P.M. To change the A.M. and P.M. symbols for Microsoft Windows, change the regional settings in Control Panel.
-
am/pm or AM/PM This format item displays A.M. and P.M. as uppercase. For example, { TIME @ «h AM/PM» } and { TIME @ «h am/pm» } display 9 AM or 5 PM.
Other text and punctuation:
-
‘text’ This format item displays any specified text in a date or time. Enclose the text in single quotation marks. For example, { TIME @ «HH:mm ‘Greenwich mean time’ » } displays 12:45 Greenwich mean time.
-
character This format item includes the specified character in a date or time, such as a : (colon), — (hyphen), * (asterisk), or space. For example, { DATE @ «HH:mm MMM-d, ‘yy» } displays 11:15 Nov-6, ’99.
-
`numbereditem` This format item includes in a date or time the number of the preceding item that you numbered by using the Caption command in the Captions group (References tab), or by inserting a SEQ field. Enclose the item identifier, such as table or figure, in grave accents (`). Word displays the sequential number in Arabic numerals. For example, { PRINTDATE @ «‘Table’ `table` ‘was printed on’ M/d/yy» } displays Table 2 was printed on 9/25/02.
Note: Quotation marks are not required around simple date-time formats that do not include spaces or text — for example, { DATE @ MM/yy }. For more complex date-time formats and those that include spaces or text, enclose the entire date-time format in quotation marks, for example, { DATE @ «dddd MMMM d, yyyy’, at’ h:mm» }. Word adds quotation marks to date-time format switches if you insert a field by using the Date and Time command in the Text group of the Insert tab or the Field dialog box.
Back to formatting switches
Control how fields are updated
By default, Word automatically updates fields when a document is opened. That way, information stays up to date. There are situations where you might not want this to happen, however. For example, you may want the date in the header to reflect a particular date rather than automatically updating to the current date every time the document is opened.
Fields can also be updated by right-clicking a field and then clicking Update Field or by clicking in a field and then pressing F9.
To manually update all the fields in the main body of a document, press CTRL+A, and then press F9. Fields in headers, footers, or text boxes must be updated separately. Click within the header, footer, or text box, press CTRL+A, and then press F9.
You can lock fields to prevent automatic or inadvertent updating of the field.
Lock or unlock a particular field
Do one of the following:
-
To lock a field so that field results are not updated, click the field, and then press CTRL+F11.
-
To unlock a field so that field results can be updated, click the field, and then press CTRL+SHIFT+F11.
Lock results of BOOKMARK, INCLUDETEXT, and REF fields
The Lock Result (!) field switch prevents a field that is included in the result of a BOOKMARK, INCLUDETEXT, or REF field from being updated unless the field result in the original location has changed. Without this switch, Word updates fields that are included in a field result whenever the BOOKMARK, INCLUDETEXT, or REF field is updated.
For example, the field { INCLUDETEXT C:\SalesQtr4 Sales.doc ! } inserts the contents of the document «Qtr4 Sales.doc,» which contains a DATE field and an EMBED field. If you update the INCLUDETEXT field, the ! switch prevents Word from updating the DATE and EMBED fields in the included text unless they are first updated in the original document («Qtr4 Sales.doc»). The switch ensures that the text inserted by the INCLUDETEXT field matches the text in the original document.
To update the DATE and EMBED fields in both locations, update fields in the original document (Qtr4 Sales.doc), and then update the INCLUDETEXT field.
Insert Fields in a Microsoft Word Document to Display Variable Content
by Avantix Learning Team | Updated January 10, 2021
Applies to: Microsoft® Word® 2010, 2013, 2016, 2019 or 365 (Windows)
You can insert built-in or custom fields in Word documents to display variable content that will change when you update the fields. Some fields (like page numbers, merge fields or cross-references) are inserted automatically when you use Microsoft Word features. If you want to insert custom fields, you will need to create custom document properties.
By default, Word displays the result of a field rather than its field codes. You can right-click a field and select Toggle Field Codes to display field codes or field results.
Recommended article: How to Hide Comments in Word (or Display Them)
Do you want to learn more about Microsoft Word? Check out our virtual classroom or live classroom Word courses >
If you are working with fields in Microsoft Word, you will be using quite a few function keys (such as F9). On some laptops, you will need to press the Fn key on your keyboard to enable your function keys. For example, instead of pressing F9 to update a field or fields, you would press Fn + F9.
Inserting built-in fields
To insert a field, click Quick Parts in the Text group on the Insert tab in the Ribbon. The Field command appears in the Quick Parts drop-down menu as follows:

Below is the Field dialog box in Microsoft Word with Page selected:

To insert a built-in field using the Field dialog box:
- Navigate to the location in the Word document where you want to insert a field.
- Click the Insert tab in the Ribbon and then click Quick Parts in the Text group. A drop-down menu appears.
- Select Field. A dialog box appears.
- In the list of Field names, select a field. You can filter the list by clicking the down arrow in the Categories list and selecting a category first. Select All to display all fields.
- Under Field properties, select any properties or options you want.
- To view the codes for a field in the Field box, click Field Codes. For some fields, this button is clicked by default.
- Ensure that Preserve Formatting During Updates is checked so that formatting you apply is not removed when the fields are updated.
- Click OK. The field is inserted into the document.
Format the field results by applying text formatting to the field using the Home tab in the Ribbon.
You can view or hide all field codes in your document by pressing Alt + F9. Field codes appear between braces or curly brackets { } and you cannot type these braces. Be sure to hide the field codes again by pressing Alt + F9.
To edit a built-in field in the Field dialog box:
- Right-click the field and then click Edit Field. A dialog box appears.
- Change the field properties and options.
- Click OK.
Understanding Word document properties
There are 3 different types of document properties in Word:
- Standard document properties (also called built-in document properties)
- Custom document properties
- Document library properties
Word documents contain a set of standard document properties such as Title, Author, Keywords and Comments. These properties are used to store metadata about your document. You cannot change the name of standard properties but you can edit the value of some of them (such as Title). Other standard properties that cannot be edited store data that is updated automatically (such as Size or Last Modified).
Document library properties are related to documents that are stored in a document library on a website or in a public folder (such as files in SharePoint).
In addition to the standard properties, you can create your own custom document properties. These properties can be created to store additional information in a document other than the standard document properties. For example, custom document properties could be created for Product1, Product2, Product3, Sponsor, Project Manager, Cell Phone or Disclaimer. Each custom document property must be assigned a name, a data type and a value. The four data types are Text, Date, Number and Yes or No.
After you create custom document properties for your Word document, you can then insert them as custom fields.
Adding a custom document property
To add a custom document property:
- Open the Word document in which you want to add a custom document property.
- Click the File tab in the Ribbon and then click Info on the left. Info is usually selected by default.
- On the right side of screen, click Properties. A drop-down menu appears.
- Select Advanced Properties. A dialog box appears.
- Click the Custom tab in the dialog box.
- Type a name for the custom document property in the Name box. You can also choose one of the other properties that appear in the drop-down list.
- Select Text, Date, Number or Yes or No as the data type for the custom property.
- Enter a value for the property in the Value box.
- Click Add. The custom property appears in the list at the bottom of the dialog box.
- Click OK.
After you have added a custom document property, you will be able to insert it into your document as a field.
In the example below, we’re adding a field for Project Manager:

After you click Add, the custom field appears in the Properties list:

Inserting custom document property fields
The value of a custom document property can be inserted in a Word document using DocProperty fields. Custom document properties that have been added to a document are saved with the document whether they are inserted as a DocProperty field or not. You can insert DocProperty fields multiple times in a document.
To insert a custom document property field using the Field dialog box:
Navigate to the location in the Word document where you want to insert a field.
- Click the Insert tab in the Ribbon and then click Quick Parts in the Text group. A drop-down menu appears.
- Select Field. A dialog box appears.
- In the list of Field names on the left, select DocProperty.
- Under Field properties, select a property name.
- To view the codes for a field in the Field box, click Field Codes. For some fields, this button is clicked by default.
- Ensure that Preserve Formatting During Updates is checked so that formatting you apply is not removed when the fields are updated.
- Click OK. The field is inserted into the document.
In the example below, we’re inserting the custom Project Manager field we created in Advanced Properties:

Updating built-in and custom fields
Word should automatically update fields when a document is opened. Many fields are also updated automatically when you go to Print Preview (click the File tab and then click Print). If you prefer, you can update fields manually.
To update a field manually, right-click the field and then click Update Field or press F9.
To update all fields manually in the main body of a document, press Ctrl + A to select all and then press F9.
Some fields in headers, footers or text boxes must be updated separately. Click in the header, footer or text box, press Ctrl + A to select all and then press F9. Page fields do not need to be updated manually because they update when you go the Print Preview.
If you want to edit a custom DocProperty field, you will need to edit it in the Advanced Properties dialog box.
Subscribe to get more articles like this one
Did you find this article helpful? If you would like to receive new articles, join our email list.
More resources
How to Create, Save, Edit and Use Templates in Word
How to Insert, Format and Update Cross-References in Word
5 Ways to Insert the Division Symbol in Word (Type or Insert ÷)
10 Microsoft Word Tips, Tricks and Shortcuts for Selecting in Tables
How to Create a Table of Contents in Word (Insert, Format and Update a TOC)
Related courses
Microsoft Word: Intermediate / Advanced
Microsoft Excel: Intermediate / Advanced
Microsoft PowerPoint: Intermediate / Advanced
Microsoft Word: Long Documents Master Class
Microsoft Word: Styles, Templates and Tables of Contents
Microsoft Word: Designing Dynamic Word Documents Using Fields
VIEW MORE COURSES >
Our instructor-led courses are delivered in virtual classroom format or at our downtown Toronto location at 18 King Street East, Suite 1400, Toronto, Ontario, Canada (some in-person classroom courses may also be delivered at an alternate downtown Toronto location). Contact us at info@avantixlearning.ca if you’d like to arrange custom instructor-led virtual classroom or onsite training on a date that’s convenient for you.
Copyright 2023 Avantix® Learning
Microsoft, the Microsoft logo, Microsoft Office and related Microsoft applications and logos are registered trademarks of Microsoft Corporation in Canada, US and other countries. All other trademarks are the property of the registered owners.
Avantix Learning |18 King Street East, Suite 1400, Toronto, Ontario, Canada M5C 1C4 | Contact us at info@avantixlearning.ca
- Right-click the field, and then click Edit Field.
- Do one of the following: If Field properties and Field options are displayed, select the formatting options that you want. If only the field code is displayed, click Options, and then select the formatting options that you want.
Contents
- 1 How do I edit fields in Word 2019?
- 2 Why can’t I edit field in Word?
- 3 How do you edit a locked field in Word?
- 4 How do I edit a field?
- 5 Where is update field in Word?
- 6 How do I unlock a field in Word?
- 7 How do you unlock a field in Word?
- 8 How do you unlock form fields in Word?
- 9 How do I edit a field in dynamics?
- 10 How do you insert a custom field in Word?
- 11 How do I make a field editable in Dynamics 365?
- 12 Where is field in Word?
- 13 How do you remove fields in Word?
- 14 How do I insert a fillable field in Word?
- 15 Why is update field greyed out?
- 16 How do I remove a locked field in a mail merge?
- 17 How do I add a field in dynamics?
- 18 How do I add a field to a form?
How do I edit fields in Word 2019?
To do so, right-click the field and choose the Update Field command. The field’s text is refreshed. Printing fields update when you print the document. They don’t need to be manually updated.
Why can’t I edit field in Word?
1. Show the Developer tab through File tab >Options >Customize Ribbon >Customize the Ribbon >Main Tabs >Select Developer. 2. Select the field and click Developer tab >Controls >Properties >Disable Locking of Contents cannot be edited.
How do you edit a locked field in Word?
On the Review tab, in the Protect group, click Restrict Editing. In the Editing restrictions area, select the Allow only this type of editing in the document check box. In the list of editing restrictions, click No changes (Read only). Select the part of the document where you want to allow changes.
How do I edit a field?
Edit a field
- Right-click in the field, and then click Edit Field.
- Change the field properties and options. For information about the properties and options available for a particular field, see List of field codes in Word or search on the field name in Help. Notes:
Where is update field in Word?
Update one field in Word
To update one field, there is a utility in right click menu. Select the field you want to update, right click to display the context menu, click Update Field. Then the selected field has been refreshed.
How do I unlock a field in Word?
Select the field you want to unlock. Press Ctrl+Shift+F11.
How do you unlock a field in Word?
To Unlock Fields
On the Tools menu, click Unprotect Document. The Protect Document pane appears. 2. Click OK.
How do you unlock form fields in Word?
Click Popular, and then select Show Developer tab in the Ribbon check box. 4. Click on the Protect Document Tab select Restrict Formatting and Editing 5. Click the Stop Protection Button Page 3 How to “unlock” a Word Form The form is now unlocked and can be edited in anyway.
How do I edit a field in dynamics?
To edit one or more fields, select the field or fields (using the Shift key) you want to modify and then on the Actions toolbar, select Edit. You can make changes to the following fields: For Field Requirement, select whether it’s optional, recommended, or required.
How do you insert a custom field in Word?
Inserting built-in fields
- Navigate to the location in the Word document where you want to insert a field.
- Click the Insert tab in the Ribbon and then click Quick Parts in the Text group.
- Select Field.
- In the list of Field names, select a field.
- Under Field properties, select any properties or options you want.
How do I make a field editable in Dynamics 365?
Dynamics 365: Make a View Editable (In-Line!)
To enable this, head to Settings, then Customize, then Customize the System. Select the entity you want to enable the editable grid feature for, then select the Controls tab.
Where is field in Word?
Place the cursor in your document where you want to insert the field. From the Insert tab on the Ribbon, in the Text group, select Quick Parts and then select Field . In the Field dialog box, from the Field names list, select the field. You can filter this list by selecting Categories .
How do you remove fields in Word?
Removing Fields from Original Documents
- Open the Word document.
- Press CTRL+A on your keyboard to select all the text within the document.
- Right-click, then click Toggle Field Codes.
- Press CTRL+SHIFT+F9 on your keyboard. This will remove the field codes, replacing them with the text they contained.
- Save the document.
How do I insert a fillable field in Word?
Creating Fillable Forms Using Microsoft Word
- Enable Developer Tab. Open Microsoft Word, then go to the File Tab > Options > Customize Ribbon > check the Developer Tab in the right column > Click OK.
- Insert a Control.
- Edit Filler Text.
- Design Mode button again to exit the mode.
- Customize Content Controls.
Why is update field greyed out?
The fact that the Update Field command is greyed out suggests that fields have been locked. You can select all document content and then press Ctrl+Shift+F11 (on some keyboards, you have to click Ctrl+Shift+FN+F11). The shortcut runs the UnlockFields command.
How do I remove a locked field in a mail merge?
On the assumption the error relates to locked mergefields, open the mailmerge main document, then use Ctrl-A, Ctrl-Shift-F11 to ensure all the fields are unlocked.
How do I add a field in dynamics?
Two ways to add a field in a Microsoft Dynamics 365 form
Select your field and drag it into the form. The second way is to click on the section where you want to add the field. The section will be framed in blue once you select it. After that, you just need to double click on the field.
How do I add a field to a form?
Adding additional fields to a form
- Select the Form Layout Tools Design tab, then locate the Tools group on the right side of the Ribbon.
- Click the Add Existing Fields command. The Add Existing Fields command.
- The Field List pane will appear. Select the field or fields to add to your form.
- The new field will be added.
Learn what document properties in Microsoft Word can be used for. How to add document properties in Word, how to edit and insert document properties, etc.
When used wisely, document properties and DocProperty fields can help you produce better Word documents in less time.
In this article, you will learn what a document property is and what a DocProperty field is. You will learn where to find the Advanced Properties in Word. The article explains how you can use the built-in functionality of Word to add or edit document properties and insert DocProperty fields, both via the general user interface and via macros (VBA).
The general information below about Microsoft Word document properties and DocProperty fields apply to both custom document properties and DocProperty fields you create using Word’s built-in functionality and using the Word add-in DocTools DocPropertyManager.
It can be slow and tiresome to work with Word’s built-in functionality when it comes to document properties. The DocTools DocPropertyManager Word add-in makes the work much easier and faster. Custom document properties and DocProperty fields created using DocTools DocPropertyManager will work as if they had been created using Word’s built-in functionality. However, DocTools DocPropertyManager makes it possible to perform several tasks that are not possible via the built-in functionality.
This article is relevant for Word 2007, Word 2010, Word 2013, Word 2016, Word 2019, and Word for Microsoft 365. Note that DocTools DocPropertyManager does not work with Word 2007.
What is a document property in Word?
There are different types of document properties.
- Standard document properties – can also be called built-in document properties
- Custom document properties
- Document library properties
All Word documents contain a set of standard document properties, e.g. Title, Author, Keywords, and Comments. These properties are used to store certain types of metadata about your document. The standard properties have fixed names that you cannot change. You can edit the value of some of the standard properties (e.g. Title, Author, Keywords and Comments) whereas others store statistics data that is updated automatically by Word and that cannot be edited, e.g. file size, when the document was last saved or printed.
In addition to the standard properties, you can add Word document properties yourself. Such properties are called custom document properties. Word documents do not contain any custom document properties by default. You can add as many custom document properties as you wish. Each custom document property must be assigned a name, a data type and a value. There are four data types: Text, Date, Number and Yes or No. For details about the types, see About the different data types of custom document properties below.
Document library properties are related to documents that are stored in a document library on a website or in a public folder, e.g. in relation to SharePoint. This article will not deal further with document library properties.
Back to Table of Contents
What can document properties be used for?
None of the Word document properties are visible in the document content unless you do something to insert their values into the content. This is true for both the standard and the custom document properties.
In e.g. File Explorer, you can see and search for documents with specific standard document property values. This article will concentrate on what you can use document properties for in the contents of Word documents.
You can insert the value of a document property in the document. You do so by inserting a field of the type DocProperty. A DocProperty field will show the value of the related document property – standard or custom. See How to insert a DocProperty field using the built-in functionality of Word later in this article.
For an illustration of what document properties and DocProperty fields can be used for, see this short video. The video shows the DocTools DocPropertyManager add-in in use. You can use document properties and DocProperty fields for the same purpose by using Word’s own features. The difference is that the work is more cumbersome and takes longer.
In many documents you may need the same data repeatedly. For example, a client name or a product name may occur several times. It is very helpful to use custom document properties for such data.
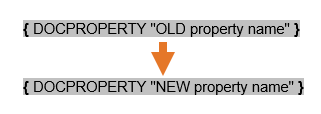
You can insert as many DocProperty fields related to the same document property as you wish. If you change the value of that custom document property, you only need to update fields. Then the new value will appear throughout the document. This applies regardless of whether one or many DocProperty fields exist. Thereby, you can define the value once and you are sure that the same value will be shown in every single DocProperty field related to that custom document property.
There are other ways to repeat data. For example, you can bookmark text and have the contents of the bookmark repeated by inserting cross-references to the bookmark. On the DocTools DocPropertyManager page, I have explained why the use of bookmarks and cross-references is less stable than the use of custom document properties and DocProperty fields.
Custom document properties and DocProperty fields also make it easy to create templates with flexible boilerplate text. This way, you can re-use text across documents. For example, this is useful in templates for proposals and agreements. It makes it fast and safe to update the contents with correct names and other values in the individual documents that are created. In the template, simply insert DocProperty fields as placeholders for the relevant data. Assign neutral, descriptive values to the custom document properties in the template. Then it is easy for the user to see which type of information each DocProperty holds. When a user creates a new document based on the template, he/she only needs to edit the values of the custom document properties and update fields.
For an example of the use of custom document properties and DocProperty fields, see the short video on the DocTools DocPropertyManager page.
Fact list
- A document property has a name and a value. A custom document property also has a type.
- The value of a document property can be inserted in Word documents using fields of the type DocProperty.
- You can add as many custom document properties in Word as you want.
- Custom document properties that have been added to a Word document are preserved in the document regardless of whether they are used in any DocProperty field.
- The field code of a DocProperty field must refer to the name of the document property whose value you want to appear in the document.
- You can repeat data in a document by inserting as many DocProperty fields referring to the same document property name as you wish.
- You can use DocProperty fields in Word templates as placeholders for document-specific data.
- To change the value of all instances of a specific DocProperty field, edit the value of the related document property and update fields.
Document properties in a template are inherited by new documents based on the template
If you want all documents that are based on a specific template to start with special values of standard properties (e.g. Title and Company) and/or a set of custom document properties, make sure these data are set up in the template. All documents based on the template will initially inherit the document properties and their values. Users of the template can then modify the values of the document properties in the individual document.
Once a Word document has been created, Word has no built-in feature for copying document properties from other documents.
Note that the DocTools DocPropertyManager add-in lets you import custom documents from one document to another. This makes it easy to re-use metadata between documents. The add-in also lets you export custom documents to a document for easy overview in a table. You can even edit properties directly in the table and add custom document properties based in the table data, ready for import into other documents.
Back to Table of Contents
How to edit the values of standard document properties
If you want to edit the value of standard document properties, you need to open the built-in Properties dialog box.
Where is document properties in Word?
In newer versions of Word, the Properties dialog box is well hidden. You must find it under the name Advanced Properties. Follow the instructions below.
How to open the Properties dialog box in Word
How to open the Properties dialog box depends on your version of Word. Note that at least one document must be open in Word in order to open the Properties dialog box.
Word 2010 and later versions
Select File > Info (left side of dialog box) > click the Properties drop-down > select Advanced Properties.

How to find Advanced Properties in Word.
Select Office button > Prepare (left side of dialog box) > in the Document Information Panel that opens below the Ribbon in Word, click the Properties drop-down > select Advanced Properties.
TIP: You can add the Properties dialog box to the Quick Access Toolbar (QAT) for easier access. The name of the command to find in the Word Options dialog box is Advanced Document Properties. For help on how to add a command to the QAT, see How to add a command or macro to the Quick Access Toolbar.
Note that DocTools DocPropertyManager provides easy access to the Properties dialog box in case you need to edit standard document properties.

Example of the Properties dialog box showing properties for a new, blank document. The name of the document appears in the title bar of the dialog box, in this case «Document3».
As can be seen in the illustration to the left, the Properties dialog box has a number of tabs: General, Summary, Statistics, Contents, and Custom. All tabs except Custom are related to standard properties.
The Summary tab has fields that let you specify a value for each of the following standard properties:
Title
Subject
Author
Manager
Company
Category
Keywords
Comments
To edit the values:
- Type the values you want to assign to the individual properties. You may leave any of the fields empty.
- Click OK when finished.
How to add or edit custom document properties
How to add document properties in Word
The built-in functionality of Word lets you add custom document properties via the Properties dialog box.
- Open the Properties dialog box and select the Custom tab. See How to open the built-in Properties dialog box.
- Type a name in the Name field (up to 255 characters).
- Select a data type in the Type field (see About the different data types of custom document properties for details).
- Type a value in the Value field (up to 255 characters, however, the value must comply with the data type you selected).
- Click Add to add the property to the Properties list. If you are creating only one document property, you can skip this step. If you are going to add more document properties, repeat steps 2-5.
- Click OK when finished.

The Custom tab of the Properties dialog box lets you add custom document properties. In this example, two custom document properties have been added.

Example of property with Link to content turned on.
Below the Name list, you will find a number of suggested names you can select from, if relevant. The result is the same as typing the name directly in the Name field.
Word custom properties link to content
About the Link to content check box
Note the check box Link to content, next to the Value field. Custom document properties with Link to content turned on will show a link icon to the left of the name.
If you turn on Link to content, the label Value changes to Source and the field changes to a drop-down list. The drop-down list shows the names of all bookmarks in the document. Select a bookmark name from the list. If you insert a DocProperty field that refers to the custom document property in question, Word will (or rather: may…) insert the content of the bookmark. If the content of the bookmark is changed, the content of any DocProperty field referring to that bookmark should change too when fields are updated. But that only seems to happen if you, after the bookmark change, open the Properties dialog box and click OK – and then updated fields.
There are also other important limitations to the bookmark content shown in such DocProperty fields: Only plain text is included in the field result and only up to 255 characters no matter what is included in the bookmark. This means that you cannot use Link to content to have DocProperty fields show longer texts or non- textual content like images or tables.
Since it is doubtful how safe and/or useful it is to use this Link to content option, the DocTools DocPropertyManager add-in does not let you add custom document properties with this option turned on. If a document contains custom document properties added via the built-in Properties dialog box and if Link to content is turned on, DocTools DocPropertyManager will detect this in case you attempt to modify the property. You will then be asked whether you want to modify the property via the built-in dialog box instead.
The built-in Properties dialog box cannot be resized. This makes it impossible to see the full names and/or full values in many cases.
The dialog box for creating and editing custom document properties in the DocTools DocPropertyManager add-in is flexible and has room for longer names and values. In addition, it lets you sort the properties alphabetically. Also, a Filter field makes it fast to find a specific property in the list. When you click a property in the list, you will see information about how many DocProperty fields are found in the document that refer to that property.
How to edit document properties in Word
You could as well ask: How to modify document properties in Word. The terms edit and modify mean the same in this situation. You can edit (modify) the value of a custom document property.
- Open the Properties dialog box and select the Custom tab. See How to open the built-in Properties dialog box.
- In the Properties list, select the relevant document property.
- In the Value field, edit the value.
- If you are going to add or edit (modify) more document properties now, click Modify, else click OK.
- If one or more DocProperty fields in the document refer to the modified property/properties, update fields (Ctrl+A to select all, F9 to update fields).
How to rename custom document properties in Word
The built-in functionality in Word does not let you change the name of a custom document property. The DocTools DocPropertyManager add-in lets you easily rename custom document properties.
Once you have added a custom document property, you can edit its value but you cannot change the name using Word’s built-in features. The only way to change the name of a custom document property is to delete the old property and add a new one. IMPORTANT: In addition, you will need to change the field code of any DocProperty field that refers to the custom document property in question. Otherwise, such field will show Error! Unknown document property name once fields have been updated.
If you use Word’s built- in feature, you must change the field code in DocProperty fields if you have deleted an old document property and added a new one to change the name.
As opposed to the cumbersome procedure needed for renaming a custom document property using Word’s own features, the DocTools DocPropertyManager add-in lets you rename any existing custom document property simply by changing its name. DocTools DocPropertyManager will automatically do all the work for you, including correcting the field code in any DocProperty field that refers to the renames document property.
How to insert document properties in Word
To insert a document property in Word, you must insert a field of the type DocProperty. Using the built-in functionality, you can insert a DocProperty field either via the Field dialog box or by typing the field code manually. Both methods are described below. Note that the DocTools DocPropertyManager add-in makes it much faster and easier to insert DocProperty fields.
How to insert a DocProperty field using the Field dialog box
- In the document, click where you want the DocProperty field to be inserted.
- Select the Insert tab.
- in the Text group on the Ribbon, click the Quick Parts drop-down and select Field to open the Field dialog box.
- In the Categories list, select either (All) or Document Information,
- In the Field names list, select DocProperty.
- In the Property list, select the name of the document property whose value the DocProperty field is to show. See the illustration of the Field dialog box below.
The list includes both the standard properties and custom properties, if any.
- Click OK to insert the DocProperty field.

The Field dialog box ready for inserting a DocProperty field.
NOTE: By default, Preserve formatting during updates is turned on. If turned on, the MERGEFORMAT switch will be added to the field code. Personally, I always turn the option off since it may result in undesired formatting. For example, a field with the switch may appear with bold text if the field has once shown an error. If special formatting is desired, it is more stable to add relevant switches for the formatting directly.

DocProperty field showing field code and field result.
How to insert a DocProperty field by typing the field code manually
If you know the name of the document property you want to use, it is faster to type the field code manually than using the Field dialog box. The same is true for many other types of fields in Word.
- In the document, click where you want the DocProperty field to be inserted.
- Press Ctrl+F9 to insert a pair of field brackets (cannot be typed manually).
- Between the field brackets, type the following field code:
DOCPROPERTY «[name of property]»
where you replace [name of property] with the name of the desired property.
The use of uppercase and lowercase in the field code is without importance. If the property name consists of one word only, you may leave out the quotation marks. If the property name includes at least one space, you must add the quotes. Therefore, I recommend that you always add quotes for consistency.
- Press F9 to update the field and turn off field codes.
If the field for some reason still shows field codes, press Alt+F9 to show the field result instead.
How to fix Error! Unknown document property name
If a DocProperty field refers to a property name that does not exist in the document, the field will show an error when fields are updated: Error! Unknown document property name. See the illustration below:
![]()
Example of DocProperty field showing an error because it refers to a property that does not exist. The error test will be shown in the language of your Word.
The error will occur if you have deleted the custom document property to which the field refers. The error will also occur if you insert content that has been copied from another document and if that content includes DocProperty fields that refer to property names that don’t exist in the target document.
To fix the error, do one of the following:
- Add the missing custom document property and update fields. You can find the property name to use by checking the field code of the error field.
OR - Change the field code in the error field to match an existing custom document property. Then update the field.
OR - Delete the DocProperty field and edit the surrounding content as needed.
The DocTools DocPropertyManager add-in lets you easily add all missing custom document properties, if any, by the click of a button.
Are DocProperty fields updated automatically?
Note that DocProperty fields do not update automatically. If the value of one or more properties referred to in DocProperty fields has been changed, you need to update the fields to reflect the changes.
You can update DocProperty fields manually by selecting all (Ctrl+A) and pressing F9.
For detailed information about how all types of fields are updated, see my article Updating Fields in Word – How it Works.
Note that the DocTools DocPropertyManager add-in automatically updates DocProperty fields when needed.
About the different data types of custom document properties
As mentioned above, custom document properties can be of the types Text, Date, Number and Yes or No. Below, you will find a description of each type.
Text is the most commonly used type. The other types, Date, Number and Yes or no require specific values and in the document, such fields will not always insert a value that is identical to the value you specify in the Properties dialog box. Therefore, you must make sure that you fully understand how the values of those types work before you start using them.
I use custom document properties and DocProperty fields in the main part of the many Word documents I work with. I always define custom document properties of the type Text.
Type of custom document property
Description – how it works
DocProperty fields that insert a Text property, inserts precisely the text you specify as the value of the property. Most often, you can use the type Text for all DocProperty fields. The value can include max. 255 characters.
The built-in functionality only lets you enter plain text as the value, without any paragraph breaks or manual line breaks. The DocTools DocPropertyManager add-in lets you add the following characters:
- nonbreaking spaces
- nonbreaking hyphens
- en dashes
- em dashes
- manual line breaks
- paragraph breaks
You must enter a value in a date format that matches the definition in the regional settings on your PC.
You may need to experiment since the language settings also influence the way Date properties work.
In case of a standard Danish setting, you can, for example, use the syntax dd-mm-yyyy, e.g. 31-05-2019. A DocProperty field in the document may not always show the date as it appears in the value you specify. You may instead use the type Text. This way, you can enter the date value precisely as you want it to appear in the DocProperty fields in the document.
You must specify a number, either an integer or a decimal number. The decimal symbol to use depends on the regional settings on your PC. If the decimal symbol is a period you can, e.g., enter 12345.678 as a value. A DocProperty field in the document will show the specified value. You may enter a number value with a thousands separator but Word ignores the separator in the field result.
You may enter the following:
* -1 (corresponds to yes) or 0 (corresponds to no) or
* True (corresponds to yes) or false (corresponds to no)
When you insert DocProperty fields, the value in the document will only be ‘Y’ for yes and ‘N’ for no.
How to manage document properties and DocProperty fields via macros (VBA)
Below, you will find VBA code examples showing:
- How you can edit the values of standard document properties via VBA
- How you can add custom document properties and edit the values of custom document properties via VBA
- How you can insert DocProperty fields via VBA
These code samples may help you create useful macros. The DocTools DocPropertyManager add-in lets you do much more than that.
In order to create solid VBA code, you will need to add error handling to handle the types of errors that might occur. The code samples below do not include such error handling.
Back to Table of Contents
How to edit the values of standard document properties via VBA
Below are examples of VBA code to edit each of the standard document properties found on the Summary tab of the Properties dialog box.
By using names from the wdBuiltInProperty enumeration, you are sure to use correct names that will work in any language version of Word. Each property also has a number that can be used but your VBA code is much easier to understand if you use the names.
For a full list of the wdBuiltInProperty enumeration for Word, see https://docs.microsoft.com/en-us/office/vba/api/word.wdbuiltinproperty. Note the comments after each of the listed properties – some are not supported in Word even if they are in the list.
Examples of VBA code for editing the values of the standard properties in the active document found on the Summary tab of the Properties dialog box:
ActiveDocument.BuiltInDocumentProperties(wdPropertyTitle) = "My Title"
ActiveDocument.BuiltInDocumentProperties(wdPropertySubject) = "My Subject"
ActiveDocument.BuiltInDocumentProperties(wdPropertyAuthor) = "My Author"
ActiveDocument.BuiltInDocumentProperties(wdPropertyManager) = "My Manager"
ActiveDocument.BuiltInDocumentProperties(wdPropertyCompany) = "My Company"
ActiveDocument.BuiltInDocumentProperties(wdPropertyCategory) = "My Category"
ActiveDocument.BuiltInDocumentProperties(wdPropertyKeywords) = "My Keywords"
ActiveDocument.BuiltInDocumentProperties(wdPropertyComments) = "My Comments"
If you are editing two or more values, you should use With and End With as shown below:
With ActiveDocument
    .BuiltInDocumentProperties(wdPropertyTitle) = "My Title"
    .BuiltInDocumentProperties(wdPropertySubject) = "My Subject"
    .BuiltInDocumentProperties(wdPropertyAuthor) = "My Author"
End With
How to add a custom document property via VBA
The VBA code below adds a custom document property in the active document, with the name «My property», link to content turned off, type «Text» and value «My property value»:
ActiveDocument.CustomDocumentProperties.Add _
    name:="My property", _
    LinkToContent:=False, _
    Value:="My property value", _
    Type:=msoPropertyTypeString
The Type can be one of the following:
- msoPropertyTypeString
Corresponds to the type Text in the Properties dialog box > Custom tab. - msoPropertyTypeDate
Corresponds to the type Date in the Properties dialog box > Custom tab. - msoPropertyTypeNumber or msoPropertyTypeFloat
Corresponds to the type Number in the Properties dialog box > Custom tab.
In case of a decimal number value, the type must be msoPropertyTypeFloat. The decimal symbol must match the decimal symbol defined in regional settings.
In case of an integer value, the type must be msoPropertyTypeNumber. - msoPropertyTypeBoolean
Corresponds to the type Yes or no in the Properties dialog box > Custom tab.
For more details about the data types, see About the different data types of custom document properties.
How to edit the value of a custom document property via VBA
The VBA code below changes the value of a custom document property named «My property» to «My new property value»:
ActiveDocument.CustomDocumentProperties("My property").Value = "My new property value"
The VBA code also works if you leave out «.Value» since .Value is the default property. However, I recommend always adding the property. It makes the code easy to read and you don’t run into problems. The example below has left out the default property .Value (not recommended even if it works):
ActiveDocument.CustomDocumentProperties("My property") = "My new property value"
The new value you assign must match the type of custom document property. For example, you can only assign the value in the example above if the type of custom document property is Text. If you assign a value that does not match the type, a run-time error occurs, saying «Type mismatch».
How to insert a DocProperty field via VBA
The VBA code below inserts a DocProperty field at the selection, referring to a custom document property named «My property». If no document property with the specified name exists, the field will show an error.
If you want the MERGEFORMAT switch to be turned on for the field, change PreserveFormatting from False to True.
The double quotation marks around «My property» are needed to have quotation marks added in the field code. There are other ways of adding the quotation marks, e.g. using the character code Chr(34). You could then replace «»My property»» with this instead:
Chr(34) & «My property» & Chr(34)
Selection.Fields.Add _
    Range:=Selection.Range, _
    Type:=wdFieldEmpty, _
    Text:="DOCPROPERTY  ""My property"" ", _
    PreserveFormatting:=False
The field code of the inserted field will look like this:
{ DOCPROPERTY «My property» }
The field result depends on the value of the property named «My property».
How to handle both built-in and custom document properties in the same VBA code
If you want to be able to handle both built-in properties and custom document properties using the same macros/VBA code, see How to use a single VBA procedure to read or write both custom and built-in Document Properties.
How to find information about the field switches
In the general help on Word, you can find information about the different types of switches that can be used with specific fields.
The fastest way to find this information is often to search using your preferred browser. You can search for «field codes [TYPE OF FIELD] field» (example: «field codes docproperty field») or something similar.
More tips about working with fields in Word
Turn on field shading so you can distinguish fields from other content
In documents with fields, it is important to be able to distinguish fields from normal text so you don’t accidentally change a field result by manually modifying its result. If you manually modify a field result, the change will disappear the next time the field is updated unless the field has been locked.
Therefore, I recommend that you set the Word option for Field shading to Always (File > Options > Advanced > Show document content group > Field shading > Always). With field shading on, all fields are shown with gray shading on the screen. The gray shading is only visible on the screen in Word – it does not print and it is not visible in PDF.
Information about how different types of fields are updated
For detailed information about how all types of fields are updated, see my article Updating Fields in Word – How it Works.
Useful shortcuts related to fields in Word
For information about keyboard shortcuts related to fields, see my article Word Fields – Useful Keyboard Shortcuts.
Back to Table of Contents

Generate complete documents in seconds from re-usable text or graphics
Manage comments in Word fast and easy – review comments, extract comments to Word or Excel, etc.
Simplify and speed up the management of cross-references even in your most complex documents
Manage and repeat data in Word fast and easy with custom document properties and DocProperty fields
Extract insertions, deletions and comments from any Word document, incl. context and headings
Apply any highlight color or remove highlight in Word with a single click – customizable shortcuts
Browse pages, sections, headings, tables, graphics, etc. and find text in Word with a single click
Check safety-critical procedure documents for human factor issues in minutes – improve quality and help prevent errors
Create screen tips in Word fast and easy – with up to 2040 characters
Once you understand how custom document properties and DocProperty fields in Word work, you will be able to create Word documents more efficiently. If you use custom document properties and DocProperty fields for metadata and repeated data, if is easier for you to keep the document data updated and correct.
This article has explained how to add document properties in Word, how to edit document properties in Word, how to insert document properties using DocProperty fields, etc. I hope this article helps you in your future work with custom document properties and DocProperty fields in Word.