
How to Edit a Textbox in Word
- Click anywhere in the Word text box to enter editing mode.
- Click and drag your mouse across a section of text to edit it.
- Click the “Home” tab to access text formatting tools.
Contents
- 1 How do I edit text in a text box in Word?
- 2 How do I edit a locked text box in Word?
- 3 How do I edit a box in Word?
- 4 How do I unlock a text box in Word?
- 5 How will you edit a text box in scratch?
- 6 How do you remove text boxes in Word?
- 7 How do I enable editing in Word?
- 8 How do I remove editing restrictions in Word?
- 9 How do you insert an editable field in Word?
- 10 Why can’t I add a text box in Word?
- 11 Why is my text box anchored in Word?
- 12 Why are there boxes in my Word document?
- 13 Can you lock a text box in Word?
- 14 How do you add text in Scratch 3?
- 15 What is Scratch paint editor?
- 16 Can’t delete a text box in Word?
- 17 How do you delete a text box in Word without deleting the text?
- 18 How do I edit a restricted document?
- 19 How do you insert a text form field?
- 20 How do I make a Word document fillable and not editable?
To change the text box shape:
The Format tab will appear. From the Format tab, click the Edit Shape command. Hover the mouse over Change Shape, then select the desired shape from the menu that appears. The text box will appear formatted as the shape.
How do I edit a locked text box in Word?
On the Review tab, in the Protect group, click Restrict Editing. In the Editing restrictions area, select the Allow only this type of editing in the document check box. In the list of editing restrictions, click No changes (Read only). Select the part of the document where you want to allow changes.
How do I edit a box in Word?
Modifying text boxes
- Select the text box you want to change. The Format tab will appear.
- From the Format tab, click the Edit Shape command. Clicking the Edit Shape command.
- Hover the mouse over Change Shape, then select the desired shape from the menu that appears.
- The text box will appear formatted as the shape.
How do I unlock a text box in Word?
To Unlock Fields
On the toolbar ribbon, from the Developer tab, under Protect, click Restrict Editing. The Restrict Formatting and Editing pane appears on the right.
How will you edit a text box in scratch?
In vector mode, double click an existing text box with the select (mouse) tool. In bitmap mode, once clicked outside of text boxes are no longer editable and act as an image. You can also edit a vector text by clicking on it with the arrow tool and then using the T tool on it.
How do you remove text boxes in Word?
Removing the Box from a Text Box
- Either click on the border of the text box or position the insertion point within the text box.
- Select the Text Box option from the Format menu.
- Click on the Colors and Lines tab, if necessary.
- In the Color drop-down list, select No Line.
- Click on OK.
How do I enable editing in Word?
Enable editing in your document
- Go to File > Info.
- Select Protect document.
- Select Enable Editing.
How do I remove editing restrictions in Word?
When you try to edit the Word document, the Editing Restriction pane will appear on the right-side of the document. Click the Stop Protection button. To remove editing restriction in your Word document, enter your password and click OK.
How do you insert an editable field in Word?
Creating Fillable Forms Using Microsoft Word
- Enable Developer Tab. Open Microsoft Word, then go to the File Tab > Options > Customize Ribbon > check the Developer Tab in the right column > Click OK.
- Insert a Control.
- Edit Filler Text.
- Design Mode button again to exit the mode.
- Customize Content Controls.
Why can’t I add a text box in Word?
If any part of the document is protected, insertion of pictures and text boxes (which in Word are actually graphic objects) is disabled. It seems you’re limiting the restriction to headers and footers.
Why is my text box anchored in Word?
The anchor is a symbol that sometimes appears when you insert an image, or a SmartArt, or a drawing into a Word document. By default, the anchor will only appear when you insert a picture, clipart, or SmartArt and then ‘Wrap text. ‘Now, if you were to try to move this paragraph, this picture would move with it.
Why are there boxes in my Word document?
The boxes surrounding text in your example document are frames. These can be removed by pressing Ctrl+Q (which reverts paragraph formatting to that of the underlying pararaph style).
Can you lock a text box in Word?
Locking text boxes in a Word document lets you prevent others from tampering with or making inadvertent changes to these text-entry controls.A simple way of locking text boxes is to use the Restrict Editing command, which allows you to single out text boxes for restricted editing.
How do you add text in Scratch 3?
You will type your description right inside a description box.
- Click the Text tool.
- Choose a color that contrasts your rectangle.
- Choose a font.
- Click inside the top‐left corner of your rectangle.
- Type the first line of your scene description.
- Click the Return or Enter button on your keyboard to start a new line.
What is Scratch paint editor?
The Paint Editor is Scratch’s built-in image editor. Many Scratchers create their own sprites and backdrops using it. These images can be used in many ways, each having its own impact on its project.
Can’t delete a text box in Word?
To delete a textbox you must click on the textbox border, then press the Delete key.
How do you delete a text box in Word without deleting the text?
Method 1: Remove Text Box By Copying and Pasting
- Step 1: Open up a Word file. To get started, let’s open up an MS Word document.
- Step 2: Copy the text from the text box.
- Step 3: Paste the text on a space outside the text box.
- Step 4: Delete the text box.
How do I edit a restricted document?
How to Make Changes in a Restricted Word Document
- Go to the Ribbon > Review > Protect group > Restrict Editing.
- Under Editing restrictions, select the checkbox for Allow only this type of editing in the document.
- Select No changes (Read only) from the dropdown.
How do you insert a text form field?
Working with Form Fields
- Position the insertion point where you want the field to appear.
- Display the Developer tab of the ribbon.
- In the Controls group click Legacy Tools and then click the Text Form Field tool.
- Right-click the form field just entered and choose Properties from the resulting Context menu.
How do I make a Word document fillable and not editable?
Head on to the “Protect” section on the ribbon and click the button labeled “Protect Document.” You should then click the button named “Restrict Formatting and Editing.” On the options that appear, select the one that says “Allow only this type of editing in the document” and pick “Filling in forms.” Once you’re done,
Text boxes offer specialized formatting options to liven up your Microsoft Word documents and separate passages from the rest of the text. Although these text boxes can produce dazzling results, such as multi-angled borders and rotated text, the words in these boxes are recognized as plain text. This means you edit the text using the same Word editing tools you would for normal text. However, you first have to enter editing mode to apply any changes.
-
Click anywhere in the Word text box to enter editing mode. Doing so opens and focuses on a new Format tab.
-
Click and drag your mouse across a section of text to edit it. Alternatively, press «Ctrl-A» to select all text in the text box. Typing text replaces currently selected text with whatever you type.
-
Click the «Home» tab to access text formatting tools.
-
Apply formatting effects, such as bold, italics, underlining, fonts, font sizing and font colors, by clicking the appropriate buttons in the Font group.
-
Format the text with bullets, justification or indentation by clicking the tools in the Paragraph group.
-
Right-click the text box’s border and select «Edit Points.» Click and drag any line or corner to distort the box, create curved sides or add angles.
-
Click and drag the green circle above the text box to rotate it.
-
Right-click the text box’s border and select «Format Shape.» Change any formatting options, such as line color, line style and artistic effects, by clicking the appropriate left-hand tab and selecting the formatting option from the right pane.
-
Click anywhere outside the text box to exit editing mode.

If you want to get creative with your text or simply have more flexibility, consider adding a customizing a text box in Word.
If you want more flexibility with certain text in your Word document, why not use a text box? Since a text box is considered an object, you can move it wherever you like in your document. This is handy for placing text in areas you normally wouldn’t.
You can use a text box to call attention to something in your document, rotate snippets of text, or create a unique appearance. Microsoft Word also provides formatting options for text boxes that give them their own nifty style or useful function.
Here, we’ll show you how to add or draw a text box and then format it to your liking in Microsoft Word.
With Word on Windows, you can either insert a preformatted text box or draw one of your own. Either way, you can customize it afterward, so choose the best option for you.
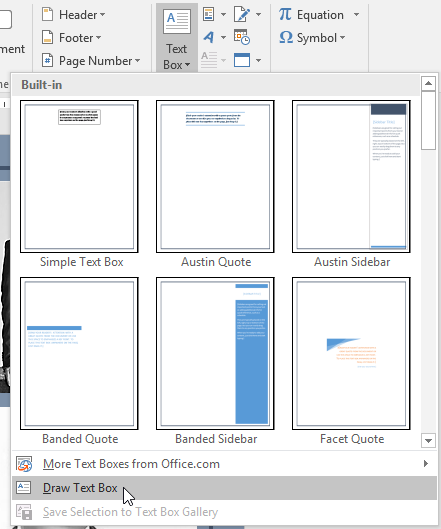
Go to the spot in your document where you want the text box and select the Insert tab. Click the Text Box drop-down arrow and pick a Built-In style or Draw a Text Box.

If you’re using Word on Mac, go to the Insert tab, click the Text drop-down arrow, and then the Text Box arrow. You can then choose to draw a simple text box or one where the text inside is vertical.

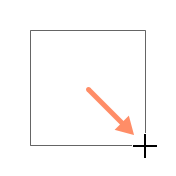
To draw your text box on either platform, drag the crosshairs to create the size you want. You can resize the text box any time after you draw it too.

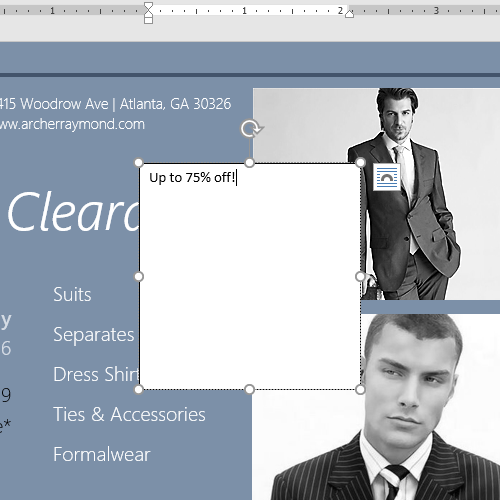
When your text box appears, click inside to add your own words.
Format and Customize a Text Box in Word
Once you insert or draw your text box, select it and go to the Shape Format tab to view all of your formatting options. You’ll find the following features in Word on Windows, which may differ slightly in Word on Mac.

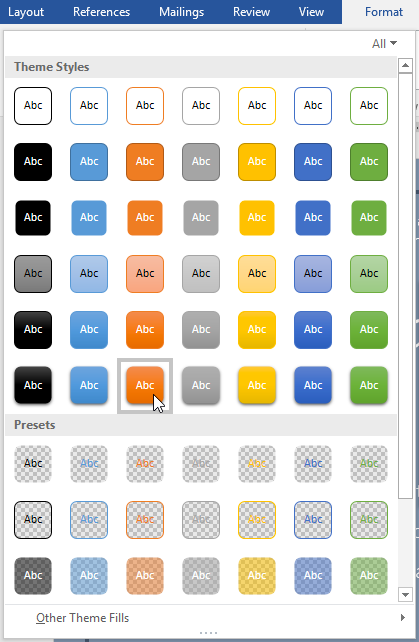
Shape Styles
Choose a theme or preset style for your text box. These options include filling colors and various effects.

Or you can use the Shape Fill, Outline, and Effects options to create your own distinctive style. From gradients and patterns to dashed lines and scribbles, you have many terrific options for customizing the appearance of your text box.

Note: Some options in the Shape Styles section may not be available if you select a preset text box.
WordArt Styles
Along with making the text box itself look snazzy, you can do the same with the text inside of it. Check out the Quick Styles in the WordArt Styles for premade options.

Or use the Text Fill, Outline, and Effects to make the text really pop. You can do things like add a shadow and glow or warp the text, so it’s curvy and cool.

Text, Accessibility, Arrange, and Size
The remaining sections of the ribbon allow you to change the direction of the text inside the box, use text wrapping with other elements in your document, rotate the text box, and adjust its exact size. You can also use the Alt Text Accessibility option to describe the text box.

Edit Your Text Box
After you customize your text box, you can still edit it anytime. Just note that when you select the text box to make changes, it may appear without some of the elements or effects you’ve applied. This is to make text editing simpler.
Once you complete your edits and deselect the text box, it will return to normal with your customizations.

Add Text Anywhere, Any Way in Word
Text boxes in Microsoft Word let you place text anywhere in your document without worries of margins or other normal text limitations. And because you can completely format the text box almost any way you want, it can be both a fun and useful addition to your document.
If you use Google Docs and Microsoft Word, take a look at how to work with text boxes in Docs too!
![]()
-

1
Click the Insert tab.
-
2
On the right side of all of the things you can insert, look for ‘Text Box.’
Advertisement
-
3
Select the text box that you want to use and double click on it.
-
4
Cut and paste the text into the text box.


Advertisement
Ask a Question
200 characters left
Include your email address to get a message when this question is answered.
Submit
Advertisement
Video
-
To change the size of the text box, click on it once, and drag one of the 8 circles.
-
You can change the design of the text box you have selected by going into the format tab.
Thanks for submitting a tip for review!
Advertisement
About This Article
Thanks to all authors for creating a page that has been read 98,464 times.
Is this article up to date?
wikiHow Tech Help Pro:
Level up your tech skills and stay ahead of the curve
Let’s go!
Lesson 21: Text Boxes
/en/word2016/shapes/content/
Introduction
Text boxes can be useful for drawing attention to specific text. They can also be helpful when you need to move text around in your document. Word allows you to format text boxes and the text within them with a variety of styles and effects.
Optional: Download our practice document.
Watch the video below to learn more about text boxes in Word.
To insert a text box:
- Select the Insert tab, then click the Text Box command in the Text group.

- A drop-down menu will appear. Select Draw Text Box.
- Click and drag anywhere on the document to create the text box.
- The insertion point will appear inside the text box. You can now type to create text inside the text box.
- If you want, you can select the text and then change the font, color, and size by using the commands on the Format and Home tabs. To learn more about using these formatting commands, see our Formatting Text lesson.
- Click anywhere outside the text box to return to your document.


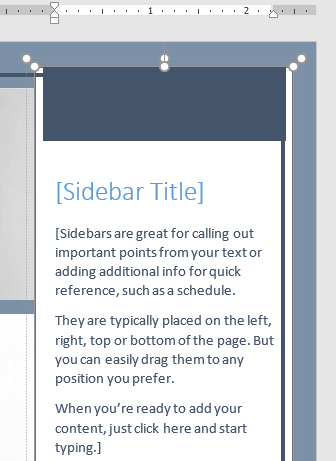
You can also select one of the built-in text boxes that have predefined colors, fonts, positions, and sizes. If you choose this option, the text box will appear automatically, so you will not need to draw it.
To move a text box:
- Click the text box you want to move.
- Hover the mouse over one of the edges of the text box. The mouse will change into a cross with arrows.
- Click and drag the text box to the desired location.

To resize a text box:
- Click the text box you want to resize.
- Click and drag any of the sizing handles on the corners or sides of the text box until it is the desired size.

Modifying text boxes
Word offers several options for changing the way text boxes appear in your document. You can change the shape, style, and color of text boxes or add various effects.
To change the shape style:
Choosing a shape style allows you to apply preset colors and effects to quickly change the appearance of your text box.
- Select the text box you want to change.
- On the Format tab, click the More drop-down arrow in the Shape Styles group.
- A drop-down menu of styles will appear. Select the style you want to use.
- The text box will appear in the selected style.


If you want to have more control over text box formatting, you can use any of the shape formatting options such as Shape Fill and Shape Outline. To learn more, see our Shapes lesson.
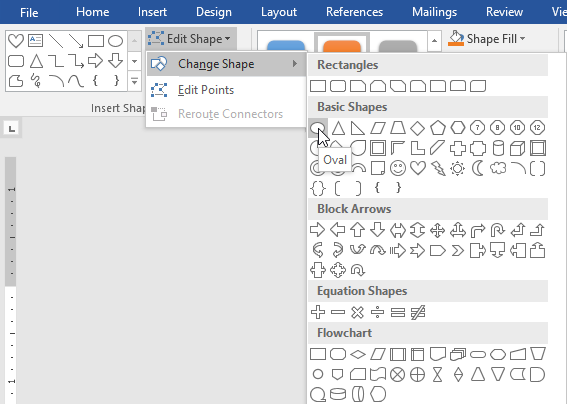
To change the text box shape:
Changing the shape of a text box can be a useful option for creating an interesting look in your document.
- Select the text box you want to change. The Format tab will appear.
- From the Format tab, click the Edit Shape command.
- Hover the mouse over Change Shape, then select the desired shape from the menu that appears.
- The text box will appear formatted as the shape.


Challenge!
- Open our practice document.
- Insert a Simple Text Box.
- In the text box, type Get an additional 25% off when you mention this ad!
- Change the font to Gadugi, 20 pt, Center Align.
- Change the shape of the text box to Double Wave from the Stars and Banners group.
- Change the text box style by selecting any style in the Intense Effect row.
- Drag the text box to the space below Buy 1, Get 1 Free* and Formalwear.
- When you’re finished, your document should look something like this:


/en/word2016/aligning-ordering-and-grouping-objects/content/
 This tutorial shows how to use the Editor in Word for Microsoft 365. The Editor is an update to the spelling and grammar check available in older versions of Word.
If you are using an older version of Word that doesn’t have an Editor button, please see my other tutorial “How to Use the Spelling and Grammar Check in Microsoft Word.”
This tutorial covers five topics:
- How to Select Grammar Issues and Refinements
- How to Run the Editor
- How to Review the Suggested Edits
- How to Finish the Edit
- How to Run a Fresh Edit
Attention Mac Users: The Editor is available in Word for Microsoft 365 for Mac. The basic steps are similar to those shown here. However, the process of selecting grammar issues and refinements is different, so we will cover the Editor in Word for Mac in a separate tutorial.
This tutorial is also available as a YouTube video showing all the steps in real time.
Watch more than 150 other writing-related software tutorials on my YouTube channel.
Are you looking for information about editing in Word with Track Changes instead of using the Editor? If so, visit “How to Use Track Changes in Microsoft Word” for a step-by-step tutorial covering ten editing tasks.
How to Select Grammar Issues and Refinements
The Editor can check for over 150 grammar issues and refinements beyond spelling, including the following:
- hyphenation
- passive voice
- Oxford comma
- clichés
All the grammar and refinement options are available in the Word Options dialog box. You should select from these options before running the Editor.
- Select the File tab in the ribbon.

- Select the Options tab in the Backstage view.

- Select the Proofing tab in the Word Options dialog box.

- Review the spelling and grammar options that affect how the Editor interacts with your document:
A. Ensure that Check spelling as you type and Mark grammar errors as you type are selected if you want issues to be marked in the text as you type.
B. Ensure that Check grammar and refinements in the Editor Pane is selected to include grammar and refinements.
C. (Optional) Ensure that Show readability statistics is selected to show your readability statistics after running the Editor.
D. Ensure that Hide spelling errors in this document only and Hide grammar errors in this document only are not selected.

Pro Tip: Always run the Editor, even if you have spelling and grammar issues marked as you type, because you may not notice all the in-text edits. Plus, the Editor seems to be more thorough than the check provided as you type.
- Select Grammar & Refinements or Grammar in the Writing Style menu. (Most users will want to choose Grammar & Refinements because it offers more options.)

- Select the Settings button.

- Select or deselect options from the Grammar Settings dialog box.

Defining each grammar option is beyond the scope of this tutorial. However, the Microsoft Office Support website provides a detailed explanation for many of the options sorted by language.
- Select the OK button to close the Grammar Settings dialog box.

- Select the OK button to close the Word Options dialog box.

Now that you have decided how you want Word to proof your document, you can run the Editor.
- Select the Home tab in the ribbon.

- Select the Editor button. (The Editor button is also available in the Proofing group on the left end of the Review tab.)

The Editor Pane will appear on the right side of your screen.
How to Review the Suggested Edits
- Review your Editor Score. This score will change based on choices you make within the Editor Pane. Therefore, you may choose to disregard this number while working with the Editor.

- (Optional) Select a level of formality from the drop-down menu.
- Formal—The Editor will apply all the grammar and refinement rules, resulting in the most recommendations.
- Professional—The Editor will apply most of the grammar and refinement rules, resulting in fewer recommendations than the Formal option.
- Casual—The Editor will apply the fewest number of grammar and refinement rules, resulting in the fewest recommendations.
Your Editor Score will change based on your choice of formality.

Pro Tip: Use the Formal writing option for the strictest edit even on less formal writing because you can always ignore suggestions—but you can’t ignore suggestions you never see.
- Select the Editor Score (see figure 12) to review each of the recommendations starting from the current placement of your cursor. Or, skip to step 4 to review by category.
- Select the Corrections or Refinements category you want to review. The available categories will depend on your selections in the Grammar Settings dialog box (see figure 7).
Categories with a checkmark don’t have any suggestions.

Spelling
- Choose a suggestion to change the individual spelling error.

Or, open the drop-down menu for the suggestion and select Change All to change every instance of the spelling error.
You can also choose (a) Ignore Once to ignore that spelling one time, (b) Ignore All to ignore that spelling every time it appears in the document, or (c) Add to Dictionary to add the word with its current spelling to your custom dictionary.

If the Editor is unable to provide any spelling suggestions, it will still let you add the word to your custom dictionary, ignore the word once, or ignore all instances of the word.
After you select or ignore a suggestion, the Editor will automatically move to the next issue in that category or return you to the main view to chose a new category.
Grammar and Refinement Issues
- Review each grammar or refinement issue. In some cases, the Editor will suggest a way to rewrite the text.
Or, select (a) Ignore Once to ignore that instance of the issue or (b) Don’t check for this issue to stop checking for that type of issue in the rest of the document.

Open the drop-down menu above the text box if you want additional information about the issue.

Pro Tip: The navigation arrows on the right side of the pane let you move forward and backward to issues you have not yet addressed. The arrow on the left side will return you to the Editor’s main view.

The Editor Pane also provides options to search the web for similar text and give feedback to Microsoft about the Editor.

How to Finish the Edit
If you included readability statistics in your proofing options in the Word Options dialog box (see figure 4), the Readability Statistics dialog box will appear after you have accepted or ignored all the Editor’s suggestions.
- Select the OK button to close the Readability Statistics dialog box.

- Select the OK button in the dialog box stating that you have finished reviewing the Editor’s suggestions.

How to Run a Fresh Edit
If you have updated your text since running the Editor, you may want to run a fresh check.
- Select the File tab in the ribbon (see figure 1).
- Select the Options tab in the Backstage view (see figure 2).
- Select the Proofing tab in the Word Options dialog box (see figure 3).
- Select the Recheck Document button.

- Select the Yes button in the dialog box stating that the new spelling and grammar check (Editor) will recheck issues that you ignored during the last check.

- Select the OK button to close the Word Options dialog box (see figure 9).
Follow the steps in the How to Run the Editor section above to recheck your document.
Important Note: Microsoft plans to continually add new features to Word for Microsoft 365. Therefore, your version of Word may have different features than those shown here.
Related Resources
How to Change the Proofing Language in Microsoft Word
How to Use the Clipboard in Microsoft Word
How to Edit Your Custom Dictionary in Microsoft Word
How to Create an Exclusion Dictionary in Microsoft Word
Updated September 25, 2022
Achieve more control and flexibility with your documents
Updated on September 11, 2022
What to Know
- Select Insert > Text Box > choose a text box template. Select and drag box to the position you want.
- To resize text, select and drag circles around the edge. To rotate text, select and drag the circular arrow.
- Place the cursor inside the text box and type the information you want to appear.
This article explains how to use text boxes in Microsoft Word. Instructions apply to Word for Microsoft 365, Word 2019, Word 2016, and Word 2013.
How to Insert a Text Box in Word
Start by opening the document you want to add a text box to. Then follow the steps below.
-
On the ribbon, select Insert.
-
In the Text group, select Text Box, then choose a text box template.
-
The new text box appears in the middle of the text, and the Shape Format tab is automatically selected.
-
Select and drag the box to the position you want. To resize the text box, select and drag the circles around the edge. To rotate the text box, select and drag the circular arrow at the top of the box.
-
Place the cursor inside the text box and type the information you want to appear there.
Why Use Text Boxes?
When you type text in Microsoft Word, you have options for making it look a particular way on the page (such as changing the page margins), but those options are limited. Text boxes expand your formatting repertoire by offering additional control and flexibility for how your text appears. You can place a text box anywhere within a document and format it with different colors and fonts. This feature is especially helpful for creating a blockquote or a sidebar.
Customize a Text Box
After you create a text box, you can customize it in a number of ways.
-
To bring up options, place the cursor inside the text box and right-click. Choose an option and follow the screen prompts to add a border, change the style, or adjust the way the text box interacts with the other text on the page.
Alternatively, use the controls on the Shape Format tab.
-
To go directly to the Layout Options menu, select the text box, then select the Layout Options icon (it looks like a horseshoe and is located to the right of the text box).
-
Change the text, make more adjustments, or move the box to another location at any time. To delete a text box, select its border, then press Delete on the keyboard.
Thanks for letting us know!
Get the Latest Tech News Delivered Every Day
Subscribe