
‘EASY TO CONTROL’ is a 13 letter
Phrase
starting with E and ending with L
Crossword answers for EASY TO CONTROL
| Clue | Answer |
|---|---|
|
|
|
|
EASY TO CONTROL (6) |
DOCILE |
|
EASY TO CONTROL (9) |
TRACTABLE |
Synonyms for TRACTABLE
4 letter words
Top answers for EASY TO CONTROL crossword clue from newspapers
Thanks for visiting The Crossword Solver «Easy to control».
We’ve listed any clues from our database that match your search for «Easy to control». There will also be a
list of synonyms for your answer.
The answers have been arranged depending on the number of characters so that they’re easy to
find.
If a particular answer is generating a lot of interest on the site today, it may be highlighted in
orange.
If your word «Easy to control» has any anagrams, you can find them with our anagram solver or at this
site.
We hope that you find the site useful.
Regards, The Crossword Solver Team
More clues you might be interested in
- person stationed to keep watch
- pacific island
- not punctual
- devout
- provost
- very tall
- slyness
- straighten up
- moral doubt
- contract work out
- ste
- very tired
- naked runner
- reappear
- cinema
- type of shirt
- tower above
- discarded
- fertilizer
- impetus
- easily irritated
- affliction
- infatuations
- educational
- rugby forward
- european river
- 40-member california group
- us lawyer
- 7, often
- malfeasance
![]()
Integrated RFID functionality makes it easy to control the process and product QA.
![]()
![]()
Встроенные функциональные средства RFID позволяют легко контролировать технологического процесса и качество продукции.
![]()
High precision, high reliability, easy to control the opening and closing of the valve plate.
Consequently there emerged little states with enormous resources, which were easy to control.
![]()
![]()
Так появились небольшие государства с огромными ресурсами, ими было легко управлять.
![]()
Good integrity, easy to control the opening and closing of the valve plate.
![]()
![]()
The situation makes such victims particularly vulnerable and easy to control.
![]()
The RZ500-G02 concrete floor
![]()
RZ500- G02 бетонный
Features: fast delivery without intermediate transshipment, flexible route, easy to control the location of the cargo.
![]()
![]()
Особенности: быстрая доставка без промежуточных перевалок, гибкий маршрут, легко контролировать местонахождение груза.
![]()
![]()
![]()
The UPnP(Universal Plug and Play) function makes it easy to control network devices in an IP network.
![]()
![]()
Функция UPnP( Universal Plug and Play) обеспечивает удобное управление устройствами, работающими в одной IР- сети.
![]()
![]()
![]()
FEATURES: Support subtitles(ASS, SRT,…) Easy to control volume, brightness.
![]()
![]()
![]()
The LED touch light system for the bath is waterproof and very easy to control.
![]()
The game, itself, is smooth and easy to control and the graphics will look perfect on any Android gadget.
![]()
![]()
Игра, сама, гладкая и легко контролировать и графика будет выглядеть идеально на любой Android гаджета.
![]()
The container cloud uses the resources of the Big Data Open Lab and
makes it easy to control the resources allocated
to
our container projects.
![]()
![]()
Контейнерное облако использует ресурсы Big Data Open Lab и
позволяет легко контролировать ресурсы, выделяемые для наших проектов на основе контейнеров.
![]()
I also want my systems
to
be easy to control, so I can, for example, adjust the temperature of the houses and see how the chickens react.
![]()
![]()
Мне также было необходимо, чтобы системами можно было легко управлять, чтобы, например, изменить температуру в птичниках и посмотреть, как на это отреагируют цыплята.
![]()
Apple diet can
stomach shrink after weight loss becomes easy to control appetite, and taste become normal,
not like spicy food or greasy food.
![]()
Яблочная диета может
желудка сокращаться после потери веса становится легко контролировать аппетит и вкус становятся нормальными,
не нравится острая пища или жирной пищи.
Lighting
control
system created for managing, and makes it easy to control lighting fixtures in the house.
![]()
![]()
Для этого и создана система управления освещением, которая позволяет легко управлять осветительными приборами в доме.
![]()
a variety of genres, sound and animation effects- all this helps
to
play educational games for children with pleasure.
![]()
![]()
разнообразие жанров, звуковые и анимационные эффекты- все это помогает играть в развивающие игры для детей с удовольствием.
![]()
Points 10:00 tech ceramic patented dual
![]()
Очка 10: 00 технологий керамической запатентовал двойной
Track your menstrual cycle in easy to control calendar and predict ovulation, fertile days and next period.
![]()
Отслеживайте свой менструальный цикл в легко управляемом календаре и прогнозируйте овуляцию, плодородные дни и следующий период.
Usability of facility operation 5 The level of facility automation shall be high; the operations shall be simple,
![]()
![]()
Удобство эксплуатации объекта 5 Объект должен отличаться высоким уровнем автоматизации, технологические операции должны быть простыми,
![]()
Of course, in the game cast, and it should be noted that they are easy to control, moreover, able
to
work even on old computers.
![]()
![]()
Конечно же, в игры Приведения, следует отметить и то, что именно они отличаются простотой управления, более того, способны работать даже на слабых компьютерах.
![]()
Before the arrival of the printing press in Europe in the 1500’s,
information was highly scarce and relatively easy to control.
![]()
До появления печатного пресса в Европе 1500- х,
So, we can easy to control the quality and give you best quality and competitive price.
Unlike Bespalov, the Interior Minister is reputed as an»easy to control team player,
who observes the subordination rules and never promotes his ego.».
![]()
Глава МВД, в отличие от Беспалова, зарекомендовал себя как» хорошо контролируемый, командный системный игрок,
соблюдающий правила субординации и никогда не выпячивающий свое» я».
Results: 50,
Time: 0.0263
English
—
Russian
Russian
—
English
На основании Вашего запроса эти примеры могут содержать грубую лексику.
На основании Вашего запроса эти примеры могут содержать разговорную лексику.
и легко контролировать
и легко контролируемым
The whole set of device is portable and easy to control.
The RZ500-G02 concrete floor grinding machine is extremely stable and easy to control.
The substrate method is more effective and easy to control than others the researchers have explored in the past.
Субстратный метод является более эффективным и легко контролируемым, чем другие, уже испытанные учеными.
He says former President Akbar Hashemi Rafsanjani, who chaired the meeting, pushed for Khamenei to be picked because he considered Khamenei «weak» and easy to control.
Он говорит, что бывший президент Акбар Хашеми Рафсанджани, который председательствовал на собрании, настаивал на выборе Хаменеи, потому что считал его «слабым» и легко контролируемым.
Many modern handguns use a locked-breech design and therefore do not require the amount of mass that the blowback design requires in order to remain safe to fire, comfortable to shoot, and easy to control during the firing process.
Многие современные пистолеты используют затворную конструкцию и поэтому не требуют количества массы, требуемого конструкцией продувки, чтобы оставаться в безопасности для стрельбы, комфортно снимать и легко контролировать во время стрельбы.
Mediocrity + no jobs keep young people weak and easy to control.
The situation makes such victims particularly vulnerable and easy to control.
Stable in air and easy to control.
He added the model is «definitely faster and easy to control» in corners.
He therefore needed to be strong, obedient and easy to control.
Japanese SUV positioned as high-tech and easy to control the car with the highest level of comfort.
Японский внедорожник позиционируют как высокотехнологичный и удобный в управлении автомобиль с максимальным уровнем комфорта.
The most popular among beginners is the distribution Ubuntu, because it is stable and easy to control work.
Самым популярным у начинающих пользователей является дистрибутив Ubuntu, так как он отличается стабильностью работы и простотой управления.
Which is why the hacker spirit will endure, he says, even in an era when computers are so ubiquitous and easy to control.
Именно поэтому хакерский дух выживет, говорит он, даже в эпоху, когда компьютеры так распространены и ими так легко управлять.
Low expenses (and easy to control)
Because the circuitry is so simple and easy to control, it will likely become widespread as complete LED luminaires become popular.
Поскольку схема настолько проста, и ею легко управлять, то, как только возрастет популярность полностью светодиодных источников освещения, она получит широкое распространение.
The results show that the pressureless sintering process of silicon carbide with appropriate content of C+B4C sintering aids is simple and easy to control.
Результаты показывают, что беспросветный процесс спекания карбида кремния с соответствующим содержанием спекающих добавок С + B4C прост и прост в управлении.
The strategic Lithuanian company will definitely remain under control of the State; however, it will become more transparent, financially stable and easy to control.
Стратегическая литовская компания, несомненно, останется в руках государства, но станет более прозрачной, финансово стабильной и легче управляемой.
The FN Five-seveN is a no-nonsense, well-thought-out weapon that is reliable, functional and easy to control.
FN Five-seven — это серьезный, продуманный, надежный, функциональный, и очень легкий в обращении пистолет.
OpenCart’s administration panel is intuitive and easy to control.
Результатов: 28. Точных совпадений: 28. Затраченное время: 120 мс
Documents
Корпоративные решения
Спряжение
Синонимы
Корректор
Справка и о нас
Индекс слова: 1-300, 301-600, 601-900
Индекс выражения: 1-400, 401-800, 801-1200
Индекс фразы: 1-400, 401-800, 801-1200
Everyone knows Clippy. But are you friends with Pilcrow? If you are, then you know more about Microsoft Word than most people do. Do you know about widow lines? The extended clipboard?
There are plenty of lesser-known Microsoft Word features that you should know about if you want to be truly proficient with the software. Here are some advanced Microsoft Word features that can make your work and life easier.
1. Be Distraction Free: Hide the Ribbon and Go Full Screen
Writers want peace. Since MS Word is packed full of features, it can feel a bit cluttered when you just want a distraction-free view of the text.
You can use a quick shortcut to hide the Ribbon. Press Ctrl + F1 to toggle the Ribbon from view.
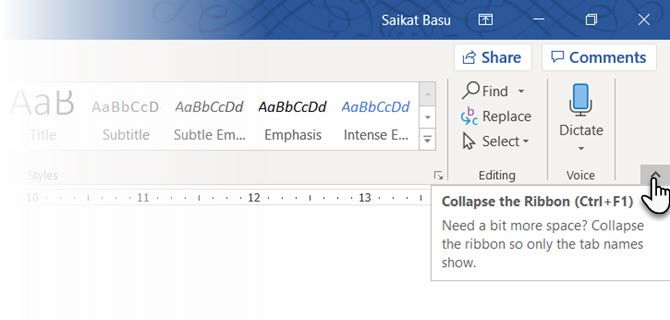
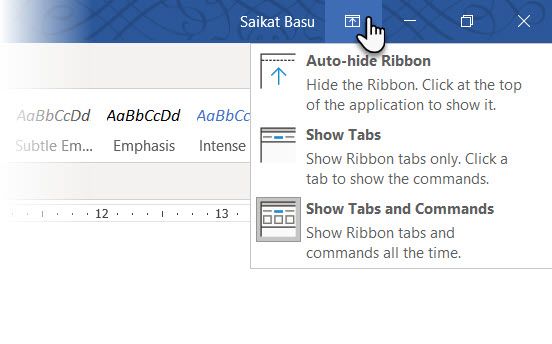
You can also change the behavior of the Ribbon to hide automatically when you don’t need it. To do this, click the Ribbon Display Options icon (next to the minimize icon) and select Auto-hide Ribbon.
Distraction-free Reading
Distraction-free reading is a more specialized feature available in Word 2010 onwards. Though primarily designed for touch-enabled tablets, the Read Mode works well on an everyday laptop as well. To access it quickly, press Alt, followed by W + F simultaneously.
Optionally, use the buttons:
- View > Read Mode (on the Ribbon menu).
- The Read Mode button on the right (on the Status Bar).
You can double-tap with your finger or double-click with your mouse to zoom in and make graphics like tables, charts and images fill the screen.
2. Reorganize With the Outline View
Outlining your main ideas and completing that first draft quickly is the surefire tip for writing productivity. If used well, the Outline View can increase your productivity with large documents by 50%.
On the Ribbon, go to the View tab and click Outline.
Outline View helps you fine-tune the organization of complex documents by reordering text blocks and nine levels of headings. Outline View brings up a special toolbar called Outlining, with controls for promoting or demoting selected text. Use the controls to hide or display selected text.

- Want to get to a specific point in a long document? Switch to Outline View and jump to a specific heading level.
- Want to draft quickly? Plan out the main sections on Outline View and then switch to the other layouts to write the body.
- Want to reorganize a report by moving huge blocks of text? Drag and drop a heading to move not only that heading, but all the sublevels under it and the body text. Use the upward-downward arrows to work them.
- Want to quickly format headings? Use Headlines 1, 2, and 3 instead of changing the size and using uppercase.
Double-click anywhere and begin typing. You don’t need to bother with positioning a cursor if you don’t want to. This is the closest MS Word comes to freestyle writing. Click and Type has existed since Word 2002. The feature works only in the Print Layout view or in Web Layout view.
Though this is very useful for inserting text and graphics, you can also use it for impromptu brainstorming as a free-form mindmapping tool.
4. Convert Tables to Graphs in 3-Steps
Take your pick: a neatly formatted table with lots of data or a nicely designed chart visualizing that data for you?
Being visual creatures, it is often a no-brainer to opt for the latter. Word makes it easy to convert tabular information into a chart. When you don’t have too much of tabular data, create a chart in Word instead of over-killing with Excel. Select the table with the data and follow three steps:
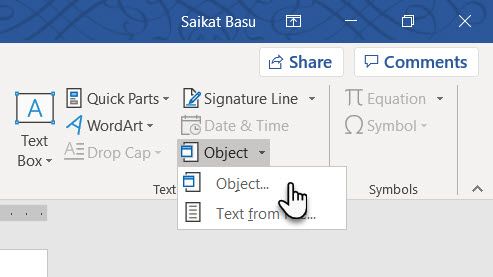
- Click on the Insert tab on the Ribbon.
- Click the Object tool within the Text group and open the Object dialog box.
- From the list of Object Types, choose Microsoft Graph Chart. Click OK.
Word displays the tabular data as a neat column chart. Modify the data sheet that appears.
You can also format this graph with a different chart type. To do this:
- Double-click your chart.
- Right-click in the white space that’s within the bounding box of the graphic.
- Select Chart Type.
You can also use Microsoft Word to create stunning flowcharts with the shapes feature.
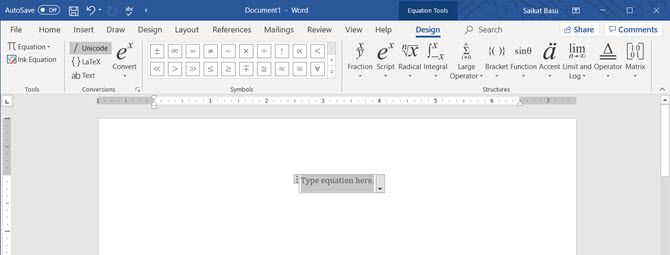
5. Write Equations in Word
It’s not only Excel formulas that are amazing. The Equation Editor has always been an important feature of MS Word. In the latest versions of Word, it is simply known as Equation. To use it, choose Insert > Equation > Insert New Equation.
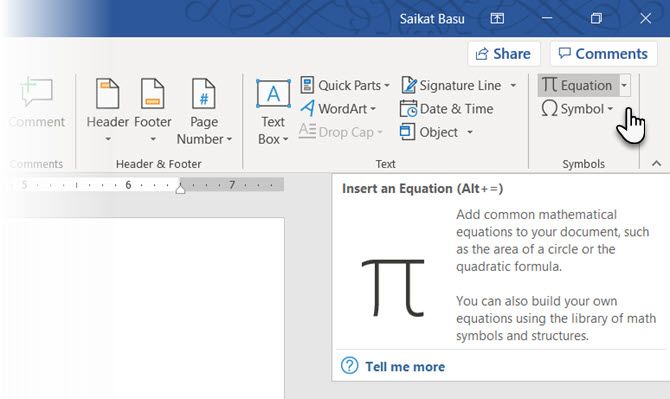
Use the Equation Toolbar to design your own advanced equations for mathematics, physics, or chemistry. Word gives you many well-known equations to insert with just a click.
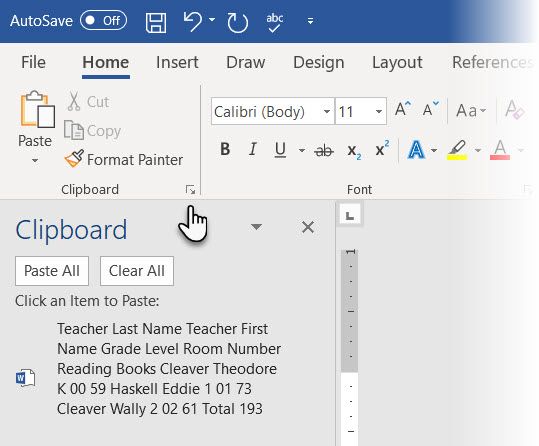
6. Hold 24 Items in the Clipboard
The Office clipboard can hold 24 items and its interoperable between all Office files. In the Home tab, click the little drop-down arrow next to Clipboard to reveal the panel on the left. For the shortcut, press Ctrl + C twice to open the Clipboard Panel.
This holding capacity enables you to cut and copy multiple elements and move them anywhere within the document or between open Office programs.
Use the clipboard’s Options to control its functions. For instance, you can disable the Show Status Near Taskbar When Copying that displays the number of items you’ve copied in the bottom-right corner of the Word window. It’s enabled by default.
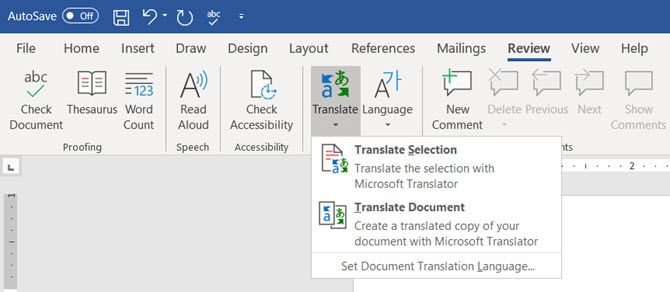
7. Translate Languages on the Go
Microsoft Office uses Microsoft Translator to handle all translations. Use the Translate feature from the Review tab. Translate a word or a sentence. Or, translate the entire document and display it in a separate Word document.
The Translator tab appears on the right and you can choose and change languages. Use this sidebar to highlight each word and explore their meaning in full.
8. Beautify Fonts with Kerning
Kerning adjusts the space between two individual letters for a better visual look. When designing a document, each typeface requires its own specific kerning. Kerning becomes important when you are designing with large fonts on Word, like on an ebook cover.
Word has kerning switched off by default, and normally you don’t need to bother with it. But let’s say you need to submit a five-page homework. Save effort by increasing the width between the letters instead of writing fluff!
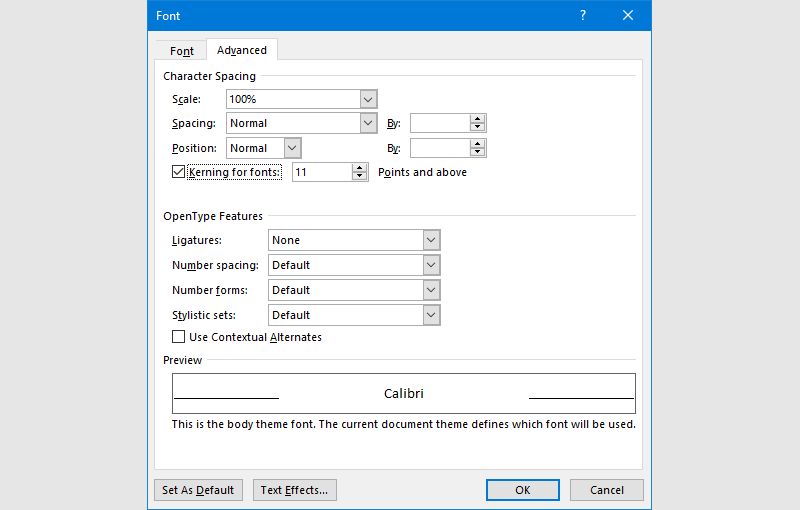
Click the little pop-out arrow on Font (on the Home tab). Alternatively, press Ctrl + D. Go to the Advanced tab. Select the checkbox for Kerning for fonts. Experiment by entering a small point size in the box. Remember, some typefaces and font sizes don’t look good with kerning.
9. Inspect Your Document
Today, an important MS Word feature is collaboration, but you have to pay attention to security too. The Document Inspector in Word helps you check your document for any information you want to keep private.
Whenever you create or even edit a document, some user information gets added to the file automatically. The Document Inspector helps you erase this kind of information before sharing a document.
To access the Document Inspector, go to File > Info > Inspect Document > Check for Issues > Inspect Document.
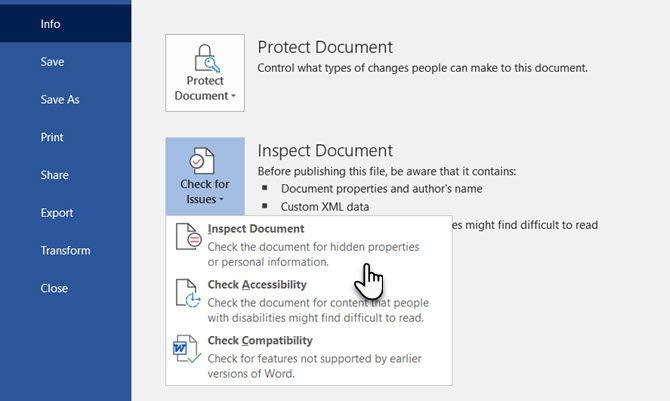
You can inspect hidden content by selecting the checkboxes. After the inspection, any categories with sensitive data gets an exclamation mark. The Remove All button for each category removes the data and finalizes the document.
10. Take the Benefits of Hidden Text
Hidden Text is a non-printing character attribute that has its usefulness. Hiding text can be useful in many situations:
- Create a simple quiz by hiding the answers.
- Control the layout for some specific printing job by inserting hidden text.
- Print two versions of a document. In one, hide portions of text. You don’t need to create two copies or delete any part of the document.
- Temporarily hide confidential information that you don’t want others to see.
On the flip side, we’ve shown how to add a watermark in Word for text that people can’t remove.
To hide or unhide text:
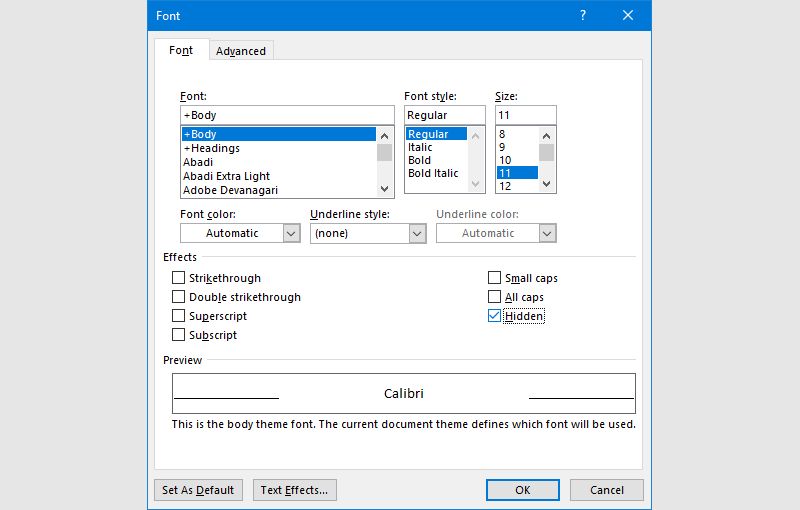
- Select the text you want to hide or the hidden text.
- Click Home > Font Dialog box > Font.
- Select or clear the Hidden checkbox.
To print hidden text:
- Go to the File tab > Options > Display.
- Select the Hidden text check box.
- Select the Print hidden text check box.
- Click Ok.
Non-printing characters are formatting marks, which enables you to troubleshoot and fine-tune the layout of a document. For instance, if words need to be single-spaced; your paragraphs have to be spaced with correct line breaks; all tabs should be lined up; table cells have to be formatted neatly, and so on.
Pilcrows, tab-markers, spaces, line breaks, page breaks, object anchors, and hidden text are just some of the non-printing elements that are handy for controlling the layout of a Word document. You can remove page breaks when needed, or display the non-printing characters by clicking the Pilcrow button on the Home tab. Alternatively, press Ctrl + *.
Use These Productivity Secrets in Word
Use these advanced Microsoft Word tips and you’ll speed up your workflow in no time. Whether you’re trying to get through a school essay, work project, or something personal, these tips will help you master Word.
There’s plenty more you can do with Word beyond these tips. For example, did you know you can create a fancy-looking cover page?
Word for Microsoft 365 Word 2021 Word 2019 Word 2016 Word 2013 Word 2010 More…Less
This article presents basic concepts in Microsoft Word to help new users get started in creating sophisticated, professional-looking documents.
-
Click the Start button
 or press the Windows key on your keyboard to display the Start menu.
 -
In the list of applications, find Word and click it. The startup screen appears and Word starts.
Tip: The first time you start Word, the Microsoft Software License Agreement might appear.
 or press the Windows key on your keyboard to display the Start menu.
To quit Word, click the x button  in the upper-right corner of your screen.
If you made any changes since you last saved the document, a message box appears asking if you want to save changes. To save the changes, click Yes. To quit without saving the changes, click No. If you clicked the x button by mistake, click Cancel.
Top of Page
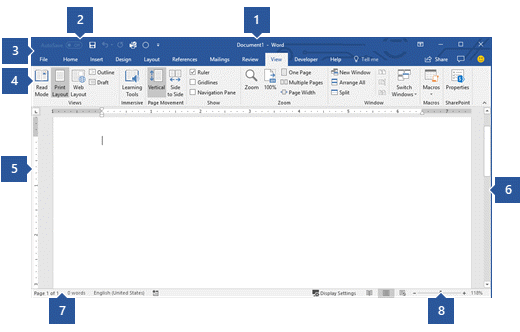
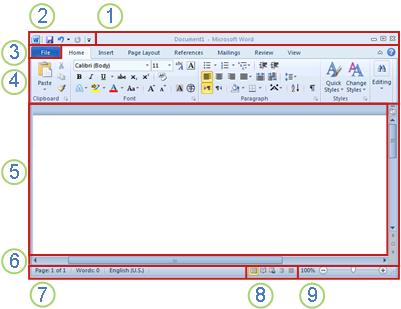
1 Title Bar: Displays the file name of the document that is being edited and the name of the software you are using. It also includes the standard Minimize, Restore, and Close buttons.
2 Quick Access Toolbar: Commands that are frequently used, such as Save, Undo, and Redo are located here. At the end of the Quick Access Toolbar is a pull-down menu where you can add other commonly used or commonly needed commands.
3 File Tab: Click this button to find commands that act on the document itself rather than the content of the document, such as New, Open, Save as, Print, and Close.
4 Ribbon: Commands needed for your work are located here. The appearance of the Ribbon will change depending on the size of your monitor. Word will compress the ribbon by changing the arrangement of the controls to accommodate smaller monitors.
5 Edit Window: Shows the contents of the document you are editing.
6 Scroll Bar: Lets you change the display position of the document you are editing.
7 Status Bar: Displays information about the document you are editing.
8 Zoom slide control: Lets you change the zoom settings of the document you are editing.
Top of Page
In Word, you must save your document so you can quit the program without losing your work. When you save the document, it is stored as a file on your computer or in a network location. Later, you can open the file, change it, and print it.
To save a document, do the following:
-
Click the Save button in the Quick Access toolbar. The Save As window appears.
-
Choose a location where you want to save the document and enter a file name in the File name box. To change the file name, type in a new file name.
-
Click Save.
You can open a Word document to resume your work. To open a document, do the following:
-
Open File Explorer, and click Documents. A list of documents appears.
-
If the document you want to work on is on the list, click the file name to open the document. If the document isn’t on the list, navigate to the location where you stored your file, and double-click the file. The Word startup screen appears, and then the document is displayed.
Tip: You can also open a document from within Word by clicking the File tab and then clicking Open. To open a document you saved recently, click Recent.
Top of Page
Before you edit or format text, you must first select the text. Follow the steps below to select text.
-
Place the curser at the beginning of the text you’d like to edit or format and then press the left mouse button.
-
While holding down the left mouse button, move it to the right (called “dragging”) to select the text. A background color is added in the location of the selected text to indicate the selection range.
You can find most text formatting tools by clicking the Home tab and then choosing from the Font group.
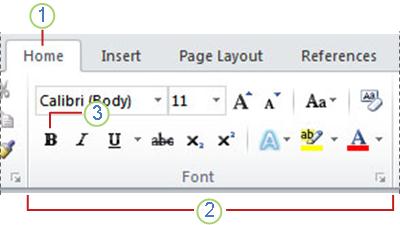
1 This is the Home tab.
2 This is the Font group on the Home tab.
3 This is the Bold button. See the table below for the names and functions of all the buttons in the Font group.
|
Button |
Name |
Function |
|---|---|---|
|
|
Font |
Changes the font. |
|
|
Font Size |
Changes the size of the text. |
|
|
Grow Font |
Increases the text size. |
|
|
Shrink Font |
Decreases the text size. |
|
|
Change Case |
Change all the selected text to uppercase, lowercase, or other common capitalizations. |
|
|
Clear Formatting |
Clears all formatting for the selected text, leaving only the plain text. |
|
|
Bold |
Makes the selected text bold. |
|
|
Italic |
Italicizes the selected text. |
|
|
Underline |
Draws a line under the selected text. Click the dropdown arrow to select the type of underline. |
|
|
Strikethrough |
Draws a line through the middle of selected text. |
|
|
Subscript |
Creates subscript characters. |
|
|
Superscript |
Creates superscript characters. |
|
|
Text Effects |
Apply a visual effect to selected text, such as shadow, glow, or reflection. |
|
|
Text Highlight Color |
Makes text look like it was marked with a highlighter pen. |
|
|
Font Color |
Changes the text color. |


Top of Page
Styles allow you to quickly format major elements in your document, such as headings, titles, and subtitles. Follow the steps below to apply styles to the text in your document.
-
Highlight the text you want to change.
-
On the Home tab in the Styles group, pause the pointer over any style to see a live preview directly in your document. To see the complete list of styles, click the More arrow to open the Styles pane.
-
To apply the style that’s most appropriate for your text, just click it.
When you’re done applying styles to the individual elements, Word lets you use a style set to change the look of your whole document all at once.
-
On the Design tab, in the Document Formatting group, choose one of the predefined style sets, such as Basic or Casual. Pause the pointer over any style set to see a live preview directly in your document. To see more predefined style sets, click the down arrow on the right side of the Document Formatting group.
-
To apply the style set that’s most appropriate for your text, just click it.
Top of Page
With Word, you can easily change the spacing between lines and paragraphs in your document.
-
On the Design tab, click Paragraph Spacing to see a drop-down list of paragraph spacing options. Pause the pointer over any paragraph spacing style to see a live preview directly in your document.
-
When you find the look you want, click it.
Tip: To define your own paragraph spacing, choose Custom Paragraph Spacing.
Top of Page
It’s easy to preview what the layout of your document will look like when printed without actually printing.
-
Click the File tab.
-
Click Print to see a preview of your document.
-
Review the Settings for any properties you might want to change.
-
When the properties for your printer and document appear the way that you want them to, click Print.

Top of Page
To use Word, look for the Word icon in the Start menu and click it.
-
Click the Start button
to display the Start menu. -
Point to All Programs, Microsoft Office, and then clickMicrosoft Word 2010.
-
The startup screen appears, and Word starts.
 to display the Start menu.
Tip: The first time you start Word, the Microsoft Software License Agreement might appear.
To quit, choose the Exit command on the File tab.
-
Click the File tab.
-
Choose Exit.
If you made any changes since you last saved the document, a message box appears asking if you want to save changes. To save the changes, click Yes. To quit without saving the changes, click No. If you clicked the Exit button by mistake, click Cancel.
Top of Page
1 Title Bar: Displays the file name of the document that is being edited and the name of the software you are using. It also includes the standard Minimize, Restore, and Close buttons.
2 Quick Access Toolbar: Commands that are frequently used, such as Save, Undo, and Redo are located here. At the end of the Quick Access Toolbar is a pull-down menu where you can add other commonly used or commonly needed commands.
3 File Tab: Click this button to find commands that act on the document itself rather than the content of the document, such as New, Open, Save as, Print, and Close.
4 Ribbon: Commands needed for your work are located here. The appearance of the Ribbon will change depending on the size of your monitor. Word will compress the ribbon by changing the arrangement of the controls to accommodate smaller monitors.
5 Edit Window: Shows the contents of the document you are editing.
6 Scroll Bar: Lets you change the display position of the document you are editing.
7 Status Bar: Displays information about the document you are editing.
8 View Buttons: Lets you change the display mode of the document you are editing to fit your needs.
9 Zoom slide control: Lets you change the zoom settings of the document you are editing.
Top of Page
In Word, you must save your document so you can quit the program without losing your work. When you save the document, it is stored as a file on your computer. Later, you can open the file, change it, and print it.
To save a document, do the following:
-
Click the Save button in the Quick Access toolbar.
-
Specify the location where you want to save the document in the Save in box. The first time you save your document, the first line of text in the document is pre-filled in as the file name in the File name box. To change the file name, type in a new file name.
-
Click Save.
-
The document is saved as a file. The file name in the Title Bar changes to reflect the saved file name.
You can open a Word document to resume your work. To open a document, do the following:
-
Click the Start button, and then click Documents.
-
Navigate to the location where you stored your file, and double-click the file. The Word startup screen appears, and then the document is displayed.
Tip: You can also open a document from within Word by clicking the File tab and then clicking Open. To open a document you saved recently, click on Recent
.
Top of Page
Before you edit or format text, you must first select the text. Follow the steps below to select text.
-
Place the curser at the beginning of the text you’d like to edit or format and then press the left mouse button.
-
While holding down the left mouse button, move it to the right (called “dragging”) to select the text. A background color is added in the location of the selected text to indicate the selection range.
Most text formatting tools are found by clicking the Home tab and then choosing from the Font group.
1 This is the Home tab.
2 This is the Font group on the Home tab.
3 This is the Bold button. See the table below for the names and functions of all the buttons in the Font group.
|
Button |
Name |
Function |
|---|---|---|
|
|
Font |
Changes the font. |
|
|
Font Size |
Changes the size of the text. |
|
|
Grow Font |
Increases the text size. |
|
|
Shrink Font |
Decreases the text size. |
|
|
Change Case |
Change all the selected text to uppercase, lowercase, or other common capitalizations. |
|
|
Clear Formatting |
Clears all formatting for the selected text, leaving only the plain text. |
|
|
Bold |
Makes the selected text bold. |
|
|
Italic |
Italicizes the selected text. |
|
|
Underline |
Draws a line under the selected text. Click the dropdown arrow to select the type of underline. |
|
|
Strikethrough |
Draws a line through the middle of selected text. |
|
|
Subscript |
Creates subscript characters. |
|
|
Superscript |
Creates superscript characters. |
|
|
Text Effects |
Apply a visual effect to selected text, such as shadow, glow, or reflection. |
|
|
Text Highlight Color |
Makes text look like it was marked with a highlighter pen. |
|
|
Font Color |
Changes the text color. |
Top of Page
Styles allow you to quickly format major elements in your document, such as headings, titles, and subtitles. Follow the steps below to apply styles to the text in your document.
-
Highlight the text you want to change.
-
On the Home tab in the Styles group, pause the pointer over any style to see a live preview directly in your document.
-
To apply the style that’s most appropriate for your text, just click it.
When you’re done applying styles to the individual elements, Word 2010 lets you change the look of your whole document all at once.
-
On the Home tab, in the Styles group, click Change Styles.
-
Point to Style Set to find predefined style sets. Pause the pointer over any style set to see a live preview directly in your document.
-
When you find the look you want, click it.
Top of Page
With Word 2010, you can easily change the spacing between lines and paragraphs in your document.
-
On the Home tab, in the Styles group, click Change Styles.
-
Point to Paragraph Spacing to find a selection of built-in paragraph spacing styles. Pause the pointer over any paragraph spacing style to see a live preview directly in your document.
-
When you find the look you want, click it.
Tip: To define your own paragraph spacing, choose Custom Paragraph Spacing.
Top of Page
It’s easy to preview what the layout of your document will look like when printed without actually printing.
-
Click the File tab.
-
Click Print to see a preview of your document.
-
Review the Settings for any properties you might want to change.
-
When the properties for your printer and document appear the way that you want them to, click Print.
Top of Page