
When you think of our new Populate Word Document action, you might not think to mail merge a Word Document with a Microsoft Forms Response, but that’s why we’re here. To inspire you!
We are excited to release our new ‘Populate Word Document‘ action, enabling you to populate Microsoft Word Documents with data quickly!
Over the next few weeks, we’ll release several posts covering everyday use case scenarios for this action; for this post, we’ll provide a detailed demonstration for adding data from a Microsoft Forms response to a Microsoft Word document.
Create a Word Document from a Microsoft Forms Response
I have previously created a simple Microsoft Form containing several questions:

Now let’s create a flow to make a Word Document containing the details of each response provided.
1. Create a new Flow using the ‘Automated cloud flow‘ option

2. Enter a name for the Flow, select the ‘When a new response is submitted‘ Microsoft Forms trigger action and click ‘Create.‘

3. Select the Form

4. Add the ‘Get response details‘ Microsoft Forms action
4.a. Form Id: Select the same form as selected in step #3
4.b. Response Id: Select the ‘Response Id‘ property provided by the ‘When a new response is submitted‘ Microsoft Forms trigger action

We now have access to all of the data for the relevant response. We need to configure the Microsoft Word document so that the Encodian ‘Populate Word Document‘ action can add the response data.
I have configured the source Word document as follows:

The syntax and capabilities of the Encodian ‘Populate Word Document‘ action are documented here: Template Syntax for Populate Word Document.
I have added ‘Token’ as a placeholder for each element of the response I wish to add to the document; the syntax is as follows:
<<[propertyName]>>
For example:
<<[submittedBy]>>
When the Encodian population runs, it will locate all of the tokens within the document and then attempt to replace them with the data provided. So let’s set this up!
The Encodian ‘Populate Word Document‘ action requires two parameters; the document we’ll pull from SharePoint for this example and the data.
5. Add and configure a SharePoint ‘Get file content‘ action or similar to obtain the template document.

6. Add the Encodian ‘Populate Word Document‘ action
6.a. File Content: Select the ‘File Content‘ property provided by the ‘Get file content‘ action

Now, we need to pass data to the Encodian ‘Populate Word Document‘ action, which will be used to replace the configured tokens. The data is formatted as JSON and follows this simple schema:
{
   "tokenName":"Value"
}
The example document I have contains several tokens, and I’ve structured the JSON as follows:
{
   "submittedBy":"",
   "submittedOn":"",
   "satisfaction":"",
   "needs":"",
   "rating":"",
   "responsiveness":"",
   "time":"",
   "future":"",
   "recommend":"",
   "comments":""
}
This screenshot depicts the relationship between a token name and the JSON property name:

6.b. Add the JSON structure to the ‘Document Data‘ field

6.c. Using dynamic data provided by the Microsoft Forms ‘Get Response Details‘ action, map to the JSON data set as follows:
Upon completion, your configuration should look similar to:

The Encodian ‘Populate Word Document‘ action returns a DOCX document with the data populated; for this example, we’ll email the document to the submitter.
7. Add a ‘Send an email notification (V3)‘ action
7.a. To: Select the ‘Responders Email‘ property from the Microsoft Forms ‘Get Response Details‘ action
7.b. Configure the Subject and Body properties as required
7.c. Attachment: Select the ‘File Content‘ property provided by the Encodian ‘Populate Word Document‘ action

7.d. Attachment File Name: Either manually add a name or use the Encodian ‘Filename’ property which will always be set to ‘result.docx’. I have manually set the filename for this example.

The flow is now complete and should follow this structure:

We recommend reviewing the following article, which will help how errors are reported during the creation of your solution: Error Handling.
Test your form by submitting a new response to the Microsoft Form; your flow should execute as follows:

As the responder, you should have received an email:

The attachment should contain a word document populated with the results of your response:

Finally…
Hopefully, this post provides an excellent example of using the Encodian ‘Populate Word Document‘ action to add data to a Microsoft Word document; please share any feedback or comments – all are welcome!
Do you know you can send emails directly from Microsoft Word and Excel? Yes, you can send Word document as an email body and Excel spreadsheets as an Attachment file or single sheet as an email body directly from the Word or Excel itself.
See also: Add Calculator in Excel Toolbar
To send email from Word or Excel you must setup Outlook profile first on your computer. If you already configured an account in Microsoft Outlook then you are good to go.
Advertisement
Now add Send Email button to the Word 2013 toolbar, do the following steps either on Word 2013 or Excel 2013.
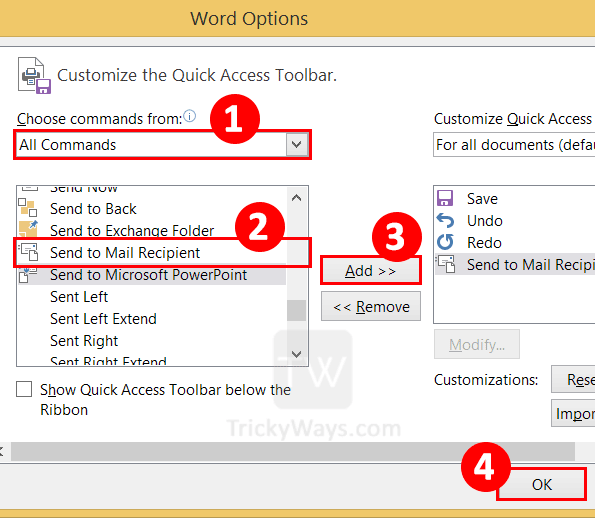
Click on the tiny arrow and then select More Commands option to open Customize quick access toolbar window.

Select the All Commands option from Choose commands from drop-down list.
Now from the commands list find Send to Mail Recipient command select it and click on Add button. You will notice this command will be added to the default commands list on the right side.
Click OK button to save the settings
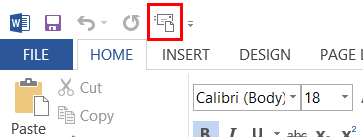
You can see Mail icon is added in the Quick access toolbar to open the mail form in Word document.
Now click on the button to compose an email from the current document. All the text that is written in this document will be added to the email body. If you open blank word document write some text in it for email body.
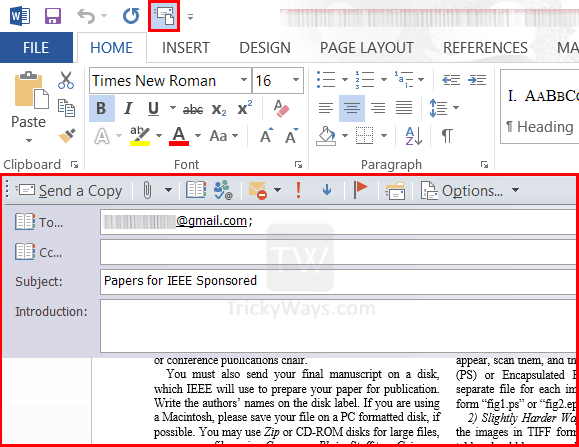
There are few more options that you can set before sending email.
Click on arrow on the right side of Options… button and check the From field option. You can use From field and type your email in it, so recipient can see your email address on your message. You can also use Bcc option and type email in it to keep record of your email message.
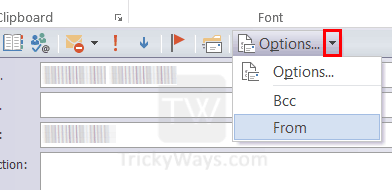
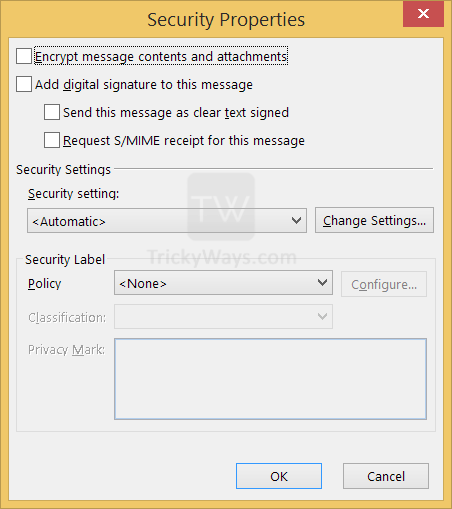
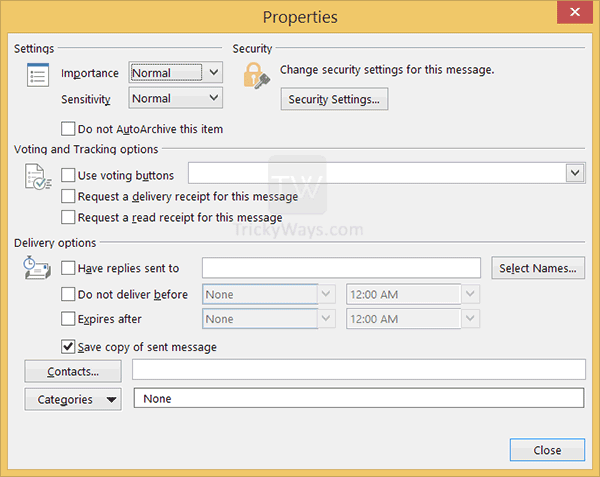
Click on Options button to see some general settings like email importance, Sensitivity and more. You can set some Security settings for the message by clicking on the Security Settings button, like encrypt message contents and attachments, Add digital signature to the message and more.
Tell us below in comments if you like this guide, Thanks.
I believe the following code snippet will assist you in sending the form to a user silently with a predefined Recipient and Subject.
Please create a command button with the following code under the Click event.
Private Sub CommandButton1_Click()
Dim OL As Object
Dim EmailItem As Object
Dim Doc As Document
Application.ScreenUpdating = False
Set OL = CreateObject(«Outlook.Application»)
Set EmailItem = OL.CreateItem(olMailItem)
Set Doc = ActiveDocument
Doc.Save
With EmailItem
.Subject = «Insert Subject Here»
.Body = «Insert message here» & vbCrLf & _
«Body Line 2» & vbCrLf & _
«Body Line 3»
.To = «emailaddress@companyname.com«
.Importance = olImportanceNormal ‘Or olImprotanceHigh Or olImprotanceLow
.Attachments.Add Doc.FullName
.Send
End With
Application.ScreenUpdating = True
Set Doc = Nothing
Set OL = Nothing
Set EmailItem = Nothing
End Sub
Please remember to click “Mark as Answer” on the post that helps you, and to click “Unmark as Answer” if a marked post does not actually answer your question. This can be beneficial to other community members reading the thread.
Thanks!
Adrian
Microsoft Online Community Support
-
Marked as answer by
Friday, September 3, 2010 1:41 AM
I already explained how to send emails automatically, but didn’t really focus on the content of the email. That is probably biggest problem of this method followers. In this article I’m going to show You how to cope with such issue and send Word document as email body.

The easiest way to have the content formatted properly is to copy text from Word and paste that to the created email. You cannot pass the content as string variable, because You will loose all the formatting.
Also there are other possibilities like adding HTML tags into the content, but this solution is good, when You have only 1 text. Not changeable, static, You know. And if it’s really long it would take a lot of time for tagging…
Anyway, back to the main topic, Word content to email body!
First of all, You need to copy the Word file content into the clipboard. To do that You need to create Word object and set the document – the equivalent of an Excel worksheet.
Set wd = CreateObject("Word.Application")
Set doc = wd.documents.Open("Word file path")
Then You can copy the content of the document and store it in clipboard.
doc.Content.CopyNow comes the standard part of sending the email with a small modification. Instead of .Body You need to go to the WordEditor in your e-message.
Set editor = .GetInspector.WordEditorAfter that just paste the text stored in clipboard by pasting that into the content of the editor object.
editor.Content.PasteTo this moment everything is easy and clear.
There goes the tricky part
Unfortunately using .Send method the content of the email body is empty. It appears that copy-pasting method is working only for .Display email method.
But nobody said that You can’t combine those 2 methods together.
.Display
.Send
It is causing a small flicker – just before sending, the email is popping up for a split second, but this is the only way to make it work.
Code
Option Explicit

Sub WordDocAsBody()

 Dim OutApp As Object, OutMail As Object
 Dim wd As Object, doc As Object, editor As Object

 Set wd = CreateObject("Word.Application")
 Set doc = wd.documents.Open("Word file path")
 doc.Content.Copy

 Set OutApp = CreateObject("Outlook.Application")
 Set OutMail = OutApp.CreateItem(0)

 With OutMail
     .To = "email address"
     .Subject = "subject"
     Set editor = .GetInspector.WordEditor
     editor.Content.Paste
     .Display
     .Send
 End With

 doc.Close 0
 Set OutMail = Nothing
 Set wd = Nothing
 Set OutApp = Nothing

 MsgBox "Done"

End Sub
That was the easiest way to have formatted text in the email body, the same way as in Word document. Although this has a small flicker, but I think we can consider this as the fastest and most comfortable way to send complex message using Outlook.
![]()
I’m very advanced in VBA, Excel, also easily linking VBA with other Office applications (e.g. PowerPoint) and external applications (e.g. SAP). I take part also in RPA processes (WebQuery, DataCache, IBM Access Client Solutions) where I can also use my SQL basic skillset. I’m trying now to widen my knowledge into TypeScript/JavaScript direction.
View all posts by Tomasz Płociński
Firstly, we do not recommend using Microsoft Word for creating your HTML email newsletters due to all of the non-standard HTML and VML it uses which isn’t supported by non-Microsoft email clients.
However, if you really must use MS Word to design your email newsletter, then there is a way to do it. This involves saving your Word document as a type “Web Page, Filtered (*.htm; *.html)” which will give you a more workable document suitable for use in email. It might still need a little editing by you.
To create an HTML email with Microsoft Word, open MS Word, click on “File”, “Save As”, choose where you want to save the file and then change the “Save As Type:” option to “Web Page, Filtered” as in the screen shot below.

You may receive the following message saying that it will remove “office specific” tags. If so, click “Yes” as you definitely want to do that.

You will now have one new .htm file and one new folder created in the location you specified during the save option. This folder contains the images that are used by your HTML file. As long as the file and folder are kept together in that order then you can move them elsewhere if needed. However, if you place the .htm file into any other folder on your computer without the images folder, then the images will not show in your message.

To summarize what we have done:
We simply saved a Microsoft Word document as an HTML file suitable for use in email.
You can now import that .htm file to GroupMail and send your message.
To do this, open GroupMail and create a new Message. Click on “File”, “Import” and choose “HTML Document”.

You can then browse to where you saved your MS Word HTML file and select it.

You now have your MS Word designed email newsletter in GroupMail and ready to send to your mailing list.

Do not forget to always test your email newsletter designs by sending to a test Group with your own email address in it so you can see what your message looks like when received in different email clients (i.e. Gmail, Yahoo, Hotmail, etc.)
Word to the mother. GroupMail even makes HTML email created in MS Word look good! Download GroupMail email newsletter software today.