You are here: Home / Revit / Dynamo / Importing an Excel Table to Revit Table using Dynamo
Revit doesn’t have a table tool as an annotation. The workaround is using a Key Schedule. It works well, and you can also place it into a sheet.
However, if you have a lot of data in Excel that you want to input into Revit, this will be an issue. You can’t import the data directly. That’s why we need Dynamo to do it.
In the video below, you will see the step by step instruction to create the Dynamo script to import the data from Excel to Revit.
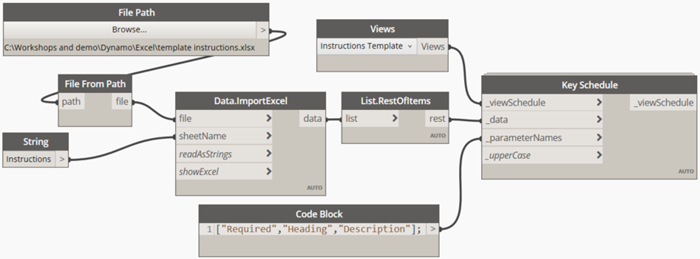
The finished script would be like below. A simple script, but very powerful!

I work as a Solution Consultant in Datech Solutions, Tech Data Indonesia. I’ve been using AutoCAD since R14 and Revit since Revit Building 9. I occasionally write for AUGIWorld magazine and I am also active in Autodesk discussion forum. I’m a member of Autodesk Expert Elite, an appreciation for individuals who give contributions to the Autodesk community.
Connect with me on twitter or LinkedIn. If you want to have my new articles sent to your email inbox, you can subscribe to the newsletter.
Loading
- Learn
- Explore
- Blog
- Forum
- Roadmap
-
Resources
- Primer
- Dictionary
- Developer
- Builds
- Events
- DesignScript Guide
- Help Center
- Get Dynamo
In this tutorial, we’ll explore the different ways in which you can transfer geometry and BIM data from Dynamo to Excel (and back!) using Speckle.
Dynamo has already a couple of nodes that let you export and import Excel files, so why bother using Speckle?
Well, there are quite a few advantages:
- data is stored in Speckle, not in files. Access it whenever you want it, wherever you want it
- no need to worry about losing data or overriding files, each time you send a permanent commit is saved automatically
- you can filter data before it’s actually received in Excel
- personally, I find the built-in nodes a bit finicky!
Prerequisites
To follow this tutorial you’ll need the following:
- Dynamo (I’m using 2.6 inside Revit 2021)
- Excel (I’m using Excel Web)
- a Speckle account (you can get one at https://speckle.xyz/)
- the Speckle Connector for Dynamo (install it via Manager)
- the Speckle Connector for Excel (install via Office store, instructions)
- a BIM model (I’m using the sample architectural one that comes with Revit)
Method 1: Pre-filtering data in Dynamo
This first method is ideal if you already know what data you’ll need in Excel or if you have old definitions using the built-in nodes that you’d like to update by using Speckle.
In Dynamo
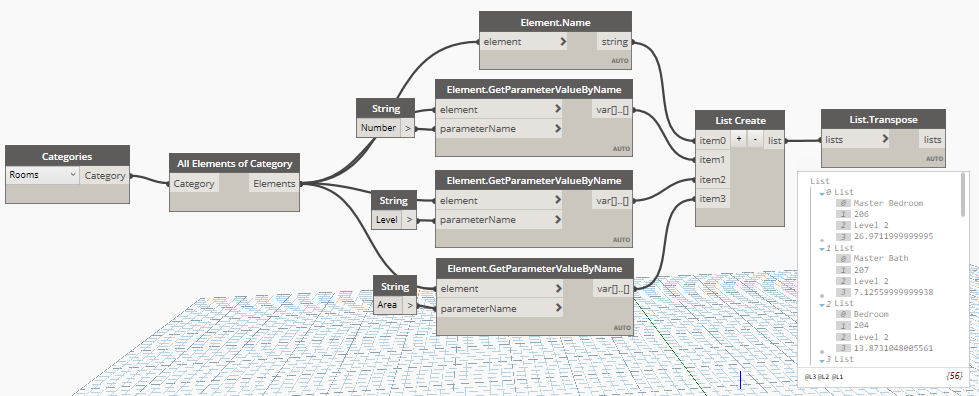
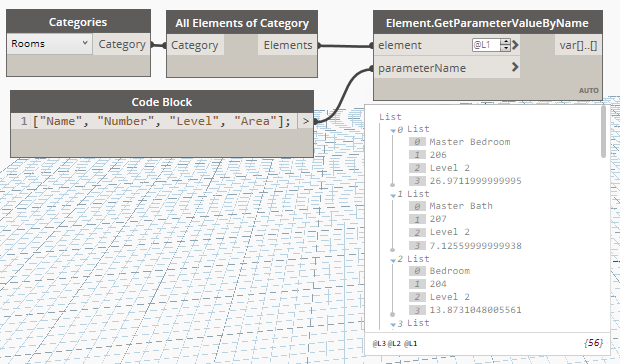
Simply create the logic to extract some data and structure it in a list of lists, where each sub-list corresponds to a row in Excel.
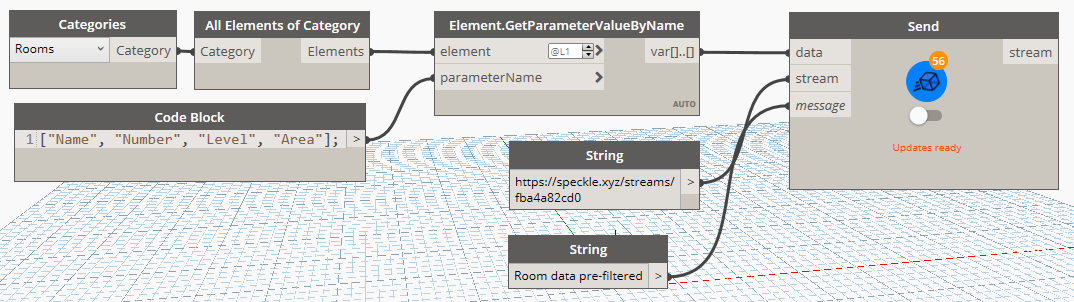
Here’s a sample that takes room information from Revit. Both images show the same logic, but the second is more concise:
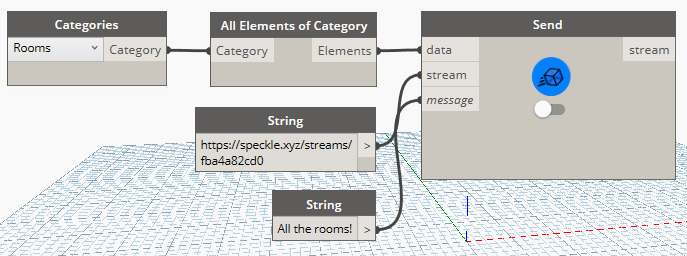
Now, it’s just a matter of sending these nested lists to Speckle. Either create a new stream or pick an existing one’s URL and plug it and our data in a sender:
After clicking the send button, you’ll be able to view the data online instantly:
::: tip
Right click the send node to view the stream online
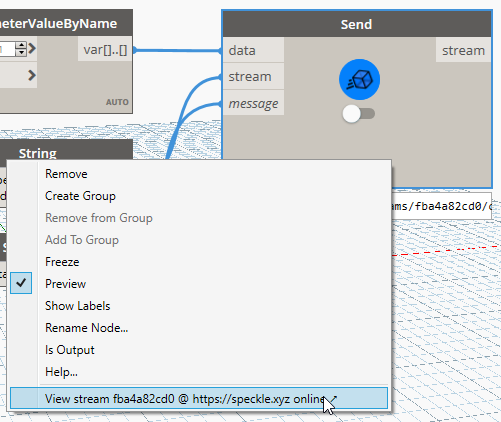
:::
In our online viewer, you can see the data just sent. In the future we will introduce a tabular interface to see this in a more natural way.
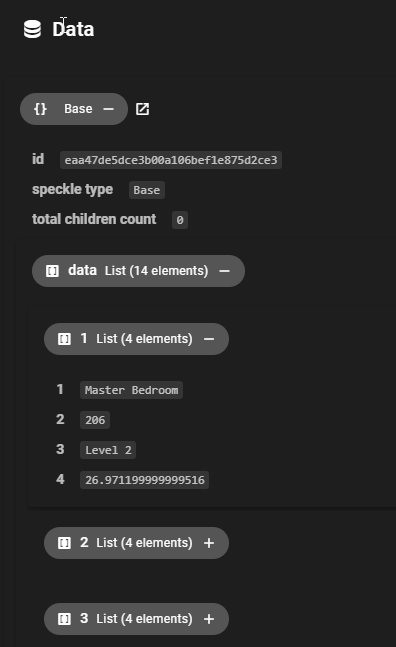
Here’s a link to the commit if you want to check it out.
In Excel
In Excel, we just need to add the stream to our document and receive this commit, since the data structure is quite simple, we won’t be asked to filter it.
The data will be inserted where our cursor is.
Let’s now update the Dynamo script and send again, for instance by adding a new parameter, like the room perimeter:

In Excel we now click «receive last selection», we’ll get the updated data set in the previosly selected cell:
Method 2: Filtering data in Excel
This second method is great if you don’t know yet what data you’ll need in Excel, we’ll be sending Revit elements with all their properties and then filter the data we need in Excel.
In Dynamo
Update the Dynamo script to just send the rooms:
In Excel
Now in Excel, if we follow the same steps as before, we’ll be prompted to filter the data before it’s written in the spreadsheet. This is because it’s a much larger data set than before.
See the gif below for how to do that, and notice that under the parameters item we have available all the parameters belonging to a Revit room, indexed by their internal Revit name.
For a list of internal parameters names, see this page.
The result achieved is the same as with the previous method, the only difference is that now we also get headers with the property names.
Conclusion
We hope you enjoyed this tutorial and found it useful!
Speckle is an Open Source project and we really ❤️ feedback, so if you have any questions, comments, critiques, or praises please let us know on our community forum.

Dynamo
Export to Excel
When dealing with data in Dynamo you may find that it’s very difficult to review the results limited by the Dynamo interface. To improve the visualization of large amounts of data, one of the best Read more…
Dynamo
What is a “String”
«In computer programming, a string is traditionally a sequence of characters…» Reference: https://en.wikipedia.org/wiki/String_(computer_science) In laymen’s terms, a string is basically “text”. It is equivalent to the “Text” type in Revit and the “Text” type in Excel, but it is not Read more…
Dynamo
When Running Graphs (Scripts)
When running Dynamo graphs, also called scripts, make sure that there aren’t any active pop-up menus open in Revit. Sometimes it’s easy to forget that you have left open the view template properties after checking Read more…
I am sure by now most of you have heard of Dynamo and hopefully some of you have started using it. This post is for people that have heard of it, are familiar with what it is, but just haven’t taken the initiative to take it for a spin yet. If that is you, now is your chance to see what you can do with this amazing tool. This lesson will be very basic, but will show you how it works. My hope is that you will see how easy it can be to use and provide just enough of a jump start to get you wanting to learn and use it more.
This lesson will use Dynamo to take an Excel Spreadsheet and create a bunch of sheets inside Revit. This might seem a little mundane and maybe not even useful or practical for you personally, but it should provoke thoughts of the endless possibilities you can accomplish with Dynamo.
- Install Revit 2020. Dynamo will install with it. You can probably also use an earlier version, but some clicks might be different.
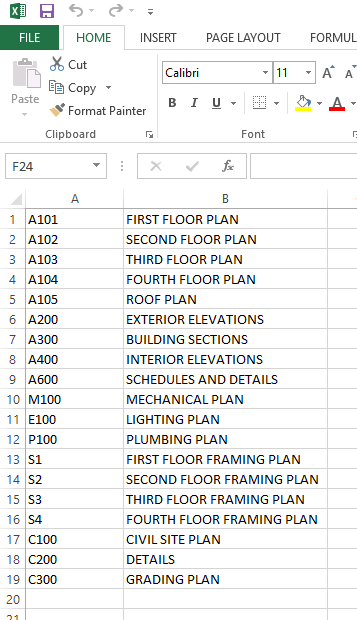
- Download my Excel file or create your own. Mine is very simple and is formatted as shown below:
- Launch Revit 2020 and start a file from the default Architectural Template
- On the Manage Tab, click Dynamo. That will Launch Dynamo in a new window:

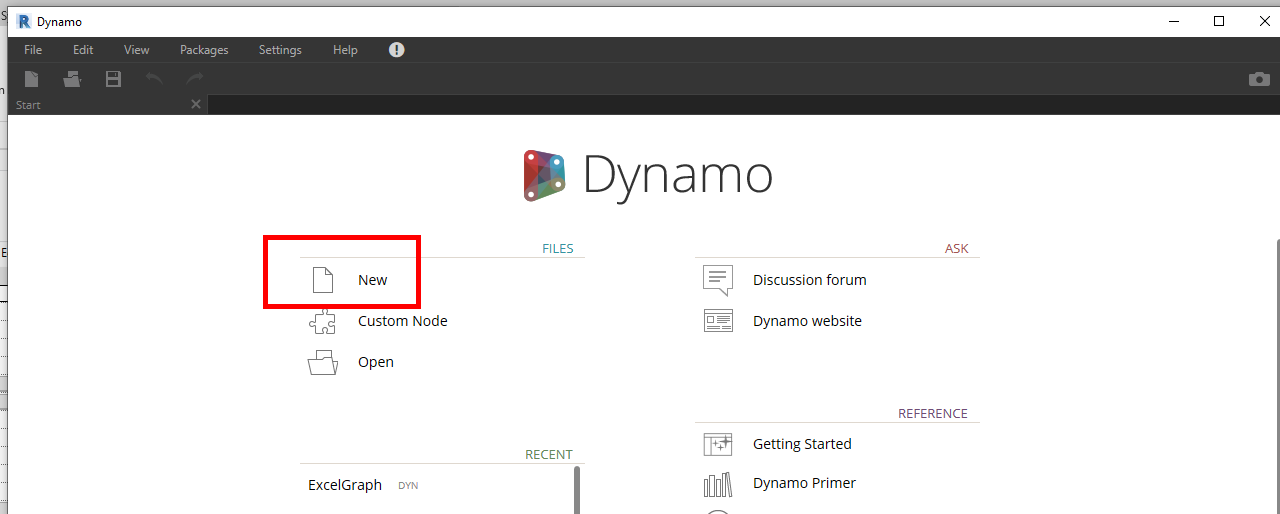
- Under the FILES section, click ‘New’:
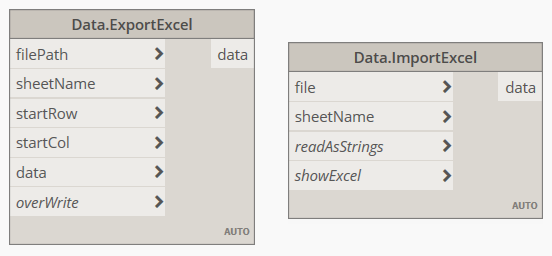
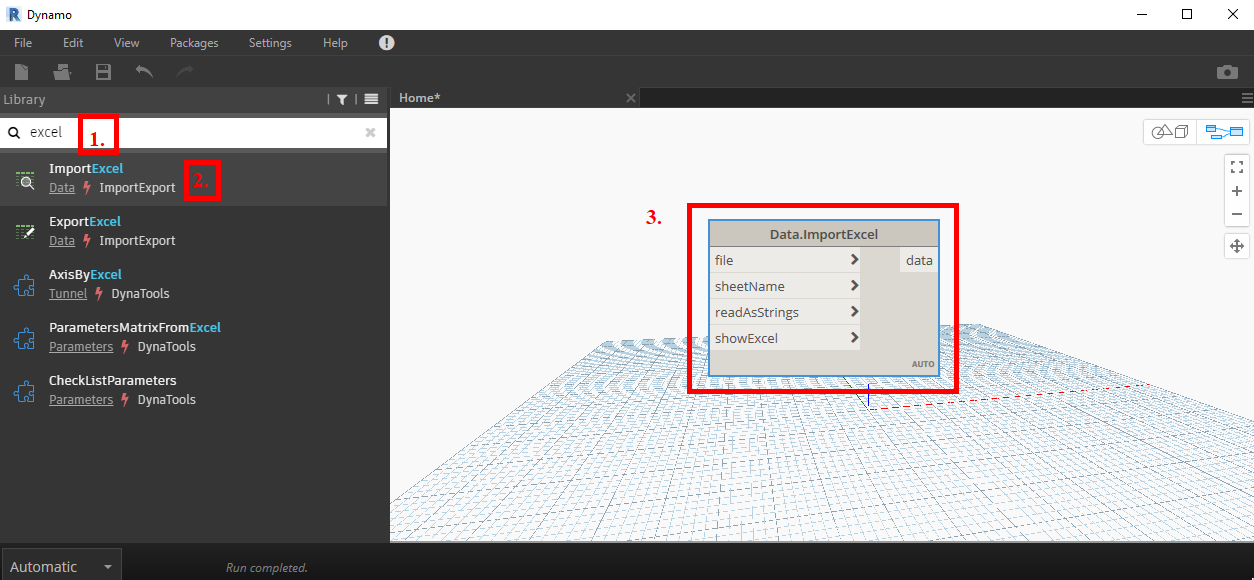
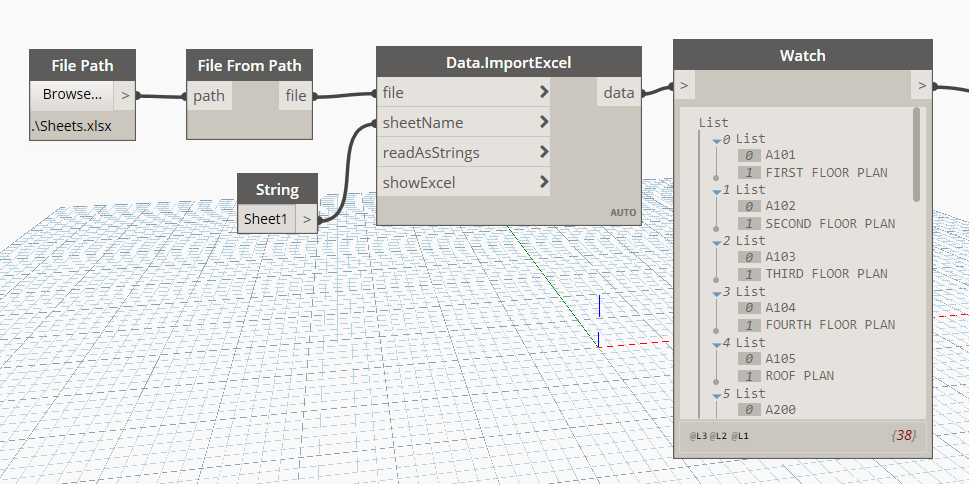
- In the Library Search box type ‘excel.’ Click on the Import Excel Node, and notice the node is added to your graph workspace as shown below:
- For the next step, use the same search box to find the ‘File Path’, ‘File From Path’, and ‘String’ Nodes. Arrange them as shown below. Then click on the Browse button and find wherever you saved the Excel file. Then type ‘Sheet1’ in the String Node. (Sheet1 is referencing the tab on my excel file where the information is located) You also need to click on the arrows to connect the nodes to the inputs as shown:
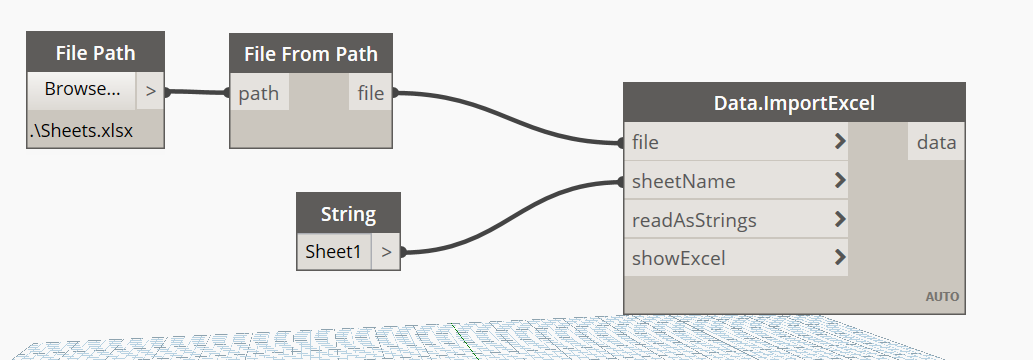
- We can leave the readAsStrings and showExcel nodes empty as it will accept the default as True. If you want to set any of these to False, you can use the Boolean node.
- Add a Watch Node to verify your data is being pulled in from Excel. If not, revisit the last several steps.
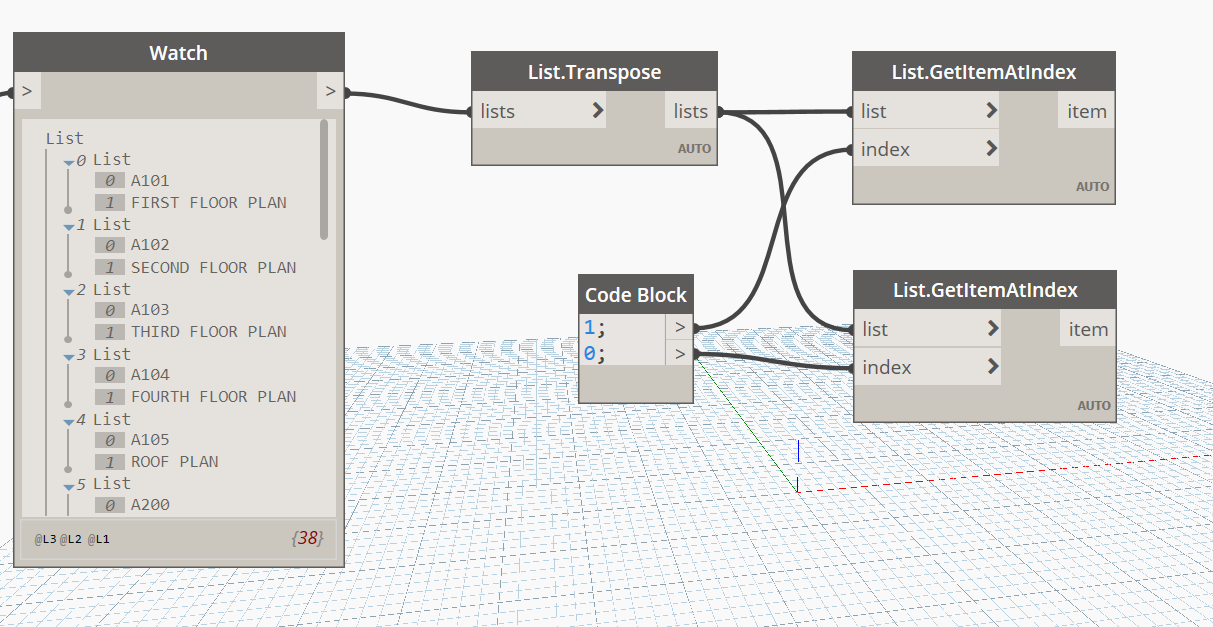
- Type ‘Transpose’ in the search box to find the List.Transpose Node. ‘GetItem….’ to find the Get Item at index node. Type ‘Code’ to find the Code Block Node. Alternatively, you can double click inside the graph and it will add a Code Block node. Type the information as shown in the Code Block then Arrange and connect the nodes as shown:

- Note that you can click on the part of the Node where it says ‘Auto’ and you will get a dropdown list showing the information being passed along. In my graph, the List.GetItemAtIndex Node on the top has the sheet names and the one on the bottom has the sheet numbers. Basically all this step does is separate the main list into two separate lists of Sheet Names and Sheet Numbers. This is important in the next step.
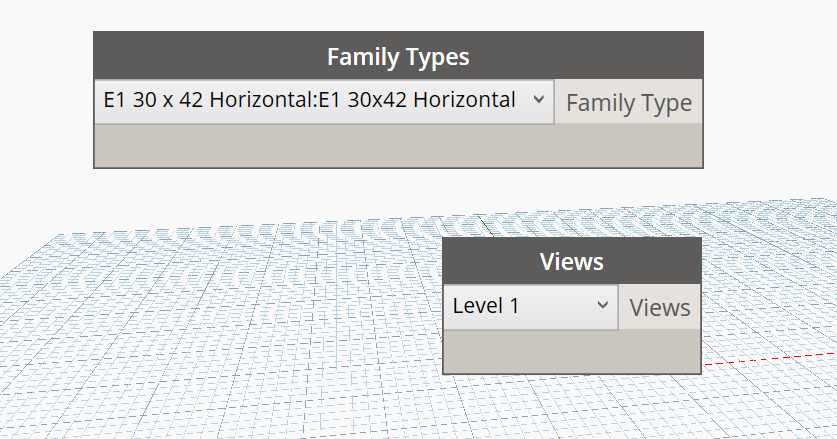
- We will also need these nodes as well. You can put them directly underneath the Code Block and ListGetItemAtIndex Nodes. You will also need to select the following items from the drop down menus as shown:
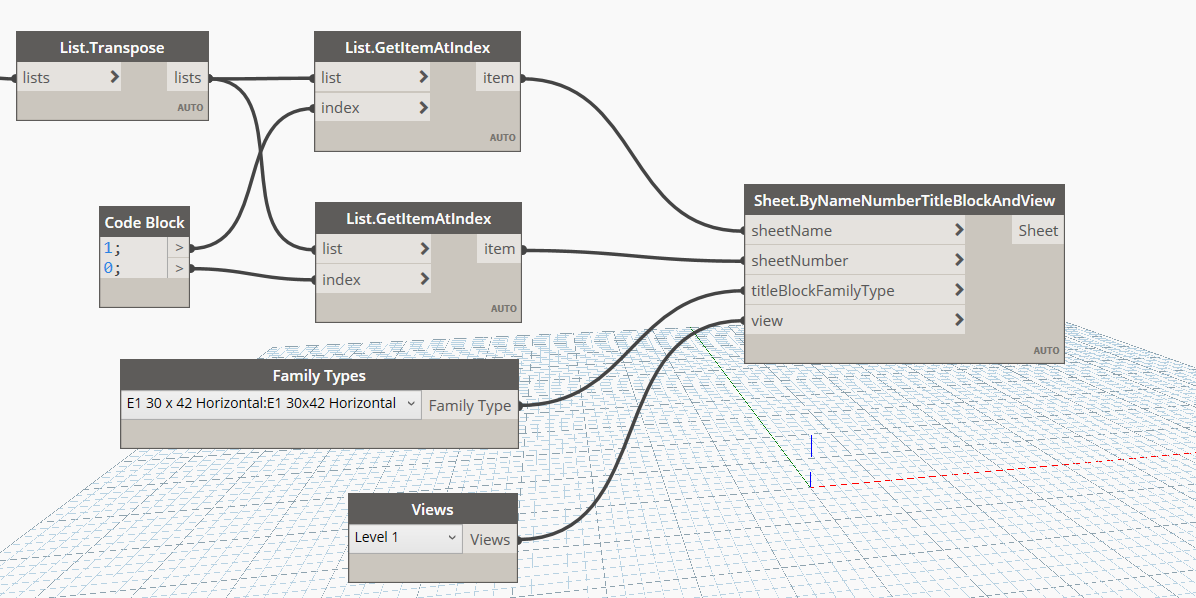
- Now get the Sheet.ByNameNumberTitleBlockAndView node and connect as shown:
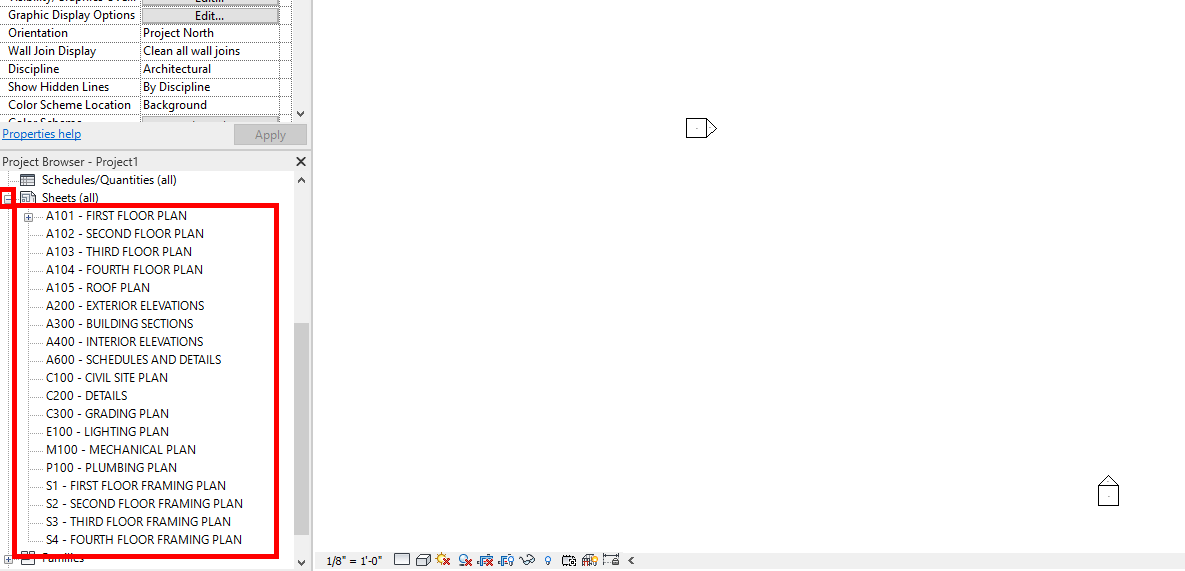
- Switch over to Revit and verify that your Sheets have been added. You might need to expand the plus sign next to Sheets in the Project Browser:

- Save your Dynamo Script, then close Dynamo. You can now save your Revit File and it will maintain the Sheets you added.