
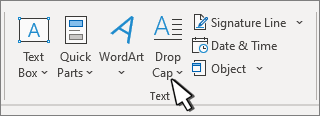
Add a drop cap
-
Select the first character of a paragraph.

-
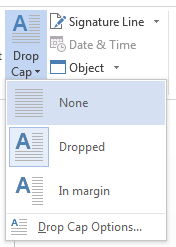
Go to INSERT > Drop Cap.
-
Select the drop cap option you want.
-
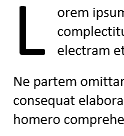
To create a drop cap that fits within your paragraph, select Dropped.
-
To create a drop cap that is in the margin, outside of your paragraph, select In margin.
-

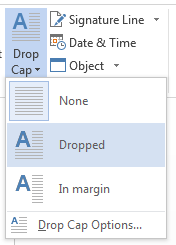
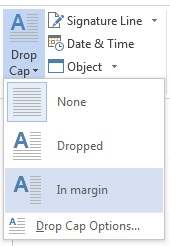
Tip: You can change the size and font of the drop cap, as well as its distance from the text. To do so, select Drop Cap > Drop Cap Options, and under Options, make your selections.
Remove a drop cap
-
Highlight the large drop cap letter.
-
Go to INSERT > Drop Cap, and select None.
See also
Create a first line indent
Add or change a drop cap
-
On the View menu, select Print Layout.
-
Select the paragraph that you want to begin with a drop cap.
The paragraph must contain text, and cannot be inside a text container.
-
On the Format menu, select Drop Cap.
-
Select Dropped or In margin.
-
Select the options that you want.
Remove a drop cap
-
On the View menu, select Print Layout.
-
Select the paragraph that contains the drop cap that you want to remove.
-
On the Format menu, select Drop Cap.
-
Select None.
See also
Adjust indents and spacing
Align or justify text
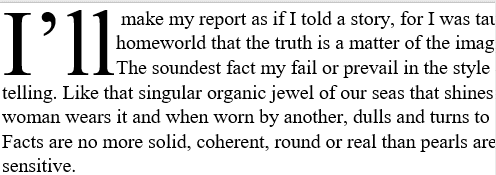
Drop Caps are very old fashioned, there’s space left for them in the oldest printed books in the world, the Gutenberg Bibles. You can do the same thing, a lot more easily, in Microsoft Word.
In this Office-Watch.com article we’ll go beyond the simple ‘how to’ for Drop Cap. There’s the basic settings supplied by Microsoft plus the extras available. Also many options not usually mentioned for Drop Caps including a third type of Drop Cap that’s not in the Microsoft list but easy to do. Finally we’ll look at why and when to use Drop Caps.
Gutenburg mostly printed black ink only and left spaces for drop caps and other ornamentation to be added by hand.
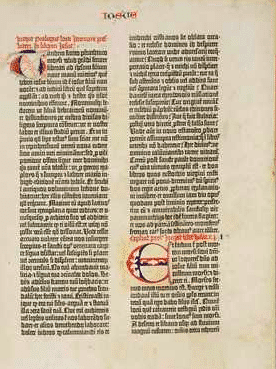
Each Gutenburg Bible is unique with its own drop caps. At the fascinating Gutenburg Museum in Mainz, Germany you can see two of his original Bibles open at the same page, side-by-side to see the very different look.
But I digress, these days we don’t need the skills of an artist to embellish a page and we can be consistent with each copy.
Word has a Drop Cap feature of long-standing. It’s become easier to use over the years with the arrival of Live Preview.
Start in any Word document, from the Insert tab choose the small Drop Caps drop-down in the Text block.
The basic choices are:
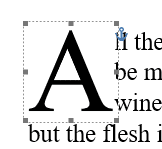
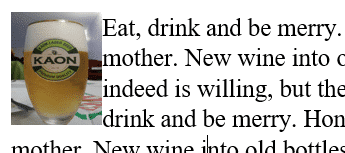
Dropped – within the current margins of the document and wraps around the text. The kind of drop cap that Gutenburg himself would recognize.

In margin – as it says on the tin, the enlarged cap in placed in the margin at the edge of the text.

Modern versions of Word include Live Preview, so you can see the effect of the drop cap setting immediately in your document.
The ‘missing’ Drop Cap option
Strictly speaking there’s a third drop cap option not included in Word.
The first letter or, more usually, word has a slightly larger font than the rest of the text. It has the same margin and baseline as the rest of the paragraph.

This version is simple to apply. For consistency, make it a character style so you can change the look across the document in a few moments.
Word or Letter
Word will automatically select the first letter of the current paragraph to apply the Drop Cap. However, you can change that by selecting multiple letters or a word at the start of the paragraph before applying the Drop Cap.
As we’ll see later, you can also change the text inside the Drop Cap box.
Remove a Drop Cap
To remove a Drop Cap, just choose ‘None’ from the Drop Cap drop-down list.
Settings
There are a few Drop Cap settings at Drop Cap Options. These options haven’t changed for over a decade.

Font – switch to another font for the drop cap.
Lines to drop – the height of the Drop Cap, measured in lines of standard text. Must be an integer, no decimals allowed.
Distance from text – the spacing around the Drop Cap. Can use decimals here.
More choices
But that’s not the end of your choices, not by a long shot.
To make a drop cap, Word creates a ‘text box’ like object (technically it seems like a Frame – an otherwise obsolete Word feature). You can resize and reposition it as you like using the handles on the edges and corners of the box.
It’s too easy to accidently drag and drop a Drop Cap away from its original location. Don’t panic. Undo Ctrl + Z will return it.
The fact that it’s ‘text box’ means you can change the contents. Just click in the box and it becomes editable. You can select the contents:

Then change the formatting, just like any other text. Color, bold, italic, underline etc. are all available.
You can change the font, also the shadow, reflection and other options at Font formatting | Text Effects or the text effects button on the Home tab.


Text Effects | Text Fill has Gradient options for a ‘fade’ effect in the letter:

Using settings like this:

Ligatures can also be used in Drop Caps.
Styles and Consistency
The letter or text inside the drop cap box can have a character style applied to it.
Just select the characters inside the box and apply a character style in the usual way. Or make new character style to suit. This example applies Purple, italics.

Note: this applies to the text inside the Drop Cap box. There’s no direct way to change the settings for multiple Drop Cap boxes at once.
Images
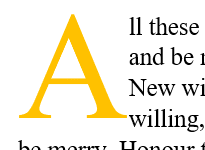
For a truly ornate look, a la ‘Gutenburg Bible’ replace the text inside the Drop Cap box with an image.
Select the text inside the Drop Cap box and paste in the image you want. You’ll probably have to resize and reposition the image a bit so it looks right with the text beside it.
The image doesn’t have to be a letter, use an appropriate image instead.
When to use a Drop Cap
Like many document embellishments, Drop Caps are best used sparingly.
For many centuries (pre-and-post Gutenburg), Drop Caps were used to identify the start of a new chapter or section of text. Paper (parchment) was expensive so space wasn’t wasted by having chapters start on a new page. These days we can afford to leave space to separate parts of a document.
Starting a chapter with a Drop Cap isn’t necessary but can add a little style to the page.
Drop Caps can be used to add a sense of style, elegance, tradition or history. Perhaps in wedding stationery or funeral service booklets?
Drop Caps could be used to highlight the letters in an alphabetical list.

![]()
Download Article
![]()
Download Article
Ever thought of adding an artistic touch to your Word documents, such as stories and articles? Well, Drop Cap is one such feature that makes the first letter of the first paragraph larger than the rest of the text. This not only helps you embellish your document but also makes it appear eye-catching. This wikiHow article covers the process step-by-step so you can create and customize drop caps in Word.
Things You Should Know
- Add a drop cap to make your text interesting and dynamic to capture the attention of your readers.
- Select the text and go to «Insert > Drop cap» (Windows) or select «Drop Cap» from the Format menu (Mac).
- Edit your drop cap by going to «Insert > Drop Cap > Drop Cap Options».
-
1
Select the first letter of a paragraph. You must select existing text to be able to use the Drop Cap menu, if you have space selected, the option will be greyed out in your menu.
-
2
Go to Insert. It’s in the editing ribbon next to File and Home.
Advertisement
-
3
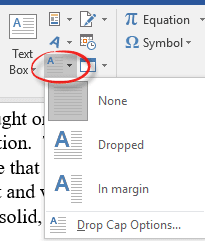
Click Drop Cap. You’ll find this in the «Text» grouping of the menu and more options will drop down.
- If you don’t see this option, click the icon in the «Text» panel that has an A with several lines.
-
4
Select an option. If you want to keep the drop cap aligned with your text and in your paragraph, select Dropped. If you want to add your drop cap to the outside of your text, select In margin.
- To remove the drop cap, select the text then go to Insert > Drop Cap > None.[1]
- To remove the drop cap, select the text then go to Insert > Drop Cap > None.[1]
-
5
Customize the drop cap (if you don’t like the default). Highlight your drop cap, then go to Insert > Drop Cap > Drop Cap Options. You’ll have some options to customize your drop cap:
- Font lets you change the font, which will only apply to your drop cap not the rest of your text.
- The option of Lines to drop will change how big your drop cap appears.
- Distance from text allows you to change how far away your drop cap is from your text.
- Click OK when you’re done to save your changes to your drop cap.


Advertisement
-
1
Make sure you’re in «Print Layout» view. It’s the default view mode, but if it isn’t active, you won’t see the drop cap menus. If you’re not sure if you’re in «Print Layout,» go to View and click Print Layout.
-
2
Select the first letter of a paragraph. You must select existing text to be able to use the Drop Cap menu, if you have space selected, the option will be greyed out in your menu.
- When you highlight the text, a menu should appear. If not, right-click your selection.
-
3
Click Drop Cap. You’ll find this in the «Format» menu that appears next to your cursor.
-
4
Select an option for the drop cap. If you want to keep the drop cap aligned with your text and in your paragraph, select Dropped. If you want to add your drop cap to the outside of your text, select In margin.
- To remove the drop cap, select the text then go to Drop Cap > None.[2]
- To remove the drop cap, select the text then go to Drop Cap > None.[2]


Advertisement
Add New Question
-
Question
Can I drop cap the first letter in every paragraph at once?

No, I don’t believe so, as the cursor position tells Word where you want the drop cap to be. Also, doing that to every paragraph would likely get messy and excessive.
-
Question
What is a Word Drop Cap applied to?
A Word Drop Cap is applied to word settings. It can help you organize the page.
-
Question
What if «Drop Cap» is greyed out?
Try highlighting the letter you want to turn into a drop cap and then do it again.
Ask a Question
200 characters left
Include your email address to get a message when this question is answered.
Submit
Advertisement
-
Aside from the drop-cap-only options, you can also apply normal text options to your drop cap. This means that you can even add a background or drop-shadow to your font. Select the drop cap, then go to Home and apply the font effects from there.
Thanks for submitting a tip for review!
Advertisement
About This Article
Thanks to all authors for creating a page that has been read 190,420 times.
Is this article up to date?

A drop cap is a decorative element typically used in documents at the start of a section or chapter. It’s a large capital letter at the beginning or a paragraph or text block that has the depth of two or more lines of normal text.
Drop caps are easy to apply in Word. First, select the first letter in the paragraph to which you want to add a drop cap.

Then, click the “Insert” tab.
In the “Text” section of the “Insert” tab, click “Drop Cap” and select the type of drop cap you want to apply. You can either wrap the rest of the text in the paragraph around the drop cap (“Dropped”) or place the drop cap in the margin (“In margin”).
To change options for the drop cap before you insert the drop cap, select “Drop Cap Options” from the “Drop Cap” drop-down menu.
You can change the font of the drop cap, specify how many lines of normal text the letter will drop, and the distance from the text on the right side of the letter. When you’ve made your choices, click “OK” to apply your changes.
Did you insert your drop cap before setting the options? No worries. The drop cap is placed in a text box that you can select. Put the cursor right before or after the drop cap so you see a dotted border around the letter. Move the mouse over one of the edges of the text box until it becomes a crosshair.
While the mouse is over an edge of the text box, right-click and select “Drop Cap.” You can now change the options for the drop cap as described above.
You can also manually change the depth of the drop cap by clicking and holding the middle handle on the bottom border of the text box containing the letter and dragging down. If you drag the middle handle on the right side of the letter, you can increase or decrease the amount of space between the drop cap and the rest of the text in the paragraph.
Drop caps are mostly used in printed documents to increase usability by calling out important passages and guiding readers through the text. They are often seen in novels. However, drop caps are not often used online, as they are hard to control due to the different rendering across different browsers.
READ NEXT
- › How to Create a Drop Cap in Google Docs
- › This New Google TV Streaming Device Costs Just $20
- › HoloLens Now Has Windows 11 and Incredible 3D Ink Features
- › BLUETTI Slashed Hundreds off Its Best Power Stations for Easter Sale
- › How to Adjust and Change Discord Fonts
- › The New NVIDIA GeForce RTX 4070 Is Like an RTX 3080 for $599
- › Google Chrome Is Getting Faster
How-To Geek is where you turn when you want experts to explain technology. Since we launched in 2006, our articles have been read billions of times. Want to know more?
Improve Article
Save Article
Like Article
Improve Article
Save Article
Like Article
MS Word provides a special feature known as a drop cap. A drop cap is a large capital letter that presents at the beginning of a text block or a paragraph and has the depth of two or more lines of regular text. Or in another word, we can say that a drop cap is the largest capital letter or a word(according to the user requirement) which is used as a decorative element at the beginning of a paragraph. Generally, the size of the drop cap is two or more lines, but you can also customize the size and spacing according to your needs.
Now let us discuss how to use drop cap step by step:
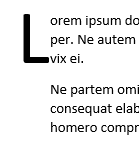
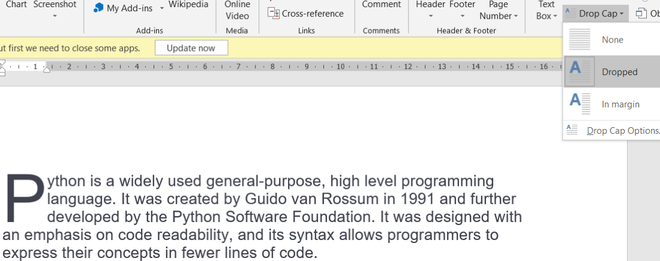
Step 1: Open MS Word and write a paragraph like as shown in the below image:

Now we use the drop cap option on the first letter of this paragraph, i.e., P.
Step 2: Click on the INSERT, then go to the Text section and click on the Drop Cap button. A list will display(like as shown in the below image). Now, this list contains four options:
- None
- Dropped
- In margin
- Drop Cap Options

Step 3: Select the Drop Cap option that you want:
- To create a Drop Cap that fits within your paragraph, select “Dropped” option.
- To create a Drop cap that is in the margin, outside of your paragraph, select “In Margin” option.

- To remove the Drop Cap letter select the “None” option.

- To customize the Drop Cap letter select Drop Cap Options.

Here, you can change the line to drop and distance from the text of the Drop Cap.
Like Article
Save Article