
Microsoft Word is useful for many more things than just composing documents. If you need to get feedback from clients or employees, you can use Word to make it easier for them to answer your questions by including drop-down boxes. Insert as many boxes as you wish to limit answers to yes or no, or to limit their answers to ranges you specify, such as «1-10,» «11-20» or «Not Applicable.»
There are two drop-down box options in Word. The Drop-Down List is to allow the reader to select one of the options you specify. The Combo Box includes the answers you specify, but also gives readers the opportunity to type their own option.
Open the Developer Tools
To insert a drop-down box, you’ll first have to unlock Word’s Developer Tools. Microsoft Word 2010 and later, including Office 365 and Word 2019, come with Developer Tools, but they aren’t visible until you unlock them. To access Developer Tools:
- Launch Word; click the «File» tab, then select «Options» at the bottom-right of the window. Select «Customize Ribbon» in the Word Options window.
- Select «Main Tabs,» and then click the «Developer» check box to enable Developer tools.
- Click «OK.»
Not only do the developer tools allow you to insert drop-down boxes, you can also insert check boxes, date pickers and text control areas in which readers can enter text where you specify.
Create a Form-Based Template
Open a new document in Word. Alternatively, you can search for a template similar to the one you want to create by typing «form template» in the Search bar after clicking «File» and then «New.»
Create a Drop-Down Box
Once you have saved your template, insert a drop-down box.
- Click the «Developer» tab that now appears in the Ribbon above your Word page.
- Click «Design Mode» in the Controls group to turn on Design Mode. This allows you to make changes to the drop-down box. When Design Mode is turned off, the drop-down box will appear as it will to your reader.
- Select either the Combo Box or the Drop-Down List.
- Click the box you just added, and then click the «Properties» icon in the Developer Ribbon directly under Designer Mode.
In the Properties window that opens, you can enter a title for the box and change its appearance. To add choices to the box for readers to select, click the «Add» button. Enter the options you want to appear, like «Yes,» «No» and «Undecided.»
Once you have added your selections, you can modify them, remove them or move them up and down in the list as needed. Click the «OK» button when you’re done.
If you want to make any changes to the drop-down box, just select it while in Developer Mode and click «Properties» again.
Select «Content control can’t be deleted» to ensure readers cannot delete the drop-down box or its options. Don’t select the «Contents cannot be edited» option. This will prevent readers from selecting an item in the drop-down list.
To change the instructional text, click the current text, which reads by default, «Choose an item,» and replace the text as desired.
Click the «File» tab, select «Save As» and then select OneDrive or a folder to save the Template in. Under the «Save as Type» options, select «Word Template (*.dotx).»
Testing Your Drop-Down Box
To test your drop-down box, save the template as a Word document by clicking «File,» «Save As» and then selecting «Word Document (*docx)» in the Save as Type field.
Click on the drop-down box, and then select an option just as one of your readers would; then save the document.
If you need to make changes, open the DOTX template; modify it as needed, and then save it. Then save a copy as a Word document DOCX file and test it again.
A Word Drop-down list lets you quickly choose one of several options. It’s a fast way to make new documents with a standardized pattern. Don’t be scared, it’s easy to create even though the word ‘Developer’ is involved.
We’ll show you how to make drop-down lists, change the bland ‘Choose an item.’ default text and how to add other text when the drop-down list doesn’t have what you need.
-
Drop down list – Content Control
- Properties and settings
- Add Drop Down choices
- Change ‘Choose an item’ text
- Another drop down list example
- Add something to the list – Go Combo
Drop-down lists can be for anywhere there’s a selection of options. Choosing a product, department, location. We’ll stick with the most common use, the honorific ‘Dear ….’ at the start of a letter.
Firstly, you need to ensure that the Developer Tab is enabled. Can’t see the Developer tab? … How to get the Developer Tab in Office apps
Drop down list – Content Control
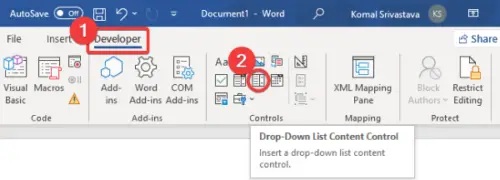
Now you can select the Developer Tab | Controls Group | Drop-down List Content Control option

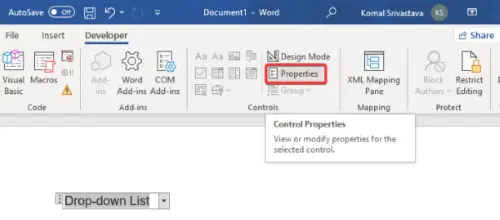
From here, a drop-down box will be added to your document which you can then customize. To customize, select the Properties tab under the Controls group.

Properties and settings
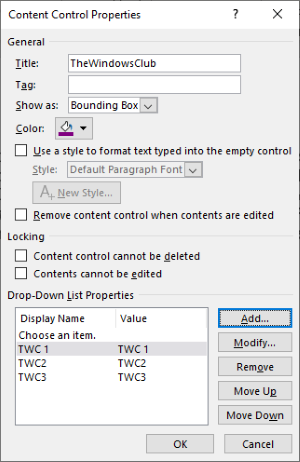
Here in the Properties, you can edit the title, box, tag, colour or style for your drop-box.
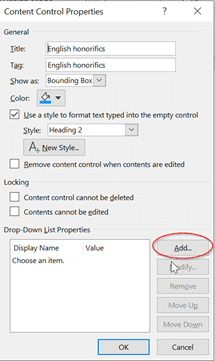
Show As – Bounding Box is the familiar drop down list.
Start/End tag is more obvious in the edit window.
None – hides the control and shows only the first option.
Color is useful to make the drop down control more obvious in Word.
Style lets you fix how the text will appear when typing into an empty control.
There are also Locking settings such as Content control cannot be deleted, and Contents cannot be edited for your drop box. Select those as suits your situation.
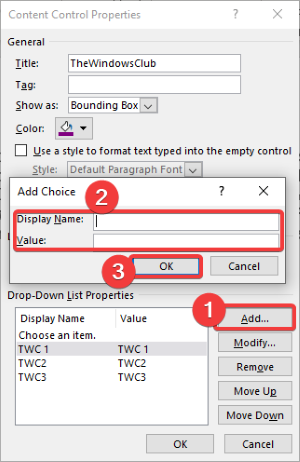
From there, select the Add button to add your choices for the drop-down list.
Add Drop Down choices
Simply type in your choice in the Display Name and select OK, you can type as many options as you’d like.
Word will automatically make Display Name and Value the same – that’s what you’ll want in most situations. Display Name is what appears in the editable document and the final printed doc. Value is saved in the document for programmatic retrieval.
If you need to make any changes… simply click on the Display Name and select Modify, likewise if you need to delete the choice, you can select remove, or move the choices up and down on the list.

In our example, we’ve selected a whole bunch of different English Honorifics.

Now when you select OK and go to your drop-down box, you can easily select your choice from the list.
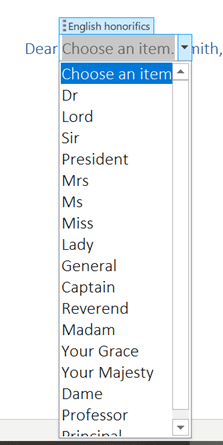
Once you have made your choice and click outside of the drop-box, the box will disappear until clicked again.

Change ‘Choose an item’ text
The default ‘Choose an item.’ text that appears in the control could do with a change to explain better what each selection is for.
To change that opening text, click on the Design Mode button then that text can be edited and formatted.

Another drop down list example
At the end of a letter template, there could be another drop-down list.

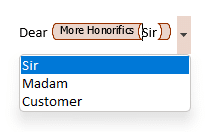
Add something to the list – Go Combo
The Drop Down List control is good for fixed lists which have the only options possible, if you need let the user type something else, you’ll need a Combo box instead.
More often, there are exceptions which you’ll want to type in specially for each document.
In our honorifics example, there might be a title missed (Lord High Poobah, Cardinal etc) or you want to make it personal with a first name.
If you want the flexibility to type other text there are two choices:
Allow the drop-down list to be deleted. Then other text can be typed in it’s place.
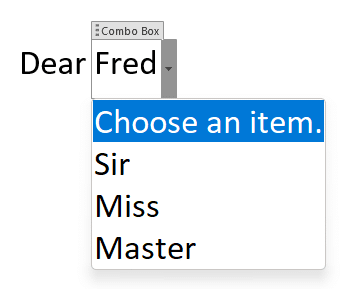
Use a Combo box control instead. On the Developer tab it’s the next button to the left of Drop Down box.
The combo box allows other text to be typed into the control box area in addition to selecting one of the drop down options.
Add different symbols for each bullet in Word or PowerPoint list
Automatic worksheet/tabs list in Excel – the new better way
How to get the Developer Tab in Office apps
All Word’s Table of Contents options

Make data entry easier or avoid issues like misspellings by adding a drop-down list in Word. It takes only a minute, and we’ll show you how.
You don’t have to make a long, fillable form in Microsoft Word to take advantage of form controls. You may have just one or two spots where you want to add something like a drop-down list. This allows you or your reader to select an item from your choices. It can help eliminate errors with data entry and spelling.
Here, we’ll show you how to add a simple drop-down list to a Word document.
Add the Drop-Down Form Control
You must use the Developer tab to work with form controls in Word. If you don’t see this tab, you can add it easily by following our how-to, How to Enable the Developer Tab on the Microsoft Office Ribbon.
- Place your cursor in the document where you want to add the drop-down list.
- Go to the Developer tab and click the Drop-Down List Content Control button.
- You’ll see the control pop into your document as a box with “Choose an item.” inside. You can then move on to setting up the list.

Next, you’ll add the list of items, give the control a name, and adjust a few other settings per your preference. Select the control, go back to the Developer tab, and click Properties in the Controls section of the ribbon.

The Content Control Properties window will open, ready for your list details.

Title and Tag: Enter the Title and, optionally, a Tag you want to use for the list.
Show as: By default, this is set to Bounding Box. If you prefer, you can change it to display with Start/End Tags.

Color and Style: If you want to give your control color or a particular style, you can select those next.
Remove the control: Optionally, you can remove the control when contents are edited by checking the next box.
Locking: You’ll see two locking options for the control. So you can restrict it from being deleted and the contents from being edited by checking one or both of those options.
Add Your List Items
Finally, you’ll add your list of items. You’ll notice that “Choose an item.” is a list option. You can keep it, edit it by clicking Modify, or delete it by clicking Remove.

Next, click Add to insert a list item. The Value will automatically enter as you type the Display Name. Click OK when you finish. Then continue to insert your remaining list items the same way.

Once you have all of your list choices, you can rearrange them using the Move Up and Move Down buttons on the right.

When you’re happy with your list set up, click OK to apply the properties.

And that’s all there is to it! To use the drop-down list, click it and choose an option using the arrow.

Limit Data Entry Options Using a Drop-Down List in Word
A drop-down list is a useful form control in Word for simplicity or to avoid data entry issues. You can make sure that only specific items are available for yourself or others to select.
For more, take a look at how to automate forms in Word with custom fields or how to create a simple Word checklist.
![]()
Download PC Repair Tool to quickly find & fix Windows errors automatically
If you are looking for a solution to how to insert a drop-down list in Microsoft Word, here is your stop. This tutorial will discuss a detailed step-by-step procedure to create a drop-down list in your Word documents.
Drop-down list is a type of content control element that allows users to select one of the multiple choices. It displays a list of choices to readers in a drop-down menu from which they can choose their preferred option. If you need to create a Word document with a drop-down menu list, you will have to set up some configurations.
You can follow the below steps in order to insert a drop-down menu list in a Word document:
Step 1: Open Microsoft Word and go to the File menu and click on Options.
Step 2: Click on the Customize Ribbon option and then from the Customize the Ribbon panel, tick on the Developer checkbox, and press the OK button, as depicted in the below screenshot.

Step 3: You will now see a Developer tab on the main interface in Word. Create a new document or import an existing document in which you want to add a drop-down menu.
Step 4: Now, from the Controls section, click on the Drop-down List Content Control option.
Step 5: A drop-down box will be added to your Word document. You can now customize the drop-down menu by clicking on the Properties button.
Step 6: In the Content Control Properties dialog box, enter title, tag, color, and set up other drop down list properties like Content control cannot be deleted, Content cannot be edited, etc.
Step 7: After that, click on the Add button and enter a choice with its display name and value and then press the OK button.
Step 8: Repeat Step (7) to enter multiple choices to your drop-down list one by one.
You can also modify choices, remove a choice, or rearrange their order.
Step 9: When done adding required choice items, click on the OK button in the Content Control Properties window and a customized drop-down list will be added to your document.

Similarly, you can also add a check box, combo box, date picker, etc., in Word.
Hopefully, this article helps you to create a drop-down list in Microsoft Word. You just have to tweak some settings and then you can start inserting drop-down menu lists into your documents.
Related read: How to create a drop-down list in Excel and Google Sheets.

Komal has done M.Tech in Computer Science & Engineering. She is a keen follower of the Windows ecosystem & a technical writer since the last six years. She loves finding solutions for day-to-day tech problems.

To add a drop-down list to a Word document, go to Options > Customize Ribbon and enable the Developer tab. Open the Developer tab and click the «Drop-Down List Content Control» button to insert a drop-down button. You can customize the drop-down box by clicking «Properties.»
A drop-down list in a Microsoft Word document lets people select from a predefined items list. Adding this drop-down list is fairly easy, and we’ll show you how to do it.
First, Enable the Developer Menu
The option to add a drop-down list is located in Word’s Developer menu. This menu is hidden by default, so you’ll have to enable it before you can add a list.
Start by opening Word on your Windows or Mac computer. At the lower left of the window, select “Options.” If you already have a document open, select the File menu to reveal the “Options” command.

In the “Word Options” window that opens, on the left sidebar, select “Customize Ribbon.”
In the “Customize Ribbon” pane on the right side of the screen, scroll down the list and enable the “Developer” option.
Click “OK” at the bottom of the window to close it.
After adding the Developer menu, you’re now ready to add a drop-down list to your Word document. To start, either open an existing Word document or create a new document.
RELATED: How to Create a Fillable Form With Microsoft Word
In your document, place your insertion point where you want to add the drop-down list.
Next, select the “Developer” menu.
On the “Developer” menu, in the “Controls” group, click the “Drop-Down List Content Control” icon (It looks like an actual drop-down icon.).
You now have a drop-down list in your document.
Configure Your New Drop-Down List
This drop-down list is not configured and is currently empty. To configure it and add items to it, click the drop-down list to select it. Return to the Developer menu and, in the “Controls” group, click “Properties.”
Word will open the “Content Control Properties” window. Start by entering a title for your list. This will appear at the top of your drop-down list.
Note: Note: Word automatically fills in the “Tag” field to match the Title field. The tag for a content control object is used mostly by other programs to identify content control data in a document’s XML structure. So, unless you’re building some document automation and specifically need to set the tag, just ignore it.
Use the “Color” option to select a color scheme for your drop-down list.
If you want to prevent people from editing your drop-down list, activate the “Content control cannot be deleted” option. Note, though, that unless you lock your document, anyone can go and disable this option.
You’ll now add items to your drop-down list. To add your first item, under the “Drop-Down List Properties” section on the current window, click the “Add” button.
On the “Add Choice” window, type a new item name into the “Display Name” field. The “Value” field automatically fills itself with the data from the first field, so you don’t have to worry about it.
Then, click “OK” to add your item. Repeat this process for each item that you want to add to your drop-down list.
After you have some items added, you can change their order. To change an item’s position in the list, select that item, and then click either “Move Up” or “Move Down” on the right.
Finally, click “OK” to save your changes.
Your drop-down list will now display your added items. Click it to test it for yourself.
Delete a Drop-Down List from Microsoft Word
To remove this drop-down list from your document, select the list. Then, from the “Controls” section at the top, click “Properties.” Disable the “Content control cannot be deleted” option, and then click “OK” at the bottom.
Right-click the drop-down list in your document and select “Remove Content Control.” The list will now be removed.
And that’s how you give people predefined options to select from in your Word documents!
Did you know that you can add checkboxes to your Word documents, too? This is yet another way to let people select items in your documents.
RELATED: How to Add Check Boxes to Word Documents
READ NEXT
- › How to Create a Fillable Form With Microsoft Word
- › How to Create a Basic Survey in Microsoft Word
- › How to Create and Customize a Drop-Down List in Google Docs
- › Get to Your Windows 11 Desktop: 7 Fastest Methods
- › Google+ Will Come to a Final End on July 5, 2023
- › The Best DNS Servers for Secure Browsing
- › Universal Audio Volt 2 Review: A Workhorse Audio Interface With Vintage Charm
- › Why One Ultrawide Is Better Than Two Monitors