
Microsoft Word is useful for many more things than just composing documents. If you need to get feedback from clients or employees, you can use Word to make it easier for them to answer your questions by including drop-down boxes. Insert as many boxes as you wish to limit answers to yes or no, or to limit their answers to ranges you specify, such as «1-10,» «11-20» or «Not Applicable.»
There are two drop-down box options in Word. The Drop-Down List is to allow the reader to select one of the options you specify. The Combo Box includes the answers you specify, but also gives readers the opportunity to type their own option.
Open the Developer Tools
To insert a drop-down box, you’ll first have to unlock Word’s Developer Tools. Microsoft Word 2010 and later, including Office 365 and Word 2019, come with Developer Tools, but they aren’t visible until you unlock them. To access Developer Tools:
- Launch Word; click the «File» tab, then select «Options» at the bottom-right of the window. Select «Customize Ribbon» in the Word Options window.
- Select «Main Tabs,» and then click the «Developer» check box to enable Developer tools.
- Click «OK.»
Not only do the developer tools allow you to insert drop-down boxes, you can also insert check boxes, date pickers and text control areas in which readers can enter text where you specify.
Create a Form-Based Template
Open a new document in Word. Alternatively, you can search for a template similar to the one you want to create by typing «form template» in the Search bar after clicking «File» and then «New.»
Create a Drop-Down Box
Once you have saved your template, insert a drop-down box.
- Click the «Developer» tab that now appears in the Ribbon above your Word page.
- Click «Design Mode» in the Controls group to turn on Design Mode. This allows you to make changes to the drop-down box. When Design Mode is turned off, the drop-down box will appear as it will to your reader.
- Select either the Combo Box or the Drop-Down List.
- Click the box you just added, and then click the «Properties» icon in the Developer Ribbon directly under Designer Mode.
In the Properties window that opens, you can enter a title for the box and change its appearance. To add choices to the box for readers to select, click the «Add» button. Enter the options you want to appear, like «Yes,» «No» and «Undecided.»
Once you have added your selections, you can modify them, remove them or move them up and down in the list as needed. Click the «OK» button when you’re done.
If you want to make any changes to the drop-down box, just select it while in Developer Mode and click «Properties» again.
Select «Content control can’t be deleted» to ensure readers cannot delete the drop-down box or its options. Don’t select the «Contents cannot be edited» option. This will prevent readers from selecting an item in the drop-down list.
To change the instructional text, click the current text, which reads by default, «Choose an item,» and replace the text as desired.
Click the «File» tab, select «Save As» and then select OneDrive or a folder to save the Template in. Under the «Save as Type» options, select «Word Template (*.dotx).»
Testing Your Drop-Down Box
To test your drop-down box, save the template as a Word document by clicking «File,» «Save As» and then selecting «Word Document (*docx)» in the Save as Type field.
Click on the drop-down box, and then select an option just as one of your readers would; then save the document.
If you need to make changes, open the DOTX template; modify it as needed, and then save it. Then save a copy as a Word document DOCX file and test it again.
«Место» в Microsoft Office — это место, доступ к которому можно получить напрямую из приложений Office, не используя Проводник Windows. Добавьте Dropbox как место, чтобы открывать файлы, делиться ими и сохранять их из Microsoft Word, Excel и PowerPoint при помощи Dropbox.
Добавив Dropbox как место, вы сможете:
- сохранять документы в Dropbox прямо в меню программы Office;
- открывать документы, сохраненные в Dropbox, прямо в меню программы Office;
- нажимать Поделиться прямо в программе Office, чтобы поделиться документом с помощью Dropbox.
Требования
Чтобы добавить Dropbox как место в Microsoft Office, необходимо:
- использовать компьютер с ОС Windows;
- запустить версию 29 или более позднюю версию программы Dropbox для компьютера;
- запустить Microsoft Office.
Как добавить Dropbox как место
Чтобы добавить Dropbox в качестве места, откройте настройки программы для компьютера Dropbox и установите галочку напротив Показывать Dropbox как папку для сохранения в Microsoft Office. Чтобы удалить Dropbox как место, уберите эту галочку.
Примечание: попросите администратора включить эту функцию, если увидите сообщение: Этот вариант был отключен администратором вашей рабочей группы.
Для пользователей аккаунтов Dropbox Business
Чтобы разрешить участникам вашей рабочей группы добавлять Dropbox как место, включите эту функцию через консоль администрирования:
- Войдите в свой аккаунт администратора на сайте dropbox.com.
- Откройте Консоль администрирования.
- Нажмите Настройки.
- В Дополнительных настройках нажмите Надстройки Microsoft Office.
- Переведите выключатель Надстройка Microsoft Office в положение ВКЛ.
После того как вы включите надстройку Microsoft Office, участники рабочей группы смогут добавить Dropbox как место в Microsoft Office. Dropbox не добавляется как место автоматически.
Работает ли функция, если программа Dropbox закрыта или если у меня нет подключения к Интернету?
Да. Если добавить Dropbox как место, эта функция интегрируется на уровне платформы Office. Dropbox будет доступен как место, даже если программа Dropbox не включена или если у вас нет подключения к Интернету. Однако ваши файлы не будут синхронизироваться, пока программа Dropbox не начнет работать и вы не подключитесь к Сети.
У вас есть другие вопросы о Microsoft Office для Dropbox?
Более подробную информацию вы найдете на странице Часто задаваемые вопросы.
A Word Drop-down list lets you quickly choose one of several options. It’s a fast way to make new documents with a standardized pattern. Don’t be scared, it’s easy to create even though the word ‘Developer’ is involved.
We’ll show you how to make drop-down lists, change the bland ‘Choose an item.’ default text and how to add other text when the drop-down list doesn’t have what you need.
-
Drop down list – Content Control
- Properties and settings
- Add Drop Down choices
- Change ‘Choose an item’ text
- Another drop down list example
- Add something to the list – Go Combo
Drop-down lists can be for anywhere there’s a selection of options. Choosing a product, department, location. We’ll stick with the most common use, the honorific ‘Dear ….’ at the start of a letter.
Firstly, you need to ensure that the Developer Tab is enabled. Can’t see the Developer tab? … How to get the Developer Tab in Office apps
Drop down list – Content Control
Now you can select the Developer Tab | Controls Group | Drop-down List Content Control option

From here, a drop-down box will be added to your document which you can then customize. To customize, select the Properties tab under the Controls group.

Properties and settings
Here in the Properties, you can edit the title, box, tag, colour or style for your drop-box.
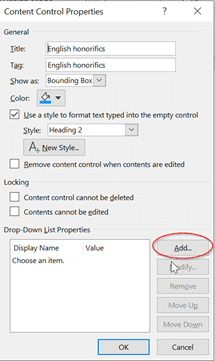
Show As – Bounding Box is the familiar drop down list.
Start/End tag is more obvious in the edit window.
None – hides the control and shows only the first option.
Color is useful to make the drop down control more obvious in Word.
Style lets you fix how the text will appear when typing into an empty control.
There are also Locking settings such as Content control cannot be deleted, and Contents cannot be edited for your drop box. Select those as suits your situation.
From there, select the Add button to add your choices for the drop-down list.
Add Drop Down choices
Simply type in your choice in the Display Name and select OK, you can type as many options as you’d like.
Word will automatically make Display Name and Value the same – that’s what you’ll want in most situations. Display Name is what appears in the editable document and the final printed doc. Value is saved in the document for programmatic retrieval.
If you need to make any changes… simply click on the Display Name and select Modify, likewise if you need to delete the choice, you can select remove, or move the choices up and down on the list.

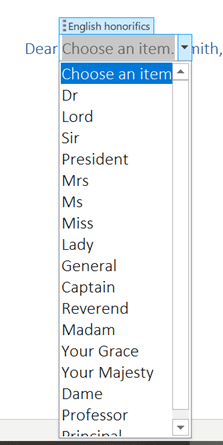
In our example, we’ve selected a whole bunch of different English Honorifics.

Now when you select OK and go to your drop-down box, you can easily select your choice from the list.
Once you have made your choice and click outside of the drop-box, the box will disappear until clicked again.

Change ‘Choose an item’ text
The default ‘Choose an item.’ text that appears in the control could do with a change to explain better what each selection is for.
To change that opening text, click on the Design Mode button then that text can be edited and formatted.

Another drop down list example
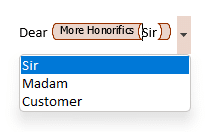
At the end of a letter template, there could be another drop-down list.

Add something to the list – Go Combo
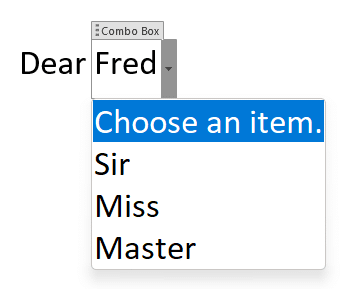
The Drop Down List control is good for fixed lists which have the only options possible, if you need let the user type something else, you’ll need a Combo box instead.
More often, there are exceptions which you’ll want to type in specially for each document.
In our honorifics example, there might be a title missed (Lord High Poobah, Cardinal etc) or you want to make it personal with a first name.
If you want the flexibility to type other text there are two choices:
Allow the drop-down list to be deleted. Then other text can be typed in it’s place.
Use a Combo box control instead. On the Developer tab it’s the next button to the left of Drop Down box.
The combo box allows other text to be typed into the control box area in addition to selecting one of the drop down options.
Add different symbols for each bullet in Word or PowerPoint list
Automatic worksheet/tabs list in Excel – the new better way
How to get the Developer Tab in Office apps
All Word’s Table of Contents options
Microsoft Word 2010 enables you to create customized forms, such as surveys or employment applications. A drop-down box is ideal when you need a form element to restrict selection to a list of possible choices. As an example, a drop-down box in an application form might only give the applicant the option of selecting from available positions, rather than risking a generic description. Creating this drop-down box requires access to the Developer tab, which is disabled by default.
Step 1
Click «File,» «Options» and then «Customize Ribbon.»
Step 2
Check «Developer» from the right list and then «OK» to enable the Developer tab.
Step 3
Click wherever in the document you want the drop-down list to appear.
Step 4
Click the «Developer» tab and then the «Drop-Down List Content Control» button from the Controls group. This button looks like a list with scroll arrows on the right side.
Step 5
Click the «Control Properties» button from the Controls group. This button looks like a hand pointing to a list.
Step 6
Click «Choose an Item» from the Drop-Down List Properties section and then «Modify» if you want to change the default display name. This display name should provide instructions, such as «Choose a Job Position,» rather than providing an actual choice.
Step 7
Click «Add,» type a descriptive first choice and press «Enter» to add the choice. Repeat for each choice you want to add.
Step 8
Click a choice and then «Move Up» or «Move Down» if you need to change its position in the list.
Step 9
Click «OK» to complete the drop-down box.
References
Writer Bio
C. Taylor embarked on a professional writing career in 2009 and frequently writes about technology, science, business, finance, martial arts and the great outdoors. He writes for both online and offline publications, including the Journal of Asian Martial Arts, Samsung, Radio Shack, Motley Fool, Chron, Synonym and more. He received a Master of Science degree in wildlife biology from Clemson University and a Bachelor of Arts in biological sciences at College of Charleston. He also holds minors in statistics, physics and visual arts.
Image Credit
Stockbyte/Stockbyte/Getty Images
Word has this nice feature which enables insertion of text fields, check boxes, drop-down lists, etc. You can use these elements to create a form in Word.
These elements are available under the tab menu Developer in the Word Ribbon. If you are unable to find this tab in the Ribbon, most likely you need to enable this using the Word Options dialog box.
To enable the Developer tab (Word 2007)
1. Click the Office button ![]() . A drop-down list appears.
. A drop-down list appears.
2. Click the Word Options button from the bottom of the list. Word Options dialog box appears.
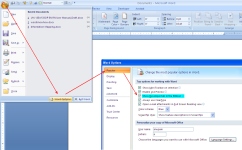
3. On the dialog box, under the category Popular (see on the left hand side), select the option Developer tab in the Ribbon. Now, you can view the Developer tab in the Ribbon. See below image.
To insert a legacy check box
1. Click the Developer tab.
2. Under the group Controls, click the Legacy Tools button. A drop-down list of icons appears. See below image.
3. Under the section Legacy Form, click the check box icon as shown in the below image. Word creates a check box at the cursor position. By default, the checkbox is in design mode (you can see the Design Mode icon being enabled within the Controls group)

Note: If you wish, you can remove the shading of the check box by clicking the Form Field Shading icon under Legacy Form.
4. By the way, you cannot use the checkbox in design mode. To disable design mode, click the Design Mode icon within the Controls group.
Also, you should enforce protection to the document (or form) before you share it with others to capture information.
This step is applicable to all other controls as well.
To enforce protection
1. Under the Developer tab, within the group Protect, click icon Protect Document. A drop-down list appears.
2. From the drop-down menu, click Restrict Formatting and Editing. Restrict Formatting and Editing task pane appears on the right hand side.
3. From this dialog box, select option Allow only this type of editing in the document option. A drop-down is enabled. Select Filling in forms option from the drop-down list. See below image.
4. Click button Yes, Start Enforcing Protection. The Start Enforcing Protection dialog box appears, which prompts you to enter a password.
5. Enter a password and retype password. Your document is protected and the check box is now clickable.

Important: Remember that you cannot edit a protected document. If you wish to make changes in the document, you have to remove protection by entering the valid password.
To stop protection
1. Under the Developer tab, within the group Protect, click Protect Document. The Restrict Formatting and Editing task pane appears.
2. From the bottom of the dialog box, click the button Stop Protection. Enter valid password to remove protection.
To insert a drop-down list
1. Under the Developer tab, within the group Controls, click the Drop-Down List icon. A drop-down list appears in the document. See below image.

2. You can see the Properties button being enabled within the Controls group. Click Properties. The Content Control Properties dialog box appears.
3. In the dialog box, under section General, enter a Title of the drop-down list.
4. Under section Drop-Down List Properties , click button Add to enter the display name and value for the first list item in the Add Choice dialog box and then click OK. Item is added to the list.
In the similar way, you can keep adding items to the list.
5. Click the Modify/Remove button to edit/delete list items.
6. Finally, click OK to close the Content Control Properties dialog box. You can view the drop-down list displays all the list items. See below image.

7. Enforce protection to the document, so that list values cannot be modified.
To insert an ActiveX Control check box
1. Click the Developer tab.
2. Under the group Controls, click the Legacy Tools button.
3. From category ActiveX Controls, click the check box icon. A check box is created at the insertion point. See below image.
You can notice that the Design Mode icon being enabled within the Controls group. This is important to edit the check box properties.
4. Right-click the check box. From the right-click menu, click CheckBox Object and then click Edit. The check is in edit mode. You can enter a name of the checkbox.
5. From the right-click menu, click Properties to control properties of the check box.
6. Click Design Mode to disable. The check box is now clickable.

Note: The difference between a legacy and ActiveX control check box is that, ActiveX checkbox provides advanced or extended features, i.e. you can write program for it in visual basic to make the check box behave in different ways.
Insert text fields
1. Click the Developer tab.
2. Under the group Controls, click the icon Rich Text or Text. A text field is created in the document. See below image.
3. You can change the default text appearing in the text box by enabling the Design Mode button in the Control Group.

Insert a Combobox
- Under the Developer tab, within the group Controls, click the Combobox icon
 . A combobox is created at the cursor position.
 - Select the combobox and then click Properties (available within the group Controls. The Content Control Properties dialog box appears.
- In the dialog box, under the section General, enter a Title of the combobox.
- In the dialog box, under the section Drop-down List Properties, click the Add button. Add Choice dialog box appears.
- Enter a display name and value for the first list item. Click OK.
- Click Add again to enter a second list item. Click OK. You can keep adding as many item as you need.
- Finally, click OK.
 . A combobox is created at the cursor position.
The combobox list is populated with the list items. Remember, the combobox should not be in Design Mode to view the list of items. You can find the Design Mode icon within the group Controls . See below image.

Also See:
https://wordknowhow.wordpress.com/2014/04/03/how-to-create-radio-buttons-option-buttons-in-ms-word/
https://wordknowhow.wordpress.com/2014/04/03/how-to-create-or-add-checkboxes-checkbox-controls-to-your-word-document/
https://wordknowhow.wordpress.com/2014/04/08/how-to-add-a-text-field-in-word/