
Word for Microsoft 365 Word 2021 Word 2019 Word 2016 Word 2013 Word 2010 Word 2007 More…Less
These are the basic types of graphics that you can use to enhance your Word documents: drawing objects, SmartArt, charts, pictures, and clip art. Drawings refer to a drawing object or a group of drawing objects.
Drawing objects include shapes, diagrams, flowcharts, curves, lines, and WordArt. These objects are part of your Word document. You can change and enhance these objects with colors, patterns, borders, and other effects.
Note: It is no longer necessary to insert a drawing canvas to work with drawing objects in Word. However, you may still use a drawing canvas as an organizational aid when working with several drawing objects, or if you want to add connectors between shapes. To insert a drawing canvas, on the Insert tab, click Shapes, and then click New Drawing Canvas.
What do you want to do?
-
Add a drawing to a document
-
Delete all or part of a drawing
Add a drawing to a document
-
Click in your document where you want to create the drawing.
-
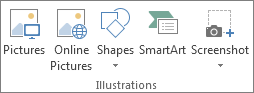
On the Insert tab, in the Illustrations group, click Shapes.

-
You can do any of the following on the Format tab, which appears after you insert a drawing shape:
-
Insert a shape. On the Format tab, in the Insert Shapes group, click a shape, and then click somewhere in the document.
-
Change a shape. Click the shape you want to change. On the Format tab, in the Insert Shapes group, click Edit Shape, point to Change Shape, and then choose a different shape.
-
Add text to a shape. Click the shape you where you want text, and then type.
-
Group selected shapes. Select several shapes at a time by pressing CTRL on your keyboard and clicking each shape you want to include in the group. On the Format tab in the Arrange group, click Group so that all of the shapes will be treated like a single object.
-
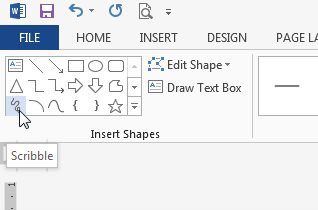
Draw in the document. On the Format tab, in the Insert Shapes group, expand the shapes options by clicking the arrow. Under Lines click Freeform or Scribble.
Tip: To stop drawing with the Freeform or Scribble lines, double-click.
-
Adjust the size of the shapes. Select the shape or shapes you want to resize. On the Format tab, in the Size group, click the arrows or type new dimensions in the Height and Width boxes.
-
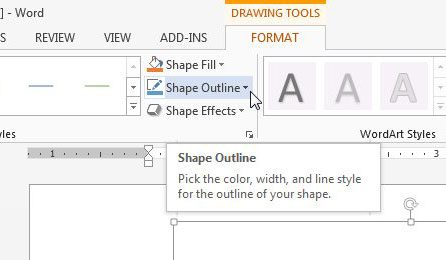
Apply a style to a shape. In the Shape Styles group, rest your pointer over a style to see what your shape will look like when you apply that style. Click the style to apply it. Or, click Shape Fill or Shape Outline and select the options that you want.
Note: If you want to apply a color and gradient that aren’t available in the Shape Styles group, select the color first, and then apply the gradient.
-
Add flow charts with connectors. Before you create a flow chart, add a drawing canvas by clicking the Insert tab, clicking Shapes in the Illustrations group, and then clicking New Drawing Canvas. On the Format tab, in the Insert Shapes group, click a Flow chart shape. Under Lines, choose a connector line such as the Curved Arrow Connector.
-
Use shadow and three-dimensional (3-D) effects to add interest to the shapes in your drawing. On the Format tab, in the Shape Styles group, click Shape Effects, and choose an effect.
-
Align the objects on the canvas. To align the objects, press and hold CTRL while you select the objects that you want to align. On the Format tab, in the Arrange group, click Align to choose from an assortment of alignment commands.
-

Delete all or part of a drawing
-
Select the drawing object that you want to delete.
-
Press DELETE.
See also
Add shapes
Draw a curve or circle shape
Insert pictures
Crop a picture
Add clip art to your file
What do you want to do?
-
Add a drawing to a document
-
Delete all or part of a drawing
Add a drawing to a document
-
Click in your document where you want to create the drawing.
-
On the Insert tab, in the Illustrations group, click Shapes.
-
When you find the shape you want to insert, double-click to insert it automatically, or click and drag to draw it in your document.
You can do any of the following on the Format tab, which appears after you insert a drawing shape:
-
Insert a shape. On the Format tab, in the Insert Shapes group, click a shape, and then click somewhere in the document.
-
Change a shape. Click the shape you want to change. On the Format tab, in the Shape Styles group, click Change Shape, and then choose a different shape.
-
Add text to a shape. Right-click the shape, click Add Text, and then type.
-
Group selected shapes. Select several shapes at a time by pressing CTRL on your keyboard and clicking each shape you want to include in the group. On the Format tab in the Arrange group, click Group so that all of the shapes will be treated like a single object.
-
Draw in the document. On the Format tab, in the Insert Shapes group, expand the shapes options by clicking the arrow. Under Lines click Freeform or Scribble.
-
Adjust the size of the shapes. Select the shape or shapes you want to resize. On the Format tab, in the Size group, click the arrows or type new dimensions in the Shape Height and Shape Width boxes.
-
Apply a style to a shape. In the Shape Styles group, rest your pointer over a style to see what your shape will look like when you apply that style. Click the style to apply it. Or, click Shape Fill or Shape Outline and select the options that you want.
Note: If you want to apply a color and gradient that aren’t available in the Shape Styles group, select the color first, and then apply the gradient.
-
Add flow charts with connectors. Before you create a flow chart, add a drawing canvas by clicking the Insert tab, clicking Shapes in the Illustrations group, and then clicking New Drawing Canvas. On the Format tab, in the Insert Shapes group, click a Flow chart shape. Under Lines, choose a connector line such as the Curved Arrow Connector.
-
Use shadow and three-dimensional (3-D) effects to add interest to the shapes in your drawing. On the Format tab, choose an option in either the Shadow Effects or the 3-D Effects group.
-
Align the objects on the canvas. To align the objects, press and hold CTRL while you select the objects that you want to align. On the Format tab, in the Arrange group, click Align to choose from an assortment of alignment commands.
-

Delete all or part of a drawing
-
Select the drawing object that you want to delete.
-
Press DELETE.
See also
Draw a curve or circle shape
Insert pictures
Crop a picture
Add clip art to your file
Need more help?
 Please Note:
This article is written for users of the following Microsoft Word versions: 97, 2000, 2002, and 2003. If you are using a later version (Word 2007 or later), this tip may not work for you. For a version of this tip written specifically for later versions of Word, click here: Creating a Drawing Object.
![]()
Written by Allen Wyatt (last updated December 27, 2019)
This tip applies to Word 97, 2000, 2002, and 2003
Word allows you to create drawing objects in your document. These objects (such as an oval, rectangle, line, or AutoShape) are positioned on what is termed the «drawing layer,» which is separate and distinct from the text that appears in a document. You generally create such objects by using the tools on the Drawing toolbar. (Display the Drawing toolbar by clicking your mouse on the Drawing tool on the Standard toolbar.)
Notice that on the left side of the Drawing toolbar are several tools used to create basic shapes. The line, arrow, rectangle, and oval tools are easily identifiable. In addition, the AutoShapes tool displays a menu of more than 125 different symbols, banners, and callouts.
You can follow these steps to place a drawing object in your document:
- Click on the tool that represents the type of object you want to create or select the object from the AutoShape tool. Once a tool is selected, the mouse pointer changes to crosshairs, or a plus sign.
- Click within your document at one corner of where you want the shape to appear.
- Drag the mouse to the opposite corner for the object.
- When you release the mouse button, the object appears in the document and you can manipulate it as desired.
WordTips is your source for cost-effective Microsoft Word training.
(Microsoft Word is the most popular word processing software in the world.)
This tip (1318) applies to Microsoft Word 97, 2000, 2002, and 2003. You can find a version of this tip for the ribbon interface of Word (Word 2007 and later) here: Creating a Drawing Object.
Author Bio
With more than 50 non-fiction books and numerous magazine articles to his credit, Allen Wyatt is an internationally recognized author. He is president of Sharon Parq Associates, a computer and publishing services company. Learn more about Allen…
MORE FROM ALLEN
Avoid Using the Normal Style
The basis of almost all styles in Word is the Normal style. Here’s a good reason why you shouldn’t use it.
Discover More
Stopping a Conditional Formatting Rule from Breaking into Smaller Ranges
When you paste information into a row that is conditionally formatted, you may end up messing up the rules applied to …
Discover More
Choosing a Power Management Plan
Windows maintains a number of power management plans that define how long the various components of your system sit idle …
Discover More
More WordTips (menu)
Placing Many Graphics in a Document
Word documents can contain more than just text. You can even create documents that contain almost no text at all. This …
Discover More
Clip Art Sizing Difficulties
A discussion of problems a reader was having resizing clip art in Word.
Discover More
Keeping Callouts Positioned
Using graphics to add callouts to your graphics is a common occurrence in Word. Here’s how to stop all those graphics …
Discover More
![]()
Download Article
![]()
Download Article
In Microsoft Word, you can do a lot more than simple word processing—you can create charts and graphs, add media, and draw and format shapes. These quick, easy steps will show you how to draw a 3D shape or add 3D effects to existing shapes. Before beginning, make sure you have updated to the latest version of Microsoft Word.
-
1
Select Insert > Shape. You’ll find the “Insert” menu at the top of the screen.
- Mac users will see a menu of shapes appear on the right side of the screen.
- PC users will see a drop down menu of shapes.
-
2
Select a 3D shape. As you scroll through the available shapes, you’ll see a small selection of pre-formatted 3D objects, including a cube, a cylinder (“can”), and a bevel. Click on your desired shape to select it.
Advertisement
-
3
Draw your 3D shape. Click anywhere on your document and your shape will appear in previously determined measurements, usually equalling or close to 1”x1”.
- You can also click and drag to draw your shape in the desired dimensions.
-
4
Modify your shape. You can modify your shape by clicking on it to reveal resize boxes. Click and drag any of these to resize your object and also change the direction it’s facing.


Advertisement
-
1
Select Insert > Shape. You’ll find the “Insert” menu at the top of the screen.
- Mac users will see a menu of shapes appear on the right side of the screen.
- PC users will see a drop down menu of shapes.
-
2
Draw a 2D object. Click on a 2D object that you’d like to convert to three dimensions. Click on your document and your shape will appear.
-
3
Open the format menu. Right click (for Mac users, Ctrl + click) the shape and select “Format Shape”.
-
4
Rotate your object in three dimensions. Select “3-D Rotation” and use the rotation buttons to turn your shape along the X, Y, and Z axes. Play with the rotation until your shape is facing the desired direction.
- You need to rotate the shape along the X or Y axis to see the depth you are about to add.
-
5
Add depth to your object. Still in your “Format Shape” menu, select 3-D Format > Depth and Surface. Increase the “Depth” value to your desired depth and watch your 2D shape become 3D.
- You can experiment with the depth amount and the X, Y, and Z angles until you are satisfied with the look of your 3D object.
- The 3-D Format > Bevel menu allows you to add more 3D effects to the top and bottom of your object.
-
6
Click “Ok” when you are finished.


Advertisement
-
1
Add a Text Box or WordArt. Select Insert > Text Box or Insert > WordArt. You’ll find the “Insert” menu at the top of the screen. Draw your box and type your desired text in the box.
-
2
Add 3D effects to the box. Right click (for Mac users, Ctrl + click) your WordArt or Text Box and choose “Format Shape” from the drop down menu. Under «3-D Rotation», change the X and/or Y axis numbers; under «3-D Format», increase the value of the depth.
- You can experiment with the depth amount and the X, Y, and Z angles until you are satisfied with the look of your 3D object.
- To better see the 3D effects you’ve added to the object, change the fill color in the «Format Shape» menu.
-
3
Add 3D effects to the letters. Right click (for Mac users, Ctrl + click) your WordArt or Text Box and select “Format Text Effects” from the drop down menu. Under «3-D Rotation», change the X and/or Y axis numbers; under «3-D Format», increase the value of the depth.
- To better see the 3D effects you’ve added to the object, change the fill color in the «Format Text Effects» menu.


Advertisement
Add New Question
-
Question
Can I divide the cube into 12 x 12 text boxes in each part?

You have to click the insert button and click INSERT CHART. Then you have to choose the 12 by 12 cube, and you’re done!
Ask a Question
200 characters left
Include your email address to get a message when this question is answered.
Submit
Advertisement
-
If you haven’t made 3D objects before, it is best to start with a simple shape.
-
You can experiment with coloring and shading in Format Shape > Fill and Format Shape > 3-D Format > Depth and Surface.
Thanks for submitting a tip for review!
Advertisement
About This Article
Thanks to all authors for creating a page that has been read 200,037 times.
Is this article up to date?
Click in your document where you want to create the drawing. On the Insert tab, in the Illustrations group, click Shapes.
Add a drawing to a document
- Insert a shape.
- Change a shape.
- Add text to a shape.
- Group selected shapes.
- Draw in the document.
- Adjust the size of the shapes.
Contents
- 1 How do I get the drawing toolbar in Word?
- 2 Does Word have drawing tools?
- 3 How do you turn on Draw in Word?
- 4 Where is the drawing toolbar in Microsoft Word 2010?
- 5 Where is drawing toolbar in open office?
- 6 How do I draw diagrams in Word?
- 7 How do I use Apple pencil in Word?
- 8 How do you draw in docs?
- 9 How do you draw a freehand in Word?
- 10 How do I turn off drawing tools in Word?
- 11 What is illustration in MS Word?
- 12 Where is the Drawing toolbar in Word 2013?
- 13 Can you draw in open office?
- 14 How do you draw on Open Office?
- 15 Where is the Drawing toolbar in Word 2007?
- 16 How do you draw a diagram on the computer?
- 17 What is the use of drawing canvas in a Word document?
- 18 How do I label a diagram in Word?
- 19 How do I use pencil in Word?
- 20 Can you use scribble on Word?
How do I get the drawing toolbar in Word?
Click View > Toolbars > Drawing. The Drawing toolbar is displayed or hidden. The Drawing toolbar contains a collection of icon buttons that allows the user to draw shapes and images in the document. Provides a number of features for drawing.
Does Word have drawing tools?
You can draw freely in Microsoft Word using the “Draw” feature whether you have Word for Mac or Windows. You can also insert customizable shapes into your document, or draw using the “Scribble” feature. The process of drawing in Word varies based on which version of Word and device you’re using.
How do you turn on Draw in Word?
If your device is touch-enabled, the Draw tab is turned on automatically. Otherwise, turn it on by selecting File > Options > Customize Ribbon > Draw.
Where is the drawing toolbar in Microsoft Word 2010?
In Word 2010, there are no toolbars; they have been replaced with ribbons at the top of the screen. Note: If you do not see the Drawing Tools tab, make sure that you have inserted/selected a shape, line, or drawing object. You may have to double-click the object.
Where is drawing toolbar in open office?
To begin using the drawing tools, select View > Toolbars > Drawing. The drawing toolbar appears at the bottom of the screen. You can tear off this toolbar and move it to a convenient place on the window.
How do I draw diagrams in Word?
Click in your document where you want to create the drawing. On the Insert tab, in the Illustrations group, click Shapes.
Add a drawing to a document
- Insert a shape.
- Change a shape.
- Add text to a shape.
- Group selected shapes.
- Draw in the document.
- Adjust the size of the shapes.
How do I use Apple pencil in Word?
In a document, tap Apple Pencil in the body of a word-processing document where you want to write. Or tap in a text box, shape, or in a table cell in a word-processing or page layout document. Tap the Scribble tool in the toolbar at the bottom of the screen, then start writing.
How do you draw in docs?
What to Know
- Open a document in Google Docs. Place the cursor where you want the drawing to appear.
- Select Insert > Drawing. Choose New to open the Drawing window.
- Choose a drawing type from the Actions menu. Options include word art, shapes, arrows, callouts, and equations.
How do you draw a freehand in Word?
Draw a freeform shape
Click anywhere in the document, and then drag to draw. To draw a straight segment with the Freeform tool, click one location, move your pointer to a different location, and then click again; to draw a curved segment, keep your mouse button pressed as you drag to draw.
How do I turn off drawing tools in Word?
To turn off the drawing canvas, do the following:
- From the Tools menu, choose Options.
- Click the General tab.
- Uncheck Automatically Create Drawing Canvas When Inserting AutoShapes in the General Options section.
- Click OK.
What is illustration in MS Word?
Illustrations Quick Reference
The Microsoft Illustrations group allows you to insert pictures, shapes, smart art, and charts into your document. These options will enhance the layout and appearance of your documents. Drawing Tools and Picture Tools tabs only appear when a graphic image is selected.
Where is the Drawing toolbar in Word 2013?
Click Insert. Click the Shapes button, then click the Scribble icon in the Lines section. Click and hold down the mouse button, then move the mouse cursor to draw. Click the Format tab under Drawing Tools to make any changes to your drawing.
Can you draw in open office?
You can use Writer’s drawing tools to create graphics, such as simple diagrams using rectangles, circles, lines, text, and other objects.You can use the drawing tools to place drawing objects directly on a page in your document, or you can insert the drawing objects into a frame.
How do you draw on Open Office?
To use a drawing tool:
- Click in the document where you want the drawing to be anchored.
- Select the tool from the Drawing toolbar.
- Move the cross-hair pointer to the place in the document where you want the graphic to appear and then click-and-drag to create the drawing object.
Where is the Drawing toolbar in Word 2007?
Accessing the Drawing Toolbar
From the View menu, select Toolbars » Drawing. The Drawing toolbar appears.
How do you draw a diagram on the computer?
8 Online Tools to Draw Diagrams and Flowcharts
- Lucidchart. Lucidchart allows you to create diagrams and flowcharts without installing any software easily.
- Draw.io. Draw.io is a completely free online tool for creating diagrams of all types.
- Cacoo.
- Gliffy.
- Sketchboard.
- Creately.
- DrawAnywhere.
- Google Drawings.
What is the use of drawing canvas in a Word document?
A drawing canvas is an object, a bounding box to contain graphics. Use it to provide a background or shading behind AutoShapes and images, group graphics, or to create a wider area for a text wrap. Because the drawing canvas is mostly obsolete, you have to turn it on in Word’s options.
How do I label a diagram in Word?
On the References tab, in the Captions group, click Insert Caption. In the Label list, select the label that best describes the object, such as a figure or equation. If the list doesn’t provide the label you want, click New Label, type the new label in the Label box, and then click OK.
How do I use pencil in Word?
Start Microsoft Word and click “File” and “Open” if you want to add handwriting to an existing document. Choose your file and press “Enter” or click “Open” to open it. Select “Insert” from the top menu bar and choose “Shape.” Choose the “Scribble” tool to change the cursor to a pencil with which you can draw.
Can you use scribble on Word?
Turn handwriting into text with Scribble
In a document, tap Apple Pencil in the body of a word-processing document where you want to write. Or tap in a text box, shape or in a table cell in a word-processing or page layout document. Tap the Scribble tool in the toolbar at the bottom of the screen, then start writing.
Lesson 26: Drawing Objects
/en/word2000/editing-tables/content/
Introduction
By the end of this lesson, you should be able to:
- Use drawing objects
Introduction to Word graphics
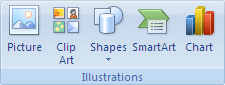
There are two different types of graphics you can use to give some pizzazz to your Word documents:
- Drawing objects: A graphic that is part of a Microsoft Word documen
- Pictures: Graphics that were created from another file
![]() In this lesson, you’ll learn about drawing objects.
In this lesson, you’ll learn about drawing objects.
Drawing objects include:
- AutoShapes: Includes lines, curves, and text boxes
- WordArt drawing objects
![]() You can change and enhance drawing objects using the Drawing toolbar.
You can change and enhance drawing objects using the Drawing toolbar.
Creating drawing objects
Access Word’s drawing tools on the Drawing toolbar.
- Choose View
 Toolbars Drawing.
OR
- Right-click any toolbar and select Drawing.
OR
- Click the Drawing button on the Standard toolbar.

The Drawing toolbar has two sets of drawing tools: AutoShapes and WordArt.
Using AutoShapes
Use AutoShapes to insert lines, scribbles, basic shapes, and text boxes into your presentation.
To access AutoShapes:
- Choose ViewToolbarsDrawing. The Drawing toolbar opens.
- Choose an AutoShape from the AutoShape drop-down menu.
OR
- Click any of the drawing tools in the first group of buttons.
 .
. - The mouse pointer changes to a crosshair
 .
. - Drag the crosshair from a starting point until the object is the desired size.
- Release the mouse button to end the drawing object and turn off the Drawing tool.
![]() Hold down the Shift key to create straight lines, perfect circles, and perfect squares.
Hold down the Shift key to create straight lines, perfect circles, and perfect squares.
![]() AutoShapes are inserted (on their own layer) with the In front of text wrapping style applied.
AutoShapes are inserted (on their own layer) with the In front of text wrapping style applied.
WordArt drawing objects
The second set of drawing tools on the Drawing toolbar allows you to create a graphic object from text. Using WordArt, you can create interesting graphics for your document. WordArt can even be shadowed, skewed, rotated, and stretched.
Here are a few examples of what WordArt allows you to do:

To insert WordArt:
- Place the insertion point where you want to insert WordArt.
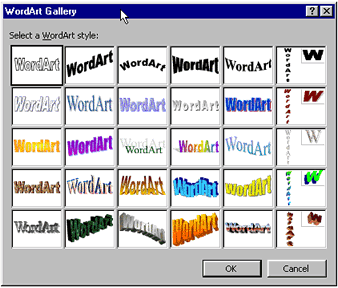
- Click the WordArt button on the Drawing toolbar
 . The WordArt gallery opens.

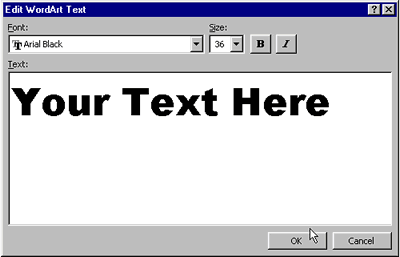
- Choose a WordArt style.
- The Edit WordArt Text dialog box appears. Edit the font, size, and style.

- Click OK.
![]() AutoShapes are inserted (on their own layer) with the In front of text wrapping style applied.
AutoShapes are inserted (on their own layer) with the In front of text wrapping style applied.
Did you know?
Drawing objects are placed in separate layers on top of the text document. AutoShapes are inserted with the In front of text wrapping style applied. If you are working with more than one layer, it can be helpful to move objects from layer to layer.
To arrange objects:
- Open the Draw menu on the Drawing toolbar.
- Choose Order.
- Your choices include:
- Bring to Front
- Send to Back
- Bring Forward
- Send Backward
- Bring in Front of Text Send Behind Text
/en/word2000/inserting-pictures-/content/
Содержание
- Руководство по работе с «Фигурами»
- Вариант 1: Microsoft Word 2007–2021
- Вариант 2: Microsoft Word 2003
- Практическое применение инструментов для рисования фигурами
- Вопросы и ответы

Руководство по работе с «Фигурами»
Прежде чем приступать непосредственно к рисованию в Microsoft Word с помощью фигур, необходимо разобраться, что именно позволяет делать программа с этими элементами. Далее будут подробно рассмотрены все возможные функции редактирования геометрических объектов, при этом руководство предоставляется отдельно для программ 2007–2021 годов и 2003 года, так как в них кардинально отличается реализация управления объектами.
Вариант 1: Microsoft Word 2007–2021
Важно! Ниже все скриншоты сделаны на примере Microsoft Word 2016 года, но в других версиях текстового редактора месторасположение элементов меню и набор функций редактирования «Фигур» такой же, поэтому руководство остается актуальным. Основные, но не критические отличия будут заключаться исключительно в графическом оформлении интерфейса.
Добавление «Фигуры» на страницу документа
Первостепенно необходимо научиться добавлять «Фигуру» на станицу документа. Делается это во вкладке «Вставка». Перейдите в нее и раскройте диалоговое меню «Фигуры». Обратите внимание, что объекты в списке поделены на категории и имеют соответствующие своей форме пиктограммы.

Кликните по подходящему пункту и наведите курсор на страницу документа, чтобы появился черный крест. Это будет означать, что активировался режим рисования. Зажмите левую кнопку мыши и начните ею водить, чтобы отобразился эскиз будущей фигуры, задав таким образом предпочитаемый размер объекту.
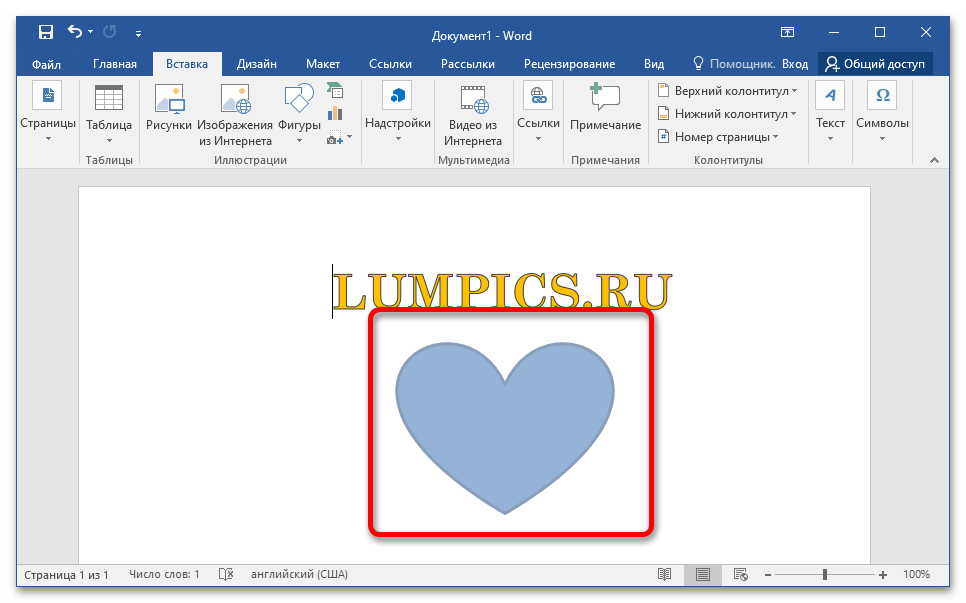
Точно так же можно разместить новые фигуры на странице, каждый раз выбирая подходящий вариант из предоставляемого списка на вкладке «Вставка».
Примечание! Забегая вперед, отметим, что создание будущего рисунка не ограничивается предоставленными формами, они служат лишь основой. Каждый добавленный на страницу объект можно будет изменять, придавая ему другой внешний вид.
Читайте также: Вставка и создание фигур в Microsoft Word
Базовое редактирование
После того как «Фигура» будет размещена в документе, появится возможность ее отредактировать — изменить размер, расположение, пропорции и угол наклона. Делается это посредством специальных маркеров, расположенных по контуру:
- Боковые слева и справа. Позволяют изменять размер фигуры по ширине, делая ее уже или толще. При зажатой клавише Ctrl происходит редактирование относительно центра (симметрично).
- Верхний и нижний. Служат для корректировки высоты объекта. Клавиша Ctrl тоже изменяет размер симметрично.
- Угловые. Применяются для одновременной смены высоты и ширины. При удержании Shift фиксируются пропорции. Ctrl служит для редактирования относительно центра.
- Круглая стрелка сверху. Необходима для изменения наклона фигуры. С зажатой клавишей Shift происходит смещение на 15 градусов относительно последнего положения.
Помимо этого, удерживая левую кнопку мыши непосредственно на объекте, можно изменить его расположение на странице документа.
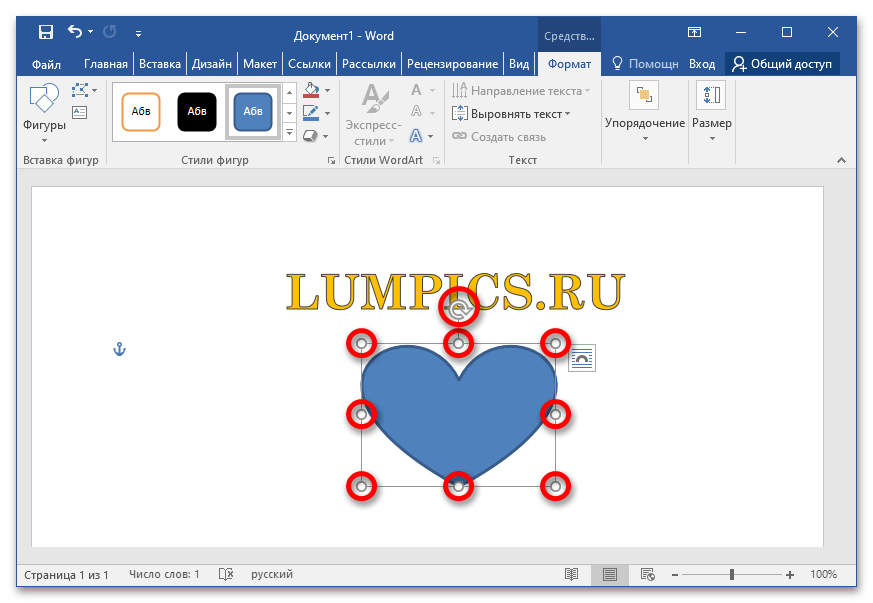
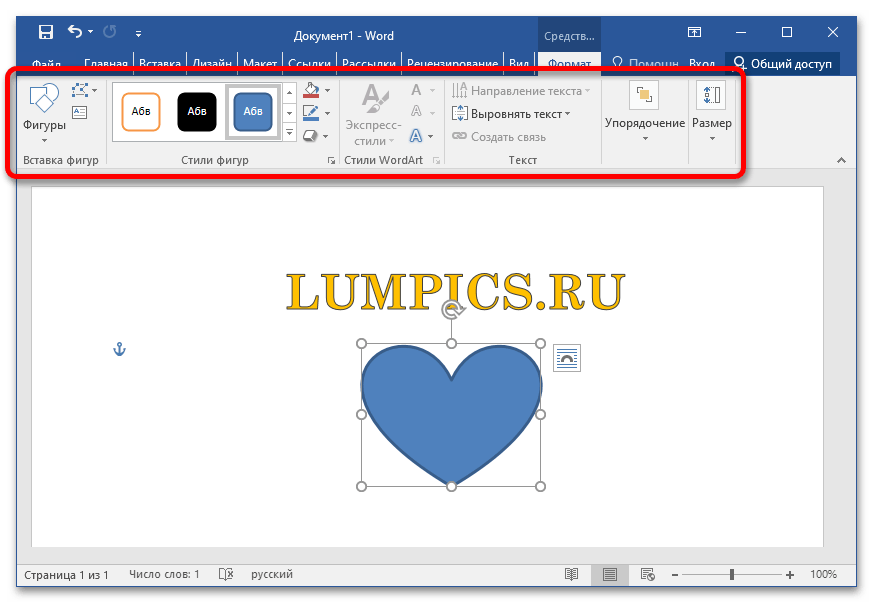
Панель инструментов «Формат»

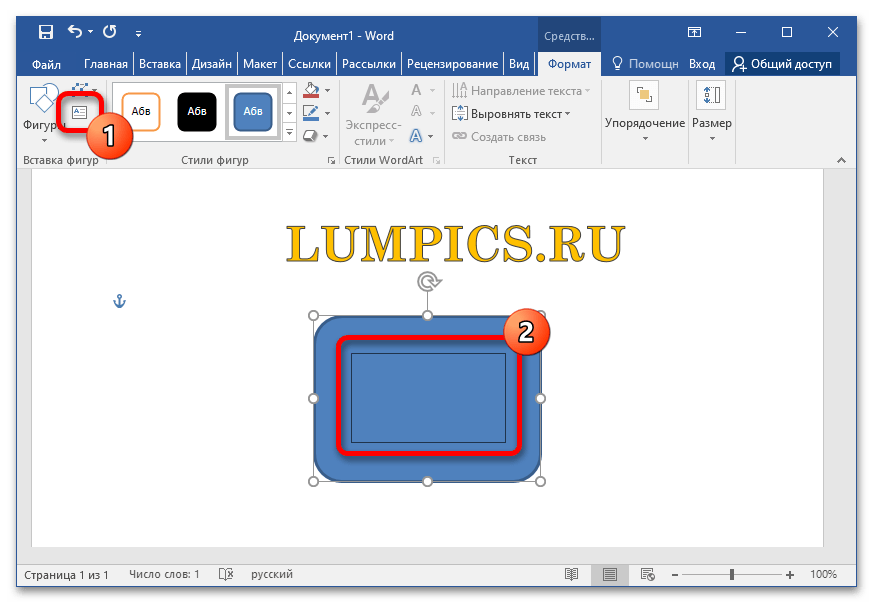
Если кликнуть по фигуре один раз левой кнопкой мыши, в верхней части интерфейса приложения появится дополнительная вкладка «Формат», в которой будут находиться все доступные инструменты для более продвинутого редактирования «Фигуры». Каждый набор функций, объединенный одной темой, размещается в отдельном блоке. Всего есть шесть наборов инструментов: «Вставка фигур», «Стили фигур», «Стили WordArt», «Текст», «Упорядочение» и «Размер». Далее о них подробнее.
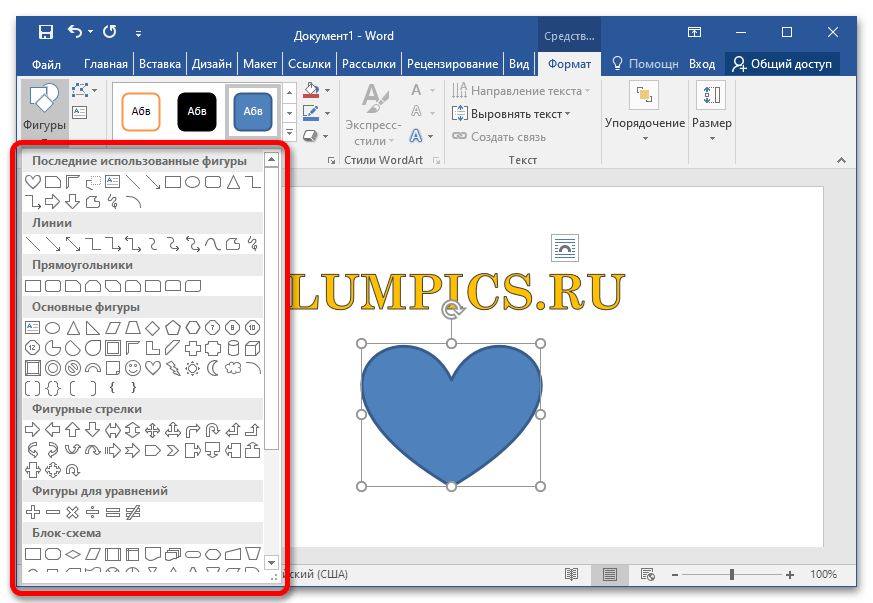
Вставка фигур
В этой группе находятся инструменты для добавления нового объекта и редактирования уже имеющегося. Также отдельно можно поместить текстовую надпись внутри или снаружи фигуры. При этом в дальнейшем она станет таким же объектом, соответственно, сможет редактироваться описанными здесь и далее по тексту инструментами.

Нажатие по пункту «Фигуры» раскрывает уже знакомый список с геометрическими фигурами. Работать с ними можно так же, как описывалось ранее. Стоит отметить, что ограничений по количеству одновременно находящихся объектов на странице документа нет.
В меню «Изменить фигуру» находятся еще три дополнительные функции. «Изменить фигуру» открывает диалоговое окно с выбором объектов, которыми будет заменена выбранная в настоящее время фигура. Повторно задавать ей размер на странице не потребуется, она вставится автоматически в указанное до этого место.
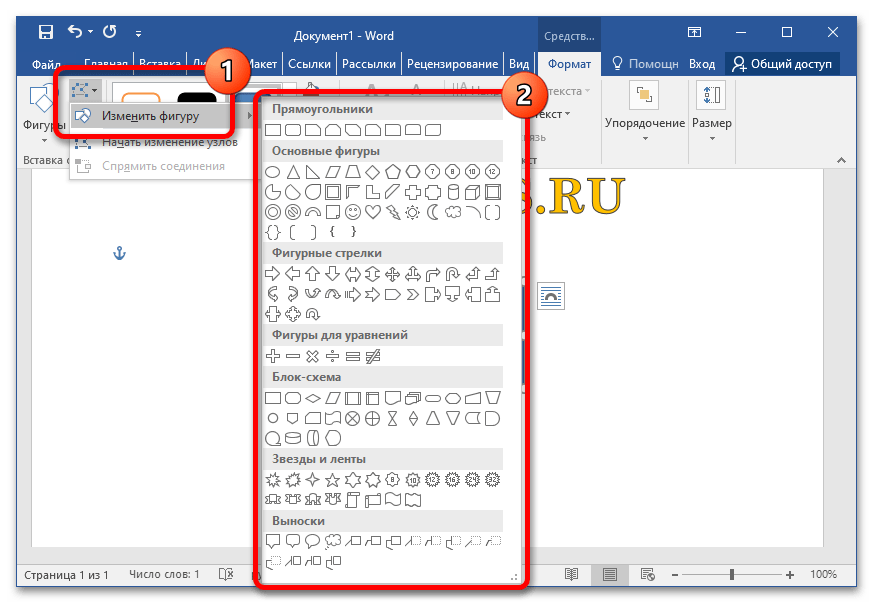
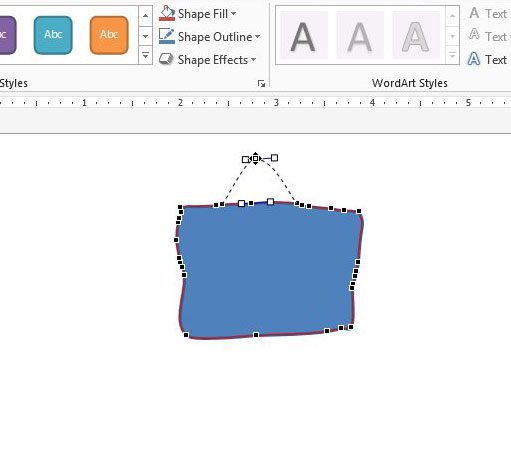
Если кликнуть по пункту «Начать изменение узлов», объект приобретет красный контур и новые маркеры черного цвета, после нажатия на которые появятся дополнительные пункты в виде белых квадратов. Все эти элементы необходимы для придания фигуре новой формы. Путем перемещения черного маркера изменяется точка сопряжения отдельных отрезков, из которых состоит весь объект. Появляющаяся во время этого пунктирная линия будет демонстрировать конечный результат такого редактирования.

Белые пункты, выходящие из черных маркеров, служат для изменения угла наклона, под которым соединительные линии фигуры будут сопрягаться. При их перемещении тоже появляется пунктирная линия для удобства.
Примечание! Посредством этих элементов можно кардинально изменить форму изначального объекта. Данный инструмент — мощное средство для рисования в Microsoft Word, он непрост в освоении, но является базовым для выполнения поставленной задачи.
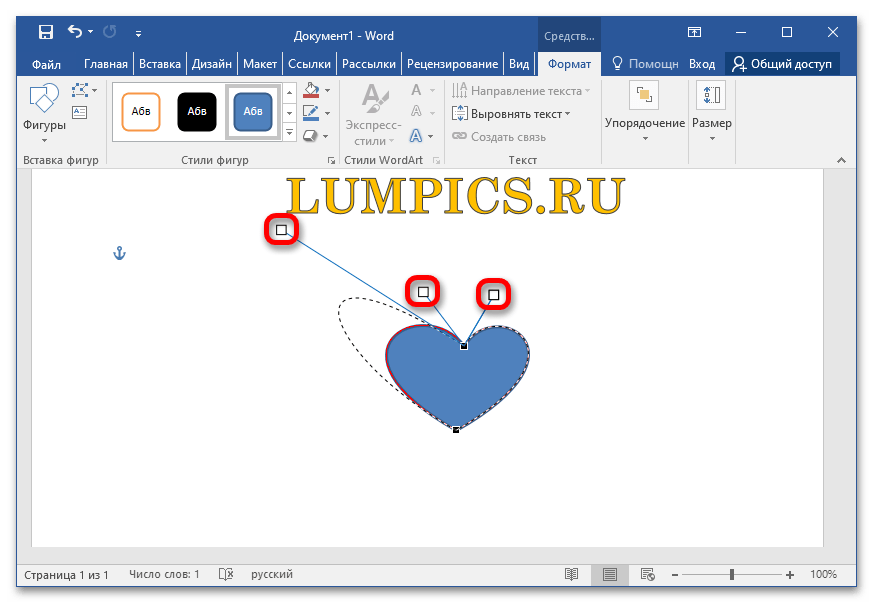
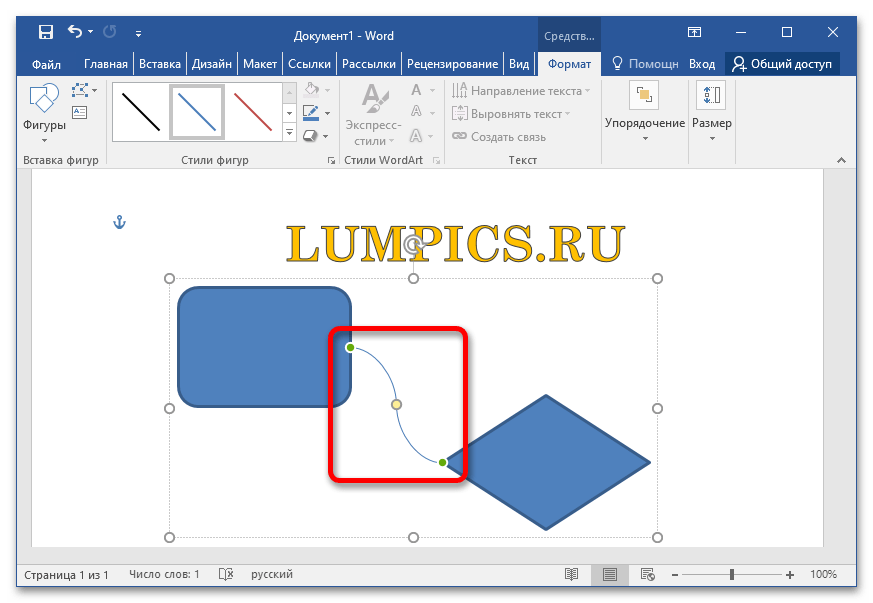
В меню «Изменить фигуру» остается третья функция под названием «Спрямить соединения». Зачастую она применяется при создании блок-схем, но может быть полезна и для создания собственных рисунков. Чтобы эта опция стала активной, необходимо сгруппировать сразу три объекта, два из которых будут геометрические фигуры, а один — соединительная линия.
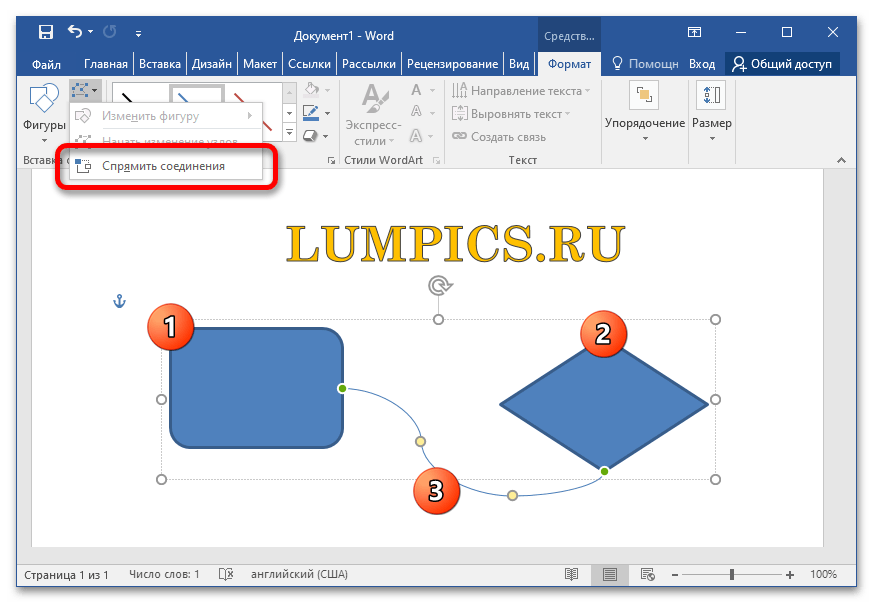
Важно! Группировка объектов рассматривается далее, сейчас же будет продемонстрирован только пример использования функции «Спрямить соединения».
Важным фактором для применения обозначенного инструмента является наличие связей соединительной линии с объектами. Зачастую это действие совершается произвольно, из-за чего выбирается не самая корректная форма линии. Нажатием по пункту «Спрямить соединение» можно это исправить, программа автоматически рассчитает самый короткий путь для соединения.
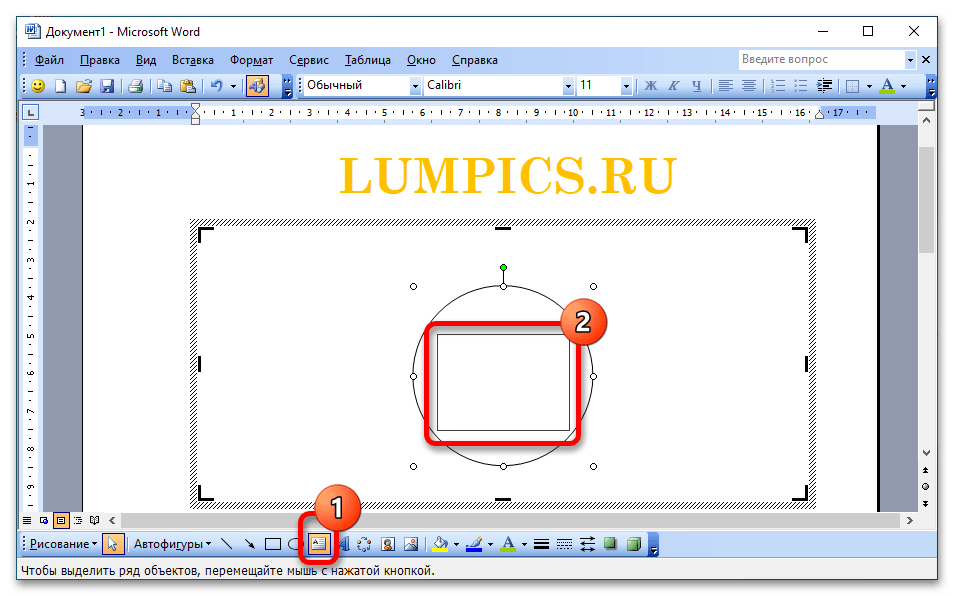
В блоке «Вставка фигур» остается последний инструмент — «Добавление надписи». После нажатия по нему курсор сменится на черный крест и можно будет, зажав левую кнопку мыши, обозначить границы текстового поля. Его размещение доступно как в центре фигуры, так и за ее пределами.
В образовавшуюся форму можно будет ввести любой текст и отформатировать его как угодно. Для этого следует воспользоваться инструментами на вкладке «Главная». К слову, на нашем сайте есть отдельная статья, в которой подробно рассказывается обо всех инструментах, предоставляющих возможность графического оформления текстовой информации.
Подробнее: Форматирование текста в документе Microsoft Word

Примечание! По умолчанию текстовое поле имеет непрозрачный фон с четкими границами по контуру. При необходимости это можно исправить инструментами, находящимися в блоке «Стили фигур» и «Стили WordArt», о которых еще будет рассказано далее.
Стили фигур
В группе «Стили фигур» находятся инструменты для изменения внешнего вида объекта. Все они отлично подходят для дизайна собственного рисунка, поэтому рекомендуем внимательно ознакомиться с каждым. Ввиду обширного списка возможностей далее будет предоставлено только условное описание функции. Подробное рассмотрение должно быть самостоятельным, что не вызовет трудностей, так как интерфейс программы богат на контекстные подсказки и следует понятной логике.
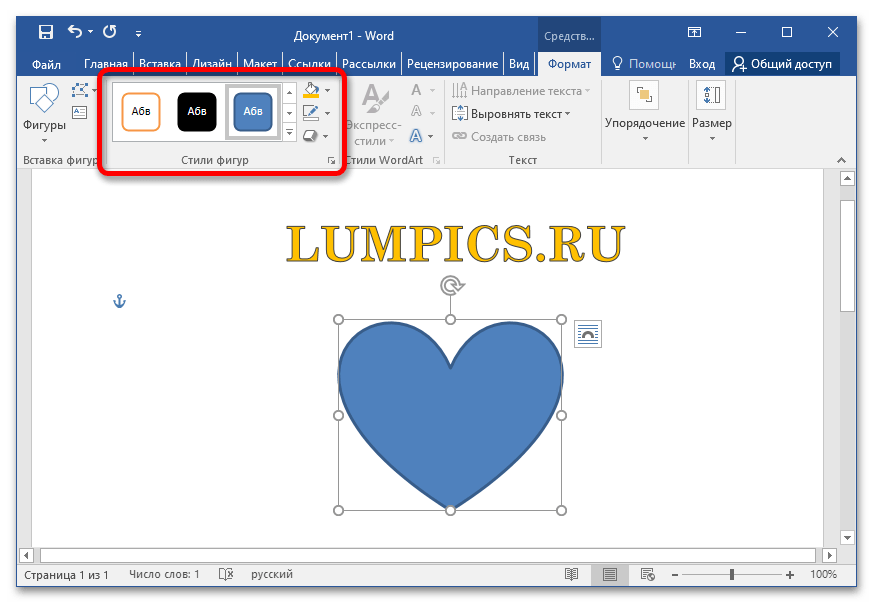
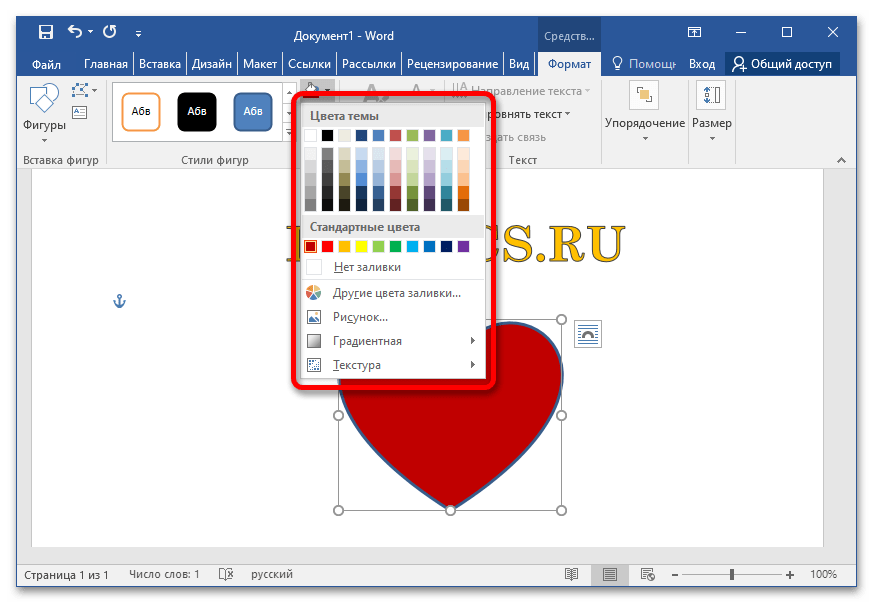
Выпадающее меню «Заливка фигуры» содержит в себе основной блок палитры цветов, для применения любого понравившегося достаточно просто кликнуть по его плитке. Если есть необходимость выбрать особый оттенок, нужно открыть дополнительное меню «Другие цвета заливки», где размещен весь цветовой спектр с удобным управлением. Здесь же есть возможность отменить заливку, чтобы у фигуры остался один контур, делается это посредством активации пункта «Нет заливки».
Наименования остальных функций соответствуют своему предназначению:
- «Рисунок». Позволяет выбрать из глобальной базы сервиса Bing изображение, которое заполнит пространство внутри объекта.
- «Градиент». Делает определенный переход цвета от светлого к более темному и наоборот, выполняется это в рамках выбранного цветового спектра.
- «Текстура». Открывает меню с предустановленными графическими решениями для заполнения фигуры. Также позволяет выбрать собственное изображение из внутренней памяти компьютера.
Читайте также: Как сделать заливку в Microsoft Word
Расположенное ниже меню «Контур фигуры» вмещает в себя практически аналогичные опции — позволяет задать определенный цвет линии или убрать ее вовсе. Также есть возможность определить оттенок, воспользовавшись специальным цветовым спектром, вызываемым нажатием по пункту «Другие цвета контура». В дополнение можно выбрать толщину контура из одноименного подменю, а также сделать штрихи. Пункт «Стрелки» будет активен только в том случае, если фигура состоит непосредственно из линии, в замкнутых объектах эта опция недоступна.

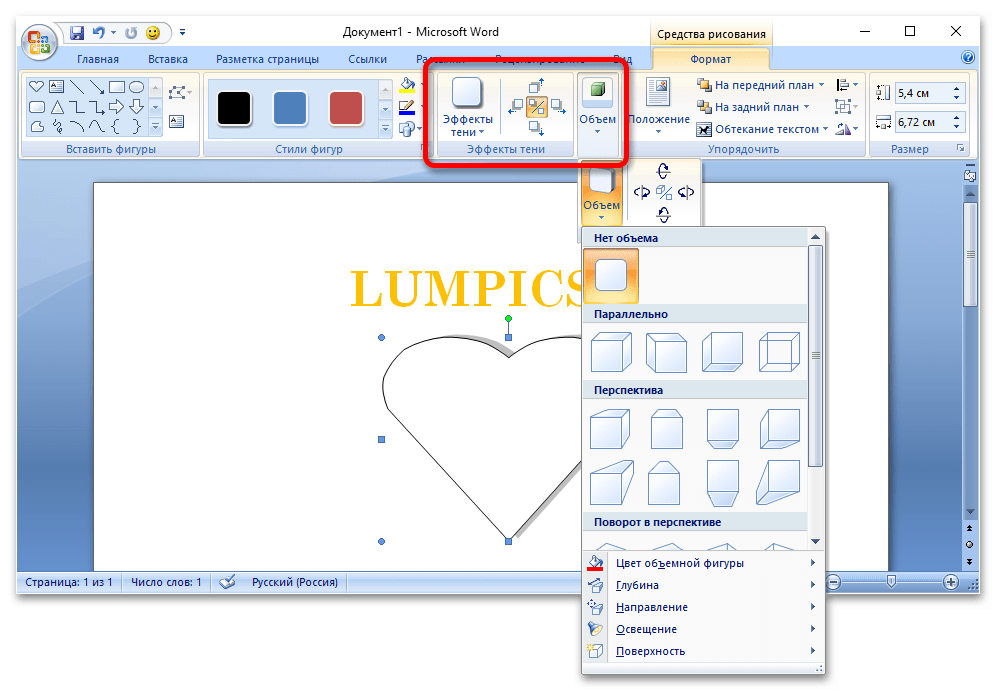
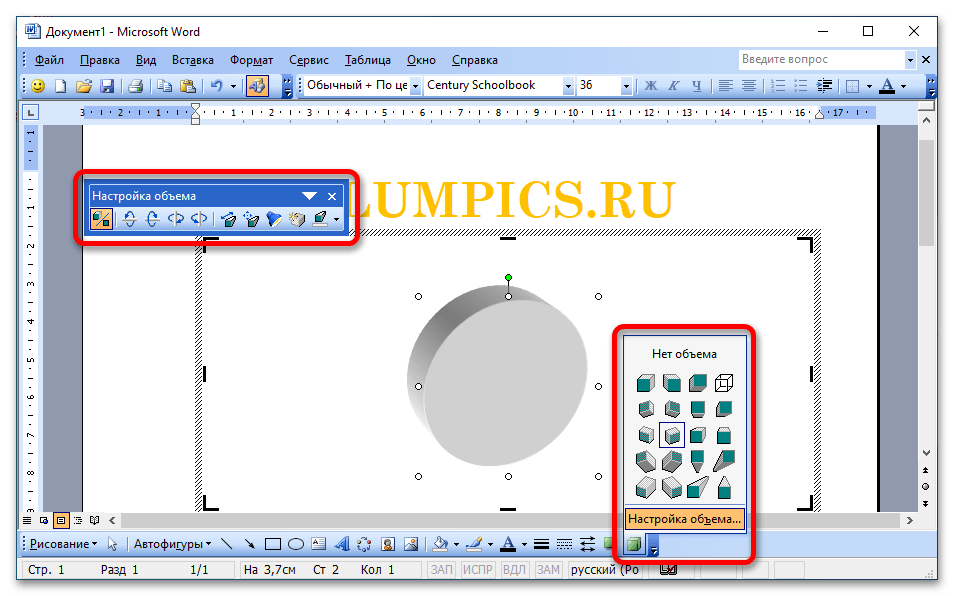
В меню «Эффекты фигуры» сосредоточены особые функции, позволяющие наложить физически корректные явления на двумерный объект. При этом в последних версиях текстового редактора появилась возможность преобразовать фигуру в трехмерную модель. В целом позволяется добавлять тень или отражение, делать подсветку по площади, осуществить сглаживание граней и придавать рельеф. Особые эффекты находятся в подменю «Поворот объемной фигуры», именно посредством него можно создать трехмерный объект.

Важным замечанием будет то, что в версиях приложения Microsoft Word 2007 — 2010 годов работа с тенью и объемом происходит в отдельно вынесенных блоках панели инструментов, которые называются соответственно — «Эффекты тени» и «Объем». Принцип их работы идентичен, а в разворачивающихся меню можно задать дополнительные настройки, такие как цвет, глубину фигуры, ее направление и источник света.
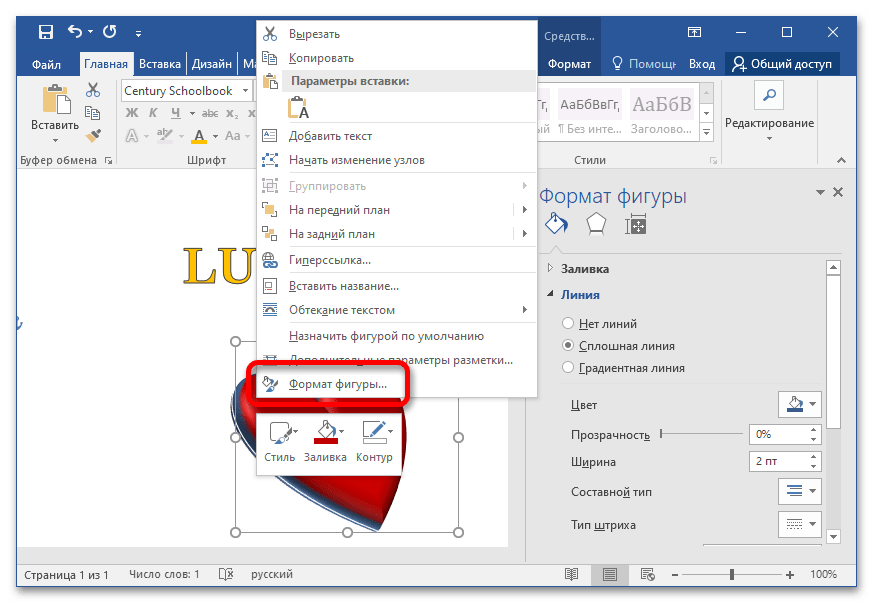
Обратите внимание! В версиях программы Microsoft Word 2013–2021 можно вызвать дополнительное боковое меню, где доступна возможность более детальной настройки визуального стиля фигуры. Там находятся уникальные инструменты, отсутствующие на панели вкладки «Формат». Например, можно преобразовать двумерный рисунок в трехмерный объект и изменять его положение в пространстве. Для вызова нажмите по фигуре правой кнопкой мышки и в появившемся контекстном меню выберите пункт «Формат фигуры». После этого откроется соответствующая боковая панель.
В блоке «Стили фигур» неосвещенным осталось еще одно меню, занимающее практически все пространство в этой части панели инструментов. По факту оно содержит уже готовые решения для преобразования фигуры, что можно выполнить самостоятельно описанными ранее опциями. Но в некоторых случаях представленные шаблоны выгодно использовать в качестве основы для ускорения рабочего процесса.
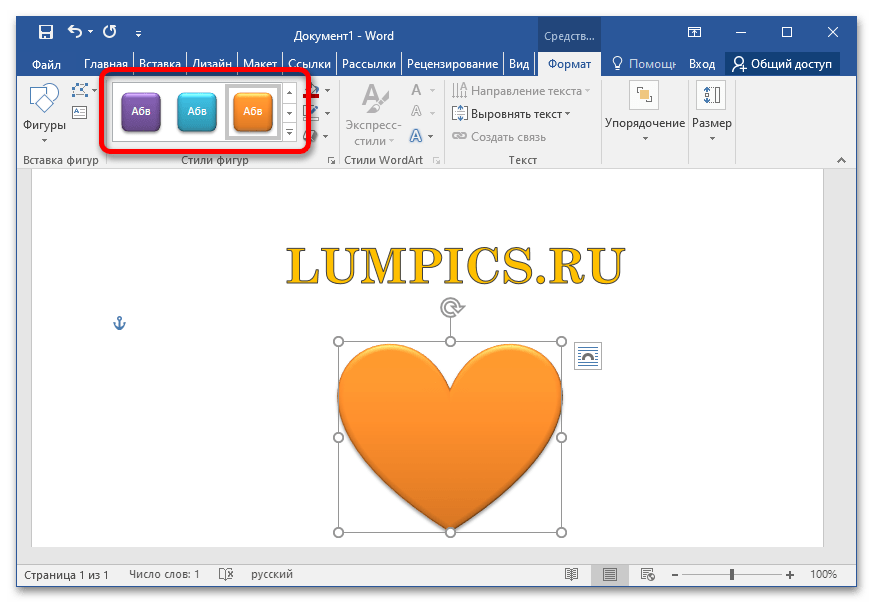
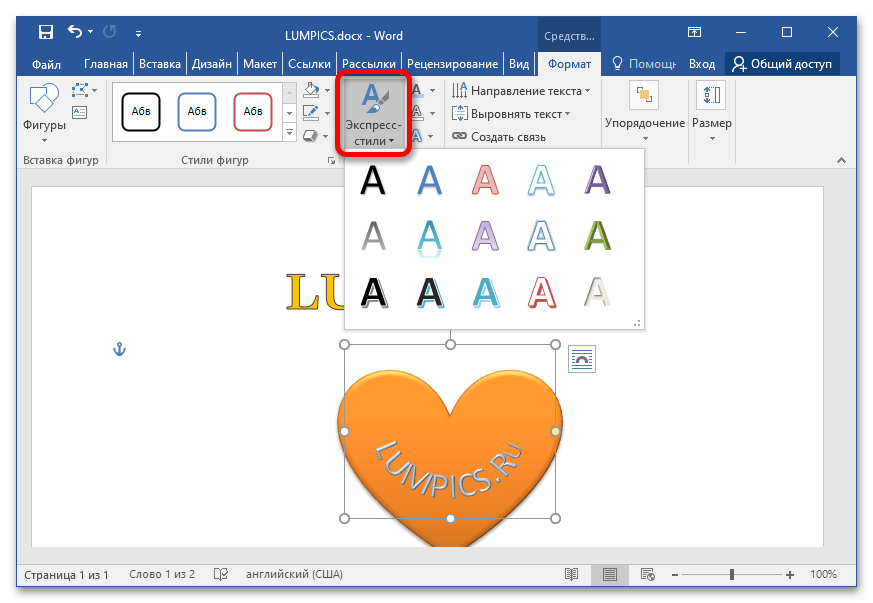
Стили WordArt
Блок «Стили WordArt» присутствует только в версиях программы, которые выходили, начиная с 2013 года. Все представленные там инструменты направлены на работу с текстовой информацией, которая добавляется посредством специальной функции «Добавление надписи», рассматриваемой ранее в статье, когда речь шла о блоке «Вставка фигур».

Инструмент «Заливка текста» позволяет выбрать цвет символов из уже знакомой палитры, также при необходимости можно расширить спектр, открыв меню «Другие цвета заливки». Еще есть возможность применить градиент, воспользовавшись одноименным подменю.

Читайте также: Как изменить цвет текста в Microsoft Word
Все функции из списка «Контур текста» служат для настройки обводки каждого напечатанного символа. Помимо стандартных возможностей, позволяется выбрать толщину контура и тип штрихов.
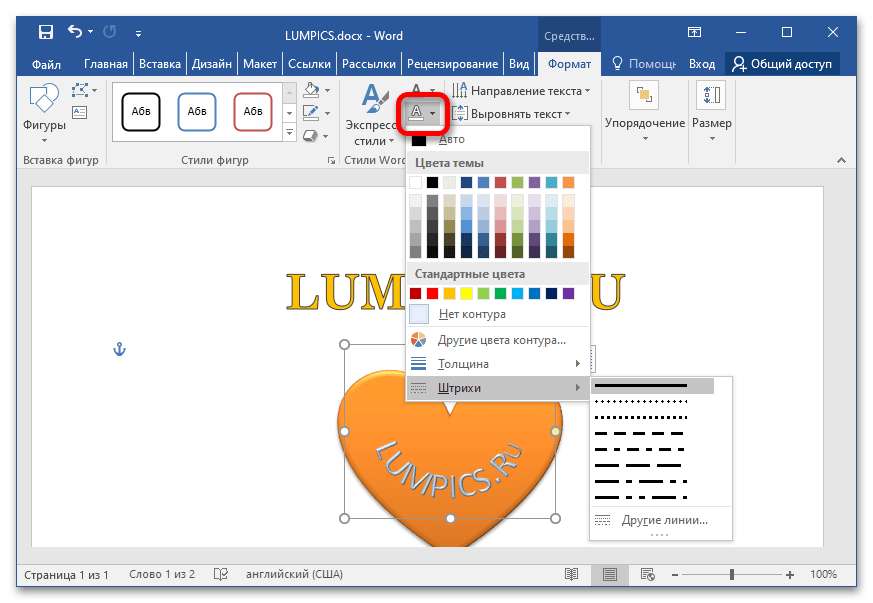
Читайте также: Как добавить буквам контур в Microsoft Word
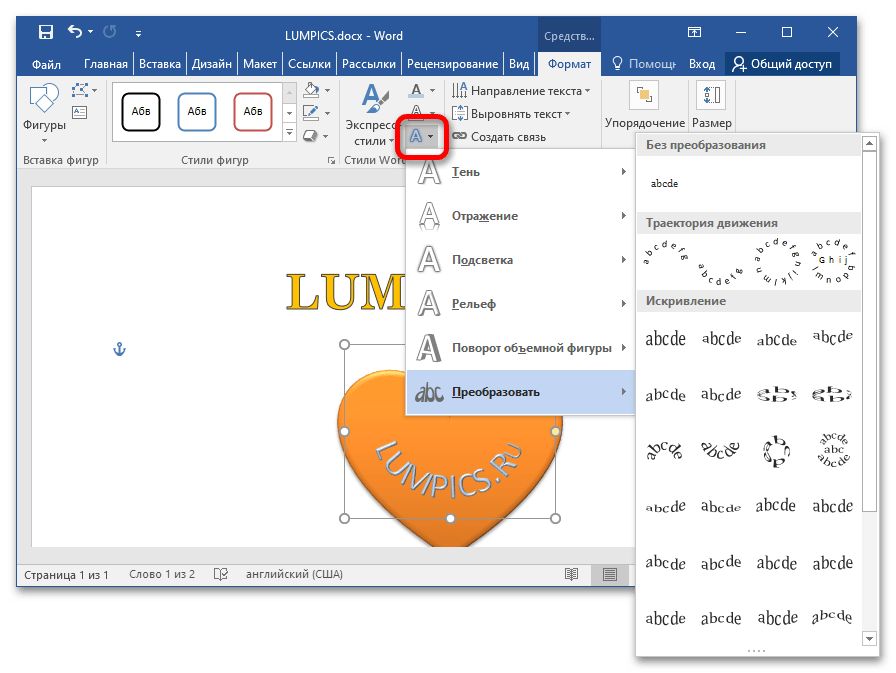
Особые инструменты располагаются в выпадающем меню «Текстовые эффекты». Они служат для придания буквам более оригинального вида — позволяют наложить тень, отражение, подсветку, подчеркнуть рельеф или создать объемный объект. Также крайне полезно для дизайна рисунка подменю «Преобразовать», через которое можно добавить искривление текста — написать его полукругом, по периметру фигуры или наложить уникальный визуальный эффект.
Меню «Экспресс стили» является по своей сути уже готовыми шаблонами начертания букв, которые можно создать самостоятельно, воспользовавшись описанными инструментами. Очень удобно их использовать в качестве исходника, на основе которого создается что-то новое.
Обратите внимание! В Microsoft Word 2007–2010 тоже есть возможность изменять внешний вид текстовой информации, созданной посредством вставки надписи. Делается это с помощью инструментов на вкладке «Формат», только прежде потребуется выделить введенные ранее символы.

Читайте также: Как сделать текст полукругом в Microsoft Word
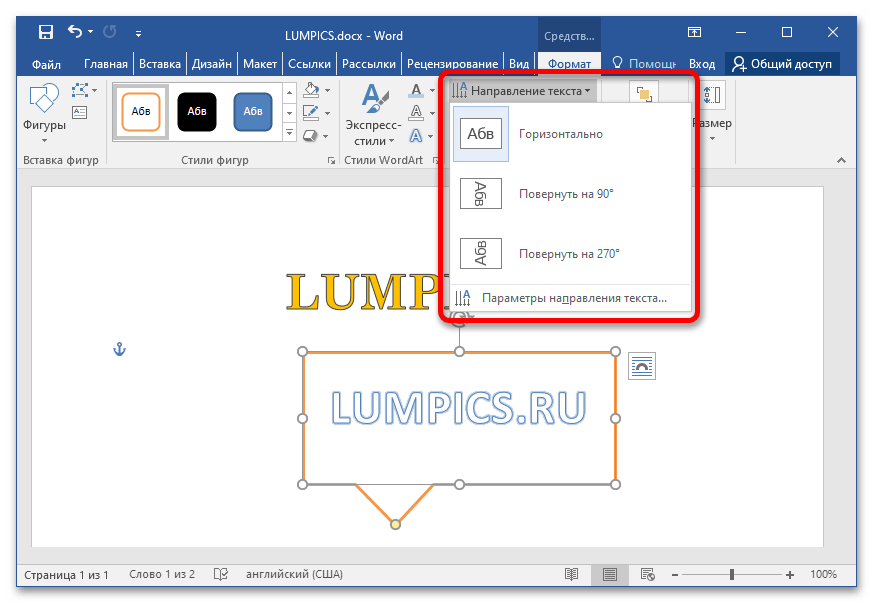
Текст
Группа инструментов в блоке «Текст», как становится понятно из названия, предназначена для работы с текстом. Долго задерживаться на всех возможностях нет смысла, так как их не очень много и они редко используются для создания рисунка из фигур в Microsoft Word.
В выпадающем меню «Направление текста» можно выбрать угол наклона символов. Инструмент «Выровнять текст» служит для определения месторасположения слов относительно границ текстового поля. Опция «Создать связь» позволяет дублировать введенную информацию в другую пустую надпись. При этом изменение данных в исходнике автоматически поменяет их и в связанных объектах.
Упорядочение
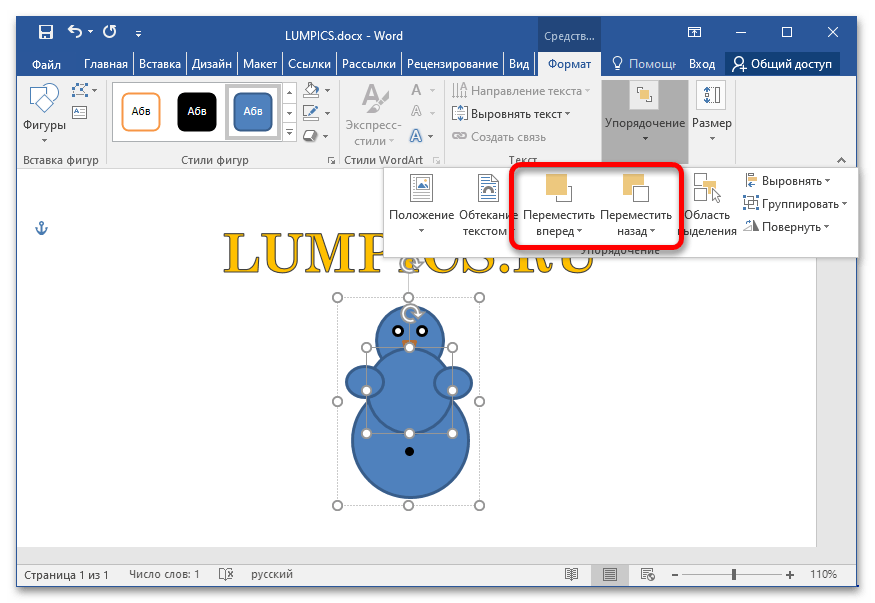
Практически все инструменты из блока «Упорядочение» очень важны при создании собственного рисунка из фигур, так как полноценный проект состоит из множества отдельных объектов и часто является важным их месторасположение относительно друг друга. В качестве примера будет взят импровизированный снеговик, состоящий из одиннадцати фигур.
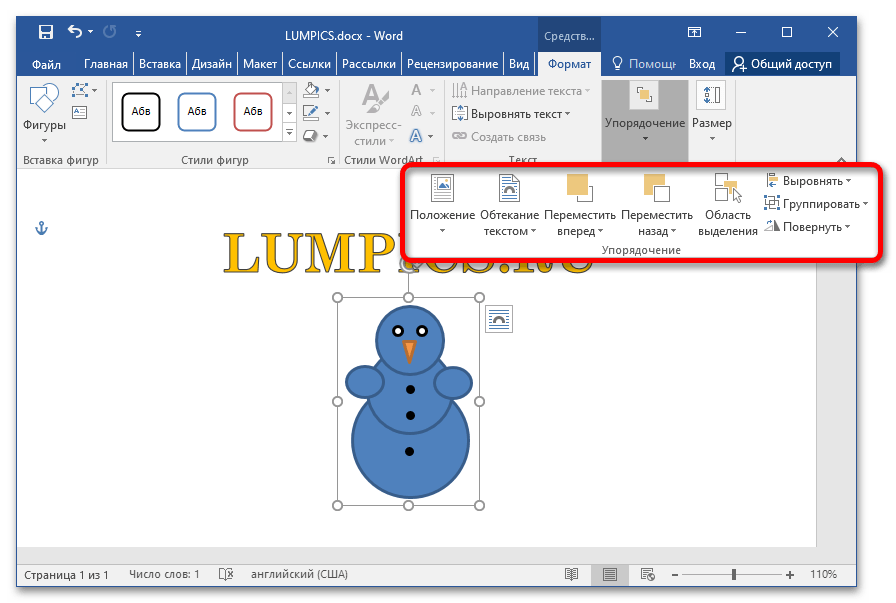
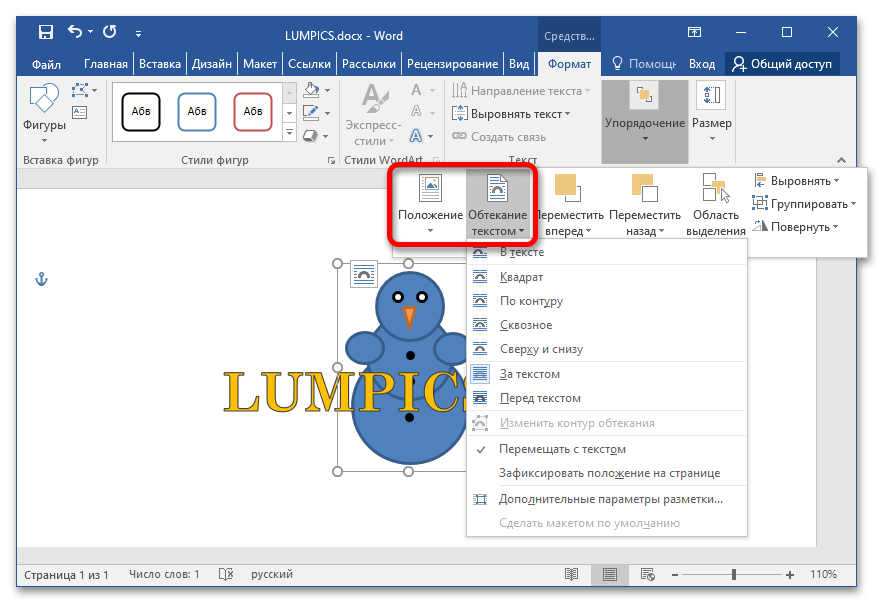
Выпадающие меню «Положение» и «Обтекание текстом» не содержат инструменты, играющие важную роль в создании рисунка. Они необходимы скорее на завершающей стадии проекта, когда требуется качественно интегрировать рисунок в текст: разместить его между строк по центру или вставить ближе к краю страницы; перекрыть им символы документа или поставить на фон.
Важную роль в рисовании играют инструменты «Переместить вперед» и «Переместить назад». Но они актуальны только при создании композиции из нескольких фигур. С их помощью можно размещать каждый слой поверх любого другого. Это отлично наблюдается в примере со снеговиком. Выделив среднюю часть туловища и нажав по кнопке «Переместить вперед», можно увидеть, что круг перекрыл собой все остальные части рисунка. Соответственно, в таких случаях следует воспользоваться опцией «Переместить назад», чтобы придать иллюстрации законченный вид.
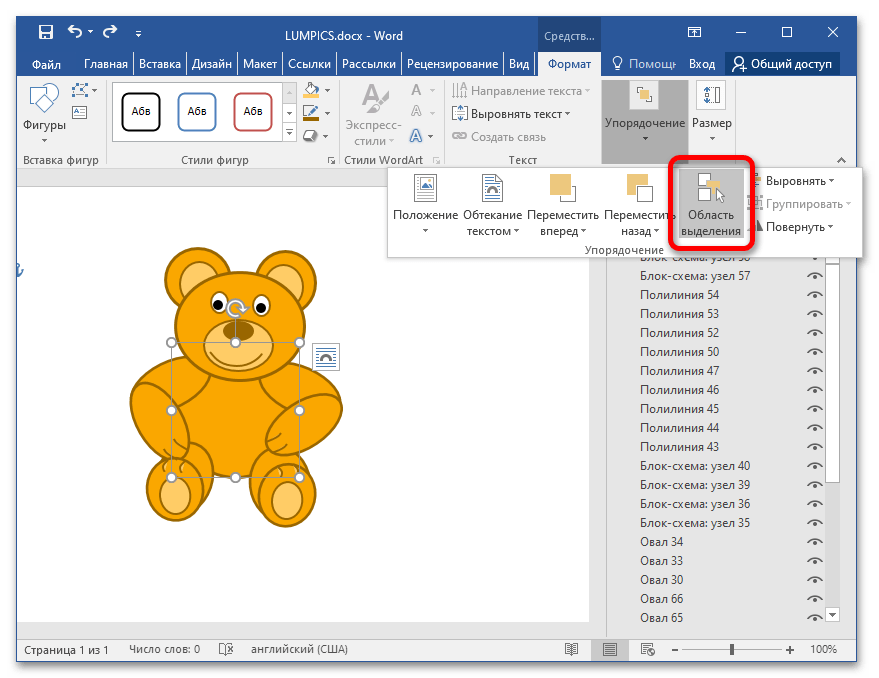
Полезным инструментом также является «Область выделения». Выбор этого пункта открывает панель справа, в которой перечисляются все объекты выделения, а нажатие по ним позволяет быстро выбрать для редактирования нужную фигуру. При создании рисунка из мелких элементов это очень удобно, так как вручную щелкать по еле заметному объекту довольно затруднительно.
Примечание! Инструмент «Область выделения» доступен только в Microsoft Word 2013–2021 годов, до этого возможности открыть дополнительную панель с перечислением всех выделенных объектов не было.

Далее идут три дополнительные функции, которые являются вспомогательными при рисовании:
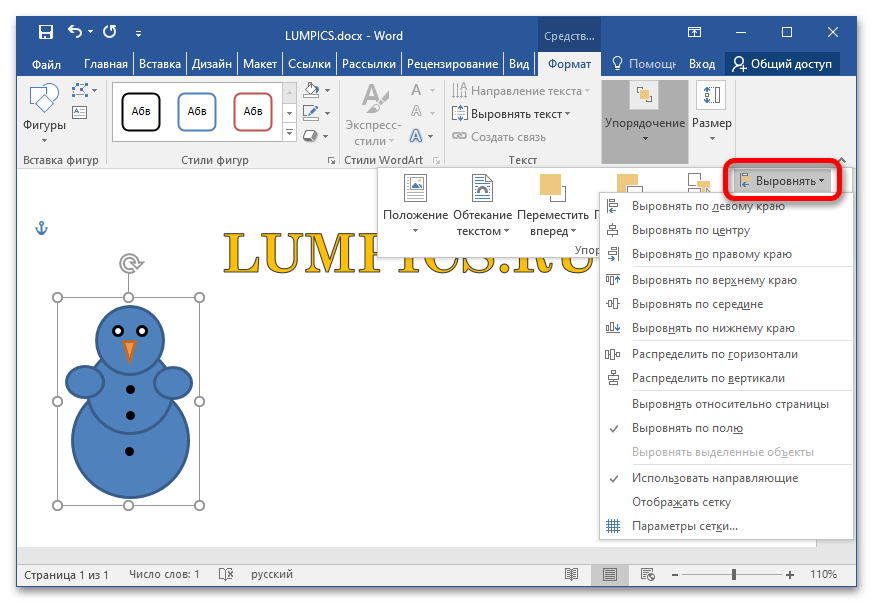
- «Выровнять». Позволяет определить месторасположение фигуры на странице. Все возможности представлены непосредственно в контекстном меню, которое можно наблюдать на изображении ниже.
-
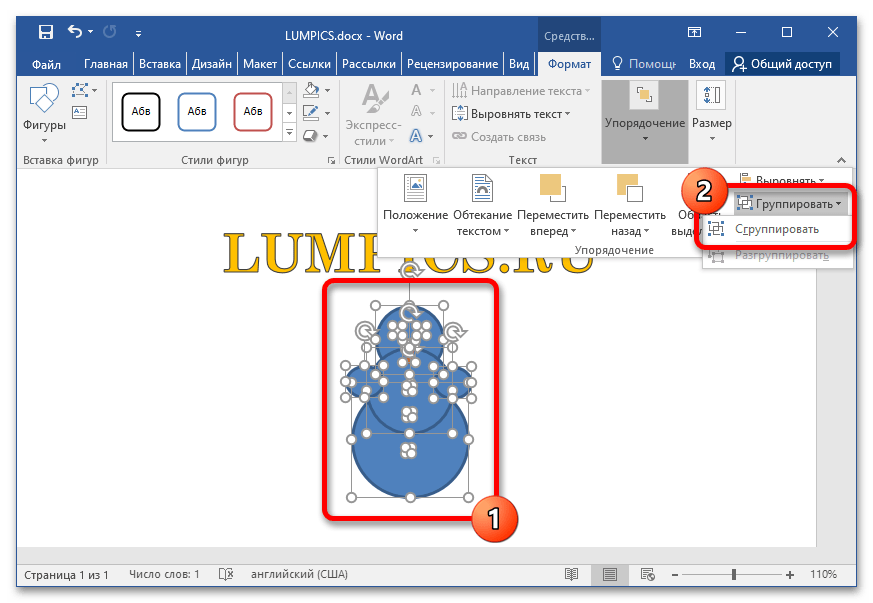
«Группировать». Важный инструмент для объединения нескольких объектов в группы. После этого между каждой фигурой устанавливается связь, а редактировать внешний вид можно комплексно. Сгруппированные объекты с соединительной линией при этом активируют функцию «Спрямить соединения», которая находится в блоке «Вставка фигур» и описывалась ранее в статье.
Подробнее: Как сгруппировать фигуры в Microsoft Word
- «Повернуть». Содержит функции для изменения угла наклона объекта. Позволяет воспользоваться уже заданным значением или ввести собственное, указав градус поворота.

Размер
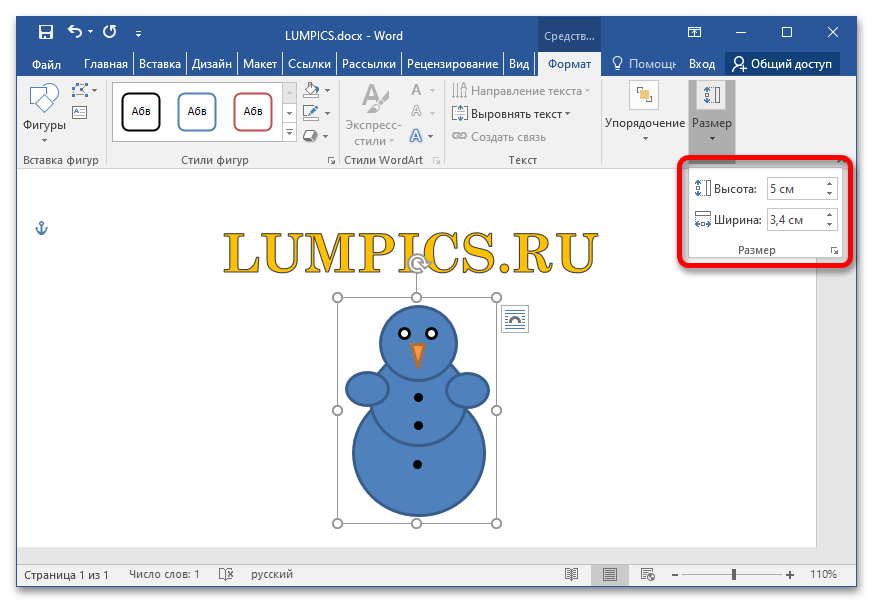
Блок «Размер» является самым маленьким, но играет важную роль при необходимости задать точные параметры в сантиметрах. В нем размещено всего два поля — «Высота» и «Ширина». Для изменения размера фигуры необходимо предварительно выделить ее и указать желаемые значения. Таким образом можно увеличить целую группу объектов, не нарушив общей композиции.
Вариант 2: Microsoft Word 2003
Текстовый редактор Word 2003 имеет намного меньше инструментов для работы с фигурами, но их все равно достаточно, чтобы создать качественный рисунок. Из-за существенных отличий в интерфейсе и внутренней логике работы программы каждое действие с объектами будет рассматриваться отдельно.
Примечание! Несмотря на различия между Microsoft Word 2003 и 2007–2021 годов, в этих версиях есть и схожие моменты. Они будут освещены вкратце, так как полный их разбор был представлен выше в статье.
Добавление фигуры
Создание рисунка в Microsoft Word 2003 начинается с добавления на страницу документа холста. Делается это посредством выпадающего меню «Вставка». В нем необходимо раскрыть список инструментов «Рисунок» и кликнуть по пункту «Создать рисунок».
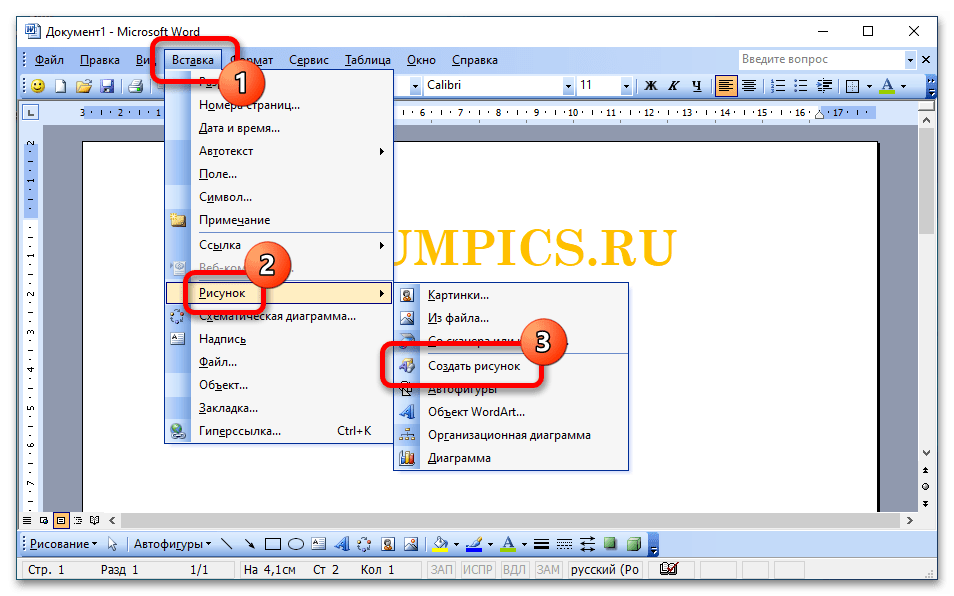
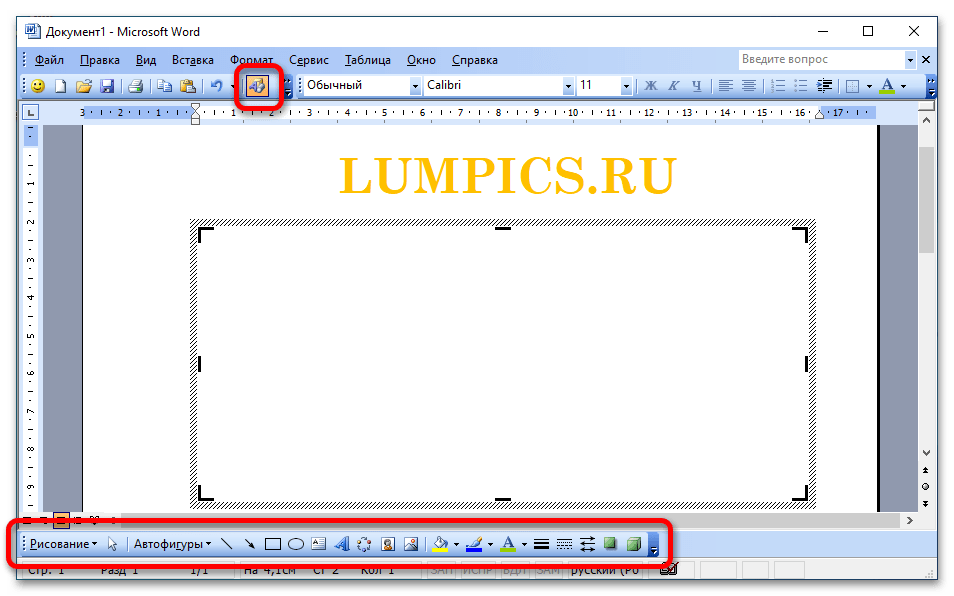
Появится прозрачное поле со штрихованными границами, в пределах которого можно будет размещать различные фигуры и настраивать их внешний вид. Делается это посредством панели инструментов «Рисование», по умолчанию расположенной в нижней части интерфейса окна.
Важно! Если панель «Рисование» не отобразилась в программе, необходимо ее активировать вручную. Делается это посредством нажатия кнопки «Панель рисования», местонахождение которой продемонстрировано на изображении ниже.
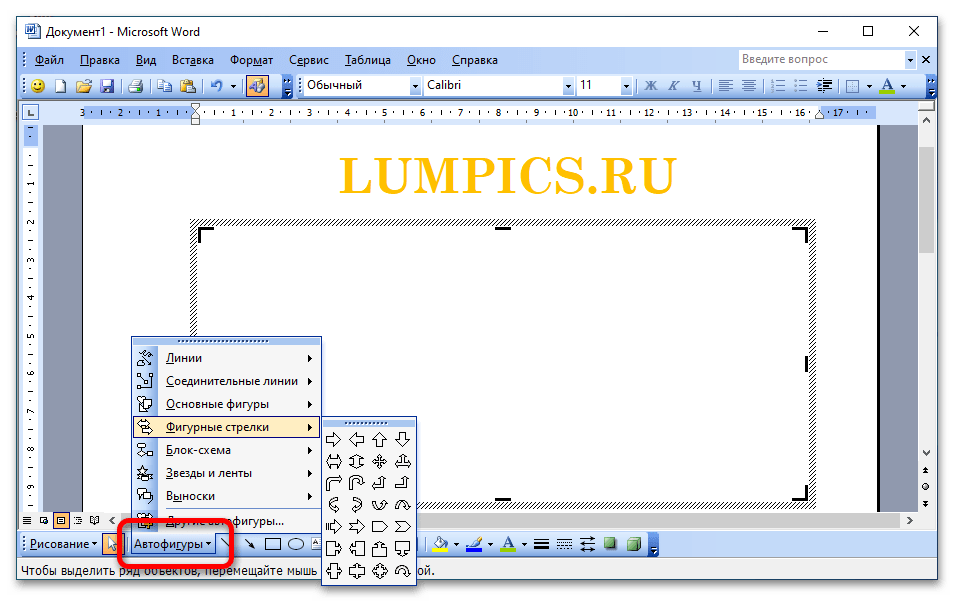
Чтобы на холсте разместить первый объект, следует выбрать подходящую фигуру. На основную панель вынесено всего четыре вида — это линия, стрелка, прямоугольник и овал, а полный список можно открыть, кликнув по пункту «Автофигуры». Появится перечень категорий, наведение курсора на которые откроет дополнительное меню непосредственно с фигурами.
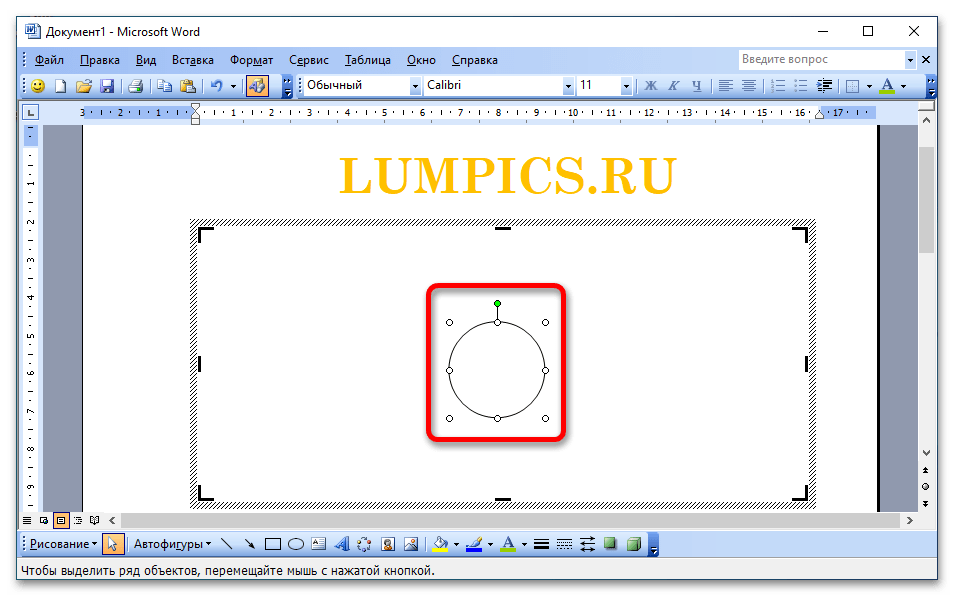
Выбрав нужный объект, наведите курсор на холст и, зажав левую кнопку мыши, определите форму и размер. Как и в случае с Microsoft Word 2007–2021, появятся маркеры по периметру, с помощью которых можно менять пропорции и угол наклона.
Работа с текстом
На холст рисунка можно также добавлять текстовую надпись, делается это посредством соответствующего пункта на панели инструментов. Способ ее размещения аналогичен любому другому объекту — необходимо с зажатой левой кнопкой мыши указать границы.
После этого появится поле для ввода текста. Добавив туда любую необходимую информацию, можно сразу же определить направление символов и организовать при необходимости связи с другими пустыми надписями. Делается это посредством всплывающей панели инструментов «Надпись».
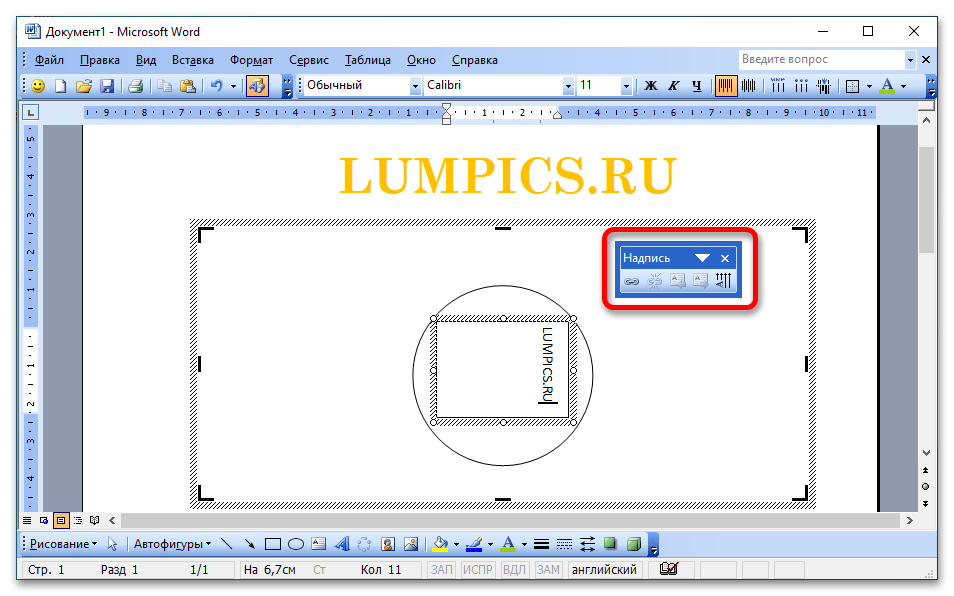
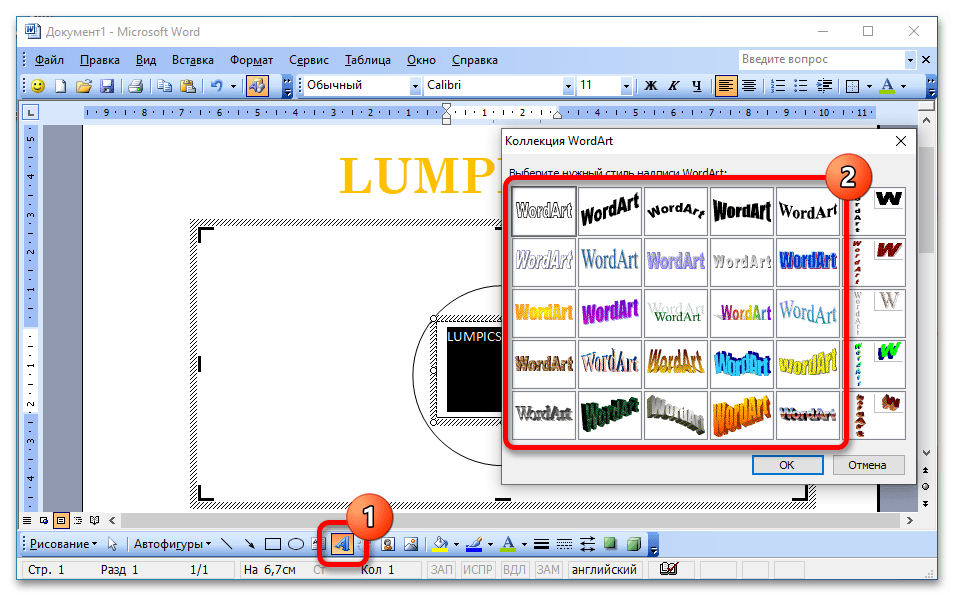
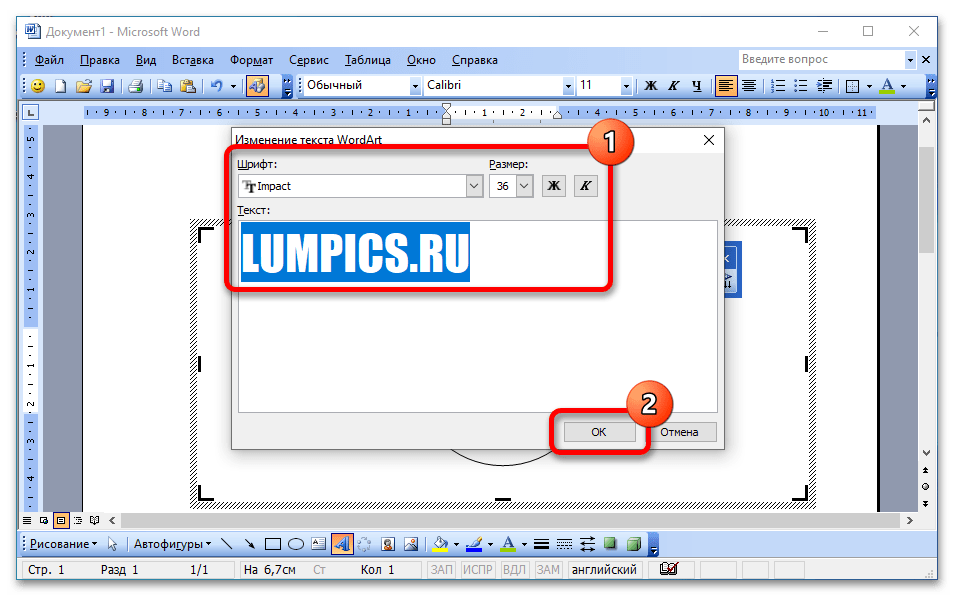
Для изменения внешнего вида букв можно применить стандартные функции на верхней панели — изменить размер, цвет, формат и так далее. Но чтобы создать более яркий дизайн, рекомендуется воспользоваться объектом WordArt. Для этого выделите свое слово и кликните по соответствующему пункту, показанному на изображении ниже. Откроется окно «Коррекция WordArt», в котором следует выбрать подходящий стиль и нажать по кнопке «ОК».
В новом меню останется выбрать шрифт, его размер и форматирование. При необходимости можно также внести изменения в сам текст. В завершении щелкните по кнопке «ОК», чтобы применить выбранный стиль.
Примечание! В дальнейшем объект WordArt можно будет редактировать отдельно. Для этих целей следует использовать одноименную всплывающую панель инструментов, с помощью которой можно изменить стиль, надпись, размещение на странице, цвет и многое другое.

Читайте также: Как добавить текст в фигуру в Microsoft Word
Работа с цветом
Для придания фигуре уникального визуального стиля на панели размещены инструменты «Цвет заливки» и «Цвет линий». С их помощью можно изменить цвет внутреннего пространства объекта или его контура. Для этого используется уже знакомая палитра. В Microsoft Word 2003 также есть возможность расширить цветовой спектр, для этого следует перейти в меню «Другие цвета заливки» или «Другие цвета линий».
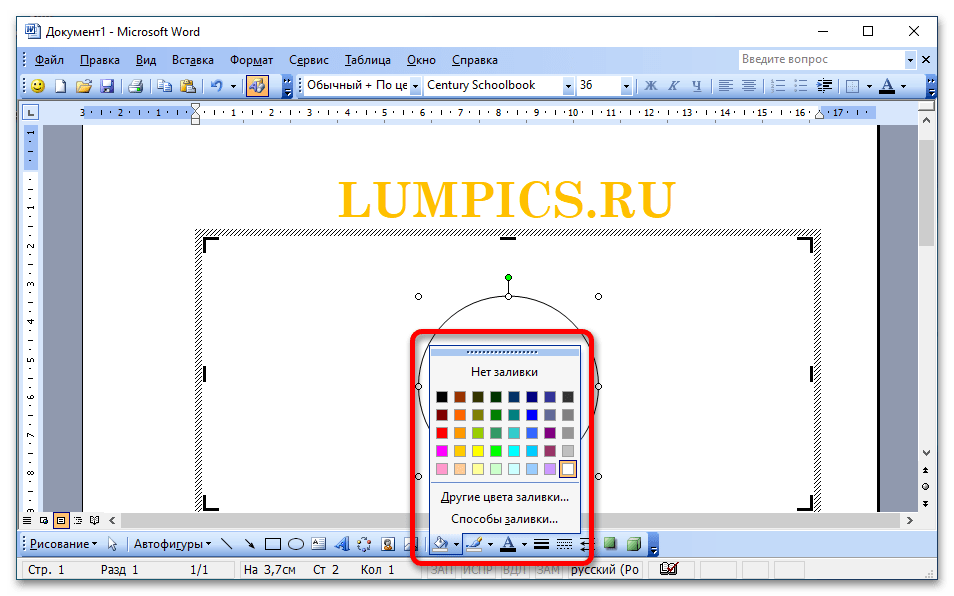
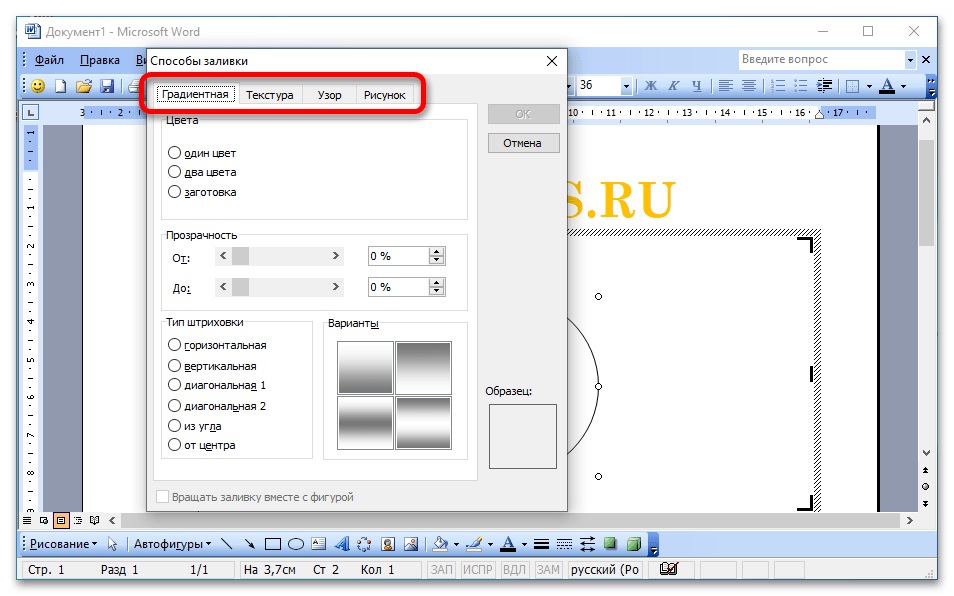
Вызов меню «Цвет заливки» и выбор пункта «Способы заливки» открывает дополнительное одноименное окно, в котором можно применить градиент, наложить текстуру или узор, а также вставить в качестве заполнителя любую картинку из внутренней памяти компьютера.
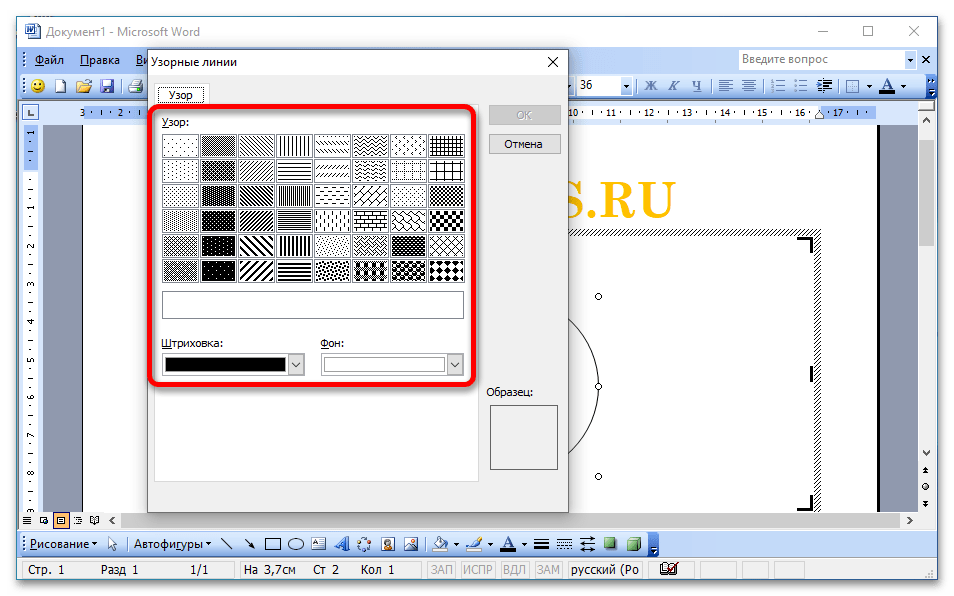
Подобные возможности предоставляет окно «Узорные линии», находящееся в меню «Цвет линии». С его помощью можно настроить отображение контура, применив любой узор из списка доступных
Работа с контуром
В Word 2003 также можно изменять визуальное отображение самого контура фигуры. Делается это посредством трех инструментов:
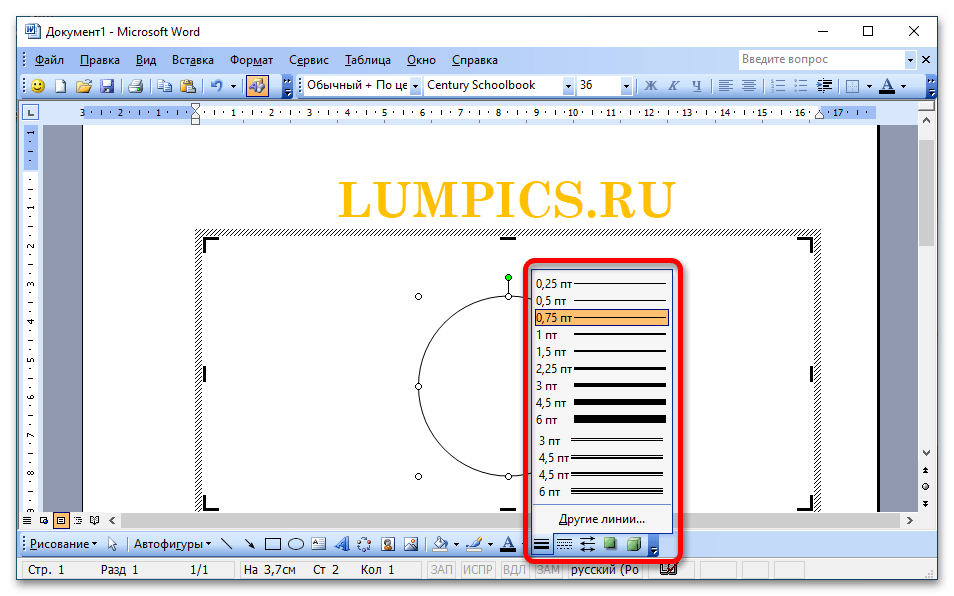
- «Тип линии». Содержит в своем списке линии различной толщины. При необходимости можно открыть окно «Другие линии», чтобы задать произвольное значение вручную.
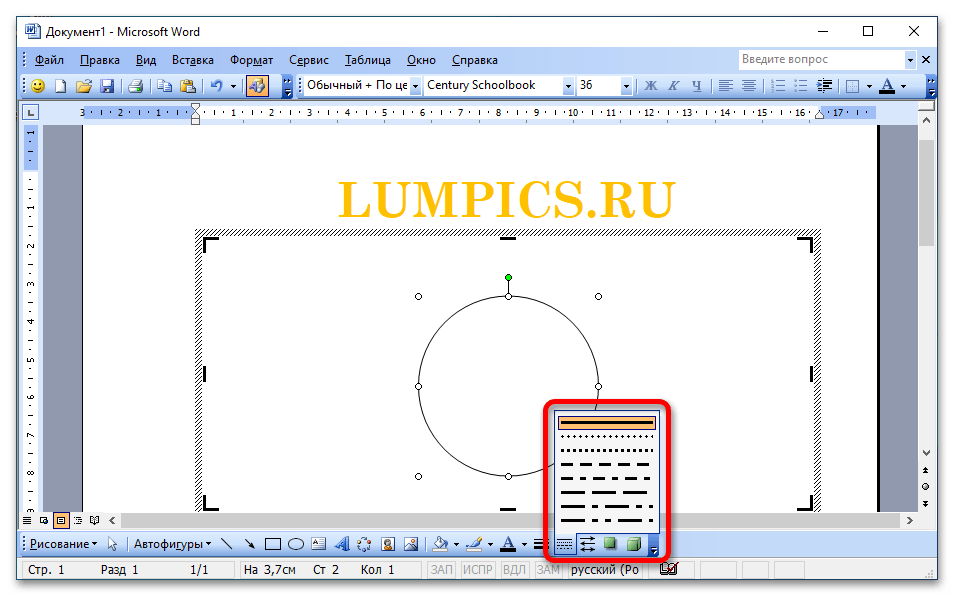
- «Штрих». Предоставляет возможность выбрать в качестве контура сплошную линию или штрихованную. Дополнительных меню не содержит.
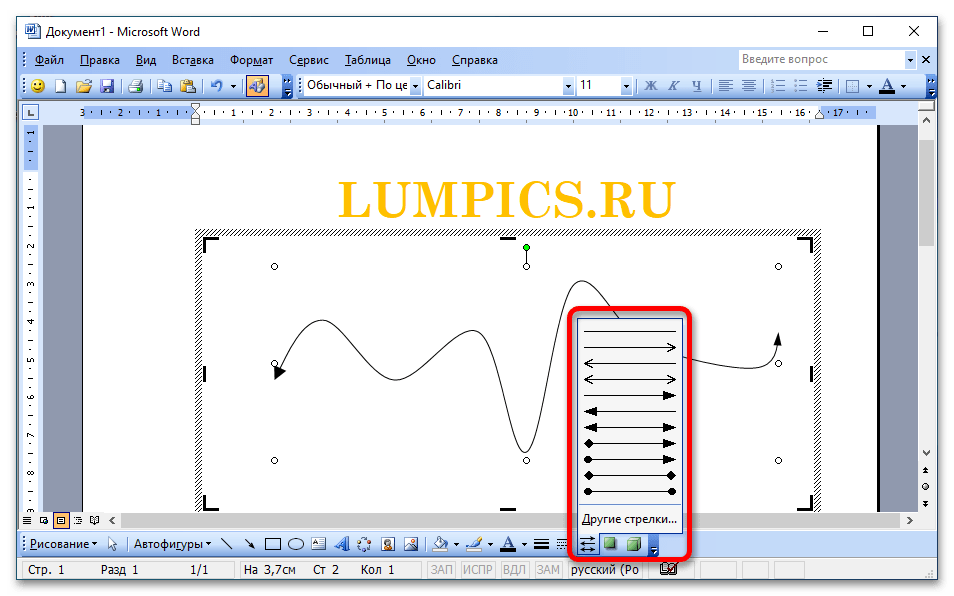
- «Стрелки». Отображает набор различных стрелок и маркеров, которые накладываются на объект. Может применяться только к незамкнутым фигурам, которые имеют начало и конец. В дополнительном меню «Другие стрелки» содержатся инструменты для более гибкой настройки этих параметров.
Читайте также: Как сделать фигуру полностью прозрачной в Microsoft Word
Работа с тенью и объемом
Крайние справа инструменты на панели «Рисование» необходимы для придания некой реалистичности добавленной на холст фигуре. В Microsoft Word 2003 можно настроить тень и задать объем:

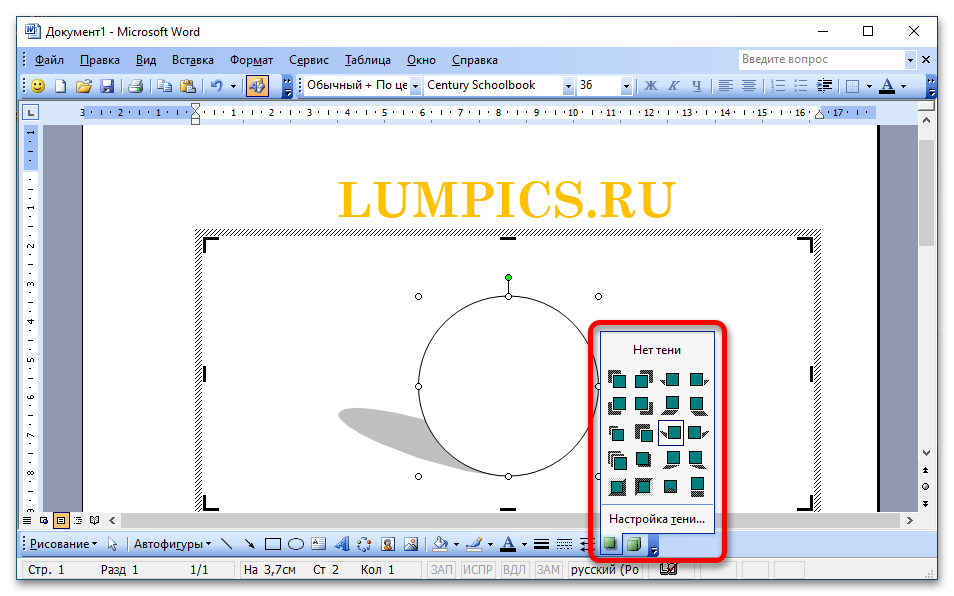
- «Тень». Содержит меню с различными типами теней. Если их будет недостаточно, можно открыть дополнительное окно параметров «Настройка тени», где находятся инструменты для изменения цвета элемента и его месторасположения.
- «Объем». Предоставляет уже настроенные шаблоны для преобразования двумерного изображения в трехмерный объект. Раскрыв дополнительную панель «Настройка объема», можно задать множество смежных параметров, начиная со степени наклона фигуры и заканчивая размещением источника света.
Инструменты «Рисование»
Оставшаяся группа инструментов имеет название «Рисование» и расположена в одноименном выпадающем списке в левой части панели. Там содержится одновременно много функций, предназначенных для создания конкретной экспозиции рисунка. Они позволяют сгруппировать отдельные объекты, переместить определенную фигуру на задний или передний план, выполнить сдвиг в одном из направлений, настроить обтекание текстом и многое другое. Большая часть этих опций рассматривалась ранее, в Microsoft Word 2007–2021 они находились в блоке «Упорядочение» и «Вставка фигуры». Если во время их использования будут возникать сложности, обратитесь к первой части этой статьи.

Читайте также: Как нарисовать стрелки в Microsoft Word
Практическое применение инструментов для рисования фигурами
Выше нами были детально рассмотрены все инструменты для рисования с помощью фигур. Зная их предназначение и принцип работы, можно попытаться самостоятельно создать рисунок на страницах документа Microsoft Word. Для начала рекомендуется сделать что-то простое, по типу изображенных ранее на скриншотах снеговика и гусеницу. Освоив большую часть функций текстового редактора, взяться потом за что-то сложное будет проще.
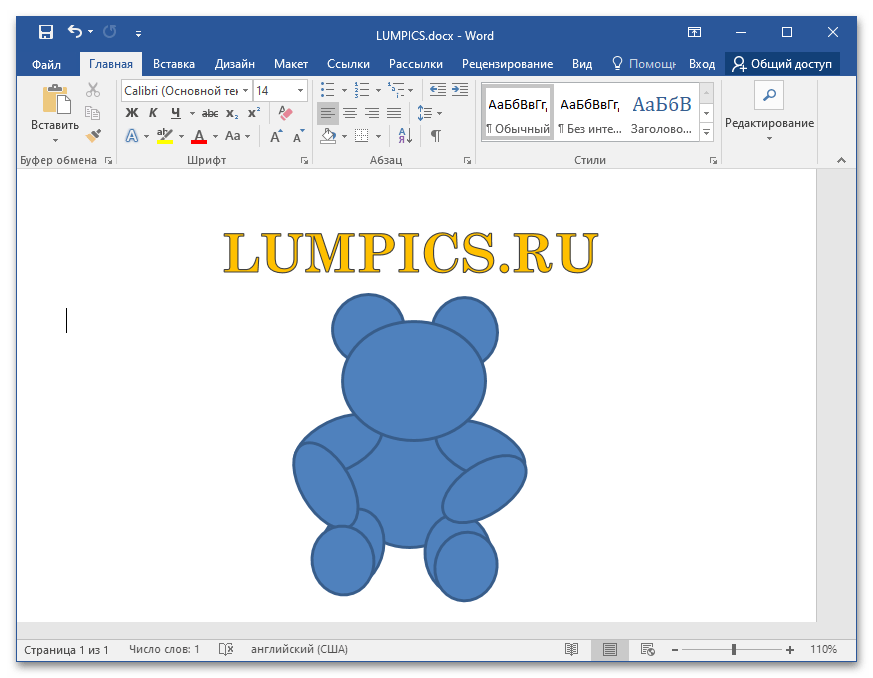
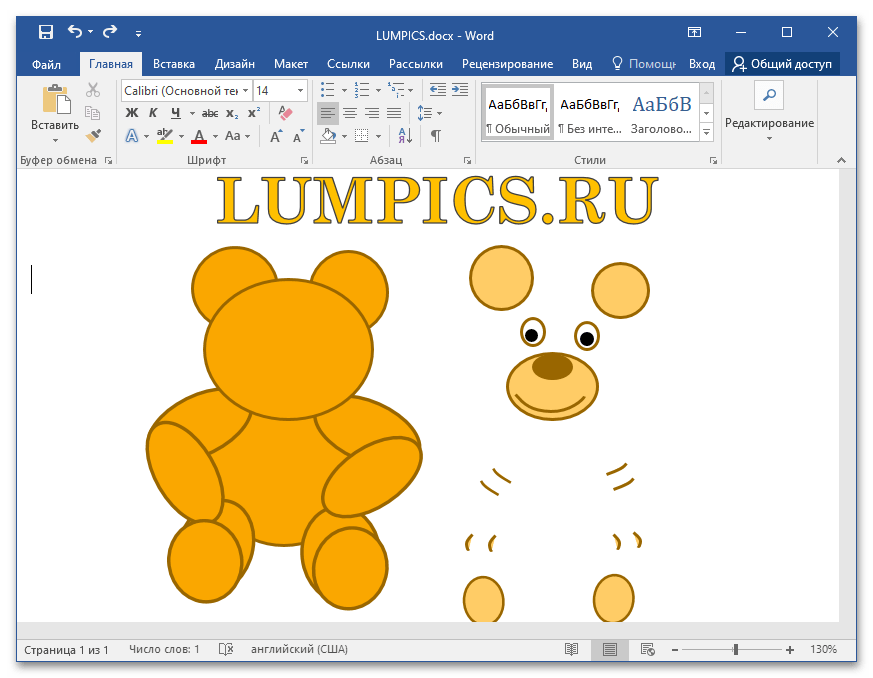
Сейчас же для наглядности будет поэтапно продемонстрировано создание рисунка с нуля с детальным объяснением всех процессов по ходу его создания. Идея заключается в изображении плюшевого медведя, который в лапах держит логотип нашего сайта.
-
Прежде всего необходимо спроектировать будущий рисунок, сделать это можно заранее, воспользовавшись карандашом и бумагой, или во время непосредственного применения инструментов Microsoft Word. В любом случае нужно определить, какие фигуры будут использоваться и сколько их понадобится в итоге. В представленном примере для того, чтобы нарисовать «скелет» медведя, потребовалось двенадцать объектов.

Обратите внимание! На начальных этапах рекомендуется пользоваться стандартными настройками каждой фигуры, не изменяя цвет и не накладывая никаких дополнительных эффектов.
- После того как эскиз будет готов, следует сгруппировать все части, чтобы в процессе редактирования дополнительных объектов не нарушить их целостности. Для этого сначала, зажав клавишу Ctrl, выделите все составные части, а затем перейдите во вкладку «Формат» и примените соответствующий инструмент в блоке «Упорядочение».
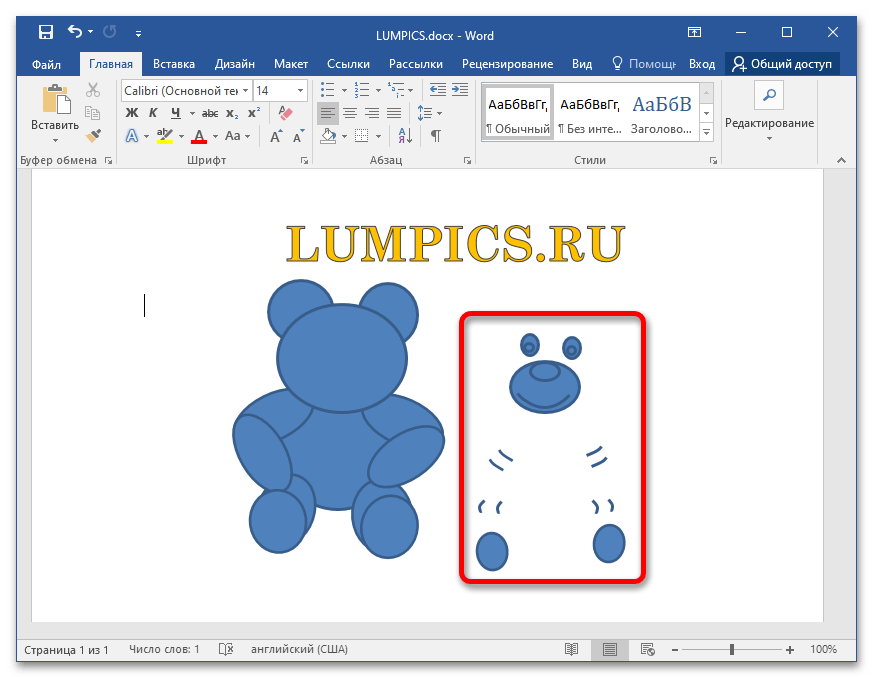
- Следом можно переходить непосредственно к рисованию более мелких элементов, и делать это рекомендуется не на основном холсте, а отдельно. На изображении ниже видно, что было подготовлена лицо медведя и контуры ушей. Отдельно находятся полоски из кривых линий для условного обозначения пальцев. При их создании периодически производилась сверка с эскизом, чтобы подобрать нужный масштаб и пропорции. В конечном итоге каждый отдельный элемент группировался.
-
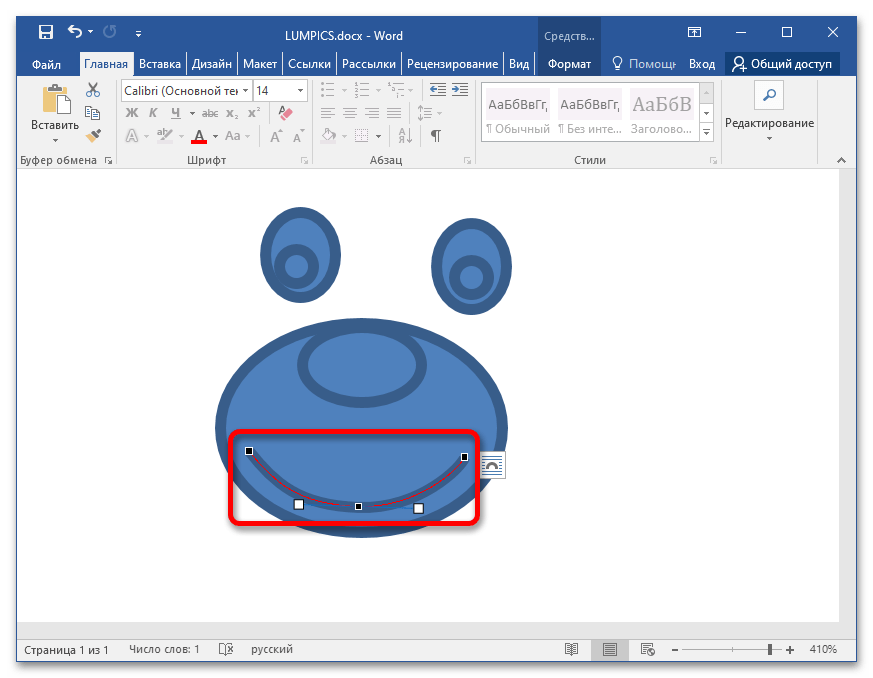
Отдельно стоит уделить внимание работе с кривыми линиями. Не следует сразу же стараться придавать им правильную форму, в большинстве случаев это попросту невозможно. Важно постараться задать исходное направление, а потом доработать посредством редактирования узлов. На изображении ниже видно, что для создания рта потребовалась одна линия с тремя основными маркерами. Придание правильной формы обеспечили белые маркеры угла сопряжения отдельных отрезков.
Читайте также: Как нарисовать кривую линию в Microsoft Word
-
После того как все составные части будут готовы, можно приступать к приданию им подобающего вида. Прежде всего следует раскрасить эскиз, для чего применяется заливка фигур и изменение цвета контуров. Результат виден на изображении.
Обратите внимание! Для элементов, которые будут размещены поверх эскиза, была изменена толщина контура. Пользуйтесь этой функцией при необходимости.
-
Следующий этап — «сборка» медведя. Следует переместить каждый объект на свое место, при этом корректно расположить относительно других фигур. Для этого воспользуйтесь инструментами в блоке «Упорядочение», а именно — «Переместить вперед» и «Переместить назад».
Примечание! Не забывайте также включать опцию «Область выделения», чтобы появилась боковая панель. Она поможет правильно распределить слои, чтобы они не перекрывали друг друга.
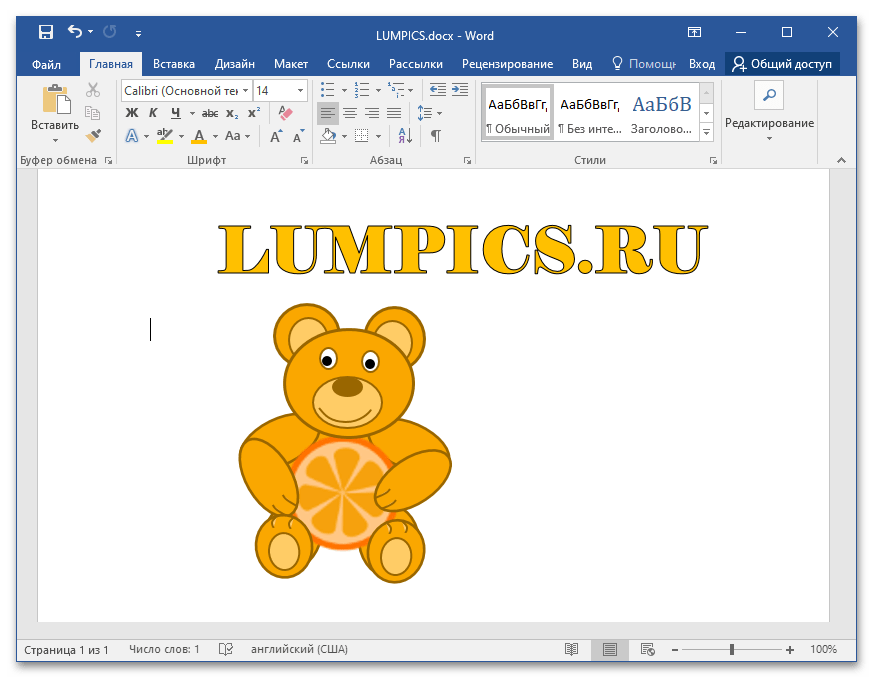
- В завершении был добавлен непосредственно сам логотип нашего сайта. Рисунок, созданный с помощью фигур можно считать законченным.

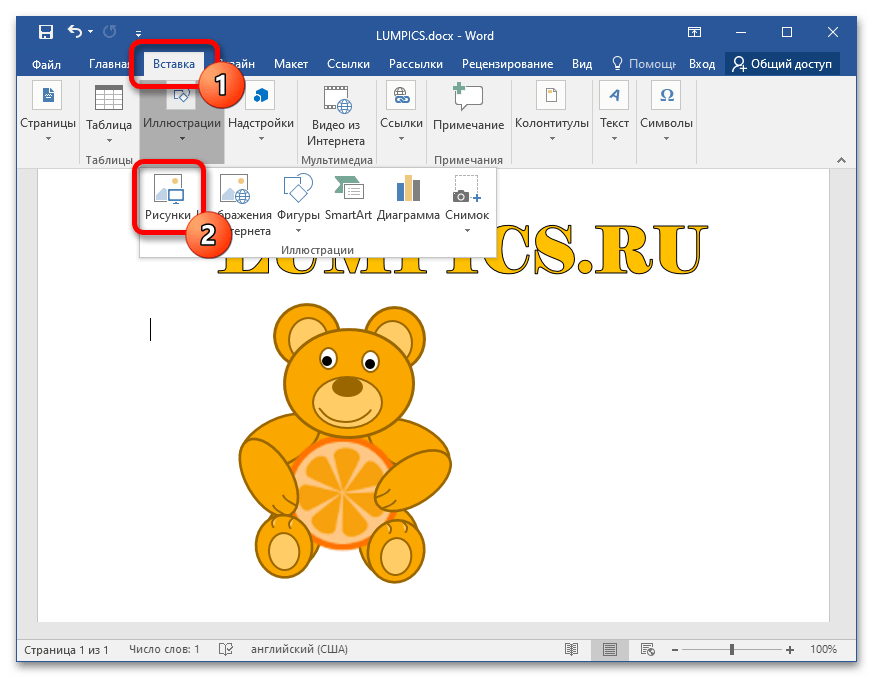
В этой статье не приводились примеры того, как можно импортировать на страницу документа картинки, но в другом материале на нашем сайте есть подробное руководство по выполнению этого действия.
Подробнее: Как добавить изображение на страницу документа Microsoft Word
Важно! Представленный выше способ создания рисунка из фигур в Microsoft Word не является эталонным, это лишь пример. Каждый способен выработать собственные решения тех или иных задач. Внимательно изучите работу каждого инструмента и совершенствуйте свое умение на практике.
Using the Drawing tools in Microsoft Office is easy. Making perfect
drawings is not. Is it making you crazy?
To use the Drawing tools, hit ViewToolbars and choose Drawing, or just hit
the icon on your Standard toolbar.
Sometimes, the only way to select a graphic is by using the
Selector Tool on the Drawing Toolbar.
Here’s the Drawing toolbar, in case you’re not familiar with
it. I’ve extended the Drawing menu so you can see the options available there,
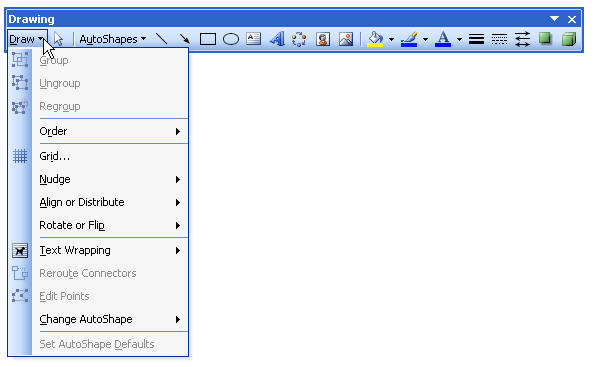
which are so important, and of which so many people are unaware.
Here’s some tips about using Drawing tools.
- You can set the default of the objects by creating an item the way you
like it and then right-click the object and choose Set AutoShape defaults. - Items move incrementally, by about one point (1/10th of an inch) whenever
you drag them around with your mouse. To place them perfectly with your mouse,
hold the Alt key while you drag. - Items move incrementally, by about one point (1/10th of an inch) whenever
you move them around using your arrow keys. To get a more defined placement,
hold your Ctrl key down while you use your arrow keys. - When you’re done creating a drawing that is comprised of more than a few
objects, such as a rectangle and a couple of arrows, select all the objects
and group them. This turns them into one object as far as Microsoft Office is
concerned, and keeps your documents from becoming corrupt-which
occurs much more with document that contain multiple-object drawings than any
other types of documents. - Can’t draw an arrow or add a textbox to an existing picture in your
document? Likely, it’s because that picture is formatted as In Line with Text.
First double-click the picture, go to the Layout tab and choose Float Over
Text, then try again. - For best results when creating multiple drawings for a large document or
report, create a PowerPoint presentation to hold your drawings. By doing this,
you can create your drawings, then copy and paste them into your Word document
as a picture (Edit Paste Special…). This helps
to minimize the size of your Word document, while retaining an editable form
of the graphic. Real graphic artists work from their original source file,
such as a CorelDraw file or a PhotoShop file, and they export to a graphic
format, which is much smaller in size because it doesn’t have to retain all
the settings that the application uses with it. - You can tell an individual drawing object to print or not print in Excel,
but in Word, you can only set them to all print, or set none to print. This
makes drawing objects very cool to use for navigation in Excel.
Call them “doodles,” “sketchnotes,” or “visual notetaking.” Whatever the name, simple hand drawings have become more popular than ever. They’re as welcome in the classroom as they are in the boardroom.


Why? Maybe it’s because they’re quick to create. You don’t have to be an artist to draw stick figures. Yet they communicate everything from how viruses replicate to how a manufacturing supply chain works. They’re a good and unique way to enhance your Word documents.
Hand drawings also allow you to express your personality and stand out from your competition. And because you’re creating your own drawings, you don’t have to worry about using copyrighted materials.


Freeform Word drawings also help you better understand and assimilate the concepts you’re trying to convey. That’s because you’re forced to simplify the concepts and come up with visual metaphors for them.
You may be wondering «How do I draw on Microsoft Word?» While Word might not be the first drawing tool that comes to mind, there are drawing tools in Word that you can learn to use.
This article shows you, step-by-step, how to draw in Word so that you, too, can harness the power of simplified drawings in your projects. As you’ll see, you don’t have to be a professional artist or to use expensive tools and software because you can draw right within Word.
Let’s get started!
(Note: In the examples below, I’m using Microsoft Word for Mac version 16. If you’re using a different version, then the interface may be different.)
How to Draw in Word: Freehand With the Shapes Freeform Tool
There are several ways for you to draw by hand on your Word document. These include the Freeform and Scribble tools in the Shape tab. Both these two tools are very similar because they let you draw in Word using your mouse or trackpad.
1. Use the Freeform or Scribble Tool
You can draw objects and handwritten lines with either one. One difference is that the Freeform tool lets you draw perfectly straight lines, while the Scribble tool draws exactly what you draw.
To draw with Freeform, click on the Insert tab.


Click Shapes > Freeform.


To draw, click, hold, and drag the cursor on the page. Word stops drawing when you either bring the cursor back to your point of origin or double-click on the page. In this example, I’ll draw a check mark.


To draw perfectly straight lines with the Freeform tool, click on your starting point. Then, release the mouse, move the cursor to the end of the line, click there, and repeat until you finish your drawing. Double-click at your end-point. Using this technique, my check mark looks like this:


Notice that the lines are perfectly straight, even though my hands were unsteady. That’s because the Freeform tool draws straight lines between two consecutive points where you click on your mouse.
Don’t worry that the text runs straight through the drawing. We can fix this with text wrap because Word treats the drawing as an image.
2. Format the Text Wrapping Around Your Drawing
Click on the Shape Format tab. Then click Arrange > Wrap Text. Select one of the text wrapping options. In this case, let’s select Square.


Now the text wraps around the drawing.


Microsoft Word also lets you wrap text around an irregularly shaped drawing. Go to Shape Format > Arrange > Wrap Text > Edit Wrap Boundary.


Click and drag the boundary points to change the boundary.


By doing this, you’ve got more granular control over how text wraps around your drawing.


3. Refine Your Drawing
Refine the drawing you’ve made. Click on your drawing to select it. Under the Shape Format tab, click Edit Shape > Edit Points.


Click and drag any of the points to change the drawing as you wish.
.jpeg)
.jpeg)
.jpeg)
You can also use the Shape Format tab to edit other aspects of your drawing. Change its color, weight, and in the case of closed shapes, add a filling color.
To change the look of your drawing, from the Shape Format tab, expand the Theme Styles and Presets selection. Choose one of the styles you want to use.


You’ll have more choices by going to Shape Outline. From there, select a color.
To change the weight or thickness of your drawing, go to Shape Format > Shape Outline > Weight.


You can also apply special effects to your drawing. On the Shape Format tab, go to Shape Effects, then choose the effect you want to apply.
-A.jpeg)
-A.jpeg)
-A.jpeg)
Here’s the check mark now, after I added a shadow.


How to Draw in Word: Using the Scribble Tool
The Scribble tool is like the Freeform tool. The only difference I’ve seen is that the Scribble tool doesn’t draw straight lines between clicks. To draw, you’ve got to click, hold, and drag the mouse. If you release the mouse button, Word will stop drawing.
To draw using the Scribble tool, click Insert > Shapes > Scribble.


Click, hold, and drag the mouse to draw the shape. If you bring the cursor back to your point of origin, Word closes and fills the shape. In this case, let’s draw a cloud.


Now the drawing can be edited by using the tools in the Shape Format ribbon.
1. Change the Fill Color of Your Drawing
For example, to change the fill color, click on the drawing then on the Shape Fill button. Choose the color you wish to use.


2. Change the Outline Color of Your Drawing in Word
To change the shape’s outline color, click on the drawing, click Shape Outline, then choose the outline color or style you desire.


For this example, I selected No Outline.


3. Fill Your Drawing with a Picture
You could even fill the drawing with an image. Go to Shape Fill > Picture.


Find the image in your computer. Select the image file, then click Insert.


The resulting shape is pretty neat!


Follow the steps described earlier to change the text wrapping around your drawing, as well as its other attributes.
How to Draw With Microsoft Word Pen Tools
Either Freeform or Scribble are adequate tools for creating simple Word drawings that have only a single element, such as a single line or shape.
But what if you want to draw something slightly more complicated, such as a stick figure? It’s made up of a circle for the head and several lines for the arms, body, and legs.
1. Draw With the Microsoft Word Pen
In this case, it would be better to use Word’s Draw tools. To access them, click on the Draw tab.


As you can see, the Draw tab gives you some ink types:
- Pen
- Pencil
- Highlighter
Each ink type gives your drawing a different look. To select an ink, click the Draw button on the ribbon, and select either a Pen, Pencil, or Highlighter.
Click, hold, and drag to draw with your mouse. Notice that even when you release the mouse, Word stays in drawing mode. This means you can keep adding elements to your drawing. When you’re done, click the Draw button again.


To change the color and thickness of any tool, click on the drop-down menu, and make your selections. A total of 16 standard colors are available, and you can access many more by clicking on More Colors….
.jpeg)
.jpeg)
.jpeg)
Plus, for the pen ink, there are eight special effects:
- Rainbow
- Galaxy
- Lava
- Ocean
- Rose Gold
- Gold
- Silver
- Bronze


If your drawing has several parts, you’ll have to group them so that Word will treat them as one object. Click, press, and hold the Shift key as you click all the elements of your drawing. When you’re done, click Shape Format > Arrange > Group > Group.


Now you can treat the drawing as a single object. (Note: Once drawing elements are grouped, they can’t be ungrouped anymore.)
Click on the drawing, Shape Format. Then use the tools in the Shape Format tab. (Note that not all the features on the Shape Format ribbon can be applied to your drawing.) From here, we’ll change the text wrap setting of the drawing.
Go to the Shape Format tab. Click Wrap Text. then select a wrap setting.


I chose the Top and Bottom text wrap.


2. Erase Your Drawing
The Draw tab provides an Eraser tool so you can erase mistakes. First, format the tool by clicking on the drop-down arrow. You’ve got three choices:
- Stroke Eraser. Erases an entire stroke when you click on it.
- Small Eraser. Erases a small area when you click, hold, and drag your mouse.
- Medium Eraser. Erases a larger area when you click, hold, and drag your mouse.


If you selected the Stroke Eraser, click on any line to delete it. If you selected either the Small or Medium Eraser, click, hold, and drag your mouse over any areas you want to delete.
3. Draw With the Trackpad
Draw in Microsoft Word without a mouse by using the Draw with Trackpad tool.
First, choose the ink type you want to use. Then click the toggle to switch on Draw with Trackpad.


A window appears on top of your document. Use two fingers on your trackpad to move it anywhere on your document.
Pressing the Command key, move one finger on your trackpad to where you wish to draw. Pause, then draw with your finger. You don’t have to press down on the trackpad to draw.


How to Draw … Without Drawing!
So far, you’ve learned how to create your own images in Word by hand-drawing with either the mouse or the trackpad.
But what if you really can’t draw? Not even stick figures?
You can still “draw” by using the pre-made lines and shapes in Word. If you think about it, most objects can be broken down into shapes and lines. By putting these together, you can create your very own sketches — without drawing by hand.
Read on to see what I mean.
1. Draw With Lines in Microsoft Word
The simplest images are made up of lines. In this example, we’ll make a trellis, which is a grid like what you’d use to play Tic-Tac-Toe.
Go to Insert > Shapes > Line. This tool makes a simple straight line with a starting point and an endpoint.


Click on the page. That’s the starting point of your line. Drag your mouse to where you want the line to end, then click again.
Go to the Shape Format tab and use the buttons to edit the line. For this example, I changed the color and the weight of the line. I also added a shadow.


When you’re happy with how the line looks, copy and paste it as many times as needed to create your image. Click on the line, then go to Edit > Copy, then Edit > Paste. Or, use the shortcuts Command + C to copy and Command + V to paste.


Click, hold, and drag the lines into place. It may be helpful to display gridlines. To do so, click on the View tab, then check the box for Gridlines. This will help you to properly align the different elements of your drawing.


To change the angle of a line, click on the line, then go to Shape Format > Arrange > Rotate. Choose from one of the available rotation options or set your own. You can also click on one end of the line, hold, and drag it in place.


If you want the elements to line up precisely, select the lines, then go to Shape Format > Arrange > Align. Select an alignment option.


In this example, I’ll use Distribute Horizontally for the vertical lines, and Distribute Vertically for the horizontal lines.


These same steps apply to block arrows and other shapes, too.
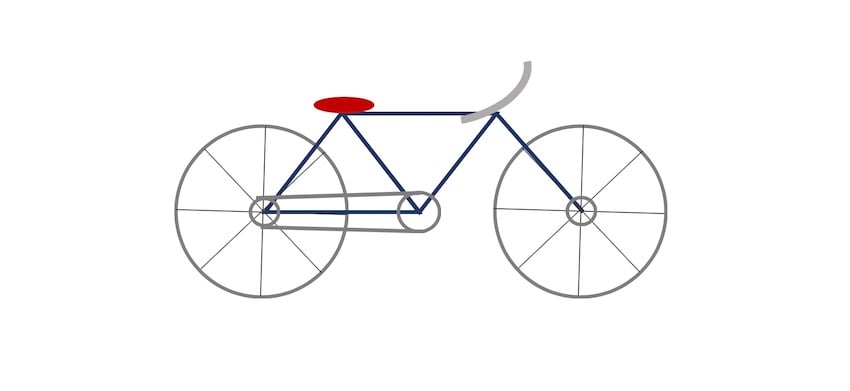
2. Draw on Microsoft Word Using Shapes and Block Arrows
Now we’re ready to make more complicated pictures!
Let’s draw a bicycle by combining circles and triangles. Go to Insert > Shapes > Oval. Hold the Shift key as you click, hold, and drag your mouse to make a perfect circle. (But, if you want to draw an oval, then don’t use the Shift key.)


With the shape selected, go to Shape Format, and use the buttons on that tab to edit the shape you made.


To make the bicycle wheels, I’ll remove the Shape Fill and change the outline of the circle.


Next, copy and paste the circle. And then follow the same steps to add the triangles.
Use the triangle’s turning handle to change its orientation. Click on the turning handle, hold, and drag the mouse to the desired angle.


Add and edit more lines and shapes to make the image look just like a bicycle. The bike below is made up of circles, triangles, lines, an oval, and a half-circle (for the handlebar).
Remember, you can make your drawing as simple or as detailed as you like. It’s all up to you!
Find Professional Graphics for Your Microsoft Word Project
Now you know how to draw on a picture in Word. But perhaps you don’t have time to create your own Word drawings from scratch. And you still would rather not use stock photos.
What to do?
You can use premium graphic images from Envato Elements.


An Elements subscription brings thousands of creative tools at your fingertips. This includes print templates for Word, graphics, fonts, photos, and a lot more. And you get unlimited downloads for one flat monthly subscription.
Another great source of premium graphics is GraphicRiver. As with Elements, this marketplace gives you access to thousands of Word templates and other creative tools. These are also professionally designed for maximum impact. The difference is, at GraphicRiver, you pay for each use of every item.
Use each premium graphic on its own in your Word document. Or better yet, incorporate them with your own or other graphics to create something original.
Learn More About Working In Word
As you can see, Microsoft Word has many robust features. Some of them are little-known functionalities such as the various drawing tools in Word that I showed you in this article. It pays to learn how to use Microsoft Word so you can maximize its potential. Not only will you be able to realize the vision you’ve got for your Word documents, but you’ll also optimize your workflow.
If you aim to produce the most visually compelling materials using Word, then you may find these articles helpful:
You Can Draw in Microsoft Word
Even though Microsoft Word wasn’t built for graphic design, it’s got some tools to help you draw right inside your Word document.
You can make anything from simple line and stick drawings, to more detailed freehand drawings and line illustrations. Use the Freeform, Scribble, or Draw tools to draw by hand. Or combine lines and shapes to create original Word drawings without drawing from scratch.
You can also find hand-drawn graphics and Word templates in Envato Elements and GraphicRiver. If you want unlimited downloads of premium graphics and other design components, then Elements is the place for you. For one-off projects, GraphicRiver is the place to go to access top-quality templates for Microsoft Word and graphics on a pay-per-use basis.
You’ve just learned how to draw on Microsoft Word. Now, it you’re turn to create your best Word drawings.
Do you need to add something to your Word 2013 document, but the only way that you can accurately express the information is through a drawing? Fortunately you can draw in Microsoft Word 2013 with the Scribble shape.
The scribble shape allows you to make a freehand drawing directly in your document. Word will then convert the drawing to a shape object, where you can adjust the appearance of the shape that you just drew.
Note that Word will create a new shape every time that you let go of your mouse with the scribble shape, so you will need to re-select it after letting go. You can also select one of the other shapes on the menu in our guide below, if your needs require a specific shape or straight lines.
This article will show you how to draw in Word and provide you with a new way to express your ideas and information that might have otherwise required you to use a different program.
How to Make Drawings in Word
- Click Insert.
- Click the Shapes button, then click the Scribble icon in the Lines section.
- Click and hold down the mouse button, then move the mouse cursor to draw.
- Click the Format tab under Drawing Tools to make any changes to your drawing.
Our article continues below with additional information on how to draw on Word, including pictures of these steps.
How to Make a Freehand Drawing in Microsoft Word 2013 (Guide with Pictures)
The steps in this article will show you how to do freehand drawing in a Microsoft Word document. You will be selecting the “Scribble” shape, which gives you complete control over what is output on your screen. You can also draw freely anywhere in the document, even on top of text that has already been entered.
Please note that drawing in Microsoft Word can be very difficult. If you find that you are having trouble achieving your desired result, then you may have more luck with Microsoft Paint, or with a more advanced tool like Adobe Photoshop.
Step 1: Open a document in Microsoft Word 2013.
Step 2: Click the Insert tab at the top of the window.

Step 3: Click the Shapes button in the Illustrations section of the navigational ribbon, then click the Scribble button in the Lines section.

Step 4: Use your mouse to draw on the canvas.
The drawing shape will be completed once you let go of the mouse, which will bring up a new Drawing Tools option. This menu will have options for ways to change the color of the drawing, or to change the fill color.
If you need to draw more, then you can re-click the Scribble shape at the left side of the navigational ribbon, as in the image below.
How to Edit the Shape of an Existing Drawing in Word
This section will show you a way to change the shape of your drawing. This method is a little cumbersome, but can be effective if you only need to make minor adjustments to your drawing.
Step 1: Select your drawing, then click the Format tab under Drawing Tools.
Step 2: Click the Edit Shape button in the Insert Shapes section of the ribbon, then click the Edit Points option.
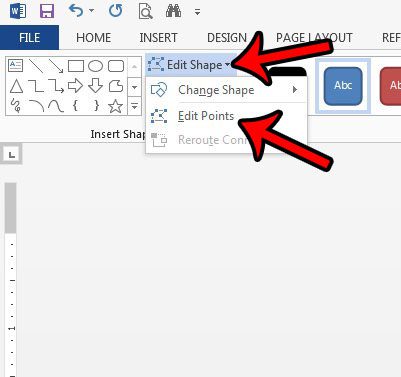
Step 3: Click on one of the points on your drawing, then drag the point to adjust the shape.
Making drawings in Word is a helpful option in the application when you need to include a simple drawing in your document and either don’t want to use a dedicated image-editing application or don’t have one at your disposal.
I use the Word drawing tool mainly when I need to make something basic, or when the quality of the drawing isn’t terribly important for the document. I’m also a terrible artist (as indicated by my drawings in the guide above) so I haven’t spent a lot of time getting good with Word’s drawing tools.
Note that drawing in Microsoft Word can be somewhat difficult, even frustrating at times. If you find that the drawing capabilities of Word are limited, then you might have better luck drawing in Microsoft Paint and inserting the saved Paint drawing into your document. This article will show you how to insert a picture in Word 2013.
More Information on How to Draw in Word
While our article above focuses specifically on how to draw on Word using the “scribble” tool, there are other ways that you can draw in your document as well.
When you go to the “Shapes” tool from the Insert tab there are a lot of different shapes that you can use. For example, if you wanted to draw a line, a square, or a circle, you could select that shape instead. This can be a preferable option if you are struggling to draw a freehand shape, as it can be very difficult to do with a mouse.
You may want to consider getting a USB drawing tablet if you are going to be doing a lot of drawings in Microsoft Word. It can be much easier to use that type of tool, as it allows you to draw in the same manner that you would when drawing on paper.
Where is the Draw Tool in Word?
Finding the Draw tool can be a little tricky, simply because there isn’t a tool that is directly called “Draw” by default. You need to use one of the shape tools, specifically the “scribble” tool that is found on the Shapes menu.
Alternatively, however, you could go to File > Options > Customize Ribbon, then check the box to the left of Draw. This is going to add a new tab to the ribbon where you can find some drawing tools and options.
How Do I Use the Pen Tool in Word?
As we mentioned in the section above, you will need to enable the Drawing tab in the ribbon by opening the Word Optiones menu, then checking the box to the left of Draw.
Once you have the Draw tab in your ribbon you will find an assortment of different drawing tools, including some pen options. While you can use these with a mouse, many people find them easier to use with a touchscreen tablet or laptop, or a drawing tablet accessory.
How Do I Use Handwriting in Word?
You can use handwriting in Microsoft Word with either the scribble tool, then Pen tool on the Draw tab, or with a connected tablet.
Alternatively you could use on of the script fonts found in Word by default, or by downloading a script font from a resource like Google Fonts.
How Do You Get Word Art on Microsoft Word?
The Word Art option is located on the Insert tab, at the right side, in the Text section of the ribbon.
This is going to add a text box with the WordArt style that you selected. You can then customize the appearance of the Word Art by selecting the text in the text box, then choosing a formatting option from the Format Shape tab in the ribbon.
See also
- How to insert a check mark in Microsoft Word
- How to do small caps in Microsoft Word
- How to center text in Microsoft Word
- How to merge cells in Microsoft Word tables
- How to insert a square root symbol in Microsoft Word

Matthew Burleigh has been writing tech tutorials since 2008. His writing has appeared on dozens of different websites and been read over 50 million times.
After receiving his Bachelor’s and Master’s degrees in Computer Science he spent several years working in IT management for small businesses. However, he now works full time writing content online and creating websites.
His main writing topics include iPhones, Microsoft Office, Google Apps, Android, and Photoshop, but he has also written about many other tech topics as well.
Read his full bio here.

While Microsoft Word isn’t the best drawing tool, you can create basic drawings or scribbles in Word directly. Here’s how.
Microsoft Word isn’t essential software for graphics designers, and for a good reason. It’s true—Microsoft Word isn’t best suited for drawing, but it does have some built-in drawing tools you can use, should you need to.
For simple drawings, you can draw in Word directly using shapes, lines, or pen tools. If you want to draw in Microsoft Word, here’s what you’ll need to do.
These instructions have been designed with Microsoft Office 2019 in mind. Note that Microsoft 365 (formerly O365) is the Office suite with 1 TB of OneDrive per user. While the steps may work for older versions of Word, there may be some variations or missing features.
Using Microsoft Word Drawing Tools
There are two sets of drawing tools available to Microsoft Word users. If you want to draw basic, block-like images, you can insert shapes or lines into your Word document and group them together. You might want to do this if you’re creating a diagram or flow chart, for instance.
Alternatively, you can turn Word into your own personal canvas using pen drawing tools. If you have a touchscreen device or a graphics tablet, you can create freehand drawings.
To insert shapes, you’ll need to press the Insert tab on the ribbon bar. For freehand drawings, press the Draw tab instead.

Inserting Shapes into Microsoft Word
If you’re not confident of your freehand drawing ability, or you want to create diagrams in Word, you can insert shapes.
There are hundreds of pre-set shapes available. You can draw typical shapes like squares or circles or insert arrows, stars, speech bubbles, and more. To insert a shape, press the Insert tab on the ribbon bar, then press the Shapes button.
This will list the various shape options in a drop-down menu for you to choose from.

Press on one of the pre-set shapes or line options to select it—your cursor will change at this point.
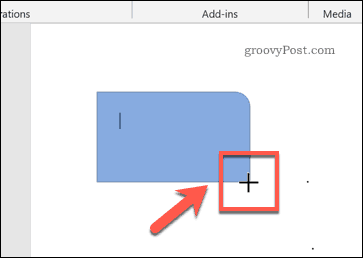
Once this happens, draw onto your Word document directly to insert the shape or line you selected. This allows you to select the appropriate size for your shape.
With the shape inserted and selected, Word will switch to the Format tab on the ribbon bar. From here, you can format your shape.

For instance, add text to your shape and begin typing with the shape selected–the text will be inserted inside the shape.

You can also change the color and style of your shape, as well as the position and alignment of any inserted text, using the options listed in the Format tab.

Creating Freehand Drawings in Word
If you want to create more original Word drawings, you can use various pen drawing tools to draw onto a Word document. You can do this using a mouse or trackpad, or more precisely, using a touchscreen device or graphics tablet.
To start, press the Draw tab on the ribbon bar. This will display the pen drawing tool options for you to use.

Three drawing options are available under the Tools section. Press Draw with Touch to begin drawing with one of the pen tools, Eraser to switch to the eraser tool, or Select to select your drawings as objects to move, copy, or delete them.
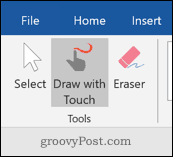
A list of available pens to draw with is shown under the Pens category. There are three drawing pens available—Pencil, Pen, and Highlighter.
As you’d expect, using the Pencil tool inserts a finer, less precise drawing line to your document. The Pen tool is the opposite—lines are clearer, thicker, and more defined. The Highlighter tool can be used for emphasis, adding color to your drawings.
Several pre-set colors and designs are available already in the Pens category—select one of these to begin drawing. Alternatively, you can create your own by pressing the Add Pen button and selecting one of the tools listed in the drop-down menu.

This will add a new pen design to the Pens category, with a settings drop-down menu. From here, you can set the thickness and color of the pen tool, with a preview of the pen design at the top.
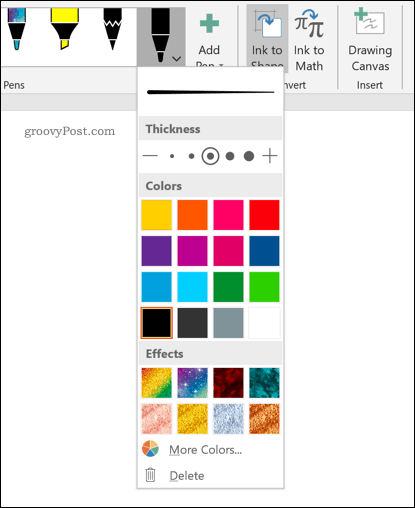
You can edit these in the future by hovering over a pen design and press the arrow icon in the bottom-left corner.
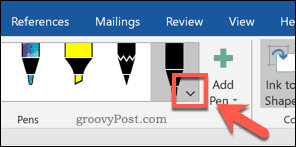
With your drawing pen tool selected and configured, you can begin drawing onto your Word document directly.
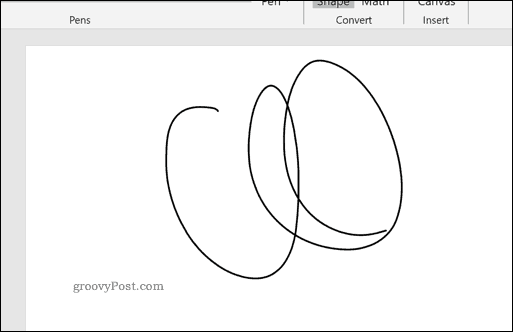
Creating a Drawing Canvas in Word
Word allows you to draw onto a Word document without constraints. If you’d prefer to draw onto a much smaller area of your Word document, however, you can insert a drawing canvas.
A drawing canvas groups your drawing into a single object which can then be moved, resized, or copied elsewhere. To do this, press the Drawing Canvas button in the Insert section of the Draw tab.

This will insert the canvas into your Word document. You will only be able to draw inside the canvas object’s borders– anything drawn outside of this will be ignored.

Designing Microsoft Word Documents
While it hasn’t been designed with drawing in mind, you can still use shapes, lines, and freehand pen drawings to create simplistic images in Microsoft Word. You can use shapes to create a flow chart or diagram or use free-hand drawings to show your artistic drawing skills.
You can insert and edit images in Microsoft Word too, but don’t forget Word’s main purpose. If you’re designing new documents, you may prefer to use building blocks to help you create them more quickly.
![]()