
You can add lines to connect shapes or use lines to point to pieces of information, and you can delete lines.
Notes:
-
For information about drawing shapes, see Draw or edit a freeform shape.
-
If you’re having trouble deleting a horizontal line, see Delete lines or connectors below.
Draw a line with connection points
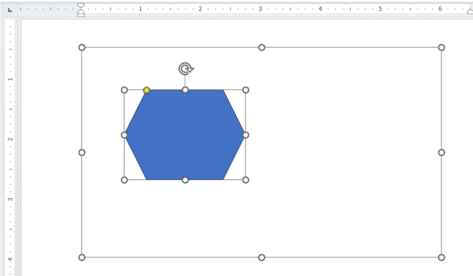
A connector is a line with connection points at each end that stays connected to the shapes you attach it to. Connectors can be straight  , elbow (angled)
  , or curved
  . When you choose a connector, dots appear on the shape outline. These dots indicate where you can attach a connector.
Important: In Word and Outlook, connection points work only when the lines and the objects they are connecting are placed on a drawing canvas. To insert a drawing canvas, click the Insert tab, click Shapes, and then click New Drawing Canvas at the bottom of the menu.
To add a line that connects to other objects, follow these steps.
-
On the Insert tab, in the Illustrations group, click Shapes.

-
Under Lines, click the connector that you want to add.
Note: The last three styles listed under Lines (Curve, Freeform Shape, and Scribble) are not connectors. Rest your pointer over each style to see its name before clicking it.
-
To draw a line connecting shapes, on the first shape, rest your mouse pointer over the shape or object to which you want to attach the connector.
Connection dots will appear, indicating that your line can be connected to the shape. (The color and style of these dots vary among different versions of Office.)
Note: If no connection points appear, you’ve either chosen a line style that is not a connector, or you are not working on a drawing canvas (in Word or Outlook).
Click anywhere on the first shape, and then drag the cursor to a connection dot on the second connection object.
Note: When you rearrange shapes that are joined with connectors, the connectors remain attached to and move with the shapes. If you move either end of a connector, that end detaches from the shape, and you can then attach it to another connection site on the same shape or attach it to another shape. After the connector attaches to a connection site, the connector stays connected to the shapes no matter how you move each shape.


Draw a line without connection points
To add a line that is not connected to other objects, follow these steps.
-
On the Insert tab, in the Illustrations group, click Shapes.
-
Under Lines, click any line style you like.
-
Click one location in the document, hold and drag your pointer to a different location, and then release the mouse button.
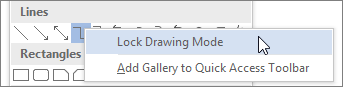
Draw the same line or connector multiple times
If you need to add the same line repeatedly, you can do so quickly by using Lock Drawing Mode.
-
On the Insert tab, in the Illustrations group, click Shapes.
-
Under Lines, right-click the line or connector that you want to add, and then click Lock Drawing Mode.
-
Click where you want to start the line or connector, and then drag the cursor to where you want the line or connector to end.
-
Repeat step 3 for each line or connector you want to add.
-
When you finish adding all of the lines or connectors, press ESC.
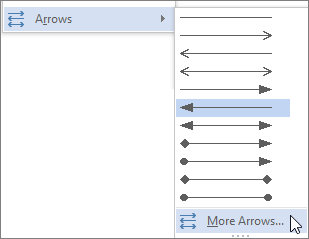
Add, edit, or remove an arrow or a shape on a line
-
Select the line you want to change.
To work with multiple lines, select the first line, and then press and hold Ctrl while you select the other lines. -
On the Format tab, click the arrow next to Shape Outline.
If you don’t see the Format tab, make sure you selected the line. You might have to double-click the line. -
Point to Arrows, and then click the arrow style that you want.
To change the arrow type or size, or to change the type, width, or color of the line or arrow, click More Arrows, and then choose the options that you want.
To remove an arrowhead, click the first style, Arrow Style 1 (no arrowheads).

Delete lines or connectors
-
Click the line, connector, or shape that you want to delete, and then press Delete.
If you want to delete multiple lines or connectors, select the first line, press and hold Ctrl while you select the other lines, and then press Delete.
See also
-
Insert or remove horizontal lines
-
Draw or edit a freeform shape
-
Change the color, style, or weight of a line
-
Group or ungroup shapes, pictures, or other objects
-
Remove the underline from hyperlink text (PowerPoint)
-
Show or hide gridlines in Word, PowerPoint, or Excel
-
Draw a decorative line in Word or Outlook
Draw a line with connection points
- On the Insert tab, in the Illustrations group, click Shapes.
- Under Lines, click the connector that you want to add.
- To draw a line connecting shapes, on the first shape, rest your mouse pointer over the shape or object to which you want to attach the connector.
Contents
- 1 How do you connect shapes?
- 2 How do you link shapes with arrows in Word?
- 3 How do you make shapes not move in Word?
- 4 What is the shape of connector?
- 5 How do you make a connector in draw io?
- 6 How do you align shapes in flowchart in Word?
- 7 How do I enable editing shapes in Word?
- 8 How do I drag a shape in Word?
- 9 What is an anchor in Word?
- 10 How do I lock alignment in Word?
- 11 How do you insert an anchor in Word?
- 12 What three actions can the connector shape perform?
- 13 What is the connector shape ability?
- 14 What tool is used to manually connect shapes when they are not already connected?
- 15 How do you connect shapes with lines?
- 16 How do you connect flowchart shapes?
- 17 How do I apply a shape style to a text box in Word?
- 18 How do I move an object anchor in Word?
- 19 How do you move a shape slightly in Word?
Add a moveable connection to a shape
Select Home > Connector. Point to the center of a shape until you see a green outline around it. Draw a line to the center of the shape you want to connect to. You’ll see a green outline around the shape when the shapes are connected.
How do you link shapes with arrows in Word?
Adding Connector Arrows
- Click the Insert tab.
- Click the Shapes dropdown.
- Click the desired line type from the gallery.
- Move your mouse near Shape 1 and little dots denoting connection points will appear on its border.
- Click on one of the dots and, while holding the left mouse button down, move the mouse over to Shape 2.
How do you make shapes not move in Word?
Follow these steps if you are using Word 2010 or a later version:
- Display the File tab of the ribbon, then click Options.
- Click Display at the left side of the dialog box.
- Select the Object Anchors check box.
- Click on OK.
- In Print Layout view, select the shape (the block arrow).
What is the shape of connector?
Both ends in a dynamic connector are surrounded by a blue box, while the start point of a point connector is a hollow red box and its end point is a solid red square. A connection point is a special point on some shapes to which you can attach (or glue) connectors and other shapes.
How do you make a connector in draw io?
Just hover over the starting shape, and you’ll see that blue arrows and crosses appear. Click and drag a connection from one of the crosses or arrows to the crosses or the border of the other shape. The connection you create is dynamic, so the connector will follow the shape if you have to move it.
How do you align shapes in flowchart in Word?
Align shapes
- Press and hold CTRL and select each of the shapes you want to arrange.
- On the Shapes tab select the Arrange. button.
- From the Arrange menu select Align, and then what you’d like to do with the shapes.
How do I enable editing shapes in Word?
Word
- Click the shape that you want to change.
- Under Drawing Tools, on the Format tab, in the Insert Shapes group, click Edit Text .
- Under Text Box Tools, on the Format tab, in the Text Box Styles group, click Change Shape, and then click the shape that you want.
How do I drag a shape in Word?
Move a picture, shape, text box, or WordArt
- Click the border of the WordArt, text box, or shape that you want to move. To move multiple text boxes or shapes, press and hold Ctrl while you click the borders.
- When the cursor changes to the four headed arrow, drag it to the new location.
What is an anchor in Word?
The anchor is a symbol that sometimes appears when you insert an image, or a SmartArt, or a drawing into a Word document.Suppose you want to keep the picture fixed to one location or position. You can click it, and wrapping options will appear. Here, you can pick ‘Fix position on page.
How do I lock alignment in Word?
On the Review tab, in the Protect group, click Protect Document, and then click Restrict Formatting and Editing. In the Restrict Formatting and Editing task pane, click Stop Protection.
How do you insert an anchor in Word?
Step-by-step guide: How to insert anchors
- Place your cursor in the text editor where you’d like to insert the anchor. You can click a word or place your cursor immediately before it.
- Click Insert / Remove anchor in the Links section of the Insert ribbon tab.
- After you assign a name to the anchor, click OK.
What three actions can the connector shape perform?
The available actions are determined by the type of connector that you select. Examples are: Get, Send, Create, Query, Delete, Update, etc.
What is the connector shape ability?
The connector shapes allow you to contain all of the information that is needed to connect to a data source or application within your Boomi processes. Connectors enable you to easily connect one third-party application to another, such as Salesforce to NetSuite, to send and receive data.
What tool is used to manually connect shapes when they are not already connected?
To allow the connector to move to the closest available connection point, position the Connector tool over the center of the first shape until a red box appears around the shape. Hold down the mouse button and drag to the center of the second shape.
How do you connect shapes with lines?
Draw a line with connection points
- On the Insert tab, in the Illustrations group, click Shapes.
- Under Lines, click the connector that you want to add.
- To draw a line connecting shapes, on the first shape, rest your mouse pointer over the shape or object to which you want to attach the connector.
How do you connect flowchart shapes?
Follow these steps to connect two flowchart shapes:
- Insert two flowchart shapes, as shown in Figure 1.
- Figure 1: Text that makes you happy?
- Now, access the Insert tab of the Ribbon, and click the Shapes button (this works in Word, Excel, and PowerPoint).
- Figure 2: Choose a connector with an arrowhead.
How do I apply a shape style to a text box in Word?
To change the shape style:
- Select the text box you want to change.
- On the Format tab, click the More drop-down arrow in the Shape Styles group.
- A drop-down menu of styles will appear. Select the style you want to use.
- The text box will appear in the selected style.
How do I move an object anchor in Word?
Click once on the object whose anchor you want to move. You should be able to see the object anchor icon as well. Click on the object anchor icon and drag it either up (towards the beginning of the document) or down (towards the end of the document).
How do you move a shape slightly in Word?
Move a picture, shape, text box, or WordArt
- Drag it to the new location.
- Press and hold Ctrl while pressing an arrow key to move in small increments.
- Press and hold Shift while you drag it to move the object horizontally or vertically only.
Thanks to some clever Office Watchers, there’s a way for Microsoft Word to connect shapes with lines or arrows that remain connected when moved. We’ll explain the trick and why it’s needed in Word and Outlook but not other Office apps.
As we’ve already explained, in Excel, PowerPoint and Publisher, you can connect shapes with lines or arrows that change when you move the shapes around. But in Word and Outlook that doesn’t happen, by default.
Word does have connected shapes
The trick with Word and Outlook for Windows is to add a Drawing Canvas before inserting shapes, lines or arrows.
Don’t blame the messenger: Word and Outlook for Mac do not have the Drawing Canvas and therefore no shape connectors are available. Mac versions of Excel and PowerPoint DO have connectors, just like the Windows versions of the apps.
Go to Insert | Shapes then waaay down the bottom is ‘New Drawing Canvas’. You might have to scroll down to see it …

A Drawing Canvas is a special region in a document that contains shapes and other drawing objects. A Drawing Canvas is transparent and borderless by default, but that can be changed from the Shape Format tab. The usual Text Wrapping options are also available. If you’re familiar with Text Boxes, then Drawing Canvases are much the same.
Within a Word/Outlook Drawing Canvas, Shapes can be connected. When you add a line/arrow inside a Drawing Canvas, the tell-tale grey connection dots appear (Office for Windows).

Link the line or arrow to one of the connection points and the line will stick to that point if you move the shape.
Changing the Insert Shapes default for Drawing Canvas
Word is preset to insert shapes without a Drawing Canvas but that can be changed.
Go to File | Options | Advanced | Editing and look for “Automatically create drawing canvas when inserting AutoShapes”.

Turn that option on and you’ll get a drawing canvas each time a shape is added and thus connections are available.
There are pros and cons to enabling that choice. It’s faster if you need connected shapes and keeps all the shapes together inside the canvas. But a drawing canvas will automatically fill the entire page width regardless of the size you need.
Word/Outlook adding a shape with automatic drawing canvas which takes up page width and extra height.
Without the drawing canvas, shapes only take up the space needed.
The Drawing Canvas can be resized and wrapping changes
Copy / Paste from other Office apps
If you have connected shapes in Excel, PowerPoint or Publisher they can be copied into Word or Outlook email but only if you paste into a Drawing Canvas.
Pasting direct into a document or email only partly works. All the shapes are pasted but the connections are lost.
Why is the Drawing Canvas necessary?
Good question … nearest we can tell, the short answer is ‘History’.
Back in the dim dark past of Microsoft Word, a Drawing Canvas was needed to add any kind of shape.
Then Microsoft changed Word so shapes could be inserted directly into a document or email. Later, Shapes were added to Excel, Publisher and PowerPoint including connections by default but the same feature wasn’t retro-fitted into Word.
Direct inserting of shapes is what Word and Outlook users have now done for many years with the Drawing Canvas all but forgotten.
Gracias
Many thanks to Ron S. and James C. who have a better memory of Word’s history than we do! Both reminded us of the archaic Drawing Canvas and its usefulness.
Why can’t Word connect shapes?
Connecting Shapes in Office with lines or arrows
Saudades
-
#1
I have been trying to figure out how to create text charts manually, and
then draw connecting lines from text entries to other text entries.
When I choose «draw connectors» options from the draw menu, or even «draw
lines,» I get a large box that I can’t seem to enter text in. The whole
thing is enormously confusing to me, and I’ve been using word for many
years. Can anyone out there help me to create an object like:
XXXXXX
oooo oooo oooo oooo oooo
xx xx xx xx xx
—
or some such, with appropriate connecting lines?
Thanks!
s.
Advertisements
Carol
-
#2
Go to Tools | Options | View and under Show make sure that Picture
Placeholders is deselected and under Print and Layout make sure that
Drawings is selected. I hope this has been helpful to you. As an
alternative, you could use Powerpoint and insert an organizational
chart. I hope this has been helpful to you!
Carol
-
#3
Also uncheck Picture Placeholder.
Advertisements
LH
-
#4
If you are using Word 2003, you may have the drawing canvas turned on
(TOOLS, OPTIONS). I’m not a big fan of it, so I always have it turned
off.
Text in drawings should be inside text boxes. There is a button on the
drawing toolbar for text box. Click, then drag out a box on the page.
Then start typing. Don’t worry about any formatting until you have all
the text boxes created. Now, format the text first. Formatting the
boxes requires that you select the box and not the text, if that makes
sense. Clicking on the word generally selects the text, but you will
see the «borders» of the text box appear as a lightly patterned line.
If you can click on these lines (they vanish if you don’t click right
on the line), you can select the box
You can select multiple boxes, if you hold down the shift key and mouse
click at the same time.
Connectors come in various types — hovering your mouse over each one
should give you a title for each one. The elbow connectors are commonly
used for org charts. Click once, then click once in the drawing but not
near any of the boxes. See the ends of the connectors? Drag one of the
connectors to one of the boxes — and you’ll find it has a tendency to
stick to one of several spots on the box. Repeat with the other end of
the connector
Microsoft Word (like Microsoft Excel and Microsoft PowerPoint) proposes tools to
create and update organizational charts,
but only for the hierarchical organizations. A hierarchical organization is
a tree-like organizational structure where every entity in the organization, except the root, is
subordinate to a single other node, i.e., has only one parent.
There are a lot of other types of organizational structures, and you may need to create an
organizational chart with one or several shapes that have multiple connected shapes:

If you need to create an organizational diagram with two or more connection lines for the entity,
you can:
- Use the standard shapes and create your organization graph from scratch (see
How to create a flowchart in Word), - Create the pre-defined SmartArt organizational chart, and, in the end, convert it to the
standard shapes and add additional connections:
I. Create a SmartArt organizational chart
For example, the simple one:

II. Convert created SmartArt to the shapes
1. Prepare the place for the shapes (you can skip these steps,
but using the drawing canvas will make it easier and faster to make various changes, such as
resizing, modifying):
1.1. Place the cursor where you want to paste the selected shapes.
1.2. On the Insert tab, in the Illustrations group,
click Shapes:

1.3. On the Shapes list, click New Drawing Canvas:

Word adds the new drawing canvas for the shapes:

1.4. Resize the added drawing:
1.4.1. Select the SmartArt and check its sizes on the
SmartArt Format tab, in the Size group:

1.4.2. Select the drawing canvas and make its sizes bigger or
similar on the Shape Format tab, in the Size group.
2. Select all or some shapes in the SmartArt graphic.
Notes:
- To select all objects, press Ctrl+A.
- To select several different shapes, hold Ctrl, and select each shape.
If you select just some shapes, don’t forget about connectors (connection lines).
For example:

3. Copy the selected shapes to the Clipboard by clicking
the Copy button on the Home tab, in the Clipboard group (or press Ctrl+C).
4. On the Home tab, in the Clipboard group, click
the Paste and then in the Paste dropdown list, select Paste Special…:

5. In the Paste Special dialog box, make sure that the
option Microsoft Office Graphic Object is selected and click OK:

Word pastes the selected shapes to the drawing canvas:

III. Add additional connection lines
On the Insert tab, in the Illustrations group, click Shapes and then on the
Shapes list, under Lines, select the connection line you prefer.
For example, Connector: Elbow:

Connect shapes you need, using the selected connector type.
See also this tip in French:
Comment créer un organigramme avec deux ou plusieurs lignes de connexion.
What to Know
- Draw a canvas (Insert > Shapes > New Drawing Canvas). Add shapes (Insert > Shapes). Drag around to organize. Double-click to add text.
- SmartArt: Go to Insert > Illustrations > SmartArt. Choose Process to view styles. Select new shapes from Add Shape drop-down menu.
- You can also download flowchart templates from places like HubSpot and Template.net, or install a flowchart maker add-in for Word.
A flowchart is a visual representation of the steps or order involved in a process, workflow, or another organization chart. In this guide, we show you how to use shapes to create a flowchart in a Microsoft Word document, as well as how to use pre-designed SmartArt graphics, and how to use flowchart makers and templates. Instructions apply to Word for Microsoft 365, Word 2019, Word 2016, and Word 2013.
Use Shapes to Create a Flowchart in Word
To create a flowchart from scratch, start with a drawing canvas, then add shapes to it, change the color and outline of the shapes, label the shapes, and draw connecting lines between the shapes to show their relationship to each other.
Create the Drawing Canvas
A drawing canvas acts as a frame around the flowchart shapes and groups the shapes as one object. This way, the text flows around the flowchart and the shapes stay in the position you intended.
To add a drawing canvas to a Word document and change the way it looks:
-
Select the location in the Word document where the drawing canvas will be located.
-
Go to the Insert tab and select Shapes > New Drawing Canvas to add a drawing canvas to the document.
-
To change the way text flows around the drawing canvas, select the drawing canvas, go to the Shape Format tab, and select Wrap Text.
-
Choose how the text will wrap around the drawing canvas. For example, choose Top and Bottom to prevent text from appearing along the sides of the canvas.
-
To change the size of the drawing canvas, drag a corner or side resize handle to make the drawing canvas smaller or larger.
To make the drawing canvas a specific size, select the shape, go to the Shape Format tab and, in the Size group, enter values for the Shape Height and Shape Width.
-
To add a border, select the drawing canvas, go to the Shape Format tab, and select Shape Outline.
-
In the Color palette, choose an outline color, select Weight to change the line thickness, and select Dashes to change the line style.
-
When the drawing canvas looks the way you want, start adding shapes.
Add Shapes to the Drawing Canvas
Before you add shapes to the drawing canvas, make a sketch of the flowchart. This will give you a plan to follow as you design the flowchart in Word.
To add shapes to the drawing canvas:
-
Go to the Insert tab and select Shapes.
-
Go to the Flowchart section and select a shape. For example, select the Process shape as the beginning point of the flowchart.
-
Select a location on the drawing canvas to place the shape. A shape with a default size and color is drawn on the canvas.
-
Add other shapes to complete the flowchart.
-
If you don’t like the way the shapes look, resize them or go to the Shape Format tab to change the fill color, add an outline color, apply a shape style, or apply a shape effect.
Add Text to Shapes
Flowchart shapes need text that briefly describes the purpose of each step in the process.
To add text to shapes:
-
Double-click the shape.
-
Enter descriptive text that explains the purpose or job of the shape.
-
Select a blank area of the drawing canvas when you finish typing.
-
To format text in a shape, select the shape, go to the Home tab, and change the font color, font style, and font size.
-
To apply the same text formatting to every shape, select an area of the drawing canvas and press Ctrl+A to select all shapes. Then, change the look of the text.
Add Connectors Between Shapes
Draw lines, or connectors, between shapes to show the relationship between the them. Connectors have connection points at each end of the line that stays connected to the shapes it’s attached to. These lines are only connected to shapes that have dots on the shape outline.
In Word, connection points only work when the shapes and lines are placed on a drawing canvas.
To draw connecting lines between shapes:
-
Go to the Insert tab and select Shapes.
-
In the Lines section, select a line shape to use as a connector between shapes.
-
Drag from one shape to another shape. As you drag from one shape to another, dots appear on the outline of the two shapes. These dots indicate where a connector line can be attached.
-
Continue to add lines until all the shapes are connected.
-
To move a line, select the line, then drag an endpoint.
-
To move a connected shape, select the shape and drag it to a different place. The lines that are connected to the dots on the shape stay attached to the shape.
-
To change the look of lines, select the lines you want to change, go to the Shape Format tab, select Shape Outline, then choose a line color, thickness, and style.
Use SmartArt to Create a Flowchart in Word
If you want a flowchart with some graphical appeal, create it with SmartArt. Some of the built-in SmartArt graphics are like a flowchart template for Word. To add a SmartArt graphic to a Word document, choose a SmartArt style, change the number of shapes, add your text, and changes the look of the SmartArt.
Select a SmartArt Graphic
To add a SmartArt graphic to a Word document:
-
Place the cursor where you want to insert the SmartArt graphic.
-
Go to the Insert tab.
-
In the Illustrations group, select SmartArt.
If you don’t see the SmartArt icon, go to the Search box and enter SmartArt.
-
In the Choose a SmartArt Graphic dialog box, select Process to view the available flowchart styles.
-
Choose a flowchart style, then select OK.
-
The SmartArt graphic appears in the Word document.
Add Shapes to a SmartArt Flowchart
If there aren’t enough shapes in the SmartArt graphic for your flowchart, add more shapes.
To add a new shape:
-
Select a shape at the location where you want to add the new shape.
-
Go to the SmartArt Design tab, then select the Add Shape dropdown arrow.
-
Choose in which direction the new shape will be added.
-
After you’ve added all the SmartArt shapes that you’ll need for your flowchart, add descriptive text.
Add Text to a SmartArt Graphic
To add text to the shapes in a SmartArt flowchart:
-
Select the arrow on the left side of the SmartArt graphic.
-
In the Text Pane, enter the text for each shape.
To add a new bullet point to a shape, press Enter after the line of text.
-
Close the Text Pane when you’re finished.
Change the Look of SmartArt Flowchart
There are several ways to make your SmartArt flowchart look different. Experiment with different colors, add images and move shapes to different locations.
- To change the color of the SmartArt shapes, select the shapes, go to the SmartArt Design tab, select Change Colors, and choose a color combination.
- Some SmartArt graphics have space for images. To add a picture, select the Picture icon on a shape, then choose to either insert a picture From a File on your computer, browse for Online Pictures from sources such as Bing and OneDrive, or add a picture From Icons stored in Word or on your computer.
- To move a shape, select the shape, go to the SmartArt Design tab, and choose either Move Selection Up or Move Selection Down.
If you don’t like the changes you made to a SmartArt graphic, go to the SmartArt Design tab and select Reset Graphic.
Find a Flowchart Maker or Flowchart Templates for Word
You’re not limited to the tools found in Word to make a flowchart. There are several Word add-ins and free templates that will get you started quickly.
Download Free Flowchart Templates
If you want a basic flowchart that will get you started, go to HubSpot and download their free flowchart template for Word.
You’ll find more detailed flowchart templates at Template.Net. There are flowchart templates for process flows, organizational charts, accident reporting, and yes or no type charts.
To use these flowchart templates, download the template to your computer, open the document in Word, and make changes to the shapes and text to fit your needs.
Install a Word Flowchart Maker Add-in
You’ll also find flowchart makers in the Microsoft Office Store.
To install a flowchart maker add-in for Word:
-
Go to the Insert tab.
-
In the Add-ins group, select Get Add-ins.
-
In the Office Add-ins page, go to the Search text box, enter flowchart, and press Enter.
-
Select one of the available flowchart makers.
-
To install the add-in, select Add.
-
After the add-in installs, it opens in a pane on the right side of Word.
The flowchart maker add-in may require you to log in to use its online flow chart creator service.
-
When you’re finished using the add-in, select Close.
-
If you want to use the add-in again, go to Insert > Add-ins > My Add-ins.
Thanks for letting us know!
Get the Latest Tech News Delivered Every Day
Subscribe
![]()
Written by Allen Wyatt (last updated February 22, 2020)
This tip applies to Word 2007, 2010, 2013, 2016, 2019, and Word in Microsoft 365
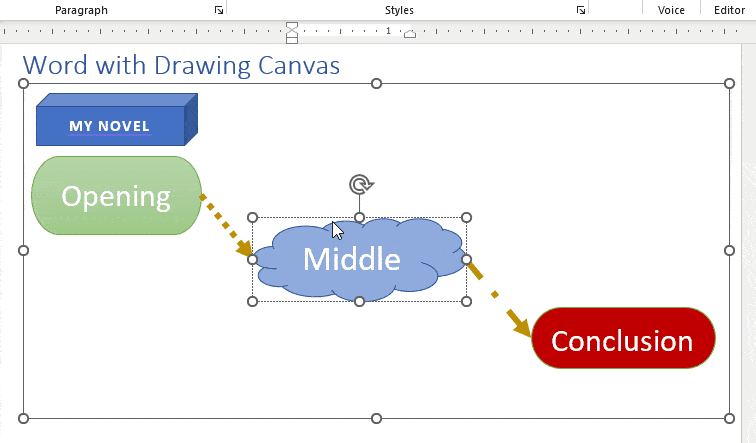
Drawing shapes are a great way to add common graphic flourishes to your document. The drawing capabilities of Word allow you to define connectors that link different shapes together. These connectors are available if you create your drawing within the drawing canvas, and they are dynamic in nature. This means that even if you move the connected shapes around on the canvas, the connectors stretch, bend, and move as necessary to keep the links valid.
To see how connectors work, try this:
- Display the Insert tab of the ribbon.
- In the Illustrations group, click the Shapes tool. Word displays a plethora of options.
- Click New Drawing Canvas. Word displays the drawing canvas and the Format tab of the ribbon. (This step is very important; if you don’t work in a drawing canvas, you cannot use connectors.)
- Using the Insert Shapes group at the left of the ribbon, select a shape you want to create.
- Click and drag within the drawing canvas to create the shape you selected in step 4.
- Use the Insert Shapes group to choose another shape.
- Click and drag within the drawing canvas to create the second shape.
- Again, using the Insert Shapes group, select the connector you want to use. (Connectors are in the Lines category. If you hover the mouse pointer over the «line» you will see a description such as «Connector: Elbow» or «Connector: Curved.»)
- In the drawing canvas, move the mouse pointer over one of the shapes you previously placed. You should see one or more connector dots appear around the perimeter of the shape. (The color and style of these dots vary depending on which version of Word you are using.) These dots are smaller than the regular handles, and they represent connection points you can use.
- Click on or near one of the connection points. This anchors one end of the connector. (See Figure 1.)
- Move the mouse pointer over the other shape and click on a connection point there. The connector is now in place. (See Figure 2.)

Figure 1. One end of the connector is anchored.
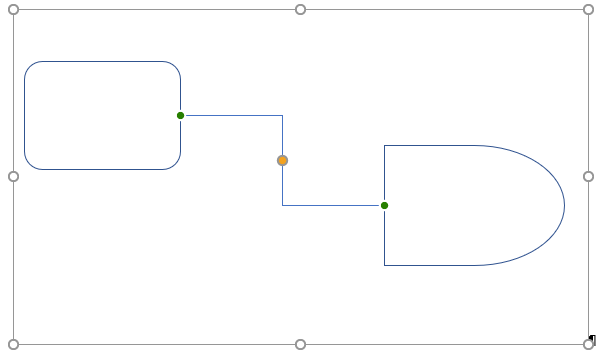
Figure 2. Both ends of the connector is anchored to both shapes.
Note that in step 9 you may not see any connector dots by moving the mouse pointer over one of the shapes. If that is the case, click on one end of the connector line and drag it to the perimeter of the shape. The mouse pointer changes to a large plus sign and at least one connector dot appears on the perimeter of the shape. «Drop» the end of the connector line on a connection point and that end of the connector line is anchored to the shape. Repeat this process with the other end of the connector line to anchor it to the other shape.
Now you can move the original shapes around, and the connector remains connected to the two connection points you selected. You can add additional shapes, as desired, with any connectors you desire.
You should be aware that connectors are only available between shapes placed on the drawing canvas. If you try to create a connector involving a shape that is outside of the drawing canvas, connectors are no longer available from the menus or ribbon.
WordTips is your source for cost-effective Microsoft Word training.
(Microsoft Word is the most popular word processing software in the world.)
This tip (6277) applies to Microsoft Word 2007, 2010, 2013, 2016, 2019, and Word in Microsoft 365.
Author Bio
With more than 50 non-fiction books and numerous magazine articles to his credit, Allen Wyatt is an internationally recognized author. He is president of Sharon Parq Associates, a computer and publishing services company. Learn more about Allen…
MORE FROM ALLEN
Deriving an Absolute Value in a Macro
Need to figure out an absolute value within your macro code? It’s easy to do using the Abs function, described in this tip.
Discover More
Undesired Font in Form Fields
If you get unwanted formatting in your form fields, it could be because of the way you are formatting the line on which …
Discover More
Finding Changes Made by Two People
The Track Changes feature in Word can be very helpful when multiple people are working on a document. What if you want to …
Discover More

on
October 4, 2021, 12:27 PM PDT
How to quickly add drawings and real connectors using the drawing canvas in Word
Microsoft Word’s drawing layer helps you keep pieces of a complex drawing together on a single canvas.

Years ago, Word added an extra layer when you inserted shapes and graphics. It was awkward to work with and created confusion for users who weren’t aware it was there. Eventually, Word allowed us to insert graphics and shapes in the actual document and set wrapping options to determine how the graphics and text mingle. Now we have another option: The drawing canvas is a new organization tool for inserting complex drawings with lots of parts. In this article, I’ll show you how to corral drawings in the drawing layer.
SEE: 83 Excel tips every user should master (TechRepublic)
I’m using Word Online because not everyone has upgraded to 365, and this feature is available only to Word Online and 365 subscribers. There’s no demonstration file; you won’t need one.
About the drawing layer
For the most part, the drawing layer is an organizational tool. For instance, you might insert a picture and then annotate it with ink. You could do so at the document level, but you might find it easier in the drawing layer, at least while you’re working on it. It’s kind of a corral for shapes, pictures, text, and so on. You can insert more pieces and move them around without impacting the content flow in the document layer. You’re not required to use the drawing layer though; if your “drawing” has only a couple of pieces, the drawing layer might be overkill.
SEE: Office 365: A guide for tech and business leaders (free PDF) (TechRepublic)
To insert a drawing using the drawing layer, position the cursor where you want the drawing. Then, click the Insert tab and then click Drawing. Doing so displays a new canvas, as shown in Figure A. If you don’t have the Draw tab in 365 desktop, click the Insert tab. In the illustrations group, click the Shapes dropdown. At the bottom of the resulting list, click New Drawing Layer. Word will display a new drawing layer.
Figure A

Once you have a canvas, you can insert text, shapes, or write using one of the many pen options. Microsoft 365 desktop also lets you insert graphic files into the drawing layer. To insert the drawing into the document, click Save and Close.
The pieces in Figure B are mere silliness, but don’t let the lack of my design skills distract you from this feature. As you can see in Figure C, the drawing is now part of the document. (If the drawing is too large, use the selection handles to reduce its size.) While you work on the drawing, nothing happens at the text level. Once the drawing is inserted, use formats as you normally would. To edit the drawing, double-click it. When you drag it through the content, Word treats everything in the drawing layer as a single object.
Figure B

Figure C

Each drawing uses its own canvas, which means you can create multiple drawings in the same document. Also, I mentioned you could use the Insert tab (in 365 desktop) if you don’t have the Draw tab. Most likely, if you do a lot of drawing in Word you’ll want to add the Draw tab as follows:
- Click the Quick Access Toolbar’s dropdown arrow and choose More Commands.
- In the left pane, choose Customize Ribbon.
- In the Main Tabs list to the right, check the Draw tab option, and then click OK.
Now that you know how to use the drawing canvas, let’s look at connectors.
How to add connectors in Microsoft Word
True connectors aren’t available in the document layer. Using Word Online, you can use lines and group them, but even then they can be a bit difficult to work with. In the drawing layer, connectors stay connected. Not only do they “stick,” they stretch and bend as you move the connected shapes. Let’s explore this feature now:
- Open a new drawing canvas.
- Insert a couple of shapes as you normally would.
- To connect them, use a line in the Shapes dropdown. Hover the mouse over them and you’ll see them defined as connectors, for example, Connector: Curved.
- Insert a line to connect the two by choosing one of the connector options and then positioning between the two shapes, as shown in Figure D.
Figure D

At this point, the shapes aren’t connected. Drag one end of the line to the shape on the left. When the connection points (little dots) appear, drag the line to one of the points. You’ll know they’re connected when the point changes color. In Figure E, you can see that the connection pointer is green instead of unfilled like the point to the right. Figure F shows both shapes connected to the same connector. Move one or both of the shapes and watch the connector conform to the new positions. When you’re done, click Save and Close to insert the new drawing into the document. Figure G shows the new drawing inserted into the document layer.
Figure E

Figure F

Figure G

We’ve touched lightly on this newish feature and had a bit of fun. If you need to create drawings in Word, you’ll find the new drawing canvas helpful in keeping the pieces together.
Also See
-
How to make fewer mistakes and work more efficiently using predictive text in Microsoft 365
(TechRepublic) -
How to use the many text wrapping options in Microsoft Word
(TechRepublic) -
Windows 11 cheat sheet: Everything you need to know
(TechRepublic) -
Zoom vs. Microsoft Teams, Google Meet, Cisco WebEx and Skype: Choosing the right video-conferencing apps for you (free PDF)
(TechRepublic) -
Checklist: Securing Windows 10 systems
(TechRepublic Premium) -
More must-read Microsoft coverage
(TechRepublic on Flipboard)
-
Microsoft
-
Software