
Word for Microsoft 365 Word 2021 Word 2019 Word 2016 Word 2013 Word 2010 Word 2007 More…Less
These are the basic types of graphics that you can use to enhance your Word documents: drawing objects, SmartArt, charts, pictures, and clip art. Drawings refer to a drawing object or a group of drawing objects.
Drawing objects include shapes, diagrams, flowcharts, curves, lines, and WordArt. These objects are part of your Word document. You can change and enhance these objects with colors, patterns, borders, and other effects.
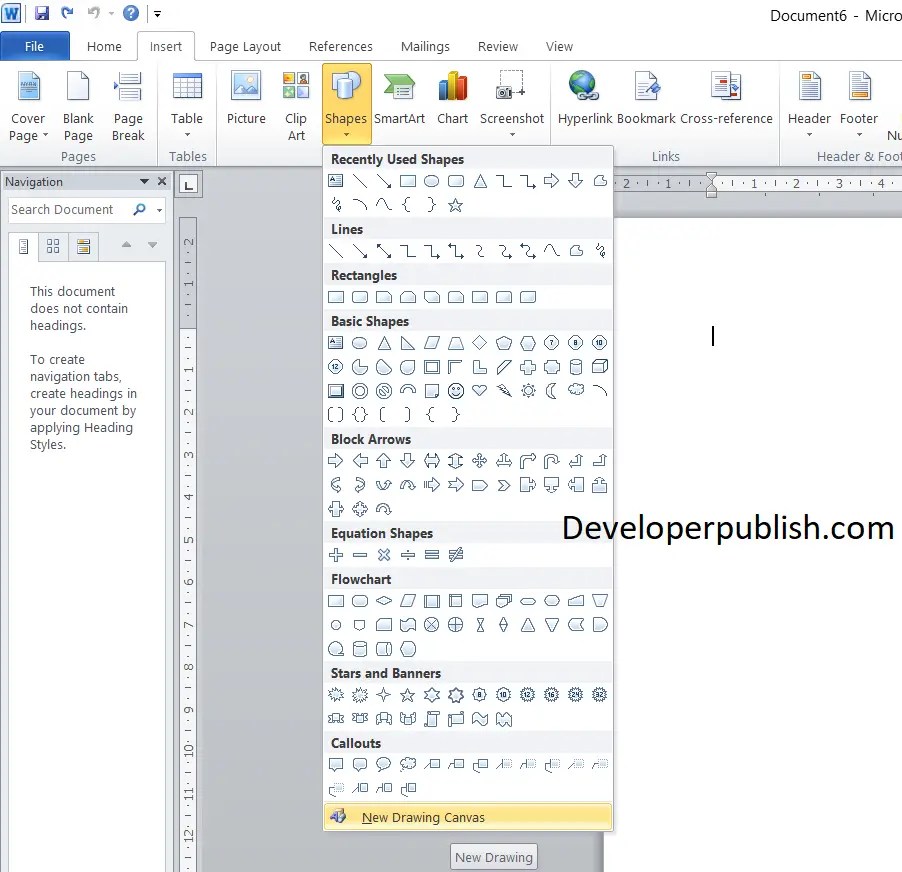
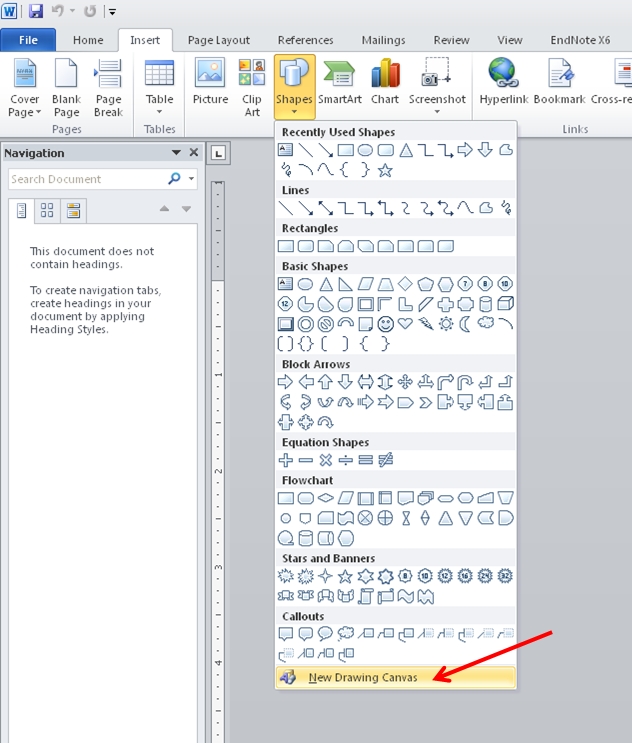
Note: It is no longer necessary to insert a drawing canvas to work with drawing objects in Word. However, you may still use a drawing canvas as an organizational aid when working with several drawing objects, or if you want to add connectors between shapes. To insert a drawing canvas, on the Insert tab, click Shapes, and then click New Drawing Canvas.
What do you want to do?
-
Add a drawing to a document
-
Delete all or part of a drawing
Add a drawing to a document
-
Click in your document where you want to create the drawing.
-
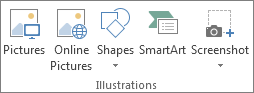
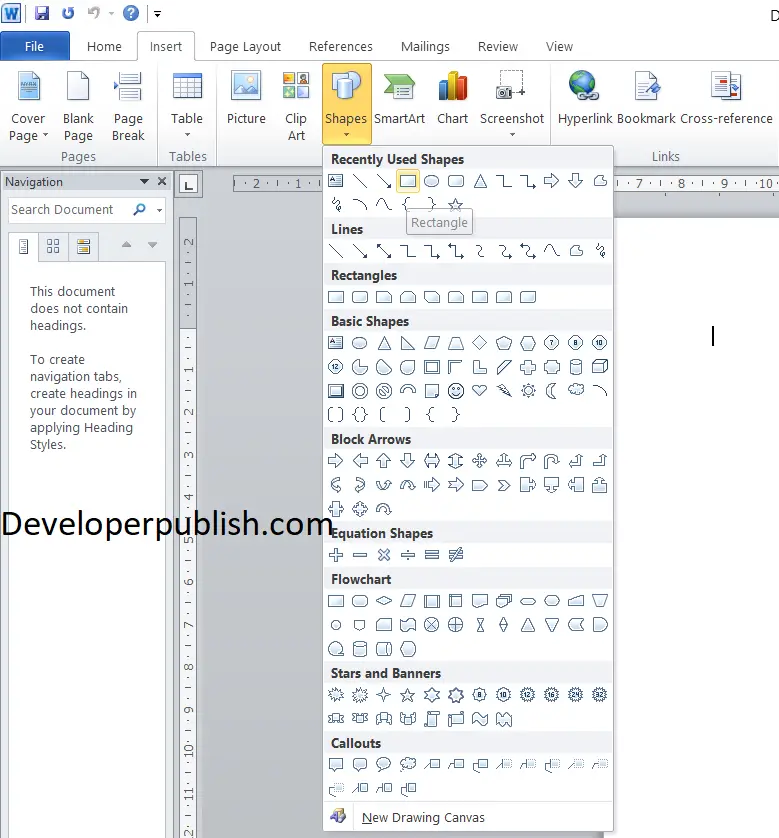
On the Insert tab, in the Illustrations group, click Shapes.

-
You can do any of the following on the Format tab, which appears after you insert a drawing shape:
-
Insert a shape. On the Format tab, in the Insert Shapes group, click a shape, and then click somewhere in the document.
-
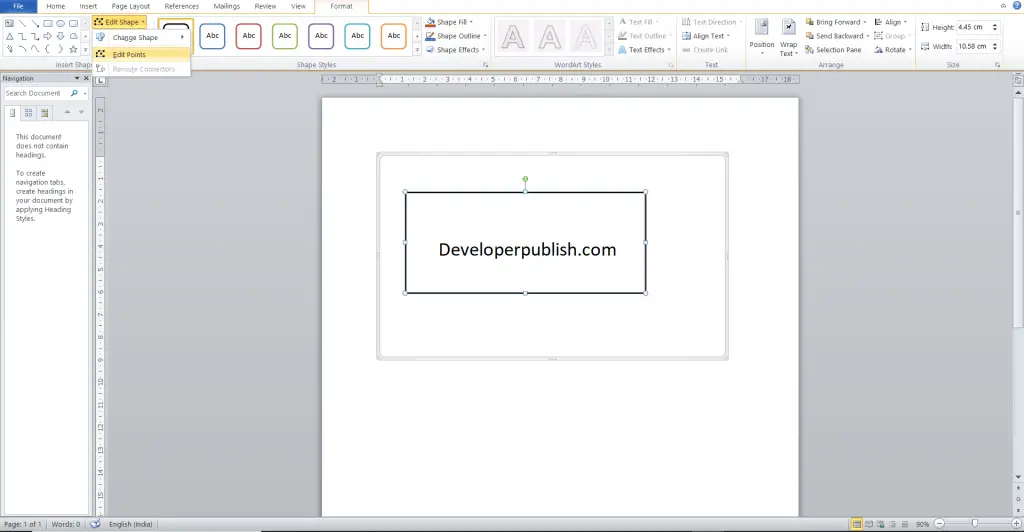
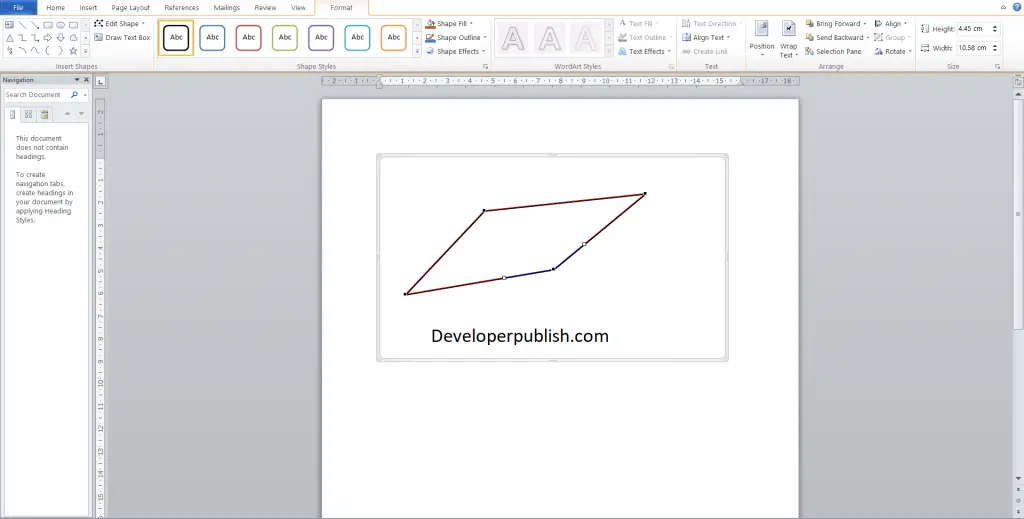
Change a shape. Click the shape you want to change. On the Format tab, in the Insert Shapes group, click Edit Shape, point to Change Shape, and then choose a different shape.
-
Add text to a shape. Click the shape you where you want text, and then type.
-
Group selected shapes. Select several shapes at a time by pressing CTRL on your keyboard and clicking each shape you want to include in the group. On the Format tab in the Arrange group, click Group so that all of the shapes will be treated like a single object.
-
Draw in the document. On the Format tab, in the Insert Shapes group, expand the shapes options by clicking the arrow. Under Lines click Freeform or Scribble.
Tip: To stop drawing with the Freeform or Scribble lines, double-click.
-
Adjust the size of the shapes. Select the shape or shapes you want to resize. On the Format tab, in the Size group, click the arrows or type new dimensions in the Height and Width boxes.
-
Apply a style to a shape. In the Shape Styles group, rest your pointer over a style to see what your shape will look like when you apply that style. Click the style to apply it. Or, click Shape Fill or Shape Outline and select the options that you want.
Note: If you want to apply a color and gradient that aren’t available in the Shape Styles group, select the color first, and then apply the gradient.
-
Add flow charts with connectors. Before you create a flow chart, add a drawing canvas by clicking the Insert tab, clicking Shapes in the Illustrations group, and then clicking New Drawing Canvas. On the Format tab, in the Insert Shapes group, click a Flow chart shape. Under Lines, choose a connector line such as the Curved Arrow Connector.
-
Use shadow and three-dimensional (3-D) effects to add interest to the shapes in your drawing. On the Format tab, in the Shape Styles group, click Shape Effects, and choose an effect.
-
Align the objects on the canvas. To align the objects, press and hold CTRL while you select the objects that you want to align. On the Format tab, in the Arrange group, click Align to choose from an assortment of alignment commands.
-

Delete all or part of a drawing
-
Select the drawing object that you want to delete.
-
Press DELETE.
See also
Add shapes
Draw a curve or circle shape
Insert pictures
Crop a picture
Add clip art to your file
What do you want to do?
-
Add a drawing to a document
-
Delete all or part of a drawing
Add a drawing to a document
-
Click in your document where you want to create the drawing.
-
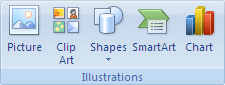
On the Insert tab, in the Illustrations group, click Shapes.
-
When you find the shape you want to insert, double-click to insert it automatically, or click and drag to draw it in your document.
You can do any of the following on the Format tab, which appears after you insert a drawing shape:
-
Insert a shape. On the Format tab, in the Insert Shapes group, click a shape, and then click somewhere in the document.
-
Change a shape. Click the shape you want to change. On the Format tab, in the Shape Styles group, click Change Shape, and then choose a different shape.
-
Add text to a shape. Right-click the shape, click Add Text, and then type.
-
Group selected shapes. Select several shapes at a time by pressing CTRL on your keyboard and clicking each shape you want to include in the group. On the Format tab in the Arrange group, click Group so that all of the shapes will be treated like a single object.
-
Draw in the document. On the Format tab, in the Insert Shapes group, expand the shapes options by clicking the arrow. Under Lines click Freeform or Scribble.
-
Adjust the size of the shapes. Select the shape or shapes you want to resize. On the Format tab, in the Size group, click the arrows or type new dimensions in the Shape Height and Shape Width boxes.
-
Apply a style to a shape. In the Shape Styles group, rest your pointer over a style to see what your shape will look like when you apply that style. Click the style to apply it. Or, click Shape Fill or Shape Outline and select the options that you want.
Note: If you want to apply a color and gradient that aren’t available in the Shape Styles group, select the color first, and then apply the gradient.
-
Add flow charts with connectors. Before you create a flow chart, add a drawing canvas by clicking the Insert tab, clicking Shapes in the Illustrations group, and then clicking New Drawing Canvas. On the Format tab, in the Insert Shapes group, click a Flow chart shape. Under Lines, choose a connector line such as the Curved Arrow Connector.
-
Use shadow and three-dimensional (3-D) effects to add interest to the shapes in your drawing. On the Format tab, choose an option in either the Shadow Effects or the 3-D Effects group.
-
Align the objects on the canvas. To align the objects, press and hold CTRL while you select the objects that you want to align. On the Format tab, in the Arrange group, click Align to choose from an assortment of alignment commands.
-

Delete all or part of a drawing
-
Select the drawing object that you want to delete.
-
Press DELETE.
See also
Draw a curve or circle shape
Insert pictures
Crop a picture
Add clip art to your file
Need more help?
Want more options?
Explore subscription benefits, browse training courses, learn how to secure your device, and more.
Communities help you ask and answer questions, give feedback, and hear from experts with rich knowledge.
In this article, you will be learning about the drawing canvas feature in Microsoft Word and how you can use it with-in your Word document.
In Microsoft Word, when you insert an AutoShape or Text box in a document, a drawing canvas appears, just like the canvas that we use to draw pictures or paintings. It allows the user to “draw” the AutoShape or Text box. You can keep the canvas or you can disable the feature in word.
Microsoft Word supports you with drawing shapes, drawing objects, SmartArt, charts, pictures, and clip art.
Whenever you inserted a shape, the drawing canvas would appear automatically as a container for the shape.
How to Add Drawing to your Word document?
To add a drawing to the document, follow these steps.
- Click in your document where you want to place your drawing.
- In the Insert tab, under the Illustrations group, click Shapes.
- You can do any of the following on the Format tab, which appears after you insert a drawing shape:
- Insert a shape.

- Change a shape: Click the shape and On the Drawing Tools Format tab, click Edit Shape, point to Change Shape.
- Add text to a shape: Click the shape where you want to text, and then type.
- Adjust the size of the shapes: Select the shape and in the drawing tools Format tab, in the Size group, click the arrows or type new dimensions in the Height and Width boxes.
You can create a flowchart; add shadows and 3D effects to your shapes using the same method.
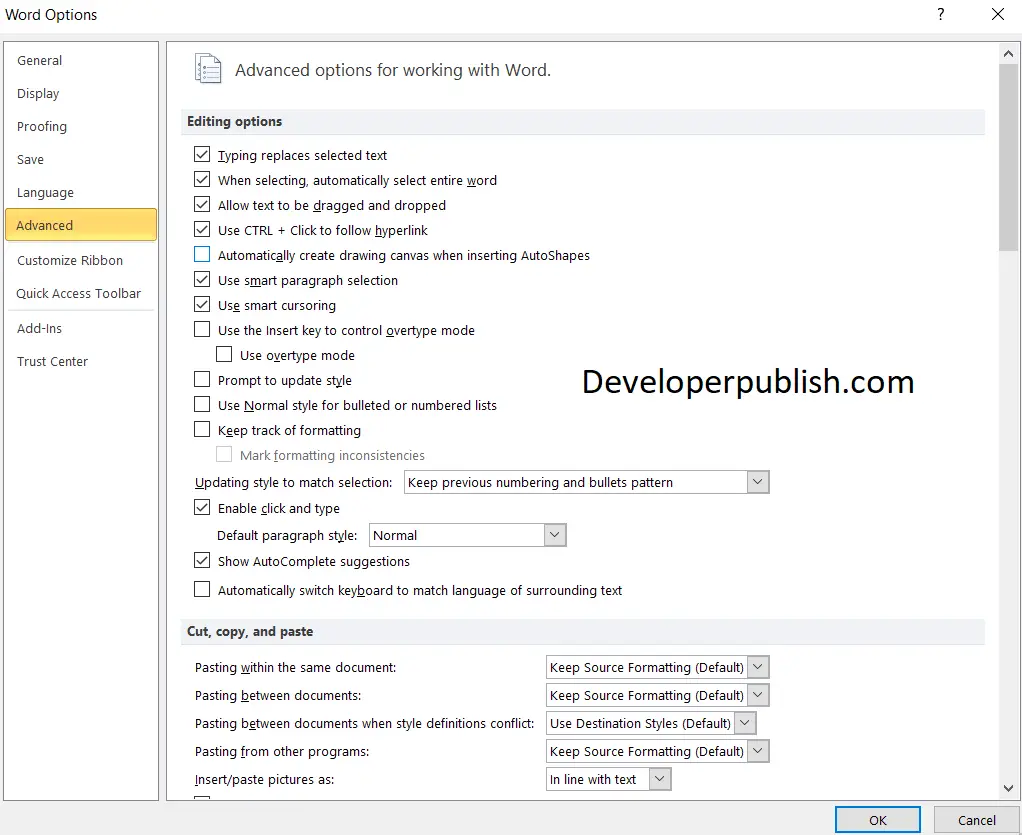
How to stop the drawing canvas from appearing?
- Under the file tab, click options in the menu.
- In the Advanced section, uncheck the box for “Automatically create drawing canvas when inserting AutoShapes”.
To insert a drawing canvas, on the Insert tab, click Shapes, and then click New Drawing Canvas.Add a drawing to a document Insert a shape. Change a shape. Add text to a shape. Group selected shapes. Draw in the document. Adjust the size of the shapes.
How do you insert a drawing canvas in Word?
To add a drawing canvas to your document, follow these steps: Click to set the insertion pointer at the spot where you want the drawing canvas to appear. Click the Insert tab. In the Illustrations group, click the Shapes button. Choose the New Drawing Canvas command.
What is the use of drawing canvas in a Word document?
A drawing canvas is an object, a bounding box to contain graphics. Use it to provide a background or shading behind AutoShapes and images, group graphics, or to create a wider area for a text wrap. Because the drawing canvas is mostly obsolete, you have to turn it on in Word’s options.
How do I use Canva in Word?
Create stunning Microsoft Word documents by utilizing Canva for Education. Transform your newsletters, worksheets, resources, teaching materials, directions and so much more.Search for headers within Canva: Select the header of your choice. Edit the content. Download the design. Upload the design into Microsoft Word.
How do I enable drawing in Word?
Right-click the Ribbon and select Customize the Ribbon. Check the box next to Draw, then click OK. The Draw tab will now be available in the Ribbon.
How do I draw on word?
How to draw in Word Click the ‘Shapes’ button and select ‘Scribble’ Open up your Microsoft Word document. Hold down your mouse to draw. Click and hold down your mouse to draw. Release the mouse. As soon as you release your mouse, the drawing will be finished. Edit your drawing. Double-click your drawing.
How do I use pencil in Word?
Write, draw, or highlight text On the Draw tab of the Ribbon, tap a pen to select it. Tap again to open the menu of Thickness and Color options for the pen. A Pencil texture is also available: On the touch screen, begin writing or drawing.
What does a drawing canvas do?
The purpose of the drawing canvas is to help you organize your drawing objects. Essentially, it provides a container for the pieces and parts that make up your drawing.
How do I label a diagram in Word?
Select the object (table, equation, figure, or another object) that you want to add a caption to. On the References tab, in the Captions group, click Insert Caption. In the Label list, select the label that best describes the object, such as a figure or equation.
How do you draw free in Word?
Draw a freeform shape Click anywhere in the document, and then drag to draw. To draw a straight segment with the Freeform tool, click one location, move your pointer to a different location, and then click again; to draw a curved segment, keep your mouse button pressed as you drag to draw.
Is Canva a word processor?
Remember, this is not a word processor. While in Powerpoint, you can easily go to Insert > Header & Footer, then check that Slide number checkbox. A 30-page limit for an ebook. Canva only allows 30 pages per one design.
How do I copy and paste from Canva to Word?
To copy text from a Canvas document into Word, you need to use the Selec- tion tool. Activate this tool by clicking on it (see right) and select the text that you want to copy. Next choose File > Copy. Or, use the keyboard commands Control+C (Windows) or Command+C (Macintosh).
Where is Draw in Word?
Click the “Draw” tab on the ribbon at the top of Word. 3. You’ll see a list of pens to choose from. Once you’ve clicked on one, click on it again to change the ink color or pen thickness.
Where is the Drawing toolbar in Word?
Accessing the Drawing Toolbar The View menu gives the option of viewing any toolbar for your particular needs. From the View menu, select Toolbars » Drawing. The Drawing toolbar appears at the bottom of the screen.
Where is the Drawing toolbar in Word 2019?
Click View > Toolbars > Drawing. The Drawing toolbar is displayed or hidden. The Drawing toolbar contains a collection of icon buttons that allows the user to draw shapes and images in the document.
How do you draw in docs?
What to Know Open a document in Google Docs. Place the cursor where you want the drawing to appear. Select Insert > Drawing. Choose +New to open the Drawing window. Choose a drawing type from the Actions menu. Options include word art, shapes, arrows, callouts, and equations.
How do I use the pen in Word 2016?
To use inking in Word 2016, go to the Review tab and click on the Start inking icon. When you do that, Word will display a Pens tab, similar to the one shown in the previous figure. You can use this tab to choose ink color, pen thickness, etc. Inking is a little bit more straightforward in Word Mobile.
How do I move a drawing in Word?
Move a picture, shape, text box, or WordArt Drag it to the new location. Press and hold Ctrl while pressing an arrow key to move in small increments. Press and hold Shift while you drag it to move the object horizontally or vertically only.
How do you label a sketch?
Format Sketch Labels In a sketch, click Modify ( ) in the toolbar at the top of the screen. Click to select a label that has already been placed on the sketch that you wish to format. Now, use the formatting options in the toolbar to the upper right to set the font, size, color, and formatting of your label.
How do you label a diagram?
A part of a diagram is sometimes labeled by an arrow or line connecting the part of the diagram to the word being used as a label. In the example, the labels are highlighted in gray. The ”head” is shown by a bracket connecting the picture of the head to the words about it. Diagrams often include captions.
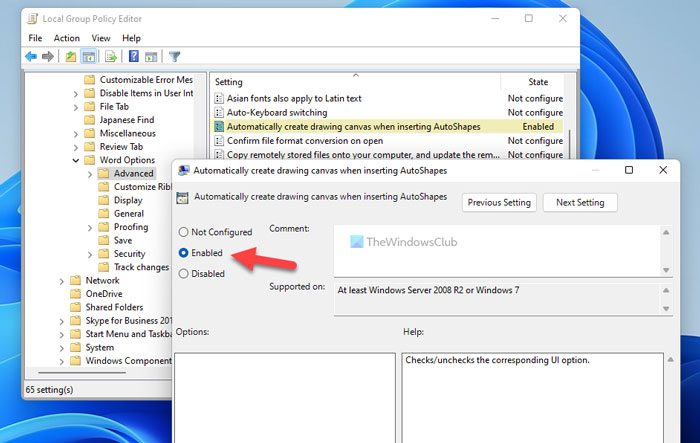
If you want to automatically create a drawing canvas in Word, here is how you can do that. It is possible to create the drawing canvas in Word when inserting AutoShapes with the help of the in-built setting, Local Group Policy Editor, and Registry Editor.

To automatically create a drawing canvas in Word, follow these steps:
- Open Word on your PC.
- Click on the Options.
- Go to the Advanced tab.
- Tick the Automatically create drawing canvas when inserting AutoShapes checkbox.
- Click the OK button.
To learn more about these steps, continue reading.
First, you need to open the Word Options panel. For that, open Microsoft Word on your computer and click on the Options menu.
Then, switch to the Advanced tab and find the Automatically create drawing canvas when inserting AutoShapes setting.
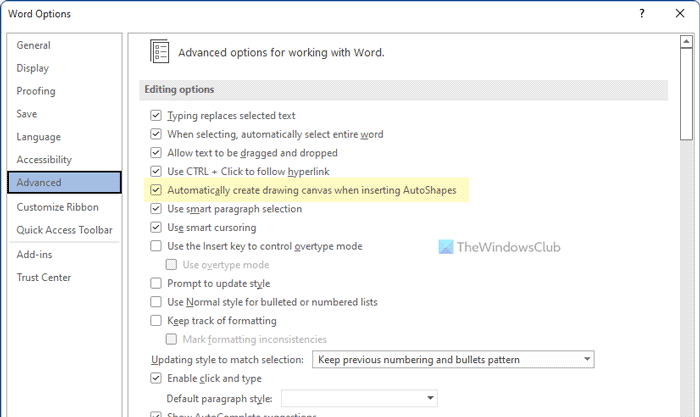
You need to tick this checkbox to enable the functionality in Word. Finally, click the OK button to save the change.
How to automatically create drawing canvas in Word using Group Policy
To automatically create drawing canvas in Word using Group Policy, follow these steps:
- Press Win+R to open the Run prompt.
- Type gpedit.msc and click the OK button.
- Navigate to Advanced in User Configuration.
- Double-click on the Automatically create drawing canvas when inserting AutoShapes setting.
- Choose the Enabled option.
- Click the OK button.
- Restart the Microsoft Word app.
Let’s check out these steps in detail.
To get started, you need to open the Local Group Policy Editor on your PC. For that, press Win+R to open the Run prompt, type gpedit.msc, and click the OK button.
Next, navigate to the following path:
User Configuration > Administrative Templates > Microsoft Word 2016 > Word Options > Advanced
Here you can see a setting called Automatically create drawing canvas when inserting AutoShapes. You need to double-click on this setting and choose the Enabled option.
Lastly, click the OK button to save the change and restart the Microsoft Word app to apply the change.
How to automatically create drawing canvas in Word using Registry
To automatically create drawing canvas in Word using Registry, follow these steps:
- Search for regedit and click the search result.
- Click the Yes button.
- Navigate to office > 16.0 in HKCU.
- Right-click on 0 > New > Key and name it as word.
- Right-click on word > New > Key and name it as options.
- Right-click on options > New > DWORD (32-bit) Value.
- Set the name as autocreatecanvas.
- Double-click on it and set the Value data as 1.
- Click the OK button.
- Restart your computer.
Let’s delve into these steps in detail to learn more.
For getting started, search for regedit in the Taskbar search box, click on the individual search result and click the Yes button to open the Registry Editor.
Then, navigate to this path:
HKEY_CURRENT_USERSoftwarePoliciesMicrosoftoffice16.0
Right-click on 16.0 > New > Key and name it as word.
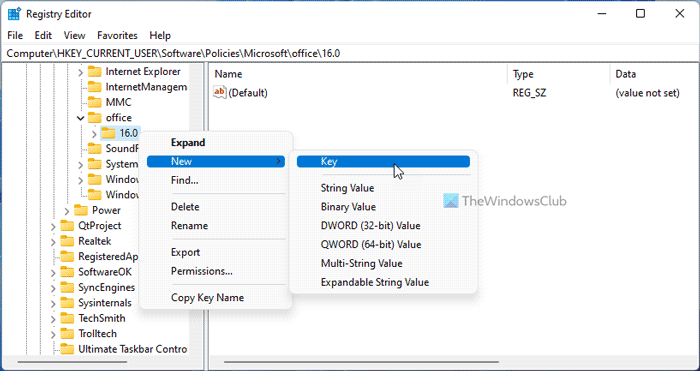
Then, repeat the same steps to create another sub-key under the word key and name it as options.
Right-click on the options > New > DWORD (32-bit) Value and set the name as autocreatecanvas.
Double-click on it to set the Value data as 1 and click the OK button.
Next, close all windows and restart your PC.
How do I insert a drawing into a canvas in Word?
To insert a drawing into a canvas in Word, you need to add a new canvas first. To do that, click on the Shapes icon and select the New Drawing Canvas option. Following that, you can draw inside the canvas using the Draw tool in Word.
How do I remove the drawing canvas in Word?
Removing a drawing canvas is pretty straightforward in Word. There are mainly two ways to delete the drawing canvas. First, you can select it and press the Delete button on your keyboard. Second, you can place your mouse cursor right next to the canvas and press the Backspace button on your keyboard.
That’s all! Hope this guide helped.
Read: How to enable or disable LinkedIn Resume Assistant in Word.
We’ve worked on a lot of documents in Word containing diagrams, but it was until recently that we discovered a little known feature called the “drawing canvas”. If you’ve ever struggled to create a diagram in a Word document that maintained its layout, then checking out the drawing canvas feature should be a high priority on your bucket list. In this short article we’ll introduce the drawing canvas and briefly discuss what it allows you to do.
The drawing canvas can be accessed by navigating to the Insert tab and selecting New Drawing Canvas from the bottom of the Shapes dropdown. This will plunk down a blank rectangle in which you can compose a diagram of shapes and images. This canvas, like other shapes, can also be formatted to have a border, background, etc.
The first benefit of the canvas is that it acts like a container to hold all of your diagram’s shapes, allowing you to easily move the diagram around and even cut and paste it as a whole. In fact it can even be copied and pasted to Paint which will paste it as an image — a very useful feature for taking snapshots of really large diagrams without having to resort to a screenshot.
The other benefit is that it allows for connections to be made between the visual elements within the canvas using the connector shape tool. This makes the diagram behave more like Visio, whereby shapes can be connected and will maintain their connections as they’re moved around. Since this isn’t possible without the drawing canvas in Word without resorting to a Visio diagram, it’s a significant feature for those who need to create diagrams in Word with many inter‑connected components.
The drawing canvas is of course not the be‑all, end‑all solution for diagrams. For instance, text wrapping is not available for the drawing canvas which limits text layout to the top and bottom of the canvas. Also, for more complex diagrams, an embedded Visio illustration is a better way to go since Visio offers a richer set of shapes and functionality that Word ever will.
However, if you’re designing diagrams directly in Word, and don’t want to resort to an embedded Visio drawing, be sure to check out the drawing canvas. It’s a great way to contain your illustrations and to create connections between their components.
This is an almost hidden feature in Word for Windows that some Prism users would find useful.
In Word 2007-2016 (Windows only), go to the Insert tab, find the Illustrations section, and drop the Shapes menu. At the bottom of that menu, choose New Drawing Canvas.
That «canvas» is an area where you can combine images. Paste in a Prism graph, add text, import images, insert shapes and equations…. If you insert those items individually right on the page, they get entangled with flowing text. Putting them into a canvas keeps them together and away from the flowing text, and lets you control their arrangement with one another.
One caution: Once you paste an object (as opposed to a picture) onto a canvas, it cannot be cropped. So if you want to crop a Prism graph, paste it first right onto the Word page, and use Format Object to crop it. Then cut and paste to put it in the canvas.
An alternative to using a drawing canvas is to combine the Prism graph, text, images and shapes on a PowerPoint slide, and then copy and paste that to Word. Using a canvas is a bit easier, as everything is contained in one program.
If you have trouble pasting a Prism graph as an object rather than a picture, try this trick: (1) create a drawing canvas in Word, (2) insert a text box INSIDE the drawing canvas and resize to suit your needs, (3) copy/paste the prism figure INSIDE the text box. This inserts the prism graph as an object so you can double-click on it and have it open in Prism.
Note that the term «canvas» used in Word has no connection to the program Canvas, or the use of Canvas in HTML 5 for creating fancy web pages.

While Microsoft Word isn’t the best drawing tool, you can create basic drawings or scribbles in Word directly. Here’s how.
Microsoft Word isn’t essential software for graphics designers, and for a good reason. It’s true—Microsoft Word isn’t best suited for drawing, but it does have some built-in drawing tools you can use, should you need to.
For simple drawings, you can draw in Word directly using shapes, lines, or pen tools. If you want to draw in Microsoft Word, here’s what you’ll need to do.
These instructions have been designed with Microsoft Office 2019 in mind. Note that Microsoft 365 (formerly O365) is the Office suite with 1 TB of OneDrive per user. While the steps may work for older versions of Word, there may be some variations or missing features.
Using Microsoft Word Drawing Tools
There are two sets of drawing tools available to Microsoft Word users. If you want to draw basic, block-like images, you can insert shapes or lines into your Word document and group them together. You might want to do this if you’re creating a diagram or flow chart, for instance.
Alternatively, you can turn Word into your own personal canvas using pen drawing tools. If you have a touchscreen device or a graphics tablet, you can create freehand drawings.
To insert shapes, you’ll need to press the Insert tab on the ribbon bar. For freehand drawings, press the Draw tab instead.

Inserting Shapes into Microsoft Word
If you’re not confident of your freehand drawing ability, or you want to create diagrams in Word, you can insert shapes.
There are hundreds of pre-set shapes available. You can draw typical shapes like squares or circles or insert arrows, stars, speech bubbles, and more. To insert a shape, press the Insert tab on the ribbon bar, then press the Shapes button.
This will list the various shape options in a drop-down menu for you to choose from.

Press on one of the pre-set shapes or line options to select it—your cursor will change at this point.
Once this happens, draw onto your Word document directly to insert the shape or line you selected. This allows you to select the appropriate size for your shape.
With the shape inserted and selected, Word will switch to the Format tab on the ribbon bar. From here, you can format your shape.

For instance, add text to your shape and begin typing with the shape selected–the text will be inserted inside the shape.

You can also change the color and style of your shape, as well as the position and alignment of any inserted text, using the options listed in the Format tab.

Creating Freehand Drawings in Word
If you want to create more original Word drawings, you can use various pen drawing tools to draw onto a Word document. You can do this using a mouse or trackpad, or more precisely, using a touchscreen device or graphics tablet.
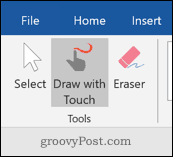
To start, press the Draw tab on the ribbon bar. This will display the pen drawing tool options for you to use.

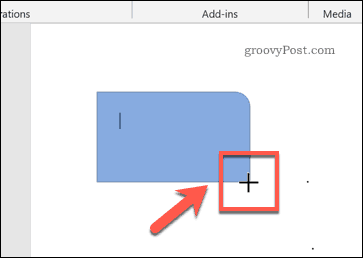
Three drawing options are available under the Tools section. Press Draw with Touch to begin drawing with one of the pen tools, Eraser to switch to the eraser tool, or Select to select your drawings as objects to move, copy, or delete them.
A list of available pens to draw with is shown under the Pens category. There are three drawing pens available—Pencil, Pen, and Highlighter.
As you’d expect, using the Pencil tool inserts a finer, less precise drawing line to your document. The Pen tool is the opposite—lines are clearer, thicker, and more defined. The Highlighter tool can be used for emphasis, adding color to your drawings.
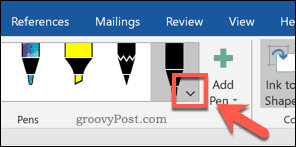
Several pre-set colors and designs are available already in the Pens category—select one of these to begin drawing. Alternatively, you can create your own by pressing the Add Pen button and selecting one of the tools listed in the drop-down menu.

This will add a new pen design to the Pens category, with a settings drop-down menu. From here, you can set the thickness and color of the pen tool, with a preview of the pen design at the top.
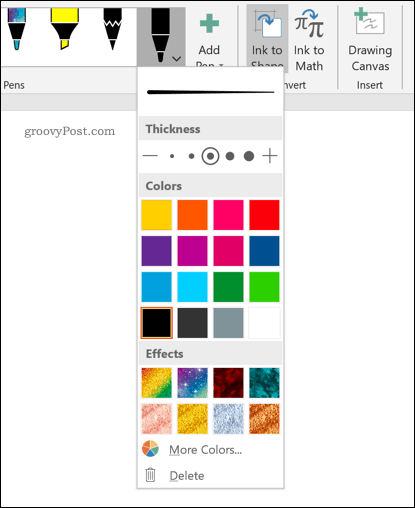
You can edit these in the future by hovering over a pen design and press the arrow icon in the bottom-left corner.
With your drawing pen tool selected and configured, you can begin drawing onto your Word document directly.
Creating a Drawing Canvas in Word
Word allows you to draw onto a Word document without constraints. If you’d prefer to draw onto a much smaller area of your Word document, however, you can insert a drawing canvas.
A drawing canvas groups your drawing into a single object which can then be moved, resized, or copied elsewhere. To do this, press the Drawing Canvas button in the Insert section of the Draw tab.

This will insert the canvas into your Word document. You will only be able to draw inside the canvas object’s borders– anything drawn outside of this will be ignored.

Designing Microsoft Word Documents
While it hasn’t been designed with drawing in mind, you can still use shapes, lines, and freehand pen drawings to create simplistic images in Microsoft Word. You can use shapes to create a flow chart or diagram or use free-hand drawings to show your artistic drawing skills.
You can insert and edit images in Microsoft Word too, but don’t forget Word’s main purpose. If you’re designing new documents, you may prefer to use building blocks to help you create them more quickly.
![]()

on
October 4, 2021, 12:27 PM PDT
How to quickly add drawings and real connectors using the drawing canvas in Word
Microsoft Word’s drawing layer helps you keep pieces of a complex drawing together on a single canvas.

Years ago, Word added an extra layer when you inserted shapes and graphics. It was awkward to work with and created confusion for users who weren’t aware it was there. Eventually, Word allowed us to insert graphics and shapes in the actual document and set wrapping options to determine how the graphics and text mingle. Now we have another option: The drawing canvas is a new organization tool for inserting complex drawings with lots of parts. In this article, I’ll show you how to corral drawings in the drawing layer.
SEE: 83 Excel tips every user should master (TechRepublic)
I’m using Word Online because not everyone has upgraded to 365, and this feature is available only to Word Online and 365 subscribers. There’s no demonstration file; you won’t need one.
About the drawing layer
For the most part, the drawing layer is an organizational tool. For instance, you might insert a picture and then annotate it with ink. You could do so at the document level, but you might find it easier in the drawing layer, at least while you’re working on it. It’s kind of a corral for shapes, pictures, text, and so on. You can insert more pieces and move them around without impacting the content flow in the document layer. You’re not required to use the drawing layer though; if your “drawing” has only a couple of pieces, the drawing layer might be overkill.
SEE: Office 365: A guide for tech and business leaders (free PDF) (TechRepublic)
To insert a drawing using the drawing layer, position the cursor where you want the drawing. Then, click the Insert tab and then click Drawing. Doing so displays a new canvas, as shown in Figure A. If you don’t have the Draw tab in 365 desktop, click the Insert tab. In the illustrations group, click the Shapes dropdown. At the bottom of the resulting list, click New Drawing Layer. Word will display a new drawing layer.
Figure A

Once you have a canvas, you can insert text, shapes, or write using one of the many pen options. Microsoft 365 desktop also lets you insert graphic files into the drawing layer. To insert the drawing into the document, click Save and Close.
The pieces in Figure B are mere silliness, but don’t let the lack of my design skills distract you from this feature. As you can see in Figure C, the drawing is now part of the document. (If the drawing is too large, use the selection handles to reduce its size.) While you work on the drawing, nothing happens at the text level. Once the drawing is inserted, use formats as you normally would. To edit the drawing, double-click it. When you drag it through the content, Word treats everything in the drawing layer as a single object.
Figure B

Figure C

Each drawing uses its own canvas, which means you can create multiple drawings in the same document. Also, I mentioned you could use the Insert tab (in 365 desktop) if you don’t have the Draw tab. Most likely, if you do a lot of drawing in Word you’ll want to add the Draw tab as follows:
- Click the Quick Access Toolbar’s dropdown arrow and choose More Commands.
- In the left pane, choose Customize Ribbon.
- In the Main Tabs list to the right, check the Draw tab option, and then click OK.
Now that you know how to use the drawing canvas, let’s look at connectors.
How to add connectors in Microsoft Word
True connectors aren’t available in the document layer. Using Word Online, you can use lines and group them, but even then they can be a bit difficult to work with. In the drawing layer, connectors stay connected. Not only do they “stick,” they stretch and bend as you move the connected shapes. Let’s explore this feature now:
- Open a new drawing canvas.
- Insert a couple of shapes as you normally would.
- To connect them, use a line in the Shapes dropdown. Hover the mouse over them and you’ll see them defined as connectors, for example, Connector: Curved.
- Insert a line to connect the two by choosing one of the connector options and then positioning between the two shapes, as shown in Figure D.
Figure D

At this point, the shapes aren’t connected. Drag one end of the line to the shape on the left. When the connection points (little dots) appear, drag the line to one of the points. You’ll know they’re connected when the point changes color. In Figure E, you can see that the connection pointer is green instead of unfilled like the point to the right. Figure F shows both shapes connected to the same connector. Move one or both of the shapes and watch the connector conform to the new positions. When you’re done, click Save and Close to insert the new drawing into the document. Figure G shows the new drawing inserted into the document layer.
Figure E

Figure F

Figure G

We’ve touched lightly on this newish feature and had a bit of fun. If you need to create drawings in Word, you’ll find the new drawing canvas helpful in keeping the pieces together.
Also See
-
How to make fewer mistakes and work more efficiently using predictive text in Microsoft 365
(TechRepublic) -
How to use the many text wrapping options in Microsoft Word
(TechRepublic) -
Windows 11 cheat sheet: Everything you need to know
(TechRepublic) -
Zoom vs. Microsoft Teams, Google Meet, Cisco WebEx and Skype: Choosing the right video-conferencing apps for you (free PDF)
(TechRepublic) -
Checklist: Securing Windows 10 systems
(TechRepublic Premium) -
More must-read Microsoft coverage
(TechRepublic on Flipboard)
-
Microsoft
-
Software
 Please Note:
This article is written for users of the following Microsoft Word versions: 2007, 2010, 2013, 2016, 2019, and Word in Microsoft 365. If you are using an earlier version (Word 2003 or earlier), this tip may not work for you. For a version of this tip written specifically for earlier versions of Word, click here: Understanding the Drawing Canvas.
![]()
Written by Allen Wyatt (last updated August 27, 2020)
This tip applies to Word 2007, 2010, 2013, 2016, 2019, and Word in Microsoft 365
Word, for quite some time, has allowed you to add graphics to your documents. If you are creating the graphics yourself, the normal way to add the graphics is through the use of the Drawing toolbar. All you need to do is click on the drawing tool you want to use, and then use the tool to create the item in your document.
There is another way you can create drawings, and that is by using what Word calls the «drawing canvas.» You create a drawing canvas by displaying the Insert tab of the ribbon, clicking the Shapes tool in the Illustrations group, and then choosing New Drawing Canvas.
The purpose of the drawing canvas is to help you organize your drawing objects. Essentially, it provides a container for the pieces and parts that make up your drawing. The drawing canvas is initially transparent and has no border around it, but you can change those settings using the same techniques that you use to change colors and borders on other drawing objects.
Remember that the drawing canvas is supposed to be an organizational aid. As such, it comes in very handy when you are creating a drawing that contains several individual drawing objects. For instance, you might combine different shapes to create a complex drawing. If those shapes are contained within the drawing canvas, then they are easier to manage as a whole.
If you are simply adding one or two independent drawing objects to your document, then the drawing canvas will be of little value. For instance, you don’t need the drawing canvas if you are simply adding an arrow, line, or a circle to your document.
There is one benefit to using the drawing canvas that you should be aware of—it allows you to use connectors between shapes. Connectors are lines that stay «connected» to set points on a shape. If you move the shapes that are connected by a connector line, then the line expands, contracts, or moves as necessary to keep the connection in place. Connector lines are available only within a drawing canvas.
WordTips is your source for cost-effective Microsoft Word training.
(Microsoft Word is the most popular word processing software in the world.)
This tip (6077) applies to Microsoft Word 2007, 2010, 2013, 2016, 2019, and Word in Microsoft 365. You can find a version of this tip for the older menu interface of Word here: Understanding the Drawing Canvas.
Author Bio
With more than 50 non-fiction books and numerous magazine articles to his credit, Allen Wyatt is an internationally recognized author. He is president of Sharon Parq Associates, a computer and publishing services company. Learn more about Allen…
MORE FROM ALLEN
Specifying Date Formats in Headers
Don’t like the default date format used by Excel when you place the date in a header or footer? You can use a macro to …
Discover More
Triggering an Event when a Worksheet is Deactivated
One way you can use macros in a workbook is to have them automatically triggered when certain events take place. Here’s …
Discover More
Getting Input from a Text File
VBA includes some commands that you can use to read information from text files (non-Word documents). These commands can …
Discover More